Geely FC. Manual part - 88


  Главная      Geely     Geely FC. Workshop Manual year 2008


поиск по сайту            


содержание   ..   80  81  82  83  84  85  86  87  88  89  ..


Geely FC. Manual part - 88


Chair--Front chair

Overhaul

Hint:

z

When assembling, please work by the sequence opposite with disassembling sequence, but

when it has items that need to pay special attention, it will add special specification.

z

This overhaul procedure is the disassembling procedure for left side, and the procedure for

right side is same.

 349 

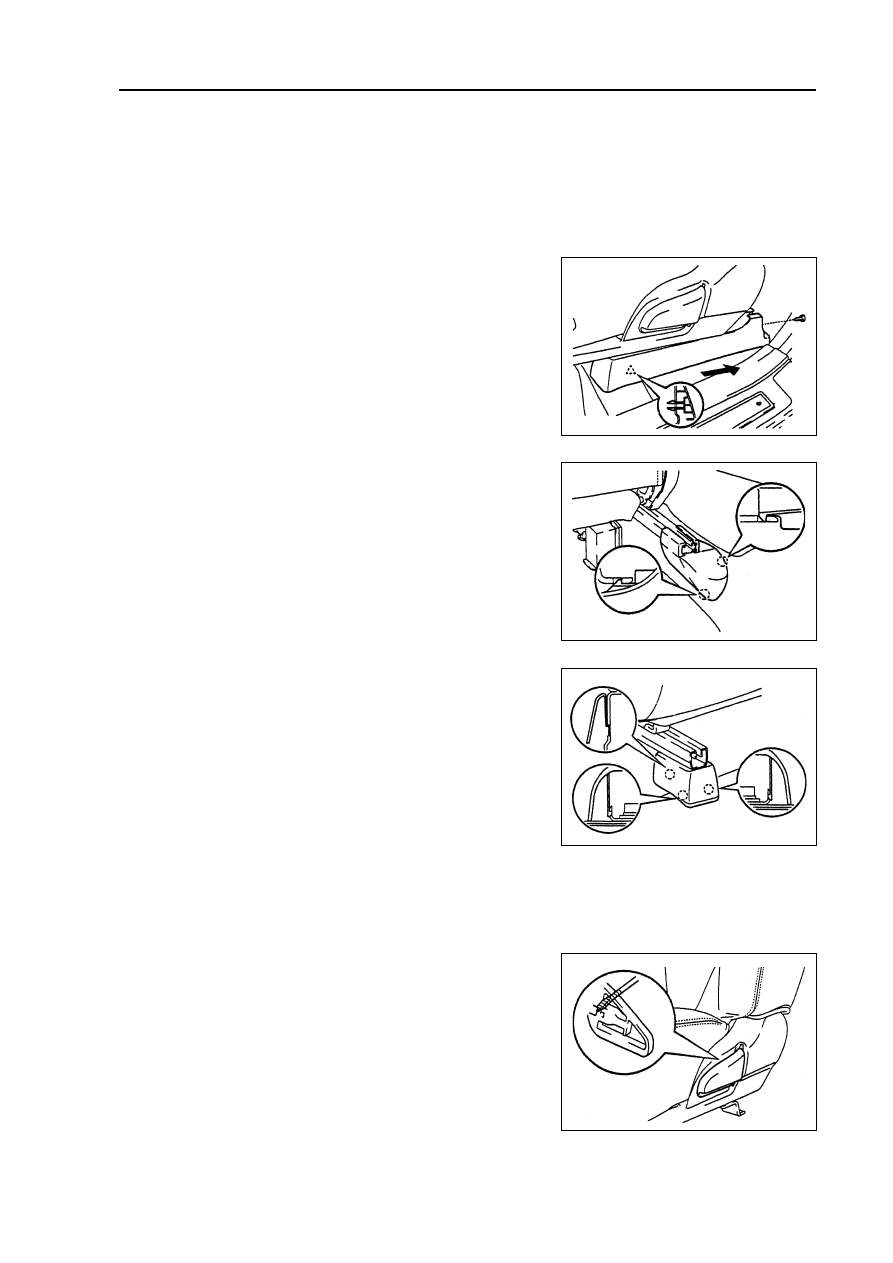
1. Disassemble driver chair assembly [68010061]

(a) Disassemble fixing clamp.

(b) Use screw driver to disassemble left lower trim board of driver

chair [68010062].

Hint: before using screw driver, it is necessary to wrap

its needled top with adhesive tape.

(c) Use screw driver to disassemble right rear lower trim board

of driver chair [68010065].

Hint: before using screw driver, it is necessary to wrap

its needled top with adhesive tape.

(d) Use screw driver to disassemble right front lower trim board

of driver chair [68010064].

Hint: before using screw driver, it is necessary to wrap

its needled top with adhesive tape.

(e) Disassemble the joint.

(f) Disassemble four bolts and front chair.

Note: Do not damage automobile body.

2. Disassemble front chair pillow assembly [68010066]

3. Disassemble chair vertical adjusting button

Disassemble fixing clamp and chair vertical adjusting

button.

4. Disassemble declining adjustment releasing handle.

Use screw driver to disassemble declining adjustment releas-

ing handle.

Hint: before using screw driver, it is necessary to wrap its

needled top with adhesive tape.

5. Disassemble lower trim cover of front chair gasket.

6. Disassemble inner trim cover of front chair gasket.

Disassemble the screw and inner trim cover of front chair gasket.

7. Disassemble left front safety belt locker assembly

[68010040]

(a) Cut off fixing clasp.

(b) Disassemble the bolt and left/right front safety belt locker

Chair--Front chair

 350 

assembly.

8. Disassemble chair backrest  assembly.

(a) Disassemble the clasp.

(b) Over turn exterior cover of chair backrest , then disassemble the clasp.

(c) Disassemble four bolts and chair backrest  assembly.

9. Disassemble exterior cover of chair backrest .

(a) Disassemble head pillow bracket.

(b) Disassemble fixing clamp and adjusting lever of waist support lever.

(c) Disassemble the clamp, then disassemble exterior cover of chair backrest  with gasket.

(d) Disassemble the clamp, then disconnect exterior cover of chair backrest  with chair backrest  gasket.

(e) Disassemble two screws and waist support lever.

10. Disassemble exterior cover of chair gasket.

(a) Disassemble fixing clamp, then disassemble exterior cover of chair backrest  with gasket.

(b) Disassemble the clamp, then disconnect exterior cover of chair backrest  with chair backrest  gasket.

11. Disassemble chair gasket bracket assembly.

12. Disassemble chair front and rear adjusting handle.

Use screw driver to disassemble chair front and rear adjusting handle.

Hint: before using screw driver, it is necessary to wrap its needled top with adhesive tape.

13. Assemble chair gasket bracket assembly.

Use four bolts to assemble chair gasket bracket on chair adjustment assembly.

Torque: 20 N

⋅⋅⋅⋅⋅m

14. Assemble exterior cover of chair gasket.

(a) Use new clamp to assemble exterior cover of chair gasket in chair gasket.

(b) Use new clamp to assemble chair gasket on chair gasket

bracket.

Hint:

z

Do not damage or dirty exterior cover of chair

gasket.

z

When assembling clamp, it is necessary to prevent

exterior cover of chair gasket from crinkling.

15. Assemble exterior cover of chair backrest .

(a) Use new clamp to assemble exterior cover of chair backrest

in chair gasket.

(b) Use new clamp to assemble chair backrest  on chair

backrest  bracket.

Hint:

z

Do not damage or dirty exterior cover of chair

backrest .

z

When assembling clamp, it is necessary to prevent

Chair--Front chair

Locking loop pliers

Locking loop pliers

 351 

exterior cover of chair backrest  from crinkling.

16. Assemble chair backrest  assembly.

(a) Use four bolts to assemble chair backrest  assembly.

Torque: 45 N

⋅⋅⋅⋅⋅m

(b) Over turn exterior cover of chair backrest  to assemble clamp.

(c) Assemble the clamp.

17. Assemble left front safety belt locking assembly [68010040]

(a) Use the bolt to assemble left front safety belt locking assembly.

Torque: 42 N

⋅⋅⋅⋅⋅m

(b) Assemble fixing clasp.

18. Assemble driver chair assembly.

(a) Assemble driver chair.

Note: do not damage automobile body.

(b) Connect the joint.

(c) Assemble four bolts.

Torque: 47 N

⋅⋅⋅⋅⋅m

(d) Assemble right front lower trim board, right rear lower trim board and left lower trim board of driver chair.

Chair--Rear chair (separating type)

Rear chair (separating type)

Overhaul

Hint:

When assembling, please work by the sequence opposite with

disassembling sequence, but when it has items that need to

pay special attention, it will add special specification.

1. Disassemble rear row chair cushion assembly.

Pull rear row chair cushion assembly upwards, then disas-

semble it.

Note: when disassembling, it is necessary to hold the

bracket at two sides of fixing clasp, then pull it upwards

to prevent it from distorting.

2. Disassemble rear chair head pillow assembly

[68010077]

3. Disassemble rear row chair backrest assembly.

4. Make the backrest face the front, then disassemble

four fixing clamps.

5. Disassemble four bolts and rear chair backrest

assembly.

6. Disassemble rear row chair right backrest assem-

bly [68010079]

Disassemble the bolt and rear row chair right backrest

assembly.

7. Disassemble rear row chair left backrest assembly

[68010078]

Disassemble two bolts and central backrest hinge.

8. Disassemble exterior cover of rear row backrest

(small).

(a) Disassemble fixing clamp, then disassemble rear row chair

gasket cloth.

(b) Disassemble fixing clamp, then disassemble head pillow

bracket.

(c) Disassemble exterior cover of rear row backrest with gasket.

(d) Disassemble the clamp, then disconnect exterior cover of

rear row backrest with gasket.

9. Disassemble exterior cover of rear row backrest (big).

(a) Disassemble central handrail hinge trim cover.

(b) Disassemble the bolt and central handrail.

A:

100mm

Fixing

clasp

Fixing

clasp

 352 

(c) Disassemble fixing clamp, then disassemble rear row chair gasket cloth.

(d) Disassemble the clamp, then disassemble head pillow bracket.

(e) Disassemble exterior cover of rear row backrest with gasket.


содержание   ..   80  81  82  83  84  85  86  87  88  89  ..