Geely FC. Manual part - 9


  Главная      Geely     Geely FC. Workshop Manual year 2008


поиск по сайту            


содержание   ..  1  2  3  4  5  6  7  8  9  10    ..


Geely FC. Manual part - 9


Engine mechanism - Valve clearance

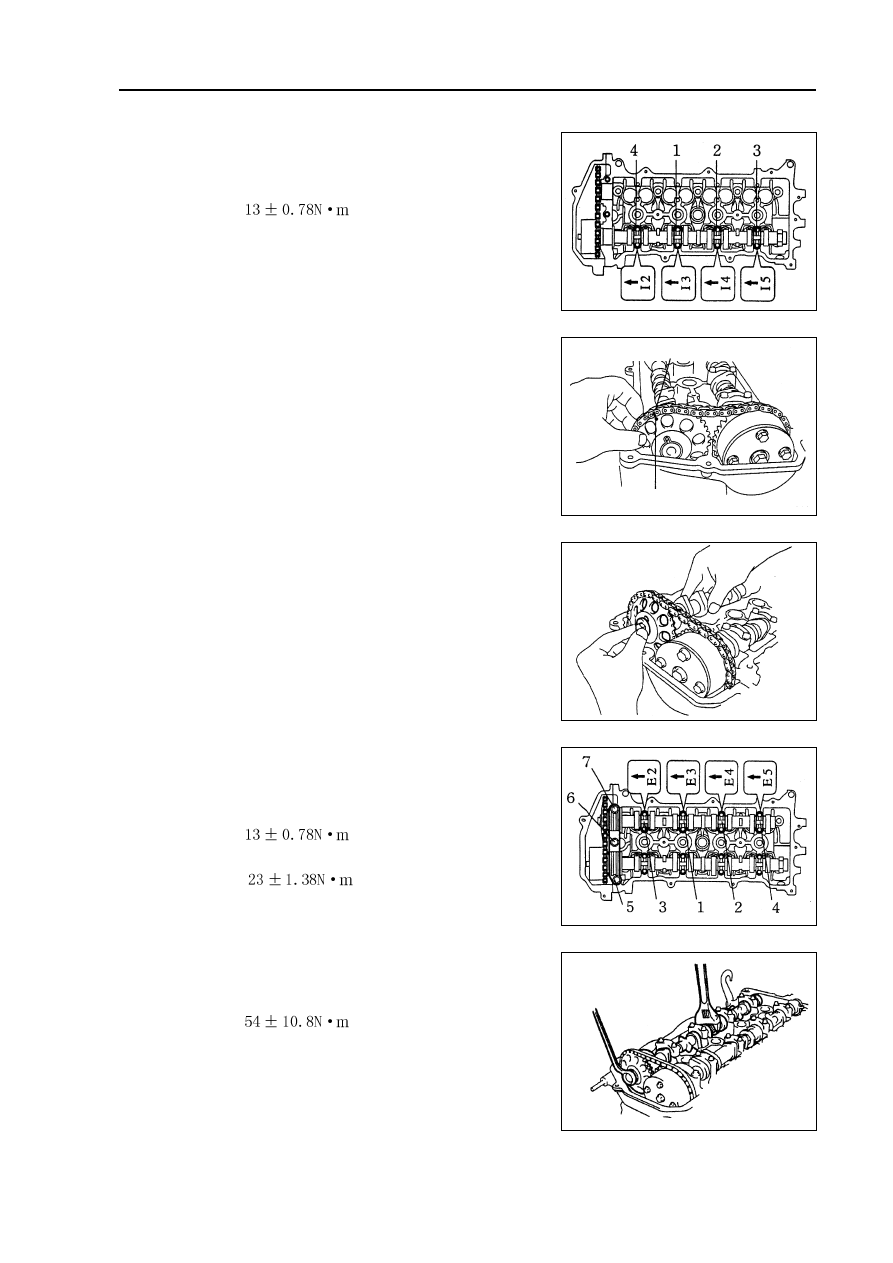
(n) Check intake side camshaft bearing cover forward re-

mark and figure, and tighten the bolts as sequences

shown in the diagram.

Torque:  

(o) Align alignment mark on the chain with timing mark on

camshaft timing sprocket, and place exhaust camshaft

in cylinder head.

 (p) Temporarily lock fixed bolts.

(q) Check exhaust side camshaft bearing cover forward

remark and figure, and tighten the bolts as sequences

shown in the diagram.

Torque:  

(r) Install camshaft front bearing cover.

Torque: 

(s) Fix camshaft with adjustable wrench and then tighten

the fixed bolts of camshaft timing sprocket.

Torque:  

Note:  be careful not to damage valve lifter.

33

Timing remark chain link

Timing mark

Tightening

Fixing

Engine mechanism - Valve clearance

(t) Check the matching marks on timing chain and cam-

shaft timing sprocket, and then align the groove of crank-

shaft pulley with the timing mark on timing chain hood

as shown in the diagram.

(u) Install chain tensioner.

(1) Check o-ring is clean, and buckle on the hook as

shown in the diagram.

(2) Coat engine oil on the chain tensioner, and then

install it.

Note:  when installing the chain temsioner, buckle

on the hook again if plunger has ejected.

(3) Turn crankshaft counterclockwise to separate the

hook from lock pin on the plunger.

Mark

Mark

Mark

Timing chain

hood surface

Groove

Pressing in

 34 

Lifting

Hook

Pressing
    in

Pin

Turning

Pin

Separation

Hook

Engine mechanism - Valve clearance

(4) Turn crankshaft clockwise, and check the sliding

parts are blocked by plunger.

Hint:  if the plunger does not eject, press the chain ten-

sion rail toward chain tensioner with screwdriver

or fingers to separate the hook from lock pin and

make the plunger eject.

11.Install cylinder head cover components.

(a) Install cylinder head cover gasket on cylinder head cover.

(b) Eliminate all old sealant (FIPG) materials.

(c) Coat sealant on 2 positions shown in the diagram.

Notes:

Wipe off all the oil stains on junction plane.

After coating sealant, finish installation of cylinder head

cover within 3 minutes.

After installing, do not refill engine oil within 2 minutes.

(d) Install cylinder head cover components with 9 bolts, 2 seal washers and 2 nuts.

Evenly tighten bolts and nuts at several times.

Torque:

Short bolt:  

Nut, long bolt etc.:  

m

12.

Install drive belt tensioner device.

Torque:  nut:  

        Bolt:  

13.

Install fixing bracket absorber on the left of engine.

Torque:  

14.

Check there is oil leakage.

Sealant

 35 

Plunger

Turning

Pushing

Engine mechanism - Engine assembly

Engine assembly

Replacement

1. Take measures to prevent gasoline leaking.

2. Remove engine right bottom shield.

3. Remove engine left bottom shield.

4. Discharge coolant.

5. Remove front wheels.

6. Remove engine plastic hood components.

7. Remove battery.

8. Remove air filter assembly.

9. Remove air filter hose.

10. Remove battery tray.

11. Disassemble fuel hose assembly.

12. Remove throttle cable assembly.

13. Disassemble radiator hose inlet end.

14. Disassemble radiator hose outlet end.

15. Disassemble cold air pipe inlet hose.

16. Disassemble cold air pipe outlet hose.

17. Remove transmission control pull cable assembly.

18. Disassemble warm air water inlet hose [4G18-1300102].

19. Disassemble warm air water outlet hose [4G18-1300108].

20. Disassemble the hoses of all joints to connect vehicle body end.

21. Uncouple engine wire harness.

(a) Remove glove compartment door.

(b) Remove engine wire harness from engine ECU and junction block.

(c) Pull out engine wire harness.

(b) Remove engine wire harness from junction block of engine room.

(e) Remove vehicle body earth wire.

 36 


содержание   ..  1  2  3  4  5  6  7  8  9  10    ..