Geely FC. Manual part - 5


  Главная      Geely     Geely FC. Workshop Manual year 2008


поиск по сайту            


содержание   ..  1  2  3  4  5  6   ..


Geely FC. Manual part - 5


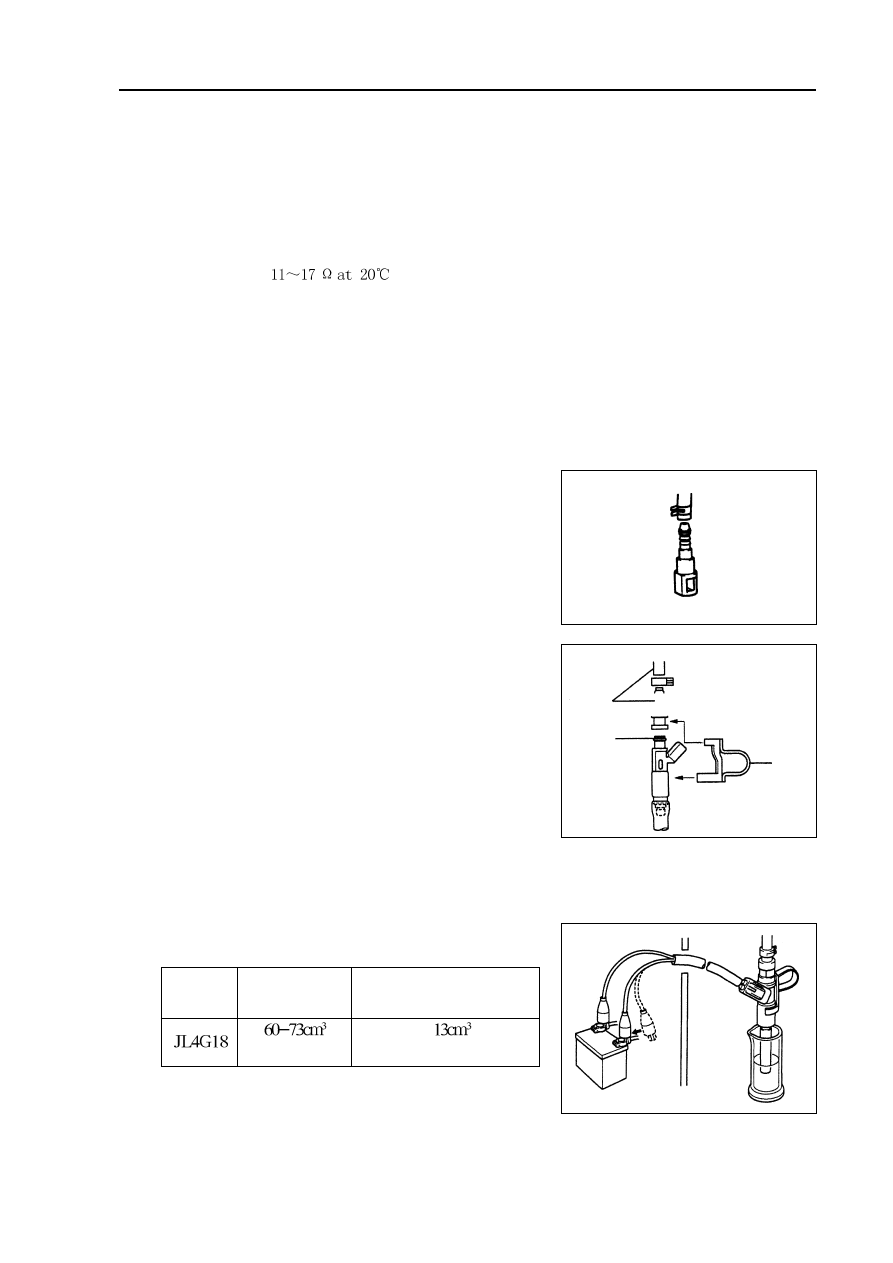
(6) Connect special tool to injection nozzle joint.

(7) Connect special tool to battery for 15 seconds, and measure the injection volume with measuring

cup, each injection nozzle should be test for 2~3 times.

Injection volume:

Fuel-Fuel system

Inspection

1. Fuel injector components [4G18-1112120]

(a) Check injection nozzle resistance.

(1) Measure the resistance between terminals with

ohmmeter.

Resistance:  

Hint: if resistance is not within specification, replace in-

jection nozzle.

(b) Injection nozzle test.

Warning: there should be no sparks during testing.

(1) Purchase new fuel pipe and take out fuel hose joint.

(2) Install special tool and fuel hose joint to fuel pipe.

Note: Only after performing precautions could the

connection operation of fuel hose joint (fast-

joint mode) be allowed to perform.

Warning: before connecting fuel pipe joint (fast-joint

mode), please read precautions carefully

(3) Install o-ring to injection nozzle.

(4) Connect special tool (joint and hose) to injection nozzle,

and hold down the injection nozzle to prevent fuel splash.

(5) Place injection nozzle into measuring cup.

Hint: install proper hose on injection nozzle to prevent

gasoline injecting out of the cup.

Engine

Injection volume  Uneven volume between

                                                 each injection nozzle

Every 15 seconds

or less

Hint: if injection volume is not within specification, replace

injection nozzle.

 17 

Special

tool

Special

tool

o-ring

Fuel-Injection nozzle assembly

Injection nozzle assembly

Replacement

1. Take measures to prevent gasoline leaking.

2. Remove engine plastic hood components.

3. Uncouple engine wire harness [4G18-3724100].

(a) Remove injection nozzle joint.

(b) Remove exhaust gas hose.

4. Remove fuel pipe assembly

(a) Loosen oil feed hose clips.

(b) Pull oil feed hose away from fuse distribution pipe.

Notes:

z

Check there is dirt on fuel pipe and its joint before removing, and clean it off in the case of dirt.

z

It is only allowed to remove with hands.

z

Check there are foreign matters with the removed fuel pipe seal surface, and clean them off in the

case of foreign matters.

z

Cover the fuel pipe with plastic bag to avoid pipe damage and foreign matters entering.

5. Remove fuel pipe assembly

Remove 2 bolts and oil feed pipe (together with injection nozzle).

6. Remove injection nozzle components.

Pull out 4 injection nozzles from oil feed pipe.

7. Install injection nozzle components.

Coat a thin layer of gasoline on o-ring and rotate left and right to push injection nozzle into oil feed pipe.

Notes:
z Be careful not to rotate o-ring.
z Check injection nozzle could rotate smoothly after it is installed, and if not replace with new o-ring.

8. Install fuel hose assembly.

Install fuel hose to oil feed pipe.

Notes:
z Check there are damage or foreign matters in the binding site of fuel pipe.
z After installing, pull the fuel pump with hands to check the fuel pipe is bound firmly with joint.

 18 

Fuel-Injection nozzle assembly

9. Install fuel rail component [4G18-1112110].

(a) Check injection nozzle o-ring and replace if there is damage.

(b) Install isolator on cylinder head.

(c) Install fuel rail component together with injection nozzle.

Torque:

(d) Install fuel pipe fixing clip.

Torque: 

m

10.

Check the function of electric fuel pump and check there is fuel leakage.

 19

Fuel  - Fuel pump assembly

Fuel pump assembly

Removing, installing and disassembling, assembling

1. Take measures to prevent gasoline leaking

2. Remove rear seat cushion assembly

3. Remove rear floor repairing hole cover

4. Remove No. 2 fuel evaporation assembly

Notes:
z Check there is contaminant looked like dirt around the joint before operating and clean it off in the

case of contaminant.

z Be careful of the contaminant looked like dirt, because fast-joint depends on o-ring to seal fuel pipe

and joint.

z Do not perform this operation with tools.
z Do not bend or distort nylon hose.
z Cover the joint with plastic bag after removing the fuel hose.
z When the joint is stuck with fuel pipe, clip the hose with fingers and rotate carefully to release the

hose, and then remove it.

5. Remove fuel tank main fuel hose and oil return pipe assembly

Notes:
z Check there is contaminant looked like dirt around the joint before operating and clean it off in the

case of contaminant.

z Be careful of the contaminant looked like dirt, because fast-joint depends on o-ring to seal fuel pipe

and joint.

z Do not perform this operation with tools.
z Do not bend or distort nylon hose.
z Cover the joint with plastic bag after removing the fuel hose.
z When the joint is stuck with fuel pipe, clip the hose with fingers and rotate carefully to release the

hose, and then remove it.

6. Remove fuel pump assembly

(a) Screw off fuel pump tighten nut (plastic fuel tank) or remove

6 screws (iron fuel tank).

(b) Pull out fuel pump assembly.

Notes:
z Do not damage fuel pump filter screen.
z Be careful not to bend the measuring oil arm of fuel gauge

float unit.

7. Install fuel pump assembly

Torque: 8 N.m

8. Install rear floor repairing hole cover

Install rear floor repairing hole cover with butyl rubber cloth.

9. Check there is fuel leakage.

 20 


содержание   ..  1  2  3  4  5  6   ..