Geely FC. Manual part - 26


  Главная      Geely     Geely FC. Workshop Manual year 2008


поиск по сайту           


содержание   ..  20  21  22  23  24  25  26  27   ..


Geely FC. Manual part - 26


Rear suspension - Rear wheel alignment

Rear wheel alignment

Adjustment

1. Check tire (see Page 109).

2. Measure vehicle height (see Page 87).

Note: adjust vehicle height to standard value before checking

vehicle tire alignment.

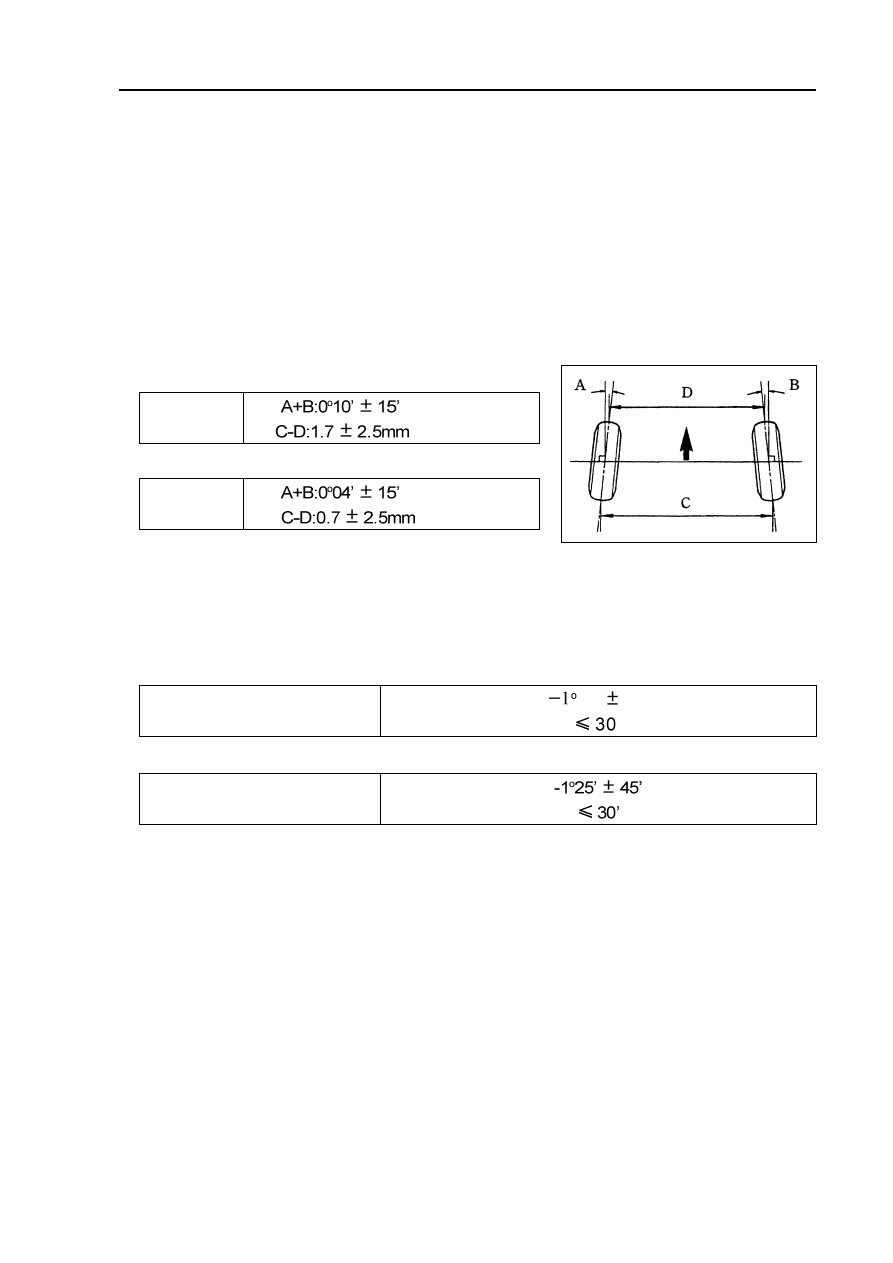
3. Inspection of toe-in

Toe-in:

(General road)

If toe-in is not within specification, check and replace relevant suspension parts.

4. Inspection of camber

(a) Install camber-caster-kingpin gauge or erect wheel alignment tester.

(b) Check camber.

Camber:

(general road)

Toe-in

        (Total) 


(Coarse road)

Toe-in

(Total)

For camber could not be adjusted, therefore check suspension components are damaged or worn if

camber measuring value is not within specification, and replace parts if necessary.

Camber

27’

45’

Left-right error

(Coarse road)

Camber

Left-right error

Front

101

Rear strut assembly

Overhaul

Hint:

the following overhaul procedures only aim at left side (LH), and the overhaul procedures

of another side (RH) are the same as LH.

1.

Remove rear wheels.

2. Remove rear left seat backrest assembly [68010078] (see Page 352).

3. Remove spare tire trim cover assembly.

4. Remove rear floor trim

5. Remove trunk left garnish [68000112].

6. Remove rear left strut assembly [64000098].

(a) Support rear shaft with a jack.

(b) Remove 2 nuts and bolts.

Rear suspension - Rear strut assembly

(c) Remove nuts, gasket and rear strut assembly.

7. Remove rear left strut assembly [64000098].

(a) Compress helical spring with special tool.

Note: do not use pneumatic wrench, or the special tool

will be damaged.

Wooden

block

Special tool

102

Rear suspension - Rear strut assembly

Special

tool

103

(b) Fix piston rod with a hexagonal wrench of 6mm, and remove

nuts.

(c) Remove bracket plate, washer, spring bracket, upper

separator, suspension pedestal, spring absorber and heli-

cal spring.

8.

[64000098]

Press in and pull out absorber piston rod, and check there is

abnormal resistance or abnormal sound.

If anything unusual occurs, please replace absorber.

Note: When abandoning absorber, please refer to

Page 97.

9. Install rear left strut assembly [64000098].

(a) Compress helical spring with special tool.

Note: do not use pneumatic wrench, or the special

tool will be damaged.

(b) Install helical spring to absorber.

Hint: install lower end of helical spring into notch of

lower spring seat.

(c) Install spring absorber and suspension bracket.

(d) Encase upper separator into spring bracket.

(e) As shown in the diagram, it is the position of upper

separator encased into spring bracket.

(f) Install washer and bracket plate.

(g) Temporarily lock up new center nuts.

(h) Remove special tool.

(i) Check spring bracket direction again.

(j) Fix piston rod with a hexagonal wrench of 6mm, and tighten

nuts.

Torque: 

.m

10.

Temporarily lock up rear strut assembly.

(a) Install rear strut, and temporarily lock up nuts and gasket.

(b) Install 2 nuts and bolts.

Torque: 

11.

Install real left seat backrest assembly [68010078].

12.

Align suspension.

(a) Lay down vehicle from the lift after installing rear wheels.

Torque: 

(b) Align suspension components by means of lifting

vehicle several times.

13.

Completely lock up rear strut assembly.

Completely tighten nuts.

Torque:

.m

14.

Check rear wheel alignment (see Page 101).

Handling

1. Handle rear left strut assembly [64000098].

(a) Completely pull out shock absorber piston rod.

(b) As shown in the diagram, drill a small hole on cylinder body

between two lines with electric drill to make inside gas flow

out.

Notes


Iron chip may fly out during drilling, please be care-

ful in operating.


The gas is colorless, odorless and nontoxic.

Rear suspension - Rear strut assembly

104


содержание   ..  20  21  22  23  24  25  26  27   ..