Geely Emgrand X7. Manual part - 247


  Главная      Geely     Geely Emgrand X7 - Manual


поиск по сайту            


содержание   ..   244  245  246  247  248  ..


Geely Emgrand X7. Manual part - 247


2.13.8.9 Timing chain cover hood replacement 

Dismantlement Procedure 

Warning: Refer to "Warning on Battery Disconnection" and "Warning on Cooling System 
maintenance" in "Warning and Precautions". 

1.  Disconnect the battery negative 

electrode cable. Refer to 2.11.8.1 
Battery Disconnection. 

2.  Exhaust engine coolant, Refer 

to“2.8.8.1 displacement and 
filling of coolant .”. 

3.  Dismantle the plastic shield of 

engine. Refer to 2.13.8.1 
Replacement of Plastic Shield of 
Engine. 

4.  Refer to 2.10.8.3 "Replacement 

of Ignition Coil" to dismantle the 
ignition coil. 

FE02-0142b

5.  Refer to 2.13.8.2 "Replacement of Cylinder Hood Cover" to dismantle the cylinder hood 

cover. 

6.  Refer to 2.13.8.3 "Replacement of Drive Belt" to dismantle the drive belt. 

7.  For dismantlement of drive belt tensioner, see "Replacement of Drive Belt Tensioner". 

8.  For dismantlement of the generator assembly, see "2.11.8.3 Replacement of Generator". 

9.  For dismantlement of the water pump, see "2.8.8.6 Replacement of Water Pump". 

10.  Dismantle the engine mounting. Refer to 2.13.8.7 Replacement of Engine Mount. 

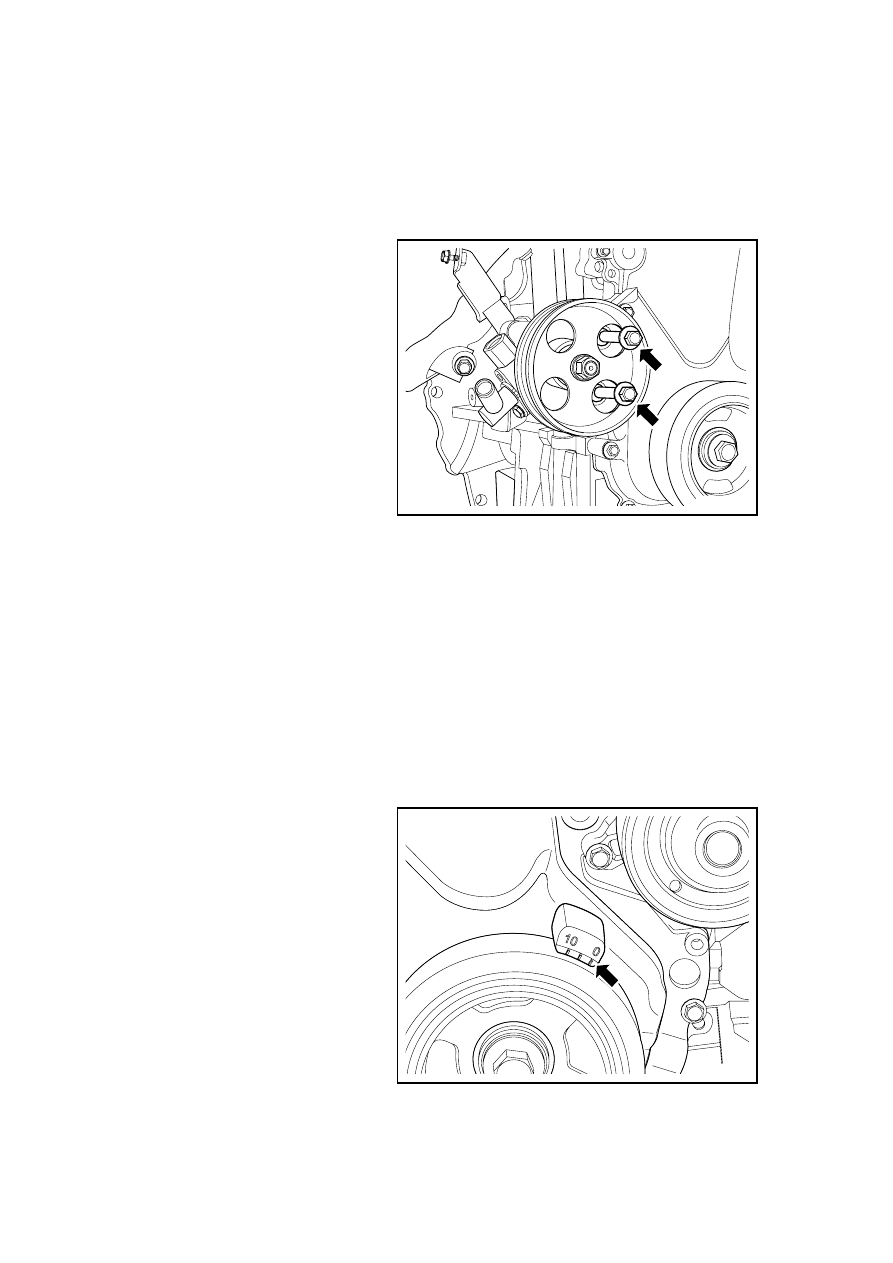
11.  Dismantle mounting bolt of power steering oil pump. 

Note: In the confined operating space, lower the jack to facilitate the operation. 

12.  Rotate crankshaft, to make the 

timing mark of crankshaft belt 
align with scale 0, as shown in 
figure. 

FE02-0135b

987

13.  Make sure that timing marks of 

air intake VVT chain wheel and 
exhaust chain wheel are in 
positions shown in figure, to 
ensure that cylinder 1 is on upper 
stop point position of 
compression. If the position is 
wrong, repeat step 12 until 
timing marks of intake and 
exhaust chain wheel are on 
positions shown in figure, and 
make marks on chain wheels 
with marker pen. 

Note: the exhaust chain wheel has 
three position marks, the one with 
two points of which faces upward. 
The VVT chain wheel has three 
position marks. The grooved side of 
the aluminum body should face up. 
During alignment with the marks, 
the yellow chain section may not 
coincide with the mark. During 
dismantlement, make sure the timing 
marks of two chain wheels are on the 
upmost position and the single-point 
mark on the chain wheel is on the 
horizontal straight line!
 

1

2

3

4

5

6

7

8

记号

记号

记号

凹槽

正时链罩的表面

FE02-0143b

14.  Use special tool GL301-020 to 

dismantle crankshaft pulley. 

GL301-020

FE02-0144b

Mark

Timing chain cover 

surface 

Groove

988

15. Dismantle timing chain bar 

tensioner . 

FE02-0145b

16.  Dismantle 3 M8 tightening bolts 

of timing chain cover. 

FE02-0146b

17.  Dismantle 9 M6 fixing bolt and 

bolt cap of timing chain. 

FE02-0147b

989

18. Insert pry bar into groove 

position, and loosen timing chain 
cover. 

FE02-0148b

19.  Remove the timing chain cover. 

FEE02-0149b

Installation Procedure: 

1.  Clean the residual sealant on the 

timing chain cover and cylinder. 

FE02-0150b

990


содержание   ..   244  245  246  247  248  ..