Volvo XC40 (2021 year). Manual in english - page 7
 

  Index      Manuals     Volvo XC40 (2021 year). Manual in english


Search            copyright infringement  


Content      ..     5      6      7      8     ..


Volvo XC40 (2021 year). Manual in english - page 7


||

DISPLAYS AND VOICE CONTROL

126

Suggestions for characters/letters/words/
parts of words. You can scroll through the
list.
Space bar. Blank spaces can be created
by writing a dash (

) in the field for hand-

written letters (1). See "Writing blank
spaces in free-text fields" below.
Delete. Tap once to erase one character/
letter at a time. Wait a moment before
tapping again to erase the next character,
letter etc.
Return to the standard keyboard layout.

Switch off/on screen tap sounds.

Hide the keyboard. In cases where this is
not possible, the button will not be dis-
played.
Change language for text input.

Handwriting characters/letters/words

1. Write a character, a letter, a word or parts

of a word in the field for handwritten let-
ters (1). Write the word or part of the word
vertically or horizontally.
> A number of suggestions for charac-

ters, letters or words will be displayed
(3). The most likely will be shown at the
top of the list.

CAUTION

Do not use sharp objects on the screen as
this could cause scratches.

2. The character/letter/word will be entered

automatically after a short pause if no
other action is taken.
> The character/letter/word at the top of

the list will be used. Tap one of the
other characters/letters/words in the
list to use it instead.

Erasing/changing handwritten characters/
letters

Erase text in the text field (2) by swiping over the

handwriting field (1).

Characters/letters can be erased or
changed in several ways:

Tap the desired letter or word in the list
(3).

Tap the delete button (5) to erase the
letter and start again.

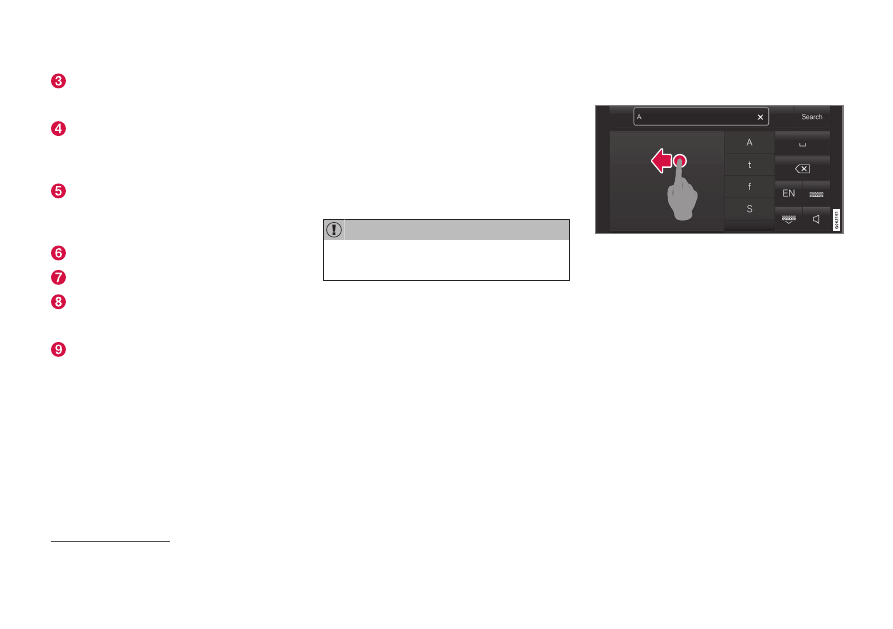
Swipe horizontally from right to left

13

over the handwriting field (1). Erase
several letters at once by swiping over
the area several times.

Tap the X box in the text field (2) to
erase all written text.

13

For Arabic keyboards, swipe in the other direction. Swiping from right to left will create a blank space.

-------------------------------------------------------------------------------------------------------------------------------------------------------------

DISPLAYS AND VOICE CONTROL

127

New lines in free-text fields in handwriting
mode

Create a new line by drawing above the characters in
the handwriting field as shown in the illustration

14

.

Writing blank spaces in free-text fields

Make a blank space by drawing a line from left to
right

15

.

Related information

Using the center display keyboard (p. 122)

Changing the appearance of the

center display

The appearance of the center display can be
changed by selecting a different theme.

1. Tap 

Settings

 in the Top view.

2. Tap 

My Car

Displays

Display

Themes

.

3. Select a theme, e.g. 

Minimalistic

 or

Chrome Rings

.

In addition to these themes, you can also
choose between 

Normal

 and 

Bright

. In

Normal

, the background of the screen is dark

and the text is light. This option is the default
setting for all themes. If the bright version is
selected, the background will be light and the
text will be dark. This option can, for example,
make the screen easier to see in bright day-
light conditions.

These alternatives are always available for
selection and are not affected by the ambient
lighting.

Related information

Changing settings in the center display's
Top view (p. 128)

Activating and deactivating the center dis-
play (p. 111)

Cleaning the center display (p. 589)

Turning off and adjusting the

volume of the center display

system sounds

The volume of the center display system
sounds can be adjusted or turned off com-
pletely.

1. Tap 

Settings

 in the Top view in the center

display.

2. Tap 

Sound

System Volumes

.

3. Pull the control under 

Touch Sounds

 to

adjust the volume or turn off screen tap
sounds. Pull the control to the desired
sound level.

Related information

Center display overview (p. 106)

Changing settings in the center display's
Top view (p. 128)

Sound settings (p. 428)

14

For Arabic keyboards, draw the same character, but in mirror image.

15

For Arabic keyboards, draw the line from right to left.

-------------------------------------------------------------------------------------------------------------------------------------------------------------

DISPLAYS AND VOICE CONTROL

128

Changing system units of

measurement

Unit settings are adjusted in the 

Settings

menu in the center display.

1. Tap 

Settings

 in the Top view in the center

display.

2. Proceed to 

System

System

Languages and Units

Units of

Measurement

.

3. Choose a measurement standard:

Metric

 - kilometers, liters and degrees

Celsius.

Imperial

 - miles, gallons and degrees

Celsius.

US

 - miles, gallons and degrees Fah-

renheit.

> The units in the instrument panel and

center display are changed.

Related information

Center display overview (p. 106)

Changing settings in the center display's
Top view (p. 128)

Changing system language (p. 128)

Changing system language

Language settings are adjusted in the

Settings

 menu in the center display.

NOTE

Changing languages in the center display
could mean that certain owner's informa-
tion will not comply with national or local
laws and regulations. Do not change to a
language you do not speak well, as it can
be difficult to find your way back through
the menu.

1. Tap 

Settings

 in the Top view in the center

display.

2. Proceed to 

System

System

Languages and Units

.

3. Select 

System Language

.

A voice control symbol indicates that the
language can be used for voice com-
mands.
> The language in the instrument panel

and center display is changed.

Related information

Center display overview (p. 106)

Changing settings in the center display's
Top view (p. 128)

Changing system units of measurement
(p. 128)

Changing settings in the center

display's Top view

You can change settings and information for
many of the vehicle's functions via the center
display.

1. Open Top view by tapping the tab at the

top of the screen or by dragging/swiping
from the top of the screen downward.

2. Tap 

Settings

 to open the Settings menu.

Top view with 

Settings

 button.

3. Tap one of the categories and sub-catego-

ries to navigate to the desired setting.

4. Change the setting(s). Different types of

settings are changed in different ways.
> Changes are saved immediately.

-------------------------------------------------------------------------------------------------------------------------------------------------------------

DISPLAYS AND VOICE CONTROL

129

A sub-category in the Settings menu with various

possible settings; has a multi-selection button and

radio buttons.

Related information

Center display overview (p. 106)

Resetting center display settings (p. 130)

Table of settings in the center display
(p. 131)

Opening contextual setting in the

center display

Most of the settings for the vehicle's basic
apps can be changed directly in Top view in
the center display via contextual settings.

Top view with button for contextual settings.

Contextual setting is a shortcut for accessing
specific settings related to the active function
displayed on the screen. Apps that are factory-
installed in your vehicle, e.g. 

FM radio

 and

USB

, are part of Sensus and are used to con-

trol the vehicle's integrated functions. The set-
tings for these apps can be changed directly
via contextual setting in Top view.

When contextual setting is available:

1. Pull down Top view when an app is in

expanded form, e.g. 

Navigation

.

2. Tap 

Navigation Settings

.

> The navigation settings page will open.

3. Change the desired settings and confirm.

Tap 

Close

 or press the Home button under

the center display to close Settings view.

Most of the vehicle's basic apps have this con-
textual setting option, but not all.

Third-party apps

Third-party apps are apps that are not factory-
installed in the vehicle's system, but can be
downloaded, e.g. 

Volvo ID

. Settings for these

apps are changed in the apps themselves, not
in Top view.

Related information

Changing settings in the center display's
Top view (p. 128)

Center display overview (p. 106)

Resetting center display settings (p. 130)

Download apps (p. 430)

-------------------------------------------------------------------------------------------------------------------------------------------------------------

DISPLAYS AND VOICE CONTROL

130

Resetting user data when the

vehicle changes owners

If the vehicle changes owners, all user data
and system settings should be reset to fac-
tory defaults.

Vehicle settings can be reset at different lev-
els. Reset all user data and system settings to
their original factory defaults when the vehicle
changes owner. It is also important to change
the owner of the Volvo On Call service.

Related information

Resetting center display settings (p. 130)

Resetting driver profile settings (p. 136)

Resetting center display settings

All settings made in the center display's Set-
tings menu can be reset to default values.

Two types of reset

There are two types of reset in the Settings
menu:

Factory Reset

- erases all data and files

and resets all settings to factory default.

Reset Personal Settings

- erases per-

sonal data and resets personalized set-
tings to factory default.

Resetting settings

Follow these instructions to reset the settings.

NOTE

Factory Reset

 is only possible when the

vehicle is stationary.

1. Tap 

Settings

 in the center display's Top

view.

2. Proceed to 

System

Factory Reset

.

3. Select the type of reset you would like to

do.
> A pop-up window will appear.

4. Tap 

OK

 to confirm the reset.

For 

Reset Personal Settings

, confirm

the reset by tapping 

Reset for the active

profile

 or 

Reset for all profiles

.

> The selected settings will be reset.

Related information

Center display overview (p. 106)

Changing settings in the center display's
Top view (p. 128)

Table of settings in the center display
(p. 131)

-------------------------------------------------------------------------------------------------------------------------------------------------------------

DISPLAYS AND VOICE CONTROL

}}

* Option/accessory.

131

Table of settings in the center

display

The center display's Settings menu has a
number of main categories and sub-catego-
ries that contain settings and information for
many of the vehicle's features and functions.

There are seven main categories: 

My Car

,

Sound

Navigation

Media

,

Communication

Climate

 and 

System

.

Some settings are personal, which means that
they can be saved to a 

Driver Profiles

. Others

are global, which means that they are not
linked to a driver profile.

My Car

Sub-categories

Displays

IntelliSafe

Drive Preferences

/

Individual Drive

Mode

*

Lights and Lighting

Mirrors and Convenience

Sub-categories

Locking

Parking Brake and Suspension

Wipers

Sound

Sub-categories

Tone

Balance

System Volumes

Navigation

Sub-categories

Map

Route and Guidance

Traffic

Media

Sub-categories

AM/FM Radio

SiriusXM

SiriusXM Travel Link

Sub-categories

Gracenote

®

Video

Communication

Sub-categories

Phone

Text Messages

Android Auto

*

Apple CarPlay

*

Bluetooth Devices

Wi-Fi

Vehicle Wi-Fi Hotspot

Vehicle Modem Internet

Volvo On Call

Volvo Service Networks

Climate

The 

Climate

 main category does not have any

sub-categories.

-------------------------------------------------------------------------------------------------------------------------------------------------------------

||

DISPLAYS AND VOICE CONTROL

* Option/accessory.

132

System

Sub-categories

Driver Profile

Date and Time

System Languages and Units

Privacy and Data

Keyboard Layouts

Voice Control

*

Factory Reset

System Information

Related information

Center display overview (p. 106)

Changing settings in the center display's
Top view (p. 128)

Resetting center display settings (p. 130)

Driver profiles

Many of the vehicle's settings can be cus-
tomized to the driver's personal preferences
and saved in one or more driver profiles.

These personal settings are automatically
saved in the active driver profile. Each key can
be linked to one driver profile. When the linked
key is used, the vehicle is customized to the
specific settings of that driver profile.

Which settings are saved in driver
profiles?

Many of the settings made in the vehicle will
be automatically stored in the active driver
profile if the profile is not protected. The vehi-
cle has settings that can be made either per-
sonal or global. The personal settings are
saved in driver profiles.

Settings that can be saved in a driver profile
include, among other things, screens, mirrors,
front seats, navigation

*

, audio and media sys-

tem, language and voice control.

Some settings are global settings. These set-
tings can be changed but are not saved to a
specific driver profile. Changes to global set-
tings affect all profiles.

Global settings

Global settings do not change when driver
profiles are changed. They remain the same
regardless of which driver profile is currently
active.

Keyboard layout is an example of a global set-
ting. If driver profile X is used to add additional
keyboard languages, these languages will also
be available for driver profile Y. The settings
for keyboard layout are not saved to a specific
driver profile - the settings are global.

Personal settings

If driver profile X has been used to e.g., set the
brightness for the center display, driver profile
Y will not be affected by this setting. It will
only be saved to driver profile X because
brightness setting is a personal setting.

Related information

Selecting a driver profile (p. 133)

Changing a driver profile's name (p. 133)

Linking a remote key to a driver profile
(p. 134)

Protecting a driver profile (p. 134)

Resetting driver profile settings (p. 136)

Table of settings in the center display
(p. 131)

-------------------------------------------------------------------------------------------------------------------------------------------------------------

DISPLAYS AND VOICE CONTROL

133

Selecting a driver profile

When the center display starts up, the
selected driver profile will be shown at the
top of the screen. The most recently used
driver profile will be active the next time the
vehicle is unlocked. A different driver profile
can be selected once the vehicle has been
unlocked. However, if the remote key has
been linked to a driver profile, this profile will
be used instead.

There are three options for switching between
driver profiles.

Option 1:

1. Tap the name of the driver profile shown

at the top of the center display when the
display starts up.
> A list will appear, showing driver pro-

files that can be selected.

2. Select desired driver profile.

3. Tap 

Confirm

.

> The driver profile has now been

selected and the system will load the
settings stored in that profile.

Option 2:

1. Pull down Top view in the center display.

2. Tap 

Profile

.

> The same list as in option 1 will be dis-

played.

3. Select desired driver profile.

4. Tap 

Confirm

.

> The driver profile has now been

selected and the system will load the
settings stored in that profile.

Option 3:

1. Pull down Top view in the center display.

2. Tap 

Settings

 in the Top view in the center

display.

3. Tap 

System

Driver Profiles

.

> A list will appear, showing driver pro-

files that can be selected.

4. Select desired driver profile.

> The driver profile has now been

selected and the system will load the
settings stored in that profile.

Related information

Driver profiles (p. 132)

Navigating in the center display's views
(p. 111)

Changing a driver profile's name (p. 133)

Linking a remote key to a driver profile
(p. 134)

Changing a driver profile's name

It is possible to change the names of the dif-
ferent driver profiles used in the vehicle.

1. Tap 

Settings

 in the Top view in the center

display.

2. Tap 

System

Driver Profiles

.

3. Select 

Edit Profile

.

> A menu will open in which the driver

profile can be changed.

4. Tap the 

Profile Name

 box.

> A keyboard will be displayed and can

be used to change the name. Tap 
to close the keyboard.

5. Save the name change by pressing 

Back

or 

Close

.

> The name has now been changed.

NOTE

Profile names may not begin with a space.
If a space is entered first, the profile name
will not be saved.

Related information

Selecting a driver profile (p. 133)

Using the center display keyboard (p. 122)

-------------------------------------------------------------------------------------------------------------------------------------------------------------

DISPLAYS AND VOICE CONTROL

134

Protecting a driver profile

It may not always be desirable to store set-
tings made in the vehicle to the active driver
profile. In these instances, the driver profile
can be protected.

NOTE

Protecting a driver profile is only possible
when the vehicle is stationary.

To protect a driver profile:

1. Tap 

Settings

 in the Top view in the center

display.

2. Tap 

System

Driver Profiles

.

3. Select 

Edit Profile

.

> A menu will open in which the driver

profile can be changed.

4. Tap 

Protect Profile

 to protect the profile.

5. Confirm your selection to protect the pro-

file by tapping 

Back

/

Close

.

> When the profile is protected, settings

made in the vehicle will not be auto-
matically stored to the profile. The
changes must instead be saved man-
ually under 

Settings

System

Driver Profiles

Edit Profile

 by tap-

ping 

Save current settings to the

profile

. If the profile is not protected,

the settings will be automatically stored
to the profile.

Related information

Driver profiles (p. 132)

Linking a remote key to a driver

profile

A remote key can be linked to a driver profile.
This driver profile and all of its settings will
then automatically be selected every time the
vehicle is used with that particular remote
key.

The first time the remote key is used, it is not
linked to any specific driver profile. The 

Guest

profile is automatically activated when the
ignition is switched on.

A driver profile can also be selected manually
without linking it to any key. When the vehicle
is unlocked, the last active driver profile will be
activated. If the key has ever been linked to a
driver profile, it is not necessary to manually
select a driver profile when using that particu-
lar key.

Linking a remote key to a specific
driver profile

NOTE

A remote key can only be connected to a
driver profile when the vehicle is stationary.

First select the profile you would like to link to
the key (if that profile is not already active).

-------------------------------------------------------------------------------------------------------------------------------------------------------------

DISPLAYS AND VOICE CONTROL

135

The active profile can then be linked to the
key.

1. Tap 

Settings

 in the Top view in the center

display.

2. Tap 

System

Driver Profiles

.

3. Mark the desired profile. The display will

return to Home view. The 

Guest

 profile

cannot be linked to a remote key.

4. Pull down Top view again and tap

Settings

System

Driver Profiles

Edit Profile

.

5. Select 

Connect key

 to link the profile with

the key. A driver profile can only be linked
to the key currently being used in the vehi-
cle. If there are any other keys in the vehi-
cle, 

More than one key is found, put the

key you want to connect on backup
reader

 will be displayed.

Location of the backup key reader in the storage

compartment.

> When 

Profile connected to key

 is dis-

played, the key and driver profile have
been linked.

6. Tap 

OK

.

> The key used is now linked to the driver

profile and will remain so as long as the

Connect key

 box is not deselected.

Related information

Driver profiles (p. 132)

Changing a driver profile's name (p. 133)

Remote key (p. 222)

-------------------------------------------------------------------------------------------------------------------------------------------------------------

DISPLAYS AND VOICE CONTROL

136

Resetting driver profile settings

Settings that have been saved for one or
more driver profiles can be reset when the
vehicle is stationary.

NOTE

Factory Reset

 is only possible when the

vehicle is stationary.

1. Tap 

Settings

 in the Top view.

2. Tap 

System

Factory Reset

Reset

Personal Settings

.

3. Select option 

Reset for the active

profile

Reset for all profiles

 or 

Cancel

.

Related information

Driver profiles (p. 132)

Resetting center display settings (p. 130)

Messages in the center display

The center display shows messages in certain
circumstances to inform or assist the driver.

Example of message in the center display's Top view.

Messages with lower priority for the driver are
shown in the center display.

Most of the messages are shown in the center
display's status bar. The message will disap-
pear from the status bar after a short period of
time or after the required action has been
taken. Messages that need to be saved are
stored in Top view in the center display.

The message may be shown along with
graphics, symbols or a button to e.g. activate/
deactivate a function connected to the mes-
sage.

Pop-up messages

Messages are sometimes shown as pop-up
windows. Pop-up messages have a higher pri-

ority than messages shown in the status bar
and require acknowledgment/action before
they disappear.

Related information

Handling messages in the center display
(p. 137)

Handling messages saved from the center
display (p. 137)

Messages in the instrument panel (p. 102)

-------------------------------------------------------------------------------------------------------------------------------------------------------------

DISPLAYS AND VOICE CONTROL

}}

137

Handling messages in the center

display

Messages in the center display are handled in
the center display's views.

Example of message in the center display's Top view.

Some messages in the center display have a
button (or several buttons in a pop-up mes-
sage) to e.g. activate/deactivate a function
related to the message.

Handling new messages

For messages with buttons:

Tap the button to perform the action or let
the message automatically time-out after
a short period.
> The message will disappear from the

status bar.

For messages without buttons:

Close the message by tapping it or let the
message automatically time-out after a
short period.
> The message will disappear from the

status bar.

Messages that need to be saved are stored in
Top view in the center display.

Related information

Messages in the center display (p. 136)

Handling messages saved from the center
display (p. 137)

Messages in the instrument panel (p. 102)

Handling messages saved from the

center display

Messages saved from the instrument panel
and center displays are handled in the center
display.

Examples of saved messages and possible selections

in Top view.

Messages that have been shown in the center
display and that need to be saved are stored in
the center display's Top view.

-------------------------------------------------------------------------------------------------------------------------------------------------------------

||

DISPLAYS AND VOICE CONTROL

* Option/accessory.

138

Reading saved messages

1. Open Top view in the center display.

> A list of saved messages will be dis-

played. Messages with an arrow to the
right can be expanded.

2. Tap a message to expand/minimize it.

> More information about the message

will appear in the list and the image to
the left of the app will display informa-
tion about the message in graphic form.

Handling saved messages

Some messages have a button to e.g. acti-
vate/deactivate a function related to the mes-
sage.

Tap the button to perform the action.

Saved messages in Top view are automatically
deleted when the ignition is switched off.

Related information

Messages in the center display (p. 136)

Handling messages in the center display
(p. 137)

Messages in the instrument panel (p. 102)

Voice Control

Voice control

16

 allows you to control func-

tions in the vehicle, e.g. the climate control
system, radio or a Bluetooth-connected
phone, using spoken commands. In vehicles
equipped with Sensus Navigation

*

, the navi-

gation system can also be controlled using
voice commands.

What is voice control?

Voice control is a driver support function that
can simplify the use of various commands in
your vehicle. It works in general like a regular
application in which you input information in a
set order in order to perform a task, but
instead of typing on a keypad, you use voice
commands. It can therefore be a good idea to
familiarize yourself with how, and in what
order, a voice command should be spoken to
get the desired result.

You can control certain infotainment and cli-
mate control functions through the voice con-
trol system by using voice commands. The
system can respond verbally and by displaying
information in the instrument panel.

WARNING

The driver is always responsible for ensur-

ing that the vehicle is operated in a safe

manner and that all applicable traffic regu-

lations are followed.

Voice control microphone

System updates

The voice control system is continuously
improved. It is recommended to always have
the latest version installed.

Download updates at volvocars.com/support.

16

Certain markets only.

-------------------------------------------------------------------------------------------------------------------------------------------------------------

DISPLAYS AND VOICE CONTROL

}}

* Option/accessory.

139

NOTE

Not all system languages support voice
control. If a language supports voice con-
trol, it is marked with a 

 symbol in the

list of available system languages. Read
more about where the information is found
in the section on voice control settings.

Related information

Use voice recognition (p. 139)

Voice control for cellular phones (p. 141)

Voice control for radio and media (p. 142)

Climate control system voice commands
(p. 192)

Voice control settings (p. 142)

Use voice recognition

Starting voice control

17

Voice commands are given
through a "dialog" with the
voice control system. Press
the button for voice control

 on the right-side steering

wheel keypad to activate the
system and initiate a voice

command dialog. When you press the button,
a beep will sound and the voice control sym-
bol will appear in the instrument panel.

This shows that the system has begun listen-
ing and you can now begin speaking com-
mands. As soon as you start speaking, the
system will be trained to recognize and under-
stand your voice. This takes several seconds
and is done automatically, which means that
you don't need to manually initiate any voice
training.

These may include:

Wait until after the tone, and then speak in
your normal voice at a normal speed.

Do not speak while the system is respond-
ing (the system is unable to process com-
mands during this time).

Avoid background noises in the passenger
compartment by keeping doors, windows
and the panoramic roof

*

 closed.

NOTE

Not all system languages support voice
control. If a language supports voice con-
trol, it is marked with a 

 symbol in the

list of available system languages. Read
more about where the information is found
in the section on voice control settings.

Generally, the system will listen for a basic
command that is then followed by more
detailed commands specifying what you want
the system to do.

To change the audio volume of the system,
turn the volume knob while the voice is speak-
ing. It is possible to use other buttons while
voice commands are being given. However,
because other audio is silenced during dialog
with the system, it is not possible to perform
any functions connected to audio using the
buttons.

17

Certain markets only.

-------------------------------------------------------------------------------------------------------------------------------------------------------------

||

DISPLAYS AND VOICE CONTROL

140

Canceling voice control

To cancel voice control, do one of the follow-
ing:

Briefly press 

 and say "

Cancel

".

Press and hold the steering wheel key-
pad's voice command button 

 until

two audible signals are given. This cancels
voice control even when the system is
speaking.

Voice control will also be canceled if you do
not respond during a dialog. The system will
first ask three times for a response and if the
response is still not given, voice control will be
automatically canceled.

To speed up communication and skip prompts
from the system, press the voice control but-
ton 

 on the steering wheel keypad. This

will interrupt the system's response and you
can say the next command.

Voice command examples

1. Tap 

.

2. Say "

Call [First name]


[Last name]

[number category]

", e.g. "

Call Robyn

Smith


cellular

".

> The system will call the selected con-

tact from the phone book. If the contact
has several phone numbers (e.g. home,
cell, work), the right category must also
be given.

Commands/phrases

The following commands can usually be used
in any situation:

"

Repeat

" - repeats the most recent voice

command in the current dialog.

"

Cancel

" - cancels the dialog.

18

"

Help

" - initiates a help dialog. The sys-

tem responds with commands that can be
used in the current situation, an instruc-
tion or an example.

Commands for specific functions, such as
phone and audio, are described in the sections
related to that function.

Numbers

Number commands can be given in different
ways depending on the function to be con-
trolled:

Phone numbers and zip codes

 should be

given by stating each number individually,

e.g. "zero, three, one, two, two, four, four,
three" (03122443).

Addresses

 can be given by stating each

number individually or in a group, e.g.
"two, two" or "twenty-two" (22). For Eng-
lish and Dutch language settings, groups
of numbers can also be said in sequence,
e.g. "twenty-two, twenty-two" (22 22).
For English, double or triple digits can also
be used, e.g. "double zero" (00). Numbers
in the range 0-2300 can be used.

Frequencies

 can be given as "ninety-eight

point eight" (98.8), "one hundred four
point two" or "hundred and four point
two" (104.2).

Speech rate and repeat mode

The speed at which the system speaks can be
adjusted.

With repeat mode on, the system will repeat
what you have said.

To change the speech rate or activate/deacti-
vate repeat mode:

1. Tap 

Settings

 in the Top view.

2. Tap 

System

Voice Control

 and select

settings.

Repeat Voice Command

Speech Rate

18

Note that this only cancels the dialog when the system is not speaking. To do this, press and hold 

 until you hear two beeps.

-------------------------------------------------------------------------------------------------------------------------------------------------------------

DISPLAYS AND VOICE CONTROL

* Option/accessory.

141

Related information

Voice Control (p. 138)

Voice control for cellular phones (p. 141)

Voice control for radio and media (p. 142)

Climate control system voice commands
(p. 192)

Voice control settings (p. 142)

Voice control for cellular phones

19

Call a contact in the phone book, have a text
message read aloud or dictate short mes-
sages using voice commands to a Bluetooth-
connected phone.

To access a contact in the phone book, the
voice command must contain the contact
information entered in the phone book. If a
contact, e.g. 

Robyn Smith

, has several phone

numbers listed in the phone book, a number
category such as 

home

 or 

cellular

 can also be

specified, i.e. "

Call Robyn


Smith


cellular

".

Tap 

 and say one of the following com-

mands:

"

Call [contact]

" - call the selected con-

tact from the phone book.

"

Call


[phone number]

" - call a phone

number.

"

Recent calls

" - display the list of recent

calls.

"

Read message

" - read a text message

aloud. If there are several messages,
select the message to read aloud.

"

Message to [contact]

" – the user is

prompted to dictate a short message. The
message will then be read aloud and the
user can choose to send or re-dictate the
message. The vehicle must be connected
to the Internet to access this function.

NOTE

Not all system languages support voice
control. If a language supports voice con-
trol, it is marked with a 

 symbol in the

list of available system languages. Read
more about where the information is found
in the section on voice control settings.

Related information

Voice Control (p. 138)

Use voice recognition (p. 139)

Voice control for radio and media (p. 142)

Climate control system voice commands
(p. 192)

Voice control settings (p. 142)

Internet-connected vehicle

*

 (p. 479)

19

Certain markets only.

-------------------------------------------------------------------------------------------------------------------------------------------------------------


Content      ..     5      6      7      8     ..