Toyota Prius Plug-in Hybrid (2023 year). Manual in english - page 10
 

  Index      Toyota     Toyota Prius Plug-in Hybrid (2023 year). Manual in english


Search            copyright infringement  


Content      ..     8      9      10      11     ..


Toyota Prius Plug-in Hybrid (2023 year). Manual in english - page 10


160

2-2. Charging

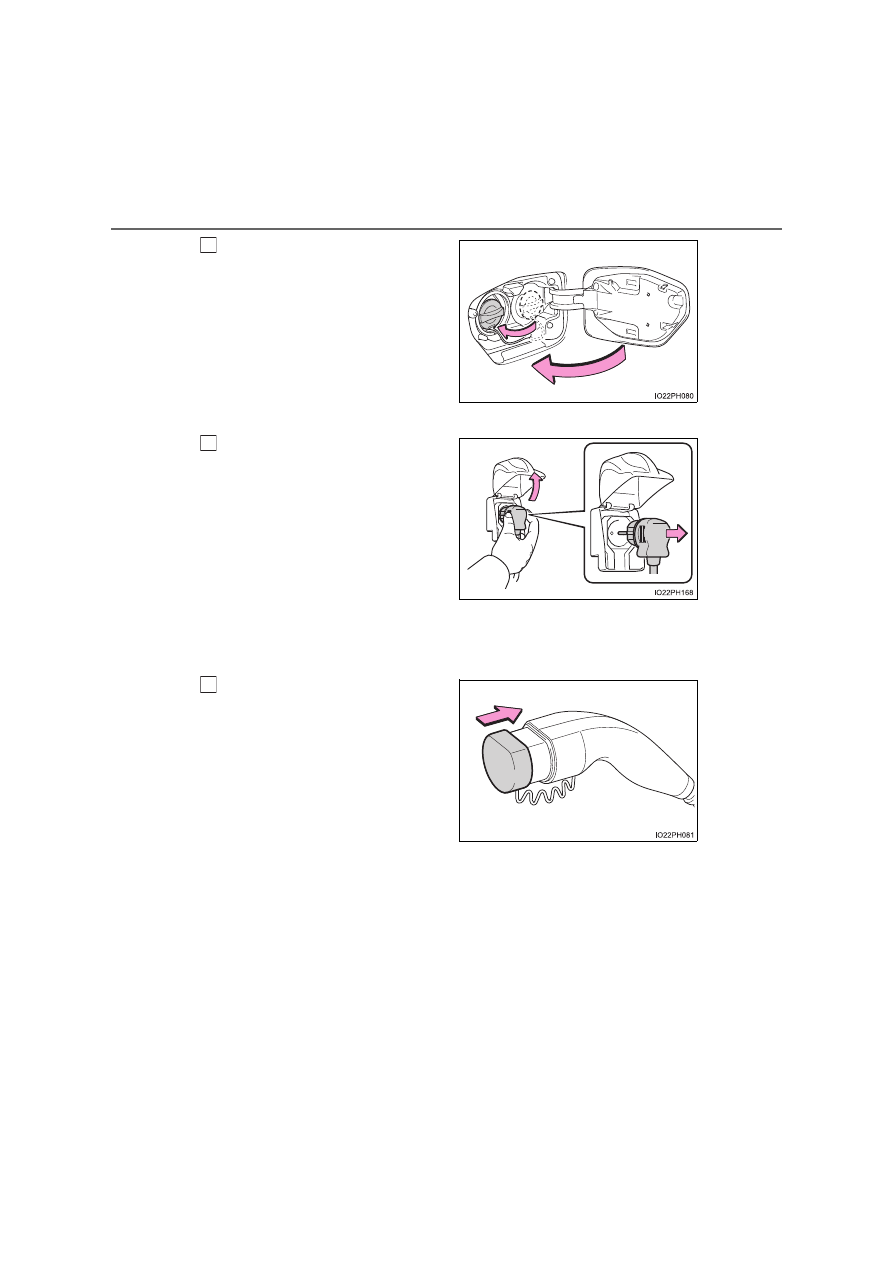
Attach the charging inlet cap
and close the charging port lid.

When using the Mode 2 charging cable

Remove the plug from the
socket when the charging
equipment will not be used for a
prolonged period of time.

Hold the body of the plug when
removing.
Make sure to put the cable away
immediately after disconnecting. 
(

P. 164)

When leaving the plug inserted, inspect the plug and connector once a
month to check if dirt or dust has accumulated.

When using the Mode 3 charging cable (if equipped)

After removing the charging
plug from the charging device,
install the cap to the charging
plug.

Make sure to hold the body of the
charging plug when removing it.
Make sure to put the cable away
immediately after disconnecting.
(

P. 164)

4

5

5

161

2-2. Charging

2

P

lu

g

-in

 hy
br

id

 s

ys

tem

Charging time

P. 143

Safety function

Charging will not start when the charging connector is not locked. If the
charging indicator does not illuminate even when the charging connector is
inserted, remove and reinsert the connector, and then check that the charging
indicator illuminates.

When the outside temperature is low or high

The level shown on the remaining charge display (

P. 232) may drop slightly

when the power switch is turned to ON mode, even if charging has been com-
pleted and the hybrid battery (traction battery) is fully charged. However, this
does not indicate a malfunction.

Charging time may increase

P. 144

While charging

When the power switch is turned to ON mode and the energy monitor dis-
plays, the charging connector is displayed on the energy monitor and the flow
of electricity during charging is displayed (

P. 223). Also, when the charging

connector is locked, 

 is displayed.

If the charging cable cannot be unlocked

P. 136

When removing the charging connector

Push lifter

Carry an electronic key and press the
charging connector lock switch and check
that the lock is released, and then pull the
charging connector towards you.

When the charging port lid is open, make
sure not to touch the push lifter. If it is
touched accidentally, the charging port lid
or connector lock may operate.
If they are accidentally operated, carry an
electronic key or unlock the doors, and
then press the charging connector lock
switch to unlock.

Push lifter

162

2-2. Charging

WARNING

When charging

Observe the following precautions.
Failure to do so may cause an unexpected accident, resulting in death or
serious injury.

Connect to a power source suitable for charging. (

P. 139)

Before charging, check that the charging inlet does not have deformations,
damage, corrosion, dust or other foreign materials such as snow or ice
adhering to it. If anything is adhering to the inlet, be sure to completely
remove the material before connecting the charging connector.

Mode 3 charging cable: Before inserting the charging plug into the char-
ger, make sure there is no dirt or dust on the terminal areas. If there is dirt
or dust on these areas, remove it completely before inserting the charging
plug.

Do not let the terminals of the charging inlet get wet.

Make sure that the charging cable, plug and socket are free of foreign mat-
ter and not deformed or damaged.

Only use sockets where the plug can be securely inserted.

Do not charge if the charging cable is coiled or bundled.

Wrapping the charging cable while in-use is not recommended because
cable may overheat. Failure to rewrap charging cable when not in-use
could result in strangulation or tripping hazard.

Do not touch the terminals of the charging connector and charging inlet
with a sharp metal objects (needles etc.) or hands, or short them with for-
eign objects.

When charging outdoors, make sure to connect to a rain-tight socket for
outdoor use. 
Ensure the rain-tight cover closes completely. If the rain-tight cover cannot
be closed, install a rain-tight cover that will close.

If any heat, smoke, odors, noise or other abnormalities are noticed during
charging, stop charging immediately.

Do not insert the plug if the socket is submerged in water or snow.

When charging during rain or snow, do not pull out or insert the plug with
wet hands. Also, do not get the electrical socket and plug wet.

Do not charge the vehicle during a lightning storm.

Do not let the wheels on the charging cable, plug, charging connector and
CCID (Charging Circuit Interrupting Device).

Firmly insert the plug into the socket.

Do not use an extension cord and converting adaptor.

163

2-2. Charging

2

P

lu

g

-in

 hy
br

id

 s

ys

tem

WARNING

After connecting the charging cable, confirm that it is not wound around
anything.

If the power indicator light does not illuminate after plugging the charging
cable into the socket, unplug it immediately.

If the error warning indicator on the CCID (Charging Circuit Interrupt-
ing Device) illuminates or flashes during charging

There may be an electrical leakage in the power source path, or there may
be a malfunction in the charging cable or CCID (Charging Circuit Interrupt-
ing Device). Refer to P. 120 and follow the correction procedure. If the error
warning indicator does not turn off even after performing the correction pro-
cedure, immediately stop charging, remove the charging cable and contact
any authorized Toyota retailer or Toyota authorized repairer, or any reliable
repairer. Continuing to charge the vehicle in that condition may lead to
unforeseen accidents or serious injury.

After charging

Remove the plug if it will not be used for a long time.
Dirt and dust may accumulate plug or socket, which could cause a malfunc-
tion or fire, possibly leading to death or serious injury.

Onboard traction battery charger

The onboard traction battery charger is located under the rear seats. Make
sure to observe the following precautions regarding the onboard traction
battery charger. Failure to observe these precautions may result in death or
serious injury such as burns and electric shocks.

The onboard traction battery charger is hot during charging. Do not touch
the onboard traction battery charger, as doing so may result in burns.

Do not disassemble, repair or modify the onboard traction battery charger.
When the onboard traction battery charger needs to be repaired, consult
any authorized Toyota retailer or Toyota authorized repairer, or any reliable
repairer.

Charging inlet

Do not disassemble, repair or modify the charging inlet. It may lead to acci-
dents or serious injury. When the charging inlet needs to be repaired, con-
sult any authorized Toyota retailer or Toyota authorized repairer, or any
reliable repairer.

164

2-2. Charging

NOTICE

When use the charging cable and related parts

To prevent damage to the charging cable and related parts, observe the fol-
lowing precautions.

When interrupting or canceling charging, remove the charging connector
before removing the plug.

When removing the charging cable, check that the charging connector is
unlocked.

Do not forcefully pull the connector cap and charging inlet cap.

Do not apply a vibration to the charging connector while charging.
Charging may be stopped.

Do not insert anything but the charging connector.

When inserting the plug into or removing the plug from the socket, make
sure to hold the body of the plug.

Do not damage the charging inlet cap with a sharp object.

Do not forcefully pull the charging cable that is caught or entangled.
If the cable is entangled, disentangle it before using.

When charging from the external device, use the charging cable equipped
with the vehicle.

When charging

Do not insert the plug into the charging inlet.
The charging inlet may be damaged.

After charging

Store the charging cable out of reach from infants and children.

After disconnecting the charging connector from the charging inlet, make
sure to put on the charging inlet cap and close the charging port lid.
If the charging inlet cap is not put on, water or foreign objects may enter
the charging inlet, which could lead to vehicle damage.

After removing the plug from the socket, keep it in a safe place free from
moisture and dust.
The charging cable or plug may be damaged if the cable is stepped on or
ridden over by the vehicle.

165

2-2. Charging

2

P

lu

g

-in

 hy
br

id

 s

ys

tem

NOTICE

Using private power generator

Do not use private power generators as a power source for charging.
Doing so may make charging unstable, the voltage may be insufficient, and
the error warning indicator on the CCID (Charging Circuit Interrupting
Device) of the charging cable may flash.

Charging station

Due to the environment in which the power equipment is located, charging
may be unstable due to noise, the voltage may be insufficient, and the error
warning indicator on the CCID (Charging Circuit Interrupting Device) of the
charging cable may flash.

166

2-2. Charging

Using the charging schedule function

When registering the charge schedule, the following settings can be
changed.

Select the charging mode

One of the two following charging modes can be selected.

*

1

: Charging schedule function is performed in accordance with the clock in

the instrument cluster. Before registering the charge schedule, check the
clock settings to the proper time.

*

2

: There might be a slight error in the timing when charging starts due to the

state of the hybrid battery (traction battery).

Repeated setting

The periodic charging schedule can be set by selecting your
desired day of the week.

Air conditioning-linked setting (“Climate Prep”) (if equipped)

When the charging mode is set to “Departure”, the vehicle air condi-
tioning system (

P. 522) can be set to automatically operate

*

according to the set time.

By adjusting the cabin temperature in advance, passengers can enjoy a
pleasant interior immediately after entering the vehicle.

*

: Operation starts approximately 10 minutes before the set departure time.

Charging can be carried out at the desired time by registering
the charge schedule. Also, it is possible to set the charging
schedule to one’s preferences, such as having charging com-
plete by a certain departure time or be carried out at the same
time on certain days.

Settings of the charging schedule function

Charging mode

Operation description

“Start”

Starts charging at the set time

*

1

 and finishes

charging when fully charged.

*

2

“Departure”

Starts charging to finish at the set time.
When this setting is selected, the air conditioning-
linked function can be used. (if equipped)

167

2-2. Charging

2

P

lu

g

-in

 hy
br

id

 s

ys

tem

Turning “Charge Now” on and off

If even one charge schedule is registered, charging does not start
until the set time, even if the charging cable is connected to the
vehicle. To start charging without changing the charge schedule
setting, turn “Charge Now” on to temporarily cancel the charge
schedule and enable charging after connecting the charging cable.

Changing “Next Charging Event”

*

1

It is possible to temporarily set the time of the next scheduled
charge without changing the registered repeated setting.

*

2

*

1

: The “Next Charging Event” refers to the closest charge schedule from the

current time among the registered charge schedules. Charging schedule is
performed based on the “Next Charging Event”.

*

2

: When “Next Charging Event” is changed, the current charge schedule will

be temporarily ignored and charging will not be carried out until the time
specified by “Next Charging Event”. (For example, when “Next Charging
Event” is set for 2 days later, even if items are registered on the charge
schedule, charging will not be carried out until the time specified by “Next
Charging Event”.)

Charging schedule

The charge schedule cannot be set while driving.

A maximum of 15 charge schedules can be registered.

To make sure that the charging schedule function operates correctly

Check the following items.

Adjust the clock to the correct time (

P. 200)

The calendar is set to the correct date (

P. 202)

Check that the power switch is turned off

After registering the charge schedule, connect the charging cable
The charging start time is determined based on the charge schedule at the
time that the charging cable was connected.

After connecting the charging cable, check that the charging indicator
flashes (

P. 115)

Do not use a socket that has a power cut off function (including a timer func-
tion)
Use a socket that constantly supplies electricity. For sockets where the
power is cut off due to a timer function, etc., charging may not be carried
out according to plan if the power is cut off during the set time.

168

2-2. Charging

When the charging cable remains connected to the vehicle

Even if multiple consecutive charge schedules are registered, the next
charge will not be carried out according to the charging schedule until the
charging cable is removed and reconnected after charging completes. Also,
when the hybrid battery (traction battery) is fully charged, charging according
to the charging schedule will not be carried out.

“Climate Prep” (if equipped)

When the air conditioning-linked setting is turned on, the air conditioning
operates until the set departure time. Therefore, the air conditioning will con-
sume electricity and charging may not complete by the set departure time.

If the hybrid battery (traction battery) is fully charged, charging will not be
carried out, even if the charge schedule is set. However, if “Climate Prep” is
turned on, the air conditioning will operate only once when it nears the time
set in “Departure”. If this occurs, the air conditioning will consume electricity
and the remaining charge of the hybrid battery (traction battery) when
departing may be decreased.

When the doors are unlocked, the air conditioning system does not operate.

When charging schedules are ignored

When the following operations are performed while the charging schedule is
on standby, charging schedule is temporarily canceled and charging is
started.

When the Remote Air Conditioning System (

P. 535) is operated

When turning “Charge Now” on (

P. 174)

When an operation that temporarily cancels charging using the charging
schedule is performed (

P. 158)

Effects of outside temperature

When the charging mode is set to “Departure”, charging schedule may be
ignored due to the outside temperature and charging may start.

“Traction Battery Cooler” (if equipped) (

P. 145)

When charging is carried out using the charging schedule, the hybrid battery
(traction battery) cooling function may operate according to the temperature
of the hybrid battery (traction battery).

When the charging mode is set to “Start”, cooling starts at the set charging
start time.

When the charging mode is set to “Departure”, cooling starts approximately
30 minutes before the charging start time. However, if there is no time to fin-
ish charging by the charging schedule, the hybrid battery (traction battery)
cooling time may be shortened and “Traction Battery Cooler” may not oper-
ate.

169

2-2. Charging

2

P

lu

g

-in

 hy
br

id

 s

ys

tem

When operating charging schedule, use the charging schedule switch
and meter control switches.

Charging schedule switch
Meter control switches 
(

P. 195)

Multi-information display

Registering the charge schedule

Press the charging schedule switch.

The “Charge Schedule” screen will display on the multi-information dis-
play.

Press 

 or 

 of the

meter control switches to
select “Scheduled Events”,

and then press 

.

The “Scheduled Events” screen
will display.

Press 

 or 

 of the

meter control switches to
select “+”, and then press

.

The “Edit Charging Event”
screen will display.

Setting procedure

1
2

3

1

2

3

170

2-2. Charging

Press 

 or 

 of the

meter control switches to
select the charging mode/
time settings row, and then

press .

The charging mode/time set-
tings screen will display.
The clock display (12-hour dis-
play/24-hour display) changes
according to the clock settings.
(

P. 200)

Press 

 or 

 of the

meter control switches to
select the item to change
with the cursor, and then

press 

 or 

 to change

the setting.

Set the desired charging mode
and charging start (or departure)
time.
When the charging mode is “Start”, this sets the charging start time.
When it is “Departure”, this sets the charging end time.
After changing the settings to the desired settings, press 

 to return to

the previous screen.

To activate the repeated set-

ting, press 

 or 

 of the

meter control switches to
select “Repeat”, and then

press .

A screen where the repeated
day can be selected will display.

4

5

6

171

2-2. Charging

2

P

lu

g

-in

 hy
br

id

 s

ys

tem

Press 

 or 

 of the

meter control switches to
select the desired day to acti-
vate for the repeated setting,

and then press 

.

Each time 

 is pressed, the

repeated setting switches
between on and off.
When set to on, the selected day is highlighted and the charging sched-
ule is repeated on that day. It is possible to set more than one day to on.
If no days are set to on, charging is only carried out once according to
the charging schedule for the next 24 hours.
After changing the settings to the desired settings, press 

 to return to

the previous screen.

When the charging mode is
set to “Departure”, set the
“Climate Prep” (

P. 166) to

on or off. (if equipped)

To turn the function on and oper-
ate the air conditioning, press

 or 

 of the meter control

switches to select “Climate
Prep”, and then press 

.

Each time 

 is pressed, the function switches between on and off.

After setting operations are
complete, press 

.

A screen where the settings can
be saved will display.

Press 

 or 

 of the meter

control switches to select “Yes”,
and then press 

 to save the

settings.
If you wish to change the settings, select “No” and perform the setting
procedure from step   again.
After setting operations are complete, when the charging cable is con-
nected to the vehicle, charging will be carried out according to the
charging schedule settings.

7

8

9

3

172

2-2. Charging

Changing the registered charge schedules

The registered charge schedules can be turned on, off, deleted or
modified.

Press the charging schedule switch.

The “Charge Schedule” screen will display on the multi-information dis-
play.

Press 

 or 

 of the

meter control switches to
select “Scheduled Events”,

and then press 

.

The “Scheduled Events” screen
is displayed, which displays a
list of the registered charge
schedule.

Press 

 or 

 of the

meter control switches to
select the item to change,

and then press 

.

The “Edit Charging Event”
screen will display.

Press 

 or 

 of the

meter control switches to
select the item to operate
and perform the necessary
operation.

1

2

3

4

173

2-2. Charging

2

P

lu

g

-in

 hy
br

id

 s

ys

tem

“ON/OFF”
Each time 

 of the meter control switch is pressed, the

selected charge schedule switches between “On” and “Off”.

When set to “Off”, a charging schedule is ignored and charging accord-
ing to the charging schedule is not carried out.
When 

 is pressed, setting is complete.

“Edit”
Change the desired settings as described starting from step 
of the “Registering the charge schedule” procedure. (

P. 169)

Press 

 or 

 of the

meter control switches to
select “Yes”, and then press

 to save the charging

schedule.

Press 

 to return to the previ-

ous screen.
When canceling any changes,
select “No” and then press 

.

“Delete”
Pressing 

 of the meter control switch displays a deletion con-

firmation screen.

Press 

 or 

 of the

meter control switches to
select “Yes”, and then press

 to delete the selected

charge schedule.

Press 

 to return to the previ-

ous screen.
To cancel deletion, select “No”
and then press 

.

4

174

2-2. Charging

Setting “Charge Now” to “On”

The “Charge Now” setting can be changed by performing one of the
two following procedures.

Operation on “Charge Schedule” screen
Press the charging schedule switch.

The “Charge Schedule” screen will display on the multi-information dis-
play.

Press 

 or 

 of the

meter control switches to
select “Charge Now”, and

then press 

.

Each time 

 is pressed,

“Charge Now” switches between
“On” and “Off”.

Operation on “Ending” screen
Turn the power switch off.

The “Ending” screen is displayed on the multi-information display. 
(

P. 198)

While the “Ending” screen is

displayed, press 

 or 

of the meter control switches
to display the “Next Event”
screen.

*

*

: When the power switch is turned

off, the “Charge Now” setting
screen may be displayed.

Press 

 to set “Charge Now” to “On”.

Each time 

 is pressed, “Charge Now” switches between “On” and

“Off”.

After setting operations are complete, charging starts when the
charging cable is connected. (

P. 155)

1

2

1

2

3

175

2-2. Charging

2

P

lu

g

-in

 hy
br

id

 s

ys

tem

Changing “Next Charging Event”

*

*

: When “Charge Now” is set to “On” etc., it is not possible to change the reg-

istered “Next Charging Event”.

Press the charging schedule switch.

The “Charge Schedule” screen will display on the multi-information dis-
play.

Press 

 or 

 of the

meter control switches to
select “Next Charging

Event”, and then press 

.

The “Edit Next Charging Event”
screen will display.

Press 

 or 

 of the

meter control switches to
select the item to change,
and then press 

.

Change the registered settings
in accordance with the following
table.

1

2

3

Setting

Operation

Charging Mode/Time

Operate 

 and 

 of the meter control

switches to set the charging mode (“Start” or
“Departure”) and charging start (or departure) time.
After changing the settings, press 

 to return the

previous screen.

“Day”

Operate 

 or 

 of the meter control switches to

select the day to carry out charging according to the
charging schedule.
After changing the setting, press 

 to return the

previous screen.

“Climate Prep” 

(if equipped)

This can be set when the charging mode is set to
“Departure”. Each time 

 is pressed, air condition-

ing-linked operation switches between “On” and
“Off”.


Content      ..     8      9      10      11     ..