Toyota Land Cruiser Prado (2023 year). Manual in english - page 9
 

  Index      Manuals     Toyota Land Cruiser Prado (2023 year). Manual in english


Search            copyright infringement  


Content      ..     7      8      9      10     ..


Toyota Land Cruiser Prado (2023 year). Manual in english - page 9


143

2. Instrument cluster

2

In

st

rum

ent cl

ust
e

r

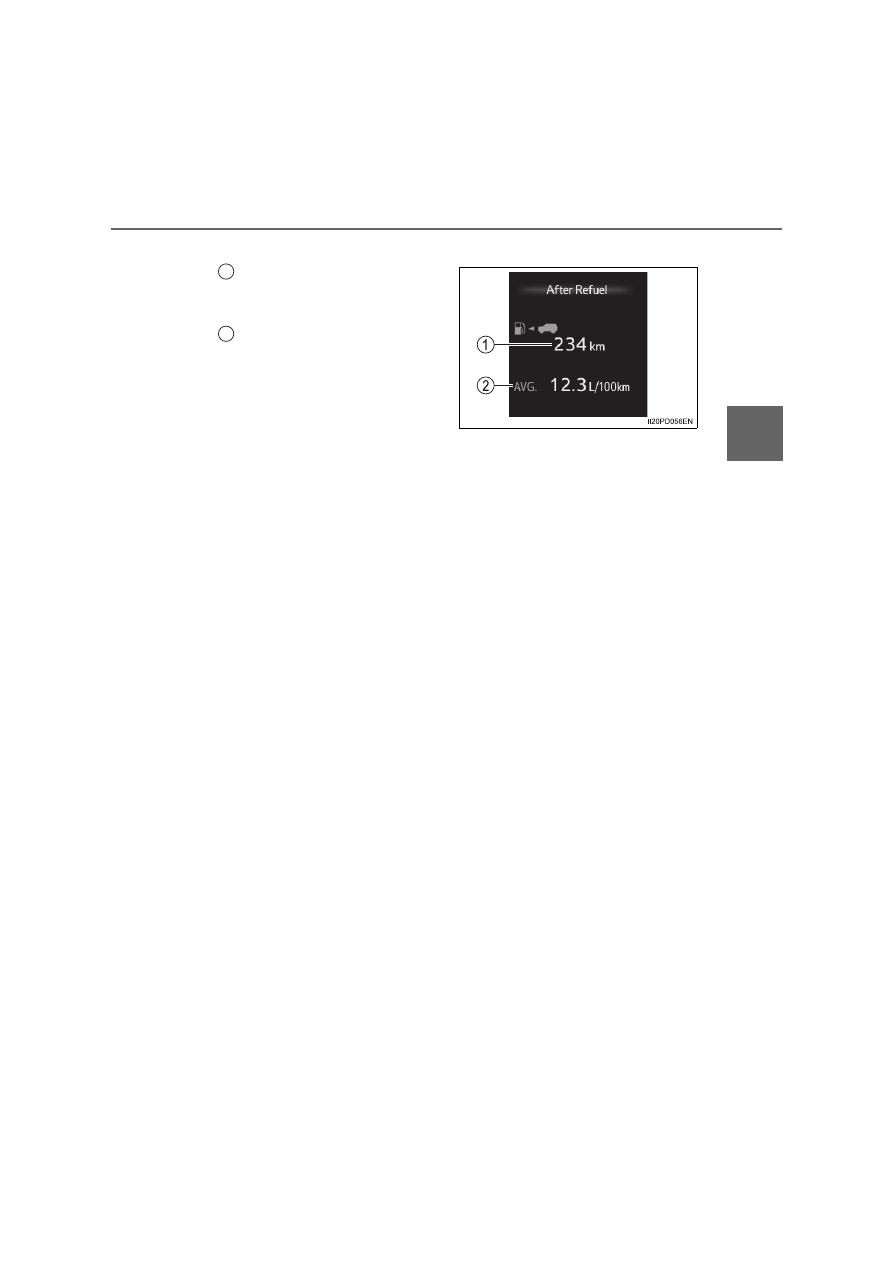
After Refuel

Range

*

1, 2

Displays the driving range with
remaining fuel.

Average fuel economy

*

2, 3

Displays the average fuel con-
sumption since the vehicle was
refueled.

*

1

: This distance is computed based on your average fuel consumption. As

a result, the actual distance that can be driven may differ from that dis-
played.

*

2

: When only a small amount of fuel is added to the tank, the display may

not be updated. When refueling, turn the engine switch off. If the vehicle
is refueled without turning the engine switch off, the display may not be
updated.

*

3

: Use the displayed average fuel economy as a reference.

Eco Indicator (Eco Driving Indicator Zone Display)

P. 148

Speed

Displays the vehicle speed.

DPF deposition monitor (if equipped)

The amount of accumulated deposit in the DPF system can be con-
firmed. (

P. 295)

AdBlue™ gauge (if equipped)

The quantity of AdBlue™ remaining in the tank can be checked.
(

P. 594)

Blank screen (display off)

Drive information is not displayed.

1

2

144

2. Instrument cluster

Stop & Start system operation time (current)/status notification

Displays the current amount of time the engine has been stopped
due to the operation of the Stop & Start system. Also shows the sta-
tus of the Stop & Start system with a pop-up display. (

P. 397)

Stop & Start system operation time/fuel savings

Operate 

 up and down to select following items:

Stop & Start system operation time (after start/after reset)
Displays the accumulated total of the following:

• Stop & Start system operation time since engine start
• Stop & Start system operation time since display was reset

Fuel savings (after start/after reset)*
Displays the accumulated total of the following:

• Fuel savings since engine start
• Fuel savings since display was reset

*

: Use the displayed fuel savings as a reference.

Stop & Start system settings

Press 

 to display the Stop & Start system settings screen.

On this screen, the following operations can be performed:

 Stop & Start

The length of time the Stop & Start system will operate when the
“A/C” switch of the air conditioning system is on can be set to 2
different levels. This setting can also be changed on 

.

Reset
Select to reset the Stop & Start system operation time display.
To reset, move the cursor to “Reset”, and then press and hold

.

Stop & Start system information (if equipped)

145

2. Instrument cluster

2

In

st

rum

ent cl

ust
e

r

Items displayed can be switched by operating 

 up and down.

Steering angle

Displays the direction of the front tires.

The tire direction is displayed in 3 stages for both left and right, in accor-
dance with the angle of the tire.
If a battery terminal is disconnected and reconnected, the display may
be disabled temporarily. After driving the vehicle for a while, the display
will be enabled.

Tire inflation pressure (vehicles with the tire pressure warning
system)

Displays inflation pressure of each tire.

The inflation pressure of the spare tire will be displayed.

Clinometer

Refer to the “Off-road driving Owner’s manual”

Traction monitor

Refer to the “Off-road driving Owner’s manual”

The settings of some features can be changed by using the meter
control switches.

Setting procedure

On the setting screen, choose the desired item using 

, and

then press 

.

• For functions that can be enabled or disabled, the function switches

between on and off each time 

 is pressed.

• For functions that allow to select operation contents, display con-

tents, etc., the setting screen is displayed.

Select the desired setting by operating 

, and then press

.

To stop the selection, press 

 to return to the previous screen.

Vehicle information

Settings display

1

2

146

2. Instrument cluster

Setting items

 LDA (Lane Departure Alert with Yaw Assist Function) (if

equipped)
Select to set up LDA. (

P. 353)

• Yaw assist on/off
• Alert  types
• Alert sensitivity
• Sway warning
• Sway sensitivity

 Toyota parking assist-sensor (if equipped)

Select to set the following item. (

P. 404)

• Buzzer volume

 BSM (Blind Spot Monitor) (if equipped)

Select activate/deactivate BSM. (

P. 422)

• BSM on/off

 PCS (Pre-Collision System) (if equipped)

Select to set the following items. (

P. 342)

• PCS sensitivity
• PCS  on/off


RSA (Road Sign Assist) (if equipped)

Select to set up RSA. (

P. 364)

• RSA on/off
• Excess speed notification level
• Excess speed condition method
• Overtaking notification method
• Other notifications method

DRCC (RSA) (if equipped)
Select to enable/disable the Dynamic Radar Cruise Control with
Road Sign Assist. (

P. 382)

 Stop & Start system (if equipped)

The length of time the Stop & Start system will operate when the
“A/C” switch of the air conditioning system is on can be set to 2
different levels. (

P. 769)

Oil maintenance (if equipped)
Select to reset the oil maintenance data. (

P. 582)

147

2. Instrument cluster

2

In

st

rum

ent cl

ust
e

r

Meter settings
Select to set the following items. (

P. 779)

• Language

Select to change the language on the display.

• Units

Select to change the unit for measure.

 Eco Driving Indicator Light (if equipped) 

Select to activate/deactivate the Eco Driving Indicator Light. 
(

P. 130)

 switch settings

You can register 1 screen as the top screen. To register, press

and hold 

 while the desired screen is displayed.

• Pop-up display (if equipped)

Select to set the pop-up displays (

P. 149), which may appear

in some situations, on/off.

• Vehicle image

Select to change the vehicle image displayed by the tire infla-
tion pressure display (

P. 602) and clinometer

*

. When turned

on, the vehicle image displays the spare tire mounted on the
back door. 
Use this item according to the actual installation position of the
spare tire. 

• Initialization

Select to reset the meter display settings.

*

: Refer to the “Off-road driving Owner’s manual”.

148

2. Instrument cluster

Driving mode

*

 (if equipped) (

P. 401)

Rear height control air suspension display (if equipped) 

Refer to the “Off-road driving Owner’s manual”

Multi-terrain Select display (if equipped) 

Refer to the “Off-road driving Owner’s manual”

Crawl Control display

*

 (if equipped) 

Refer to the “Off-road driving Owner’s manual”

Outside temperature display

Displays the outside temperature

The temperature range that can be displayed is from -40 °C (-40 °F) to
50 °C (122 °F).
When the outside temperature drops below 3 °C (37 °F), 

 will

flash approximately 10 seconds, then stay on.

Customization

Settings (e.g. available language) can be changed. 
(Customizable features: 

P. 779)

*

: Automatically displayed when the system is used

Eco Driving Indicator (vehicles with an automatic transmission)

Other contents

Eco Driving Indicator Light (

P. 130)

Eco Driving Indicator Zone Display
Suggests the Zone of Eco driving with
current Eco driving ratio based on
acceleration.
Eco driving ratio based on acceleration
If the acceleration exceeds Zone of Eco
driving, the right side of Eco Driving
Indicator Zone Display will illuminate.
Zone of Eco driving

1

2

3

4

149

2. Instrument cluster

2

In

st

rum

ent cl

ust
e

r

Pop-Up display (if equipped)

The pop-up display is displayed on the multi-information display according to
the operating conditions of the following functions:

Route guidance display of the navigation system-linked system (if equipped)

Incoming call display of the hands-free phone system (if equipped)

Stop & Start system duration (if equipped)

Stop & Start system status (if equipped)

The pop-up display function can be disabled.

Tire inflation pressure (vehicles with the tire pressure warning system)

It may take a few minutes to display the tire inflation pressure after the
engine switch is turned to IGNITION ON mode. It may also take a few min-
utes to display the tire inflation pressure after inflation pressure has been
adjusted.

“---” may be displayed if the tire information cannot be determined due to
unfavorable radio wave conditions.

Tire inflation pressure changes with temperature. The displayed values may
also be different from the values measured using a tire pressure gauge.

Outside temperature display

In the following situations, the correct outside temperature may not be dis-
played, or the display may take longer than normal to change:

When the vehicle is stopped, or moving at low speeds (less than 20 km/h
[12 mph])

When the outside temperature has changed suddenly (at the entrance/exit
of a garage, tunnel, etc.)

When “--” or “E” is displayed, the system may be malfunctioning. Take your
vehicle to any authorized Toyota retailer or Toyota authorized repairer, or
any reliable repairer.

Suspension of the settings display

In the following situations, the settings display using the meter control
switches will be suspended.

When a warning message appears on the multi-information display

When the vehicle begins to move

Liquid crystal display

Small spots or light spots may appear on the display. This phenomenon is
characteristic of liquid crystal displays, and there is no problem continuing to
use the display.

150

2. Instrument cluster

WARNING

Caution for use while driving

For safety, avoid operating the meter control switches while driving as much
as possible, and do not look continuously at the multi-information display
while driving. Stop the vehicle and operate the meter control switches. Fail-
ure to do so may cause a steering wheel operation error, resulting in an
unexpected accident.

Cautions while setting up the display

As the engine needs to be running during setting up the display, ensure that
the vehicle is parked in a place with adequate ventilation. In a closed area
such as a garage, exhaust gases including harmful carbon monoxide (CO)
may collect and enter the vehicle. This may lead to death or a serious
health hazard.

The multi-information display at low temperatures (vehicles with an
automatic transmission)

Allow the interior of the vehicle to warm up before using the multi-informa-
tion display. At extremely low temperatures, the multi-information display
monitor may respond slowly, and display changes may be delayed.
For example, there is a lag between the driver’s shifting and the new gear
number appearing on the display. This lag could cause the driver to down-
shift again, causing rapid and excessive engine braking and possibly an
accident resulting in death or serious injury.

NOTICE

While setting up the display

To prevent battery discharge, ensure that the engine is running while setting
up the display features.

151

2

2. Instrument cluster

In

st

rum

ent cl

ust
e

r

Fuel consumption information

Navigation system or multime-
dia system screen
“MENU” button

Press the “MENU” button to display the “Menu” screen.
Select “Info” on the “Menu” screen.

: If equipped

The fuel consumption information can be displayed on the navi-
gation system or multimedia system screen.

System components

1

2

Display the screen

1

2

152

2. Instrument cluster

Trip information

If a screen other than “Trip information” is displayed, select “Trip
information”.

Fuel consumption in the past
15 minutes
Current fuel consumption
Resetting the consumption
data
Average vehicle speed since
the engine was started
Elapsed time since the
engine was started
Cruising range

Average fuel consumption for the past 15 minutes is divided by
color into past averages and averages attained since the engine
switch was last turned to the “ON” position (vehicles without a
smart entry & start system) or IGNITION ON mode (vehicles with a
smart entry & start system). Use the displayed average fuel con-
sumption as a reference.
These images are examples only, and may vary slightly from actual
conditions.

Fuel consumption

1

2
3

4

5

6

153

2. Instrument cluster

2

In

st

rum

ent cl

ust
e

r

History

If a screen other than “History” is displayed, select “History”.

Best recorded fuel consump-
tion
Latest fuel consumption
Previous fuel consumption
record
Updating the latest fuel con-
sumption data
Resetting the history data

The average fuel consumption history is divided by color into past
averages and the average fuel consumption since the last updated.
Use the displayed average fuel consumption as a reference.
The image is an example only, and may vary slightly from actual
conditions.

Updating the history data

Update the latest fuel consumption by selecting “Update” to measure the cur-
rent fuel consumption again.

Resetting the data

Selecting “Clear” on the consumption screen will reset the consumption data.

Cruising range

Displays the estimated maximum distance that can be driven with the quan-
tity of fuel remaining.
This distance is computed based on your average fuel consumption. As a
result, the actual distance that can be driven may differ from that displayed.

1

2
3

4

5

155

3

Operation of

each component

3-1. Key information

Keys...................................156

3-2. Opening, closing and 

locking the doors

Side doors..........................164
Back door...........................175
Glass hatch........................181
Smart entry & start 

system .............................187

3-3. Adjusting the seats

Front seats.........................195
Rear seats .........................198
Driving position 

memory............................212

Head restraints ..................216

3-4. Adjusting the steering 

wheel and mirrors

Steering wheel ...................219
Inside rear view mirror .......222
Outside rear view 

mirrors .............................224

3-5. Opening and closing the 

windows and moon roof

Power windows..................229
Moon roof...........................233

156

3-1. Key information

Keys

The following keys are provided with the vehicle.

Vehicles without a smart entry & start system (type A)

Master keys
Valet key
Wireless remote controls

Operating the wireless remote control function

Key number plate

The keys

1
2
3

4

157

3-1. Key information

3

O

p

er

ati

on 
of e
a

ch

 c

o

m

pon
ent

Vehicles without a smart entry & start system (type B)

Master keys

Operating the wireless remote con-
trol function

Valet key
Key number plate

Vehicles with a smart entry & start system

Electronic keys

• Operating the smart entry &

start system (

P. 187)

• Operating the wireless remote

control function

Mechanical keys
Key number plate

1

2
3

1

2
3

158

3-1. Key information

Vehicles without a smart entry & start system (type A)

Locks the doors (

P. 165)

Closes the windows and moon
roof (if equipped)

*

 (

P. 165)

Unlocks the doors (

P. 165)

Opens the windows and moon
roof (if equipped)

*

 (

P. 165)

Opens the glass hatch 
(

P. 181)

*

: These settings must be customized at any authorized Toyota retailer or

Toyota authorized repairer, or any reliable repairer.

Wireless remote control

1
2

3
4

5

159

3-1. Key information

3

O

p

er

ati

on 
of e
a

ch

 c

o

m

pon
ent

Vehicles without a smart entry & start system (type B)

Locks the doors (

P. 165)

Closes the windows and moon
roof (if equipped)

*

 (

P. 165)

Unlocks the doors (

P. 165)

Opens the windows and moon
roof (if equipped)

*

 (

P. 165)

Opens the glass hatch (vehi-
cles with the glass hatch) 
(

P. 181)

*

: These settings must be customized at any authorized Toyota retailer or

Toyota authorized repairer, or any reliable repairer.

Vehicles with a smart entry & start system

Locks the doors (

P. 165)

Closes the windows and moon
roof (if equipped)

*

 (

P. 165)

Unlocks the doors (

P. 165)

Opens the windows and moon
roof (if equipped)

*

 (

P. 165)

Opens the glass hatch (vehi-
cles with the glass hatch) 
(

P. 181)

*

: These settings must be customized at any authorized Toyota retailer or

Toyota authorized repairer, or any reliable repairer.

1
2

3
4

5

1
2

3
4

5


Content      ..     7      8      9      10     ..