Toyota Tundra (2023 year). Manual in english - page 26
 

  Index      Toyota     Toyota Tundra (2023 year). Manual in english


Search            copyright infringement  


Content      ..     24      25      26      27     ..


Toyota Tundra (2023 year). Manual in english - page 26


417

5-1. Using the air conditioning system and defogger

5

Interior

 featur

es

This feature is used to prevent 
ice from building up on the wind-
shield and wiper blades.
Press the rear window and out-
side rear view mirror defoggers 
switch.

The windshield wiper de-icer will 
automatically turn off after 15 min-
utes.
Turning the rear window and out-
side rear view mirror defoggers on 
will turn the windshield wiper de-
icer on.
When the rear window and outside 
rear view mirror defoggers switch is 
on, the indicator illuminates on the 
rear window and outside rear view 
mirror defoggers switch.

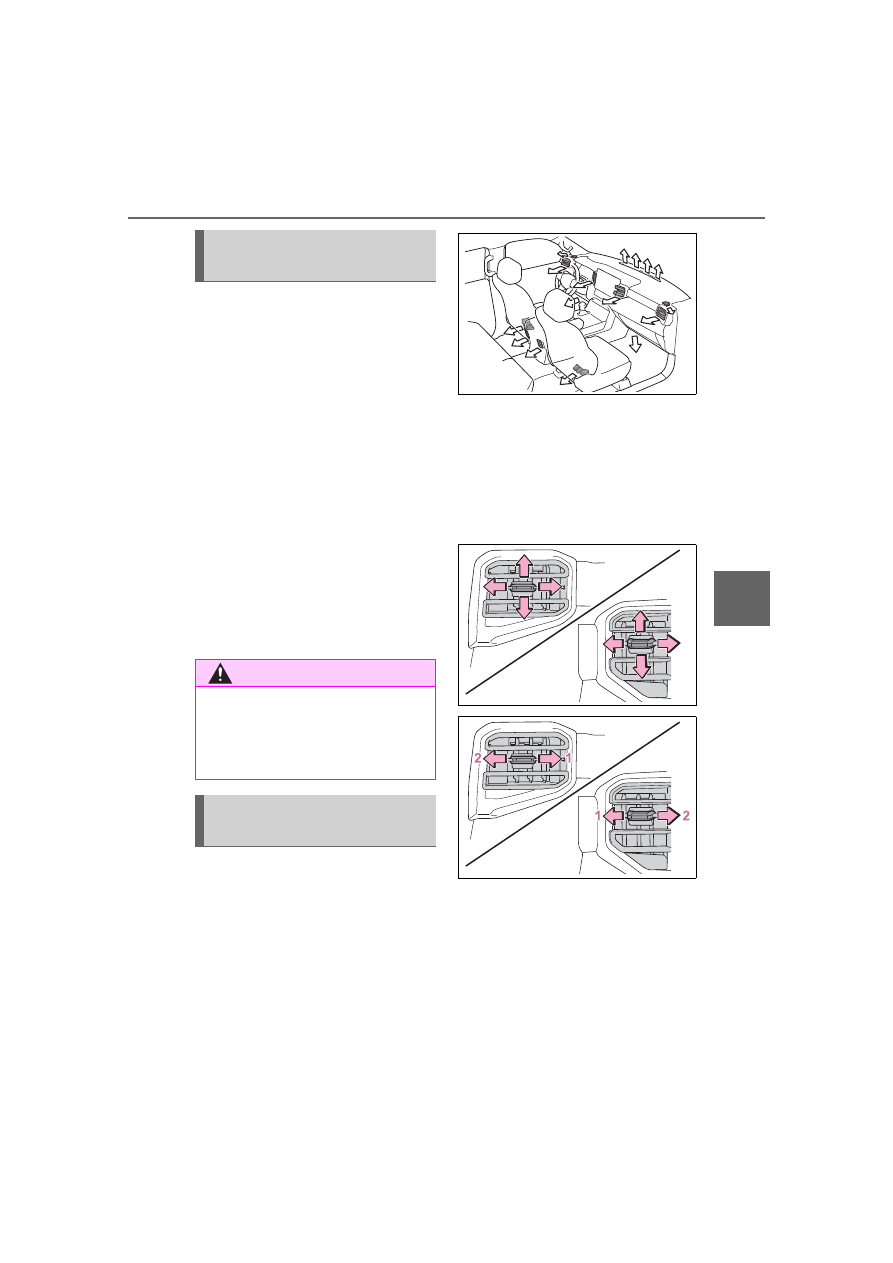
Location of air outlets

The air outlets and air volume 
change according to the 
selected air flow mode.

Adjusting the air flow direc-
tion and opening/closing 
the air outlets

Front

Direct air flow to the left or right, 
up or down

1

Open the vent

2

Close the vent

Rear (if equipped)

Direct air flow to the left or right, 
up or down

Windshield wiper de-icer 
(if equipped)

WARNING

To prevent burns

Do not touch the glass at lower 

part of the windshield or to the 

side of the front pillars when the 

windshield wiper deicer is on.

Air outlet layout and oper-
ations

418

5-1. Using the air conditioning system and defogger

1

Open the vent

2

Close the vent

*

: If equipped

WARNING

To not interrupt the wind-

shield defogger from operat-

ing

Do not place anything on the 

instrument panel which may cover 

the air outlets. Otherwise, air flow 

may be obstructed, preventing the 

windshield defoggers from defog-

ging.

Heated steering 

wheel

*

/seat heat-

ers

*

/seat ventilators

*

Heated steering wheel

Warms up the grip of the 
steering wheel

Front seat heaters/Rear 
seat heaters

Warm up the seat upholstery

Front seat ventilators/Rear 
seat ventilators

Maintain good ventilation by 
pulling air through the seat 
upholstery

WARNING

To prevent minor burn inju-

ries

Care should be taken if anyone in 

the following categories comes in 

contact with the steering wheel or 

seats when the heater is on:

Babies, small children, the 

elderly, the sick and the physi-

cally challenged

Persons with sensitive skin

Persons who are fatigued

Persons who have taken alco-

hol or drugs that induce sleep 

(sleeping drugs, cold remedies, 

etc.)

419

5-1. Using the air conditioning system and defogger

5

Interior

 featur

es

Heated steering wheel

Turns heated steering wheel 
on/off When the heated steering 
wheel is on, the indicator illumi-
nates on the heated steering 
wheel switch.

Front seat heaters/seat ven-
tilators

Adjust the front seat heater 
temperature level

Each time the switch is pressed, 
the operation condition changes as 
follows.
Hi (3 segments lit) 

 Mid (2 seg-

ments lit) 

 Lo (1 segment lit) 


Off
The level indicator (red) light up 
during operation.

Adjust the front seat ventila-
tor fan speed level

Each time the switch is pressed, 
the operation condition changes as 
follows.
Hi (3 segments lit) 

 Mid (2 seg-

ments lit) 

 Lo (1 segment lit) 


Off
The level indicator (blue) light up 
during operation.

Rear seat heaters/seat ven-
tilators

Adjust the rear seat heater 
temperature level

Each time the switch is pressed, 
the operation condition changes as 
follows.
Hi (3 segments lit) 

 Mid (2 seg-

ments lit) 

 Lo (1 segment lit) 


Off
The level indicator (red) light up 

NOTICE

To prevent damage to the 

seat heaters and seat ventila-

tors

Do not put heavy objects that 

have an uneven surface on the 

seat and do not stick sharp 

objects (needles, nails, etc.) into 

the seat.

To prevent battery discharge

Do not use the functions when the 

engine is off.

Operating instructions

420

5-1. Using the air conditioning system and defogger

during operation.

Adjust the rear seat ventilator 
fan speed level

Each time the switch is pressed, 
the operation condition changes as 
follows.
Hi (3 segments lit) 

 Mid (2 seg-

ments lit) 

 Lo (1 segment lit) 


Off
The level indicator (blue) light up 
during operation.

The heated steering wheel, seat 

heaters and seat ventilators can 

be used when

The engine switch is in ON.

WARNING

To prevent overheating and 

minor burn injuries

Observe the following precautions 

when using the seat heaters.

Do not cover the seat with a 

blanket or cushion when using 

the seat heater.

Do not use seat heater more 

than necessary.

421

5-2. Using the interior lights

5

Interior

 featur

es

5-2.Using the interior lights

Personal/interior lights (

P.422)

Door courtesy lights (if equipped)

Ambient lights (if equipped) (

P.422)

Shift lever light (if equipped)

Engine switch light

Glove box light (if equipped)

Footwell lights (if equipped)

Front tray light

Console box light (if equipped)

Cargo lamp (

P.422)

Bed lamp (if equipped) (

P.422)

Trailer hitch light (if equipped) (

P.402, 422)

Interior lights list

Location of the interior lights

422

5-2. Using the interior lights

“OFF”

The personal/interior lights can be 
individually turned on or off.

“DOOR”

The personal/interior lights come 
on when a door is opened. They 
turn off when the doors are closed.

“ON”

The personal/interior lights cannot 
be individually turned off.

Front

Turns the lights on/off

Rear

Turns the lights on/off

Each time the “MOOD” switch is 
pressed, the brightness level 
changes.

“OFF”

Turns the lights off

“DOOR”

The cargo lamp and bed lamp turns 
on/off when the door or tailgate is 

Personal/interior lights 
main switch

Operating the per-
sonal/interior lights

Ambient lights (if 
equipped)

Cargo lamp main switch

423

5-2. Using the interior lights

5

Interior

 featur

es

opened or closed while the shift 
lever is in P, D or R. 
The trailer hitch light turns on when 
the door or tailgate is opened or 
closed while the shift lever is in P or 
R. trailer hitch light will turn off 
when shift lever in D.

“ON”

The cargo lamp, bed lamp, trailer 
hitch light turns on while the shift 
lever is in P or R. Only cargo lamp 
and bed lamp turns on while shift 
lever is in D.

Illuminated entry system

The lights automatically turn on/off 

according to the engine switch 

mode, the presence of the elec-

tronic key, whether the doors are 

locked/unlocked, and whether the 

doors are open/closed.

To prevent the battery from 

being discharged

If the following lights remain on 

when the door is not fully closed and 

the main switch is in the “DOOR” 

position, the lights will go off auto-

matically after 20 minutes:

Personal/interior lights

Cargo lamp

Bed lamp

Trailer hitch light

The personal/interior lights may 

turn on automatically when

If any of the SRS airbags deploy 

(inflate) or in the event of a strong 

rear impact, the personal/interior 

lights will turn on automatically.
The personal/interior lights will turn 

off automatically after approximately 

20minutes.
The personal/interior lights can be 

turned off manually. However, in 

order to help prevent further colli-

sions, it is recommended that they 

be left on until safety can be 

ensured.
(The personal/interior lights may not 

turn on automatically depending on 

the force of the impact and condi-

tions of the collision.)

Customization

Some functions can be customized. 

(

P.567)

NOTICE

To prevent battery discharge

Do not leave the lights on longer 

than necessary when the engine 

is off.

Removing light lenses

Never remove the lens for the 

personal/interior lights. Otherwise, 

the lights will be damaged. If a 

lens needs to be removed, con-

tact your Toyota dealer.

424

5-3. Using the storage features

5-3.Using the storage features

Auxiliary boxes

Glove box

Cup holders

Console box

Bottle holders

Storage box

List of storage features

Location of the storage features

WARNING

Items that should not be left 

in the storage spaces

Do not leave glasses, lighters or 

spray cans in the storage spaces, 

as this may cause the following 

when cabin temperature becomes 

high:

Glasses may be deformed by 

heat or cracked if they come 

into contact with other stored 

items.

Lighters or spray cans may 

explode. If they come into con-

tact with other stored items, the 

lighter may catch fire or the 

spray can may release gas, 

causing a fire hazard.

425

5-3. Using the storage features

5

Interior

 featur

es

Pull up the lever to open.

1

Unlock with the mechanical 
key

2

Lock with the mechanical key

Tray within glove box

The tray can be removed by lifting 

the tray and then sliding it out.

1

Lift the tray to disengage clip

2

Slide to remove tab from hole

Front (Type A)

Front (Type B)

Press in and release the button.

Rear (Type A)

Rear (Type B)

Pull the armrest down for use.

Glove box

WARNING

Caution while driving

Keep the glove box closed. In the 

event of sudden braking or sud-

den swerving, an accident may 

occur due to an occupant being 

struck by the open glove box or 

the items stored inside.

Cup holders

426

5-3. Using the storage features

Front

Rear (if equipped)

Bottle holders

When storing a bottle, close the 

cap.

The bottle may not be stored 

depending on its size or shape.

Press either button to open the 
console box.

WARNING

Items unsuitable for the cup 

holder

Do not place anything other than 

cups or beverage cans in the cup 

holders.

Inappropriate items must not be 

stored in the cup holders even if 

the lid is closed.

Other items may be thrown out of 

the holders in the event of an 

accident or sudden braking and 

cause injury. If possible, cover hot 

drinks to prevent burns.

When not in use

Keep the cup holders closed.

Injuries may result in the event of 

an accident or sudden braking.

Bottle holders

WARNING

Items unsuitable for the bottle 

holders

Do not place anything other than 

a bottle in the bottle holders.

Other items may be thrown out of 

the holders in the event of an 

accident or sudden braking and 

cause injury.

NOTICE

Items that should not be 

stowed in the bottle holders

Put the cap on before stowing a 

bottle. Do not place open bottles 

in the bottle holders, or glasses 

and paper cups containing liquid. 

The contents may spill and 

glasses may break.

Console box

427

5-3. Using the storage features

5

Interior

 featur

es

Console box

When the auxiliary box is slid, the 

console box can be accessed.

Console box partition

The partition of the console box can 

be removed.

The removed partition can be 

stowed in the position as shown in 

the illustration.

Type A

Push in and release the auxiliary 
box.

This box is useful for temporarily 
storing the small items.

Type B

Pull the auxiliary box out.

Type C (if equipped)

Pull the lid to open.

WARNING

Caution while driving

Keep the console box closed.

Injuries may result in the event of 

an accident or sudden braking.

Auxiliary boxes

428

5-3. Using the storage features

Type D (if equipped)

Folding down the rear seat-
backs. (

P.132)

Open the storage box

Raising the bottom cushions.
(

P.134)

Close the storage box

Returning the bottom cushions.
(

P.134)

Storage box

The partition of the storage box can 

be removed or its position can be 

changed.

WARNING

Caution while driving

Do not leave the auxiliary box 

open while driving.

Items may fall out and cause 

death or serious injury in case of 

an accident or sudden stop.

Items unsuitable for storing 

(type A)

Do not store items heavier than 

0.4 lb. (0.2 kg).

Doing so may cause the auxiliary 

box to open and the items inside 

may fall out, resulting in an acci-

dent.

Storage box

429

5-3. Using the storage features

5

Interior

 featur

es

Bed hooks are provided for 
securing loose items.

Vertical position

The plank can be inserted in the 
deck side groove.

Insertion position:

Type A

Type B

Type C

Dimensions of the wood that is 
prepared:
Prepare a 2 

 8 wood plank with 

the following dimensions.

Luggage compart-

ment features

Bed hooks

Deck divider

430

5-3. Using the storage features

62.2 in (1580 mm)

60.7 in (1541 mm)

6 degree

Measure dimension 

 and 

 on 

your vehicle to ensure accurate 
length based on vehicle variation.

Horizontal position

A 2 

 8 wood plank can be 

placed in the deck board 
grooves.
Prepare the board by measuring 
the length with the actual vehicle 
according to the position it is to 
be placed.

Insertion position:

Type A

Type B

Type C

Dimensions:

431

5-3. Using the storage features

5

Interior

 featur

es

Width 61.9 in. (1573 mm)

Width 55.5 in. (1409 mm)

Width 61.9 in. (1573 mm)

Measure dimension 

 and 


on your vehicle to ensure accurate 
length based on vehicle variation.

WARNING

When using and operating 

the deck divider

Do not use deck divider boards 

when off-roading or crossing 

rough terrain. The boards could 

come out of the cargo bed area, 

causing damage to other vehi-

cles or causing injury or death.

Ensure that deck divider boards 

are prepared to the proper 

dimensions, including the edge 

angle. Failure to do so could 

cause the boards to could come 

out of the cargo bed area, caus-

ing damage to other vehicles or 

causing injury or death.

NOTICE

When using the deck divider

Boards in board slots alone may 

not guarantee that the cargo be 

held sufficiently, other means 

may be necessary.

Board dimensions are for refer-

ence due to variations in bed 

size manufacturing. The board 

size may require minor adjust-

ment due to variation. If board is 

forced into slot, it could result in 

damage to bed.

432

5-4. Using the other interior features

5-4.Using the other interior features

The USB charging ports are 
used to supply 2.5 A (USB 
Type-A) or 3.0 A (USB Type-C) 
of electricity at 5 V to external 
devices.
Use the appropriate terminal for 
each charging port type.
The USB charging ports are for 
charging only. They are not 
designed for data transfer or 
other purposes.
Depending on the external 
device, it may not charge prop-
erly. Refer to the manual 
included with the device before 
using a USB charging port.

Using the USB charging 
ports

In the console box

USB Type-A

USB Type-C

Rear of console box (if 
equipped)

Open the lid.

USB Type-A

USB Type-C

The USB charging ports can be 

used when

The engine switch is in ACC or ON.

Situations in which the USB 

charging ports may not operate 

correctly

USB Type-A: If a device which 

consumes more than 2.5 A at 5 V 

is connected

USB Type-C: If a device which 

consumes more than 3.0 A at 5 V 

is connected

If a device designed to communi-

cate with a personal computer, 

such as a USB memory device, is 

connected

If the connected external device is 

turned off (depending on device)

If the temperature inside the vehi-

cle is high, such as after the vehi-

cle has been parked in the sun

About connected external 

devices

Depending on the connected exter-

nal device, charging may occasion-

ally be suspended and then start 

again. This is not a malfunction.

Other interior features

USB charging ports


Content      ..     24      25      26      27     ..