Toyota Tundra (2023 year). Manual in english - page 24
 

  Index      Toyota     Toyota Tundra (2023 year). Manual in english


Search            copyright infringement  


Content      ..     22      23      24      25     ..


Toyota Tundra (2023 year). Manual in english - page 24


383

4-5. Using the driving support systems

4

Dr

iv

ing

*

: If equipped

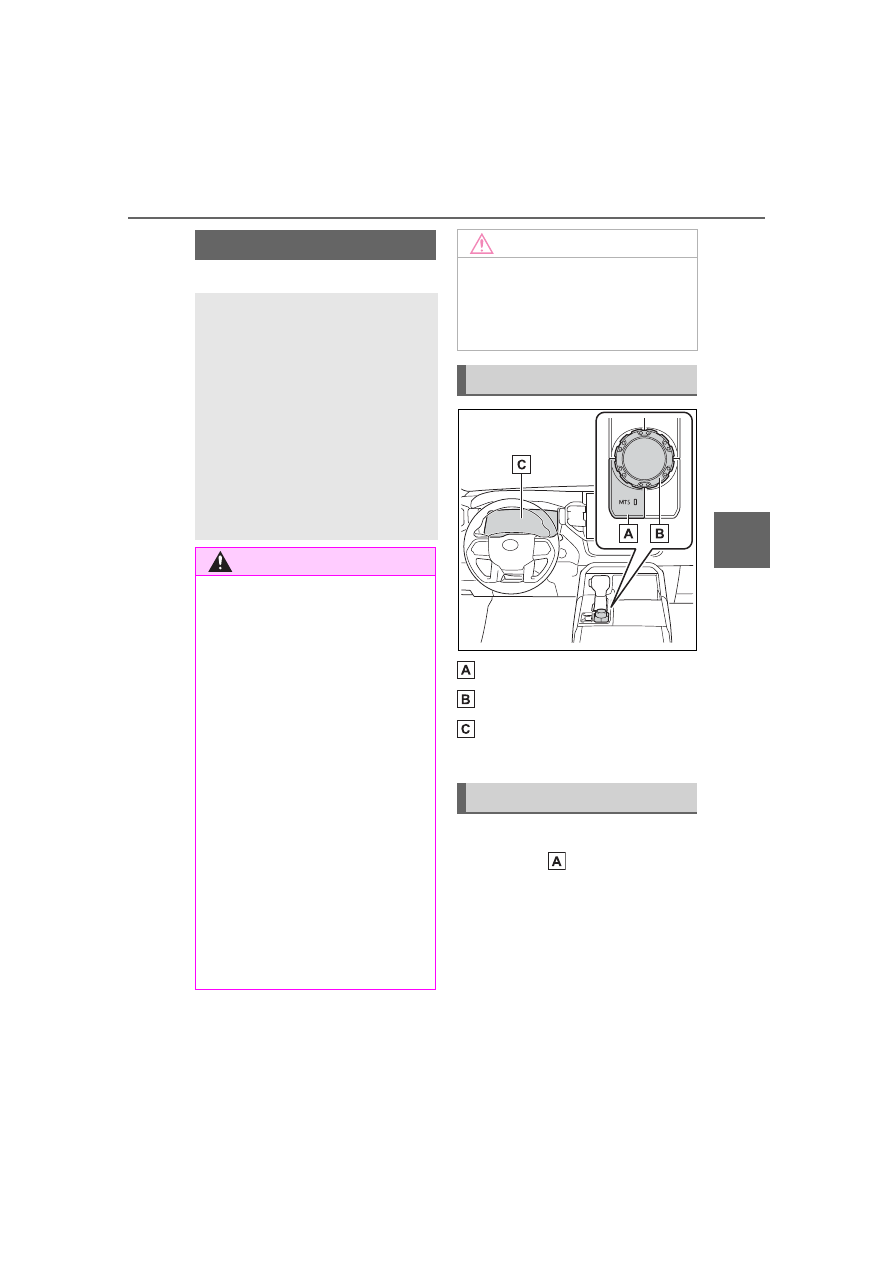
“MTS” switch

Mode select switch

Multi-information display

Selected mode is displayed.

1

Press the “MTS” switch.

The indicator 

 on the switch will 

Multi-terrain Select

*

Multi-terrain Select is a sys-
tem that improves drivabil-
ity in off-road situations.

Select a mode that most 
closely matches the type of 
terrain on which you are driv-
ing from several modes.

Brake control, steering feel 
and drive force control can be 
optimized in accordance with 
the selected mode.

WARNING

When using the Multi-terrain 

Select

Observe the following precautions 

to avoid an accident that could 

result in death or serious injuries:

Check that the selected mode 

indicators are illuminated before 

driving. Multi-terrain Select will 

not operate when the indicators 

are off.

The road conditions listed 

(

P.385) are for reference only. 

There is a chance that the func-

tion may not be the most appro-

priate in terms of road 

conditions such as pitch, slip-

periness, undulation, etc. Thor-

oughly check the road 

conditions before driving.

Multi-terrain Select is not 

intended to expand the limits of 

the vehicle. Check the road con-

ditions thoroughly beforehand, 

and drive safely and carefully.

NOTICE

Precaution for use

The Multi-terrain Select is 

intended for use during off-road 

driving. Do not use the system at 

any other time.

System components

Switching modes

384

4-5. Using the driving support systems

turn on.

2

Select the Multi-terrain Select 
modes on the multi-informa-
tion display while turning the 
mode select switch left and 
right.

Depending on the positions of the 

front-wheel drive control switch, a 

mode can be selected from among 

the following modes.

Front-wheel drive control 
switch is in “4L”

If the brake control has activated, 
the slip indicator light will flash.

Front-wheel drive control 
switch is in “4H”

If the brake control has activated, 
the slip indicator light will flash.
When the vehicle is in “SAND”, 
“MUD” or “DEEP SNOW” mode, 
VSC is automatically turned off. 
(VSC OFF indicator light come on.)

Mode

Road Condi-

tions

“MOGU
L”

Suitable for 
bumpy roads 
with large 
inclines

“SAND”

Suitable for 
sandy roads 
and other slip-
pery conditions

“MUD”

Suitable for 
muddy roads 
and other slip-
pery conditions

“ROCK”

Suitable for 
rocky terrain

Mode

Road Condi-

tions

“DIRT”

Suitable for 
bumpy road 
conditions, 
such as dirt 
roads

“SAND”

Suitable for 
sandy roads 
and other slip-
pery conditions

“MUD”

Suitable for 
muddy roads 
and other slip-
pery conditions

“DEEP 
SNOW”

Suitable for 
deep snow 
roads

Mode

Road Condi-

tions

385

4-5. Using the driving support systems

4

Dr

iv

ing

Multi-terrain Select

Multi-terrain Select controls the 

vehicle so that it can maximize the 

drive force and improve drivability 

on rough roads. As a result, fuel effi-

ciency may diminish when com-

pared to driving in normal mode.

Automatic system cancelation

In the following situations, Multi-ter-

rain Select will be canceled auto-

matically.

When the engine switch is turned 

off

When the front-wheel drive control 

switch is in “2H”

When “TOW HAUL” mode and 

“TOW+” mode is selected while 

the front-wheel drive control 

switch is in “4H”

When drive mode select is 

selected while the front-wheel 

drive control switch is in “4H”

Turning off Multi-terrain Select

Performing the following turns Multi-

terrain Select off, and then the dis-

play on the multi-information display 

will disappear.

When the “MTS” switch indicator 

is illuminated

Press the “MTS” switch while the 
system is in operation.

When the “MTS” switch indicator 

is not illuminated

Press the “MTS” switch to turn the 
indicator on.
Press the “MTS” switch again with 
the Multi-terrain Select indicator illu-
minated.

When the vehicle is stuck

Switching the transfer and differen-

tial For the operation of the following 

functions, refer to the following 

pages. (If equipped)

Four-wheel drive system 

(

P.377)

Rear differential lock (

P.380)

Driving in Multi-terrain Select

The following types of situations 

may occur, but they are not malfunc-

tions.

Vibrations may be felt throughout 

the vehicle or steering wheel.

Operating noise may be heard 

from the engine compartment.

When an inspection at your 

Toyota dealer is necessary

In the following situations, the sys-

tem may be malfunctioning. Have 

the vehicle inspected by your Toyota 

dealer immediately.

When the slip indicator light illumi-

nates.

When the indicator for each mode 

does not illuminate on the multi-

information display even though 

Multi-terrain Select is selected.

386

4-5. Using the driving support systems

*

: If equipped

“DAC/CRAWL” switch

Mode select switch

Multi-information display

Press the “DAC/CRAWL” 
switch.

The downhill assist control system 
indicator will comes on and the sys-
tem will operate.
When the system is in operation, 
the slip indicator will flash, and the 
stop lights/high mounted stop lights 
will be lit. A sound may also occur 
during the operation. This does not 
indicate a malfunction.

Turn the mode select switch to 
set the desired speed (approx. 3 
mph [4 km/h] to 18 mph [30 
km/h]). The set speed is dis-
played on the multi-information 
display.

Downhill assist con-

trol system

*

The downhill assist control 
system helps to prevent 
excessive speed on steep 
downhill slopes. The sys-
tem will operate when the 
vehicle is traveling under 18 
mph (30 km/h) and transfer 
mode is in “4H”.

WARNING

When using downhill assist 

control system

Do not rely overmuch on the 

downhill assist control system. 

This function does not extend the 

vehicle’s performance limitations. 

Always thoroughly check the road 

conditions, and drive safely.

System components

System operation

Setting the speed of the 
downhill assist control 
system

387

4-5. Using the driving support systems

4

Dr

iv

ing

Multi-information display 
(4.2-inch display type)

Multi-information display (full 
LCD type)

Decreases the speed

Increases the speed

When the “DAC/CRAWL” 
switch indicator illuminates

Press the “DAC/CRAWL” switch 
again.

When the “DAC/CRAWL” 
switch indicator does not illu-
minate

Press the “DAC/CRAWL” switch 
to turn the indicator on.
Press the “DAC/CRAWL” switch 
again with the indicator turned 
on.

The downhill assist control system 
indicator will flash as the system 
gradually ceases operation, and will 
turn off when the system is fully off.

Press the “DAC/CRAWL” switch 
while the downhill assist control 
system indicator is flashing to start 
the system again.

Operating tips

Downhill assist control system can 

be used with “TOW HAUL” mode 

and “TOW+” mode, drive mode 

select, or Multi-terrain Select ON 

or OFF.

The system will operate when the 

shift lever is in a position other 

than P, however to make effective 

use of the system it is recom-

mended to select a lower shift 

range.

If the downhill assist control 

system indicator flashes

In the following situations, the indi-

cator flashes and the system will 

not operate:

• The front-wheel drive control 

switch is changed to a position 

other than “4H”.

• The shift lever is in P.

• The vehicle speed exceeds 

approximately 18 mph (30 km/h).

• The brake system overheats.

In the following situations, the indi-

cator flashes to alert the driver, 

but the system will operate:

• The shift lever is in N.

• The “DAC/CRAWL” switch is 

pressed while the “DAC/CRAWL” 

switch indicator illuminates.

The system will gradually ceases 

operation. The indicator will flash 

during operation, and then go off 

when the system is fully off.

When the downhill assist con-

trol system is operated continu-

ously

If the downhill assist control system 

is operated for a long period of time, 

the brake system may abnormally 

overheat. To prevent that, a buzzer 

will sound and the function is tempo-

rarily stopped. In this case, the 

Turning off the system

388

4-5. Using the driving support systems

downhill assist control system indi-

cator will flash. (The vehicle an be 

driven normally during this time) 

When the downhill assist control 

system indicator switches to steadily 

illuminated after a short while and 

the system will become available.

Sounds and vibrations caused 

by the downhill assist control 

system

A sound may be heard from the 

engine compartment when the 

engine is started or just after the 

vehicle begins to move. This 

sound does not indicate that a 

malfunction has occurred in down-

hill assist control system.

Either of the following conditions 

may occur when the downhill 

assist control system is operating. 

None of these are indicators that a 

malfunction has occurred.

• Vibrations may be felt through the 

vehicle body and steering.

• A motor sound may be heard after 

the vehicle comes to a stop.

System malfunction

In the following cases, have your 

vehicle checked by your Toyota 

dealer.

The downhill assist control system 

indicator does not come on when 

the “DAC/CRAWL” switch is 

pressed.

The slip indicator light comes on.

ABS (Anti-lock Brake Sys-
tem)

Helps to prevent wheel lock 
when the brakes are applied 
suddenly, or if the brakes are 
applied while driving on a slip-
pery road surface, or in off-road 
conditions (such as rough 
roads, sand and mud)
The ABS operates in synchroni-
zation with the Multi-terrain 
Select

Brake assist

Generates an increased level of 
braking force after the brake 
pedal is depressed when the 
system detects a panic stop sit-
uation

Enhanced VSC (Enhanced 
Vehicle Stability Control)

Provides cooperative control of 
the ABS, TRAC, VSC and EPS.

WARNING

The system may not operate 

on the following surfaces, 

which may lead to an acci-

dent causing death or serious 

injury

Slippery surfaces such as wet 

or muddy roads

Icy surface

Very bumpy and rough roads

Driving assist systems

To keep driving safety and 
performance, the following 
systems operate automati-
cally in response to various 
driving situations. Be 
aware, however, that these 
systems are supplementary 
and should not be relied 
upon too heavily when oper-
ating the vehicle.

Summary of the driving 
assist systems

389

4-5. Using the driving support systems

4

Dr

iv

ing

Helps to maintain directional 
stability when swerving on slip-
pery road surfaces by con-
trolling steering performance.

Trailer Sway Control

Helps the driver to control trailer 
sway by selectively applying 
brake pressure for individual 
wheels and reducing driving 
torque when trailer sway is 
detected.

TRAC (Traction Control)

Helps to maintain drive power 
and prevent the drive wheels 
from spinning when starting the 
vehicle or accelerating on slip-
pery roads

Hill-start assist control

Helps to reduce the backward 
movement of the vehicle when 
starting on an uphill

AVS (Adaptive Variable 
Suspension System) (if 
equipped)

The damping force of the shock 
absorbers are independently 
controlled for the 4 wheels 
according to factors including 
the road surface conditions and 
driving operation, contributing 
toward enhancing smooth driv-
ing comfort and superior stabil-
ity, and helping to maintain 
vehicle posture.
In addition, the damping force 
can be changed by selecting the 
drive mode with the driving 

mode select (

P.374), and driv-

ing comfort can be ensured 
during off-road driving by setting 
the front-wheel drive control 
switch to “4L”.(

P.377)

EPS (Electric Power Steer-
ing)

Employs an electric motor to 
reduce the amount of effort 
needed to turn the steering 
wheel

The Secondary Collision 
Brake

When the SRS airbag sensor 
detects a collision and the sys-
tem operates, the brakes and 
brake lights are automatically 
controlled to reduce the vehicle 
speed and help reduce the pos-
sibility of further damage due to 
a secondary collision.

When the 

TRAC/VSC/ABS/Trailer Sway 

Control systems are operating

The slip indicator light will flash 

while the TRAC/VSC/ABS/Trailer 

Sway Control systems are operat-

ing.

Disabling the TRAC system

If the vehicle gets stuck in mud, dirt 
or snow, the TRAC system may 

390

4-5. Using the driving support systems

reduce power from the engine to the 
wheels. Pressing 

 to turn the 

system off may make it easier for 
you to rock the vehicle in order to 
free it.
To turn the TRAC system off, quickly 
press and release 

.

“Traction Control Turned OFF” is 
displayed in the multi-information 
display.

Press 

 again to turn the system 

back on.

Turning off the 

TRAC/VSC/Trailer Sway Con-

trol systems

To turn the TRAC, VSC and Trailer 
Sway Control systems off, press 
and hold 

 for more than 3 sec-

onds while the vehicle is stopped.
The “Traction Control Turned OFF” 
is displayed in the multi-information 
display and the VSC OFF indicator 
light will come on.

*

Press 

 again to turn the system 

back on.

*

: On vehicles with PCS will also be 

disabled (only Pre-Collision warn-
ing is available). The PCS warning 
light will come on and a message 
will be displayed on the multi-
information display. (

P.246, 512)

When the message is dis-
played on the multi-information 
display showing that TRAC has 
been disabled even if 

 has 

not been pressed

TRAC is temporary deactivated. If 

the information continues to show, 

contact your Toyota dealer.

When using Multi-terrain Select, 

the “VSC OFF” indicator will turn 

on depending on the mode, even 

if the VSC OFF switch has not 

been pressed.

Operating conditions of hill-

start assist control

When the following five conditions 

are met, the hill-start assist control 

will operate:

The shift lever is in a position 

other than P or N (when stating off 

forward/backward on an upward 

incline)

The vehicle is stopped

The accelerator pedal is not 

depressed

The parking brake is not engaged

The engine switch is turned to ON

Automatic system cancelation 

of hill-start assist control

The hill-start assist control will turn 

off in any of the following situations:

The shift lever is shifted to P or N

The accelerator pedal is 

depressed

The parking brake is engaged

A maximum of 2 seconds have 

elapsed after the brake pedal is 

released

The engine switch is turned to 

OFF

Sounds and vibrations caused 

by the ABS, brake assist, VSC, 

Trailer Sway Control, TRAC and 

hill-start assist control systems

A sound may be heard from the 

391

4-5. Using the driving support systems

4

Dr

iv

ing

engine compartment when the 

brake pedal is depressed repeat-

edly, when the engine is started or 

just after the vehicle begins to 

move. This sound does not indi-

cate that a malfunction has 

occurred in any of these systems.

Any of the following conditions 

may occur when the above sys-

tems are operating. None of these 

indicates that a malfunction has 

occurred.

• Vibrations may be felt through the 

vehicle body and steering.

• A motor sound may be heard also 

after the vehicle comes to a stop.

EPS operation sound

When the steering wheel is oper-

ated, a motor sound (whirring 

sound) may be heard. This does not 

indicate a malfunction.

Automatic reactivation of 

TRAC, Trailer Sway Control and 

VSC systems

After turning the TRAC, Trailer 

Sway Control and VSC systems off, 

the systems will be automatically re-

enabled in the following situations:

When the engine switch is turned 

off

If only the TRAC system is turned 

off, the TRAC will turn on when 

vehicle speed increases

If both the TRAC and VSC sys-

tems are turned off, automatic re-

enabling will not occur when vehi-

cle speed increases.

Reduced effectiveness of the 

EPS system

The effectiveness of the EPS sys-

tem is reduced to prevent the sys-

tem from overheating when there is 

frequent steering input over an 

extended period of time. The steer-

ing wheel may feel heavy as a 

result. Should this occur, refrain 

from excessive steering input or 

stop the vehicle and turn the engine 

off. The EPS system should return 

to normal within 10 minutes.

Secondary Collision Brake 

operating conditions

The system operates when the SRS 

airbag sensor detects a collision 

while the vehicle is in motion. How-

ever, the system does not operate 

when the components are dam-

aged.

Secondary Collision Brake 

automatic cancelation

The system is automatically can-

celed in any of the following situa-

tions.

The vehicle speed drops to 

approximately 0 mph (0 km/h).

A certain amount of time elapses 

during operation

The accelerator pedal is 

depressed a large amount

WARNING

The ABS does not operate 

effectively when

The limits of tire gripping perfor-

mance have been exceeded 

(such as excessively worn tires 

on a snow covered road).

The vehicle hydroplanes while 

driving at high speed on wet or 

slick roads.

Stopping distance when the 

ABS is operating may exceed 

that of normal conditions

The ABS is not designed to 

shorten the vehicle’s stopping dis-

tance. Always maintain a safe dis-

tance from the vehicle in front of 

you, especially in the following sit-

uations:

When driving on dirt, gravel or 

snow-covered roads

When driving with tire chains

When driving over bumps in the 

road

392

4-5. Using the driving support systems

WARNING

When driving over roads with 

potholes or uneven surfaces

TRAC/VSC may not operate 

effectively when

Directional control and power may 

not be achievable while driving on 

slippery road surfaces, even if the 

TRAC/VSC system is operating. 

Drive the vehicle carefully in con-

ditions where stability and power 

may be lost.

Hill-start assist control does 

not operate effectively when

Do not overly rely on hill-start 

assist control. Hill-start assist 

control may not operate effec-

tively on steep inclines and 

roads covered with ice.

Unlike the parking brake, hill-

start assist control is not 

intended to hold the vehicle sta-

tionary for an extended period 

of time. Do not attempt to use 

hill-start assist control to hold 

the vehicle on an incline, as 

doing so may lead to an acci-

dent.

When the TRAC/VSC/Trailer 

Sway Control is activated

The slip indicator light flashes. 

Always drive carefully. Reckless 

driving may cause an accident. 

Exercise particular care when the 

indicator light flashes.

When the TRAC/VSC/Trailer 

Sway Control systems are 

turned off

Be especially careful and drive at 

a speed appropriate to the road 

conditions. As these are the sys-

tems to help ensure vehicle stabil-

ity and driving force, do not turn 

the TRAC/VSC/Trailer Sway Con-

trol systems off unless necessary.
Trailer Sway Control is part of the 

VSC system and will not operate 

if VSC is turned off or experiences 

a malfunction.

Replacing tires

Make sure that all tires are of the 

specified size, brand, tread pat-

tern and total load capacity. In 

addition, make sure that the tires 

are inflated to the recommended 

tire inflation pressure level.
The ABS, TRAC, Trailer Sway 

Control and VSC systems will not 

function correctly if different tires 

are installed on the vehicle.

Contact your Toyota dealer for fur-

ther information when replacing 

tires or wheels.

Handling of tires and the sus-

pension

Using tires with any kind of prob-

lem or modifying the suspension 

will affect the driving assist sys-

tems, and may cause a system to 

malfunction.

393

4-5. Using the driving support systems

4

Dr

iv

ing

*

: If equipped

WARNING

Trailer Sway Control precau-

tion

The Trailer Sway Control system 

is not able to reduce trailer sway 

in all situations. Depending on 

many factors such as the condi-

tions of the vehicle, trailer, road 

surface and driving environment, 

the Trailer Sway Control system 

may not be effective. Refer to 

your trailer owner’s manual for 

information on how to tow your 

trailer properly.

If trailer sway occurs

Observe the following precau-

tions.

Failing to do so may cause death 

or serious injury.

Firmly grip the steering wheel. 

Steer straight ahead. Do not try 

to control trailer sway by turning 

the steering wheel.

Begin releasing the accelerator 

pedal immediately but very 

gradually to reduce speed.

Do not increase speed. Do not 

apply vehicle brakes.

If you make no extreme correction 

with the steering or brakes, your 

vehicle and trailer should stabi-

lize. (

P.186)

Secondary Collision Brake

Do not rely solely upon the Sec-

ondary Collision Brake. This sys-

tem is designed to help reduce 

the possibility of further damage 

due to a secondary collision, how-

ever, that effect changes accord-

ing to various conditions. Overly 

relying on the system may result 

in death or serious injury.

Trailer brake control-

ler

*

The trailer brakes can be 
controlled by the Trailer 
brake controller via the 7-
pin connector. By selecting 
the type of brakes that are 
being used on the trailer 
(electric or electric-over-
hydraulic) and setting the 
“gain” for the controller, the 
manual brake slider is used 
to slow just the trailer. The 
vehicle brake pedal will also 
slow down as well as stop 
the trailer when applied, 
also via the same connec-
tor. “Gain” values, manual 
brake outputs, trailer brake 
types, and the trailer con-
nection status are displayed 
in the multi-information dis-
play.

WARNING

When driving on slippery 

road surfaces

When stopping with ABS acti-

vated, output to the trailer might 

be reduced in order to reduce the 

likelihood of trailer wheels to lock. 

The trailer is not equipped with 

ABS. Drive safely on slippery road 

surfaces.

394

4-5. Using the driving support systems

“GAIN” (+/-) selection button

Pressing the “GAIN” (+/-) buttons 
will adjust the amount of power that 
can be outputted to the trailer 
brakes. The “gain” can be adjusted 
from 0 (no trailer braking) to 10 
(maximum output) in 0.5 incre-
ments. Each press of the button will 
increase or decrease the “gain” set-
ting by one step. The “gain” value 
will appear in the multi-information 
display.

Trailer brake type

Trailer brake type can be selected 
by using the multi-information. The 
combination meter will show which 
trailer brake type is selected in the 
multi-information display.

Manual brake slider

Adjusting this slider position will 
engage the trailer’s brakes only. If 
the manual brake slider is used 
while the vehicle brake is applied, 
the greater of the two outputs will 
be sent to the trailer brakes.

Select the item desired to be 
setup and select as follows on 
the multi-information screen 
(

P.98):

1

Press 

 or 

 on the meter 

control switch and then select 

.

2

Press 

 or 

 on the meter 

control switch, select “Trailer 
Settings”, and then press and 
hold 

 on the meter control 

switch.

3

According to the display, 
select the desired setting and 
then press 

.

Changing trailer brake type or 
trailer ID will cause the current 
“gain” setting to reset to zero. 
Make sure to set the “gain” as 
described in the following sec-
tion.

“Gain” setting on trailer brake 
controller should be set for a 
specific towing condition. “Gain” 
setting should be adjusted each 
time the vehicle load, trailer 
load, road conditions, or 
weather changes. Setting the 
“gain” value to 0 will disable the 
trailer brake controller output.

System operation

Changing settings of the 
trailer brake type

Setting the “Gain”

395

4-5. Using the driving support systems

4

Dr

iv

ing

1

Make sure the trailer brakes 
are in good working condition 
and functioning normally. See 
trailer dealer if necessary.

2

Hook up the trailer and make 
proper electrical connections.

3

Select the correct type of 
trailer brakes that are 
equipped on the trailer by 
using the multi-information 
display.

4

Drive vehicle with trailer 
attached on a level road sur-
face similar to towing condi-
tion and in traffic-free 
environment. Driving speed 
should be approximately 20 - 
25 mph [35 - 40 km/h].

5

Using the “GAIN” (+/-) selec-
tion buttons, set a starting 
“gain” of 5.0.

6

While driving 20 - 25 mph [35 
- 40 km/h], fully apply the 
manual brake slider.

7

Adjust the “gain” setting, 
using the “GAIN” (+/-) selec-
tion buttons, to either 
increase or decrease to just 
below the point of trailer 
wheel lock-up.

8

For confirmation, repeat 
steps 

6

 and 

7

 until desired 

“gain” setting is reached (just 
below point of trailer wheel 
lock-up).

When setting the “gain”

Wheel lock-up occurs when the 

trailer wheel squeals or tire smoke 

occurs. Trailer wheels may not lock-

up while driving heavily loaded 

trailer. During this case, adjust the 

Trailer “gain” to the highest allow-

able setting for the towing condition.

When disconnecting and recon-

necting battery terminals

The “gain” setting data will be reset.

Trailer Sway Control Function

Helps suppress trailer sway at an 

early stage by using the trailer brake 

control system to operate the trailer 

brakes.

If the Trailer brake warning light 

comes on

Indicates a malfunction in the Trailer 

brake control system or Trailer con-

nector circuit.

Have the vehicle inspected by your 

Toyota dealer immediately.

396

4-5. Using the driving support systems

*

: If equipped

1

Select “Trailer Settings” from 

 (

P.94) on the multi-

information display and add a 
trailer according to the dis-
play.

WARNING

Trailer brake type setting

It is the responsibility of the driver 

to make sure the trailer brakes 

are functioning normally and 

adjusted appropriately. Failure to 

check and maintain trailer brakes 

may result in loss of vehicle con-

trol, crash, or serious injury. 

Trailer brake control system will 

work with most electric and elec-

tric-overhydraulic trailer braking 

systems up to 3 axles (24A output 

to trailer brakes). Please be sure 

to test compatibility with the sys-

tem at low speeds and in a safe 

area. If a warning message 

appears in the multi-information 

display (

P.520), have the vehi-

cle inspected by your Toyota 

dealer immediately. Some elec-

tric-over-hydraulic trailer brakes 

will take some minimum output to 

activate. Trailer brake control sys-

tem will not work with trailer 

hydraulic surge brakes.

Trailer Backup Guide

*

Trailer Backup Guide is a 
system to assist when back-
ing up a trailer by providing 
either (1) steering control to 
assist backing up straight 
(Straight Path Assist) or (2) 
guidance for manual steer-
ing backup (Guidance 
mode).

Trailer Backup Guide uses 
the rear camera to detect 
the trailer and a trailer hitch 
light, which allows the 
driver to use the system at 
night time.

The system calculates the 
trailer angle by image pro-
cessing from the rear cam-
era and calculates trailer 
length and hitch length 
during the trailer setup (cali-
bration) maneuver.

Procedure

397

4-5. Using the driving support systems

4

Dr

iv

ing

2

Press the switch to turn the 
system ON.

3

Continue or reselect the 
trailer in the message dis-
played on the multi-informa-
tion display.

When the selected trailer is being 

used for the first time, setup (cali-

bration) is necessary (

P.399).

Once calibration is completed, it is 

retained for future use and the sys-

tem will automatically detect the 

trailer.
The driver needs to change the 

trailer selection when using a differ-

ent trailer. The system does not 

automatically recognize the trailer 

from the saved trailers list.

4

Once trailer is detected, shift 
the shift lever to R to activate 
Guidance mode.

5

Touch the switch at the bot-
tom right on multimedia to 
activate Straight Path Assist.

“Trailer Direction”

When using Straight Path Assist, 

the driver can override the system 

using the steering wheel to adjust 

the trailer direction. Upon release of 

the steering wheel, Straight Path 

Assist re-activates with a revised 

straight back target direction.

When adding the trailer

Use the meter control switches to 

select the trailer type. (

P.94)

1

Press 

 or 

 to select 

.

2

Press 

 or 

 to select “Trailer 

Settings” and then press and 
hold 

.

3

According to the display, select 
the desired setting and then 
press 

. (

P.98)

Trailer Settings are not available 

while Trailer Backup Guide system 

is active.
The system is designed to support 

trailers with single or multi-axles 

using a ball hitch. The system does 

not support fifth wheel or gooseneck 

trailers.

Bring the vehicle and trailer to a 
large open space like an empty 
parking lot. Activate Trailer 
Backup Guide system and fol-
low the instructions displayed on 
the multi-information dis-
play/multimedia.
For best calibration results, do 
not exceed 5 mph (8 km/h).

Setup (Calibration)

398

4-5. Using the driving support systems

1

Drive straight forward slowly 
(5 mph [8 km/h] or less) while 
holding the steering wheel 
straight.

2

Stop vehicle with trailer 
straight and confirm blue line 
is aligned with trailer center 
in Camera view.

3

Drive forward slowly making 
a left or right turn that 
changes vehicle direction 90 
degrees or more.

4

After completing the turn, 
continue straight forward 
slowly to align trailer.

5

Stop vehicle to complete cali-
bration.

When calibrating the system

Please check whether the blue 

line appropriately aligns with the 

center of the trailer in the camera 

view, such as in the following dia-

gram, with regards to procedure 

2

.

State where the blue line aligns 
with the center of the trailer. 
(Select “Yes” in the multi-infor-
mation display)

State where the blue line does 
not align with the center of the 
trailer. (Select “No” in the multi-
information display)

Blue line

The system is designed to support 

most trailers 6.6 ft. (2 m) to 26.2 ft. 

(8 m) in length (length is defined 

from the coupler center point for 

the ball to the wheel axle [single 

axle] or center of the wheel axles 

[2 or more axles]) with ball mount 

lengths between 4.5 in. (114.3 

mm) and 18.5 in. (469.9 mm). Do 

not attempt to use trailers or ball 

mounts that have a length outside 

of this range as the system perfor-

mance degrades and could cause 

improper system function.


Content      ..     22      23      24      25     ..