Toyota Tundra (2023 year). Manual in english - page 25
 

  Index      Toyota     Toyota Tundra (2023 year). Manual in english


Search            copyright infringement  


Content      ..     23      24      25      26     ..


Toyota Tundra (2023 year). Manual in english - page 25


399

4-5. Using the driving support systems

4

Dr

iv

ing

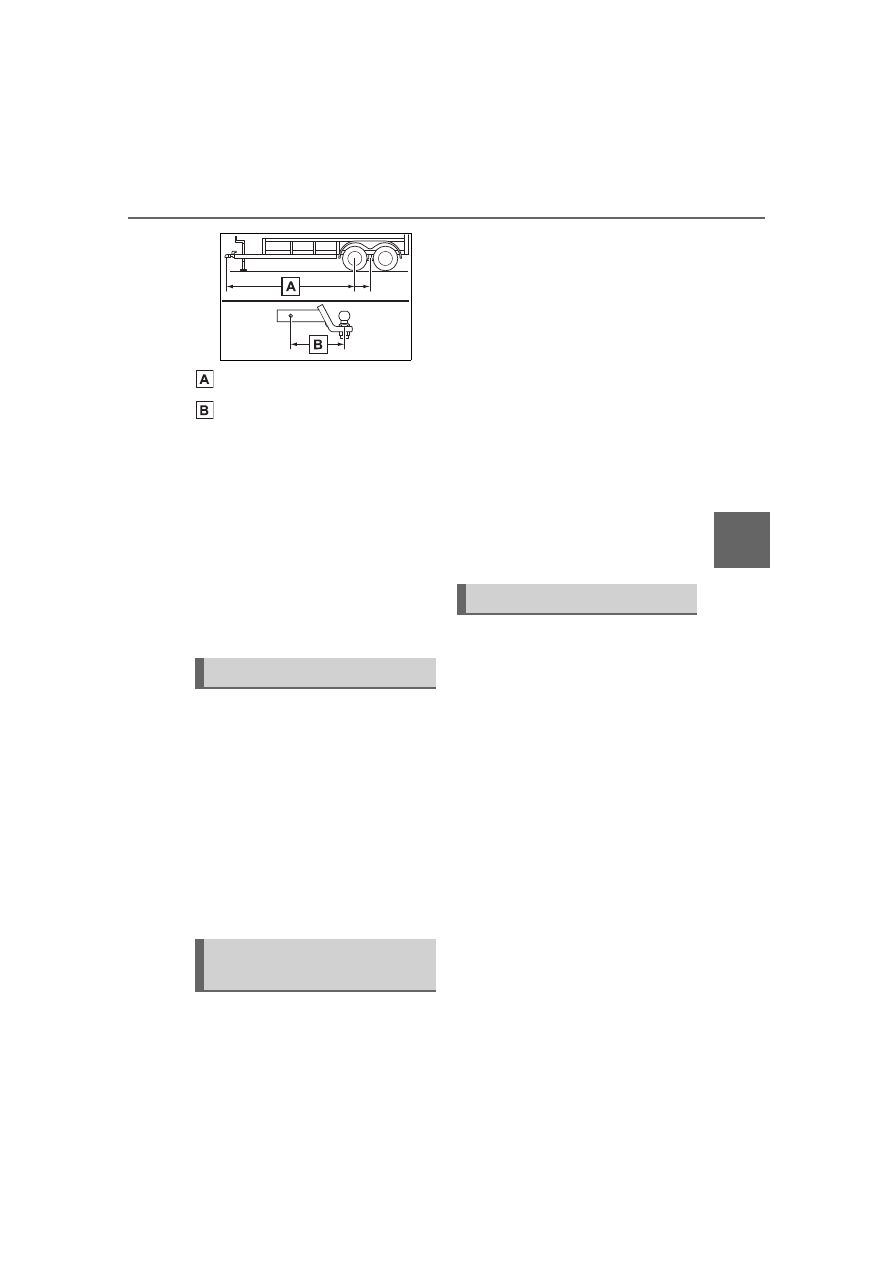
Trailer length

Ball mount length

For best calibration results, cali-

brate in daytime on a smooth and 

level road.

It may be necessary at times to re-

calibrate the trailer to improve per-

formance.

The system is designed to be 

used with the same trailer connec-

tion every time. If the ball mount 

position is changed or reconfig-

ured or items are added to the 

trailer tongue after calibration, re-

calibration may be required.

Guidance mode provides a 
“Trailer Direction” arrow that 
indicates the direction the trailer 
will swing, based on calculations 
from the steering wheel angle 
information. Guidance mode 
provides a “BRAKE Extreme 
Trailer Angle” (jackknife) warn-
ing with warning buzzer to alert 
the driver that the trailer angle is 
near the jackknife condition.

Touch the switch at the bottom 
right on multimedia to activate 

Straight Path Assist. Straight 
Pass Assist controls steering to 
back up the trailer in a straight-
line. The system can be overrid-
den by using steering wheel to 
adjust trailer direction.
The driver is always responsible 
for paying attention to the vehi-
cle’s surroundings and driving 
safely. This system does not 
control braking. Driver needs to 
control vehicle speed, control 
braking, and stop the vehicle to 
avoid any collision.
For best results, reverse slowly 
when using Straight Path Assist.

Trailer Backup Guide system 
is canceled when the trailer 
cannot be detected (e.g. dirty 
camera lens, insufficient light-
ing condition, obstruction of 
the trailer in the rear camera 
view, incorrectly selected 
trailer, etc.)

Guidance mode is canceled 
when any of the following 
occurs:

• Press the Trailer Backup Guide 

switch

*

• Press the Camera switch

*

• Vehicle speed is greater than 

approximately 4.7 mph (7.6 km/h)

• VSC or ABS is operated

*

• Tailgate is opened

*

• Trailer tracking is lost

Using Guidance mode

Using Straight Path 
Assist

Canceling the system

400

4-5. Using the driving support systems

• Shift the shift lever out of R

• There is a system malfunction

*

*

: Includes Trailer Backup Guide 

system cancel

Straight Path Assist is can-
celed when any of the follow-
ing occurs:

• Any of the events, above, that 

cancel Guidance mode occur

• Press the Straight Path Assist 

switch on the multimedia screen

• The system temperature preser-

vation function operates (to pre-
vent power steering equipment 
from overheating)

This light’s usage for Trailer 
Backup Guide is controlled by 
the Trailer Backup Guide sys-
tem and the driver does not 
need to activate the light sepa-
rately.
For other usage: 

P.422

Trailer hitch light

WARNING

Cautions regarding the use of 

the system

In order for this system to perform 

as designed, the vehicle must be 

driven safely and the driver must 

control the speed to keep it within 

operating parameters and to 

avoid a collision.

As there is a limit to the degree of 

control performance that this sys-

tem can provide, do not overly 

rely on this system. The driver is 

always responsible for paying 

attention to the vehicle’s sur-

roundings and driving safely. This 

system does not control braking 

(or steering when in Guidance 

mode). Driver needs to control 

vehicle speed, control braking, 

(and steering when in Guidance 

mode,) and stop the vehicle to 

avoid any collision. Failure to fol-

low this warning could result in 

property damage, serious injury 

or death.

When using the Trailer 

Backup Guide

For proper system performance, 

observe the following precautions. 

Failure to do so may lead to an 

accident resulting in property 

damage, serious injury, or death.

Keep the tailgate fully latched.

Keep the rear camera clean at 

all times.

Do not change the installation 

position or direction of the rear 

camera or remove it.

Do not modify the trailer hitch 

light. (

P.402)

Make sure nothing can obstruct 

the rear camera view of the 

trailer.

401

4-5. Using the driving support systems

4

Dr

iv

ing

*

: If equipped

Automatic operating conditions

The active front spoiler will acti-

vate automatically as follows 

according:

Always observe the legal speed limit 

when driving on public roads.

Automatically operates when the 

outside temperature is 40°F (5°C) 

and above.

Automatically stows when in Tow 

mode.

Automatically stows when in “4H” 

mode or “4L” mode. (If equipped)

When there is a malfunction in the 

system, avoid high speed driving 

and have the vehicle inspected by 

your Toyota dealer.

WARNING

The system is designed to oper-

ate in various weather and lighting 

conditions and on different ground 

surfaces (asphalt, grass, gravel, 

etc.), however performance can 

still be affected by various envi-

ronmental factors (e.g. shadow 

passing over the trailer or dimin-

ished contrast between trailer and 

the ground leading to trailer 

detection being lost, etc.) so 

always drive carefully, remain 

alert and aware of your surround-

ings, and do not overly rely on the 

system.

Active front spoiler

*

The equipped active front 
spoiler operates automati-
cally while the vehicle is 
being driven. This active 
front spoiler enhances aero-
dynamic performance espe-
cially at high speeds, 
contributing to a more sta-
ble ride.

Conditions

Speed mph (km/h)

Deploy

Over 37 (60)

Retract

Under 25 (40)

NOTICE

To prevent system damage

Do not attach any accessories 

or other foreign objects to the 

active front spoiler.

402

4-5. Using the driving support systems

It is necessary to deploy the 
Active front spoiler to remove 
the engine under cover for main-
tenance.

Lowering the active front 
spoiler to the service posi-
tion

Within approximately 45 sec-
onds of turning the engine 
switch off, move the wiper lever 
to the 

*1

 or 

*2

 position 

and hold it for approximately 2 
seconds or more.
The active front spoiler will 
move to the service position.

*1

:U.S.A.

*2

:Canada

Raising the active front 
spoiler to the retracted 
position

Turn the engine switch to ON, 
and when the shift lever is put in 
R or D, the active front spoiler 
will retract to the stowed posi-
tion.

NOTICE

Do not modify or disassemble 

the active front spoiler.

Do not subject the active front 

spoiler to severe impacts.

Manually deploying the 
active front spoiler

NOTICE

To prevent damage to the 

active front spoiler

Before manually deploying or 

stowing the active front spoiler, 

make sure there are no obstacles 

or foreign objects in the surround-

ing area.

403

4-6. Driving tips

4

Dr

iv

ing

4-6.Driving tips

Specific design characteris-
tics give it a higher center of 
gravity than ordinary passen-
ger cars. This vehicle design 
feature causes this type of 
vehicle to be more likely to 
rollover. And, utility vehicles 
have a significantly higher 
rollover rate than other types 
of vehicles.

An advantage of the higher 
ground clearance is a better 
view of the road allowing you 
to anticipate problems.

It is not designed for corner-
ing at the same speeds as 
ordinary passenger cars any 
more than low-slung sports 
cars are designed to perform 
satisfactorily under off-road 
conditions. Therefore, sharp 
turns at excessive speeds 
may cause the vehicle to roll-
over.

When driving your vehicle off-
road, please observe the follow-
ing precautions to ensure your 
driving enjoyment and to help 
prevent the closure of areas to 

Off-road precautions

This vehicle belongs to the 
utility vehicle class, which 
has higher ground clear-
ance and narrower tread in 
relation to the height of its 
center of gravity to make it 
capable of performing in a 
wide variety of off-road 
applications.

Off-road vehicle features

WARNING

Off-road vehicle precautions

Always observe the following pre-

cautions to minimize the risk of 

death, serious injury or damage to 

your vehicle:

In a rollover crash, an unbelted 

person is significantly more 

likely to die than a person wear-

ing a seat belt. Therefore, the 

driver and all passengers 

should always fasten their seat 

belts.

Avoid sharp turns or abrupt 

maneuvers, if at all possible.

Failure to operate this vehicle 

correctly may result in loss of 

control or vehicle rollover caus-

ing death or serious injury.

Avoid loading any items on the 

roof that will raise the vehicle’s 

center of gravity.

Always slow down in gusty 

crosswinds. Because of its pro-

file and higher center of gravity, 

your vehicle is more sensitive to 

side winds than an ordinary 

passenger car.

Slowing down will allow you to 

have better control.

Do not drive horizontally across 

steep slopes. Driving straight up 

or straight down is preferred. 

Your vehicle (or any similar off-

road vehicle) can tip over side-

ways much more easily than 

forward or backward.

Off-road driving

404

4-6. Driving tips

off-road vehicles:

Drive your vehicle only in 
areas where off-road vehicles 
are permitted to travel.

Respect private property. Get 
owner’s permission before 
entering private property.

Do not enter areas that are 
closed. Honor gates, barriers 
and signs that restrict travel.

Stay on established roads. 
When conditions are wet, 
driving techniques should be 
changed or travel delayed to 
prevent damage to roads.

Additional information for 
off-road driving

For owners in U.S. mainland, 
Hawaii and Puerto Rico:

To obtain additional information 
pertaining to driving your vehicle 
off-road, consult the following 
organizations.

State and Local Parks and 
Recreation Departments

State Motor Vehicle Bureau

Recreational Vehicle Clubs

U.S. Forest Service and 
Bureau of Land Management

WARNING

Off-road driving precautions

Always observe the following pre-

cautions to minimize the risk of 

death, serious injury or damage to 

your vehicle:

Drive carefully when off the 

road. Do not take unnecessary 

risks by driving in dangerous 

places.

Do not grip the steering wheel 

spokes when driving off-road. A 

bad bump could jerk the wheel 

and injure your hands. Keep 

both hands and especially your 

thumbs on the outside of the 

rim.

Always check your brakes for 

effectiveness immediately after 

driving in sand, mud, water or 

snow.

After driving through tall grass, 

mud, rock, sand, rivers, etc., 

check that there is no grass, 

bush, paper, rags, stone, sand, 

etc. adhering or trapped on the 

underbody. Clear off any such 

matter from the underbody. If 

the vehicle is used with these 

materials trapped or adhering to 

the underbody, a breakdown or 

fire could occur.

In a rollover crash, an unbelted 

person is significantly more 

likely to die than a person wear-

ing a seat belt. Therefore, the 

driver and all passengers 

should fasten their seat belts 

whenever the vehicle is moving.

When driving off-road or in rug-

ged terrain, do not drive at 

excessive speeds, jump, make 

sharp turns, strike objects, etc. 

This may cause loss of control 

or vehicle rollover causing 

death or serious injury. You are 

also risking expensive damage 

to your vehicle’s suspension 

and chassis.

405

4-6. Driving tips

4

Dr

iv

ing

NOTICE

To prevent water damage

Take all necessary safety mea-

sures to ensure that water dam-

age to the engine or other 

components does not occur.

Water entering the engine air 

intake will cause severe engine 

damage.

Water entering the automatic 

transmission will cause deterio-

ration in shift quality, locking up 

of your transmission accompa-

nied by vibration, and ultimately 

damage.

Water can wash the grease 

from wheel bearings, causing 

rusting and premature failure, 

and may also enter the differen-

tials, transmission and transfer 

case, reducing the gear oil’s 

lubricating qualities.

When you drive through 

water

If driving through water, such as 

when crossing shallow streams, 

first check the depth of the water 

and the bottom of the riverbed for 

firmness. Press the Stop & Start 

cancel switch to disable the Stop 

& Start system. Drive slowly and 

avoid deep water.

Inspection after off-road driv-

ing

Sand and mud that has accu-

mulated around brake discs 

may affect braking efficiency 

and may damage brake system 

components.

Always perform a maintenance 

inspection after each day of off-

road driving that has taken you 

through rough terrain, sand, 

mud, or water. For scheduled 

maintenance information, refer 

to the “Scheduled Maintenance 

Guide” or “Owner’s Manual 

Supplement”.

406

4-6. Driving tips

Use fluids that are appropriate 
to the prevailing outside tem-
peratures.

• Engine oil
• Engine coolant
• Washer fluid

Have a service technician 
inspect the condition of the 
battery.

Have the vehicle fitted with 
four snow tires or purchase a 
set of tire chains for the rear 
tires

*

.

*

: Tire chains cannot be mounted 

on 285/65R18 tires.

Ensure that all tires are the same 
size and brand, and that chains 
match the size of the tires.

Winter driving tips

Carry out the necessary 
preparations and inspec-
tions before driving the 
vehicle in winter. Always 
drive the vehicle in a man-
ner appropriate to the pre-
vailing weather conditions.

Preparation for winter

WARNING

Driving with snow tires

Observe the following precautions 

to reduce the risk of accidents.

Failure to do so may result in a 

loss of vehicle control and cause 

death or serious injury.

Use tires of the specified size.

Maintain the recommended 

level of air pressure.

Do not drive in excess of 75 

mph (120 km/h), regardless of 

the type of snow tires being 

used.

Use snow tires on all, not just 

some wheels.

4WD models: Do not mix tires of 

different makes, models, tread 

patterns or treadwear.

Driving with tire chains (vehi-

cles without 285/65R18 tires)

Observe the following precautions 

to reduce the risk of accidents.

Failure to do so may result in the 

vehicle being unable to be driven 

safely, and may cause death or 

serious injury.

Do not drive in excess of the 

speed limit specified for the tire 

chains being used, or 30 mph 

(50 km/h), whichever is lower.

Avoid driving on bumpy road 

surfaces or over potholes.

Avoid sudden acceleration, 

abrupt steering, sudden brak-

ing and shifting operations that 

cause sudden engine braking.

Slow down sufficiently before 

entering a curve to ensure that 

vehicle control is maintained.

Do not use LTA (Lane Tracing 

Assist) (if equipped) system.

407

4-6. Driving tips

4

Dr

iv

ing

Perform the following according 
to the driving conditions:

Do not try to forcibly open a 
window or move a wiper that 
is frozen. Pour warm water 
over the frozen area to melt 
the ice. Wipe away the water 
immediately to prevent it from 
freezing.

To ensure proper operation of 
the climate control system 
fan, remove any snow that 
has accumulated on the air 
inlet vents in front of the wind-
shield.

Check for and remove any 
excess ice or snow that may 
have accumulated on the 
exterior lights, vehicle’s roof, 
chassis, around the tires or on 
the brakes.

Remove any snow or mud 
from the bottom of your shoes 
before getting in the vehicle.

Accelerate the vehicle slowly, 
keep a safe distance between 
you and the vehicle ahead, and 
drive at a reduced speed suit-
able to road conditions.

Park the vehicle and move 
the shift lever to P without set-
ting the parking brake. The 
parking brake may freeze up, 
preventing it from being 
released. If the vehicle is 
parked without setting the 
parking brake, make sure to 
block the wheels.
Failure to do so may be dan-
gerous because it may cause 
the vehicle to move unexpect-
edly, possibly leading to an 
accident.

If the vehicle is parked without 
setting the parking brake, 
confirm that the shift lever 
cannot be moved out of P

*

.

*

: The shift lever will be locked if it is 

attempted to be shifted from P to 
any other position without 
depressing the brake pedal. If the 
shift lever can be shifted from P, 
there may be a problem with the 
shift lock system. Have the vehi-
cle inspected by your Toyota 
dealer immediately.

NOTICE

Repairing or replacing snow 

tires

Request repairs or replacement of 

snow tires from Toyota dealers or 

legitimate tire retailers.

This is because the removal and 

attachment of snow tires affects 

the operation of the tire pressure 

warning valves and transmitters.

Before driving the vehicle

When driving the vehicle

When parking the vehicle

408

4-6. Driving tips

Vehicles without 285/65R18 
tires

Use the correct tire chain size 
when mounting the tire chains.
Chain size is regulated for each 
tire size.

Side chain (0.2 in. [5 mm] in 
diameter)

Cross chain (0.25 in. [6.3 
mm] in diameter)

Vehicles with 285/65R18 tires

Tire chains cannot be mounted 
as the space between the tire 
and body is too narrow.
Snow tires should be used 
instead.

Regulations regarding the use 
of tire chains vary depending on 
location and type of road. 
Always check local regulations 
before installing chains.

Tire chain installation

Observe the following precautions 

when installing and removing 

chains:

Install and remove tire chains in a 

safe location.

Install tire chains on the rear tires. 

Do not install tire chains on the 

front tires.

Install tire chains on the rear tires 

as tightly as possible. Retighten 

chains after driving 1/4

1/2 mile 

(0.5

1.0 km).

Install tire chains following the 

instructions provided with the tire 

chains.

Selecting tire chains

Regulations on the use of 
tire chains (vehicles with-
out 285/65R18 tires)

NOTICE

Fitting tire chains

The tire pressure warning valves 

and transmitters may not function 

correctly when tire chains are fit-

ted.

411

5

5

Interior

 featur

es

Interior features

5-1. Using the air conditioning 

system and defogger

Automatic air conditioning 

system.......................

412

Heated steering wheel/seat 

heaters/seat ventilators

..................................

418

5-2. Using the interior lights

Interior lights list ..........

421

5-3. Using the storage features

List of storage features

424

Luggage compartment fea-

tures ..........................

429

5-4. Using the other interior 

features

Other interior features .

432

Garage door opener....

445

412

5-1. Using the air conditioning system and defogger

5-1.Using the air conditioning system and defogger

Type A

Type B

Temperature control toggle

Fan speed control toggle

Air flow mode control toggle

Outside air mode switch

Recirculated air mode switch

“A/C” switch

Rear window and outside rear view mirror defoggers switch

Windshield defogger switch

“OFF” switch

Automatic air conditioning system

Air outlets and fan speed are automatically adjusted accord-
ing to the temperature setting.

Air conditioning controls

413

5-1. Using the air conditioning system and defogger

5

Interior

 featur

es

“AUTO” switch

Left-hand side temperature control toggle

“AUTO” toggle

“SYNC” toggle

Right-hand side temperature control toggle

Adjusting the temperature 
setting

Operate the temperature con-
trol toggle upwards to increase 
the temperature and downwards 
to decrease the temperature.

If the “A/C” switch is not pressed, 
the system will blow ambient tem-
perature air or heated air.

Setting the fan speed

Operate the fan speed control 
toggle upwards to increase the 
fan speed and downwards to 
decrease the fan speed.

Press the “OFF” switch to turn the 
fan off.

Change the airflow mode

Operate the air flow mode con-
trol toggle

The airflow mode changes as fol-
lows each time the toggle is oper-
ate.

1

Air flows to the upper body.

2

Air flows to the upper body 
and feet.

3

Air flows to the feet.

4

Air flows to the feet and the 
windshield defogger oper-
ates.

Switching between outside 
air and recirculated air 
modes

To change to recirculated air 
mode, press the recirculated 
air mode switch.

The indicator illuminates on the 
recirculated air mode switch.

To change to outside air 
mode, press the outside air 
mode switch.

414

5-1. Using the air conditioning system and defogger

The indicator illuminates on the out-
side air mode switch.

Set cooling and dehumidifi-
cation function

Press the “A/C” switch.

When the function is on, “A/C ON” 
indicator will illuminate. When the 
function is off, “A/C OFF” indicator 
will illuminate.

Defogging the windshield

Defoggers are used to defog the 
windshield and front side win-
dows.
Press the windshield defogger 
switch.

Press the outside air mode switch if 
the recirculated air mode is used. (It 
may switch automatically.)
To defog the windshield and the 
side windows quickly, turn the air 
flow and temperature up.
To return to the previous mode, 
press the windshield defogger 
switch again when the windshield is 
defogged.
When the windshield defogger 
switch is on, the indicator illumi-
nates on the windshield defogger 
switch.

Defogging the rear window 
and outside rear view mir-
rors

Defoggers are used to defog the 
rear window and to remove rain-
drops, dew and frost from the 
outside rear view mirrors.
Press the rear window and out-
side rear view mirror defoggers 

switch.

The defoggers will automatically 
turn off after 15 minutes.
When the rear window and outside 
rear view mirror defoggers switch is 
on, the indicator illuminates on the 
rear window and outside rear view 
mirror defoggers switch.

When the outside temperature 

exceeds 75°F (24°C) and the air 

conditioning system is on

In order to reduce the air condi-

tioning power consumption, the air 

conditioning system may switch to 

recirculated air mode automati-

cally.

This may also reduce fuel con-

sumption.

Recirculated air mode is selected 

as a default mode when the 

engine switch is turned to ON.

It is possible to switch to outside air 

mode at any time by pressing the 

outside air mode switch.

Fogging up of the windows

The windows will easily fog up 

when the humidity in the vehicle is 

high. Turning the cooling and 

dehumidification function on will 

dehumidify the air from the outlets 

and defog the windshield effec-

tively.

If you turn the cooling and dehu-

midification function off, the win-

dows may fog up more easily.

The windows may fog up if the 

recirculated air mode is used.

When driving on dusty roads

Close all windows. If dust thrown up 

by the vehicle is still drawn into the 

vehicle after closing the windows, it 

is recommended that the air intake 

mode be set to outside air mode and 

the fan speed to any setting except 

off.

415

5-1. Using the air conditioning system and defogger

5

Interior

 featur

es

Outside/recirculated air mode

Setting to the recirculated air 

mode temporarily is recom-

mended in preventing dirty air 

from entering the vehicle interior 

and helping to cool the vehicle 

when the outside air temperature 

is high.

Outside/recirculated air mode may 

automatically switch depending on 

the temperature setting or the 

inside temperature.

When the outside temperature 

falls to nearly 32°F (0°C)

The dehumidification function may 

not operate even when “A/C” switch 

is pressed.

Ventilation and air conditioning 

odors

To let fresh air in, set the air condi-

tioning system to the outside air 

mode.

During use, various odors from 

inside and outside the vehicle may 

enter into and accumulate in the 

air conditioning system. This may 

then cause odor to be emitted 

from the vents.

In order to suppress odors that 

occur when the air conditioning 

system starts, the air flow mode 

may change to blow air to the feet 

or air may stop blowing for a short 

period of time immediately after 

the air conditioning system is 

started in automatic mode.

When parking, the system auto-

matically switches to outside air 

mode to encourage better air cir-

culation throughout the vehicle, 

helping to reduce odors that occur 

when starting the vehicle.

Air conditioning filter

P.491

Air conditioning system refrig-

erant

A label regarding the refrigerant of 

the air conditioning system is 

attached to the hood at the loca-

tion shown in the following illustra-

tion.

The meaning of each symbol on 

the label are as follows:

Customization

Some functions can be customized.

(Customizable features: 

P.575)

Caution

Air conditioning sys-
tem

Air conditioning sys-
tem lubricant type

Requires registered 
technician to service 
air conditioning sys-
tem

Flammable refrigerant

416

5-1. Using the air conditioning system and defogger

Type A

1

Press the “AUTO” switch.

2

Adjust the temperature set-
ting.

3

To stop the operation, press 
the “OFF” switch.

Type B

1

Operate the “AUTO” toggle.

2

Adjust the temperature set-
ting.

3

To stop the operation, press 
the “OFF” switch.

If the fan speed setting or air 
flow modes are operated, the 
automatic mode indicator goes 
off. However, automatic mode 
for functions other than that 
operated is maintained.

Using automatic mode

Fan speed is adjusted automati-

cally according to the temperature 

setting and the ambient conditions.
Therefore, the fan may stop for a 

while until warm or cool air is ready 

to flow immediately after the auto-

matic mode switch is pressed.

To turn on the “SYNC” mode, 
operate the “SYNC” toggle 
upwards or downwards.

The driver’s side temperature con-
trol toggle can be used to adjust the 
temperature for the driver’s and 
front passenger’s side. To enter 
individual mode, operate the front 
passenger’s side temperature con-
trol toggle or press the “SYNC” tog-
gle again.
When the “SYNC” mode is on, the 
“SYNC” indicator is illuminate.

WARNING

To prevent the windshield 

from fogging up

Do not use the windshield defog-

ger switch during cool air opera-

tion in extremely humid weather.

The difference between the tem-

perature of the outside air and 

that of the windshield can cause 

the outer surface of the wind-

shield to fog up, blocking your 

vision.

When the outside rear view 

mirror defoggers are operat-

ing

Do not touch the rear view mirror 

surfaces when the outside rear 

view mirror defoggers are on.

NOTICE

To prevent battery discharge

Do not leave the air conditioning 

system on longer than necessary 

when the engine is off.

When repairing/replacing 

parts of the air conditioning 

system

Have repair/replacement per-

formed by your Toyota dealer. 

When a part of the air conditioning 

system, such as the evaporator, is 

to be replaced, it must be 

replaced with a new one.

Using automatic mode

Adjusting the temperature 
for driver and front pas-
senger seats simultane-
ously (“SYNC” mode) (if 
equipped)


Content      ..     23      24      25      26     ..