Toyota Sienna Hybrid (2023 year). Manual in english - page 22
 

  Index      Toyota     Toyota Sienna Hybrid (2023 year). Manual in english


Search            copyright infringement  


Content      ..     20      21      22      23     ..


Toyota Sienna Hybrid (2023 year). Manual in english - page 22


352

5-1. Using the air conditioning system and defogger

(Customizable features: 

P.549)

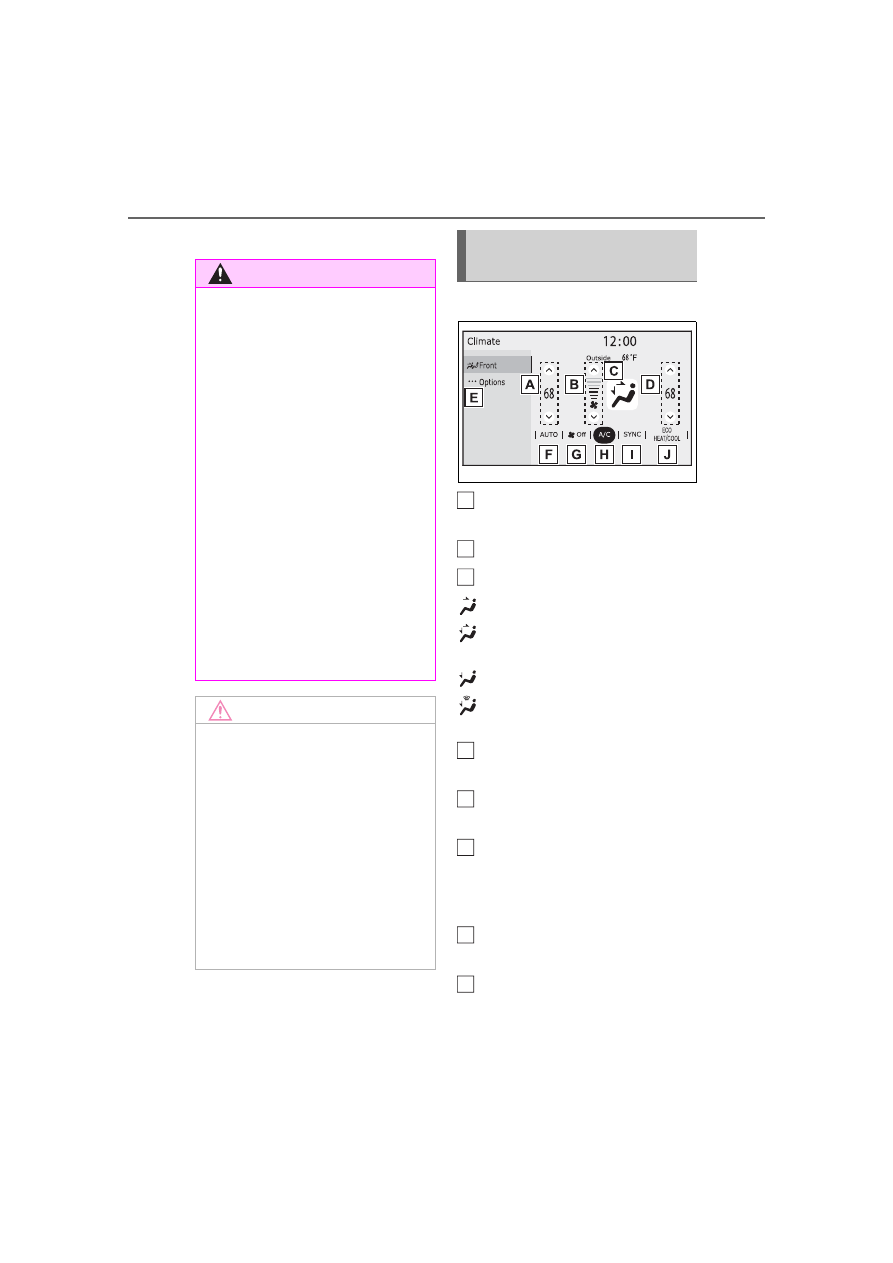
Main control screen

Adjust the left side seat tem-
perature setting

Adjust the fan speed setting

Select the air flow mode

: Air flows to the upper body

: Air flows to the upper body and 

feet

: Air flows to the feet

: Air flows to the feet and the 

windshield defogger operates

Adjust the right side seat 
temperature setting

Display the option control 
screen. (

P.353)

“AUTO” switch (automatic 
mode)

Set automatic mode on/off 
(

P.353)

“OFF” switch

Turn the fan off

Set cooling and dehumidifi-
cation function

If “A/C” switch is not pressed, the 

WARNING

To prevent the windshield 

from fogging up

Do not use the windshield defog-

ger switch during cool air opera-

tion in extremely humid weather.

The difference between the tem-

perature of the outside air and 

that of the windshield can cause 

the outer surface of the wind-

shield to fog up, blocking your 

vision.

To prevent burns

Vehicles with outside rear view 

mirror defoggers: Do not touch 

the outside rear view mirror sur-

faces, as they can become very 

hot and burn you.

Vehicles with windshield wiper 

deicer: Do not touch the glass at 

lower part of the windshield or 

to the side of the front pillars 

when the windshield wiper de-

icer is on.

NOTICE

To prevent 12-volt battery dis-

charge

Do not leave the air conditioning 

system on longer than necessary 

when the hybrid system is off.

When repairing/replacing 

parts of the air conditioning 

system

Have repair/replacement per-

formed by your Toyota dealer.

When a part of the air condition-

ing system, such as the evapora-

tor, is to be replaced, it must be 

replaced with a new one.

Front air conditioning 
control screen

A

B

C

D

E

F

G

H

353

5-1. Using the air conditioning system and defogger

5

Interior

 featur

es

system will blow ambient tempera-
ture air or heated air.

“SYNC” switch (

P.355)

Vehicles with “3-ZONE” mode: If 
the indicator on the “SYNC” switch 
is off, the temperature for the driver, 
front passenger and rear seats can 
be adjusted separately.
Vehicles with “4-ZONE” mode: The 
temperature for the driver, front 
passenger, left-hand side rear 
seats and right-hand side rear 
seats can be adjusted separately.

Set eco air conditioning 
mode

The air conditioning is controlled 
with low fuel consumption priori-
tized such as reducing fan speed, 
etc.

Option control screen

Select “Options” to display the 
option control screen.

The functions can be switched on 
and off.
When the function is on, the indica-
tor illuminates on the screen.

“SYNC” switch (

P.355)

Vehicles with “3-ZONE” mode: If 
the indicator on the “SYNC” switch 
is off, the temperature for the driver, 
passenger and rear seats can be 

adjusted separately.
Vehicles with “4-ZONE” mode: The 
temperature for the driver, front 
passenger, left-hand side rear 
seats and right-hand side rear 
seats can be adjusted separately.

Set cooling and dehumidifi-
cation function

If “A/C” switch is not pressed, the 
system will blow ambient tempera-
ture air or heated air.

Set eco air conditioning 
mode

The air conditioning is controlled 
with low fuel consumption priori-
tized such as reducing fan speed, 
etc.

1

Press the “AUTO” switch on 
the air conditioning operation 
panel or select the “AUTO” 
switch on the control screen.

The dehumidification function 

begins to operate. Air outlets and 

fan speed are automatically 

adjusted according to the tempera-

ture setting and humidity.

2

Adjust the temperature set-
ting.

3

To stop the operation, press 
the “OFF” switch on the air 
conditioning operation panel 
or select the “OFF” switch on 
the control screen.

If the fan speed setting or air 
flow modes are operated, the 
automatic mode indicator goes 
off. However, automatic mode 

I

J

A

Using automatic mode

B

C

354

5-1. Using the air conditioning system and defogger

for functions other than that 
operated is maintained.

Using automatic mode

Fan speed is adjusted automati-

cally according to the temperature 

setting and the ambient conditions.
Therefore, the fan may stop for a 

while until warm or cool air is ready 

to flow immediately after the auto-

matic mode switch is pressed.

This function automatically con-
trols the air conditioning airflow 
so that priority is given to the 
front seats. Unnecessary air 
conditioning is suppressed, con-
tributing to increased fuel effi-
ciency.
Front seat concentrated airflow 
mode operates in the following 
situations.

No passengers are detected 
in the rear seats

The windshield defogger is 
not operating

While operating, 

 illumi-

nates.

Manually turning front seat 
concentrated airflow mode 
on/off

In front seat concentrated air-
flow mode, directing airflow to 
the front seats only and to all 
seats can be switched via switch 
operation. When the mode has 

been switched manually, auto-
matic airflow control stops oper-
ating.

Press 

 on the air condition-

ing operation panel and switch 
the airflow.

Indicator illuminated: Airflow 
to the front seats only

Indicator off: Airflow to all the 
seats

Operation of automatic airflow 

control

In order to maintain a comfortable 

interior, airflow may be directed to 

seats without passengers immedi-

ately after the hybrid system is 

started and at other times depend-

ing on the outside temperature.

After the hybrid system is started, 

if passengers move around inside 

or enter/exit the vehicle, the sys-

tem cannot accurately detect the 

presence of passengers and auto-

matic airflow control will not oper-

ate.

Operation of manual airflow 

control

Even if the function is manually 

switched to directing airflow to only 

the front seats, when a rear seat is 

occupied, it may automatically direct 

airflow to all seats.

To return to automatic airflow 

control

1

With the indicator off, turn the 

power switch off.

2

After 60 minutes or more elapse, 

turn the power switch to ON.

Front seat concentrated 
airflow mode (S-FLOW)

355

5-1. Using the air conditioning system and defogger

5

Interior

 featur

es

The air conditioning system can 
be switched between the indi-
vidual and synchronous modes.
The mode switches each time 
the “SYNC” switch is operated 
on the air conditioning operation 
panel or the “SYNC” is selected 
on the control screen.

Vehicles with “3-ZONE” mode

In the individual mode, the 
temperature for the driver, 
front passenger, and rear 
seats can be adjusted sepa-
rately.

In the synchronous mode, the 
driver’s side temperature con-
trol switch can be used to 
adjust the temperature for the 
driver, front passenger, and 
rear seats.

• To adjust the temperature for the 

front passenger seat separately 
from other seats: operate the 
front passenger’s side tempera-
ture control switch. (The “SYNC” 
of “PASSSYNC” display disap-
pears)

• To adjust the temperature for the 

rear seats separately from the 
front seats: when the synchro-
nous mode is on, operate the 
“REAR” switch. Then, operate the 
driver’s side or front passenger’s 
side temperature control switch 
upwards to increase the rear 
seats temperature and down-

wards to decrease the rear seats 
temperature. (The “SYNC” of 
“REAR SYNC” display on the 
front air conditioning operation 
panel and “SYNC” display on the 
rear air conditioning operation 
panel disappear)

Vehicles with “4-ZONE” mode

In the individual mode, the 
temperature for the driver, 
front passenger, left-hand 
side rear seats, and right-
hand side rear seats can be 
adjusted separately by the 
corresponding temperature 
control switch on the front and 
rear air conditioning operation 
panels.

In the synchronous mode, the 
driver’s side temperature con-
trol switch can be used to 
adjust the temperature for the 
driver, front passenger, left-
hand side rear seats, and 
right-hand side rear seats.

• To adjust the temperature for the 

front passenger seat separately 
from other seats: operate the 
front passenger’s side tempera-
ture control switch. (The “SYNC” 
of “PASSSYNC” display disap-
pears)

• To adjust the temperature for the 

rear seats separately from the 
front seats: when the synchro-
nous mode is on, operate the 
“REAR” switch. Then, operate the 
driver’s side temperature control 
switch upwards to increase the 
rear seats temperature and 
downwards to decrease the rear 

Switching between the 
individual and synchro-
nous modes

356

5-1. Using the air conditioning system and defogger

seats temperature. (The “SYNC” 
of “REAR SYNC” display on the 
front air conditioning operation 
panel disappears)
To adjust the temperature for the 
right-hand side rear seats sepa-
rately from the left-hand side rear 
seats, operate the passenger’s 
side temperature control switch. 
(The “SYNC” of “RIGHT SYNC” 
display on the rear air condition-
ing operation panel disappears)

• To adjust the temperature for the 

driver’s seat and passenger’s 
seat separately from the rear 
seats: when the synchronous 
mode is on, operate the passen-
ger’s side temperature control 
switch to adjust the front passen-
ger’s seat temperature. Then 
operate the “REAR” switch, and 
operate the driver’s side tempera-
ture control switch to adjust the 
rear seats temperature. (The 
“SYNC” of “REAR SYNC” display 
and the “SYNC” of “PASSSYNC” 
display on the front air condition-
ing operation panel disappear)
To adjust the temperature for the 
driver’s seat, operate the “REAR” 
switch again and operate driver’s 
side temperature switch.

Operate the “REAR” switch.

The modes between the rear air 
conditioning system and the front 
air conditioning system switches 
each time the “REAR” switch is 
operated.
The air conditioning system 

switches between individual and 
synchronous modes each time the 
“SYNC” switch is operated. 
(

P.355)

If the system is left untouched for 
approximately 6 seconds after 
changing to the rear air condition-
ing system, the control mode in the 
front control panel returns to the 
front.

Adjusting the temperature 
setting

Vehicles with “3-ZONE” mode

Operate the driver’s or passen-
ger’s side temperature control 
switch upwards to increase the 
temperature and operate the 
switch downwards to decrease 
the temperature.

Vehicles with “4-ZONE” mode

Operate the passenger’s side 
temperature control switch to 
adjust the right-hand rear seats 
temperature, and operate the 
driver’s side temperature control 
switch to adjust the left-hand 
side rear seats temperature. 
Operate the temperature con-
trol switch upwards to increase 
the temperature and operate the 
switch downwards to decrease 
the temperature.

Fan speed setting

Operate the fan speed control 
switch upwards to increase the fan 
speed and downwards to decrease 
the fan speed.
Touch the “OFF” switch to turn the 
fan off.

Changing the rear seat 
settings (if equipped)

357

5-1. Using the air conditioning system and defogger

5

Interior

 featur

es

Change the airflow mode

Operate the airflow mode control 
switch.
The airflow mode changes each 
time the switch is operated. 
(

P.359)

Using automatic mode

Press the “AUTO” switch. (

P.359)

Location of air outlets

The air outlets and air volume 
change according to the 
selected air flow mode.

Adjusting the air flow direc-
tion and opening/closing 
the air outlets

Front center outlets

Direct air flow to the left or right, 

up or down

Front side outlets

1

Direct air flow to the left or 
right, up or down

2

Open the vent

3

Close the vent

Air outlet layout and oper-
ations

WARNING

To not interrupt the wind-

shield defogger from operat-

ing

Do not place anything on the 

instrument panel which may cover 

the air outlets. Otherwise, air flow 

may be obstructed, preventing the 

windshield defoggers from defog-

ging.

358

5-1. Using the air conditioning system and defogger

“AUTO” switch (automatic mode)

“OFF” switch

Left-hand side temperature control switch

Right-hand side temperature control switch (if equipped)

Fan speed control switch

Airflow mode control switch

Adjusting the temperature 
setting

Vehicles with “3-ZONE” mode

In the individual mode, operate 
the temperature control switch 
upwards to increase the rear 
seats temperature and down-
wards to decrease the rear 
seats temperature.
To change to the synchronous 
mode from the individual mode, 
press the “OFF” switch and then 
press the “AUTO” switch.

Vehicles with “4-ZONE” mode

To adjust the temperature for 
the left-hand side rear seats and 
right-hand side rear seats 
together, operate the rear left-
hand side temperature control 
switch upwards to increase the 
temperature and downwards to 
decrease the temperature.
To adjust the temperature for 
the right-hand side rear seats 
separately from the left-hand 
side rear seats, operate the 
right-hand side temperature 
control switch. Then, operate 

Rear automatic air conditioning system

Air outlets and fan speed are automatically adjusted accord-
ing to the temperature setting.

Air conditioning controls

A

B

C

D

E

F

359

5-1. Using the air conditioning system and defogger

5

Interior

 featur

es

the left-hand side temperature 
control switch to adjust the left-
hand rear seats. (The “SYNC” of 
“RIGHT SYNC” display on the 
rear air conditioning operation 
panel disappears)
To change to the synchronous 
mode from the individual mode, 
press the “OFF” switch and then 
press the “AUTO” switch.

Adjusting the fan speed set-
ting

Operate the fan speed control 
switch upwards to increase the 
fan speed and downwards to 
decrease the fan speed.

Press the “OFF” switch to turn off 
the fan.

Change the airflow mode

Press the airflow mode control 
switch.

The airflow mode changes as fol-
lows each time the switch is 
pressed.

1

Upper body

2

Upper body and feet

3

Feet

Ventilation and air conditioning 

odors

During use, various odors from 

inside the vehicle may enter into 

and accumulate in the air condi-

tioning system. This may then 

cause odor to be emitted from the 

vents.

To reduce potential odors from 

occurring: The start timing of the 

blower may be delayed for a short 

period of time immediately after 

the air conditioning system is 

started in automatic mode.

1

Press the “AUTO” switch. 
(“AUTO” appears on the dis-
play)

The dehumidification function 

begins to operate. Air outlets and 

fan speed are automatically 

adjusted according to the tempera-

ture setting.

2

Adjust the temperature set-
ting.

3

To stop the operation, press 
the “OFF” switch.

If the fan speed setting or air flow 

modes are operated, the automatic 

mode indicator goes off. However, 

automatic mode for functions other 

than that operated is maintained.

MODE

NOTICE

To prevent 12-volt battery dis-

charge

Do not leave the rear air condi-

tioning system on longer than 

necessary when the hybrid sys-

tem is off.

Using the automatic mode

360

5-1. Using the air conditioning system and defogger

Using automatic mode

Fan speed is adjusted automati-

cally according to the temperature 

setting. Therefore, the fan may stop 

for a while until warm or cool air is 

ready to flow immediately after the 

“AUTO” switch is pressed.

P.356

Location of air outlets

The air outlets and air volume 
changes according to the 
selected air flow mode.

Adjusting the air flow direc-
tion and opening/closing 
the air outlets (side ceiling)

1

Direct air flow to up or down.

2

Direct air flow to the left or 
right and turns the knob to 
open or close the vent

To close the vent, move the knob 
rearward.

Changing the rear seat 
settings from the front 
control panel

Air outlet layout and oper-
ations

361

5-1. Using the air conditioning system and defogger

5

Interior

 featur

es

*

: If equipped

Turns the heated steering wheel 
on/off

The indicator light comes on when 
the heated steering wheel is oper-
ating.

Operation condition

The power switch is in ON.

Each time the switch is pressed, 
the operation condition changes 
as follows.
Hi (3 segments lit) 

 Mid (2 

segments lit) 

 Lo (1 segment 

Heated steering 

wheel

*

/seat heat-

ers

*

/seat ventilators

*

Heated steering wheel

Warm up the grip of the steer-
ing wheel

Seat heaters

Warm up the seat upholstery

Seat ventilators

Maintain good ventilation by 
sucking air through the seat 
upholstery

WARNING

To prevent minor burn inju-

ries

Care should be taken if anyone in 

the following categories comes in 

contact with the steering wheel or 

seats when the heater is on:

Babies, small children, the 

elderly, the sick and the physi-

cally challenged

Persons with sensitive skin

Persons who are fatigued

Persons who have taken alco-

hol or drugs that induce sleep 

(sleeping drugs, cold remedies, 

etc.)

NOTICE

To prevent damage to the 

seat heaters and seat ventila-

tors

Do not put heavy objects that 

have an uneven surface on the 

seat and do not stick sharp 

objects (needles, nails, etc.) into 

the seat.

To prevent 12-volt battery dis-

charge

Do not use the functions when the 

hybrid system is off.

Heated steering wheel

Operating the seat heat-
ers

362

5-1. Using the air conditioning system and defogger

lit) 

 Off

The level indicator lights up during 
operation.

Front

Rear (second outboard seats) 
(if equipped)

Operation condition

The power switch is in ON.

Each time the switch is pressed, 
the operation condition changes as 
follows.
Hi (3 segments lit) 

 Mid (2 seg-

ments lit) 

 Lo (1 segment lit) 


Off
The level indicator lights up during 
operation.

Operation condition

The power switch is in ON.

Air conditioning system-linked 

control mode

When a seat ventilator is set to Hi, 

the fan speed of the seat ventilator 

may increase according to the fan 

speed of the air conditioning sys-

tem.

WARNING

To prevent causes of over-

heating and minor burn inju-

ries

Observe the following precautions 

when using a seat heater:

Do not cover the seat with a 

blanket or cushion when using 

the seat heater.

Do not use seat heater more 

than necessary.

Operating the seat venti-
lators (front seats)

363

5-2. Using the interior lights

5

Interior

 featur

es

5-2.Using the interior lights

Power switch illumination (

P.234)

Front interior lights/personal lights

*1

 (

P.364)

Shift lever light (if equipped)

Open tray light

*2

 (if equipped)

Door courtesy lights

*1

 (if equipped)

Console tray light

*2

Second row personal lights (Type A)

*1

 (

P.364)

Second row personal lights (Type B)

*1

 (if equipped) (

P.364)

Third row interior light

*1

 (

P.364)

Outer foot lights (if equipped)

*1

:These lights turn on when a door is opened. When the shift lever is in a 

position other than P, these lights turn off.

*2

:When the shift lever is in a position other than P, the brightness of these 

lights will reduce intensity.

Interior lights list

Location of the interior lights

A

B

C

D

E

F

G

H

I

J

364

5-2. Using the interior lights

1

Turns the lights on/off linked 
to door positions

2

Turns the lights on

3

Turns the lights off

Front

Turns the lights on/off

Second row

Turns the lights on/off when the 
personal/interior light main 
switch is in the “DOOR” position.

When a door is opened while the 
personal/interior light main switch is 
in the “DOOR” position, the lights 
turn on.

When the personal/interior light 
main switch is in the off position, 
the second row personal lights will 
not turn on even if the switch is on.
When the personal/interior light 
main switch is in the on position, 
the second row personal lights will 
turn on even if the switch is off.

Type A

Type B (if equipped)

1

Turns the door position on

The rear interior light turns on/off 

Operating the per-
sonal/interior light main 
switch

Operating the personal 
lights

Third row interior light

365

5-2. Using the interior lights

5

Interior

 featur

es

together the front interior lights.
When a door is opened while the 
front and rear interior light door 
position is on, the lights turn on.

2

Turns the light on

Illuminated entry system

The lights automatically turn on/off 

according to the power switch 

mode, the presence of the elec-

tronic key, whether the doors are 

locked/unlocked, and whether the 

doors are opened/closed.

To prevent the 12-volt battery 

from being discharged

If the interior lights remain on when 

the power switch is turned to OFF, 

the lights will go off automatically 

after 20 minutes.

The interior lights will turn on 

automatically when

If any of the SRS airbags deploy 

(inflate) or in the event of a strong 

rear impact, the interior lights will 

turn on automatically.
The interior lights will turn off auto-

matically after approximately 20 

minutes.
The interior lights can be turned off 

manually. However, in order to help 

prevent further collisions, it is rec-

ommended that they be left on until 

safety can be ensured.
(The interior lights may not turn on 

automatically depending on the 

force of the impact and conditions of 

the collision.)

Customization

Setting (e.g. the time elapsed before 

the lights turn off) can be changed. 

(Customizable features: 

P.549)

NOTICE

To prevent 12-volt battery dis-

charge

Do not leave the lights on longer 

than necessary when the hybrid 

system is off.

366

5-3. Using the storage features

5-3.Using the storage features

Conversation mirror (

P.370)

Open tray (

P.370)

Glove box (

P.367)

Door pockets (

P.370)

Bottle holders (

P.369)

Auxiliary storage (7-passenger models)

Cup holders (

P.368)

Console box (

P.367)

List of storage features

Location of the storage features

A

B

C

D

E

F

G

H

367

5-3. Using the storage features

5

Interior

 featur

es

1

Unlock with the mechanical 
key

2

Lock with the mechanical key

3

Open (pull up the lever)

Glove box light

The glove box light turns on when 

the tail lights are on.

Press the button to open the 
console box.

Console box light

The console box light turns on when 

the tail lights are on.

WARNING

Items that should not be left 

in the vehicle

Do not leave glasses, lighters or 

spray cans in the storage spaces, 

as this may cause the following 

when cabin temperature becomes 

high:

Glasses may be deformed by 

heat or cracked if they come 

into contact with other stored 

items.

Lighters or spray cans may 

explode. If they come into con-

tact with other stored items, the 

lighter may catch fire or the 

spray can may release gas, 

causing a fire hazard.

When storage compartments 

are not in use

When driving or when the storage 

compartments are not in use, 

keep it closed.
In the event of sudden braking or 
sudden swerving, an accident 
may occur due to an occupant 
being struck by an open lid or the 
items stored inside.

Glove box

WARNING

Caution while driving

Keep the glove box closed. In the 

event of sudden braking or sud-

den swerving, an accident may 

occur due to an occupant being 

struck by the open glove box or 

the items stored inside.

Console box

WARNING

Caution while driving

Keep the console box closed.
Injuries may result in the event of 

an accident or sudden braking.


Content      ..     20      21      22      23     ..