Toyota Raize (2023 year). Manual in english - page 5
 

  Index      Toyota     Toyota Raize (2023 year). Manual in english


Search            copyright infringement  


Content      ..     3      4      5      6     ..


Toyota Raize (2023 year). Manual in english - page 5


79

2-1. Instrument cluster

: If equipped

In

st

ru

me
nt

 c

lus

te

r

2

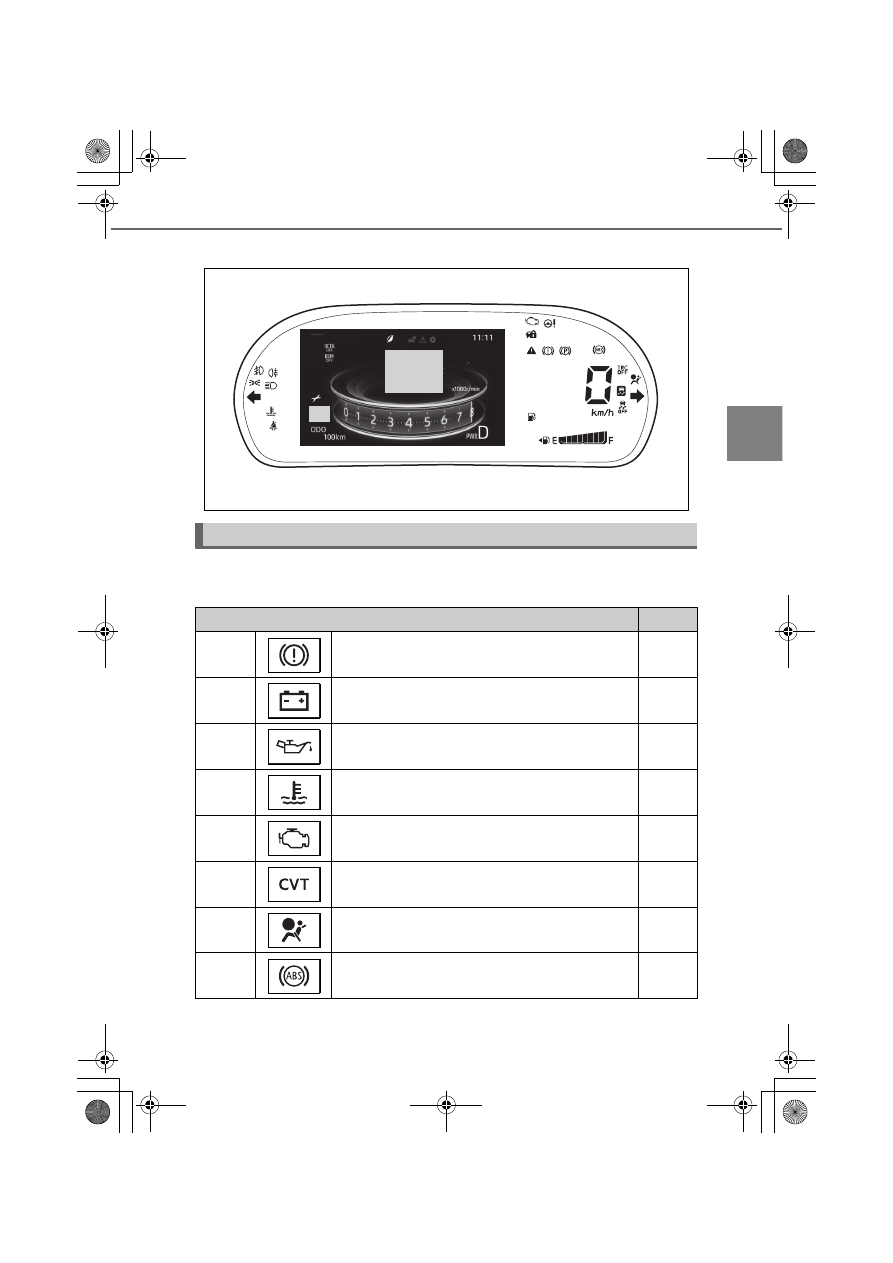
Vehicles with TFT color multi-information display

Warning lights

Warning lights inform the driver of malfunctions in the indicated vehicle’s

systems.

Warning lights

Reference

*

1

Brake system warning light

379

*

1

Charging system warning light

379

*

1

Low engine oil pressure warning light

379

*

1

High coolant temperature warning light (red)

379

*

1

Malfunction indicator lamp

379

*

1

Continuously variable transmission warning 

light

379

*

1

SRS warning light

380

*

1

ABS warning light

380

KBRO210102E

80

2-1. Instrument cluster

: If equipped

*

1

Electric power steering system warning light 

(red/yellow)

380

*

1

Master warning light

380

*

2

Front corner sensor/Reverse sensor indicator

380

*

1

3

Slip indicator

380

*

1

BSM OFF indicator 

(flashing)

380

*

1

RCTA OFF indicator 

(flashing)

381

*

1

Brake Override System warning light

381

Open door warning light

381

Low fuel level warning light

381

Driver’s/front passenger’s seat belt reminder 

warning light

381

*

4

Rear seat belt reminder warning light

381

*

1

Speed warning light

381

*

1

Tire pressure warning light

382

*

1

Oil deteriorate warning light

382

Parking brake non release warning light

382

Warning lights

Reference

81

2-1. Instrument cluster

: If equipped

In

st

ru

me
nt

 c

lus

te

r

2

*1

These lights turn on when the engine switch is turned to “ON”, to indicate that
a system check is being performed. They will turn off after the engine is
started, or after a few seconds. There may be a malfunction in a system if a
light does not come on, or if the lights do not turn off. Have the vehicle
inspected at your Toyota dealer.

*2

The indicator also lights up when the front corner sensors or reverse sensors
get activated.

*3

If the light is flashing, it indicates that the system is operating, and if the light
comes on, it may indicate a system failure.

*4

The indicator lights up on the upper part of the inside rear view mirror.

Indicators

Indicators inform the driver of the status of the vehicle’s various systems.

Indicators

Reference

Turn signal indicator

196

Headlight high beam indicator

198

Front fog light indicator

201

Rear fog light indicator

201

*

1

Low coolant indicator (blue)

Security indicator

72, 73

Tail light indicator

198

*

2

Slip indicator (flashing)

233

*

2

VSC OFF indicator

233

*

2

TRC OFF indicator

233

82

2-1. Instrument cluster

: If equipped

*1

The indicator lights up when the engine coolant temperature is low. If the
indicator remains lit blue after the engine is warmed up enough, have it
inspected at Toyota dealer.

*2

These lights turn on when the engine switch is turned to “ON”, to indicate that
a system check is being performed. They will turn off after the engine is
started, or after a few seconds. There may be a malfunction in a system if a
light does not come on, or if the lights do not turn off. Have the vehicle
inspected at your Toyota dealer.

*3

It is indicated on the outside rear view mirror.

WARNING

If a safety system warning light does not come on

If warning lights for the safety system such as ABS, and SRS airbags do not

turn on when you turn the engine switch to “ON”, or if the lights remain lit after

a few minutes or when you start the engine, the safety system may not operate

in the event of an accident, resulting in serious injury or death.
Have the vehicle inspected at your Toyota dealer immediately.

*

2

Eco Driving Indicator Light

169

*

2

BSM OFF indicator

211

*

2

RCTA OFF indicator

211

*

2

3

Outside rear view mirror indicators

211

Power mode indicator

190

Indicators

Reference

83

2-1. Instrument cluster

In

st

ru

me
nt

 c

lus

te

r

2

NOTICE

To prevent damage to the engine and its components

High coolant temperature warning light (

P. 379) is equipped instead of tem-

perature gauge. When the High coolant temperature warning light blinks in

red, or remains lit, the engine is probably overheated. Stop the vehicle in a safe

place immediately. (

P. 412)

For vehicles with TFT color multi-information display, the warning message

(

P. 387) will also be displayed.

84

2-1. Instrument cluster

: If equipped

Gauges and meters

Vehicles without TFT color multi-information display (vehicles without

tachometer)

Vehicles without TFT color multi-information display (vehicles with

tachometer)

a

Tachometer

Shows the engine speed in revolutions per minute.

b

Multi-information display

Displays and sets a variety of information about the vehicle. (

P. 86)

c

Fuel gauge

Indicates the amount of remaining fuel.

2 3

5

7

6

KBRO210203E

2 3 4

1

5

7

6

KBRO210201E

85

2-1. Instrument cluster

: If equipped

In

st

ru

me
nt

 c

lus

te

r

2

d

Shift position display

Indicates the selected shift position. (

P. 189)

e

Speedometer

Indicates the speed of the vehicle.

f

Display change button

Switches the display of the multi-information display. (

P. 87)

g

Clock adjustment switches (

P. 88)

Vehicles with TFT color multi-information display

a

TFT color multi-information display

Displays and sets a variety of information about the vehicle. (

P. 98)

b

Speedometer

Indicates the speed of the vehicle.

c

Fuel gauge

Indicates the amount of remaining fuel.

Meter/display operating conditions

When the engine switch is “ON”

Liquid crystal display

Small spots or light spots may appear on the display. This phenomenon is

characteristic of liquid crystal display, and there is no problem continuing to

use the display.

1

3

2

KBRO210202E

86

2-1. Instrument cluster

: If equipped

Multi-information display

Display contents

The multi-information display shows a variety of outside temperature- and

driving-related information.

Trip information (

P. 89)

The displayed items are as follows.

Odometer

Trip meter A/B

Instrument panel illumination adjust-

ment

Driving information (

P. 90)

The displayed items are as follows.

Instantaneous fuel economy

Average fuel economy

Cruising distance

Outside temperature

Fuel gauge

Indicates the amount of remaining fuel.

Shift position display

 (

P. 189)

Clock display (

P. 88)

Front corner sensor/Reverse sen-

sor indicator

 (

P. 221)

Vehicles without tachometer

Vehicles with tachometer

KBRO210501E

KBRO210301E

87

2-1. Instrument cluster

In

st

ru

me
nt

 c

lus

te

r

2

Display change

Vehicles without tachometer

To change the display of the trip

information (

P. 89) and the driving

information (

P. 90), press the

ODO/TRIP DISP switch.

Vehicles with tachometer

Trip information (

P. 89)

To change the display, press the ODO/

TRIP switch (

a

).

Driving information (

P. 90)

To switch the display, press the DISP

switch (

b

).

KBRO210502E

1

2

KBRO210303

88

2-1. Instrument cluster

Clock display

The time can be adjusted by pressing the clock adjustment switches.

Time cannot be adjusted when automatic correction is turned ON on the user cus-

tomization screen. (

P. 92)

a

Adjust “hours” (H)

b

Adjust “minutes” (M)

c

Set “minutes” to 00*

Press and hold the clock adjustment

switches (

a

) and (

b

) at the same time.

*

(Example) For 1:00 to 1:29, 1:00 is set

For 1:30 to 1:59, 2:00 is set

Vehicles without tachometer

Vehicles with tachometer

1

2

3

KBRO210503E

1

2

3

KBRO210305

89

2-1. Instrument cluster

In

st

ru

me
nt

 c

lus

te

r

2

Trip information

Use the ODO/TRIP DISP switch (for vehicles without tachometer) or the

ODO/TRIP switch (for vehicles with tachometer) to switch the display.

*

The text layout in the display varies according to the vehicle grade level and
options, etc.

Odometer

Displays the total distance the vehi-

cle has been driven.

Trip meter A*/Trip meter B*

Displays the distance the vehicle has

been driven since the meter was last

reset.

To reset the display, press and hold the

switch while trip meter A or B is dis-

played.

Vehicles without tachometer: Press the switch while trip meter B is dis-

played, the menu changes to instantaneous fuel economy (

P. 90).

*

Trip meters A and B can be used to record and display different distances inde-

pendently.

Instrument panel illumination adjustment

Vehicles without tachometer: Press the switch while the outside tempera-

ture (

P. 91) is displayed, the display changes to the instrument panel

illumination adjustment.

Indicates instrument panel illumina-

tion for day illumination or night illu-

mination (

P. 96).

Pressing and holding the switch while

instrument panel illumination is dis-

played can adjust the instrument

panel illumination in 5 steps.

Adjust day illumination by turning off

the front position lights.

Adjust night illumination by turning on

the front position lights.

90

2-1. Instrument cluster

Driving information

Use the ODO/TRIP DISP switch (for vehicles without tachometer) or the

DISP switch (for vehicles with tachometer) to switch the display.

*

The text layout in the display varies according to the vehicle grade level and
options, etc.

Instantaneous fuel economy

Vehicles without tachometer: Press the switch while trip meter B (

P. 89)

is displayed, the display changes to instantaneous fuel economy.

Indicates instantaneous fuel econ-

omy at present.

Average fuel economy

Indicates average fuel economy

taken after reset.

To reset the display, press and hold

the switch while average fuel economy

is displayed.

Note that the figures displayed as

average fuel economy are just for ref-

erence.

Cruising distance

Indicates the approximate cruising

distance to be attained with the

amount of remaining fuel at present.

The distance indicated is calculated

based on the average fuel economy

taken from the past, which does not

necessarily represent the exact dis-

tance the vehicle can actually run.

Pressing and holding the switch for

more than 5 seconds while cruising

distance is displayed may erase the

average fuel economy data from the

past, and refresh the display.

The display may not be refreshed

when the fuel supply is low.

91

2-1. Instrument cluster

In

st

ru

me
nt

 c

lus

te

r

2

Outside temperature

Displays the outside temperature.

Outside temperature: the temperature is

shown in a range from –30°C to 60°C (-

22

 to 140

).

Road surface freezing warning is

displayed when the outside tem-

perature becomes 3°C (37

) or

lower.

Temperature indicator blinks indicating

the road surface may possibly be frozen.

Vehicles without tachometer: Press the switch while the outside tempera-

ture is displayed, the display changes to the instrument panel illumination

adjustment (

P. 89).

User customization screen

When you switch to the user customization screen, you can change the

settings for meter display and functions.

Note that the screen is not operable while the vehicle is running. Be sure to operate

the screen when the vehicle is stopped in a safe place.

Use the ODO/TRIP DISP switch (for vehicles without tachometer) or the

ODO/TRIP switch (for vehicles with tachometer) to adjust the display.

How to change settings

a

Press and hold the switch while Odometer is displayed to switch to the

user customization screen

b

Press the switch until the item you need to change appears

Each time you press the switch, the indication switches over.

c

Press and hold the switch to change the settings

Each time you press and hold the switch, the display switches over.

To exit the user customization screen, press the switch until 
appears on the screen, then press and hold the switch.

92

2-1. Instrument cluster

: If equipped

Customizable items

Item

Settings Display (Initial setting)

Resetting average fuel economy when fueling

ON

OFF

Resetting Trip meter A when fueling

ON

OFF

On/Off of Eco Driving Indicator Light

ON

OFF

Automatic correction of time (for vehicles 

equipped with 9 inch display audio pairable with

smart phones)

ON

OFF

Speed linked door locking function (

P. 136)

ON*

1

OFF

Shift-linked auto lock

 (

P. 136)

ON*

2

OFF

Shift-linked auto unlock

 (

P. 136)

ON*

3

OFF

Engine switch “OFF”-linked auto unlock (

P. 136)

ON*

4

OFF

93

2-1. Instrument cluster

: If equipped

In

st

ru

me
nt

 c

lus

te

r

2

*1

When this is set to ON, the setting for shift-linked auto lock

 turns OFF.

*2

When this is set to ON, the setting for speed linked door locking function
turns OFF.

*3

When this is set to ON, the setting for door unlocking linked with engine
switch OFF turns OFF.

*4

When this is set to ON, the setting for shift-linked auto unlock

 turns OFF.

Buzzer volume for answering back (signaling for 

wireless remote control operation) (

P. 131)

(Mute)

(Low)

to

(High)

Signal for wireless remote control activation 

(emergency flashers) (

P. 121)

ON

OFF

Intermittent windshield wiper operation linked 

with speed (

P. 203)

ON

OFF

Rear wiper reverse wiper function

 (

P. 206)

ON

OFF

The function that the turn signal indicator flashes 

3 times when the turn signal lever is pushed half 

way through (

P. 196)

ON

OFF

Item

Settings Display (Initial setting)

94

2-1. Instrument cluster

: If equipped

How to initialize settings

a

Press and hold the switch while Odometer is displayed to switch to the

user customization screen

b

Press the switch until 

 appears

c

While 

 is displayed, press and hold the switch. After

 appears, press and hold the switch again

After 

 starts flashing, go back to the odometer display to see the fol-

lowing items are initialized.

Engine oil deterioration warning reset

Perform this operation after the engine oil has been changed.

When the engine oil is deteriorated or the engine oil replacement is due soon, the Oil

deteriorate warning light will turn on (

P. 382).

a

Press the ODO/TRIP switch to

display trip meter A

b

Turn the engine switch to “OFF”

c

While pressing the ODO/TRIP

switch, turn “ON” the engine

switch

Do not start the engine yet.
Keep holding the ODO/TRIP switch

until the Oil deteriorate warning light

turns off.

d

Check that the Oil deteriorate

warning light is flashing fast

Item

Initial setting

Resetting average fuel economy when fueling

OFF

Resetting Trip meter A when fueling

OFF

On/Off of Eco Driving Indicator Light

ON

Automatic correction of time (for vehicles equipped with 9 inch dis-

play audio pairable with smart phones)

ON

KBRO210342E


Content      ..     3      4      5      6     ..