Toyota Prius (2022 year). Manual in english - page 9
 

  Index      Toyota     Toyota Prius (2022 year). Manual in english


Search            copyright infringement  


Content      ..     7      8      9      10     ..


Toyota Prius (2022 year). Manual in english - page 9


145

2. Instrument cluster

2

Instru

me
nt clu

ster

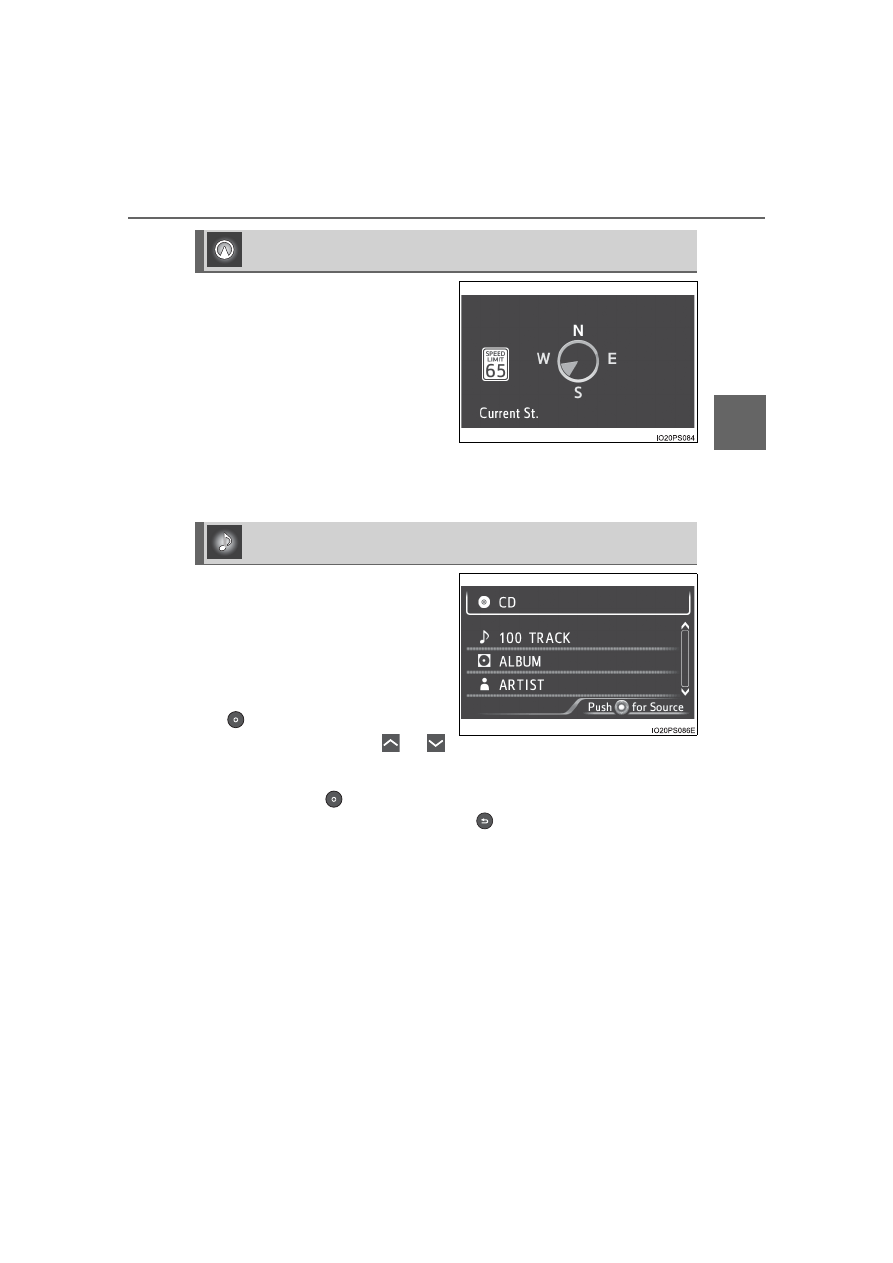
Displays  a  compass  linked  with
the navigation system. Also, when
the navigation system is perform-
ing  intersection  guidance  during
destination  guidance,  the  inter-
section guidance is also displayed
on the multi-information display.

The illustration is only an example
and  may  differ  from  the  actual
screen.
For  details  on  how  to  set  the  destination  and  switch  the  map  direction,
refer to “NAVIGATION SYSTEM OWNER’S MANUAL”.

The  information  about  the  cur-
rently  selected  audio  source  is
displayed.

The illustration is only an example
and  may  differ  from  the  actual
screen.
To  switch  the  audio  source,  press

  to  display  the  audio  source

selection  screen,  press 

  or 

of  the  meter  control  switches  and
select  the  desired  audio  source,
and then press 

.

To  stop  audio  source  selection,  press 

  on  the  audio  source  selection

screen.

 Navigation system-linked display (if equipped)

 Audio system-linked display (if equipped)

146

2. Instrument cluster

The condition of the air conditioning system settings can be checked
on  the  screen  and  the  air  conditioning  system  settings  can  be
changed using the meter control switches.

On the air conditioning settings screen, press 

 or 

 of the meter con-

trol switches to switch the contents of the display.
For details regarding the air conditioning system function, refer to P. 430 and
440.

Screen display and setting items that can be changed

 Air conditioning system settings screen

147

2. Instrument cluster

2

Instru

me
nt clu

ster

*

1

: “LO” is displayed if the temperature is adjusted to the lowest setting, and

“HI” is displayed if the temperature is adjusted to the highest setting.

*

2

: The selectable modes differ depending on whether a passenger is present.

(

P. 432, 442)

Adjusting the settings

Press 

 to display the cursor.

Press 

  or 

  of  the  meter  control  switches  to  select  the

desired item to set.

Press 

 or 

 of the meter control switches to select the set-

ting item or setting value.

The  air  conditioning  system  cannot  be  stopped  by  performing  opera-
tions on the air conditioning settings screen. Please use the air condi-
tioning switch or navigation system

*

 to stop the air conditioning system.

*

: Vehicles with 11.6-inch display only

Item

Settings

Eco score 
(A/C score)

P. 148

Temperature
setting

Changes according to operation of the meter control 

switches

*

1

Outside air and
recirculated  air
modes


(Outside air mode)

(Recirculated air mode)

Fan speed

1 to 7

“CLIMATE 
CONTROL”

“NORMAL”

“ECO”

Front seat 
concentrated 
airflow mode 
(S-FLOW)

“On (Driver 

Priority)”

*

2

“On (Fr Seat 

Only)”

*

2

“Off (All seat)”

1

2

3

4

5

6

1

2

3

148

2. Instrument cluster

Eco score (A/C score)

The current air conditioning system usage status is evaluated in 5
levels to determine whether it is Eco-friendly.
The  evaluation  changes  according  to  the  air  conditioning  system
usage status. When the power switch is turned off, the current total
driving  score

*

1

  and  advice

*

2

  related  to  using  the  air  conditioning

system are displayed. (

P. 102)

Low score

*

3

High score

Avoiding  excessive  use  of  the
air  conditioning  system  and
using  the  air  conditioning  sys-
tem  at  the  appropriate  setting
according  to  the  ambient  tem-
perature and number of passen-
gers  and  with  the  front  seat
concentrated  airflow  mode  (S-
FLOW)  (

)  and  “CLIMATE

CONTROL”  will  result  in  a  high
evaluation.

*

1

: The Eco score (A/C score) is not evaluated for approximately 1 minute

after the power switch is turned to ON mode.

*

2

: This advice may not be displayed depending on the situation.

*

3

: For  items  not  evaluated  with  an  Eco  score  (A/C  score),  the  display

reads 0.

1

2

149

2. Instrument cluster

2

Instru

me
nt clu

ster

Operating switches of the air conditioning system operation panel

The pop-up display function that displays when the air conditioning settings
are changed using the air conditioning system switches can be turned off in
the “Meter Customize” settings. (

P. 153)

Eco score (A/C score)

The  setting  status  of  the  following  air  conditioning  system  functions  are
reflected in the score.
• Temperature setting
• Fan speed setting
• Outside air and recirculated air modes
• “A/C” button
• Front seat concentrated airflow mode (S-FLOW)
• “CLIMATE CONTROL”

The Eco score (A/C score) is evaluated according to the ambient tempera-
ture  and  cabin  temperature.  Accordingly,  even  if  the  same  settings  are
always  used  for  the  air  conditioning  system,  the  evaluation  will  change
according to such factors as the season and weather.

When the air conditioning system is not being used or the airflow mode is
set to 

 or 

, the Eco score (A/C score) is not evaluated. (While the

air conditioning system is not evaluated, its usage status is not reflected in
the total Eco score result.)

The Eco score (A/C score) is a function that helps select an air conditioning
system setting which reduces fuel consumption, not a function that satisfies
both comfortability and low fuel consumption.

When  the  air  conditioning  system
switches are operated to change the air
conditioning  settings  while  a  screen
other  than  the  air  conditioning  system
settings screen is displayed on the multi-
information display, a pop-up display for
the  air  conditioning  settings  contents  is
displayed.  However,  air  conditioning
system  settings  cannot  be  changed  on
the pop-up display.

150

2. Instrument cluster

The  operation  status  of  driving
support  system  such  as  the  LTA
(Lane 

Tracing 

Assist) 

(if

equipped)  and  dynamic  radar
cruise  control  with  full-speed
range  (if  equipped)  and  warning
information are displayed.

For  details  regarding  the  driving
support functions, refer to the page
for the corresponding function.

The warning messages that have
been  displayed  since  the  power
switch  was  turned  to  ON  mode
can be checked.

When  multiple  warning  messages
have  been  displayed,  the  display
can be switched by pressing 

 or

 of the meter control switches.

Warning  messages  that  have  been  currently  cleared  and  some  warning
messages are not displayed. Also, when there are no warning messages
that can be checked, the display indicates that there are no messages.

 Driving assist system information

 Warning message display

151

2. Instrument cluster

2

Instru

me
nt clu

ster

The  operation  contents  of  the  driving  support  systems  and  settings
related to the combination meter display can be changed.

Driving  support  systems  such  as  the  PCS  (Pre-Collision  System)  (if
equipped) and Blind Spot Monitor (if equipped) is turned on and off by sim-
ply pressing 

. Make sure not to cancel the systems accidentally.

Setting procedure

Press 

 or 

 of the meter control switches on the steering

wheel and select 

.

Press 

  or 

  of  the  meter  control  switches  and  select  the

item to change, and then press 

.

If  the  function  is  turned  on  and
off  or  the  sensitivity,  etc.  is
changed  on  the  setting  screen,
the setting is changed each time
the 

 is pressed.

For  functions  that  allow  opera-
tion  contents,  display  contents,
etc., of a function to be selected,
the setting screen is displayed.

When  the  setting  screen  is  displayed,  select  the  setting  or
desired value (time, etc.) with the meter control switches.

*

1, 2

For  selectable  operation  con-
tents  and  setting  values,  select
the desired setting or value, and
then press 

.

To stop the selection, press 

.

When  the  setting  check  screen
is  displayed,  select  proceed  or
cancel and press 

.

*

1

: Depending on the items, a subsequent setting screen may be displayed

after selecting an item.

*

2

: For items which set the adjustment level or time, after the item is set,

the setting screen remains displayed until 

 is pressed.

 Settings display

1

2

3

152

2. Instrument cluster

Settings table

Item

Settings

Setting result

*

“On”

Turns  the  LTA  (Lane  Tracing  Assist)  lane
centering function on and off. (

P. 302)

“Off”

*

“On”

Turns the LTA (Lane Tracing Assist) steer-
ing assist function on and off. (

P. 302)

“Off”

*

“High”

Switches  the  LTA  (Lane  Tracing  Assist)
alert sensitivity. (

P. 302)

“Standard”

*

“On”

Turns  the  PCS  (Pre-Collision  System)  on
and off. (

P. 295)

“Off”

*

Early

Switches  the  PCS  (Pre-Collision  System)
warning timing. (

P. 295)

Middle

Late

*

“On”

Turns the Intuitive parking assist on and off.
(

P. 358)

“Off”

*

“On”

Turns  the  Parking  Support  Brake  function
on and off. (

P. 372)

“Off”

*

“On”

Turns the Blind Spot Monitor on and off. 
(

P. 345)

“Off”

*

“On”

Turns the LTA (Lane Tracing Assist) vehicle
sway warning on and off. (

P. 302)

“Off”

*

“High”

Switches  the  LTA  (Lane  Tracing  Assist)
vehicle sway warning sensitivity. (

P. 302)

“Standard”

“Low”

*

Height

Changes  the  display  position  and  bright-
ness of the head-up display. (

P. 160)

Brightness

*

“On”

Turns  the  RSA  (Road  Sign Assist)  on  and
off. (

P. 317)

“Off”

“km/h”

Switches the speed unit used by the screen
display.

“MPH”

153

2. Instrument cluster

2

Instru

me
nt clu

ster

*

: If equipped

“Meter Customize” settings ( 

 )

“Meter Customize” settings: 

P. 153

“Vehicle Settings” settings: 

P. 686

Item

Settings

Setting result

Item

Settings

Setting result

“Simple/Split
Screen”

*

1

“Simple”

Switches  the  display  mode  of
the main display. (

P. 121)

“Split”

“Screen
OFF”

*

2

“Yes”

Turns the multi-information dis-
play off.

“No”

“HV System 
Indicator” 
(

P. 129)

“ECO  Acceler-
ator Guidance”

“On”

Turns  the  “ECO  Accelerator
Guidance” on and off.

“Off”

“EV Indicator 
Light On/Off”

“On”

Turns the  EV indicator on and
off.

“Off”

154

2. Instrument cluster

“Pop-up  Display
On/Off”

“Navigation”

*

1

“On”

Turns the pop-up display of the
selected  item  on  the  multi-
information display on and off.

“Off”

“Instrument 
Panel Light”

“On”

“Off”

“Gasoline
Price”

“On”

“Off”

“Climate 
Settings”

“On”

“Off”

“Cruise 
Control 
Operation 
Display”

“On”

“Off”

“HUD 
Settings”

*

1

“On”

“Off”

“Driving  Mode
Select”

“On”

“Off”

“Multimedia
Menu”

*

1

“On”

“Off”

“Speed
Limit”

*

1, 3

(

P. 162)

“Off”

Switches  the  operation  con-
tents  of  the  speed  limit  func-
tion.

“Only Display”

“With Caution”

“Language”

“English” (English)

Switches  the  language  dis-
played on the screen.

“Français” (French)

“Español” (Spanish)

“Calendar”

Month/Day/Year

*

4

Changes  the  date  used  to
record fuel consumption data.

Day/Month/Year

*

5

“Eco Savings” 
(

P. 138)

“Gasoline Price”

Registers  data  used  to  calcu-
late and record “Eco Savings”.

“COMP. Consumption”

Item

Settings

Setting result

155

2. Instrument cluster

2

Instru

me
nt clu

ster

*

1

: If equipped

*

2

: When  the  screen  is  turned  off,  pressing 

  displays  the  setting  screen

again.

*

3

: U.S.A. only

*

4

: Except for Canada

*

5

: For Canada

“History
Reset”

“Monthly  Fuel
Consumption”

“Yes”

Deletes  data  of  “Fuel  Con-
sumption  Record  (Monthly)”.
(

P. 133)

“No”

“Eco Savings
(Monthly)”

“Yes”

Deletes  data  of  “Eco  Savings
(Monthly)”. (

P. 138)

“No”

“Eco-Diary 
(Daily)”

“Yes”

Deletes  data  of  “Eco-Diary
(Daily)”. (

P. 141)

“No”

“Eco-Diary 
(Monthly)”

“Yes”

Deletes  data  of  “Eco-Diary
(Monthly)”. (

P. 141)

“No”

“Initialization”

“Yes”

Returns the combination meter
settings to their initial settings.

“No”

Item

Settings

Setting result

156

2. Instrument cluster

Setting items

“Meter  Customize”  and  “Vehicle  Settings”  setting  items  are  not  selectable
during driving and cannot be operated. 
Also, the settings screen is temporarily canceled in the following situations.
• A warning message is displayed.
• The vehicle starts off.

Settings for functions not equipped to the vehicle are not displayed.

When a function is turned off, the related settings for that function are not
selectable.

Calendar settings

Calendar settings  contents are linked  to the recorded information  of “Fuel
Consumption  Record  (Monthly)”  (

P.  133)  and  “Eco-Diary”  (

P.  141).

When the calendar date is changed, each record is processed as follows:

*

: Month/date information not recorded is set to “0” or “0.0”.

When  the  recorded  contents  of  “Fuel  Consumption  Record  (Monthly)”  are
changed due to changing the calendar settings, the “Monthly” information of
“Eco Savings” (

P. 138) is also changed.

Contents of date 

change

“Fuel Consumption 

Record (Monthly)” 

record

“Eco-Diary” record

Date changed to future
date

Not cleared

*

Not cleared

*

Date changed to before
last month

Cleared

All cleared

Date changed to earlier
date 

within 

current

month

Not cleared

Only “Daily” data 

cleared

157

2. Instrument cluster

2

Instru

me
nt clu

ster

WARNING

Cautions while setting up the display

As the hybrid system needs to be operating during setting up the display,
ensure that the vehicle is parked in a place with adequate ventilation. In a
closed  area  such  as  a  garage,  exhaust  gases  including  harmful  carbon
monoxide (CO) may collect and enter the vehicle. This may lead to death or
a serious health hazard.

NOTICE

While setting up the display

To prevent 12-volt battery discharge, ensure that the hybrid system is oper-
ating while setting up the display features.

158

2. Instrument cluster

Head-up display

The units used on the display may differ depending on the target region.

Meter control switches

These switches are used when adjusting the display position and bright-
ness of the head-up display. (

P. 160)

“HUD” (Head-up display) switch

 (

P. 159

)

Vehicle speed display
Cruise control display

Dynamic radar cruise control (if equipped): 
Displays the set speed and approach warning display. (

P. 321)

Cruise control (if equipped): 
Displays the set speed only. (

P. 337)

Hybrid System Indicator (

P. 129)

: If equipped

The head-up display can display the current vehicle speed and
Hybrid System Indicator in front of the driver. Also, it can display
various types of information to assist the driver.

Operation switches and display contents

1

2

3

4

5

159

2. Instrument cluster

2

Instru

me
nt clu

ster

Insert display

 (

P. 161

)

This display inserts information from each driving support system accord-
ing to driving conditions.

Route guidance display (vehicles with navigation system) 
(

P. 162)

This  display  is  automatically  shown  when  the  navigation  system  is  per-
forming route guidance.

The “HUD” switch can be used to turn the head-up display on and off,
or switch the display contents.

When the head-up display is off

Pressing  the  “HUD”  switch
turns  the  head-up  display  on
and starts the display.

The indicator light on the “HUD”
switch comes on.
The display  position and  bright-
ness adjustment screen is auto-
matically displayed on the multi-
information display. (

P. 160)

When the head-up display is on

Display items can be switched by pressing the “HUD” switch.

Vehicle  speed  display  and
cruise control display

*

Vehicle  speed  display  and
Hybrid System Indicator

*

Refer to P. 129 for details of the
Hybrid System Indicator.

No  display  (head-up  display
is off)

The indicator light on the “HUD”
switch turns off.

*

: When the insert display of each

driving  support  system  is  dis-
played,  the display  is temporar-
ily turned off.

“HUD” (Head-up display) switch

6

7

1

2

3

160

2. Instrument cluster

In  order  to  improve  the  visibility  of  the  head-up  display,  the  display
position and brightness can be adjusted.

Displaying the adjustment screen on the multi-information display.
When the head-up display is on:

Select 

  on  the 

  screen  of  the  multi-information  dis-

play, and then press 

. (

P. 151)

When the head-up display is off:
When the “HUD” switch is pressed, the adjustment screen for the
head-up display automatically displays.

*

1

If an adjustment operation is not performed for approximately 6 seconds

*

2

,

the multi-information display automatically returns to the previous screen.

Adjusting  the  display  position  and  brightness  by  operating  the
meter control switches.

When 

  or 

  is  pressed,  the

position  of  the  head-up  display
changes.
When 

  or 

  is  pressed,  the

brightness  of  the  head-up  display
changes.
When the 

 is pressed, the multi-

information  display  returns  to  the
previous screen.

*

1

: This function can be turned off. (

P. 153)

*

2

: The adjustment screen may suddenly be canceled if it is interrupted by a

warning message shown on the display.

Display position and brightness adjustment

1

2


Content      ..     7      8      9      10     ..