Toyota 86 (2023 year). Manual in english - page 16
 

  Index      Toyota     Toyota 86 (2023 year). Manual in english


Search            copyright infringement  


Content      ..     14      15      16      17     ..


Toyota 86 (2023 year). Manual in english - page 16


253

4-6. Using other driving systems

4

Dr

iv

ing

Help lines

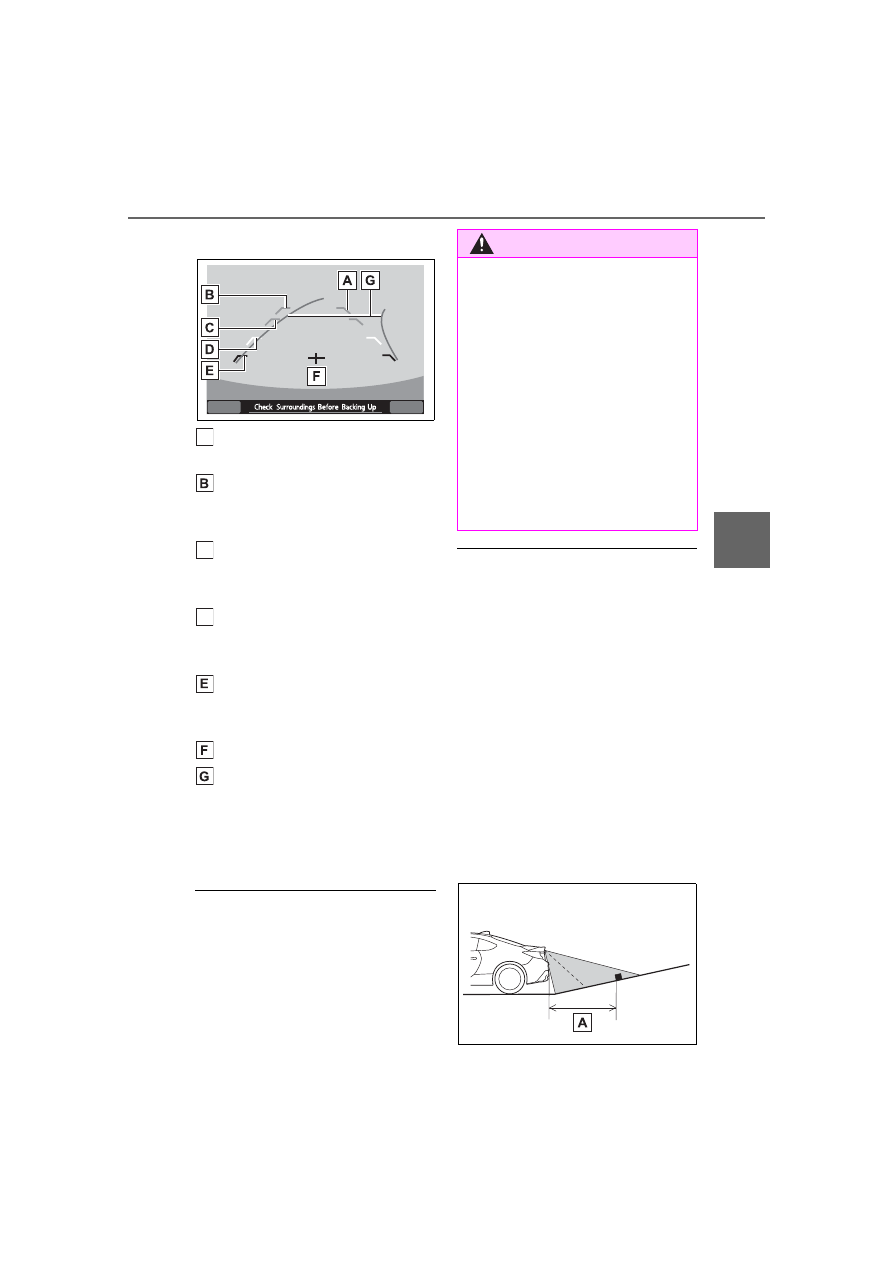
Vehicle width line (oblique 
vertical line)
Approx. 10 ft (3 m) from the 
bumper (green horizontal 
line)
Approx. 6 ft (2 m) from the 
bumper (green horizontal 
line)
Approx. 3 ft (1 m) from the 
bumper (yellow horizontal 
line)
Approx. 1.5 ft (0.5 m) from 
the bumper (red horizontal 
line)
Vehicle centerline
Dynamic guidelines

When the shift lever is set to R, 
the multimedia system screen 
the help lines together with the 
rear view image.

If you shift to the R range within sev-

eral seconds after turning on the 

engine switch, the warning message 

may not be displayed. Wait for sev-

eral seconds after turning on the 

engine switch before shifting to the 

R range. Then, the warning mes-

sage will be displayed.

When “Steering Angle Lines” is off, 

the dynamic guidelines will be dis-

appear on the multimedia system 

screen. To turn the dynamic guide-

lines on and off, refer to “MULTIME-

DIA OWNER’S MANUAL”.

Difference between screen 
image and actual road

The distance markers show the 
distance for a level road when 
the vehicle is not loaded. It may 
be different from the actual dis-
tance depending on the loading 
conditions or road conditions.

When there is an upward 
slope at the back

A

C

D

WARNING

When moving backward, always 

check the back with your eyes 

without relying on the help lines.

Otherwise, it may cause an 

accident or injury.

The actual position may be dif-

ferent from the indication of the 

help lines.

Differences may occur due to 

the number of passengers or 

the loaded cargo.

When the vehicle is on a slope 

or inclined against the road, the 

indication is different from the 

actual position.

254

4-6. Using other driving systems

3 ft (1 m)

The distance on the screen 
looks farther than the actual dis-
tance.

When there is a downward 
slope at the back

3 ft (1 m)

The distance on the screen 
looks nearer than the actual dis-
tance.

When cargo is loaded, the rear view 

distance on the screen looks farther 

than the actual distance as in an 

upward slope.

Feature of distance marker

3 ft (1 m) line
10 ft (3 m) line

The distance marker shows the 
distance on the road. If there is 
a car or another object close 

behind, distance cannot be cor-
rectly displayed.

A

A

A

255

4-6. Using other driving systems

4

Dr

iv

ing

Conventional Cruise Control 

enables you to maintain a con-

stant vehicle speed without hold-

ing your foot on the accelerator 

pedal and it is operative when the 

vehicle speed is 20 mph (30 km/h) 

or more.

Make sure the Conventional 

Cruise Control system is turned 

off when the Conventional Cruise 

Control is not in use to avoid unin-

tentionally setting of the Conven-

tional Cruise Control.

1

After the engine has started, 
press the “ON-OFF” switch of 
the cruise control switch.

The Conventional Cruise Control 

indicator (white) on the meter will 

illuminate.

2

Depress the accelerator 
pedal until the vehicle 
reaches the desired speed.

Conventional Cruise 

Control (vehicles with-

out the EyeSight)

Conventional Cruise Con-
trol is a driving support sys-
tem intended to allow more 
comfortable driving on 
expressways, freeways and 
interstate highways. It can 
be used to travel at a con-
stant speed by maintaining 
the vehicle speed set by the 
driver. Please remember 
that you should not exceed 
posted speed limits.

WARNING

Do not use the Conventional 

Cruise Control under any of the 

following conditions. These may 

cause loss of vehicle control.

• In heavy traffic

• On roads with sharp bends

• On winding roads

• On slippery roads, such as 

those covered with rain, ice or 

snow

• On steep hills

• Vehicle speed may exceed the 

set speed when driving down a 

steep hill.

• During emergency towing

When using the Conventional 

Cruise Control, always set the 

speed appropriately according 

to the speed limit, traffic flow, 

road conditions, and other con-

ditions.

To set Conventional 
Cruise Control

256

4-6. Using other driving systems

3

When the vehicle reaches 
the desired speed, push the 
cruise control switch to the “+ 
RES” side or the “- SET” 
side. The vehicle speed at 
the time when the switch is 
pushed will become the set 
vehicle speed, and constant 
speed driving will initiate.

At this time, the Conventional 

Cruise Control indicator (green) is 

illuminated in the meter. The set 

speed will be shown on the meter. 

You can change the displayed units 

by operating the meter display. 

(

P.400)

The vehicle will maintain the 

desired speed.
Vehicle speed can be temporarily 

increased while driving with the 

Conventional Cruise Control acti-

vated. Simply depress the acceler-

ator pedal to accelerate the vehicle. 

When the accelerator pedal is 

released, the vehicle will return to 

and maintain the previous cruising 

speed.

When setting the displayed 
unit as “MPH”
When setting the displayed 
unit as “km/h”

The Conventional Cruise Con-
trol can be temporarily canceled 
in the following ways.

When the Conventional Cruise 
Control is cancelled, the Conven-
tional Cruise Control indicator in the 
meter will change from green to 
white.

Pulling the cruise control 
switch.

Depress the brake pedal.

Depress the clutch pedal.

To resume the Conventional 
Cruise Control after it has been 
temporarily canceled and with 
vehicle speed of approximately 
20 mph (30 km/h) or more, push 
the lever up to return to the orig-
inal cruising speed automati-
cally.

At this time, the Conventional 

To temporarily cancel the 
Conventional Cruise Con-
trol

A

257

4-6. Using other driving systems

4

Dr

iv

ing

Cruise Control indicator in the 
meter will change from white to 
green.

There are two ways to turn off 
the Conventional Cruise Con-
trol:

Press the “ON-OFF” switch of 
the cruise control switch 
again.

Turn the engine switch to the 
ACC or OFF (but only when 
the vehicle is completely 
stopped).

To increase the speed (by 
the cruise control switch)

Push the cruise control switch to 
the “+RES” side and hold it until 
the vehicle reaches the desired 
speed. Then, release the switch. 
The vehicle speed at that 
moment will be memorized and 
treated as the new set speed.

When setting the displayed 
unit as “MPH”:

The set speed can be increased 
1 mph (1.6 km/h) each time by 
pushing the cruise control 
switch to the “+RES” side.

When setting the displayed 
unit as “km/h”:

The set speed can be increased 
1 km/h (0.6 mph) each time by 
pushing the cruise control 
switch to the “+RES” side.

To increase the speed (by 
accelerator pedal)

1

Depress the accelerator 
pedal to accelerate the vehi-
cle to the desired speed.

2

Push the cruise control 
switch to the “-SET” side 
once. Now the desired speed 
is set and the vehicle will 
keep running at that speed 
without depressing the accel-
erator pedal.

To decrease the speed (by 
the cruise control switch)

Push the cruise control switch to 
the “-SET” side and hold it until 
the vehicle reaches the desired 

To turn off the Conven-
tional Cruise Control

To change the cruising 
speed

258

4-6. Using other driving systems

speed. Then, release the switch. 
The vehicle speed at that 
moment will be memorized and 
treated as the new set speed.

When setting the displayed 
unit as “MPH”:

The set speed can be 
decreased 1 mph (1.6 km/h) 
each time by pushing the cruise 
control switch to the “-SET” side.

When setting the displayed 
unit as “km/h”:

The set speed can be 
decreased 1 km/h (0.6 mph) 
each time by pushing the cruise 
control switch to the “-SET” side.

To decrease the speed (by 
brake pedal)

1

Depress the brake pedal to 
release Conventional Cruise 
Control temporarily.

2

When the speed decreases 
to the desired speed, push 
the cruise control switch to 
the “-SET” side once. Now 
the desired speed is set and 
the vehicle will keep running 
at that speed without 
depressing the accelerator 
pedal.

*

: If equipped

Press the sport mode switch or 
snow mode switch to change 
between normal mode and sport 
mode or snow mode respectively.
To cancel sport mode or snow 
mode, press the same switch again.

1

Normal mode

Provides an optimal balance of fuel 
economy, quietness, and dynamic 
performance. Suitable for normal 
driving.

2

Sport mode

Use sport mode for sporty driving or 
when driving in mountainous 
regions with lots of curves.
The “SPORT” indicator comes on.
Also, if the mode is changed to 
sport mode while driving with the 
shift lever in the D position, the 
selected gear, from “D1” to “D6”, 
will be displayed on the meter.

3

Snow mode

Driving mode select 

switch

*

The driving modes can be 
selected to suit driving con-
dition.

Selecting a drive mode

259

4-6. Using other driving systems

4

Dr

iv

ing

Use snow mode for accelerating 
and driving on slippery road sur-
faces such as snow.
The snow mode indicator comes 
on.

Sport mode

In sport mode, lower gears are 

used and gears change at a 

higher engine speed.

In the following situations, it may 

not be possible to change to sport 

mode. When the mode cannot be 

changed to sport mode, a buzzer 

will sound and a message will be 

displayed on the multi-information 

display.

• When the Adaptive Cruise Control 

or Conventional Cruise Control is 

operating

• When the engine is cold

Snow mode

To prevent slipping, 1st gear cannot 

be selected when in snow mode.

Automatic deactivation of sport 

mode and snow mode

In the following situations, the driv-

ing mode is automatically deacti-

vated:

When the engine is turned off after 

driving in sport mode or snow 

mode.

When the Adaptive Cruise Control 

or Conventional Cruise Control is 

activated while driving in sport 

mode.

When in sport mode and stop-

ping/starting off is automatically 

performed in second gear. 

(

P.150)

When the engine switch is 
turned to ON, the hill-start assist 
control ON indicator will illumi-
nate.
When the hill-start assist control 
operates, the indicator will flash.

1

Park your vehicle in a flat, 
safe location.

Make sure that the parking brake is 

securely engaged.

2

Stop the engine by turning 
the engine switch off.

Hill-start assist con-

trol

Hill-start assist control 
helps to maintain braking 
force to assist starting off 
forward while facing uphill 
or starting off backward 
while facing downhill.

Hill-start assist control 
ON indicator

Disabling hill-start assist 
control

260

4-6. Using other driving systems

3

Start the engine and check 
that the ABS warning light 
and slip indicator are off.

4

Press and hold the 


switch for approximately 30 
seconds.

Check that the TRAC OFF and 

VSC OFF indicators illuminate and 

then turn off.

5

Within 5 seconds after the 
indicator lights turn off, 

release the 

 switch. Then, 

press the 

 switch again 

within 2 seconds of releasing 
it.

The hill-start assist control ON indi-

cator will turn off and then illumi-

nate.

6

Turn the engine switch off.

7

Start the engine again and 
check that the hill-start assist 
control ON indicator turns off.

Hill-start assist control will be dis-

abled.

To enable hill-start assist con-
trol, perform steps 

1

 through 

7


again.

When enabling the hill-start 

assist control

If the hill-start assist control ON 

indicator does not turn off or a 

mistake was made during the pro-

cedure, turn the engine switch off 

and start the procedure from step 

4

 again.

If the 

 switch is pressed and 

held for 30 seconds or more, the 

TRAC OFF indicator and VSC 

OFF indicator will turn off and the 

switch will become inoperable. In 

this case, the VSC will operate in 

normal mode. (

P.263) If the 

engine switch is turned off and 

then the engine is started again, 
operation of the 

 switch will 

become possible.

Operating conditions of 

hill-start assist control

When the following conditions are 

met, the hill-start assist control will 

operate:

Vehicles with an automatic trans-

mission: The shift lever is in D or 

M (when starting off forward on 

while facing uphill) or in R (when 

starting off backward while facing 

downhill).

Vehicles with a manual transmis-

sion: The shift lever is in a position 

other than R (when starting off for-

ward while facing uphill) or in R 

(when starting off backward while 

facing downhill).

The vehicle is stopped.

The accelerator pedal is not 

depressed.

The parking brake is not engaged.

Hill-start assist control will not 

operate when

Hill-start assist control will not oper-

ate when any of the following condi-

tions are met:

Vehicles with an automatic trans-

261

4-6. Using other driving systems

4

Dr

iv

ing

mission: The shift lever is in a 

position other than D or M (when 

facing uphill) or in a position other 

than R (when facing downhill).

Vehicles with a manual transmis-

sion: The shift lever is in R (when 

facing uphill) or in a position other 

than R (when facing downhill).

Vehicles with an automatic trans-

mission: The accelerator pedal is 

depressed.

The parking brake is applied.

Vehicles with a manual transmis-

sion: The clutch is engaged.

Approximately 2 seconds have 

elapsed since the brake pedal 

was released.

The hill-start assist control ON 

indicator is not illuminated.

The engine switch is turned to 

ACC or OFF.

Notes for hill-start assist con-

trol

A slight jolt may be felt when start-

ing off backward with the shift 

lever in R and then moving for-

ward.

If the braking power of hill-start 

assist control is insufficient, 

depress the brake pedal.

While the vehicle is stopped, 

make sure to depress the brake 

pedal.

The system may be malfunc-

tioning when

In the following situations, the sys-

tem may be malfunctioning. Have 

the vehicle inspected by your Toyota 

dealer.

The slip indicator is illuminated.

The hill-start assist control ON 

indicator turns off and a buzzer 

sounds.

WARNING

Hill-start assist control pre-

cautions

Do not overly rely on hill-start 

assist control. Hill-start assist 

control may not operate effec-

tively on steep inclines and 

roads covered with ice.

Unlike the parking brake, 

hill-start assist control is not 

intended to hold the vehicle sta-

tionary for an extended period 

of time. Do not attempt to use 

hill-start assist control to hold 

the vehicle on an incline, as 

doing so may lead to an acci-

dent.

Do not stop the engine while 

hill-start assist control is operat-

ing, as hill-start assist control 

will stop operating, possibly 

leading to an accident.

262

4-6. Using other driving systems

ABS (Anti-lock Brake Sys-
tem)

Helps to prevent wheel lock 
when the brakes are applied 
suddenly, or if the brakes are 
applied while driving on a slip-
pery road surface

Brake assist

Generates an increased level of 
braking force after the brake 
pedal is depressed when the 
system detects a panic stop sit-
uation

VSC (Vehicle Stability Con-
trol)

Helps the driver to control skid-
ding when swerving suddenly or 
turning on slippery road sur-
faces

TRAC (Traction Control)

Helps to maintain drive power 

and prevent the drive wheels 
from spinning when starting the 
vehicle or accelerating on slip-
pery roads
The TRAC system is also 
equipped with the brake LSD 
function.

Hill-start assist control

P.259

EPS (Electric Power Steer-
ing)

Employs an electric motor to 
reduce the amount of effort 
needed to turn the steering 
wheel

When the TRAC/VSC systems 

are operating

The slip indicator will flash while the 

TRAC (Including brake LSD func-

tion)/VSC systems are operating.

Disabling the TRAC system

If the vehicle gets stuck in mud, dirt 

or snow, the TRAC system may 

reduce power from the engine to the 
wheels. Pressing 

 switch to turn 

the system off may make it easier 

for you to rock the vehicle in order to 

free it.
In this case, the brake LSD function 

remains on.
To turn the TRAC system off, quickly 
press and release 

 switch.

Driving assist systems

To help enhance driving 
safety and performance, the 
following systems operate 
automatically in response to 
various driving situations. 
Be aware, however, that 
these systems are supple-
mentary and should not be 
relied upon too heavily 
when operating the vehicle.

Summary of the driving 
assist systems

263

4-6. Using other driving systems

4

Dr

iv

ing

The TRAC OFF indicator will come 
on.

Press 

 switch again to turn the 

system back on.

“TRACK” mode

Your vehicle is equipped with two 

types of control modes to accommo-

date various driving preferences. 

The control modes can be selected 

with the “TRACK” switch. Normal 

mode allows secure and smooth 

normal driving. When the switch is 

pressed and held for 1 second or 

more, “TRACK” mode is activated. 

When “TRACK” mode is selected, 

the control characteristics of VSC, 

TRAC, etc. will be changed and 

sportier than normal driving will be 

possible.
When “TRACK” mode is selected, 
the multi-information display will 
change to the “TRACK” mode dis-

play and the “TRACK” indicator and 
VSC OFF indicator will illuminate.
To change back to normal mode 

while in “TRACK” mode, press 


switch or the “TRACK” switch.

Turning off both TRAC and VSC 

systems

To turn the TRAC and VSC systems 
off, press and hold 

 switch for 

more than 3 seconds while the vehi-

cle is stopped.
The TRAC OFF indicator and the 
VSC OFF indicator will come on.
However, on vehicles with an auto-
matic transmission, the brake LSD 
function will remain on.

Press 

 switch again to turn the 

systems back on.

Selecting TRAC mode and VSC mode

Modes can be selected to suit your driving conditions as follows:

Driving condi-

tions

TRAC modes VSC modes

Brake LSD 

function

Indicators

Normal roads Normal mode Normal mode Normal mode

Rough roads

OFF

Normal mode Normal mode

264

4-6. Using other driving systems

*1

:Vehicles with an automatic transmission

*2

:Vehicles with a manual transmission

Sounds and vibrations caused 

by the ABS, brake assist, TRAC 

and VSC systems

A sound may be heard from the 

engine compartment when the 

brake pedal is depressed repeat-

edly, when the engine is started or 

just after the vehicle begins to 

move. This sound does not indi-

cate that a malfunction has 

occurred in any of these systems.

Any of the following conditions 

may occur when the above sys-

tems are operating. None of these 

indicates that a malfunction has 

occurred.

• Vibrations may be felt through the 

vehicle body and steering.

• A motor sound may be heard after 

the vehicle comes to a stop.

• The brake pedal may pulsate 

slightly after the ABS is activated.

• The brake pedal may move down 

slightly after the ABS is activated.

EPS operation sound

When the steering wheel is oper-

ated, a motor sound (whirring 

sound) may be heard. This does not 

indicate a malfunction.

Automatic reactivation of TRAC 

and VSC systems

After turning the TRAC and VSC 

systems off, the systems will be 

automatically reactivated in the fol-

lowing situations:

When the engine switch is turned 

off.

If only the TRAC system is turned 

off, the TRAC will turn on when 

vehicle speed is more than 

approximately 31 mph (50 km/h).

If both the TRAC and VSC sys-

tems are turned off, automatic 

reactivation will not occur when 

vehicle speed increases.

Reduced effectiveness of the 

EPS system

The effectiveness of the EPS sys-

tem is reduced to prevent the sys-

tem from overheating when there is 

frequent steering input over an 

extended period of time. The steer-

ing wheel may feel heavy as a 

result. Should this occur, refrain 

from excessive steering input or 

stop the vehicle and turn the engine 

off. The EPS system should return 

to normal after a little while.

Automatic deactivation of 

“TRACK” mode

When the engine switch is turned off 

after driving in “TRACK” mode, the 

mode is automatically deactivated.

Sport driving

“TRACK” 

mode

“TRACK” 

mode

“TRACK” 

mode

OFF

OFF

“TRACK” 

mode

*1

OFF

*2

Driving condi-

tions

TRAC modes VSC modes

Brake LSD 

function

Indicators

265

4-6. Using other driving systems

4

Dr

iv

ing

WARNING

The ABS does not operate 

effectively when

The limits of tire gripping perfor-

mance have been exceeded 

(such as excessively worn tires 

on a snow covered road).

The vehicle hydroplanes while 

driving at high speed on wet or 

slick roads.

Stopping distance when the 

ABS is operating may exceed 

that of normal conditions

The ABS is not designed to 

shorten the vehicle’s stopping dis-

tance. Always maintain a safe dis-

tance from the vehicle in front of 

you, especially in the following sit-

uations:

When driving on dirt, gravel or 

snow-covered roads

When driving with tire chains

When driving over bumps in the 

road

When driving over roads with 

potholes or uneven surfaces

TRAC may not operate effec-

tively when

Directional control and power may 

not be achievable while driving on 

slippery road surfaces, even if the 

TRAC system is operating. Do not 

drive the vehicle in conditions 

where stability and power may be 

lost.

When the VSC and/or brake 

LSD function is activated

The slip indicator flashes. Always 

drive carefully. Reckless driving 

may cause an accident. Exercise 

particular care when the indicator 

flashes.

When the TRAC/VSC systems 

are turned off

Be especially careful and drive at 

a speed appropriate to the road 

conditions. As these are the sys-

tems to help ensure vehicle stabil-

ity and driving force, do not turn 

the TRAC/VSC systems off 

unless necessary.

Replacing tires

Make sure that all tires are of the 

specified size, brand, tread pat-

tern and total load capacity. In 

addition, make sure that the tires 

are inflated to the recommended 

tire inflation pressure level.
The ABS, TRAC and VSC sys-

tems will not function correctly if 

different tires are installed on the 

vehicle.

Contact your Toyota dealer for fur-

ther information when replacing 

tires or wheels.

Handling of tires and the sus-

pension

Using tires with any kind of prob-

lem or modifying the suspension 

will affect the driving assist sys-

tems, and may cause a system to 

malfunction.

266

4-7. Driving tips

4-7.Driving tips

Use fluids that are appropriate 
to the prevailing outside tem-
peratures.

• Engine oil
• Engine coolant
• Washer fluid

Have a service technician 
inspect the condition of the 
battery.

Have the vehicle fitted with 
four snow tires.

Make sure to install 4 tires that are 
of the specified size, and that all 4 
tires are the same size, same 
maker, same brand and tread pat-
tern.

Perform the following according 
to the driving conditions:

Do not try to forcibly open a 
window or move a wiper that 
is frozen. Pour warm water 
over the frozen area to melt 
the ice. Wipe away the water 
immediately to prevent it from 
freezing.

To ensure proper operation of 
the climate control system 
fan, remove any snow that 
has accumulated on the air 
inlet vents in front of the wind-
shield.

Check for and remove any 
excess ice or snow that may 
have accumulated on the 
exterior lights, vehicle’s roof, 

Winter driving tips

Carry out the necessary 
preparations and inspec-
tions before driving the 
vehicle in winter. Always 
drive the vehicle in a man-
ner appropriate to the pre-
vailing weather conditions.

Preparation for winter

WARNING

Driving with snow tires

Observe the following precautions 

to reduce the risk of accidents.

Failure to do so may result in a 

loss of vehicle control and cause 

death or serious injury.

Use tires of the specified size, 

and that are the same size, 

same maker, same brand and 

tread pattern.

Maintain the recommended 

level of air pressure.

Do not drive in excess of 75 

mph (120 km/h), regardless of 

the type of snow tires being 

used.

Use snow tires on all, not just 

some wheels.

NOTICE

Repairing or replacing snow 

tires

Request repairs or replacement of 

snow tires from Toyota dealers or 

legitimate tire retailers.

This is because the removal and 

attachment of snow tires affects 

the operation of the tire pressure 

warning valves and transmitters.

Before driving the vehicle

267

4-7. Driving tips

4

Dr

iv

ing

chassis, around the tires or on 
the brakes.

Remove any snow or mud 
from the bottom of your shoes 
before getting in the vehicle.

If a door is opened and closed 
when its side window is fro-
zen, the window safety device 
will operate and the side win-
dow open/close function 
linked to door operation may 
not operate correctly. 
If this occurs, perform the fol-
lowing after the ice has 
melted.

1

Open the window to the 
approximately half open posi-
tion with the door closed.

2

Press and hold the power 
window switch in the 
one-touch opening position. 
After the window is fully 
opened, continue pressing 
the switch for approximately 
1 second.

3

Pull and hold the power win-
dow switch in the one-touch 
closing position. After the 
window is fully closed, con-
tinue pulling the switch for 
approximately 1 second.

The window position wil lbe reset 

and the operation of the window 

safety device will be canceled.

Accelerate the vehicle slowly, 
keep a safe distance between 

you and the vehicle ahead, and 
drive at a reduced speed suit-
able to road conditions.

Park the vehicle and shift the 
shift lever to P (automatic 
transmission), or 1 or R (man-
ual transmission) without set-
ting the parking brake. The 
parking brake may freeze up, 
preventing it from being 
released. If the vehicle is 
parked without setting the 
parking brake, make sure to 
block the wheels.
Failure to do so may be dan-
gerous because it may cause 
the vehicle to move unexpect-
edly, possibly leading to an 
accident.

Vehicles with an automatic 
transmission: If the vehicle is 
parked without setting the 
parking brake, confirm that 
the shift lever cannot be 
moved out of P

*

.

*

: The shift lever will be locked if it is 

attempted to be shifted from P to 
any other position without 
depressing the brake pedal. If the 
shift lever can be shifted from P, 
there may be a problem with the 
shift lock system. Have the vehi-
cle inspected by your Toyota 
dealer immediately.

When driving the vehicle

When parking the vehicle

268

4-7. Driving tips

Tire chains cannot be used on 
your vehicle because of the lack 
of clearance between the tires 
and vehicle body.
When tire chains cannot be 
used, use of another type of 
traction device (such as spring 
chains) may be acceptable if 
use on your vehicle is recom-
mended by the device manufac-
turer, taking into account tire 
size and road conditions. Follow 
the device manufacturer's 
instructions, especially regard-
ing maximum vehicle speed.
To help avoid damage to your 
vehicle, drive slowly, readjust or 
remove the device if it is con-
tacting your vehicle, and do not 
spin your wheels. Damage 
caused to your vehicle by use of 
a traction device is not covered 
under warranty.
Make certain that any traction 
device you use is an SAE class 
“S” device, and use it on the rear 
wheels only. Always use the 
utmost care when driving with a 
traction device. Overconfidence 
because you are using a traction 
device could easily lead to a 
serious accident.

We recommend that you consult 
your Toyota dealer for informa-

tion about the chains that you 
can use.

Tire chains

Selecting tire chains


Content      ..     14      15      16      17     ..