Toyota Corolla Hybrid (2022 year). Manual in english - page 18
 

  Index      Toyota     Toyota Corolla Hybrid (2022 year). Manual in english


Search            copyright infringement  


Content      ..     16      17      18      19     ..


Toyota Corolla Hybrid (2022 year). Manual in english - page 18


290

5-4. Other settings

3

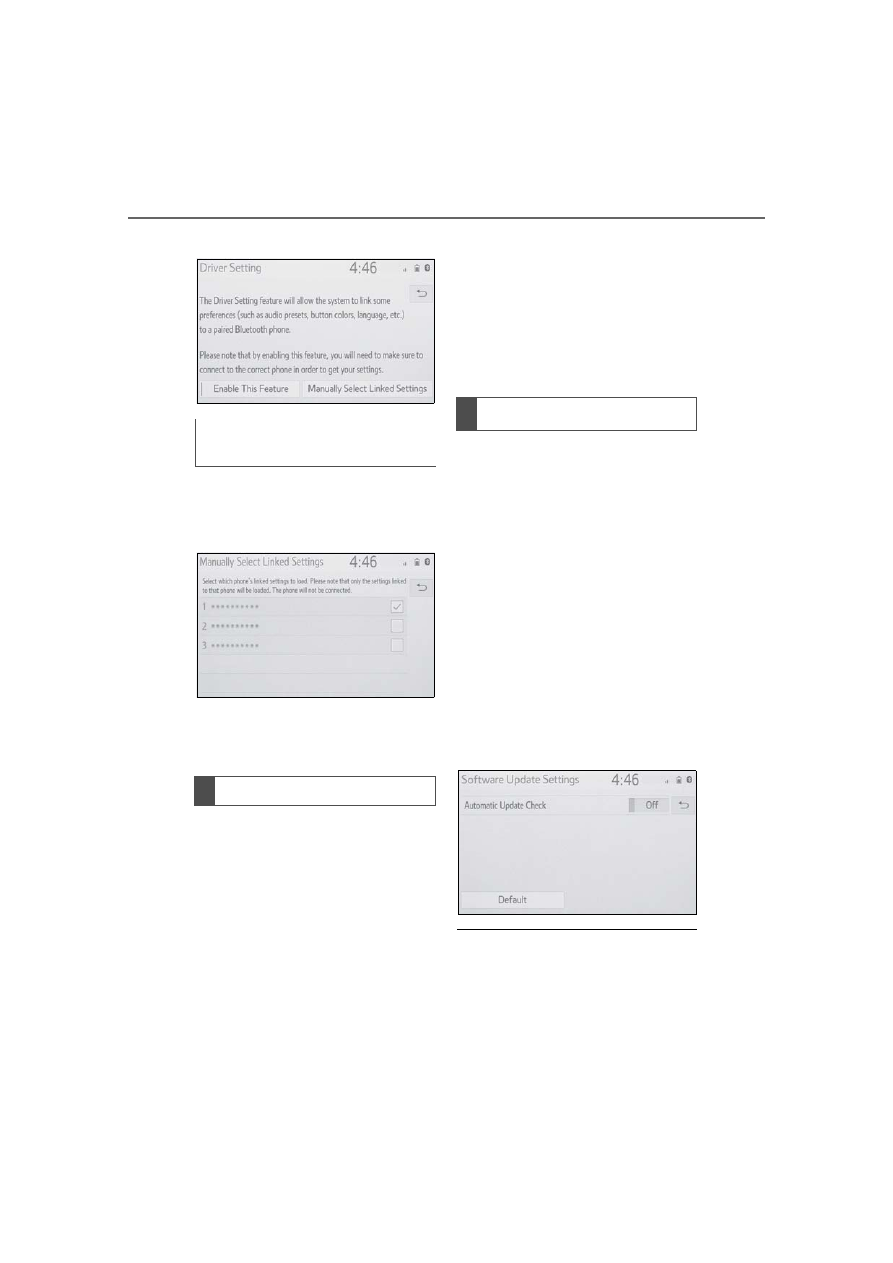
Select “Enable This Feature”.

1

Select “Manually Select 
Linked Settings”.

2

Select the desired phone.

After a few seconds, loaded screen 
automatically switches to the home 
screen.

Registered or changed per-
sonal settings will be deleted or 
returned to their default condi-
tions.

1

Display the general settings 
screen. (

P.287)

2

Select “Delete Personal 
Data”.

3

Select “Delete”.

4

Select “Yes” when the confir-
mation screen appears.

Examples of settings that can be 

returned to their default conditions:

Audio settings

Phone settings

etc.

*

: This function is not made avail-

able in some countries or areas.

When the automatic update 
check function is enabled, if a 
software update is available 
from the Toyota response cen-
ter, a message will be displayed.

1

Display the general settings 
screen. (

P.287)

2

Select “Software Update Set-
ting”.

3

Select “Automatic Update 
Check” to enable/disable the 
automatic update check func-
tion.

When software update information 

is displayed, contact your Toyota 

dealer.

Manually select linked set-
tings

Deleting personal data

Software update settings

*

291

5-4. Other settings

5

Audio

1

Press the “MENU” button.

2

Select “Setup”.

3

Select “Voice”.

4

Select the desired items to 
be set.

Select to adjust the volume of 
voice guidance.
Select to set the voice recog-
nition prompts.
Select to train voice recogni-
tion.

The voice command system 
adapts the user accent.
Select to start the voice rec-
ognition tutorial.
Select to set the voice 
prompt interrupt on/off.
Select to reset all setup 
items.

Voice settings

Voice volume, etc. can be 
set.

Displaying the voice set-
tings screen

Voice settings screen

292

5-4. Other settings

1

Press the “MENU” button.

2

Select “Setup”.

3

Select “Vehicle”.

4

Select the desired items to 
be set.

Select to set vehicle customi-
zation. (

P.528)

Select to set valet mode. 
(

P.292)

The security system can be set 
to on by entering a security code 
(4-digit number).
When set to on, the system will 
become inoperative once the 
electrical power source is dis-
connected until the security 
code is entered.

1

Display the vehicle settings 
screen. (

P.292)

2

Select “Valet Mode”.

3

Enter the 4-digit personal 
code and select “OK”.

4

Enter the same 4-digit per-
sonal code again and select 
“OK”.

The system will request that 
you input the security code 
again to confirm that you 
remember it correctly.

When valet mode activates, 
the system stops and a secu-
rity code (4-digit number) 
standby screen is displayed.

If the 4-digit personal code is forgot-

ten, please contact your Toyota 

dealer.

Enter the 4-digit personal code 
and select “OK”.

If an incorrect security code (4-digit 

number) is entered 6 times, the sys-

tem will not accept another security 

Vehicle settings

Settings are available for 
vehicle customization, etc.

Displaying the vehicle 
settings screen

Vehicle settings screen

Setting the valet mode

If the valet mode has been 
activated

293

5-4. Other settings

5

Audio

code (4-digit number) for 10 min-

utes.

294

5-5. Using the audio/visual system

5-5.Using the audio/visual system

The audio control screen can be reached by the following methods:

From the “AUDIO” button

Press the “AUDIO” button.

From the “MENU” button

Press the “MENU” button, then select “Audio”.

• Using the radio (

P.299)

• Playing a USB memory (

P.305)

• Playing an iPod/iPhone (Apple CarPlay

*

) (

P.307)

• Using the Android Auto

*

 (

P.310)

• Playing a Bluetooth

®

 device (

P.311)

• Using the steering wheel audio switches (

P.315)

• Audio system settings (

P.317)

*

: This function is not made available in some countries or areas.

Quick reference

Functional overview

295

5-5. Using the audio/visual system

5

A

ud

io

“POWER VOLUME” knob: 
Press to turn the audio/visual 
system on and off. The system 
turns on in the last mode used. 
Turn this knob to adjust the vol-
ume.

1

Press the “AUDIO” button.

2

Select “Source” or press 
“AUDIO” button again.

3

Select the desired source.

Dimmed screen buttons cannot be 

operated.

When there are two pages, select 

 or 

 to change the page.

When an Apple CarPlay/Android 

Auto connection is established, 

some system functions, such as 

the following, will be replaced by 

similar Apple CarPlay/Android 

Auto function or will become 
unavailable

*

:

• iPod (Audio Playback)

• USB audio/USB video
• Bluetooth

®

 audio

• Toyota apps

*

: This function is not made avail-

able in some countries or areas.

1

Display the audio source 
selection screen. (

P.295)

2

Select “Reorder”.

Some basics

This section describes 
some of the basic features 
of the audio/visual system. 
Some information may not 
pertain to your system.

Your audio/visual system 
works when the power 
switch is in ACC or ON.

NOTICE

To prevent the battery from being 

discharged, do not leave the 

audio/visual system on longer 

than necessary when the hybrid 

system is not running.

Turning the system on 
and off

Selecting an audio source

Reordering the audio 
source

296

5-5. Using the audio/visual system

3

Select the desired audio 
source then 

 or 

 to reor-

der.

4

Select “OK”.

Connect a device.

Turn on the power of the device if it 
is not turned on.

If a USB hub is plugged-in, two 

devices can be connected at a 

time.

Even if a USB hub is used to con-

nect more than two USB devices, 

only the first two connected 

devices will be recognized.

If a USB hub that has more than 

two ports is connected to the USB 

port, devices connected to the 

USB hub may not charge or be 

inoperable, as the supply of cur-

rent may be insufficient.

1

Display the audio control 
screen. (

P.295)

2

Select “Sound”.

3

Select the desired item to be 
set.

Select to set the tre-
ble/mid/bass. (

P.296)

Select to set the fader/bal-
ance. (

P.297)

Select to set the automatic 
sound levelizer. (

P.297)

Treble/Mid/Bass

How good an audio program 
sounds is largely determined by 
the mix of the treble, mid and 
bass levels. In fact, different 
kinds of music and vocal pro-
grams usually sound better with 
different mixes of treble, mid 
and bass.

1

Select “Treble/Mid/Bass”.

2

Select the desired screen 
button.

Select “+” or “-” to adjust 
high-pitched tones.

USB port

Sound settings

297

5-5. Using the audio/visual system

5

Audio

Select “+” or “-” to adjust 
mid-pitched tones.
Select “+” or “-” to adjust 
low-pitched tones.

Fader/Balance

A good balance of the left and 
right stereo channels and of the 
front and rear sound levels is 
also important.
Keep in mind that when listening 
to a stereo recording or broad-
cast, changing the right/left bal-
ance will increase the volume of 
1 group of sounds while 
decreasing the volume of 
another.

1

Select “Fader/Balance”.

2

Select the desired screen 
button.

Select to adjust the sound 
balance between the front 
and rear speakers.
Select to adjust the sound 
balance between the left and 
right speakers.

Automatic sound levelizer 
(ASL)

The system adjusts to the opti-
mum volume and tone quality 

according to vehicle speed to 
compensate for increased road 
noise, wind noise, or other 
noises while driving.

1

Select “Automatic Sound 
Levelizer”.

2

Select “High”, “Mid”, “Low” or 
“Off”.

Screen format settings

The screen format can be 
selected for USB video.

1

Press the “MENU” button.

2

Select “Setup”.

3

Select “Audio”.

4

Select “Common”.

5

Select “Screen Format”.

6

Select the desired item to be 
adjusted.

Select to display a 4 : 3 
screen, with either side in 
black.
Select to enlarge the image 
horizontally and vertically to 
full screen.
Select to enlarge the image 
by the same ratio horizontally 

Audio screen adjustment

298

5-5. Using the audio/visual system

and vertically.

Contrast and brightness
adjustment

The contrast and brightness of 
the screen can be adjusted.

1

Press the “MENU” button.

2

Select “Setup”.

3

Select “Audio”.

4

Select “Common”.

5

Select “Display”.

6

Select the desired item to be 
adjusted.

“Contrast”

“+”: Select to strengthen the con-
trast of the screen.
“-”: Select to weaken the contrast of 
the screen.

“Brightness”

“+”: Select to brighten the screen.
“-”: Select to darken the screen.

Depending on the audio source, 

some functions may not be avail-

able.

1

Press this switch to operate 
the voice command system.

The voice command system and its 

list of commands can be operated. 

(

P.330)

Voice command system

299

5-6. Radio operation

5

Audio

5-6.Radio operation

*

: If equipped

The radio operation screen can 
be reached by the following 
methods:

P.295

Select to display the audio 
source selection screen.
Select to display the preset 
stations screen. (

P.299)

Select to display a list of 
receivable stations. (

P.300)

Select to display the radio 
options screen. (

P.300)

Select to display the sound 
setting screen. (

P.296)

Select to tune to preset sta-
tions/channels. (

P.299)

Press to seek for stations in 
the relevant program type.
Press and hold for continu-
ous seek.
Turn to step up/down fre-
quencies.
Turn to move up/down the 
station. Also, the knob can be 
used to enter selections on 
the list screens by pressing it.

The radio automatically changes to 

stereo reception when a stereo 

broadcast is received.

Radio mode has a mix preset 
function, which can store up to 
36 stations (6 stations per page 
x 6 pages) from any of the AM, 
FM or SXM bands.

1

Tune in the desired station.

AM radio/FM radio/Siri-

usXM

®

 Satellite 

Radio(SXM)

*

Overview

Control screen

Control panel

Presetting a station

300

5-6. Radio operation

2

Select and hold “(Hold Edit)”.

To change the preset station 
to a different one, select and 
hold the preset station.

The number of preset radio stations 

displayed on the screen can be 

changed. (

P.317)

1

Select “Station List”.

2

Select “AM”, “FM” or “SXM”.

Select the desired program genre 

when the genre selection screen is 

displayed.

3

Select the desired station.

Refreshing the station list

1

Select “Refresh”.

“Cancel Refresh”: Select to can-
cel the refresh.
“Source”: Select to change to 
another audio source while 
refreshing.

The audio/visual system sound is 

muted during refresh operation.

In some situations, it may take 

some time to update the station 

list.

1

Select “Options”.

2

Select the desired item to be 
set.

When “SXM Tune Start” is 
turned on, the current song is 
played from the beginning 
when you select the channel.
Analog FM only: Select to 
display RBDS text mes-
sages.
Select to scan for receivable 
stations.

This audio/visual system is 
equipped with Radio Broadcast 
Data Systems (RBDS). RBDS 
mode allows text messages to 
be received from radio stations 
that utilize RBDS transmitters.
When RBDS is on, the radio can 
do the following functions.
• Only selecting stations of a 

particular program type

• Displaying messages from 

radio stations

• Searching for a stronger sig-

Selecting a station from 
the list

Radio options

Radio Broadcast Data 
System

301

5-6. Radio operation

5

A

ud

io

nal station

RBDS features are available 
only when listening to an FM 
station that broadcasts RBDS 
information and the “FM Info” 
function is on. (

P.300)

All SiriusXM services, including 
satellite radio and data services, 
plus streaming services, require 
a subscription, sold separately 
or as a package by Sirius XM 
Radio Inc. (or in Canada, Sirius 
XM Canada Inc.), after any trial 
subscription which may be 
included with your vehicle pur-
chase or lease. To subscribe 
after your trial subscription, call 
1-877-447-0011 (U.S.A.) or 
1-877-438-9677 (Canada).

Important information 
about your subscription

Your SiriusXM services will 
automatically stop at the end of 
your trial unless you decide to 
subscribe. If you decide to con-
tinue service, the paid subscrip-
tion plan you choose will 
automatically renew and you will 
be charged the rate in effect at 
that time and according to your 
chosen payment method. Fees 
and taxes apply. You may can-
cel at any time by calling 
1-866-635-2349. See SiriusXM 
Customer Agreement for com-

plete terms at www.siri-
usxm.com (U.S.A.) or 
www.siriusxm.ca (Canada). All 
fees and programming subject 
to change. Traffic information 
not available in all markets.

About SiriusXM Services

• Most in-car trials today include 

SiriusXM’s best package — All 

Access. It includes every channel 

available on your radio, plus 

streaming.

SiriusXM All Access Subscription

• Listen everywhere with All 

Access. You get every channel 

available in your ride, plus you can 

listen on the app and online — so 

you can enjoy the best SiriusXM 

has to offer, anywhere life takes 

you. It’s the only package that 

gives you all of our premium pro-

gramming, including Howard 
Stern, every NFL, MLB

®

 and NBA 

How to subscribe to Siri-
usXM Radio Services

NOTICE

It is prohibited to copy, decom-

pile, disassemble, reverse engi-

neer, hack, manipulate, or 

otherwise make available any 

technology or software incorpo-

rated in receivers compatible 

with the SiriusXM Satellite 

Radio System or that support 

the SiriusXM website, the 

streaming service or any of its 

content. Furthermore, the 
AMBE

®

 voice compression soft-

ware included in this product is 

protected by intellectual prop-

erty rights including patent 

rights, copyrights, and trade 

secrets of Digital Voice Sys-

tems, Inc.

Note: this applies to SiriusXM 

Satellite Radio receivers only 

and not SiriusXM Ready 

devices.

302

5-6. Radio operation

game, every NASCAR

®

 race, 

NHL

®

 games, 24/7 talk channels 

dedicated to the biggest leagues, 

and more. You get all kinds of 

commercial-free music, including 

artist-dedicated channels and 

more, plus sports, news, talk and 

entertainment.

Radio operation

• Look for the Sirius, XM, SiriusXM, 

Band, SAT, AUX, Radio or Source 

button and you’re in. If you can’t 

hear us, it’s easy to get started:

U.S.A.: 

Locate your Radio ID by turning to 

Channel 0. If you don’t see your 

number there, go to siri-

usxm.com/activationhelp to find it. 

Visit siriusxm.com/refresh or call 

1-855-MYREFRESH (697-3373) 

to send a refresh signal to your 

radio.

Canada: 

Locate your Radio ID by turning to 

Channel 0. 

Visit siriusxm.ca/refresh to send a 

refresh signal to your radio or call 

1-888-539-7474 for service.

Each SiriusXM tuner is identified 
with a unique radio ID. The radio 
ID is required when activating 
an SiriusXM service or when 
reporting a problem.

If “Ch 000” is selected using 
the “TUNE SCROLL” knob, 
the ID code, which is 8 alpha-
numeric characters, will be 
displayed. If another channel 
is selected, the ID code will no 
longer be displayed. The 
channel (000) alternates 
between displaying the radio 
ID and the specific radio 
code.

When problems occur with the SiriusXM tuner, a message will 
appear on the screen. Referring to the table below to identify the 
problem, take the suggested corrective action.

Displaying the radio ID

Refer to the table below to identify the problem and take 
the suggested corrective action

Message

Explanation

“Check 
Antenna”

The SiriusXM antenna is not connected. Check whether the 
SiriusXM antenna cable is attached securely. Contact your 
Toyota dealer for assistance.

A short circuit occurs in the antenna or the surrounding 
antenna cable. Contact your Toyota dealer for assistance.

“No Signal”

The SiriusXM signal is too weak at the current location. Wait 
until your vehicle reaches a location with a stronger signal.

303

5-6. Radio operation

5

Audio

“Chan 
Unavailable”

The channel you selected is not broadcasting any program-
ming. Select another channel.

“Ch Unsub-
scribed”

The channel you selected is no longer available. Wait for 
about 2 seconds until the radio returns to the previous chan-
nel or “Ch 001”. If it does not change automatically, select 
another channel.

Message

Explanation

304

5-6. Radio operation

Other applications can be acti-

vated while listening to internet

radio.

Some parts of applications can be

adjusted using the switches on the

steering wheel.

For additional information, refer to

https://www.toyota.com/

audio-multimedia or call

1-800-331-4331 in the United

States,

https://www.toyota.ca/connected

or call

1-888-869-6828 in Canada, and

http://www.toyotapr.com/

audio-multimedia or call

1-877-855-8377 in Puerto Rico.

1

Display the audio source 
selection screen. (

P.295)

2

Select the desired application 
screen button.

The internet radio application
screen is displayed.

Perform operations accord-
ing to the displayed applica-
tion screen.

For the instrument panel
operation method: 

P.295

If a compatible phone is

already registered, it will be 
connected automatically.

Internet radio

One of Toyota apps Connect 
features is the ability to lis-
ten to internet radio. In 
order to use this service, a 
compatible phone and the 
system needs to be set up. 
For details: 

P.375

Listening to internet radio

305

5-7. Media operation

5

A

ud

io

5-7.Media operation

The USB memory operation 
screen can be reached by the 
following methods: 

P.295

Connecting a USB memory 
(

P.296)

When an Apple CarPlay/Android 
Auto connection is established, 
this function will be unavailable

*

.

*

: This function is not made avail-

able in some countries or areas.

USB audio

Select to display the audio 
source selection screen.
Select to return to the top 
screen.
Select to display a song list 
screen.
Select to display the play 
mode selection screen.
Select to display the sound 
setting screen. (

P.296)

Select to set repeat playback. 
(

P.306)

Select to change the 
file/track.
Select and hold to fast 
rewind.
Select to play/pause.
Select to change the 
file/track.
Select and hold to fast for-
ward.
Select to set random play-
back. (

P.307)

Select to change the 
folder/album.
Displays cover art

USB memory

WARNING

Do not operate the player’s con-

trols or connect the USB memory 

while driving.

NOTICE

Do not leave your portable

player in the car. In particular,

high temperatures inside the

vehicle may damage the porta-

ble player.

Do not push down on or apply

unnecessary pressure to the

portable player while it is con-

nected as this may damage the

portable player or its terminal.

Do not insert foreign objects into

the port as this may damage the

portable player or its terminal.

Overview

Control screen


Content      ..     16      17      18      19     ..