Toyota Corolla Hybrid (2022 year). Manual in english - page 16
 

  Index      Toyota     Toyota Corolla Hybrid (2022 year). Manual in english


Search            copyright infringement  


Content      ..     14      15      16      17     ..


Toyota Corolla Hybrid (2022 year). Manual in english - page 16


258

5-2. Basic information before operation

ACC or ON, or restart the sys-
tem by press and hold the 
“POWER VOLUME” knob for 
3 seconds or more.

Capacitive touch screen button sen-

sor sensitivity can be adjusted. 

(

P.287)

1

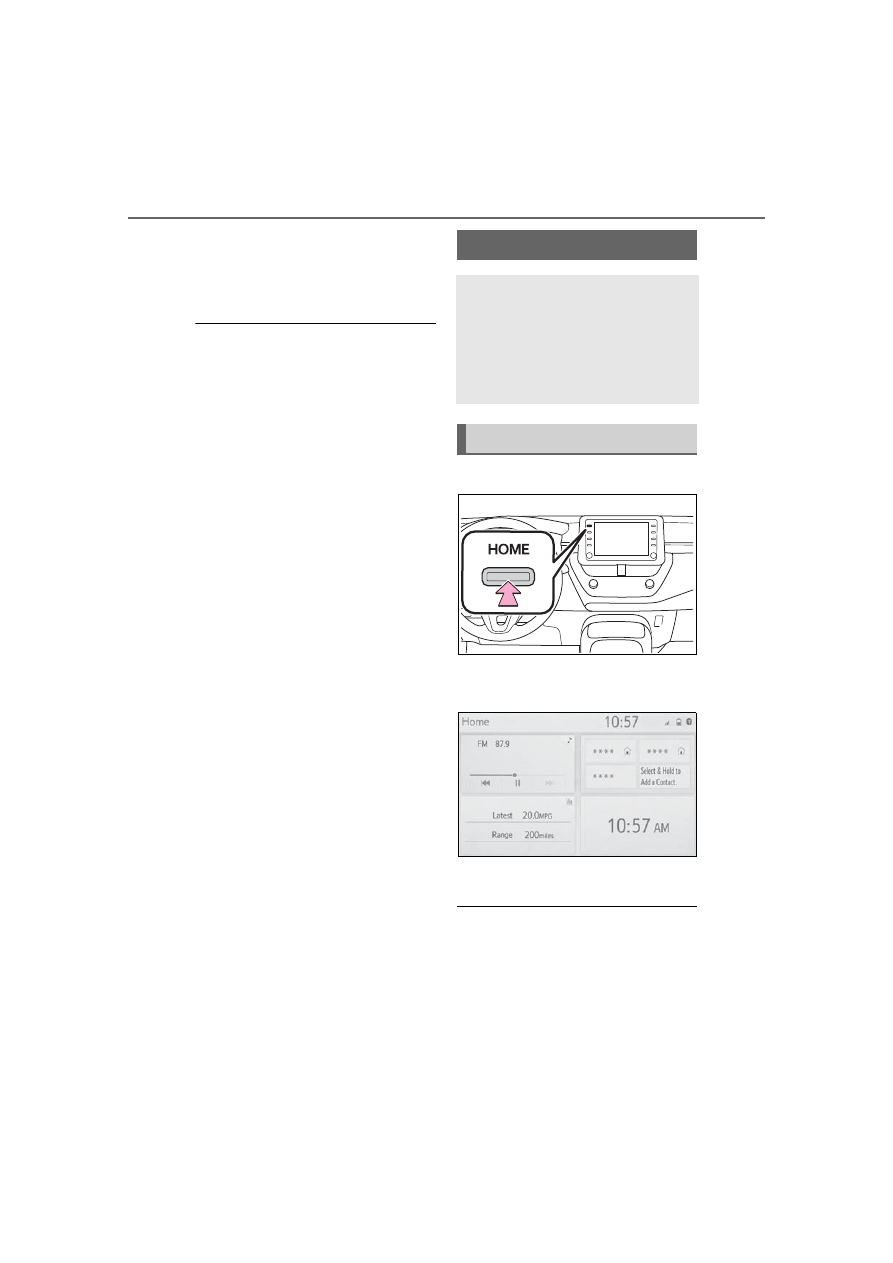
Press the “HOME” button.

2

Check that the home screen 
is displayed.

Selecting a screen will display it full 

screen.

The display information and area 

on the home screen can be cus-

tomized.

The home screen can be set to 

several types of split layouts

Home screen

On the home screen, multi-
ple screens, such as the 
audio/visual system screen, 
hands-free screen and clock 
screen, can be displayed 
simultaneously.

Home screen operation

259

5-2. Basic information before operation

5

Audio

The display information/area on 
the home screen and the home 
screen layout can be changed.

1

Press the “MENU” button.

2

Select “Setup”.

If the general settings screen is not 

displayed, select “General”.

3

Select “Customize Home 
Screen”.

4

Select the items to be set.

Select to change the display 
information and area on the 
home screen.
Select to change the home 
screen layout.

When searching by a name or 
entering data, letters and num-
bers can be entered via the 
screen.

Text field. Entered charac-
ter(s) will be displayed.
Select to erase one charac-
ter. 
Select and hold to continue 
erasing characters.
Select to move the cursor.
Select to choose predictive 
text candidate for entered 
text. (

P.260)

Select to display a list of pre-
dictive text candidates when 
there is more than one. 
(

P.260)

Select to enter desired char-
acters.
Select to enter characters in 
lower case or in upper case.

Customizing the home 
screen

Entering letters and 

numbers/list screen 

operation

Entering letters and num-
bers

260

5-2. Basic information before operation

Select to change character 
types. (

P.260)

Select to make a space on 
cursor.

Keyboard layout can be changed. 

(

P.287)

1

Select “Change Type”.

2

Select the desired character.

Depending on the screen being dis-

played, it may not be possible to 

change keyboard characters.

When text is input, the system 
predicts the text that may com-
plete the currently unconfirmed 
text and displays predictive 
replacement candidates that 
match the beginning of the text.

1

Input text.

2

Select the desired candidate.

To select a candidate that is not 
displayed, select 

, and 

then select the desired predic-
tive replacement candidate.

The list screen may be dis-
played after entering characters. 
When a list is displayed, use the 
appropriate screen button to 
scroll through the list.

Changing character type

Displaying predictive text 
candidates

List screen

Scrolling list screen

261

5-2. Basic information before operation

5

Audio

To scroll up/down the list, 
flick the list up/down.
Select to skip to the next or 
previous page. Select and 
hold 

 or 

 to scroll 

through the displayed list.
Indicates the position of the 
displayed entries in the entire 
list.
To scroll up/down pages, 
drag the bar.

If 

 appears to the right of an item 

name, the complete name is too 

long to display.

Select to 

 scroll to the end of 

the name.

Select 

 to move to the begin-

ning of the name.

Items are displayed in the list 
with the most similar results of 
the search at the top.

1

Select 

.

2

Input text.

3

Select “Search”.

4

The list is displayed.

Searching a list

262

5-2. Basic information before operation

1

Press the “MENU” button.

2

Select “Display”.

3

Select the desired items to 
be set.

Select to turn the screen off. 
To turn it on, press any but-

ton.
Select to turn day mode 
on/off. (

P.262)

Select to adjust the screen 
display. (

P.262)

Select to adjust the camera 
display.

When the screen is viewed through 

polarized sunglasses, a rainbow 

pattern may appear on the screen 

due to optical characteristics of the 

screen. If this is disturbing, please 

operate the screen without polarized 

sunglasses.

Depending on the position of the 
headlight switch, the screen 
changes to day or night mode. 
This feature is available when 
the headlight is switched on.
Select “Day Mode”.

If the screen is set to day mode with 

the headlight switch turned on, this 

condition is memorized even with 

the hybrid system turned off.

The contrast and brightness of 
the screen can be adjusted 
according to the brightness of 
your surroundings.

1

Select “General” or “Cam-
era”.

2

Select the desired item.

“Display (General)” screen only: 

Screen adjustment

The contrast and brightness 
of the screen display and 
the image of the camera dis-
play can be adjusted. The 
screen can also be turned 
off, and/or changed to either 
day or night mode.

(For information regarding 
audio/visual screen adjust-
ment: 

P.297)

Displaying the screen 
adjustment screen

Changing between day 
and night mode

Adjusting the con-
trast/brightness

263

5-2. Basic information before operation

5

Audio

Select “<” or “>” to select the 

desired display.

“Contrast”

“+”: Select to strengthen the con-
trast of the screen.
“-”: Select to weaken the contrast of 
the screen.

“Brightness”

“+”: Select to brighten the screen.
“-”: Select to darken the screen.

Linking multi-informa-

tion display and the 

system

The following functions of 
the system are linked with 
the multi-information dis-
play in the instrument clus-
ter:

Audio

Phone

*

etc.

These functions can be 
operated using multi-infor-
mation display control 
switches on the steering 
wheel. (

P.101)

*

: When an Apple CarPlay con-

nection is established, this 
function will be unavailable.

264

5-3. Connectivity settings

5-3.Connectivity settings

This system is not guaranteed to
operate with all Bluetooth

®

devices.

If your cellular phone does not

support HFP, registering the Blue-
tooth

®

 phone or using OPP,

PBAP, MAP or SPP profiles indi-

vidually will not be possible.

If the connected Bluetooth

®

device version is older than rec-

ommended or incompatible, the
Bluetooth

®

 device function may

not work properly.

Refer to

https://www.toyota.com/

audio-multimedia in the United

States,

https://www.toyota.ca/connected

in Canada, and

http://www.toyotapr.com/

audio-multimedia in Puerto Rico,
to find approved Bluetooth

®

phones for this system.

Certification

Bluetooth is a registered trademark 

of Bluetooth SIG, Inc.

Registering from the sys-
tem

1

Turn the Bluetooth

®

 connec-

tion setting of your cellular 
phone on.

This function is not available when 
Bluetooth

®

 connection setting of 

your cellular phone is set to off.

Registering/Connect-

ing a Bluetooth

®


device

To use the hands-free sys-
tem, it is necessary to regis-
ter a Bluetooth

®

 phone with 

the system.

Once the phone has been 
registered, it is possible to 
use the hands-free system.

This operation cannot be 
performed while driving.

When an Apple CarPlay 
connection is established, 
Bluetooth

®

 functions of the 

system will become unavail-
able and any connected 
Bluetooth

®

 devices will be 

disconnected.

*

When connecting to 
Android Auto, a Bluetooth

®


connection will be made 
automatically.

*

When an Android Auto con-
nection is established, 
some Bluetooth

®

 functions 

other than hands-free sys-
tem cannot be used.

*

*

: This function is not made avail-

able in some countries or 
areas.

Registering a Bluetooth

®


phone for the first time

265

5-3. Connectivity settings

5

Audio

2

Press the “MENU” button.

3

Select “Phone”.

Operations up to this point can also 

be performed by pressing the 

“PHONE” button on the instrument 

panel.

4

Select “Yes” to register a 
phone.

5

Select the desired Bluetooth

®


device.

If the desired Bluetooth

®

 phone is 

not on the list, select “If you cannot 

find...” and follow the guidance on 

the screen. (

P.266)

6

Register the Bluetooth

®


device using your Blue-
tooth

®

 device.

For details about operating 
the Bluetooth

®

 device, see 

the manual that comes with it.

A PIN code is not required for 
SSP (Secure Simple Pairing) 
compatible Bluetooth

®


devices. Depending on the 
type of Bluetooth

®

 device 

being connected, a message 
confirming registration may 
be displayed on the Blue-
tooth

®

 device’s screen. 

Respond and operate the 
Bluetooth

®

 device according 

to the confirmation message.

7

Check that the following 
screen is displayed, indicat-
ing pairing was successful (a 
Bluetooth

®

 link has been 

266

5-3. Connectivity settings

established but registration is 
not yet complete).

The system is connecting to 
the registered device.

At this stage, the Bluetooth

®


functions are not yet avail-
able.

8

Check that “Connected” is 
displayed and registration is 
complete.

If an error message is displayed, 

follow the guidance on the screen 

to try again.

If a cellular phone does not operate 

properly after being connected, turn 

the cellular phone off and on and 

then connect it again.

Registering from phone

1

Select “If you cannot find…”.

2

Select “Register from 
Phone”.

3

Check that the following 
screen is displayed, and reg-
ister the Bluetooth

®

 device 

using your Bluetooth

®


device.

For details about operating 
the Bluetooth

®

 device, see 

the manual that comes with it.

A PIN code is not required for 
SSP (Secure Simple Pairing) 
compatible Bluetooth

®


267

5-3. Connectivity settings

5

Audio

devices. Depending on the 
type of Bluetooth

®

 device 

being connected, a message 
confirming registration may 
be displayed on the Blue-
tooth

®

 device’s screen. 

Respond and operate the 
Bluetooth

®

 device according 

to the confirmation message.

4

Follow the steps in “Register-
ing a Bluetooth

®

 phone for 

the first time” from step 

7

(

P.264)

To use the Bluetooth

®

 audio, it is 

necessary to register an audio 
player with the system.
Once the player has been regis-
tered, it is possible to use the 
Bluetooth

®

 audio.

This operation cannot be per-
formed while driving.
For details about registering a 
Bluetooth

®

 device: 

P.264

1

Turn the Bluetooth

®

 connec-

tion setting of your audio 
player on.

This function is not available when 
the Bluetooth

®

 connection setting 

of your audio player is set to off.

2

Press the “AUDIO” button.

3

Select “Source” on the audio 
screen or press “AUDIO” but-
ton again.

4

Select “Bluetooth”.

5

Select “Yes” to register an 
audio player.

6

Follow the steps in “Register-
ing a Bluetooth

®

 phone for 

the first time” from step 

5

(

P.264)

This system supports the follow-
ing services.

Bluetooth

®

 Core Specifica-

tion

Ver. 2.0 (Recommended: Ver. 
4.1 +EDR)

Profiles

HFP (Hands Free Profile) Ver. 
1.0 (Recommended: Ver. 1.7)

This is a profile to allow hands-free 
phone calls using a cellular phone. 
It has outgoing and incoming call 
functions.

OPP (Object Push Profile) 
Ver. 1.1 (Recommended: Ver. 

Registering a Bluetooth

®


audio player for the first 
time

Profiles

268

5-3. Connectivity settings

1.2)

This is a profile to transfer contacts 
data.

PBAP (Phone Book Access 
Profile) Ver. 1.0 (Recom-
mended: Ver. 1.2)

This is a profile to transfer phone-
book data.

MAP (Message Access Pro-
file) Ver. 1.0 (Recommended: 
Ver. 1.2)

This is a profile to use phone mes-
sage functions.

SPP (Serial Port Profile) Rec-
ommended: Ver. 1.2

This is a profile to use the Toyota 
audio multimedia function.

A2DP (Advanced Audio Dis-
tribution Profile) Ver. 1.0 (Rec-
ommended: Ver. 1.3)

This is a profile to transmit stereo 
audio or high quality sound to the 
audio/visual system.

AVRCP (Audio/Video Remote 
Control Profile) Ver. 1.0 (Rec-
ommended: Ver. 1.6)

This is a profile to allow remote 
control the A/V equipment.

1

Press the “MENU” button.

2

Select “Setup”.

3

Select “Bluetooth”.

Setting Bluetooth

®


details

When an Apple CarPlay 
connection is established, 
this function will be unavail-
able.

*

When an Android Auto con-
nection is established, 
some functions will be 
unavailable.

*

*

: This function is not made avail-

able in some countries or 
areas.

Displaying the Blue-
tooth

®

 setup screen

269

5-3. Connectivity settings

5

Audio

4

Select the desired item to be 
set.

Connecting a Bluetooth

®


device and editing the Blue-
tooth

®

 device information 

(

P.269, 272)

Registering a Bluetooth

®


device (

P.271)

Deleting a Bluetooth

®

 device 

(

P.271)

Setting the Bluetooth

®

 sys-

tem (

P.273)

Up to 5 Bluetooth

®

 devices 

(Phones (HFP) and audio play-
ers (AVP)) can be registered.

If more than 1 Bluetooth

®

 device 

has been registered, select 
which device to connect to.

1

Display the Bluetooth

®

 set-

tings screen. (

P.268)

2

Select “Registered Device”.

3

Select the device to be con-
nected.

: Phone

: Audio player

: Phone/Toyota apps services

The profile icon for a currently 
connected device will be dis-
played in color.

Selecting a profile icon which 
is not currently connected will 
switch the connection to the 
function.

If the desired Bluetooth

®


device is not on the list, select 
“Add New Device” to register 
the device. (

P.271)

Bluetooth

®

 setup screen

Connecting a Bluetooth

®


device

270

5-3. Connectivity settings

4

Select the desired connec-
tion.

“Device Info”: Select to confirm and 
change the Bluetooth

®

 device infor-

mation. (

P.272)

When another Bluetooth

®


device is connected

To disconnect the Bluetooth

®


device, select “Yes”.

5

Check that a confirmation 
screen is displayed when the 
connection is complete.

If an error message is displayed, 

follow the guidance on the screen 

to try again.

It may take time if the device con-

nection is carried out during Blue-
tooth

®

 audio playback.

Depending on the type of Blue-
tooth

®

 device being connected, it 

may be necessary to perform 

additional steps on the device.

When disconnecting a Bluetooth

®


device, it is recommended to dis-

connect using the system.

Connecting a Bluetooth

®


device in a different way 
(from phone top screen)

P.341

Connecting a Bluetooth

®


device in a different way 
(from phone setup screen)

P.354

Connecting a Bluetooth

®


device in a different way 
(from Bluetooth

®

 audio 

screen)

P.313

Auto connection mode

To turn auto connection mode 
on, set “Bluetooth Power” to on. 
(

P.273) Leave the Bluetooth

®


device in a location where the 
connection can be established.

When the power switch is in 
ACC or ON, the system 
searches for a nearby regis-
tered device.

The system will connect with 
the registered device that was 
last connected, if it is nearby. 
When automatic connection 
priority is set to on and there 
is more than one registered 
Bluetooth

®

 phone available, 

the system will automatically 
connect to the Bluetooth

®


phone with the highest prior-
ity. (

P.273)

Connecting manually

When the auto connection has 
failed or “Bluetooth Power” is 
turned off, it is necessary to con-
nect the Bluetooth

®

 device man-

ually.

271

5-3. Connectivity settings

5

Audio

1

Display the Bluetooth

®

 set-

tings screen. (

P.268)

2

Follow the steps in “Connect-
ing a Bluetooth

®

 device” from 

step 

2

. (

P.269)

Reconnecting the Blue-
tooth

®

 phone

If a Bluetooth

®

 phone is discon-

nected due to poor reception 
from the Bluetooth

®

 network 

when the power switch is in 
ACC or ON, the system auto-
matically reconnects the Blue-
tooth

®

 phone.

Up to 5 Bluetooth

®

 devices can 

be registered.

Bluetooth

®

 compatible phones 

(HFP) and audio players (AVP) 
can be registered simultane-
ously.
This operation cannot be per-
formed while driving.

1

Display the Bluetooth

®

 set-

tings screen. (

P.268)

2

Select “Add New Device”.

When another Bluetooth

®


device is connected

To disconnect the Bluetooth

®


device, select “Yes”.

When 5 Bluetooth

®

 devices 

have already been registered

A registered device needs to be 
replaced. Select “Yes”, and select 
the device to be replaced.

3

Follow the steps in “Register-
ing a Bluetooth

®

 phone for 

the first time” from step 

5

(

P.264)

This operation cannot be per-
formed while driving.

1

Display the Bluetooth

®

 set-

tings screen. (

P.268)

2

Select “Remove Device”.

3

Select the desired device.

4

Select “Yes” when the confir-
mation screen appears.

5

Check that a confirmation 
screen is displayed when the 
operation is complete.

When deleting a Bluetooth

®

 phone, 

the contact data will be deleted at 

the same time.

Registering a Bluetooth

®


device

Deleting a Bluetooth

®


device

272

5-3. Connectivity settings

The Bluetooth

®

 device’s infor-

mation can be displayed on the 
screen. The displayed informa-
tion can be edited.
This operation cannot be per-
formed while driving.

1

Display the Bluetooth

®

 set-

tings screen. (

P.268)

2

Select “Registered Device”.

3

Select the desired device to 
be edited.

4

Select “Device Info”.

5

Confirm and change the 
Bluetooth

®

 device informa-

tion.

The name of the Bluetooth

®


device is displayed. It can be 
changed to a desired name. 
(

P.273)

Select to set the Bluetooth

®


audio player connection 
method. (

P.273)

Device address is unique to 
the device and cannot be 
changed.
Phone number is unique to 
the Bluetooth

®

 phone and 

cannot be changed.
Compatibility profile is unique 
to the Bluetooth

®

 device and 

cannot be changed.
Select to reset all setup 
items.

Editing the Bluetooth

®


device information

273

5-3. Connectivity settings

5

Audio

If 2 Bluetooth

®

 devices have been 

registered with the same device 

name, the devices can be distin-

guished referring to the device’s 

address.

Depending on the type of Blue-
tooth

®

 phone, some information 

may not be displayed.

1

Select “Device Name”.

2

Enter the name and select 
“OK”.

Even if the device name is changed, 

the name registered in your Blue-
tooth

®

 device does not change.

1

Select “Connect Audio Player 
From”.

2

Select the desired connec-
tion method.

“Vehicle”: Select to connect the 

audio player from the vehicle’s 

audio/visual system.
“Device”: Select to connect the 

vehicle’s audio/visual system from 

the audio player.
Depending on the audio player, the 

“Vehicle” or “Device” connection 

method may be best. As such, refer 

to the manual that comes with the 

audio player.

The Bluetooth

®

 settings can be 

confirmed and changed.

1

Display the Bluetooth

®

 set-

tings screen. (

P.268)

2

Select “Detailed Settings”.

3

Select the desired item to be 
set.

Select to set Bluetooth

®

 con-

nection on/off. (

P.273)

Select to change the auto-
matic connection priority of 
the registered Bluetooth

®


devices. (

P.274)

Select to edit the system 
information. (

P.274)

Select to reset all setup 
items.

1

Select “Bluetooth Power”.

When “Bluetooth Power” is on: 
The Bluetooth

®

 device is auto-

Changing a device name

Setting audio player con-
nection method

“Detailed Settings” 
screen

Changing “Bluetooth 
Power”


Content      ..     14      15      16      17     ..