Toyota Corolla Hybrid (2022 year). Manual in english - page 17
 

  Index      Toyota     Toyota Corolla Hybrid (2022 year). Manual in english


Search            copyright infringement  


Content      ..     15      16      17      18     ..


Toyota Corolla Hybrid (2022 year). Manual in english - page 17


274

5-3. Connectivity settings

matically connected when the 
power switch is in ACC or ON.
When “Bluetooth Power” is off: 
The Bluetooth

®

 device is dis-

connected, and the system will 
not connect to it next time.

While driving, the auto connection 

state can be changed from off to on, 

but cannot be changed from on to 

off.

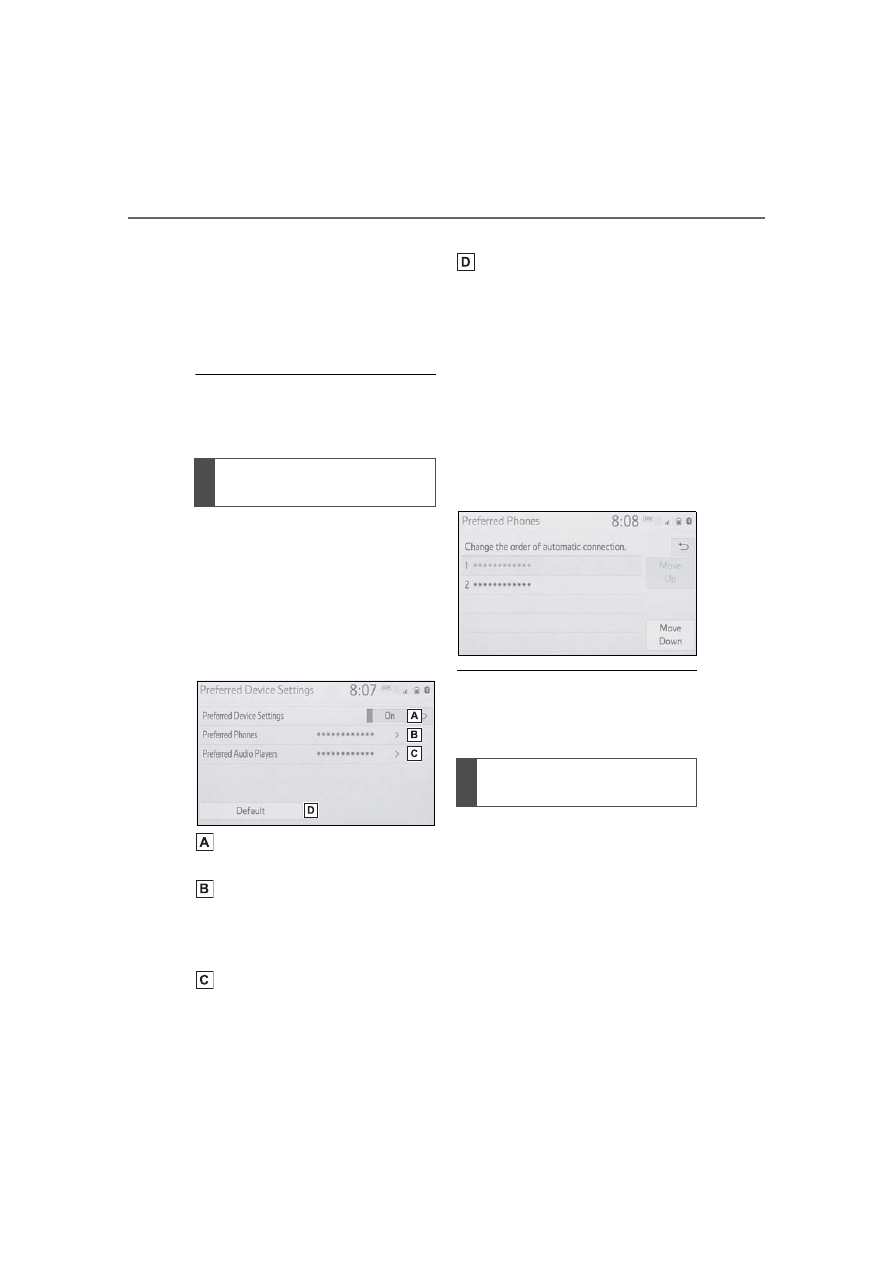
The automatic connection prior-
ity of the registered Bluetooth

®


devices can be changed.

1

Select “Preferred Device Set-
tings”.

2

Select the desired item to be 
set.

Select to set automatic con-
nection priority on/off.
Select to change the auto-
matic connection priority of 
the registered Bluetooth

®


phones. (

P.274)

Select to change the auto-
matic connection priority of 
the registered Bluetooth

®


audio players. (

P.274)

Select to reset all setup 
items.

Changing Bluetooth

®


device automatic connec-
tion priority

1

Select “Preferred Phones” or 
“Preferred Audio Players”.

2

Select the desired Bluetooth

®


device and select “Move Up” 
or “Move Down” to change 
the preferred order.

A newly registered Bluetooth

®


device will automatically be given 

the highest automatic connection 

priority.

1

Select “System Information”.

Setting automatic connec-
tion priority

Editing the system infor-
mation

275

5-3. Connectivity settings

5

Audio

2

Select the desired item to be 
set.

Displays system name. Can 
be changed to a desired 
name. (

P.275)

PIN code used when the 
Bluetooth

®

 device was regis-

tered. Can be changed to a 
desired code. (

P.275)

Device address is unique to 
the device and cannot be 
changed.
Select to set the connection 
status display of the phone 
on/off.
Select to set the connection 
status display of the audio 
player on/off.
Compatibility profile of the 
system
Select to reset all setup 
items.

Editing the system name

1

Select “System Name”.

2

Enter a name and select 
“OK”.

Editing the PIN code

1

Select “System PIN Code”.

2

Enter a PIN code and select 
“OK”.

276

5-3. Connectivity settings

*

: If equipped

1

Enable the Wi-Fi

®

 Hotspot 

function. (

P.277)

2

Disable the “Hide Access 
Point” function. (

P.276)

3

Search for the vehicle access 
point using the device you 
wish to connect.

For details about operating the 

device, refer to the documentation 

which came with it.

4

Operate the device to con-
nect it to the vehicle access 
point.

To check the vehicle access point 

password, check “Password”. 

(

P.277)

Hints for connecting to the vehicle 
via Wi-Fi

®

 can be displayed. 

(

P.277)

1

Enable the Wi-Fi

®

 Hotspot 

function. (

P.277)

2

Enable the “Hide Access 
Point” function. (

P.276)

3

Enter the access point name 
(SSID) into the device you 
wish to connect and connect 
it.

To check the vehicle access 
point password, check “Pass-
word”. (

P.277)

The security settings on the 
device must be the same as 
that displayed for “Security”. 
(

P.277)

For details about operating 
the device, refer to the docu-
mentation which came with it.

Wi-Fi

®

 Hotspot

*

By connecting a device to 
the vehicle via Wi-Fi

®

, it can 

access the internet through 
the DCM.

To use this function, a 
Wi-Fi

®

 Hotspot service sub-

scription from Verizon Wire-
less is required. Contact 
your Toyota dealer for 
details.

This function is not made 
available in some countries 
or areas.

Connecting a device to 
the in-vehicle access 
point

Searching for and con-
necting a device to the 
vehicle access point

Connecting a device to the 
in-vehicle access point 
using the access point 
name (SSID)

277

5-3. Connectivity settings

5

Audio

1

Press the “MENU” button.

2

Select “Setup”.

3

Select “Wi-Fi

*

”.

*

: Wi-Fi

®

 is a registered trademark 

of Wi-Fi Alliance

®

.

4

Select the desired item to be 
set.

Select to enable/disable the 
Wi-Fi

®

 Hotspot function. 

(

P.277)

Select to check/change the 
access point password. 
(

P.278)

Select to display hints for 
connecting to the vehicle via 
Wi-Fi

®

.

Select to make the access 
point searchable/unsearch-
able.
Select to check/change the 
security protocol of the 
access point (for authentica-
tion and encryption). 
(

P.278)

Select to change the access 
point name (SSID). (

P.278)

Select to change the Wi-Fi

®


connection channel (within 
the 2.4GHz frequency band). 
(

P.278)

If any settings have been changed, 

it will be necessary to reset the 
Wi-Fi

®

 system to complete the 

changes. To reset the Wi-Fi

®

 sys-

tem, select “Yes” on the pop-up dis-

played after changing the settings.

When the Wi-Fi

®

 Hotspot func-

tion is enabled, the system 
checks for a valid Hotspot ser-
vice subscription.
If a hotspot service subscription 
has not been started, connect 
your device to the in-vehicle 
access point to start your sub-

Changing the Wi-Fi

®

 set-

tings

Enabling/disabling the 
Wi-Fi

®

 Hotspot function

278

5-3. Connectivity settings

scription. A trial subscription 
may be available.

1

Select “Password”.

2

Check that the following 
screen is displayed.

Displays the password
Select to display/hide the 
entered password.
Select to change the pass-
word.

1

Select “Change Password”.

2

Enter the desired password 
and select “OK”.

When setting/changing a pass-

word, observe the following guide-

lines to help prevent the password 

from being cracked by a third party:

Use an 8-character or longer 
password consisting of letters 
and numbers. (Non-ASCII 
characters will not be recog-
nized by the system.)

Change the password regu-
larly.

If you write the password 
down, do not leave it some-
where where it would be visi-
ble.

Do not use the same or a sim-
ilar password to that for other 
accounts.

Avoid using easy to identify 
words, such as your vehicle’s 
model name or license plate 
number, simple dictionary 
words, or words with simple 
obfuscation, such as c@t (for 
cat), as your password.

1

Select “Security”.

2

Select the desired security 
protocol.

1

Select “Access Point Name”.

2

Enter the desired access 
point name (SSID) and select 
“OK”.

1

Select “Channel”.

Checking/changing the 
password

Changing the password

Changing the security pro-
tocol

Changing the access point 
name (SSID)

Selecting a Wi-Fi

®

 connec-

tion channel

279

5-3. Connectivity settings

5

A

ud

io

2

Check that the following 
screen is displayed.

Select to change the chan-
nel selection to auto-
matic/manual.
When “Manual” is selected, 
select to change the channel.

1

Set “Select Channel” to 
“Manual”.

2

Select “Channel Number”.

3

Enter the desired channel 
number and select “OK”.

Channels 1 through 11 can be 

selected.

Wi-Fi

®

 function operating hints

If a connected device is taken out 
of the Wi-Fi

®

 connection area, the 

connection will be severed.

If the vehicle is driven out of the 

cellular communication coverage 

area, connecting to the internet 
via the Wi-Fi

®

 Hotspot will not be 

possible.

If a Bluetooth

®

 device is used 

while a device is connected using 

the Wi-Fi

®

 Hotspot function, the 

communication speed may 

decrease.

If the vehicle is near a radio 

antenna, radio station or other 

source of strong radio waves and 

electrical noise, communication 

may be slow or impossible.

The condition of Wi-Fi

®

 connec-

tion appears on the right upper 
side of the screen. (

P.252)

Changing the channel

Wi-Fi

®

 function operating 

hints

WARNING

Use Wi-Fi

®

 devices only when 

safe and legal to do so.

Your audio unit is fitted with 
Wi-Fi

®

 antennas. People with 

implantable cardiac pacemak-

ers, cardiac resynchronization 

therapy-pacemakers or implant-

able cardioverter defibrillators 

should maintain a reasonable 

distance between themselves 
and the Wi-Fi

®

 antennas.

The radio waves may affect the 

operation of such devices.

Before using Wi-Fi

®

 devices, 

users of any electrical medical 

device other than implantable 

cardiac pacemakers, cardiac 

resynchronization ther-

apy-pacemakers or implantable 

cardioverter defibrillators should 

consult the manufacturer of the 

device for information about its 

operation under the influence of 

radio waves. 

Radio waves could have unex-

pected effects on the operation 

of such medical devices.

Conditions displayed with 
Wi-Fi

®

 icon

280

5-3. Connectivity settings

Communication standards
IEEE 802.11b
IEEE 802.11g
IEEE 802.11n (2.4GHz)

Security
WPA™
WPA2™

• WPA™ and WPA2™ are trade-

marks of Wi-Fi Alliance

®

.

*

: This function is not made avail-

able in some countries or areas.

1

Enable Siri on the device to 
be connected.

Specifications

Apple CarPlay/

Android Auto

*

Apple CarPlay allows some 
applications, such as Map, 
Phone, and Music, to be 
used on the system.

When an Apple CarPlay 
connection is established, 
Apple CarPlay compatible 
applications will be dis-
played on the system dis-
play.

Compatible devices

Apple iPhone (iOS Ver. 9.3 or 
later) that supports Apple Car-
Play. 

For details, refer to
https://www.apple.com/ios/car
play/.

*

Android™ devices with Android 
OS Ver. 5.0 or higher which sup-
port Android Auto and have the 
Android Auto application 
installed.
For details, refer to

https://www.android.com/auto/
.

*

*

: Some devices may not operate 

with this system.

Establishing an Apple 
CarPlay connection

281

5-3. Connectivity settings

5

Audio

2

Connect the device to the 
USB port. (

P.296)

3

Select “Always Enable” or 
“Enable Once”.

If “Do Not Enable” is selected,
an Apple CarPlay connection
will not be established. In this
case, the device can be oper-
ated as a normal Apple
device, such as an iPod.

Depending on the device con-
nected, it may take approxi-
mately 3 to 6 seconds before
an Apple CarPlay connection
is established.

4

Check that home screen of 
Apple CarPlay is displayed.

Select to display the home 
screen of Apple CarPlay.
Touch and hold to activate 
Siri.
Select to start the application.
User can use any iPhone 

application supported by 
Apple CarPlay.
Select to display the system 
screen.

1

Check that the Android Auto 
application is installed to the 
device to be connected.

2

Connect the device to the 
USB port. (

P.295)

3

Select “On” to enable the 
function.

“Off”: Select to not enable
Android Auto. Android Auto
will remain off until “Android
Auto” of “Projection Settings”
on the general settings screen
is turned on.

Depending on the device con-
nected, it may take approxi-
mately 3 to 6 seconds before 
the system returns to previous 
screen.

The screen may change to
“step 

6

” depending on the

system.

Establishing an Android 
Auto connection

282

5-3. Connectivity settings

4

Press the “MENU” button.

5

Select “Android Auto”.

6

Check that home screen of 
Android Auto is displayed.

When an Apple CarPlay/Android 

Auto connection is established, 

the function of some system but-

tons will change.

When an Apple CarPlay/Android 

Auto connection is established, 

some system functions, such as 

the following, will be replaced by 

similar Apple CarPlay/Android 

Auto functions or will become 

unavailable:

• iPod (Audio Playback)

• Hands-free Phone

• USB audio/USB video
• Bluetooth

®

 audio

• Bluetooth

®

 phone (Apple CarPlay 

only)

• Toyota apps

When an Apple CarPlay/Android 

Auto connection is established, 

voice command system (Siri/Goo-

gle Assistant) and map application 

voice guidance volume can be 

changed by selecting “Voice Vol-

ume” on the voice settings screen. 

It cannot be changed by “POWER 

VOLUME” knob on Audio control 

panel. (

P.291)

Apple CarPlay/Android Auto is an 

application developed by Apple 

Inc/Google LLC. Its functions and 

services may be terminated or 

changed without notice depending 

on the connected device’s opera-

tion system, hardware and soft-

ware, or due to changes in Apple 

CarPlay/Android Auto specifica-

tions.

For a list of the apps supported by 

Apple CarPlay or Android Auto, 

refer to their respective website.

While using these functions, vehi-

cle and user information, such as 

location and vehicle speed, will be 

shared with the respective appli-

cation publisher and the cellular 

service provider.

By downloading and using each 

application, you agree to their 

terms of use.

Data for these functions is trans-

mitted using the internet and may 

incur charges.

For information about data trans-

mission fees, contact your cellular 

service provider.

Depending on the application, cer-

tain functions, such as music play-

back, may be restricted.

As the applications for each func-

tion are provided by a third-party, 

they may be subject to change or 

discontinuation without notice.

For details, refer to the website of 

the function.

If the USB cable is disconnected, 

operation of Apple Car-

Play/Android Auto will end.

At this time, sound output will stop 

and change to the system screen.

Use of the Apple CarPlay logo 

means that a vehicle user inter-

face meets Apple performance 

standards. Apple is not responsi-

ble for the operation of this vehicle 

283

5-3. Connectivity settings

5

A

ud

io

or its compliance with safety and 

regulatory standards. Please note 

that the use of this product with 

iPhone or iPod may affect wire-

less performance.

Apple CarPlay is a trademark of

Apple Inc.

Compatible models

Made for

• iPhone X

• iPhone 8

• iPhone 8 Plus

• iPhone 7

• iPhone 7 Plus

• iPhone SE

• iPhone 6s

• iPhone 6s Plus

• iPhone 6

• iPhone 6 Plus

• iPhone 5s

• iPhone 5c

• iPhone 5

Android and Android Auto are

trademarks of Google LLC.

If you are experiencing difficulties with Apple CarPlay/Android Auto, 
check the following table.

WARNING

Do not connect iPhone or operate 

the controls while driving.

NOTICE

Do not leave your iPhone in the

vehicle. In particular, high tem-

peratures inside the vehicle

may damage the iPhone.

Do not push down on or apply

unnecessary pressure to the

iPhone while it is connected as

this may damage the iPhone or

its terminal.

Do not insert foreign objects into

the port as this may damage the

iPhone or its terminal.

Troubleshooting

284

5-3. Connectivity settings

Symptom

Solution

An Apple Car-
Play/Android Auto con-
nection cannot be 
established.

Check if the device supports Apple Car-
Play/Android Auto.
Check if Apple CarPlay/Android Auto is 
enabled on the connected device.
Check if that the Android Auto application is 
installed to the device to be connected.
For details, refer to 
Apple CarPlay: 
https://www.apple.com/ios/carplay/.
Android Auto: 
https://www.android.com/auto/.

Check if “Apple CarPlay”/“Android Auto” of 
“Projection Settings” on the general settings 
screen is set to on. (

P.287)

Check if the USB cable being used is securely 
connected to the device and USB port.
Check that the device is connected directly to 
the USB port of the system and not connected 
to a USB hub.
For Apple CarPlay: Check if the Lightning cable 
being used is certified by Apple. Check if Siri is 
enabled.

After checking all of the above, try to establish 
an Apple CarPlay/Android Auto connection. 
(

P.280, 281)

When an Apple Car-
Play/Android Auto con-
nection is established and 
a video is being played, 
the video is not displayed, 
but audio is output 
through the system.

As the system is not designed to play video 
through Apple CarPlay/Android Auto, this is not 
a malfunction.

Although an Apple Car-
Play/Android Auto con-
nection is established, 
audio is not output 
through the system.

The system may muted or the volume may be 
low. Increase the system volume.

285

5-3. Connectivity settings

5

Audio

The Apple Car-
Play/Android Auto screen 
has artifacts and/or audio 
from Apple Car-
Play/Android Auto has 
noise.

Check if the USB cable being used to connect 
the device to the system is damaged.
To check if the USB cable is damaged inter-
nally, connect the device to another system, 
such as a PC, and check if the device is recog-
nized by the connected system. (The device 
should begin charging when connected.)

After checking all of the above, try to establish 
an Apple CarPlay/Android Auto connection. 
(

P.280, 281)

The map display of the 
Apple CarPlay Maps app 
cannot be enlarged or 
contracted with pinch 
multi-touch gestures.

As the Apple CarPlay Maps app is not compati-
ble with pinch multi-touch gestures, this is not a 
malfunction.

During Apple CarPlay 
music application (Apple 
Music, Spotify, etc.) play-
back, if the iPhone is 
operated to start and play 
audio from an application 
that is not compatible with 
Apple CarPlay* and the 
onboard device volume is 
changed, the audio of the 
incompatible application 
stops and the system 
resumes playback of the 
original music application.

This operation is performed according to the 
specification of the onboard device, this is not a 
malfunction.

After interrupt audio (such 
as navigation route guid-
ance) is played from an 
application that is not 
compatible with Apple 
CarPlay while the onboard 
device is playing audio, 
the system does not 
resume playback of the 
original audio.

This operation is performed according to the 
specification of the onboard device, this is not a 
malfunction.
Manually change the audio source by yourself. 
Or, do not use applications that are not compat-
ible with Apple CarPlay.

*

 Due to some naviga-

tion applications are compatible from iOS 12, 
update to the latest iOS and application ver-
sions.

Symptom

Solution

286

5-3. Connectivity settings

*

: Applications not compatible with Apple CarPlay are applications installed 

on the iPhone that are not displayed on the Apple CarPlay screen appli-
cation list. (such as visual voicemail)

When using Apple Car-
Play, route guidance 
arrows and turn by turn 
navigation are not dis-
played on the multi-infor-
mation display and 
system display.
When using Android Auto, 
turn by turn navigation is 
not displayed on the 
multi-information display 
and system display.

This is not a malfunction as display of these 
items is not possible with this function.

When using Android Auto, 
hands-free call audio can-
not be heard from the 
vehicle’s speakers.

Disconnect the phone from the USB cable and 
check if hands-free call audio can be heard 
using the hands-free system.

Connect the phone to the system using Android 
Auto, turn up the volume on the system and 
check if hands-free call audio can be heard.
Check if other sounds can be heard from the 
vehicle’s speakers.

Symptom

Solution

287

5-4. Other settings

5

Audio

5-4.Other settings

1

Press the “MENU” button.

2

Select “Setup”.

If the general settings screen is not 

displayed, select “General”.

3

Select the desired items to 
be set.

“Clock”

Select to change the time zone and 
select “On” or “Off” for daylight sav-
ing time, automatic adjustment of 
the clock, etc. (

P.288)

“Language”

Select to change the language. The 
language setting of Apple Car-
Play/Android Auto can only be 
changed on the connected device.

“Customize Home Screen”

Select to change the display infor-
mation/area on the home screen 
and the home screen layout.  
(

P.258)

“Theme Setting”

Select to change the screen theme 
setting.

“Beep”

Select to turn the beep sound 
on/off.

“Units of Measurement”

Select to change the unit of mea-
sure for distance/fuel consumption.

“Keyboard Layout”

Select to change the keyboard lay-
out.

“Delete Keyboard History”

Select to delete the keyboard his-
tory.

“Memorize Keyboard History”

Select to set the memorize key-
board history on/off.

“Animation”

Select to turn the animations on/off.

“Projection Settings”

*1

Select to set automatic Apple Car-
Play/Android Auto connection 
establishment on/off. (

P.289)

“Driver Setting”

Select to change the driver set-

General settings

Settings are available for 
clock, operation sounds, 
etc.

Displaying the general 
settings screen

General settings screen

288

5-4. Other settings

tings. (

P.289)

“Delete Personal Data”

Select to delete personal data. 
(

P.290)

“Software Update”

Select to update software versions. 
For details, contact your Toyota 
dealer.

“Software Update Setting”

*2

Select to set software update set-
ting. (

P.290)

“Gracenote Database 
Update”

Select to update Gracenote

®

 data-

base versions. For details, contact 
your Toyota dealer.

“Software Information”

Select to display the software infor-
mation. Notices related to third 
party software used in this product 
are enlisted. (This includes instruc-
tions for obtaining such software, 
where applicable.)

“SW Sensitivity Level”

Select to change the capacitive 
touch screen button sensitivity to 1 
(low), 2 (medium), or 3 (high).

*1

:This function is not made avail-

able in some countries or areas.

*2

:If equipped

1

Display the general settings 
screen. (

P.287)

2

Select “Clock”.

3

Select the desired items to 
be set.

Select to change the time 
zone. (

P.288)

Select to set daylight saving 
time on/off.
Select to set automatic 
adjustment of the clock by 
GPS on/off.
When set to off, the clock can 
be manually adjusted. 
(

P.288)

Select to set the 24 hour time 
format on/off.
When set to off, the clock is 
displayed in 12 hour time for-
mat.

1

Select “Time Zone”.

2

Select the desired time zone.

When “Auto Adjust by GPS” is 
turned off, the clock can be 
manually adjusted.

1

Select “Auto Adjust by GPS” 
to set to off.

Clock settings

Setting the time zone

Manual clock setting

289

5-4. Other settings

5

Audio

2

Adjust the clock manually.

Select “+” to set the time for-
ward one hour and “-” to set 
the time back one hour.
Select “+” to set the time for-
ward one minute and “-” to 
set the time back one minute.
Select to round to the nearest 
hour.
e.g.
1:00 to 1:29 

 1:00

1:30 to 1:59 

 2:00

*

: This function is not made avail-

able in some countries or areas.

1

Display the general settings 
screen. (

P.287)

2

Select “Projection Settings”.

3

Select the desired items to 
be set.

Select to turn Apple CarPlay 

connection establishment 
on/off when a compatible 
iPhone is connected to the 
system via USB. (

P.280)

Depending on the system, 
this setting cannot be 
changed when a device is 
connected to the system via 
USB. Disconnect the device 
before attempting to change 
the setting.
Select to turn Android Auto 
connection establishment 
on/off when a compatible 
device is connected to the 
system via USB. (

P.281)

Depending on the system, 
this setting cannot be 
changed when a device is 
connected to the system via 
USB. Disconnect the device 
before attempting to change 
the setting.

The driver settings feature will 
allow the system to link some 
preferences (such as audio pre-
sets, screen theme, language, 
etc.) to a paired Bluetooth

®


phone.

1

Display the general settings 
screen. (

P.287)

2

Select “Driver Setting”.

Projection settings

*

Driver settings


Content      ..     15      16      17      18     ..