Toyota Mirai (2022 year). Manual in english - page 25
 

  Index      Toyota     Toyota Mirai (2022 year). Manual in english


Search            copyright infringement  


Content      ..     23      24      25      26     ..


Toyota Mirai (2022 year). Manual in english - page 25


403

7-3. Do-it-yourself maintenance

7

Maintena

nce
 a

nd ca

re

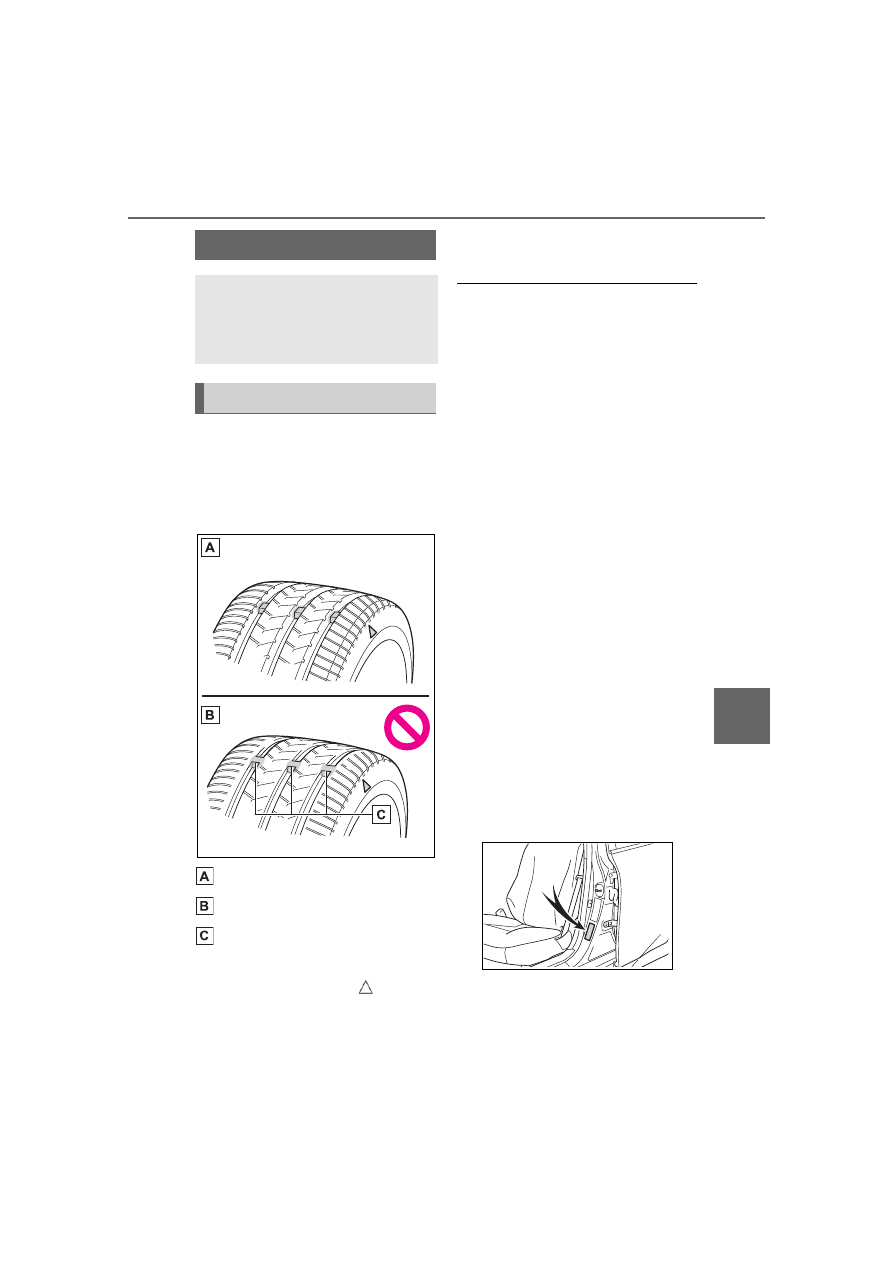
Check if the treadwear indica-
tors are showing on the tires. 
Also check the tires for uneven 
wear, such as excessive wear 
on one side of the tread.

New tread

Worn tread

Treadwear indicator

The location of treadwear indicators 
is shown by a “TWI” or “

” mark, 

etc., molded into the sidewall of 
each tire.

Replace the tires if the treadwear 
indicators are showing on a tire.

When to replace your vehicle’s 

tires

Tires should be replaced if:

The treadwear indicators are 

showing on a tire.

You have tire damage such as 

cuts, splits, cracks deep enough 

to expose the fabric, and bulges 

indicating internal damage

A tire goes flat repeatedly or can-

not be properly repaired due to the 

size or location of a cut or other 

damage

If you are not sure, consult with your 

Toyota dealer.

Tire life

Any tire over 6 years old must be 

checked by a qualified technician 

even if it has seldom or never been 

used or damage is not obvious.

Maximum load of tire

Check that the maximum load of the 

replacement tire is greater than 1/2 

of the Gross Axle Weight Ratings 

(GAWR) of either the front axle or 

the rear axle, whichever is greater.
For the GAWR, see the Certification 

Label.

For the maximum load of the tire, 

see the load limit at maximum cold 

tire inflation pressure mentioned on 

the sidewall of the tire. (

P.488)

Tire types

Summer tires

Summer tires are high-speed perfor-

Tires

Replace or rotate tires in 
accordance with mainte-
nance schedules and tread-
wear.

Checking tires

404

7-3. Do-it-yourself maintenance

mance tires best suited to highway 
driving under dry conditions. Since 
summer tires do not have the same 
traction performance as snow tires, 
summer tires are inadequate for 
driving on snow-covered or icy 
roads. For driving on snow-covered 
roads or icy roads, the use of snow 
tires is recommended. When install-
ing snow tires, be sure to replace all 
four tires.

All season tires

All season tires are designed to pro-
vide better traction in snow and to 
be adequate for driving in most win-
ter conditions as well as for use 
year-round. All season tires, how-
ever, do not have adequate traction 
performance compared with snow 
tires in heavy or loose snow. Also, 
all season tires fall short in accelera-
tion and handling performance com-
pared with summer tires in highway 
driving.

Snow tires

For driving on snow-covered roads 
or icy roads, we recommend using 
snow tires. If you need snow tires, 
select tires of the same size, con-
struction and load capacity as the 
originally installed tires. Since your 
vehicle has radial tires as original 
equipment, make sure your snow 
tires also have radial construction. 
Do not install studded tires without 
first checking local regulations for 
possible restrictions. Snow tires 
should be installed on all wheels. 
(

P.320)

If the tread on snow tires wears 

down below 0.16 in. (4 mm)

The effectiveness of the tires as 

snow tires is lost.

Rotate the tires in the order 

WARNING

When inspecting or replacing 

tires

Observe the following precautions 

to prevent accidents.

Failure to do so may cause dam-

age to parts of the drive train as 

well as dangerous handling char-

acteristics, which may lead to an 

accident resulting in death or seri-

ous injury.

Do not mix tires of different 

makes, models or tread pat-

terns.

Also, do not mix tires of remark-

ably different treadwear.

Do not use tire sizes other than 

those recommended by Toyota.

Do not mix differently con-

structed tires (radial, bias-belted 

or bias-ply tires).

Do not mix summer, all season 

and snow tires.

Do not use tires that have been 

used on another vehicle.

Do not use tires if you do not 

know how they were used previ-

ously.

NOTICE

Driving on rough roads

Take particular care when driving 

on roads with loose surfaces or 

potholes.

These conditions may cause 

losses in tire inflation pressure, 

reducing the cushioning ability of 

the tires. In addition, driving on 

rough roads may cause damage 

to the tires themselves, as well as 

the vehicle’s wheels and body.

Tire rotation

405

7-3. Do-it-yourself maintenance

7

Maintena

nce
 a

nd ca

re

shown.

Front

To equalize tire wear and extend 
tire life, Toyota recommends that 
tire rotation is carried out at the 
same interval as tire inspection.
Do not fail to initialize the tire pres-
sure warning system after tire rota-
tion.

Your vehicle is equipped with a 
tire pressure warning system 
that uses tire pressure warning 
valves and transmitters to detect 
low tire inflation pressure before 
serious problems arise.

The tire pressure detected by 
the tire pressure warning sys-
tem can be displayed on the 
multi-information display. 
(

P.105)

If the tire pressure drops 
below a predetermined level, 
the driver is warned by a 
screen display and a warning 
light. (

P.447)

Routine tire inflation pressure 

checks

The tire pressure warning system 

does not replace routine tire inflation 

pressure checks. Make sure to 

check tire inflation pressure as part 

of your routine of daily vehicle 

checks.

Tire inflation pressure

It may take a few minutes to dis-

play the tire inflation pressure 

after the power switch is turned to 

ON. It may also take a few min-

utes to display the tire inflation 

pressure after inflation pressure 

has been adjusted.

Tire inflation pressure changes 

with temperature. The displayed 

values may also be different from 

the values measured using a tire 

pressure gauge.

Tire pressure warning 
system

406

7-3. Do-it-yourself maintenance

Situations in which the tire 

pressure warning system may 

not operate properly

In the following cases, the tire 

pressure warning system may not 

operate properly.

• If non-genuine Toyota wheels are 

used.

• If a tire has been replaced with a 

tire that is not an OE (Original 

Equipment) tire.

• If a tire has been replaced with a 

tire that is not of the specified size.

• If tire chains, etc. are installed.

• If a window tint that affects the 

radio wave signals is installed.

• If there is a lot of snow or ice on 

the vehicle, particularly around the 

wheels or wheel housings.

• If the tire inflation pressure is 

much higher than the specified 

level.

• If wheels not equipped with tire 

pressure warning valves and 

transmitter are used.

• If the ID code on the tire pressure 

warning valves and transmitters is 

not registered in the tire pressure 

warning computer.

Performance may be affected in 

the following situations.

• When driving near a TV tower, 

electric power plant, gas station, 

radio station, large display, airport 

or other facility that generates 

strong radio waves or electrical 

noise

• When carrying a portable radio, 

cellular phone, cordless phone or 

other wireless communication 

device

If tire position information is not cor-

rectly displayed due to the radio 

wave conditions, the display may be 

corrected by changing the location 

of the vehicle as the radio wave 

conditions may change.

When the vehicle is stopped, the 

time taken for the warning to start 

or turn off may be longer.

When the inflation pressure of a 

tire drops rapidly, for example 

when a tire has burst, the warning 

may not operate.

Warning performance of the tire 

pressure warning system

The warning of the tire pressure 

warning system will change in 

accordance the conditions under 

which it was initialized. For this rea-

son, the system may give a warning 

even if the tire pressure does not 

reach a low enough level, or if the 

pressure is higher than the pressure 

that was adjusted to when the sys-

tem was initialized.

Tire pressure warning system 

certification

P.553

When replacing the tires or 
wheels, the tire pressure warn-
ing valves and transmitters must 
be installed to the wheels which 
will be installed to the vehicle.
When new tire pressure warning 
valves and transmitters are 
installed, new ID codes must be 
registered in the tire pressure 
warning computer and the tire 
pressure warning system must 
be initialized. (

P.409)

Replacing tires and wheels

If the ID codes of the tire pressure 

warning valves and transmitters are 

not registered, the tire pressure 

warning system will not work prop-

erly. In this case, after driving for 

about 10 minutes, the tire pressure 

warning light will blink for approxi-

mately 1 minute and then illuminate 

to indicate a system malfunction.

Installing tire pressure 
warning valves and trans-
mitters

407

7-3. Do-it-yourself maintenance

7

Maintena

nce
 a

nd ca

re

The tire pressure warning 
system must be initialized 
in the following circum-
stances:

When the tire inflation pres-
sure is changed such as 
when changing traveling 
speed or load weight.

When the tire inflation pres-
sure is changed such as 
when the tire size is changed.

When rotating the tires.

After performing the transmit-
ter ID code registration proce-
dure. (

P.409)

When the tire pressure warning 
system is initialized, the current 
tire inflation pressure is set as 
the benchmark pressure.

How to initialize the tire 
pressure warning system

1

Park the vehicle in a safe 
place, turn the power switch 
off and wait 20 minutes or 
more.

Initialization cannot be performed 

while the vehicle is moving.

2

Adjust the tire inflation pres-
sure to the specified cold tire 
inflation pressure level.

Make sure to adjust the tire pres-

sure to the specified cold tire infla-

tion pressure level. The tire 

pressure warning system will oper-

ate based on this pressure level.

3

Start the fuel cell system.

4

Press 

 or 

 of the meter 

control switch to select 

.

5

Press 

 or 

 to select 

“Vehicle Settings” and then 
press and hold 

.

6

Press 

 or 

 to select 

“TPWS” and then press 

.

7

Press 

 or 

 to select “Set 

Pressure”. Then press and 
hold 

 until the tire pressure 

warning light starts blinking.

A message is displayed on the 

multi-information display. Also, “--” 

is displayed for inflation pressure of 

NOTICE

Repairing or replacing tires, 

wheels, tire pressure warn-

ing valves, transmitters and 

tire valve caps

When removing or fitting the 

wheels, tires or the tire pressure 

warning valves and transmit-

ters, contact your Toyota dealer 

as the tire pressure warning 

valves and transmitters may be 

damaged if not handled cor-

rectly.

Make sure to install the tire 

valve caps. If the tire valve caps 

are not installed, water could 

enter the tire pressure warning 

valves, corrode the valve, and 

cause sticking and air leaks.

When replacing tire valve caps, 

do not use tire valve caps other 

than those specified. The cap 

may become stuck.

Initializing the tire pres-
sure warning system

408

7-3. Do-it-yourself maintenance

each tire on the multi-information 

display while the tire pressure 

warning system determines the 

position.

8

Drive at approximately 25 
mph (40 km/h) or more for 
approximately 10 to 30 min-
utes.

When initialization is complete, the 

inflation pressure of each tire will be 

displayed on the multi-information 

display.
Even if the vehicle is not driven at 

approximately 25 mph (40 km/h) or 

more, initialization can be com-

pleted by driving for a long time. 

However, if initialization does not 

complete after driving for 1 hour or 

more, park the vehicle in a safe 

place for approximately 20 minutes 

and then drive the vehicle again.

When initializing

Initialization is performed while 

driving at a vehicle speed of 

approximately 25 mph (40 km/h) 

or more.

Make sure to carry out initializa-

tion after adjusting the tire inflation 

pressure. Also, make sure the 

tires are cold before carrying out 

initialization or tire inflation pres-

sure adjustment.

The tire pressure warning system 

can be initialized by yourself, but 

depending on the driving condi-

tions and driving environment, ini-

tialization may take some time to 

complete.

The initialization operation

If you have accidentally turned the 

power switch off during initializa-

tion, it is not necessary to manu-

ally restart the initialization again, 

as initialization will restart auto-

matically the next time the power 

switch is turned to ON.

If you accidentally perform initial-

ization when initialization is not 

necessary, adjust the tire inflation 

pressure to the specified level 

when the tires are cold, and con-

duct initialization again.

While the position of each tire is 

being determined and the inflation 

pressures are not being displayed 

on the multi-information display, if 

the inflation pressure of a tire 

drops, the tire pressure warning 

light will come on.

If the tire pressure warning sys-

tem is not initialized properly

In the following situations, initial-

ization may take longer than usual 

to be completed or may not be 

possible. Normally, initialization 

completes within approximately 

30 minutes.

• Vehicle is not driven at approxi-

mately 25 mph (40 km/h) or more

• Vehicle is driven on unpaved 

roads

• Vehicle is driven near other vehi-

cles and system cannot recog-

nize tire pressure warning valve 

and transmitters of your vehicle 

over those of other vehicles

If initialization does not complete 

after driving for 1 hour or more, park 

the vehicle in a safe place for 

approximately 20 minutes and then 

drive the vehicle again.

If the vehicle is reversed during 

initialization, the data up to that 

point is reset, so perform the ini-

tialization procedure again from 

the beginning.

In the following situations, initial-

409

7-3. Do-it-yourself maintenance

7

Maintena

nce
 a

nd ca

re

ization will not be started or was 

not completed properly and the 

system will not operate properly. 

Perform the initialization proce-

dure again.

• If, when attempting to start initial-

ization, the tire pressure warning 

light does not blink 3 times.

• If, when the vehicle has been 

driven for about 20 minutes after 

performing initialization, the tire 

pressure warning light blinks for 

approximately 1 minute and then 

illuminates.

If initialization cannot be completed 

after performing the above proce-

dure, contact your Toyota dealer.

Every tire pressure warning 
valve and transmitter has a 
unique ID code. When replacing 
a tire pressure warning valve 
and transmitter, it is necessary 
to register the ID codes.
When registering the ID codes, 
perform the following procedure.

1

When registering the ID 
codes, perform the following 
procedure.Park the vehicle in 
a safe place and turn the 
power switch off, wait for 

approximately 15 minutes or 
more and perform the proce-
dure.

2

Start the fuel cell system. 
(

P.172)

3

Press 

 or 

 of the meter 

control switch to select 

.

4

Press 

 or 

 to select 

“Vehicle Settings” and then 
press and hold 

.

5

Press 

 or 

 to select 

“TPWS” and then press 

.

6

Press 

 or 

 to select 

“Change Wheel”. Then press 
and hold 

 until the tire 

pressure warning light blinks 
slowly 3 times.

Then a message will be displayed 

on the multi-information display.
When registration is being per-

formed, the tire pressure warning 

light will blink for approximately 1 

minute then illuminate and “--” will 

be displayed for the inflation pres-

sure of each tire on the multi-infor-

mation display.

WARNING

When initializing the tire pres-

sure warning system

Do not initialize the tire pressure 

warning system without first 

adjusting the tire inflation pres-

sure to the specified level. Other-

wise, the tire pressure warning 

light may not come on even if the 

tire inflation pressure is low, or it 

may come on when the tire infla-

tion pressure is actually normal.

Registering ID codes

410

7-3. Do-it-yourself maintenance

7

Drive at 25 mph (40 km/h) or 
more for approximately 10 to 
30 minutes.

Registration is complete when the 

tire pressure warning light turns off 

and the inflation pressure of each 

tire is displayed on the multi-infor-

mation display.
Even if the vehicle is not driven at 

approximately 25 mph (40 km/h) or 

more, registration can be com-

pleted by driving for a long time. 

However, if registration does not 

complete after driving for 1 hour or 

more, perform the procedure again 

from the beginning.

8

Initialize the tire pressure 
warning system. (

P.407)

When registering ID codes

ID code registration is performed 

while driving at a vehicle speed of 

approximately 25 mph (40 km/h) 

or more.

Before performing ID code regis-

tration, make sure that no wheels 

with tire pressure warning valve 

and transmitters installed are near 

the vehicle.

Make sure to initialize the tire 

pressure warning system after 

registering the ID codes. If the 

system is initialized before regis-

tering the ID codes, the initialized 

values will be invalid.

ID codes can be registered by 

yourself, but depending on the 

driving conditions and driving 

environment, registration may 

take some time to complete.

Canceling ID code registration

To cancel ID code registration 

after it has been started, turn the 

power switch off before driving the 

vehicle.

If the vehicle is driven after ID 

code registration is started, to 

cancel registration, perform the ID 

code registration start procedure 

again and turn the power switch 

off before driving.

If ID code registration has been 

canceled, the tire pressure warn-

ing light will blink for approxi-

mately 1 minute when the power 

switch is turned to ON and then 

illuminate. The tire pressure warn-

ing system will be operational 

when the tire pressure warning 

light turns off.

If the warning light does not turn 

off even after several minutes 

have elapsed, ID code registration 

may not have been canceled cor-

rectly. To cancel registration, per-

form the ID code registration start 

procedure again and then turn the 

power switch off before driving.

If ID codes are not registered 

properly

In the following situations, ID code 

registration may take longer than 

usual to be completed or may not 

be possible. Normally, registration 

completes within approximately 

30 minutes.

• Vehicle is not parked for approxi-

mately 20 minutes or more before 

driving

• Vehicle is not driven at approxi-

mately 25 mph (40 km/h) or more

• Vehicle is driven on unpaved 

roads

• Vehicle is driven near other vehi-

cles and system cannot recog-

nize tire pressure warning valves 

and transmitters of your vehicle 

over those of other vehicles

• Wheel with tire pressure warning 

valve and transmitter installed is 

inside or near the vehicle

If registration does not complete 
after driving for 1 hour or more, per-
form the ID code registration proce-
dure again from the beginning.

If the vehicle is reversed during 

registration, the data up to that 

point is reset, so perform the reg-

istration procedure again from the 

411

7-3. Do-it-yourself maintenance

7

Maintena

nce
 a

nd ca

re

beginning.

In the following situations, ID code 

registration will not be started or 

was not completed properly and 

the system will not operate prop-

erly. Perform the ID code registra-

tion procedure again.

• If, when attempting to start ID 

code registration, the tire pressure 

warning light does not blink slowly 

3 times.

• If, when the vehicle has been 

driven for about 20 minutes after 

performing ID code registration, 

the tire pressure warning light 

blinks for approximately 1 minute 

and then illuminates.

If ID code registration cannot be 

completed after performing the 

above procedure, contact your 

Toyota dealer.

Stop the vehicle in a safe 
place on a hard, flat surface.

Set the parking brake.

Shift the shift position to P.

Stop the fuel cell system.

Jack and tools

As your vehicle is not installed spare 

tire, the following tools for replacing 

a tire are not included with your 

vehicle. They can be purchased at 

your Toyota dealer.

Wheel nut wrench

Jack

Jack handle

Replacing the tire

When raising your vehicle 
with a jack, position the jack 
correctly.
Improper placement may 
damage your vehicle or 
cause injury.
If necessary tire replace-
ment seems difficult to per-
form, contact your Toyota 
dealer.

Before jacking up the 
vehicle

412

7-3. Do-it-yourself maintenance

1

Chock the tires.

2

Slightly loosen the wheel 
nuts (one turn).

3

Turn the tire jack portion   
by hand until the notch of the 

WARNING

Using the tire jack

Observe the following precau-

tions.

Improper use of the tire jack may 

cause the vehicle to suddenly fall 

off the jack, leading to death or 

serious injury.

Do not use the tire jack for any 

purpose other than replacing 

tires or installing and removing 

tire chains.

Do not use other tire jacks for 

replacing tires on this vehicle.

Put the jack properly in its jack 

point.

Do not put any part of your body 

under the vehicle while it is sup-

ported by the jack.

Do not start the fuel cell system 

or drive the vehicle while the 

vehicle is supported by the jack.

Do not raise the vehicle while 

someone is inside.

When raising the vehicle, do not 

put an object on or under the 

jack.

Do not raise the vehicle to a 

height greater than that required 

to replace the tire.

Use a jack stand if it is neces-

sary to get under the vehicle.

When lowering the vehicle, 

make sure that there is no-one 

near the vehicle. If there are 

people nearby, warn them 

vocally before lowering.

Removing a tire

Tire

Wheel chock 

positions

Front left-hand 
side

Behind the rear 
right-hand side 
tire

Front right-hand 
side

Behind the rear 
left-hand side tire

Rear left-hand 
side

In front of the 
front right-hand 
side tire

Rear right-hand 
side

In front of the 
front left-hand 
side tire

413

7-3. Do-it-yourself maintenance

7

Maintena

nce
 a

nd ca

re

jack is in contact with the jack 
point.

The jack point guides are located 

under the rocker panel. They indi-

cate the jack point positions.

4

Raise the vehicle until the tire 
is slightly raised off the 
ground.

5

Remove all the wheel nuts 
and the tire.

When resting the tire on the 

ground, place the tire so that the 

wheel design faces up to avoid 

scratching the wheel surface.

1

Remove any dirt or foreign 
matter from the wheel con-
tact surface.

If foreign matter is on the wheel 

contact surface, the wheel nuts 

may loosen while the vehicle is in 

motion, causing the tire to come off.

WARNING

Replacing a tire

Do not touch the disc wheels or 

the area around the brakes imme-

diately after the vehicle has been 

driven.
After the vehicle has been driven 

the disc wheels and the area 

around the brakes will be 

extremely hot. Touching these 

areas with hands, feet or other 

body parts while changing a tire, 

etc. may result in burns.

Installing the tire

414

7-3. Do-it-yourself maintenance

2

Install the tire and loosely 
tighten each wheel nut by 
hand by approximately the 
same amount.

Turn the wheel nuts until the wash-

ers come into contact with the disc 

wheel.

Washer

Disc wheel

3

Lower the vehicle.

4

Firmly tighten each wheel nut 
two or three times in the 
order shown in the illustra-
tion.
Tightening torque:

103 ft•lbf (140 N•m, 14.3 
kgf•m)

WARNING

When installing the tire

Failure to follow these precau-

tions could cause the wheel nuts 

to loosen and the tire to fall off, 

resulting in death or serious injury.

Never use oil or grease on the 

wheel bolts or wheel nuts.

Oil and grease may cause the 

wheel nuts to be excessively 

tightened, leading to bolt or disc 

wheel damage. In addition, the 

oil or grease can cause the 

wheel nuts to loosen and the 

wheel may fall off, causing a 

serious accident. Remove any 

oil or grease from the wheel 

bolts or wheel nuts.

Have the wheel nuts tightened 

with a torque wrench to 103 

ft•lbf (140 N•m, 14.3 kgf•m) as 

soon as possible after changing 

wheels.

Do not attach a heavily dam-

aged wheel ornament, as it may 

fly off the wheel while the vehi-

cle is moving.

When installing a tire, only use 

wheel nuts that have been spe-

cifically designed for that wheel.

415

7-3. Do-it-yourself maintenance

7

Maintena

nce
 a

nd ca

re

The recommended cold tire 
inflation pressure and tire size 
are displayed on the tire and 
loading information label. 
(

P.487)

Tire valve

WARNING

If there are any cracks or defor-

mations in the bolt screws, nut 

threads or bolt holes of the 

wheel, have the vehicle 

inspected by your Toyota 

dealer.

NOTICE

Repairing or replacing tires, 

wheels, tire pressure warn-

ing valves, transmitters and 

tire valve caps

P.406

Tire inflation pressure

Checking the specified 
tire inflation pressure

Inspection and adjust-
ment procedure

416

7-3. Do-it-yourself maintenance

Tire pressure gauge

1

Remove the tire valve cap.

2

Press the tip of the tire pres-
sure gauge onto the tire 
valve.

3

Read the pressure using the 
gauge gradations.

4

If the tire inflation pressure is 
not at the recommended 
level, adjust the pressure.
If you add too much air, press 
the center of the valve to 
deflate.

5

After completing the tire infla-
tion pressure measurement 
and adjustment, apply soapy 
water to the valve and check 
for leakage.

6

Put the tire valve cap back 
on.

Tire inflation pressure check 

interval

You should check tire inflation pres-

sure every two weeks, or at least 

once a month. Do not forget to 

check the spare.

Effects of incorrect tire inflation 

pressure

Driving with incorrect tire inflation 

pressure may result in the following:

Reduced fuel economy

Reduced driving comfort and poor 

handling

Reduced tire life due to wear

Reduced safety

Damage to the drive train

If a tire needs frequent inflating, 

have it checked by your Toyota 

dealer.

Instructions for checking tire 

inflation pressure

When checking tire inflation pres-

sure, observe the following:

Check only when the tires are 

cold.

If your vehicle has been parked for 

at least 3 hours or has not been 

driven for more than 1 mile or 1.5 

km, you will get an accurate cold 

tire inflation pressure reading.

Always use a tire pressure gauge.

It is difficult to judge if a tire is 

properly inflated based only on its 

appearance.

It is normal for the tire inflation 

pressure to be higher after driving 

as heat is generated in the tire. Do 

not reduce tire inflation pressure 

after driving.

Never exceed the vehicle capacity 

weight.

Passengers and luggage weight 

should be placed so that the vehi-

cle is balanced.

WARNING

Proper inflation is critical to 

save tire performance

Keep your tires properly inflated.

If the tires are not properly 

inflated, the following conditions 

may occur which could lead to an 

accident resulting in death or seri-

ous injury:

Excessive wear

Uneven wear

Poor handling

Possibility of blowouts resulting 

from overheated tires

Air leaking from between tire 

and wheel

Wheel deformation and/or tire 

damage

417

7-3. Do-it-yourself maintenance

7

Maintena

nce
 a

nd ca

re

When replacing wheels, care 
should be taken to ensure that 
they are equivalent to those 
removed in load capacity, diam-
eter, rim width and inset

*

.

Replacement wheels are avail-
able at your Toyota dealer.

*

: Conventionally referred to as off-

set.

Toyota does not recommend 
using the following:

Wheels of different sizes or 
types

Used wheels

Bent wheels that have been 
straightened

When replacing wheels

The wheels of your vehicle are 

equipped with tire pressure warning 

valves and transmitters that allow 

the tire pressure warning system to 

provide advance warning in the 

event of a loss in tire inflation pres-

sure. Whenever wheels are 

replaced, the tire pressure warning 

valves and transmitters must be 

installed. (

P.406)

WARNING

Greater possibility of tire dam-

age while driving (due to road 

hazards, expansion joints, 

sharp edges in the road, etc.)

NOTICE

When inspecting and adjust-

ing tire inflation pressure

Be sure to put the tire valve caps 

back on.

If a valve cap is not installed, dirt 

or moisture may get into the valve 

and cause an air leak, resulting in 

decreased tire inflation pressure.

Wheels

If a wheel is bent, cracked or 
heavily corroded, it should 
be replaced. Otherwise, the 
tire may separate from the 
wheel or cause a loss of 
handling control.

Wheel selection

418

7-3. Do-it-yourself maintenance

Use only Toyota wheel nuts 
and wheel nut wrenches 
designed for use with your 
aluminum wheels.

When rotating, repairing or 
changing your tires, check 
that the wheel nuts are still 
tight after driving 1000 miles 
(1600 km).

Be careful not to damage the 
aluminum wheels when using 
tire chains.

Use only Toyota genuine bal-
ance weights or equivalent 
and a plastic or rubber ham-
mer when balancing your 
wheels.

WARNING

When replacing wheels

Do not use wheels that are a dif-

ferent size from those recom-

mended in the Owner’s Manual, 

as this may result in a loss of 

handling control.

Never use an inner tube in a 

leaking wheel which is designed 

for a tubeless tire.

Doing so may result in an acci-

dent, causing death or serious 

injury.

When installing the wheel 

nuts

Never use oil or grease on the 

wheel bolts or wheel nuts. Oil and 

grease may cause the wheel nuts 

to be excessively tightened, lead-

ing to bolt or disc wheel damage. 

In addition, the oil or grease can 

cause the wheel nuts to loosen 

and the wheel may fall off, caus-

ing an accident and resulting in 

death or serious injury. Remove 

any oil or grease from the wheel 

bolts or wheel nuts.

Use of defective wheels pro-

hibited

Do not use cracked or deformed 

wheels. Doing so could cause the 

tire to leak air during driving, pos-

sibly causing an accident.

NOTICE

Replacing tire pressure warn-

ing valves and transmitters

Because tire repair or replace-

ment may affect the tire pres-

sure warning valves and 

transmitters, make sure to have 

tires serviced by your Toyota 

dealer or other qualified service 

shop. In addition, make sure to 

purchase your tire pressure 

warning valves and transmit-

ters at your Toyota dealer.

Ensure that only genuine Toyota 

wheels are used on your vehi-

cle.

Tire pressure warning valves 

and transmitters may not work 

properly with non-genuine 

wheels.

Aluminum wheel precau-
tions


Content      ..     23      24      25      26     ..