Toyota Mirai (2022 year). Manual in english - page 26
 

  Index      Toyota     Toyota Mirai (2022 year). Manual in english


Search            copyright infringement  


Content      ..     24      25      26      27     ..


Toyota Mirai (2022 year). Manual in english - page 26


419

7-3. Do-it-yourself maintenance

7

Maintena

nce
 a

nd ca

re

1

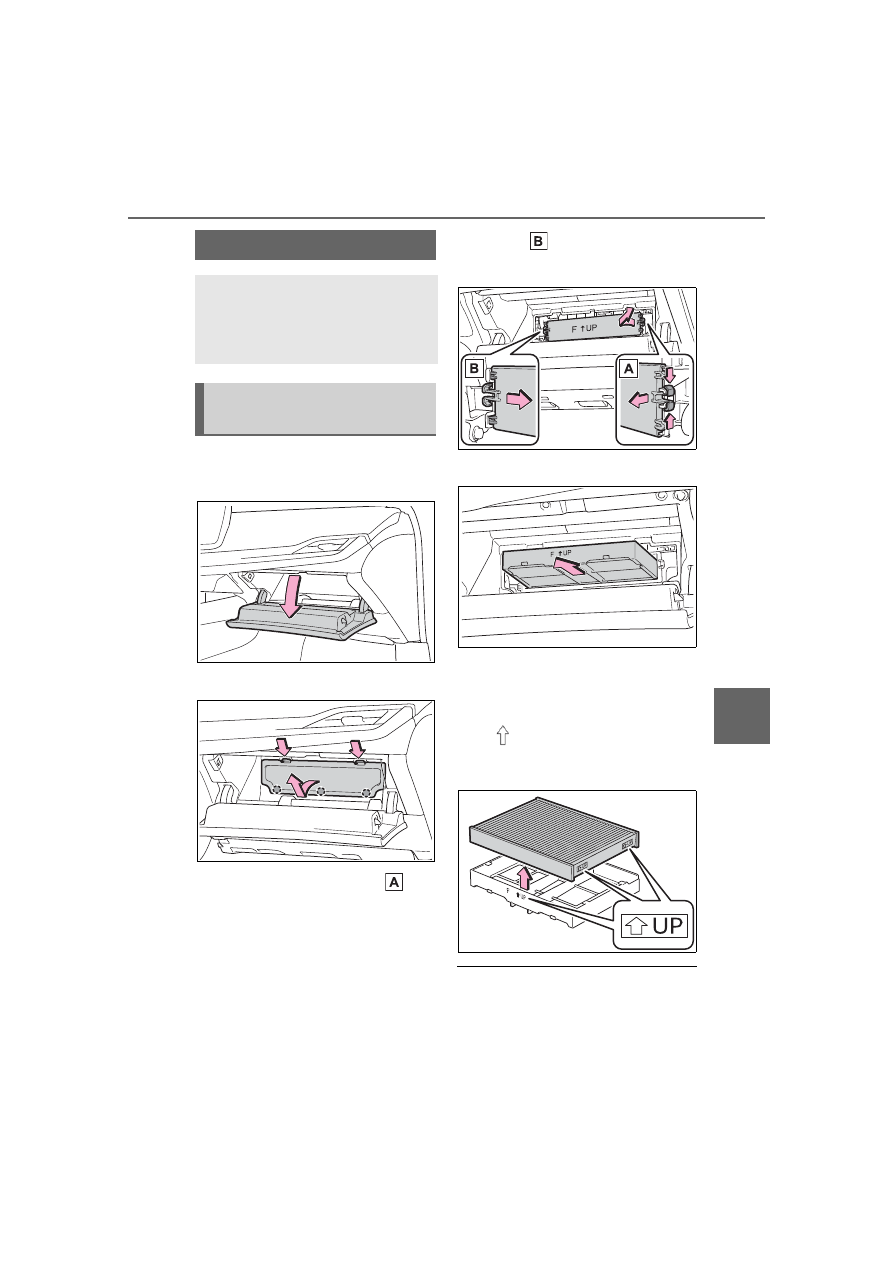
Turn the power switch off.

2

Open the glove box.

3

Remove the panel.

4

Unlock the filter cover ( ), 
pull the filter cover out of the 

claws ( ), and remove the 
filter cover.

5

Remove the filter case.

6

Remove the air conditioning 
filter from the filter case and 
replace it with a new one.

The “

UP” marks shown on the 

filter and the filter case should be 
pointing up.

Checking interval

Inspect and replace the air condi-

tioning filter according to the mainte-

nance schedule. In dusty areas or 

Air conditioning filter

The air conditioning filter 
must be changed regularly 
to maintain air conditioning 
efficiency.

Removing the air condi-
tioning filter

420

7-3. Do-it-yourself maintenance

areas with heavy traffic flow, early 

replacement may be required. (For 

scheduled maintenance information, 

please refer to the “Scheduled 

Maintenance Guide” or “Owner’s 

Manual Supplement”.)

If air flow from the vents 

decreases dramatically

The filter may be clogged. Check 

the filter and replace if necessary.

Air conditioning filter with 

deodorizing function

When fragrances are placed in your 

vehicle, the deodorizing effect may 

become significantly weakened in a 

short period.

When an air conditioning odor 

comes out continuously, replace the 

air conditioning filter.

Remove the dust from the air 
intake vents with a vacuum 
cleaner etc.

Make sure to only use a vacuum to 
suck out dust and clogs. Attempting 
to blow out dust and clogs using an 
airgun etc. may push it into the air 
intake vents. (

P.422)

NOTICE

When using the air condition-

ing system

Make sure that a filter is always 

installed.

Using the air conditioning system 

without a filter may cause damage 

to the system.

To prevent damage to the fil-

ter cover

When moving the filter cover in 

the direction of arrow to release 

the fitting, pay attention not to 

apply excessive force to the 

claws. Otherwise, the claws may 

be damaged.

Cleaning the traction 

battery air intake 

vents and filters

To prevent the fuel economy 
from being affected, visually 
inspect the traction battery 
air intake vents periodically 
for dust and clogs. If it is 
dusty or clogged or if 
“Maintenance Required for 
Traction Battery Cooling 
Parts See Owner’s Manual” 
is shown on the multi-infor-
mation display, clean the air 
intake vents using the fol-
lowing procedures:

Cleaning the air intake 
vents

421

7-3. Do-it-yourself maintenance

7

Maintena

nce
 a

nd ca

re

If dust and clogs cannot be com-
pletely removed with the air 
intake vent cover installed, 
remove the cover and clean the 
filter.

1

Remove the grille.

2

Remove the filter.

3

Remove any dust and clogs 
from the filter using a vacuum 
cleaner, etc.

Make sure to also remove dust and 

clogs from the inner side of the air 

intake vent grille.
If the filter is damaged, have it 

replaced by your Toyota dealer.

4

Reinstall the filter to the grille.

5

Install the grille.

Scheduled maintenance of the 

air intake vents is necessary 

when

In some situations such as when the 

vehicle is used frequently or in 

heavy traffic or dusty areas, the air 

intake vents may need to be 

cleaned more regularly. For details, 

refer to the “Owner’s Warranty Infor-

mation Booklet” or “Owner’s Manual 

Supplement”.

If dust and clogs cannot 
be completely removed

422

7-3. Do-it-yourself maintenance

Cleaning the air intake vents

Dust in the air intake vents may 

interfere with the cooling of the 

traction battery. If charging/dis-

charging of the traction battery 

becomes limited, the distance that 

the vehicle can be driven using 

the electric motor may be reduced 

and the fuel economy may be 

reduced. Inspect and clean the air 

intake vents periodically.

Improper handling of the air intake 

vent covers and filters may result 

in damage to them. If you have 

any concerns about cleaning the 

filter, contact your Toyota dealer.

If “Maintenance Required for 

Traction Battery Cooling Parts 

See Owner’s Manual” is shown 

on the multi-information display

If this warning message is shown 

on the multi-information display, 

remove the air intake vent covers 

and clean the filters. (

P.453)

After cleaning the air intake vents, 

start the fuel cell system and 

check that the warning message 

is no longer shown.

It may take approximately 20 min-

utes after the fuel cell system is 

started until the warning message 

disappears. If the warning message 

does not disappear, have the vehi-

cle inspected by your Toyota dealer.

WARNING

When cleaning the air intake 

vents

Do not use water or other liq-

uids to clean the air intake 

vents. If water is applied to the 

traction battery or other compo-

nents, a malfunction or fire may 

occur.

Before cleaning the air intake 

vents, make sure to turn the 

power switch off to stop the fuel 

cell system.

When removing the air intake 

vent covers

Do not touch the service plug 

located near the air intake vents. 

(

P.79)

NOTICE

When cleaning the air intake 

vents

When cleaning the air intake 

vents, make sure to only use a 

vacuum to suck out dust and 

clogs. If a compressed air blow 

gun, etc. is used to blow out dust 

and clogs, the dust or clogs may 

be pushed into the air intake 

vents, which may affect the per-

formance of the traction battery 

and cause a malfunction.

To prevent damage to the 

vehicle

Do not allow water or foreign 

matter to enter the air intake 

vent when the cover is 

removed.

Carefully handle the removed 

filter so that it will not be dam-

aged. If the filter is damaged, 

have it replaced with a new filter 

by your Toyota dealer.

Make sure to reinstall the filter 

and cover to their original posi-

tions after cleaning.

Do not install anything to the air 

intake vent other than the exclu-

sive filter for this vehicle or use 

the vehicle without the filter 

installed.

423

7-3. Do-it-yourself maintenance

7

Maintena

nce
 a

nd ca

re

If the electronic key battery is 

depleted

The following symptoms may occur:

The smart key system and wire-

less remote control will not func-

tion properly.

The operational range will be 

reduced.

Flathead screwdriver

Small flathead screwdriver

Lithium battery CR2032

Use a CR2032 lithium battery

Batteries can be purchased at 

your Toyota dealer, local electrical 

appliance shops or camera stores.

Replace only with the same or 

equivalent type recommended by 

the manufacturer.

Dispose of used batteries accord-

ing to local laws.

NOTICE

If “Maintenance Required for 

Traction Battery Cooling 

Parts See Owner’s Manual” is 

shown on the multi-informa-

tion display

If the vehicle is continuously 

driven with the warning message 

(indicating that charging/discharg-

ing of the traction battery may 

become limited) displayed, the 

traction battery may malfunction. 

If the warning message is dis-

played, clean the air intake vents 

immediately.

Electronic key battery

Replace the battery with a 
new one if it is depleted.
As the key may be damaged 
if the following procedure is 
not performed properly, it is 
recommended that key bat-
tery replacement be per-
formed by your Toyota 
dealer.

Items to prepare

424

7-3. Do-it-yourself maintenance

1

Take out the mechanical key.

2

Remove the cover.

To prevent damage to the key, 

cover the tip of the flathead screw-

driver with a tape.

3

Remove the depleted battery.

Insert a new battery with the “+” ter-

minal facing up.

Replacing the battery

WARNING

Removed battery and other 

parts

These parts are small and if swal-

lowed by a child, they can cause 

choking. Keep away from chil-

dren. Failure to do so could result 

in death or serious injury.

NOTICE

When replacing the battery

Use a flathead screwdriver of 

appropriate size. Applying exces-

sive force may deform or damage 

the cover.

For normal operation after 

replacing the battery

Observe the following precautions 

to prevent accidents:

Always work with dry hands.

Moisture may cause the battery 

to rust.

Do not touch or move any other 

component inside the remote 

control.

Do not bend either of the battery 

terminals.

425

7-3. Do-it-yourself maintenance

7

Maintena

nce
 a

nd ca

re

1

Turn the power switch off.

2

Open the fuse box cover.

Fuel cell unit compartment: 
type A fuse box

Push the tabs in and lift the lid off.

Fuel cell unit compartment: 
type B fuse box

Remove the fuel cell unit compart-
ment cover (

P.396) and push the 

tabs in and lift the lid off.

Driver’s side instrument panel

Push the tab in and remove the lid.
Make sure to push the tab in during 
removal or installation.

Passenger’ side instrument 
panel

Remove the cover.

Checking and replac-

ing fuses

If any of the electrical com-
ponents do not operate, a 
fuse may have blown. If this 
happens, check and replace 
the fuses as necessary.

Checking and replacing 
fuses

426

7-3. Do-it-yourself maintenance

Remove the footwell lights connec-
tor.

Remove the lid.
Make sure to push the claw when 
removing/installing the lid.

Trunk

Remove the luggage mat 
(

P.352), and while lifting up the 

luggage under tray, use a flathead 
screw driver and remove the clip.

Push the tab in and lift the lid off.

427

7-3. Do-it-yourself maintenance

7

Maintena

nce
 a

nd ca

re

3

Remove the fuse with the 
pullout tool.
Only type A fuse can be 
removed using the pullout 
tool.

4

Check if the fuse is blown.

Type A and B:

Replace the blown fuse with a new 

fuse of an appropriate amperage 

rating. The amperage rating can be 

found on the fuse box lid.
Type C and D:

Contact your Toyota dealer.

Type A

Normal fuse

Blown fuse

Type B

Normal fuse

Blown fuse

Type C

Normal fuse

Blown fuse

Type D

Normal fuse

Blown fuse

428

7-3. Do-it-yourself maintenance

After a fuse is replaced

When installing the lid, make sure 

that the tab is installed securely.

If the lights do not turn on even 

after the fuse has been replaced, 

a bulb may need replacement.

If the replaced fuse blows again, 

have the vehicle inspected by 

your Toyota dealer.

If there is an overload in a cir-

cuit

The fuses are designed to blow, pro-

tecting the wiring harness from 

damage.

Adjustment bolt A

Adjustment bolt B

Make sure the vehicle has a 
full tank of fuel and the area 
around the headlight is not 
deformed.

Park the vehicle on level 
ground.

Make sure the tire inflation 
pressure is at the specified 
level.

Have someone sit in the 
driver’s seat.

Bounce the vehicle several 
times.

WARNING

To prevent system break-

downs and vehicle fire

Observe the following precau-

tions.

Failure to do so may cause dam-

age to the vehicle, and possibly a 

fire or injury.

Never use a fuse of a higher 

amperage rating than that indi-

cated, or use any other object in 

place of a fuse.

Always use a genuine Toyota 

fuse or equivalent.

Never replace a fuse with a 

wire, even as a temporary fix.

Do not modify the fuses or fuse 

boxes.

NOTICE

Before replacing fuses

Have the cause of electrical over-

load determined and repaired by 

your Toyota dealer as soon as 

possible.

Headlight aim

Vertical movement adjust-
ing bolts

Before checking the head-
light aim

429

7-3. Do-it-yourself maintenance

7

Maintena

nce
 a

nd ca

re

1

Using a Phillips-head screw-
driver, turn bolt A in either 
direction.
Remember the turning direc-
tion and the number of turns.

2

Turn bolt B the same number 
of turns and in the same 
direction as step 

1

.

If the headlight cannot be adjusted 

using this procedure, take the vehi-

cle to your Toyota dealer to adjust 

the headlight aim.

LED Lights

The lights consist of a number of 

LEDs. If any of the LEDs burn out, 

take your vehicle to your Toyota 

dealer to have the light replaced.

Condensation build-up on the 

inside of the lens

Temporary condensation build-up 

on the inside of the headlight lens 

does not indicate a malfunction. 

Contact your Toyota dealer for more 

information in the following situa-

tions:

Large drops of water have built up 

on the inside of the lens.

Water has built up inside the 

headlight.

Adjusting the headlight 
aim

Light bulbs

If any lights burn out, have it 
replaced by your Toyota 
dealer.

431

8

8

Whe

n tr

ouble

 a

rises

When trouble arises

8-1. Essential information

Emergency flashers ....

432

If your vehicle has to be 

stopped in an emergency

..................................

432

If the vehicle is submerged 

or water on the road is ris-
ing .............................

433

8-2. Steps to take in an emer-

gency

If your vehicle needs to be 

towed.........................

435

If you think something is 

wrong ........................

439

If a warning light turns on or 

a warning buzzer sounds

..................................

441

If a warning message is dis-

played........................

451

If you have a flat tire....

455

If the fuel cell system will not 

start ...........................

466

If you lose your keys ...

467

If the fuel door cannot be 

opened ......................

468

If the electronic key does 

not operate properly ..

468

If the 12-volt battery is dis-

charged .....................

471

If your vehicle overheats

..................................

476

If the vehicle becomes stuck

..................................

480

432

8-1. Essential information

8-1.Essential information

Press the switch to flash all of 
the turn signal lights.

To turn them off, press the switch 
once again.

Emergency flashers

If the emergency flashers are 

used for a long time while the fuel 

cell system is not operating (while 

the “READY” indicator is not illu-

minated), the 12-volt battery may 

discharge.

If any of the SRS airbags deploy 

(inflate) or in the event of a strong 

rear impact, the emergency flash-

ers will turn on automatically. 

The emergency flashers will turn 

off automatically after operating 

for approximately 20 minutes. To 

manually turn the emergency 

flashers off, press the switch 

twice. 

(The emergency flashers may not 

turn on automatically depending 

on the force of the impact and 

conditions of the collision.)

1

Steadily step on the brake 
pedal with both feet and 
firmly depress it.

Do not pump the brake pedal 

repeatedly as this will increase the 

effort required to slow the vehicle.

2

Shift the shift position to N.

If the shift position is shifted to 
N

3

After slowing down, stop the 
vehicle in a safe place by the 
road.

4

Stop the fuel cell system.

If the shift position cannot be 
shifted to N

3

Keep depressing the brake 
pedal with both feet to reduce 
vehicle speed as much as 
possible.

4

To stop the fuel cell system, 
press and hold the power 
switch for 2 consecutive sec-
onds or more, or press it 

Emergency flashers

The emergency flashers are 
used to warn other drivers 
when the vehicle has to be 
stopped on the road due to 
a breakdown, etc.

Operating instructions

If your vehicle has to 

be stopped in an emer-

gency

Only in an emergency, such 
as if it becomes impossible 
to stop the vehicle in the 
normal way, stop the vehicle 
using the following proce-
dure:

Stopping the vehicle

433

8-1. Essential information

8

Whe

n tr

ouble

 a

rises

briefly 3 times or more in suc-
cession.

5

Stop the vehicle in a safe 
place by the road.

If the door can be opened, 
open the door and exit the 
vehicle.

If the door can not be opened, 
open the window using the 
power window switch and 
ensure an escape route.

If the window can be opened, 
exit the vehicle through the 
window.

If the door and window cannot 
be opened due to the rising 
water, remain calm, wait until 
the water level inside the 
vehicle rises to the point that 
the water pressure inside of 
the vehicle equals the water 
pressure outside of the vehi-
cle and then open the door 
after waiting for the rising 
water to enter the vehicle, and 
exit the vehicle. When the 

WARNING

If the fuel cell system has to 

be turned off while driving

Power assist for the steering 

wheel will be lost, making the 

steering wheel heavier to turn. 

Decelerate as much as possible 

before turning off the fuel cell sys-

tem.

If the vehicle is sub-

merged or water on 

the road is rising

This vehicle is not designed 
to be able to drive on roads 
that are deeply flooded with 
water. Do not drive on roads 
where the roads may be 
submerged or the water 
may be rising. It is danger-
ous to remain in the vehicle, 
if it anticipated that the vehi-
cle will be flooded or set a 
drift. Remain calm and fol-
low the following.

434

8-1. Essential information

outside water level exceeds 
half the height of the door, the 
door cannot be opened from 
the inside due to water pres-
sure.

Water level exceeds the floor

When the water level exceeds the 

floor and time has passed, the elec-

trical equipment will get damaged, 

the power windows will not operate, 

the motor stop, and the vehicle may 

not be able to get moving.

Using an emergency escape 
hammer

*

Laminated glass is used in the wind-

shield on this vehicle.
Laminated glass cannot be shat-
tered with an emergency hammer

*

.

Tempered glass is used in the win-

dows on this vehicle.

*

: Contact your Toyota dealer or 

aftermarket accessory manufac-
turer for further information about 
an emergency hammer.

WARNING

Caution while driving

Do not drive on roads where the 

roads may be submerged or the 

water may be rising. Otherwise 

the vehicle may be damaged and 

cannot move, as well as become 

flooded and set a drift, which may 

lead to death.

435

8-2. Steps to take in an emergency

8

Whe

n tr

ouble

 a

rises

8-2.Steps to take in an emergency

If your vehicle needs 

to be towed

If towing is necessary, we 
recommend having your 
vehicle towed by your Toy-
ota dealer or commercial 
towing service, using a 
wheel-lift type truck or flat-
bed truck.

Use a safety chain system 
for all towing, and abide by 
all state/provincial and local 
laws.

WARNING

Observe the following precau-

tions.

Failure to do so may result in 

death or serious injury.

When towing the vehicle

Be sure to transport the vehicle 

with all four wheels raised off the 

ground. If the vehicle is towed 

with the tires contacting the 

ground, the drivetrain and related 

parts may be damaged, an acci-

dent may occur due to a change 

in direction of the vehicle or elec-

tricity generated by the operation 

of the motor may cause a fire to 

occur depending on the nature of 

the damage or malfunction.

While towing

When towing using cables or 

chains, avoid sudden starts, etc. 

which place excessive stress on 

the towing eyelets, cables or 

chains. The towing eyelets, 

cables or chains may become 

damaged, broken debris may hit 

people, and cause serious dam-

age.

Do not perform any of the fol-

lowing as doing so may cause 

the parking lock mechanism to 

engage, locking the rear wheels 

and possibly leading to an acci-

dent resulting in death or seri-

ous injury:

• Unfasten the driver’s seat belt 

and open the driver’s door.


Content      ..     24      25      26      27     ..