Toyota RAV4 (2022 year). Manual in english - page 20
 

  Index      Toyota     Toyota RAV4 (2022 year). Manual in english


Search            copyright infringement  


Content      ..     18      19      20      21     ..


Toyota RAV4 (2022 year). Manual in english - page 20


321

4-5. Using the driving support systems

4

Dr

iv

ing

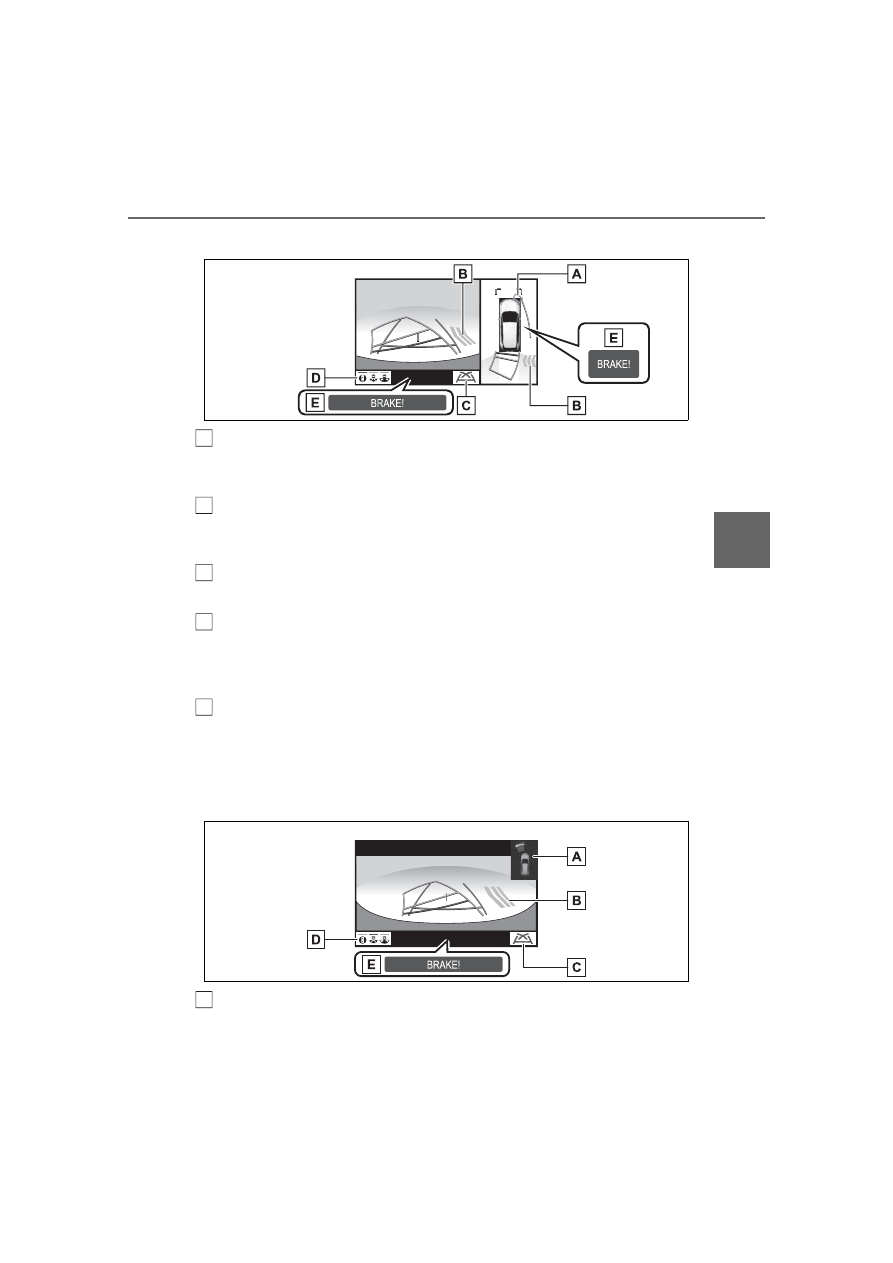
Rear view & panoramic view

Intuitive parking assist

When a sensor detects an obstacle, the direction of and the approximate 
distance to the obstacle are displayed and the buzzer sounds.

Rear Cross Traffic Alert

When a sensor detects an obstacle, the direction of obstacle is displayed 
and the buzzer sounds.

Guide line switching button

Select to switch the guide line mode. (

P.323)

Display mode switching button

Each time the display mode switching button is selected, the mode will 
change between the rear view & panoramic view mode, the wide rear view 
mode and rear view mode.

Parking Support Brake

*

When the system determines that the possibility of a collision with a 
detected object is high, a warning message is displayed.

*

: If equipped

Wide rear view

Intuitive parking assist

When a sensor detects an obstacle, the direction of and the approximate 

A

B

C

D

E

A

322

4-5. Using the driving support systems

distance to the obstacle are displayed and the buzzer sounds.

Rear Cross Traffic Alert

When a sensor detects an obstacle, the direction of obstacle is displayed 
and the buzzer sounds.

Guide line switching button

Select to switch the guide line mode. (

P.323)

Display mode switching button

Each time the display mode switching button is selected, the mode will 
change between the rear view & panoramic view mode, the wide rear view 
mode and rear view mode.

Parking Support Brake

*

When the system determines that the possibility of a collision with a 
detected object is high, a warning message is displayed.

*

: If equipped

Rear view

Intuitive parking assist

When a sensor detects an obstacle, the direction of and the approximate 
distance to the obstacle are displayed and the buzzer sounds.

Rear Cross Traffic Alert

When a sensor detects an obstacle, the direction of obstacle is displayed 
and the buzzer sounds.

Guide line switching button

Select to switch the guide line mode. (

P.323)

Display mode switching button

Each time the display mode switching button is selected, the mode will 
change between the rear view & panoramic view mode, the wide rear view 
mode and rear view mode.

Parking Support Brake

*

B

C

D

E

A

B

C

D

E

323

4-5. Using the driving support systems

4

Dr

iv

ing

When the system determines that the possibility of a collision with a 
detected object is high, a warning message is displayed.

*

: If equipped

The monitor is canceled when the shift lever is shifted into any position 

other than the “R” position.

For details about the intuitive parking assist (

P.270), Rear Cross Traffic 

Alert function (

P.266) and Parking Support Brake

*

 function. (

P.278)

The display position of the intuitive parking assist and the position of 

obstacles displayed in the camera image do not match.

*

: If equipped

Each time the guide line switching button is selected, the mode will 
change as follows:

Estimated course line

Estimated course lines are displayed which move in accordance with 
the operation of the steering wheel.

Distance guide lines

Shows distance in front of the vehicle.
• Display points approximately 3 ft. (1 m) from the edge of the bumper.

WARNING

When a sensor indicator on the intuitive parking assist display illumi-

nates in red or a buzzer sounds continuously, be sure to check the area 

around the vehicle immediately and do not proceed any further until 

safety has been ensured, otherwise an unexpected accident may occur.

As the intuitive parking assist display and Rear Cross Traffic Alert dis-

play are displayed over the camera view, it may be difficult to see the 

intuitive parking assist display and Rear Cross Traffic Alert display 

depending on the color and brightness of the surrounding area.

Guide lines displayed on the screen

A

324

4-5. Using the driving support systems

Estimated course lines

Shows an estimated course when the steering wheel is turned.

Distance guide lines

Shows the distance behind the vehicle when the steering wheel is turned.
• The guide lines move in conjunction with the estimated course lines.
• The guide lines display points approximately 1.5 ft. (0.5 m) (red) and 

approximately 3 ft. (1 m) (yellow) from the center of the edge of the 
bumper.

Distance guide line

Shows the distance behind the vehicle.
• Displays a point approximately 1.5 ft. (0.5 m) (blue) from the edge of the 

bumper.

Vehicle width guide lines

Displays a guide path when the vehicle is being backed straight up.

Vehicle center guide line

Indicates the estimated vehicle center on the ground.

Parking assist guide line

The steering wheel return points (parking assist guide lines) are dis-
played.
This mode is recommended for those who are comfortable with park-
ing the vehicle without the aid of the estimated course lines.

Distance guide lines

Shows distance in front of the vehicle.
• Display points approximately 3 ft. (1 m) from the edge of the bumper.

Distance guide line

Shows the distance behind the vehicle.
• Displays a point approximately 1.5 ft. (0.5 m) (red) from the edge of the 

bumper.

B

C

D

E

F

A

B

325

4-5. Using the driving support systems

4

Dr

iv

ing

Vehicle center guide line

Indicates the estimated vehicle center on the ground.

Vehicle width guide lines

Displays a guide path when the vehicle is being backed straight up.

Parking assist guide lines

Shows the path of the smallest turn possible behind the vehicle.

Distance guide line

Only distance guide line is displayed.
This mode is recommended for those who are comfortable with park-
ing the vehicle without the aid of the guide lines.

Distance guide lines

Shows distance in front of the vehicle.
• Display points approximately 3 ft. (1 m) from the edge of the bumper.

Distance guide line

Shows the distance behind the vehicle.
• Displays a point approximately 1.5 ft. (0.5 m) (red) from the edge of the 

bumper.

The display position of the intuitive parking assist and the position of 

obstacles displayed in the camera image do not match.

WARNING

Depending on the circumstances of the vehicle (number of passengers, 

amount of luggage, etc.), the position of the guide lines displayed on the 

screen may change. Be sure to check visually around the vehicle before 

proceeding.

If the steering wheel is straight and the vehicle width guide lines and the 

estimated course lines are not in alignment, have the vehicle inspected 

by your Toyota dealer.

C

D

E

A

B

326

4-5. Using the driving support systems

When parking in a space which 
is in the reverse direction to the 
space described in the proce-
dure below, the steering direc-
tions will be reversed.

1

Shift the shift lever to the “R” 
position.

2

Turn the steering wheel so 
that the estimated course 
lines are within the parking 
space, and back up slowly.

Parking space

Estimated course lines

3

When the rear position of the 
vehicle has entered the park-
ing space, turn the steering 
wheel so that the vehicle 
width guide lines are within 
the left and right dividing 
lines of the parking space.

Vehicle width guide line

4

Once the vehicle width guide 
lines and the parking space 
lines are parallel, straighten 
the steering wheel and back 
up slowly until the vehicle 
has completely entered the 
parking space.

WARNING

Do not use the system if the display is incorrect due to an uneven (hilly) 

road or a non-straight (curvy) road.

Parking

Using the estimated course 
line

A

B

A

327

4-5. Using the driving support systems

4

Dr

iv

ing

5

Stop the vehicle in an appro-
priate place, and finish park-
ing.

When parking in a space which 
is in the reverse direction to the 
space described in the proce-
dure below, the steering direc-
tions will be reversed.

1

Shift the shift lever to the “R” 
position.

2

Back up until the parking 
assist guide line meets the 
edge of the dividing line of 
the parking space.

Parking assist guide line

Parking space dividing line

3

Turn the steering wheel all 
the way to the left, and back 
up slowly.

4

Once the vehicle is parallel 
with the parking space, 
straighten the steering wheel 
and back up slowly until the 
vehicle has completely 
entered the parking space.

5

Stop the vehicle in an appro-
priate place, and finish park-
ing.

Even when outside rear view 
mirrors are stored, the monitor 
can display various images of 
the vicinity of the vehicle and 
assist the operation in the con-
firming safe conditions in a nar-
row places, parking, etc.

Wide front view & side views

Using parking assist guide 
line

A

B

When folding the outside 
rear view mirrors

Screen display

328

4-5. Using the driving support systems

Rear view & side views

Intuitive parking assist

When a sensor detects an obsta-
cle, the direction of and the approx-
imate distance to the obstacle are 
displayed and the buzzer sounds.

For details about the front view 

and the rear view: 

P.315, 320

If displayed objects are too 
small to see clearly when the 
panoramic view is displayed, the 
area around any of the 4 cor-
ners of the vehicle can be mag-
nified.

1

Turn the intuitive parking 
assist on.

2

Select the area on the pan-
oramic view display you wish 
to magnify.

Touching one of the 4 areas 
within the dotted lines will 
magnify that area. (Dotted 
lines are not displayed on the 
actual display.)

To return to the normal view, 
touch the panoramic view dis-
play again.

The magnifying function is 

enabled when all of the following 

conditions are met:

• The wide front view & panoramic 

view or the rear view & panoramic 

view is displayed.

• The vehicle speed is below 

approximately 7 mph (12 km/h).

• The intuitive parking assist is 

available.

In the following situations, the 

magnified display will be can-

celed automatically:

• The vehicle speed is approxi-

mately 7 mph (12 km/h) or higher.

• The intuitive parking assist is 

unavailable.

When the display is magnified, the 

guide lines will not be displayed.

The color of the vehicle dis-

WARNING

When a sensor indicator on the 

intuitive parking assist display 

illuminates in red or a buzzer 

sounds continuously, be sure to 

check the area around the vehi-

cle immediately and do not pro-

ceed any further until safety has 

been ensured, otherwise an 

unexpected accident may 

occur.

Magnifying function

Magnifying the display

A

Customizing the pan-
oramic view monitor

329

4-5. Using the driving support systems

4

Dr

iv

ing

played on the panoramic view 
monitor can be changed.

1

Display the moving view/see-
through view screen. 
(

P.314)

2

Select 

.

3

Select the desired color.

Displays the next page

The panoramic view monitor displays an image of the surrounding 
view of the vehicle.
Since the panoramic view processes and displays images based on 
flat road surfaces, it cannot depict the position of three-dimension 
objects (such as vehicle bumpers, etc.) that are in positions higher 
than the surface of the road. Even if there is room between the bum-
pers of the vehicles and it seems not likely to collide in the image, in 
reality, the both vehicles are on a collision course.
Check the safety of the surroundings directly.

Objects located in the shaded areas will not be displayed on the 
screen.

Changing the body color 
displayed in the pan-
oramic view monitor

A

Panoramic view monitor precautions

Area displayed on screen

Area of image of panoramic view

A

330

4-5. Using the driving support systems

Parts of objects which extend above a certain height cannot be 
displayed on the screen.

As the images obtained from four cameras are processed and displayed 

on the standard of a flat road surface; the panoramic view/moving 

view/see through view may be displayed as follows.

• Objects may look collapsed; thinner or bigger than usual.

• An object with a higher position than the road surface may look farther 

away than it actually is or may not appear at all.

• Tall objects may appear protruding from the non-displayed areas of the 

image.

Variations in the brightness of the image may appear for every camera.

The displayed image may be shifted by inclination of the vehicle body, 

change in vehicle height, etc., depending on the number of passengers, 

amount of luggage, fuel quantity, etc.

If the front doors or back door are not completely closed; neither the 

image nor the guide lines are displayed.

The position relations of the vehicle icon and the road surface or obstacle 

may differ from the actual positions.

The black areas of the vicinity of the vehicle icon are areas that are not 

captured by the camera.

Images like the following are combined, thus some areas may be difficult 

to view.

A

331

4-5. Using the driving support systems

4

Dr

iv

ing

Wide front view

Side view

WARNING

When a sensor indicator on the intuitive parking assist display illumi-

nates in red or a buzzer sounds continuously, be sure to check the area 

around the vehicle immediately and do not proceed any further until 

safety has been ensured, otherwise an unexpected accident may occur.

Area of the image captured 
by the camera

332

4-5. Using the driving support systems

Rear view

The area around both cor-
ners of the bumper will not be 
displayed.

Wide rear view

The area around both cor-

ners of the bumper will not be 
displayed.

Black masking is done for dis-

tance detection differences to the 

front of the vehicle.

The area covered by the camera 

is limited. Objects which are close 

to either corner of the bumper or 

under the bumper cannot be seen 

on the screen.

The area displayed on the screen 

may vary depending on vehicle 

orientation or road conditions.

The camera uses a special lens. 

The distance in the image dis-

played on the screen will differ 

from the actual distance.

The cameras for the panoramic 
view monitor are located as 
shown in the illustrations.

Front camera

Side cameras

A

A

The camera

333

4-5. Using the driving support systems

4

Dr

iv

ing

Rear camera

If dirt or foreign matter (such as 
water droplets, snow, mud, etc.) 
is adhering to the camera, it 
cannot transmit a clear image. 
In this case, flush it with a large 
quantity of water and wipe the 
camera lens clean with a soft 
and wet cloth.

The distance guide lines and 
the vehicle width guide lines 

Using the camera

NOTICE

The panoramic view monitor 

may not operate properly in the 

following cases.

• If the camera is hit, the position 

and mounting angle of the cam-

era may change.

• As the camera has a water 

proof construction, do not 

detach, disassemble or modify 

it. This may cause incorrect 

operation.

• When cleaning the camera lens, 

flush the camera with a large 

quantity of water and wipe it 

with a soft and wet cloth. 

Strongly rubbing the camera 

lens may cause the camera lens 

to be scratched and unable to 

transmit a clear image.

• Do not allow an organic solvent, 

car wax, window cleaner or a 

glass coating to adhere to the 

camera. If this happens, wipe it 

off as soon as possible.

• If the temperature changes rap-

idly, such as when hot water is 

poured on the vehicle in cold 

weather, the system may not 

operate normally.

• When washing the vehicle, do 

not apply intensive bursts of 

water to the camera or camera 

area. Doing so may result in the 

camera malfunctioning.

Do not expose the camera to 

strong impacts as this could 

cause a malfunction. If this hap-

pens, have the vehicle 

inspected by your Toyota dealer 

as soon as possible.

Difference between the 
screen and the actual road

334

4-5. Using the driving support systems

may not actually be parallel 
with the dividing lines of the 
parking space, even when 
they appear to be so. Be sure 
to check visually.

The distances between the 
vehicle width guide lines and 
the left and right dividing lines 
of the parking space may not 
be equal, even when they 
appear to be so. Be sure to 
check visually.

The distance guide lines give 
a distance guide for flat road 
surfaces. In any of the follow-
ing situations, there is a mar-
gin of error between the guide 
lines on the screen and the 
actual distance/course on the 
road.

The distance guide lines will 
appear to be closer to the vehi-
cle than the actual distance. 
Because of this, objects will 
appear to be farther away than 
they actually are. In the same 
way, there will be a margin of 
error between the guidelines 
and the actual distance/course 
on the road.

The distance guide lines will 
appear to be farther from the 
vehicle than the actual distance. 
Because of this, objects will 
appear to be closer than they 
actually are. In the same way, 
there will be a margin of error 
between the guidelines and the 
actual distance/course on the 
road.

When the ground behind the 
vehicle slopes up sharply

When the ground behind the 
vehicle slopes down sharply

335

4-5. Using the driving support systems

4

Dr

iv

ing

When any part of the vehicle 
sags due to the number of pas-
sengers or the distribution of the 
load, there is a margin of error 
between the guide lines on the 
screen and the actual dis-
tance/course on the road.

A margin of error

When there are three-dimensional objects (such as vehicle bum-
pers, etc.) nearby in positions higher than the surface of the road, 
take extra care when using the following.

Since the panoramic view processes and displays images based on 
flat road surfaces, it cannot depict the position of three-dimension 
objects (such as vehicle bumpers, etc.) that are in positions higher 
than the surface of the road. For example, even though it appears 
that there is space between the bumpers of the two vehicles in the 
illustration below and they are not likely to collide, in reality, a colli-
sion is about to occur.

When any part of the vehicle 
sags

A

Distortion of three-dimensional objects on the screen

Panoramic view display (including magnified display)

336

4-5. Using the driving support systems

The estimated course lines target flat surfaced objects (such as the 
road). It is not possible to determine the position of three-dimen-
sional objects (such as vehicles) using the estimated course lines 
and distance guide lines. When approaching a three-dimensional 
object that extends outward (such as the flatbed of a truck), be care-
ful of the following.

Since the estimated course line 
is displayed for a flat road sur-
face, it cannot depict the posi-
tion of three-dimensional objects 
(such as vehicle bumpers, etc.) 
that are in positions higher than 

the surface of the road. Even if 
the bumpers of the vehicle is on 
the outside of the estimated 
course line in the image, in real-
ity, the vehicles are on a colli-
sion course.

WARNING

When a sensor indicator on the intuitive parking assist display illumi-

nates in red or a buzzer sounds continuously, be sure to check the area 

around the vehicle immediately and do not proceed any further until 

safety has been ensured, otherwise an unexpected accident may occur.

When approaching three-dimensional objects

WARNING

When a sensor indicator on the intuitive parking assist display illumi-

nates in red or a buzzer sounds continuously, be sure to check the area 

around the vehicle immediately and do not proceed any further until 

safety has been ensured, otherwise an unexpected accident may occur.

Estimated course lines


Content      ..     18      19      20      21     ..