Toyota RAV4 (2022 year). Manual in english - page 19
 

  Index      Toyota     Toyota RAV4 (2022 year). Manual in english


Search            copyright infringement  


Content      ..     17      18      19      20     ..


Toyota RAV4 (2022 year). Manual in english - page 19


305

4-5. Using the driving support systems

4

Dr

iv

ing

When any part of the vehi-
cle sags

When any part of the vehicle 
sags due to the number of pas-
sengers or the distribution of the 
load, there is a margin of error 
between the guide lines on the 
screen and the actual dis-
tance/course on the road.

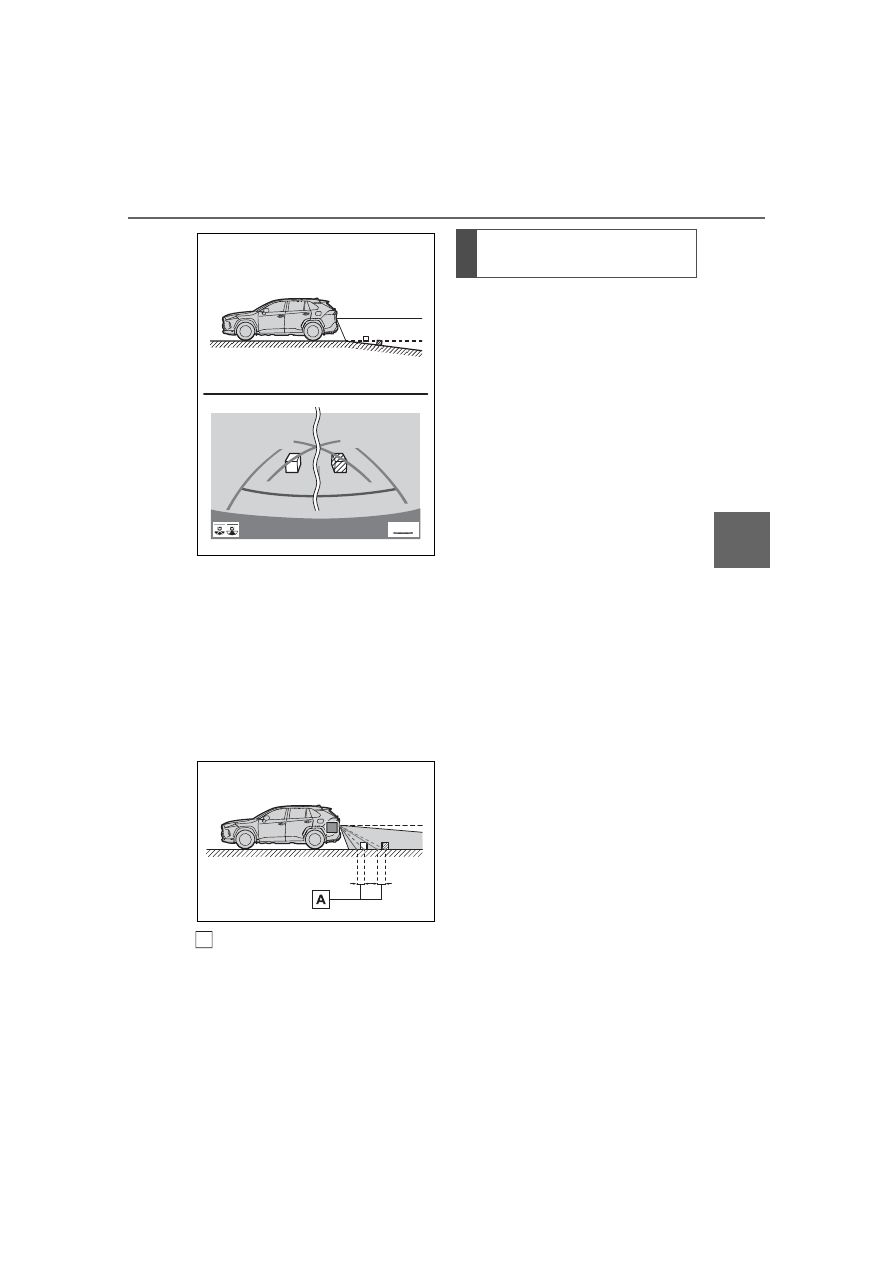
A margin of error

The estimated course lines tar-
get flat surfaced objects (such 
as the road). It is not possible to 
determine the position of three-
dimensional objects (such as 
vehicles) using the estimated 
course lines and distance guide 
lines. When approaching a 
three-dimensional object that 
extends outward (such as the 
flatbed of a truck), be careful of 
the following.

Estimated course lines

Visually check the surroundings 
and the area behind the vehicle. 
In the case shown below, the 
truck appears to be outside of 
the estimated course lines and 
the vehicle does not look as if it 
hits the truck. However, the rear 
body of the truck may actually 
cross over the estimated course 
lines. In reality if you back up as 
guided by the estimated course 
lines, the vehicle may hit the 
truck.

A

When approaching three-
dimensional objects

306

4-5. Using the driving support systems

Estimated course lines

Distance guide lines

Visually check the surroundings 
and the area behind the vehicle. 
On the screen, it appears that a 
truck is parking at point 

However, in reality if you back 

up to point 

, you will hit the 

truck. On the screen, it appears 
that 

 is closest and 

 is far-

thest away. However, in reality, 
the distance to 

 and 

 is the 

same, and 

 is farther than 


and 

.

If you notice any of the following symptoms, refer to the likely cause 
and the solution, and re-check.
If the symptom is not resolved by the solution, have the vehicle 
inspected by your Toyota dealer.

A

B

A

A

C

A

C

B

A

C

Things you should know

If you notice any symptoms

307

4-5. Using the driving support systems

4

Dr

iv

ing

Symptom

Likely cause

Solution

The image is difficult to 
see

The vehicle is in a dark 
area

The temperature 
around the lens is 
either high or low

The outside tempera-
ture is low

There are water drop-
lets on the camera

It is raining or humid

Foreign matter (mud 
etc.) is adhering to the 
camera

Sunlight or headlights 
are shining directly 
into the camera

The vehicle is under 
fluorescent lights, 
sodium lights, mer-
cury lights etc.

Back up while visually 
checking the vehicle’s 
surroundings. (Use the 
monitor again once con-
ditions have been 
improved.)
The procedure for 
adjusting the picture 
quality of the parking 
assist monitor is the 
same as the procedure 
for adjusting the screen 
display. (

P.384)

The image is blurry

Dirt or foreign matter 
(such as water droplets, 
snow, mud etc.) is 
adhering to the camera.

Flush the camera with a 
large quantity of water 
and wipe the camera 
lens clean with a soft 
and wet cloth.

The image is out of 
alignment

The camera or sur-
rounding area has 
received a strong 
impact.

Have the vehicle 
inspected by your 
Toyota dealer.

The guide lines are 
very far out of align-
ment

The camera position is 
out of alignment.

Have the vehicle 
inspected by your 
Toyota dealer.

The vehicle is tilted 
(there is a heavy load 
on the vehicle, tire 
pressure is low due to 
a tire puncture, etc.)

The vehicle is used on 
an incline.

If this happens due to 
these causes, it does 
not indicate a malfunc-
tion.
Back up while visually 
checking the vehicle’s 
surroundings.

308

4-5. Using the driving support systems

The estimated course 
lines move even 
though the steering 
wheel is straight

There is a malfunction in 
the signals being output 
by the steering sensor.

Have the vehicle 
inspected by your 
Toyota dealer.

Guide lines are not dis-
played

The back door is open.

Close the back door.
If this does not resolve 
the symptom, have the 
vehicle inspected by 
your Toyota dealer.

The estimated course 
lines are not displayed

Battery has been rein-
stalled.

The steering wheel 
has been moved while 
the battery was being 
reinstalled.

Battery power is low.

The steering sensor 
has been reinstalled.

There is a malfunction 
in the signals being 
output by the steering 
sensor.

Stop the vehicle, and 
turn the steering wheel 
as far as it will go to the 
left and right.
If this does not resolve 
the symptom, have the 
vehicle inspected by 
your Toyota dealer.

Symptom

Likely cause

Solution

309

4-5. Using the driving support systems

4

Dr

iv

ing

*

: If equipped

The screen illustrations used in 

this text are intended as exam-

ples, and may differ from the 

image that is actually displayed on 

the screen.

The panoramic view monitor is a 
supplemental device intended to 
assist the driver when checking 
around the vehicle. When using, 
be sure to visually check all 
around the vehicle both directly 
and using the mirrors before 
proceeding. If you do not, you 

may hit another vehicle or possi-
bly cause an accident.
Pay attention to the following 
precautions when using the 
panoramic view monitor.

Panoramic view moni-

tor

*

Panoramic view monitor 
assists the driver in view-
ing the surroundings, when 
operating at low speeds, by 
combining the front, side 
and rear cameras and dis-
playing a complete vehicle 
overhead image on the 
screen.
When you press the camera 
switch or shift the shift lever 
to the “R” position while the 
engine switch is in ON, the 
panoramic view monitor 
operates.
The monitor displays vari-
ous views of the position 
and surroundings of the 
vehicle.

Driving precautions

WARNING

Never depend on the panoramic 

view monitor entirely. The 

image and the position of the 

guide lines displayed on the 

screen may differ from the 

actual state. Use caution just as 

you would when driving any 

other vehicle.

Always make sure to check all 

around the vehicle with your 

own eyes when driving.

Never drive while looking only at 

the screen as the image on the 

screen is different from actual 

conditions. If you are driving 

while looking only at the screen, 

you may hit a person or an 

object, resulting in an accident. 

When driving, be sure to check 

the vehicle’s surroundings with 

your own eyes and the vehicle’s 

mirrors.

Depending on the circum-

stances of the vehicle (number 

of passengers, amount of lug-

gage, etc.), the position of the 

guide lines displayed on the 

screen may change. Be sure to 

check visually around the vehi-

cle before proceeding.

310

4-5. Using the driving support systems

WARNING

Do not use the panoramic view 

monitor system in the following 

cases:

• On icy or slick road surfaces, or 

in snow

• When using tire chains or emer-

gency tires

• When the front door or the back 

door is not closed completely

• On roads that are not flat or 

straight, such as curves or 

slopes

• If the suspension has been 

modified or tires of a size other 

than specified are installed

In low temperatures, the screen 

may darken or the image may 

become faint. The image could 

distort when the vehicle is mov-

ing, or you may become unable 

to see the image on the screen. 

Be sure to visually check all 

around the vehicle both directly 

and using the mirrors before 

proceeding.

If the tire sizes are changed, the 

position of the guide lines dis-

played on the screen may 

change.

The camera uses a special lens. 

The distances between objects 

and pedestrians that appear in 

the image displayed on the 

screen will differ from the actual 

distances. (

P.333)

When an aftermarket part is 

installed in the display area of 

the screen.

NOTICE

In panoramic view/moving 

view/see-through view, the sys-

tem combines images taken 

from the front, back, left and 

right side cameras into a single 

image. There are limits to the 

range and content that can be 

displayed. Familiarize yourself 

with the characteristics of the 

panoramic view monitor system 

before using it.

Image clarity may decline at the 

four corners of the panoramic 

view/moving view/see-through 

view. However, this is not a mal-

function, as these are the 

regions along the border of 

each camera image where the 

images are combined.

Depending on lighting condi-

tions near each of the cameras, 

bright and dark patches may 

appear on the panoramic 

view/moving view/see-through 

view.

The panoramic view/moving 

view/see-through view display 

does not extend higher than the 

installation position and image 

capture range of each camera.

There are blind spots around 

the vehicle. Accordingly, there 

are regions not displayed in 

panoramic view.

Three-dimensional objects dis-

played in wide front view, rear 

view, wide rear view or side 

view may not be displayed in 

panoramic view/moving 

view/see-through view.

311

4-5. Using the driving support systems

4

Dr

iv

ing

The camera switch is located as 
shown in the illustration.

Moving view

See-through view

NOTICE

People and other three-dimen-

sional obstacles may appear 

differently when displayed on 

the panoramic view monitor. 

(These differences include, 

among others, cases in which 

displayed objects appear to 

have fallen over, disappear near 

image processing areas, appear 

from image processing areas, 

or when the actual distance to 

an object differs from the dis-

played position.)

When the back door, which is 

equipped with the back camera, 

or front doors, which are 

equipped with door mirrors that 

have built-in side cameras, are 

open, images will not be dis-

played properly on the pan-

oramic view monitor.

The vehicle icon displayed in 

panoramic view/moving 

view/see-through view is a com-

puter generated image. Accord-

ingly, properties such as the 

color, shape and size will differ 

from the actual vehicle. For this 

reason, nearby three-dimen-

sional objects may appear to be 

touching the vehicle, and actual 

distances to three-dimensional 

objects may differ from those 

displayed.

Camera switch

Display

Checking around the vehi-
cle

312

4-5. Using the driving support systems

Wide front view & panoramic 
view

Rear view & panoramic view

Wide front view & side views

Side views

Rear view & side views

When you press the camera switch or shift the shift lever to the “R” 
position while the engine switch is in ON, the panoramic view moni-
tor operates.
The monitor displays various views of the position of the vehicle. 
(The following is an example)

Checking the front and 
around the vehicle

Checking the rear and 
around the vehicle

When folding the outside 
rear view mirrors

How to switch the display

313

4-5. Using the driving support systems

4

Dr

iv

ing

Audio screen, etc.

Moving view

See-through view

Audio screen, etc.

Wide front view & panoramic view

Side views

When the shift lever is in the “P” position

When the shift lever is in the “D” or “N” position

A

B

C

A

B

C

314

4-5. Using the driving support systems

Rear view & panoramic view

Wide rear view

Rear view

The moving view screen and the 
see-through view screen pro-
vide support when checking the 
areas of around the vehicle 
while parking. These screens 
display an image of the vicinity 
of the vehicle combined from the 
4 cameras. The screen will dis-
play a 360° view around the 
vehicle from either inside the 
vehicle or from a birds-eye view 
at an angle.
To display the moving view/see-
through view screen, press the 
camera switch when the shift 
lever is in the “P” position and 
the intuitive parking assist is 

enabled.

Moving view

Display mode switching but-
ton

Select to change the display mode 
between the moving view and the 
see-through view.

Rotation pause switch

Select to pause the rotation of the 

When the shift lever is in the “R” position

A

B

C

Checking around the 
vehicle

Screen display

A

B

315

4-5. Using the driving support systems

4

Dr

iv

ing

screen.

To resume rotation, select 

.

Body color setting switch

Select to display the body color set-
ting screen and change the color of 
the vehicle displayed on the pan-
oramic view monitor. (

P.328)

See-through view

Display mode switching but-

ton

Select to change the display mode 
between the moving view and the 
see-through view.

Rotation pause switch

Select to pause the rotation of the 
screen.

To resume rotation, select 

.

Body color setting switch

Select to display the body color set-
ting screen and change the color of 
the vehicle displayed on the pan-
oramic view monitor. (

P.328)

Pressing the camera switch again 

changes the screen back to the 

previously displayed screen, such 

as the audio screen.

The wide front view & panoramic view screen provides support when 
checking the areas in front of the vehicle and around the vehicle 
when taking-off at T-intersections or other intersections during poor 
visibility.
To display the screen, press the camera switch when the shift lever 
is in the “N” or “D” position with the vehicle moving approximately 7 
mph (12 km/h) or less.
This screen will be displayed if the intuitive parking assist detects an 
object in front of your vehicle (intuitive parking assist linked display).

C

A

B

C

Checking the front and around the vehicle

316

4-5. Using the driving support systems

Wide front view & panoramic view

Distance guide lines

Shows distance in front of the vehicle.
• Display points approximately 3 ft. (1 m) from the edge of the bumper.

Intuitive parking assist

When a sensor detects an obstacle, the direction of and the approximate 
distance to the obstacle are displayed and the buzzer sounds.

Estimated course lines

Shows an estimated course when the steering wheel is turned.
• This line will be displayed when the steering wheel is turned by 90° or 

more from the center (straight-line) position.

Guide line switching button

Select to change the guide line mode between the distance guide line 
mode and the estimated course line mode. (

P.317)

Automatic display button

Select to turn automatic display mode on/off. The indicator on the button 
illuminates during automatic display mode. (

P.317)

Parking Support Brake

*

When the system determines that the possibility of a frontal collision with a 
detected object is high, a warning message is displayed.

*

: If equipped

Pressing the camera switch changes the screen to the side views screen 

or previously displayed screen, such as the audio screen.

For details about the intuitive parking assist (

P.270) and Parking Sup-

port Brake

*

 function. (

P.278)

The display position of the intuitive parking assist and the position of 

obstacles displayed in the camera image do not match.

Screen display

A

B

C

D

E

F

317

4-5. Using the driving support systems

4

Dr

iv

ing

*

: If equipped

Each time the guide line switch-
ing button is selected, the mode 
will change as follows:

Distance guide line

Only the distance guide lines 
are displayed.

Estimated course line

Estimated course lines will be 
added to the distance guide 
lines.

In addition to screen switching 
by operating the camera switch, 
automatic display mode is avail-
able. In this mode, the screen is 
switched automatically in 
response to vehicle speed.
In automatic display mode, the 
monitor will automatically dis-
play images in the following situ-
ations:

When the shift lever is shifted 
to “N” or “D” position.

When vehicle speed is 
reduced to approximately 6 
mph (10 km/h) or less.

The side view screen displays images from the cameras installed on 

WARNING

When a sensor indicator on the intuitive parking assist display illumi-

nates in red or a buzzer sounds continuously, be sure to check the area 

around the vehicle immediately and do not proceed any further until 

safety has been ensured, otherwise an unexpected accident may occur.

As the intuitive parking assist display is displayed over the camera view, 

it may be difficult to see the intuitive parking assist display depending on 

the color and brightness of the surrounding area.

Switching the guide line 
mode

Automatic display mode

Checking the sides of the vehicle

318

4-5. Using the driving support systems

each outside rear view mirror. This screen is designed to support the 
driver in safe driving in situations such as when driving on a narrow 
road, by allowing them to check the areas around the sides of the 
vehicle.
To display the screen, press the camera switch when the shift lever 
is in the “D”, or “N” position with the vehicle moving approximately 7 
mph (12 km/h) or less.

Side view

Distance guide lines

Show distance in front of the vehicle.
• Display points approximately 3 ft. (1 m) from the edge of the bumper.

Vehicle width guide lines

Shows guide lines of the vehicle’s width including the outside rear view mir-
rors.

Front tire guide lines

Shows guide lines of where the front tire touches the ground.

Automatic display button

Select to turn automatic display mode on/off. The indicator on the button 
illuminates during automatic display mode. (

P.319)

Intuitive parking assist

When a sensor detects an obstacle, the direction of and the approximate 
distance to the obstacle are displayed and the buzzer sounds.

Pressing the camera switch changes the screen to the wide front view & 

panoramic view screen or previously displayed screen, such as the audio 

screen.

For details about the intuitive parking assist. (

P.270)

Screen display

A

B

C

D

E

319

4-5. Using the driving support systems

4

Dr

iv

ing

The side views can be displayed even when the outside rear view mirrors 

are retracted.

In addition to screen switching 
by operating the camera switch, 
automatic display mode is avail-
able. In this mode, the screen is 
switched automatically in 
response to vehicle speed.
In automatic display mode, the 
monitor will automatically dis-
play images in the following situ-
ations:

When the shift lever is shifted 
to “N” or “D” position.

When vehicle speed is 
reduced to approximately 6 
mph (12 km/h) or less.

Side View

Check the positions and dis-
tance between the vehicle 
width guide line and a target 
object such as the obstacle or 
curb of the road.

WARNING

When a sensor indicator on the intuitive parking assist display illumi-

nates in red or a buzzer sounds continuously, be sure to check the area 

around the vehicle immediately and do not proceed any further until 

safety has been ensured, otherwise an unexpected accident may occur.

As the intuitive parking assist display is displayed over the camera view, 

it may be difficult to see the intuitive parking assist display depending on 

the color and brightness of the surrounding area.

Automatic display mode

Using the vehicle width 
guide line

320

4-5. Using the driving support systems

Pull over to the curb as shown 
in the illustration above, tak-
ing care not to let the vehicle 
width guide line overlap the 

target object.

Ensure that the vehicle width 
guide line is parallel to the tar-
get object.

The rear view & panoramic view screen, the wide rear view screen 
and the rear view screen provide support when checking the areas 
of behind the vehicle and around the vehicle while backing up, for 
example while parking.
The screens will be displayed when the shift lever is in the “R” posi-
tion.

Each time the display mode switching button is selected, the mode 
will change as follows:

Checking the rear and around the vehicle

Screen display


Content      ..     17      18      19      20     ..