Toyota Corolla Hatchback (2022 year). Manual in english - page 17
 

  Index      Toyota     Toyota Corolla Hatchback (2022 year). Manual in english


Search            copyright infringement  


Content      ..     15      16      17      18     ..


Toyota Corolla Hatchback (2022 year). Manual in english - page 17


272

5-3. Connectivity settings

8

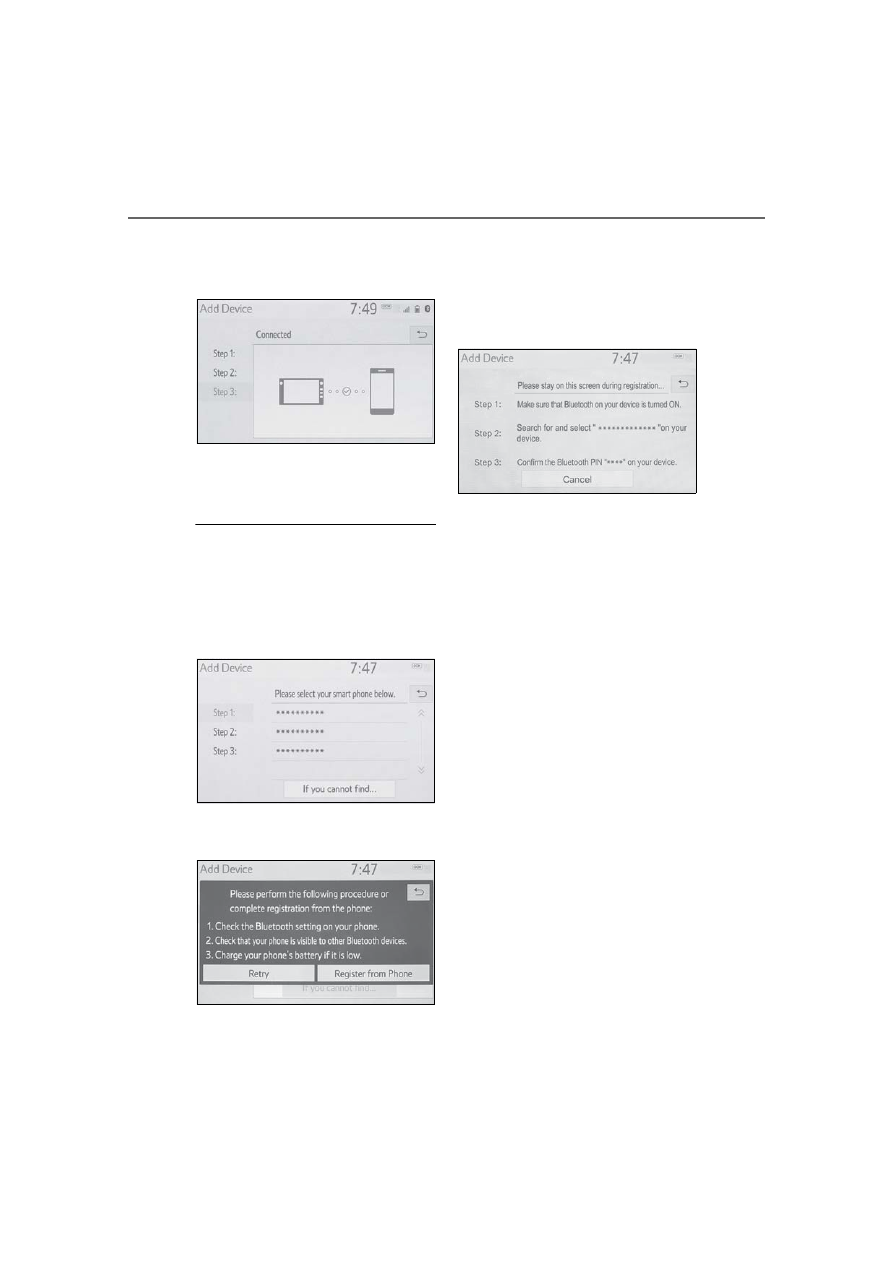
Check that “Connected” is 
displayed and registration is 
complete.

If an error message is dis-
played, follow the guidance 
on the screen to try again.

If a cellular phone does not oper-

ate properly after being con-

nected, turn the cellular phone off 

and on and then connect it again.

Registering from phone

1

Select “If you cannot find…”.

2

Select “Register from 
Phone”.

3

Check that the following 
screen is displayed, and reg-
ister the Bluetooth

®

 device 

using your Bluetooth

®


device.

For details about operating 
the Bluetooth

®

 device, see 

the manual that comes with it.

A PIN code is not required for 
SSP (Secure Simple Pairing) 
compatible Bluetooth

®


devices. Depending on the 
type of Bluetooth

®

 device 

being connected, a message 
confirming registration may 
be displayed on the Blue-
tooth

®

 device’s screen. 

Respond and operate the 
Bluetooth

®

 device according 

to the confirmation message.

4

Follow the steps in “Register-
ing a Bluetooth

®

 phone for 

the first time” from step 

7

(

P.270)

273

5-3. Connectivity settings

5

Audio

To use the Bluetooth

®

 audio, it is 

necessary to register an audio 
player with the system.
Once the player has been regis-
tered, it is possible to use the 
Bluetooth

®

 audio.

This operation cannot be per-
formed while driving.
For details about registering a 
Bluetooth

®

 device: 

P.270

1

Turn the Bluetooth

®

 connec-

tion setting of your audio 
player on.

This function is not available 
when the Bluetooth

®

 connec-

tion setting of your audio 
player is set to off.

2

Press the “AUDIO” button.

3

Select “Source” on the audio 
screen or press “AUDIO” but-
ton again.

4

Select “Bluetooth”.

5

Select “Yes” to register an 
audio player.

6

Follow the steps in “Register-
ing a Bluetooth

®

 phone for 

the first time” from step 

5

(

P.270)

This system supports the follow-
ing services.

Bluetooth

®

 Core Specifica-

tion

Ver. 2.0 (Recommended: Ver. 
4.1 +EDR)

Profiles

HFP (Hands Free Profile) Ver. 
1.0 (Recommended: Ver. 1.7)

• This is a profile to allow 

hands-free phone calls using a 
cellular phone or head set. It has 
outgoing and incoming call func-
tions.

OPP (Object Push Profile) 
Ver. 1.1 (Recommended: Ver. 
1.2)

• This is a profile to transfer con-

tacts data.

PBAP (Phone Book Access 
Profile) Ver. 1.0 (Recom-
mended: Ver. 1.2)

• This is a profile to transfer phone-

book data.

MAP (Message Access Pro-
file) Ver. 1.0 (Recommended: 
Ver. 1.2)

• This is a profile to use phone 

message functions.

SPP (Serial Port Profile) Rec-

Registering a Bluetooth

®


audio player for the first 
time

Profiles

274

5-3. Connectivity settings

ommended: Ver. 1.2

• This is a profile to use the Toyota 

audio multimedia function.

A2DP (Advanced Audio Dis-
tribution Profile) Ver. 1.0 (Rec-
ommended: Ver. 1.3)

• This is a profile to transmit stereo 

audio or high quality sound to the 
audio system.

AVRCP (Audio/Video Remote 
Control Profile) Ver. 1.0 (Rec-
ommended: Ver. 1.6)

• This is a profile to allow remote 

control the A/V equipment.

This system is not guaranteed to 

operate with all Bluetooth

®


devices.

If your cellular phone does not 

support HFP, registering the Blue-

tooth

®

 phone or using OPP, 

PBAP, MAP or SPP profiles indi-

vidually will not be possible.

If the connected Bluetooth

®


device version is older than rec-

ommended or incompatible, the 

Bluetooth

®

 device function may 

not work properly.

Refer to https://www.toyota.com/

audio multimedia in the United 

States, 

https://www.toyota.ca/connected 

in Canada, and 

http://www.toyotapr.com/

audio multimedia in Puerto Rico, 

to find approved Bluetooth

®


phones for this system.

Certification

Bluetooth is a registered trademark 

of Bluetooth SIG, Inc.

275

5-3. Connectivity settings

5

Audio

1

Press the “MENU” button.

2

Select “Setup”.

3

Select “Bluetooth”.

4

Select the desired item to be 
set.

Connecting a Bluetooth

®


device and editing the Blue-
tooth

®

device information 

(

P.275, 278)

Registering a Bluetooth

®


device (

P.277)

Deleting a Bluetooth

®

 device 

(

P.278)

Setting the Bluetooth

®

 sys-

tem (

P.280)

Up to 5 Bluetooth

®

 devices 

(Phones (HFP) and audio play-
ers (AVP)) can be registered.

If more than 1 Bluetooth

®

 device 

Setting Bluetooth

®


details

When an Apple CarPlay 
connection is established, 
this function will be unavail-
able.

*

When an Android Auto con-
nection is established, 
some functions will be 
unavailable.

*

*

: This function is not made avail-

able in some countries or 
areas.

Displaying the Blue-
tooth

®

 setup screen

Bluetooth

®

 setup screen

Connecting a Bluetooth

®


device

276

5-3. Connectivity settings

has been registered, select 
which device to connect to.

1

Display the Bluetooth

®

 set-

tings screen. (

P.275)

2

Select “Registered Device”.

3

Select the device to be con-
nected.

: Phone

: Audio player

: Phone/Toyota apps services

The profile icon for a currently 
connected device will be dis-
played in color.

Selecting a profile icon which 
is not currently connected will 
switch the connection to the 
function.

If the desired Bluetooth

®


device is not on the list, select 
“Add New Device” to register 
the device. (

P.277)

4

Select the desired connec-
tion.

“Device Info”: Select to con-
firm and change the Blue-
tooth

®

 device information. 

(

P.278)

When another Bluetooth

®


device is connected

To disconnect the Bluetooth

®


device, select “Yes”.

5

Check that a confirmation 
screen is displayed when the 
connection is complete.

If an error message is dis-
played, follow the guidance 
on the screen to try again.

It may take time if the device con-

nection is carried out during Blue-
tooth

®

 audio playback.

Depending on the type of Blue-
tooth

®

 device being connected, it 

may be necessary to perform 

additional steps on the device.

When disconnecting a Bluetooth

®


device, it is recommended to dis-

connect using the system.

Connecting a Bluetooth

®


device in a different way 
(from phone top screen)

P.348

277

5-3. Connectivity settings

5

Audio

Connecting a Bluetooth

®


device in a different way 
(from phone setup screen)

P.362

Connecting a Bluetooth

®


device in a different way 
(from Bluetooth

®

 audio 

screen)

P.320

Auto connection mode

To turn auto connection mode 
on, set “Bluetooth Power” to on. 
(

P.280) Leave the Bluetooth

®


device in a location where the 
connection can be established.

When the engine switch is in 
ACC or ON, the system 
searches for a nearby regis-
tered device.

The system will connect with 
the registered device that was 
last connected, if it is nearby. 
When automatic connection 
priority is set to on and there 
is more than one registered 
Bluetooth

®

 phone available, 

the system will automatically 
connect to the Bluetooth

®


phone with the highest prior-
ity. (

P.280)

Connecting manually

When the auto connection has 
failed or “Bluetooth Power” is 
turned off, it is necessary to con-
nect the Bluetooth

®

 device man-

ually.

1

Display the Bluetooth

®

 set-

tings screen. (

P.275)

2

Follow the steps in “Connect-
ing a Bluetooth

®

 device” from 

step 

2

. (

P.275)

Reconnecting the Blue-
tooth

®

 phone

If a Bluetooth

®

 phone is discon-

nected due to poor reception 
from the Bluetooth

®

 network 

when the engine switch is in 
ACC or ON, the system auto-
matically reconnects the Blue-
tooth

®

 phone.

Up to 5 Bluetooth

®

 devices can 

be registered.

Bluetooth

®

 compatible phones 

(HFP) and audio players (AVP) 
can be registered simultane-
ously.
This operation cannot be per-
formed while driving.

1

Display the Bluetooth

®

 set-

tings screen. (

P.275)

2

Select “Add New Device”.

When another Bluetooth

®


device is connected

To disconnect the Bluetooth

®


device, select “Yes”.

Registering a Bluetooth

®


device

278

5-3. Connectivity settings

When 5 Bluetooth

®

 devices 

have already been registered

A registered device needs to 
be replaced. Select “Yes”, and 
select the device to be 
replaced.

3

Follow the steps in “Register-
ing a Bluetooth

®

 phone for 

the first time” from step 

5

(

P.270)

This operation cannot be per-
formed while driving.

1

Display the Bluetooth

®

 set-

tings screen. (

P.275)

2

Select “Remove Device”.

3

Select the desired device.

4

Select “Yes” when the confir-
mation screen appears.

5

Check that a confirmation 
screen is displayed when the 
operation is complete.

When deleting a Bluetooth

®


phone, the contact data will be 

deleted at the same time.

The Bluetooth

®

 device’s infor-

mation can be displayed on the 
screen. The displayed informa-
tion can be edited.
This operation cannot be per-
formed while driving.

1

Display the Bluetooth

®

 set-

tings screen. (

P.275)

2

Select “Registered Device”.

3

Select the desired device to 
be edited.

4

Select “Device Info”.

Deleting a Bluetooth

®


device

Editing the Bluetooth

®


device information

279

5-3. Connectivity settings

5

Audio

5

Confirm and change the 
Bluetooth

®

 device informa-

tion.

The name of the Bluetooth

®


device is displayed. It can be 
changed to a desired name. 
(

P.279)

Select to set the Bluetooth

®


audio player connection 
method. (

P.279)

Device address is unique to 
the device and cannot be 
changed.
Phone number is unique to 
the Bluetooth

®

 phone and 

cannot be changed.
Compatibility profile is unique 
to the Bluetooth

®

 device and 

cannot be changed.
Select to reset all setup 
items.

If 2 Bluetooth

®

 devices have been 

registered with the same device 

name, the devices can be distin-

guished referring to the device’s 

address.

Depending on the type of Blue-
tooth

®

 phone, some information 

may not be displayed.

1

Select “Device Name”.

2

Enter the name and select 
“OK”.

Even if the device name is 

changed, the name registered in 
your Bluetooth

®

 device does not 

change.

1

Select “Connect Audio Player 
From”.

2

Select the desired connec-
tion method.

“Vehicle”: Select to connect the 

audio player from the vehicle’s 

audio/visual system.
“Device”: Select to connect the 

vehicle’s audio/visual system from 

the audio player.

Depending on the audio 

Changing a device name

Setting audio player con-
nection method

280

5-3. Connectivity settings

player, the “Vehicle” or 
“Device” connection method 
may be best. As such, refer to 
the manual that comes with 
the audio player.

The Bluetooth

®

 settings can be 

confirmed and changed.

1

Display the Bluetooth

®

 set-

tings screen. (

P.275)

2

Select “Detailed Settings”.

3

Select the desired item to be 
set.

Select to set Bluetooth

®

 con-

nection on/off. (

P.280)

Select to change the auto-
matic connection priority of 
the registered Bluetooth

®


devices. (

P.280)

Select to edit the system 
information. (

P.281)

Select to reset all setup 
items.

1

Select “Bluetooth Power”.

When “Bluetooth Power” is on: 
The Bluetooth

®

 device is auto-

matically connected when the 
engine switch is in ACC or ON.
When “Bluetooth Power” is off: 
The Bluetooth

®

 device is dis-

connected, and the system will 
not connect to it next time.

While driving, the auto connection 

state can be changed from off to 

on, but cannot be changed from 

on to off.

The automatic connection prior-
ity of the registered Bluetooth

®


devices can be changed.

1

Select “Preferred Device Set-
tings”.

2

Select the desired item to be 
set.

Select to set automatic con-
nection priority on/off.
Select to change the auto-

“Detailed Settings” 
screen

Changing “Bluetooth 
Power”

Setting automatic connec-
tion priority

281

5-3. Connectivity settings

5

Audio

matic connection priority of 
the registered Bluetooth

®


phones. (

P.281)

Select to change the auto-
matic connection priority of 
the registered Bluetooth

®


audio players. (

P.281)

Select to reset all setup 
items.

Changing Bluetooth

®


device automatic connec-
tion priority

1

Select “Preferred Phones” or 
“Preferred Audio Players”.

2

Select the desired Bluetooth

®


device and select “Move Up” 
or “Move Down” to change 
the preferred order.

A newly registered Bluetooth

®


device will automatically be given 

the highest automatic connection 

priority.

1

Select “System Information”.

2

Select the desired item to be 
set.

Displays system name. Can 
be changed to a desired 
name. (

P.282)

PIN code used when the 
Bluetooth

®

 device was regis-

tered. Can be changed to a 
desired code. (

P.282)

Device address is unique to 
the device and cannot be 
changed.
Select to set the connection 
status display of the phone 
on/off.
Select to set the connection 
status display of the audio 
player on/off.
Compatibility profile of the 
system
Select to reset all setup 
items.

Editing the system infor-
mation

282

5-3. Connectivity settings

Editing the system name

1

Select “System Name”.

2

Enter a name and select 
“OK”.

Editing the PIN code

1

Select “System PIN Code”.

2

Enter a PIN code and select 
“OK”.

*

: If equipped

1

Enable the Wi-Fi

®

 Hotspot 

function. (

P.283)

2

Disable the “Hide Access 
Point” function. (

P.283)

3

Search for the vehicle access 
point using the device you 
wish to connect.

For details about operating 
the device, refer to the docu-
mentation which came with it.

Wi-Fi

®

 Hotspot

*

By connecting a device to 
the vehicle via Wi-Fi

®

, it can 

access the internet through 
the DCM.

To use this function, a 
Wi-Fi

®

 Hotspot service sub-

scription from Verizon Wire-
less is required. Contact 
your Toyota dealer for 
details.

This function is not made 
available in some countries 
or areas.

Connecting a device to 
the in-vehicle access 
point

Searching for and con-
necting a device to the 
vehicle access point

283

5-3. Connectivity settings

5

Audio

4

Operate the device to con-
nect it to the vehicle access 
point.

To check the vehicle access 
point password, check “Pass-
word”. (

P.283)

Hints for connecting to the vehicle 
via Wi-Fi

®

 can be displayed. 

(

P.283)

1

Enable the Wi-Fi

®

 Hotspot 

function. (

P.283)

2

Enable the “Hide Access 
Point” function. (

P.282)

3

Enter the access point name 
(SSID) into the device you 
wish to connect and connect 
it.

To check the vehicle access 
point password, check “Pass-
word”. (

P.283)

The security settings on the 
device must be the same as 
that displayed for “Security”. 
(

P.283)

For details about operating 
the device, refer to the docu-
mentation which came with it.

1

Press the “MENU” button.

2

Select “Setup”.

3

Select “Wi-Fi

*

”.

*

: Wi-Fi

®

 is a registered trademark 

of Wi-Fi Alliance

®

.

4

Select the desired item to be 
set.

Select to enable/disable the 
Wi-Fi

®

 Hotspot function. 

(

P.284)

Connecting a device to the 
in-vehicle access point 
using the access point 
name (SSID)

Changing the Wi-Fi

®

 set-

tings

284

5-3. Connectivity settings

Select to check/change the 
access point password. 
(

P.284)

Select to display hints for 
connecting to the vehicle via 
Wi-Fi

®

.

Select to make the access 
point searchable/unsearch-
able.
Select to check/change the 
security protocol of the 
access point (for authentica-
tion and encryption). 
(

P.285)

Select to change the access 
point name (SSID). (

P.285)

Select to change the Wi-Fi

®


connection channel (within 
the 2.4GHz frequency band). 
(

P.285)

If any settings have been 

changed, it will be necessary to 
reset the Wi-Fi

®

 system to com-

plete the changes. To reset the 
Wi-Fi

®

 system, select “Yes” on the 

pop-up displayed after changing 

the settings.

When the Wi-Fi

®

 Hotspot func-

tion is enabled, the system 
checks for a valid Hotspot ser-
vice subscription.
If a hotspot service subscription 
has not been started, connect 
your device to the in-vehicle 

access point to start your sub-
scription. A trial subscription 
may be available.

1

Select “Password”.

2

Check that the following 
screen is displayed.

Displays the password
Select to display/hide the 
entered password.
Select to change the pass-
word.

1

Select “Change Password”.

2

Enter the desired password 
and select “OK”.

When setting/changing a 
password, observe the follow-
ing guidelines to help prevent 
the password from being 
cracked by a third party:

• Use an 8-character or longer 

password consisting of letters 
and numbers. (Non-ASCII char-
acters will not be recognized by 
the system.)

Enabling/disabling the 
Wi-Fi

®

 Hotspot function

Checking/changing the 
password

Changing the password

285

5-3. Connectivity settings

5

Audio

• Change the password regularly.
• If you write the password down, 

do not leave it somewhere where 
it would be visible.

• Do not use the same or a similar 

password to that for other 
accounts.

• Avoid using easy to identify 

words, such as your vehicle’s 
model name or license plate 
number, simple dictionary words, 
or words with simple obfuscation, 
such as c@t (for cat), as your 
password.

1

Select “Security”.

2

Select the desired security 
protocol.

1

Select “Access Point Name”.

2

Enter the desired access 
point name (SSID) and select 
“OK”.

1

Select “Channel”.

2

Check that the following 
screen is displayed.

Select to change the chan-
nel selection to auto-
matic/manual.
When “Manual” is selected, 
select to change the channel.

1

Set “Select Channel” to 
“Manual”.

2

Select “Channel Number”.

3

Enter the desired channel 
number and select “OK”.

Channels 1 through 11 can be 
selected.

If a connected device is taken out 
of the Wi-Fi

®

 connection area, the 

connection will be severed.

If the vehicle is driven out of the 

cellular communication coverage 

area, connecting to the internet 
via the Wi-Fi

®

 Hotspot will not be 

possible.

If a Bluetooth

®

 device is used 

while a device is connected using 
the Wi-Fi

®

 Hotspot function, the 

Changing the security pro-
tocol

Changing the access point 
name (SSID)

Selecting a Wi-Fi

®

 connec-

tion channel

Changing the channel

Wi-Fi

®

 function operating 

hints

286

5-3. Connectivity settings

communication speed may 

decrease.

If the vehicle is near a radio 

antenna, radio station or other 

source of strong radio waves and 

electrical noise, communication 

may be slow or impossible.

The condition of Wi-Fi

®

 connec-

tion appears on the right upper 
side of the screen. (

P.258)

Communication standards
IEEE 802.11b
IEEE 802.11g
IEEE 802.11n (2.4GHz)

Security
WPA™
WPA2™

• WPA™ and WPA2™ are trade-

marks of Wi-Fi Alliance

®

.

WARNING

Use Wi-Fi

®

 devices only when 

safe and legal to do so.

Your audio unit is fitted with 
Wi-Fi

®

 antennas. People with 

implantable cardiac pacemak-

ers, cardiac resynchronization 

therapy-pacemakers or implant-

able cardioverter defibrillators 

should maintain a reasonable 

distance between themselves 
and the Wi-Fi

®

 antennas.

The radio waves may affect the 

operation of such devices.

Before using Wi-Fi

®

 devices, 

users of any electrical medical 

device other than implantable 

cardiac pacemakers, cardiac 

resynchronization ther-

apy-pacemakers or implantable 

cardioverter defibrillators should 

consult the manufacturer of the 

device for information about its 

operation under the influence of 

radio waves. 

Radio waves could have unex-

pected effects on the operation 

of such medical devices.

Conditions displayed with 
Wi-Fi

®

 icon

Specifications

287

5-3. Connectivity settings

5

Audio

*

: This function is not made avail-

able in some countries or areas.

1

Enable Siri on the device to 
be connected.

2

Connect the device to the 
USB port. (

P.303)

3

Select “Always Enable” or 
“Enable Once”.

If “Do Not Enable” is selected, 
an Apple CarPlay connection 
will not be established. In this 
case, the device can be oper-
ated as a normal Apple 
device, such as an iPod.

Depending on the device con-
nected, it may take approxi-
mately 3 to 6 seconds before 
an Apple CarPlay connection 
is established.

4

Press the “MENU” button.

Apple CarPlay/

Android Auto

*

Apple CarPlay allows some 
applications, such as Map, 
Phone, and Music, to be 
used on the system.

When an Apple CarPlay 
connection is established, 
Apple CarPlay compatible 
applications will be dis-
played on the system dis-
play.

Compatible device

Apple iPhone (iOS Ver. 9.3 or 
later) that supports Apple Car-
Play. For details, refer to

https://www.apple.com/ios/car

play/

.

Android devices with Android OS 
ver 5.0 or higher which support 
Android Auto and have the 
Android Auto application 
installed.
For details, refer to

https://www.android.com/auto/
.

*

*

: Some devices may not operate 

with this system.

Establishing an Apple 
CarPlay connection


Content      ..     15      16      17      18     ..