Toyota Tundra. Manual - part 2496


  Index      Toyota     Toyota Tundra (2007-2010 year) - Service and Repair Manual


Search            copyright infringement  


Content   ..  2494  2495  2496  2497   ..


Toyota Tundra. Manual - part 2496


ADJUSTMENT 

1. VEHICLE PREPARATION FOR HEADLIGHT AIM ADJUSTMENT 

a. Prepare the vehicle: 

Ensure that there is no damage or deformation to the body around the headlights.  

Fill the fuel tank.  

Make sure that the oil is filled to the specified level.  

Make sure that the coolant is filled to the specified level.  

Inflate the tires to the appropriate pressure.  

Place the spare tire, tools, and jack in their original positions.  

Unload the trunk.  

Have a person of average weight (68 kg, 149.9 lb) sit in the driver's seat.  

2. PREPARATION FOR HEADLIGHT AIMING (Using a tester) 

a. Prepare the vehicle for the headlight aim check.  

b. Adjust in accordance with headlight tester instructions.  

3. PREPARATION FOR HEADLIGHT AIMING (Using a screen) 

a. Prepare the vehicle according to the following conditions: 

Place the vehicle in a location that is dark enough to clearly observe the cutoff line. The 
cutoff line is a distinct line, below which light from the headlights can be observed and above 
which it cannot.  

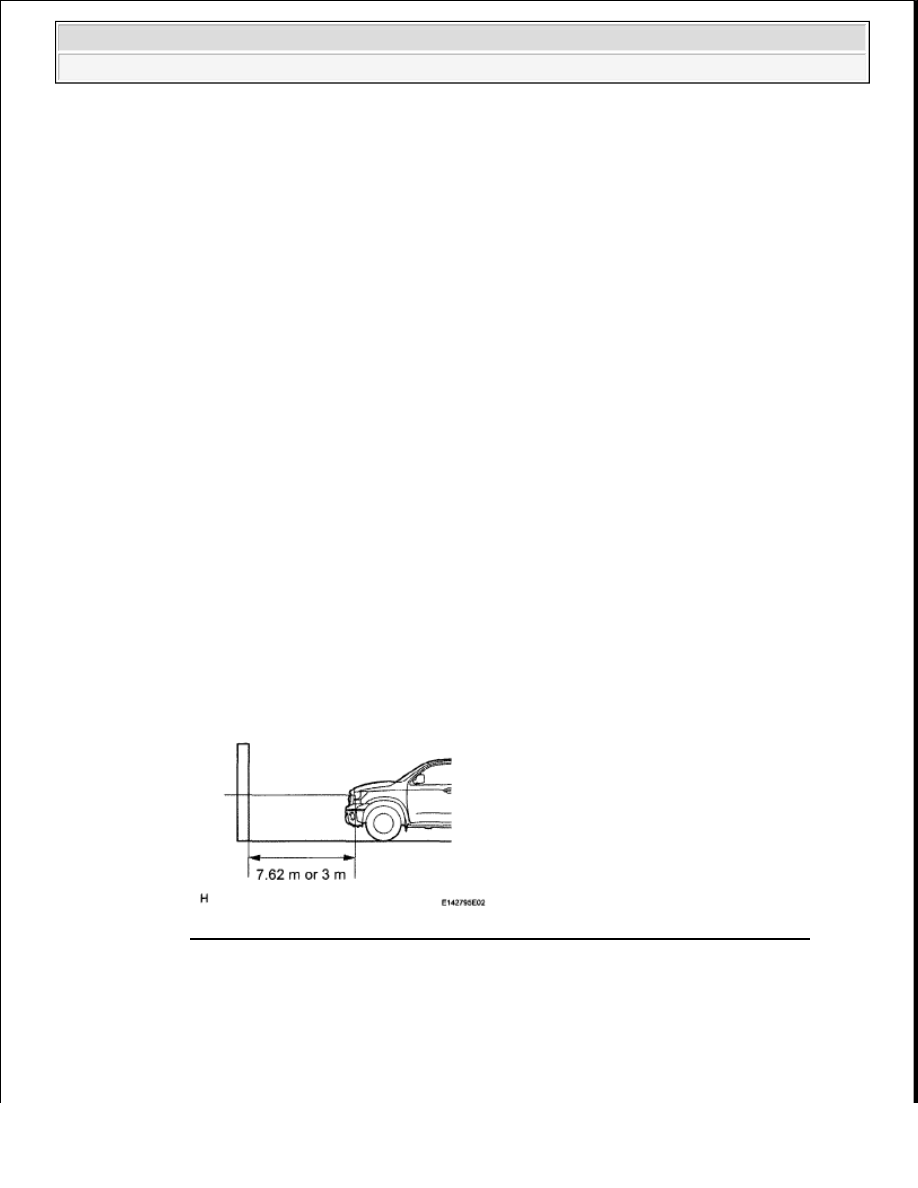
Place the vehicle at a 90° angle to the wall.  

Create a 7.62 m (25.0 ft.) distance between the vehicle (headlight bulb center) and the wall.  

Place the vehicle on a level surface.  

Bounce the vehicle up and down to settle the suspension. 

Fig. 93: Identifying Distance Between Vehicle (Headlight Bulb Center) And Wall 
Courtesy of TOYOTA MOTOR SALES, U.S.A., INC. 

NOTE:

A distance of 7.62 m (25.0 ft.) between the vehicle (headlight bulb 
center) and the wall is necessary for proper aim adjustment. If 
unavailable, secure a distance of exactly 3 m (9.84 ft.) for the check 
and adjustment. (The target zone will change with the distance, so 
follow the instructions in the illustration.)


2009 Toyota Tundra 

2009 ACCESSORIES AND EQUIPMENT Lighting - Tundra


b. Prepare a piece of thick white paper (approximately 2 m (6.56 ft.) (height) x 4 m (13.1 ft.) (width)) 

to use as a screen.  

c. Draw a vertical line down the center of the screen (V line).  

d. Set the screen as shown in the illustration. 

Fig. 94: Identifying Headlight Aligning Distance 
Courtesy of TOYOTA MOTOR SALES, U.S.A., INC. 

HINT: 

Stand the screen perpendicular to the ground.  

Align the V line on the screen with the center of the vehicle.  

e. Draw base lines (H line, V LH, V RH lines) on the screen as shown in the illustration. 

Fig. 95: Identifying Base Lines (H Line, V LH, V RH Lines) On Screen 
Courtesy of TOYOTA MOTOR SALES, U.S.A., INC. 

HINT: 

The base lines differ for "low-beam inspection" and "high-beam inspection".  


2009 Toyota Tundra 

2009 ACCESSORIES AND EQUIPMENT Lighting - Tundra


Mark the headlight bulb center marks on the screen. If the center mark cannot be observed on 
the headlight, use the center of the headlight bulb or the manufacturer's name marked on the 
headlight as the center mark.  

1. H Line (Headlight height): 

Draw a horizontal line across the screen so that it passes through the center marks. The H line 
should be at the same height as the headlight bulb center marks of the low-beam headlights. 

2. V LH Line, V RH Line (Center mark position of left-hand (LH) and right-hand (RH) 

headlights): 

Draw two vertical lines so that they intersect the H line at each center mark (aligned with the 
center of the low-beam headlight bulbs). 

4. HEADLIGHT AIMING INSPECTION 

a. Cover the headlight or disconnect the connector of the headlight on the opposite side to prevent 

light from the headlight not being inspected from affecting headlight aiming inspection. 

HINT: 

When checking the aim of the high-beam, cover the low-beam or disconnect the connector. 

b. Start the engine.  

c. Turn on the headlight and make sure that the cutoff line falls within the specified area, as shown in 

the illustration. 

NOTE:

Do not keep the headlight covered for more than 3 minutes. The 
headlight lens is made of synthetic resin, and may easily melt or 
be damaged due to heat.  

Do not cover the headlight with a black or dark colored material, 
as such a material absorbs heat faster and this may melt the 
lens.  


2009 Toyota Tundra 

2009 ACCESSORIES AND EQUIPMENT Lighting - Tundra


Fig. 96: Inspecting Headlight Aiming 
Courtesy of TOYOTA MOTOR SALES, U.S.A., INC. 

HINT: 

Since the low-beam light and the high-beam light are a unit, if the aim on one is correct, the 
other should also be correct. However, check both beams just to make sure.  

If the alignment distance is 7.62 m (25.0 ft.): 

The cutoff line should be within 101 mm (3.97 in.) above or below the H line as well as 101 
mm (3.97 in.) left or right of the V line with low-beam (SAEJ599). 

If the alignment distance is 3 m (9.84 ft.): 

The cutoff line should be within 40 mm (1.57 in.) above or below the H line as well as 40 
mm (1.57 in.) left or right of the V line with low-beam (SAEJ599). 

If the alignment distance is 7.62 m (25.0 ft.): 

The high beam center of intensity should be within 101 mm (3.97 in.) above or below the H 
line as well as 101 mm (3.97 in.) left or right of the V line. (SAEJ599). 

If the alignment distance is 3 m (9.84 ft.): 

The high beam center of intensity should be within 40 mm (1.57 in.) above or below the H 
line as well as 40 mm (1.57 in.) left or right of the V line (SAEJ599). 


2009 Toyota Tundra 

2009 ACCESSORIES AND EQUIPMENT Lighting - Tundra


Content   ..  2494  2495  2496  2497   ..