Subaru Legacy (2023 year). Manual in english - page 18
 

  Index      Manuals     Subaru Legacy (2023 year). Manual in english


Search            copyright infringement  


Content      ..     16      17      18      19     ..


Subaru Legacy (2023 year). Manual in english - page 18


(278,1)

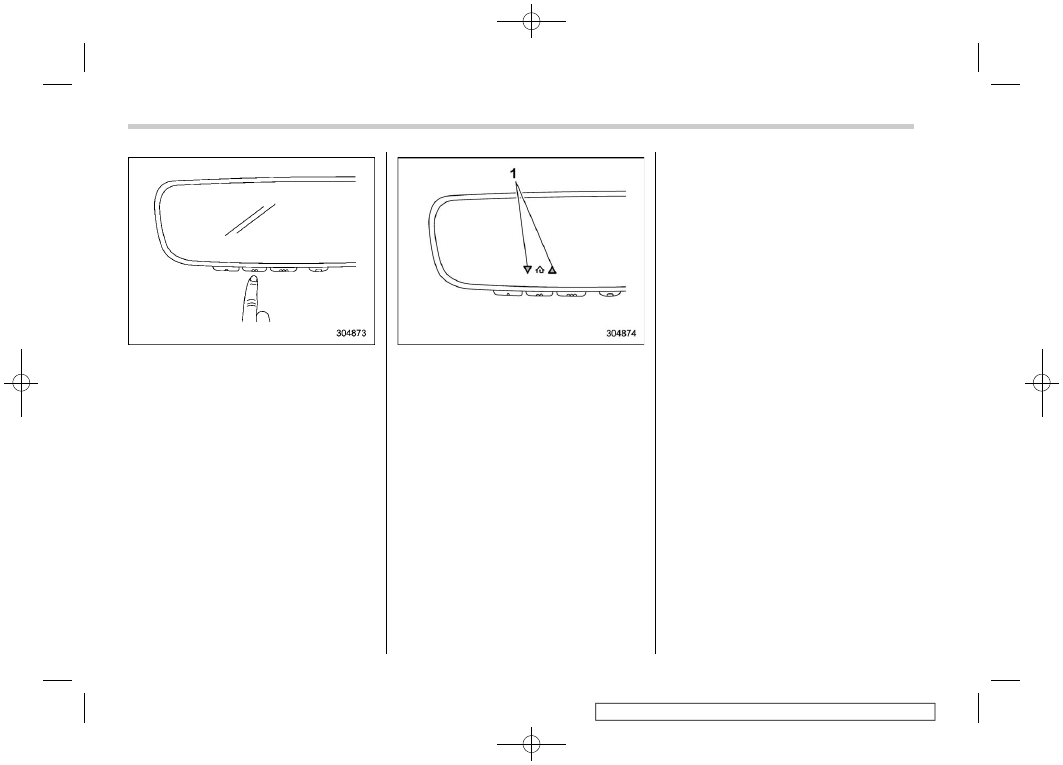
7. Return to the vehicle and firmly press,
hold for 2 seconds and release the
HomeLink

®

button up to three times. At

this point programming is complete and
your device should operate when the
HomeLink

®

button is pressed and re-

leased.

1)

Status Indicators

8. If status indicator arrows appear next
to the indicator light, please refer to
“Garage Door Two-Way Communication”

P277.

In the event that there are still program-
ming difficulties or questions, additional
HomeLink

®

information and programming

videos can be found at
www.HomeLink.com and
www.youtube.com/HomeLinkGentex. For
Genie and Sommer garage door openers
please go directly to the HomeLink

®

website.

!

Gate Operator/Canadian Pro-
gramming

Canadian radio-frequency laws require
transmitter remote signals to “time-out”
(or quit) after several seconds of transmis-
sion, which may not be long enough for
HomeLink

®

to pick up the signal during

programming. Similar to this Canadian
law, some U.S. gate operators are de-
signed to “time-out” in the same manner.
The indicator LED on the hand-held
remote will go off when the device times
out, indicating that it has finished transmit-
ting.

If you live in Canada or you are having
difficulties programming a gate operator or
garage door opener by using the program-
ming procedures, replace “Programming a
New HomeLink

®

button” step 3 with the

following:

While the HomeLink

®

indicator light is

flashing orange, press and release (“cy-
cle”) your device’s hand-held remote every
two seconds until the HomeLink

®

indicator

light changes from orange to green. You
may now release the hand-held remote
button.

NOTE

If programming a garage door opener
or gate operator, it is advised to unplug

Mirrors

276

(279,1)

the device during the “cycling” process
to prevent possible overheating.

Proceed with “Programming a New
HomeLink

®

button” step 4 to complete.

!

Using HomeLink

®

To operate, simply press and release the
programmed HomeLink

®

button. Activa-

tion will now occur for the trained device
(i.e. garage door opener, gate operator,
security system, entry door lock, home/
office lighting, etc.). For convenience, the
hand-held remote of the device may also
be used at any time.

!

Erasing HomeLink

®

buttons

To erase programming from the three
buttons (individual buttons cannot be
erased but can be “reprogrammed” as
outlined below), follow the step noted:

Press and hold the two outer HomeLink

®

buttons for at least 10 seconds. The LED
indicator will change from continuously lit
to rapidly flashing. Release both buttons.
Do not hold for longer than 20 seconds.
HomeLink

®

is now ready to be pro-

grammed at any time beginning with
“Programming a New HomeLink

®

button”

- step 1.

!

R e p r o g r a m m i n g a S i n g l e
HomeLink

®

button

To program a previously trained button,
follow these steps:
1. Press and hold the desired HomeLink

®

button. DO NOT release the button.
2. The indicator light will begin to slowly
flash orange after 20 seconds. The
HomeLink

®

button can be released at this

point. Proceed with “Programming a New
HomeLink

®

button” - step 3.

3. If you do not complete the program-
ming of a new device to the button, it will
revert to the previously stored program-
ming.

!

Garage Door Two-Way Commu-
nication

HomeLink

®

has the capability of commu-

nicating with your garage door opener.
HomeLink

®

can receive and display “clos-

ing” or “opening” status messages from
compatible garage door opener systems.
At any time, HomeLink

®

can also recall and

display the last recorded status commu-
nicated by the garage door opener to
indicate your garage door being “closed”
or “opened”.

HomeLink

®

has the capability of receiving

this communication from the garage door
opener at a range up to 820 feet (250 m).

Range may be reduced by obstacles such
as houses or trees. You may have to slow
your vehicle speed to successfully receive
the garage door opener communication.

!

Programming Two-Way Commu-
nication

1)

Status Indicators

Within 5 seconds after programming a new
HomeLink

®

button, both of HomeLink’s

garage door status indicators will flash
rapidly green indicating that the garage
door two-way communication has been
enabled. If your garage door status in-
dicators flashed, two-way communication
programming is complete.

If the garage door status indicators do not
flash, additional HomeLink

®

information

and programming videos can be found

– CONTINUED –

Mirrors

277

3

Instruments

and

Controls

(280,1)

online at www.HomeLink.com and
www.youtube.com/HomeLinkGentex.

!

Using Two-Way Communication

1)

Status Indicator

Recall and display (at any time) the last
recorded garage door status message
communicated to HomeLink

®

by simulta-

neously pressing HomeLink

®

buttons 1

and 2 for 2 seconds. HomeLink

®

will

display the last recorded status for 3
seconds.
If two-way communication programming is
successful, HomeLink

®

will display the

status of your garage door opener with
arrow indicators (see below).

1)

Garage Door Opener CLOSING (Blinking
Orange)

2)

Garage Door Opener CLOSED (Solid
Green)

3)

Garage Door Opener OPENING (Blink-
ing Orange)

4)

Garage Door Opener OPENED (Solid
Green)

!

Certification

In the event that there are still program-
ming difficulties or questions, additional
HomeLink

®

information and programming

videos can be found at
www.HomeLink.com,
www.youtube.com/HomeLinkGentex, or
by calling the toll-free HomeLink-hotline
at 1-800-355-3515.

.

U.S.-spec. models

CAUTION

FCC WARNING

Changes or modifications not ex-
pressly approved by the party re-
sponsible for compliance could void
the user’s authority to operate the
equipment.

Mirrors

278

(281,1)

.

Canada-spec. models

HomeLink

®

and the HomeLink

®

house are

registered trademarks of Gentex Corpora-
tion.

– CONTINUED –

Mirrors

279

3

Instruments

and

Controls

(282,1)

WARNING

.

W h e n

p r o g r a m m i n g

t h e

HomeLink

®

Wireless Control Sys-

tem, you may be operating a
garage door opener or other
device. Make sure that people
and objects are out of the way of
the garage door or other device
to prevent potential harm or da-
mage.

.

Do not use the HomeLink

®

Wire-

less Control System with a gar-
age door opener that lacks the
safety stop and reverse feature
as required by applicable safety
standards. A garage door opener
which cannot detect an object,
signaling the door to stop and
reverse, does not meet these
safety standards. Using a garage
door opener without these fea-
tures increases risk of serious
injury or death. For more infor-
mation, consult the HomeLink

®

website at www.homelink.com or
call 1-800-355-3515.

&

Smart Rearview Mirror/Com-
pass with HomeLink

®

(Outback) (If Equipped)

!

Safety precautions

WARNING

.

Never rely exclusively on the

Smart Rearview Mirror. The
Smart Rearview Mirror has blind
spots that must be checked prior
to operating the vehicle. Please
exercise caution when using this
system.

.

Do not disassemble or modify the

main unit, camera or wiring of the
Smart Rearview Mirror. If there is
a strange odor or smoke, stop
using it immediately and we re-
commend that you consult a
SUBARU dealer.

.

Never operate the Smart Rear-

view Mirror while driving. Doing
so could result in an accident that
causes serious injury or death.

CAUTION

.

Do not put the main unit, camera

or wiring of the Smart Rearview
Mirror close to fire. Doing so
could result in a malfunction
and fire.

.

When the Smart Rearview Mirror

malfunctions, change to the mir-
ror mode immediately and we
recommend that you consult a
SUBARU dealer.

.

Staring at Smart Rearview Mirror

for extended period of time may
result in car sickness.

.

The display could become hard to

see because of lights (e.g. sun-
light or the headlights of ap-
proaching vehicles) from outside
of the vehicle. In this case,
change to the mirror mode if
necessary.

NOTE

When the moonroof is opened (if
equipped):
If the sunlight is too bright to see the
display of the Smart Rearview Mirror,
close the moonroof (sunshade), or
select the mirror mode.

Mirrors

280

(283,1)

!

Smart Rearview Mirror switches

1)

Mode lever

2)

Left button

3)

Center button

4)

Right button

5)

HomeLink buttons

!

How to use the Smart Rearview
Mirror

CAUTION

Adjust the rearview mirror before
driving.

1) Change the Smart Rearview Mir-

ror to the mirror mode.

2) Sit with the correct posture in the

driver’s seat and adjust the mir-
ror position to see behind.

3) Change the Smart Rearview Mir-

ror to the display mode.

If you start driving without adjusting
the mirror, light may reflect on the
mirror while selecting the display
mode and it may make it hard to see
the screen.

!

To change the mode

1)

To select the display mode, first adjust the
rearview mirror, then pull the mode lever
towards you.

2)

To select the mirror mode, push the mode
lever away from you.

Select the display mode to show the image
from the camera that is installed in the roof
antenna.
Select the mirror mode to use as a normal
mirror. If the mirror mode is selected, the
image from the camera is not shown on the
mirror.

NOTE

.

It is not possible to use the Smart

Rearview Mirror in the display mode
when the ignition switch is in the
“LOCK”/“OFF” or “ACC” position.

– CONTINUED –

Mirrors

281

3

Instruments

and

Controls

(284,1)

.

When using the display mode, parts

of the vehicle interior may reflect light
on the display. Adjust the angle of the
Smart Rearview Mirror to avoid un-
wanted reflection.

!

Display adjustment

1)

Left button

2)

Center button

3)

Right button

Press any of the left, center or right buttons
to display the main menu.

NOTE

The main menu cannot be displayed on
the display while the select lever is in a
position other than the “P” position.

Brightness adjustment

1)

Setting button: Press the setting button to
set the brightness.

2)

Press this button to decrease the bright-
ness.

3)

Press this button to increase the bright-
ness.

After pressing the setting button, the mode
will change to the up/down adjustment
mode.

NOTE

If the button is not touched for 5
seconds, the brightness adjustment
menu will exit.

Up/down adjustment

1)

Setting button: Press the setting button to
set the angle.

2)

Press this button to lower the angle.

3)

Press this button to raise the angle.

After pressing the setting button, the mode
will change to the left/right adjustment
mode.

NOTE

If the button is not touched for 5
seconds, the up/down adjustment
menu will exit.

Mirrors

282

(285,1)

Left/right adjustment

1)

Setting button: Press the setting button to
set the angle.

2)

Press this button to turn the angle left.

3)

Press this button to turn the angle right.

After pressing the setting button, the mode
will change to the rotation adjustment
mode.

NOTE

If the button is not touched for 5
seconds, the left/right adjustment
menu will exit.

Rotation adjustment

1)

Setting button: Press the setting button to
set the angle.

2)

Press this button to turn the angle
counterclockwise.

3)

Press this button to turn the angle clock-
wise.

After pressing the setting button, the mode
will change to the HomeLink menu.

NOTE

If the button is not touched for 5
seconds, the rotation adjustment menu
will finish.

!

Dimming setting

The Smart Rearview Mirror has a dimming
mirror mode. When the mirror mode is
selected with the ignition switch in the “ON”
position, auto dimming will activate. This
mode decreases glare automatically de-
pending on the brightness level from
behind.

1)

Left button

2)

Center button

3)

Right button

When selecting the mirror mode, press
any of the buttons to display the auto
dimming menu. Press the center or right
buttons to turn the dimming mirror mode
ON/OFF.

– CONTINUED –

Mirrors

283

3

Instruments

and

Controls

(286,1)

Dimming mirror mode ON indicator

Dimming mirror mode OFF indicator

When turning the dimming mirror mode
ON/OFF, the dimming mirror mode ON/
OFF indicator will illuminate for 5 seconds.

NOTE

.

When the ignition switch is turned to

the “LOCK”/“OFF” position, auto dim-
ming will not activate.

.

When the display mode is selected,

auto dimming will not activate.

!

When the display mode malfunc-
tions

!

Vehicle communication error

When there is a vehicle communication
error, the warning indicators will appear as
shown in the illustration.

1)

Mode lever

2)

Left button

3)

Center button

4)

Right button

When the warning indicators appear,
operate the mode lever to select the mirror
mode. In such a case, we recommend that
you consult your SUBARU dealer for
repair.

If the mode does not change to the mirror
mode even when operating the mode
lever, the mode lever may have malfunc-
tioned. In such a case, press and hold one
of the left, center, or right buttons for 10
seconds. Then the mode will change to the
mirror mode.

Mirrors

284

(287,1)

!

Camera calibration error

When there is a camera calibration error,
the warning indicators will appear as
shown in the illustration.
When the warning indicators appear,
operate the mode lever to select the mirror
mode. In such a case, we recommend that
you consult your SUBARU dealer for
repair.

!

Maintenance

1)

Camera

.

Make sure to clean the Smart Rearview

Mirror and the area around the camera
regularly. If these parts are not clean, the
screen cannot be seen clearly.

.

Wipe off the Smart Rearview Mirror and

the area around the camera by using a dry
soft cloth. If the foreign matter cannot be
removed, first wipe the area off using a wet
soft cloth, and then wipe using a dry cloth.

.

Do not use alcohol, benzine or thinner

for cleaning. Doing so could result in
discoloration, deterioration, or malfunc-
tion.

.

Make sure to clean the rear camera

lens regularly. When you clean the rear
camera lens, first soak a soft cloth with

diluted mild detergent to wipe it off, and
wipe using a dry cloth.

.

During snowy weather, remove the

accumulated snow from around the anten-
na, because snow interferes with the
camera image on the mirror.

.

When installing a roof box or a similar

accessory, do not block the area in front of
the camera lens to avoid interfering with
the camera image on the mirror.

.

When the Smart Rearview Mirror’s

visibility is poor because there is dirt or
other foreign material adhering to the
camera, switch to the original rearview
mirror.

!

Tips

.

Do not use the display mode for a long

time while the engine is not running. Doing
so could result in the battery discharge.

.

Do not install radio antennas around

the Smart Rearview Mirror. Radio waves
may disturb the Smart Rearview Mirror
screen.

.

Observe the following instructions. Not

doing so could result in malfunction or the
main mirror unit falling off.

– Do not push the button too strongly
or move the lever too forcibly.
– Do not turn the main mirror unit
more than 90 degrees.
– Do not impact the main mirror unit.

– CONTINUED –

Mirrors

285

3

Instruments

and

Controls

(288,1)

– Do not impact the camera or anten-
na.

.

If the screen is hard to see because of

light, select the mirror mode.

.

If LED lights or scattered reflections are

caught in the camera, the screen may
flicker. However, this is not a malfunction.

.

If something moves rapidly near the

camera, the display may not be able to
catch the item. However, this is not a
malfunction.

.

If the display mode is used, the view of

the rear will be different from the normal
use of the inner mirror or the mirror mode.
Do not rely solely on the Smart Rearview
Mirror; check the rear visually if necessary.
Pay attention to traffic conditions for safe
driving.

.

Adjust the brightness of the screen

appropriately. If the screen is too bright,
the driver’s eyes may get tired while
driving.

.

The Smart Rearview Mirror sometimes

becomes hot. However, this is not a
malfunction.

.

In the following cases, the color may not

be clear. However, this is not a malfunc-
tion.

– The shown items are a very far
distance away.

– The environmental conditions are
very dark.

!

To operate the compass feature

1)

Left button

2)

Center button

3)

Right button

Press any of the left, center or right buttons
to display the main menu. Select compass
mode using the left button.

NOTE

The main menu cannot be displayed on
the display while the select lever is in a
position other than the “P” position.

!

To turn the compass feature on/
off

1)

Compass

Select “ON” or “OFF” using the center
button.

Mirrors

286

(289,1)

!

Compass calibration

If the compass appears inaccurate, recali-
brate the compass.

1. Select “CALIBRATE” using the right
button.
2. To start the compass calibration, press
the center button.
3. Select “Continue” using the center
button.

4. Select your current location in the
display using the left button.
5. Select “Continue” using the center
button.
6. Once “C” appears in the display, slowly
drive the vehicle in circles until compass is
calibrated.

!

HomeLink

®

Wireless Control Sys-

tem

The HomeLink

®

Wireless Control System

provides a convenient way to replace up to
three hand-held radio-frequency remotes
used to activate devices such as gate
operators, garage door openers, entry
door locks, security systems, and even
home lighting. The below steps are gen-
eric programming instructions; for Genie
and Sommer garage door openers, please

go directly to the HomeLink website.
Additional information and programming
videos can be found at
www.HomeLink.com/Subaru and
www.youtube.com/HomeLinkGentex.

CAUTION

.

Before programming HomeLink

to a garage door opener or gate
operator, make sure that people
and objects are out of the way of
the device to prevent potential
harm or damage.

.

When programming a garage

door opener, it is advised to park
outside of the garage.

.

Do not use HomeLink with any

garage door opener that lacks
safety stop and reverse features,
as required by U.S. federal safety
standards (this includes any gar-
age door opener model manufac-
tured before April 1, 1982). A
garage door that cannot detect
an object signaling the door to
stop and reverse does not meet
current U.S. federal safety stan-
dards.

.

It is also recommended that a new

battery be placed in the hand-
held remote (garage door opener

– CONTINUED –

Mirrors

287

3

Instruments

and

Controls

(290,1)

remote) of the device for quicker
and more accurate training.

.

Some vehicles may require the

ignition switch to be turned to the
“ON” or “ACC” position for pro-
gramming and/or operation of
HomeLink.

.

Keep the hand-held remote (gar-

age door opener remote) of the
device you are programming for
use in other vehicles as well as
for future HomeLink program-
ming. It is also suggested that
upon the sale of the vehicle, the
programmed HomeLink buttons
be erased for security purposes.
Refer to “Erasing HomeLink But-
tons”

P290.

!

HomeLink set up

1)

HomeLink buttons

2)

Left button

3)

Center button

4)

Right button

Press any of the left, center or right buttons
to display the main menu. Select
HomeLink menu using the left button or
press any of the HomeLink buttons.

NOTE

The main menu cannot be displayed on
the display while the select lever is in a
position other than the “P” position.

1. Select “SET UP” using the right button.
2. Select “Continue” using the HomeLink
left button.
3. Press any of the HomeLink buttons.
4. Be sure to read the displayed instruc-
tions.
Select “Continue” using the HomeLink left
button.
5. Position the hand-held remote (garage
door opener remote) 2 in (5 cm) away from
the mirror.

Mirrors

288

(291,1)

1)

Garage door opener remote

6. While the HomeLink programming in-
structions are displayed, press and hold
the hand-held remote button.

NOTE

Some hand-held remotes (garage door
opener remotes) may actually train
better at a distance of 6 to 12 in (15 to
30 cm). Keep this in mind if you have
difficulty with the programming pro-
cess.

7. Be sure your garage door is not
moving, then press OK.
8. Firmly press the HomeLink left button 3
times.
At this point, your device should operate
when the HomeLink button is pressed and

released.

9. “Program Success”:
If the programmed HomeLink button
works, select “Yes” and programming is
completed.
If the programmed HomeLink button does
not work, select “No” and proceed to step
10.

1)

“Learn” button

10. At the garage door opener motor,
(security gate motor, etc.) locate the
“Learn”, “Smart”, or “Program” button. This
can usually be found where the hanging
antenna wire is attached to the motor-head

– CONTINUED –

Mirrors

289

3

Instruments

and

Controls

(292,1)

unit (see the device’s manual to identify
this button). The name and color of the
button may vary by manufacturer.

NOTE

A ladder and/or second person may
simplify the following steps.

11. Firmly press and release the “Learn”,
“Smart”, or “Program” button. You now
have 30 seconds in which to complete step
12.
12. Return to the vehicle and press the
HomeLink left button.
13. Firmly press the HomeLink left button 3
times.
At this point, your device should operate
when the HomeLink button is pressed and
released.
14. “Program Success”:
If the programmed HomeLink button
works, select “Yes” and programming is
completed.

In the event that there are still program-
ming difficulties or questions, additional
HomeLink information and programming
videos can be found at
www.HomeLink.com/Subaru and
www.youtube.com/HomeLinkGentex. For
Genie and Sommer garage door openers,
please go directly to the HomeLink web-
site.

!

Gate Operator/Canadian Pro-
gramming

Canadian radio-frequency laws require
transmitter remote signals to “time-out”
(or quit) after several seconds of transmis-
sion, which may not be long enough for
HomeLink to pick up the signal during
programming. Similar to this Canadian
law, some U.S. gate operators are de-
signed to “time-out” in the same manner.
The indicator LED on the hand-held
remote will go off when the device times
out, indicating that it has finished transmit-
ting.

If you live in Canada or you are having
difficulties programming a gate operator or
garage door opener by using the program-
ming procedures, replace “Programming a
New HomeLink Button” step 3 with the
following:

While the HomeLink indicator light is
flashing orange, press and release (“cy-
cle”) your device’s hand-held remote every
two seconds until the HomeLink indicator
light changes from orange to green. You
may now release the hand-held remote
button.

NOTE

If programming a garage door opener
or gate operator, it is advised to unplug

the device during the “cycling” process
to prevent possible overheating.

Proceed with “Programming a New
HomeLink Button” step 4 to complete.

!

Using HomeLink

To operate, simply press and release the
programmed HomeLink button. Activation
will now occur for the trained device (i.e.
garage door opener, gate operator, secur-
ity system, entry door lock, home/office
lighting, etc.). For convenience, the hand-
held remote of the device may also be
used at any time.

!

Erasing HomeLink Buttons

1. Press any of the left, center or right
buttons to select the main menu. Select
HomeLink menu using the left button.
2. Select “SET UP” using the right button.
3. Select “Continue” using the HomeLink
left button.
4. Select the “Trash can icon” using the
HomeLink left button.

Mirrors

290

(293,1)

5. To erase the program for the HomeLink
button, select “Clear” using the HomeLink
center button.

HomeLink is now ready to be programmed
at any time beginning with “Programming a
new HomeLink button” - step 1.

!

R e p r o g r a m m i n g a S i n g l e
HomeLink Button

To program a previously programmed
HomeLink button, refer to “HomeLink set
up”

P288.

!

Garage Door Two-Way Commu-
nication

HomeLink has the capability of commu-
nicating with your garage door opener.
HomeLink can receive and display “clos-
ing” or “opening” status messages from
compatible garage door opener systems.
At any time, HomeLink can also recall and
display the last recorded status commu-
nicated by the garage door opener to
indicate your garage door being “closed”
or “opened”.

HomeLink has the capability of receiving
this communication from the garage door
opener at a range up to 820 feet (250 m).
Range may be reduced by obstacles such
as houses or trees. You may have to slow
your vehicle speed to successfully receive
the garage door opener communication.

!

Programming Two-Way Commu-
nication

1)

Status Indicators

Within five seconds after programming a
new HomeLink button, both of HomeLink’s
garage door status indicators will flash
rapidly green indicating that the garage
door two-way communication has been
enabled. If your garage door status in-
dicators flashed, two-way communication
programming is complete.

If the garage door status indicators do not
flash, additional HomeLink information
and programming videos can be found
online at www.HomeLink.com/Subaru and
www.youtube.com/HomeLinkGentex.

– CONTINUED –

Mirrors

291

3

Instruments

and

Controls


Content      ..     16      17      18      19     ..