Subaru BRZ (2023 year). Manual in english - page 8
214
Storage Compartment
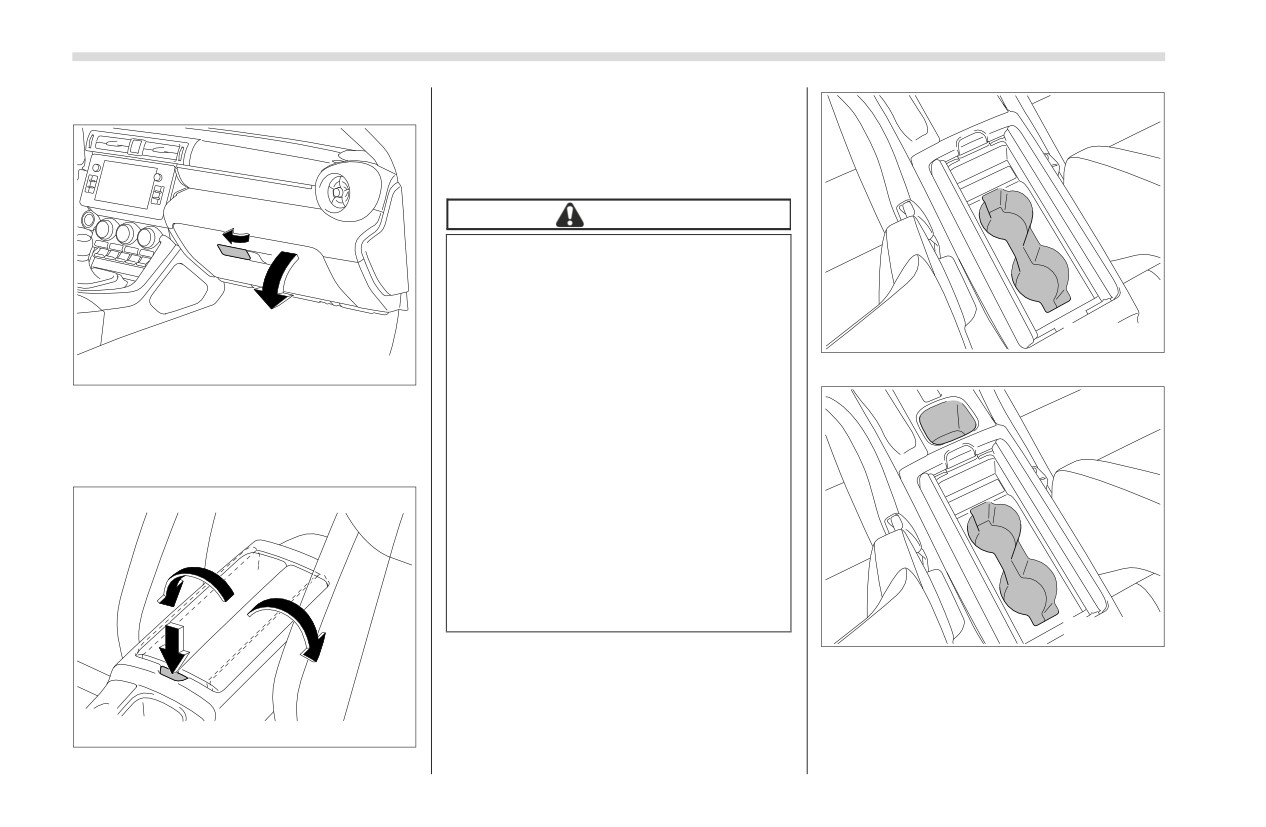
■ Glove Box
To open the center console, push on the
button lightly and it will automatically
open.
▼ Cup Holder and Console Tray
CAUTION
Take care to avoid spills. Bever-
ages, if hot, might burn you and/
or your passengers. Spilled
beverages may also damage
upholstery, carpets or audio
602367
equipment.
602247
MT models
Do not pick up a cup from the cup
To open the glove box, pull the handle. To
holder or put a cup in the holder
close it, push the lid firmly upward.
while you are driving, as this may
distract you and lead to an acci-
■ Center Console
dent.
Take care not to spill a beverage
on the select lever/shift lever or
any switch(es) in the adjacent
area. If the beverage is spilled, it
may cause a malfunction of the
select lever/shift lever and/or
switch(es).
602249
AT models
The cup holder and console tray is built
into the center console.
602248
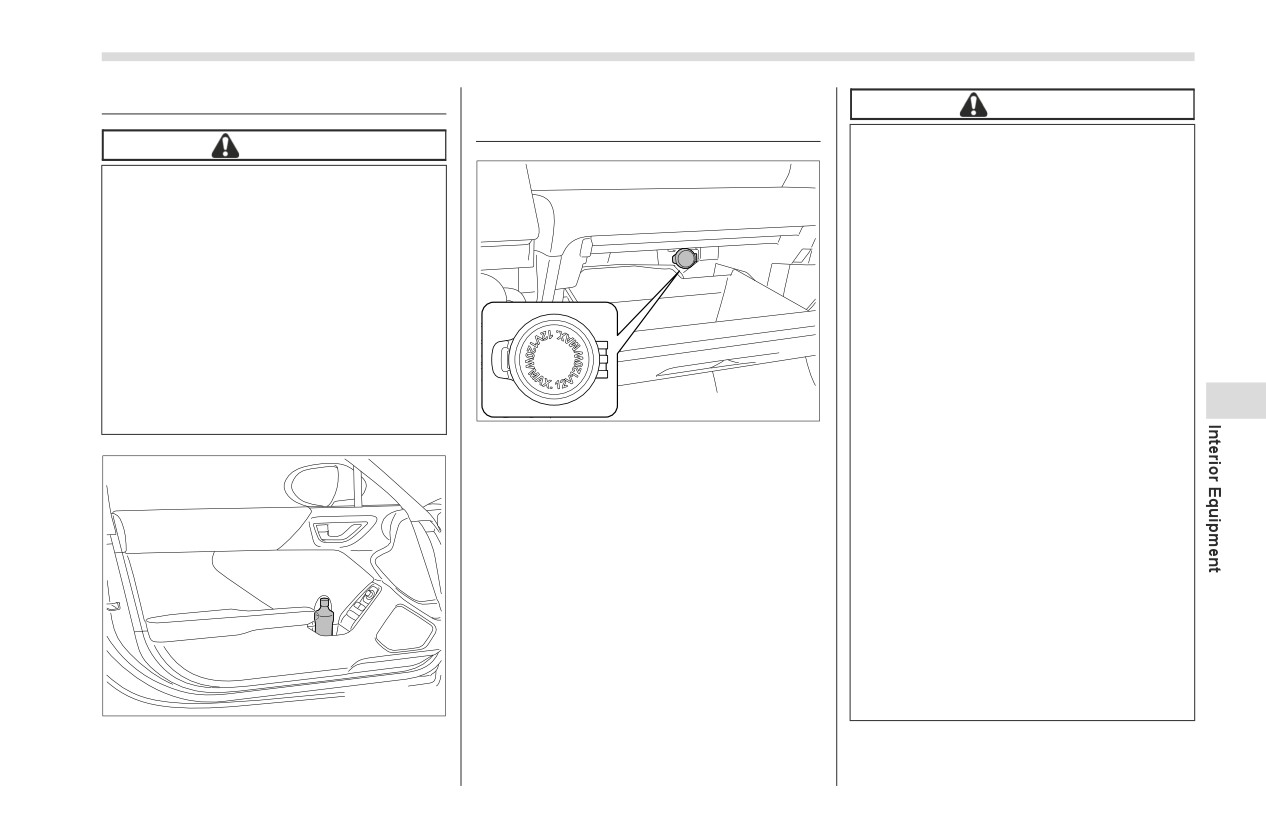
Bottle Holders
215
6-4. Bottle Holders
6-5. Accessory Power
CAUTION
Outlets
Do not attempt to use a cigarette
CAUTION
lighter in the accessory power
Do not pick up a bottle from the
outlet.
bottle holder or put a bottle in the
Do not place any foreign objects,
holder while you are driving, as
especially metal ones such as
this may distract you and lead to
coins or aluminum foil, into the
an accident.
accessory power outlet. That
When placing a beverage in a
could cause a short circuit.
bottle holder, make sure it is
Always put the cap on the acces-
capped. Otherwise, the beverage
sory power outlet when it is not in
could spill when opening/closing
use.
the door or while driving and, if
Use only electrical appliances
the beverage is hot, it could burn
which are designed for 12 V DC.
602251
6
you and/or your passengers.
The maximum power rating of an
Power outlet in the glove box
appliance that can be connected
Accessory power outlets are provided in
is 120 W. Do not use an appliance
the glove box. Electrical power (12 V DC)
which exceeds the indicated
from the battery is available at any of the
wattage for each outlet.
outlets when the ignition switch is in either
the “ACC” or “ON” position.
When using appliances con-
You can use an in-vehicle electrical appli-
nected to two or more outlets
ance by connecting it to an outlet.
simultaneously, the total power
consumed by them must not
The maximum power rating of an appli-
exceed 120 W. Overloading the
ance that can be connected is 120 W. Do
accessory power outlet can
not use an appliance which exceeds the
cause a short circuit. Do not use
indicated wattage for each outlet.
double adapters or more than
602250
When using appliances connected to two
one electrical appliance.
or more outlets simultaneously, the total
The bottle holder equipped on each door
power consumed by them must not
trim can be used to hold beverage bottles
exceed 120 W.
and other items.
- CONTINUED -
216
USB Power Supply
If the plug on your electric appli-
6-6. USB Power Supply
If a device is connected for a long
ance is either too loose or too
time when the engine is not
tight for the accessory power
running, doing so may cause the
CAUTION
outlet, this can result in a poor
risk of a discharged battery. Even
contact or cause the plug to get
The specification of a USB
when the engine is running, we
stuck. Only use plugs that fit
terminal that can be used is the A-
recommend that you do not
properly.
type. If a different specification of
connect a device for an unneces-
terminal is connected, power
Use of an electric appliance in the
sarily long time.
supply or charging may not be
accessory power outlet for a long
Do not connect a malfunctioning
possible, or the device may
period of time while the engine is
device. Doing so may cause the
malfunction.
not running can cause battery
risk of smoke and fire.
There is a risk that a connected
discharge.
device may malfunction or data
Before driving your vehicle, make
may be damaged. The connection
NOTE
sure that the plug and the cord on
of a device shall be performed at
The rated voltage of each USB
your electrical appliance will not
your responsibility.
terminal is 5 V/2.1 A (total 4.2 A). For
interfere with your shifting gears
and operating the accelerator and
To avoid an electric shock or a
details about the maximum rated
malfunction,
observe
the
power, refer to "How to Use the USB
brake pedals. If they do, do not
following precautions.
Power Supply"
) P217. Before
use the electrical appliance while
connecting a device, be sure to read
driving.
-
Do not connect a USB hub.
the instruction manual of the device
-
Do not insert any metal or
and check whether or not this specifi-
other foreign object into the
cation of the output is supported by the
USB terminal.
device. If a device that requires power
-
Do not spill water or other
exceeding the maximum rating is
liquid on the USB terminal.
connected, power supply or charging
Be careful not to pull the
may not be possible. Even if charging
connected cable. Doing so could
could be completed, the time required
break the USB terminal and the
for charging may be longer than when
connected device.
the genuine charger for that device is
used.
Depending on the device, charging
may be possible only when a special
Ashtray (Dealer Option)
217
cable is used. In this case, be sure to
When the ignition switch is in the “ACC” or
6-7. Ashtray (Dealer Option)
connect the device using the special
“ON” position, the power can be supplied
cable.
to the electronic device. Up to 5 V/2.1 A
CAUTION
When a device that communicates
can be supplied from each terminal (total
with a PC is connected, power supply
of 4.2 A).
Do not use ashtrays as waste
or charging may not be possible.
receptacles or leave a lighted
When connect a device for charging,
cigarette in an ashtray. This could
disconnect the device promptly after
cause a fire.
charging is completed.
Always extinguish matches and
cigarettes before putting them
■ How to Use the USB Power
into the ashtray, and then close
Supply
the ashtray securely. If you keep
the ashtray open, the fire of the
cigarette may spread to another
cigarette butt and start a fire.
6
Do not put flammable material in
the ashtray.
Do not leave a lot of cigarette
butts in the ashtray.
NOTE
Particles of ash and tobacco will accu-
mulate around the hinges of the ash-
602252
tray’s inner lid. Clean them off using a
toothbrush or a similar narrow-ended
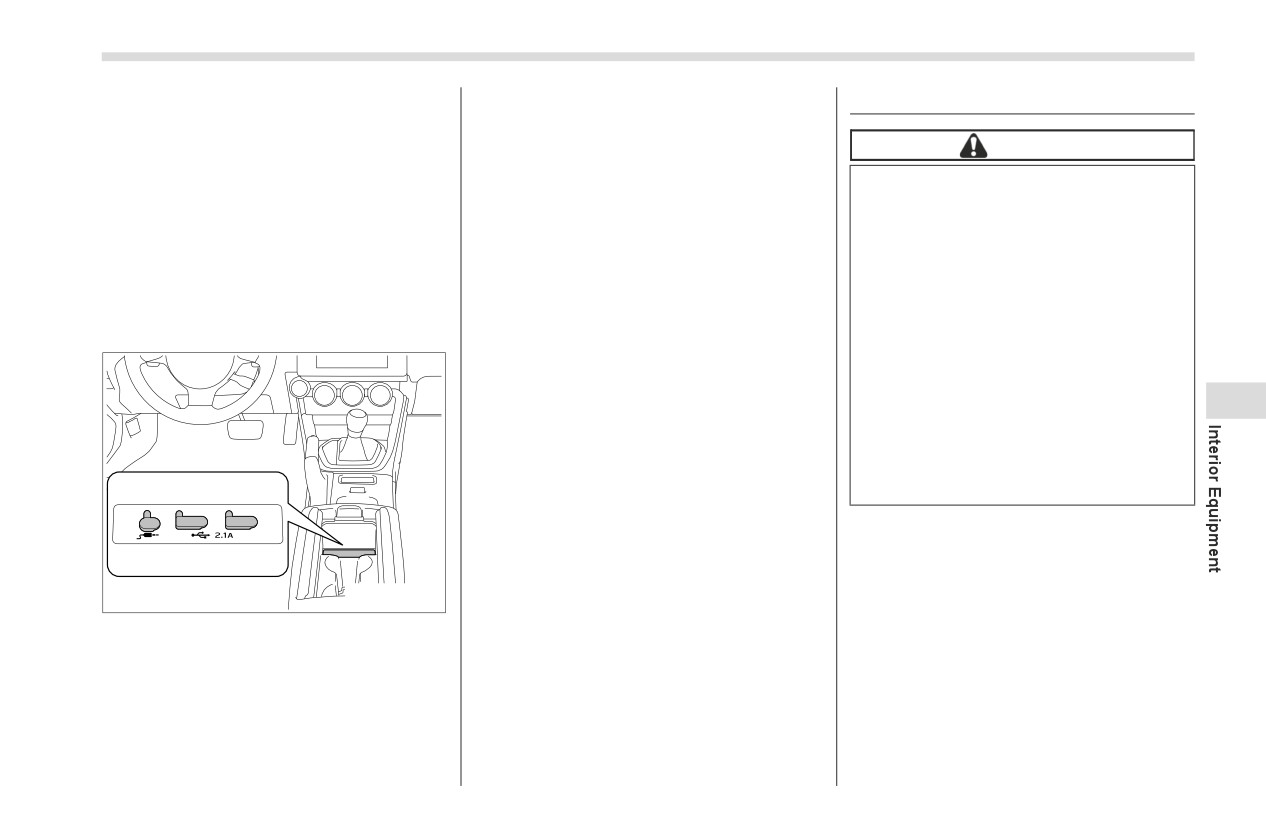
Console USB power supply
(an audio
implement.
device can be connected and used)
Use the USB terminal to use or charge an
electronic device.
When using the USB, open the USB
power supply cover. After use, close it.
- CONTINUED -
218
Floor Mat
6-8. Floor Mat
Do not use more than one floor
mat.
601270
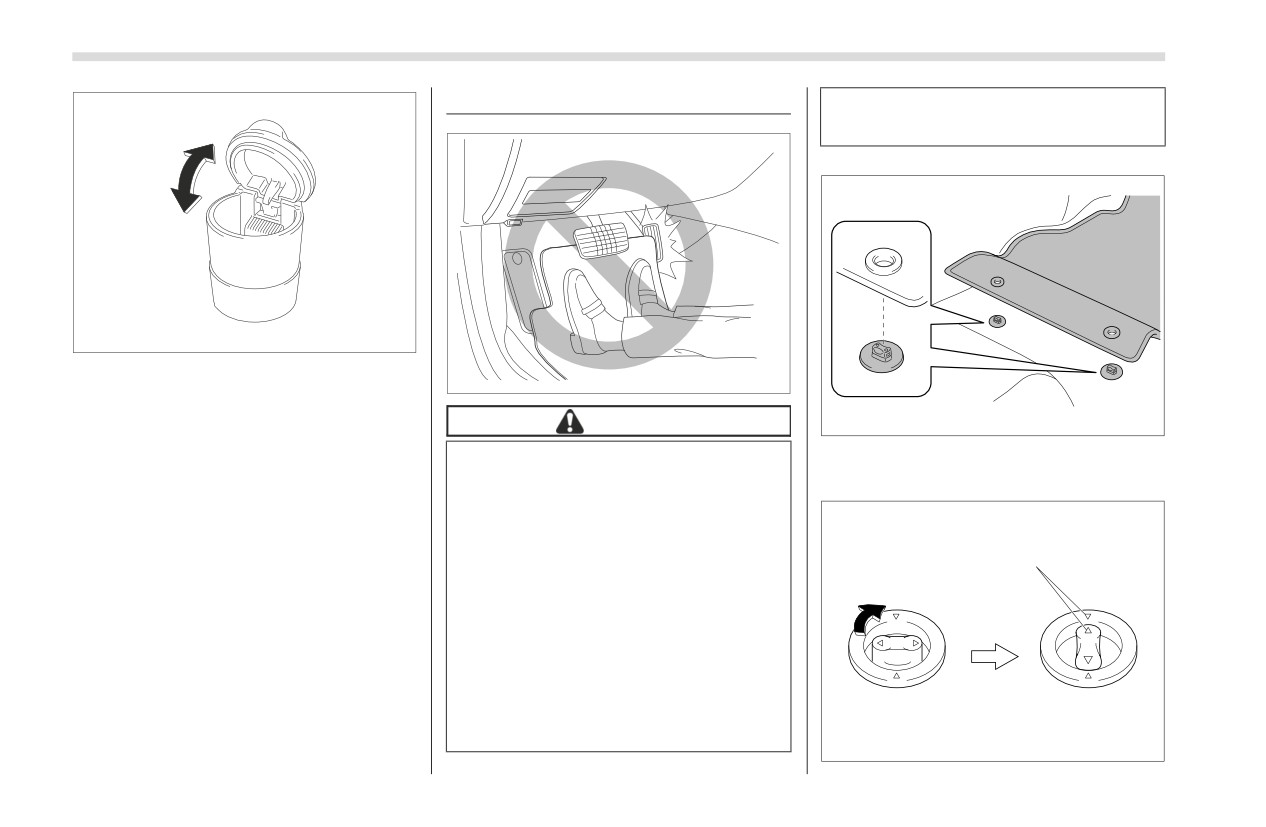
The portable ashtray can be installed in
601534
each cup holder or bottle holder. For the
locations of the cup holders, refer to "Cup
CAUTION
601287
Holder and Console Tray" ) P214. For the
locations of the bottle holders, refer to
If the floor mat slips forward and
1. Insert the retaining hooks (clips) into
"Bottle Holders" ) P215.
interferes with the movement of the
the floor mat eyelets.
When using the ashtray, open the lid of
pedals during driving, it could
the ashtray. Fully close the lid after using
cause an accident. Observe the fol-
the ashtray to help reduce residual
lowing precautions to prevent the
smoke.
floor mat from slipping forward.
A
Be sure to use a genuine
SUBARU floor mat designed with
grommets in the correct loca-
tions.
Make sure that the driver’s floor
mat is placed back in its proper
location and is correctly secured
on its retaining pins.
602368
Under-Floor Storage Compartment (models with the flat tire repair kit)
219
2. Turn the upper knob of each retaining
6-9. Under-Floor Storage
Do not store spray cans,
hook (clip) to secure the floor mats in
containers with flammable or
Compartment (models with
place.
corrosive liquids or any other
the flat tire repair kit)
A: Always align the “
” marks.
dangerous items in the subfloor
storage compartment.
6
602253
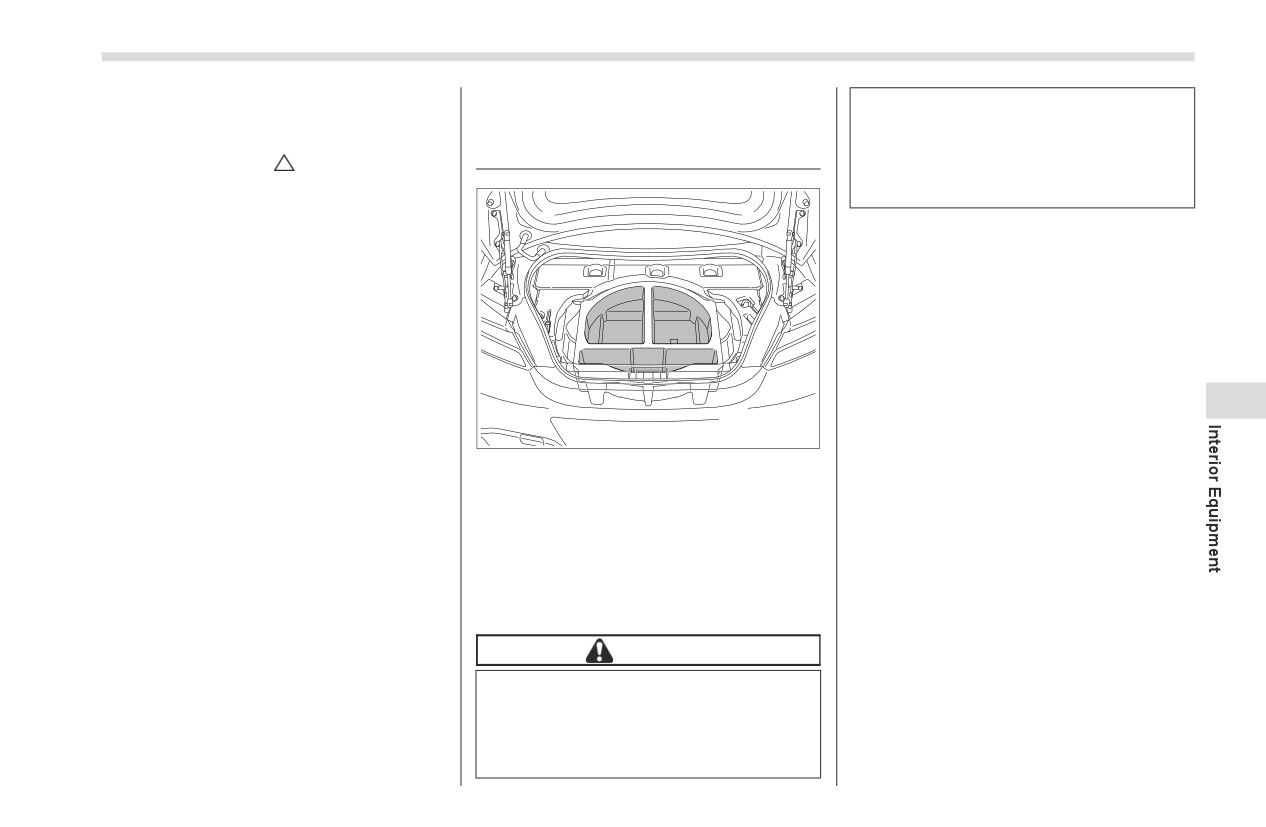
The subfloor storage compartment is
located under the floor of the trunk and
can be used to store small items. To open
the lid, pull the tab or handle up.
NOTE
When storing a flat tire, put the sub-
floor storage in the trunk.
CAUTION
Always keep the lid of the
subfloor storage compartment
closed while driving to reduce the
risk of injury in the event of
sudden stop or an accident.
Starting and Operating
7-1. Fuel
223
Brake System
244
Fuel Requirements
223
Disc Brake Pad Wear Warning Indicators
245
Fuel Filler Lid and Cap
224
7-11. ABS (Anti-Lock Brake System)
245
7-2. State Emission Testing (U.S. Only)
227
ABS Self-Check
245
7-3. Preparing to Drive
228
ABS Warning Light
245
7-4. Starting and Stopping Engine
229
7-12. Electronic Brake Force Distribution (EBD)
Safety Precautions
229
System
246
Operating Range for Push-Button Start System
229
EBD System Malfunctions
246
General Precautions When Starting Engine
229
7-13. Vehicle Stability Control (VSC)/TRAC
Starting Engine
230
System
247
Stopping Engine
232
Vehicle Stability Control (VSC) System
247
When Access Key Fob Does Not Operate
TRAC System
247
Properly
232
Vehicle Stability Control (VSC) System Monitor
248
Steering Lock
232
Vehicle Stability Control (VSC) OFF Switch
248
7-5. Manual Transmission
233
7-14. TRACK Mode
250
Shifting Speeds
234
TRACK Mode
250
Driving Tips
235
Selecting TRAC Mode and Vehicle Stability Control
7
7-6. Automatic Transmission
235
(VSC) Mode
251
Select Lever
236
7-15. Tire Pressure Monitoring System (TPMS)
Adaptive Control
237
(If Equipped)
251
Shift Lock Function
238
Certification for the Transmitter
253
Selection of Manual Mode
239
Certification for the Receiver
253
Driving Tips
240
TPMS Screen
254
7-7. Driving Mode Select Switch (If Equipped)
241
Initializing the Tire Pressure Monitoring System
254
Normal Mode
241
How to Initialize the Tire Pressure Monitoring
Sport Mode
241
System (If Equipped)
254
Snow Mode
241
If You Press the Tire Pressure Monitoring Reset
Driving Mode Select Switch
241
Switch Accidentally
254
7-8. Active Sound Control
242
Initialization Procedure
254
7-9. Power Steering
242
When Initialization of the Tire Pressure Monitoring
7-10. Braking
243
System has Failed
255
Registering ID Codes
255
Braking Tips
243
Starting and Operating
Changing the ID code set
255
System Operation
270
7-16. Parking Your Vehicle
255
BSD/RCTA Approach Indicator Light/Warning
Parking Brake
255
Buzzer
271
Parking Tips
256
BSD/RCTA OFF Indicator
273
7-17. Hill Start Assist System
257
BSD/RCTA Warning Indicator
274
To Activate/Deactivate the Hill Start Assist
To Turn On/Off the BSD/RCTA
274
System
258
Certification for the BSD/RCTA
274
Hill Start Assist Indicator Light
259
Handling of Radar Sensors
276
7-21. Reverse Automatic Braking (RAB) System
7-18. Cruise Control (Models without the
(If Equipped)
277
EyeSight system)
260
To Set Cruise Control
260
Reverse Automatic Braking (RAB) System
To Temporarily Cancel the Cruise Control
261
Overview
278
To Turn Off the Cruise Control
262
Operating Conditions
279
Sonar Audible Alarm
282
To Change the Cruising Speed
262
Automatic Braking Operation
284
Cruise Control Indicator Light
263
Canceling the Reverse Automatic Braking (RAB)
7-19. Rear View Camera
263
System Operation
285
How to Use the Rear View Camera
264
Reverse Automatic Braking (RAB) System
Viewing Range on the Screen
265
ON/OFF Setting
286
Help Lines
266
RAB Warning Indicator
286
7-20. BSD/RCTA (If Equipped)
268
Handling of the Sonar Sensors
286
System Features
268
Fuel
223
7-1. Fuel
RON) fuel will not affect your warranty
▼ Reformulated gasoline
coverage.
SUBARU supports the use of reformu-
CAUTION
lated gasoline when available. Reformu-
▼ Fuel octane rating
lated gasoline has been blended to burn
Use of a fuel which is low in
Using a gasoline with a lower octane
more cleanly and reduce vehicle emis-
quality or use of an inappropriate
rating can cause persistent and heavy
sions.
fuel additive may cause damage
knocking, which can damage the engine.
to the engine and/or fuel system.
Do not be concerned if your vehicle some-
▼ MMT
Some gas stations, particularly
times knocks lightly when you drive up a
Some gasoline contains an octane-
those in high altitude areas, offer
hill or when you accelerate. See your
enhancing additive called MMT (Methylcy-
fuels posted as regular octane
dealer or a qualified service technician if
clopentadienyl Manganese Tricarbonyl). If
gasoline with an octane rating
you use a fuel with the specified octane
you use such fuels, your emission control
below 93 AKI (98 RON). Use of
rating and your vehicle knocks heavily or
system performance may deteriorate and
those fuels are not recom-
persistently.
the CHECK ENGINE warning light/
mended.
malfunction indicator light may turn on. If
▽ RON
this happens, return to your authorized
This octane rating is the Research Octane
SUBARU Dealer for service. If it is deter-
■ Fuel Requirements
7
Number.
mined that the condition is caused by the
The engine is designed to operate using
type of fuel used, repairs may not be
unleaded gasoline with an octane rating
▽ AKI
covered by your warranty.
of 93 AKI (98 RON) or higher.
This octane rating is the average of the
If unleaded gasoline with an octane
Research Octane and Motor Octane
▼ Gasoline for cleaner air
rating of 93 AKI (98 RON) is not available,
numbers and is commonly referred to as
Your use of gasoline with detergent addi-
unleaded gasoline with an octane rating of
the Anti Knock Index (AKI).
tives will help prevent deposits from
91 AKI (95 RON) may be used with no
detriment to engine durability or
forming in your engine and fuel system.
▼ Unleaded gasoline
driveability.
This helps keep your engine in tune and
The neck of the fuel filler pipe is designed
your emission control system working
However, you may notice a slight
to accept only an unleaded gasoline filler
properly, and is a way of doing your part
decrease in maximum engine perfor-
nozzle. Under no circumstances should
for cleaner air. If you continuously use a
mance and you may hear some knocking
leaded gasoline be used because it will
high quality fuel with the proper detergent
(pinging) from the engine while using 91
damage the emission control system and
and other additives, you should never
AKI (95 RON) fuel. Use of 91 AKI (95
may impair driveability and fuel economy.
- CONTINUED -
224
Fuel
need to add any fuel system cleaning
Methanol (methyl or wood alcohol) is
■ Fuel Filler Lid and Cap
agents to your fuel tank.
sometimes mixed with unleaded gasoline.
▼ Locations of the fuel filler lid
Many gasolines are now blended with
Methanol can be used in your vehicle
materials called oxygenates. Use of these
ONLY if it does not exceed 5% of the fuel
fuels can also help keep the air cleaner.
mixture AND if it is accompanied by suffi-
Oxygenated blend fuels, such as ethanol
cient quantities of the proper cosolvent
(ethyl or grain alcohol) may be used in
and corrosion inhibitors required to
your vehicle, but should contain no more
prevent damage to the fuel system. Do not
than 15% ethanol for the proper operation
use fuel containing methanol EXCEPT
of your SUBARU.
under these conditions.
Do not use any gasoline that contains
If undesirable driveability problems are
experienced and you suspect they may be
more than 15% ethanol, including from
any pump labeled E30, E50 or E85 (which
fuel related, try a different brand of gaso-
are only some examples of fuel containing
line before seeking service at your
more than 15% ethanol).
SUBARU dealer.
702786
In addition, some gasoline suppliers are
Fuel system damage or driveability
now producing reformulated gasolines,
problems which result from the use of
▼ Refueling
which are designed to reduce vehicle
improper fuel are not covered under the
emissions. SUBARU approves the use of
SUBARU Limited Warranty.
Only one person should be involved in
refueling. Do not allow others to approach
reformulated gasoline.
the area of the vehicle near the fuel filler
If you are not sure what the fuel contains,
pipe while refueling is in progress.
you should ask your service station oper-
ators if their gasolines contain detergents
Be sure to observe any other precautions
and oxygenates and if they have been
that are posted at the service station.
reformulated to reduce vehicle emissions.
1. Stop the vehicle, turn the ignition
As additional guidance, only use fuels
switch to the “OFF” position and turn off all
suited for your vehicle as explained in the
the other electrical components.
following description.
2. Push the rear side of the fuel filler lid.
Fuel should be unleaded and have an
If the fuel filler lid is locked, perform one of
octane rating no lower than that specified
the operations below.
in this manual.
Press the “
” button on the key fob.
Fuel
225
Press the unlock side of the power
When opening the cap, grasp it
door locking switch.
firmly and turn it slowly to the left.
3. The fuel filler lid opens automatically.
2
Do not remove the cap quickly.
Open it further by hand.
Fuel may be under pressure and
1
spray out of the fuel filler neck,
WARNING
especially in hot weather. If you
hear a hissing sound while you
Before opening the fuel filler cap,
are removing the cap, wait for the
first touch the vehicle body or a
sound to stop and then slowly
metal portion of the fuel pump or
open the cap to prevent fuel from
similar object to discharge any
spraying out and creating a fire
static electricity that may be present
hazard.
on your body. If your body is carry-
702787
ing an electrostatic charge, there is
1)
Open
a possibility that an electric spark
2)
Close
could ignite the fuel, which could
burn you. To avoid acquiring a new
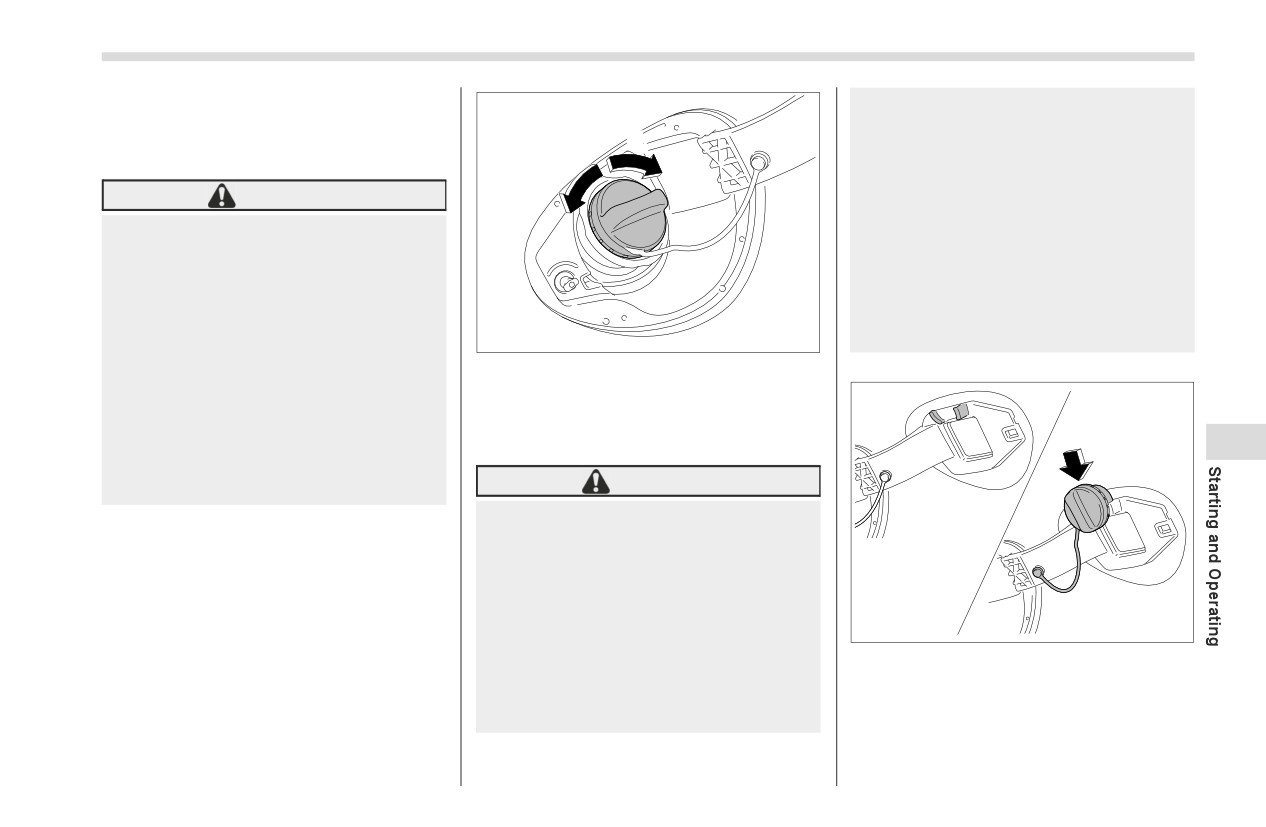
4. Remove the fuel filler cap by turning it
static electric charge, do not get
slowly counterclockwise.
7
back into the vehicle while refueling
is in progress.
WARNING
Gasoline vapor is highly flam-
mable. Before refueling, always
turn the ignition switch to the
“OFF” position first and then
close all vehicle doors and
windows. Make sure that there
702788
are no lighted cigarettes, open
flames or electrical sparks in the
5.
Set the fuel filler cap on the cap holder
adjacent area. Only handle fuel
inside the fuel filler lid.
outdoors. Quickly wipe up any
spilled fuel.
- CONTINUED -
226
Fuel
WARNING
CAUTION
CAUTION
When refueling, insert the fuel
Do not let fuel spill on the exterior
Never add any cleaning agents to
nozzle securely into the fuel filler
surfaces of the vehicle. Because
the fuel tank. The addition of a
pipe. If the nozzle is lifted or not
fuel may damage the paint, be sure
cleaning agent may cause
fully inserted, its automatic stop-
to wipe off any spilled fuel quickly.
damage to the fuel system.
ping mechanism may not func-
Paint damage caused by spilled fuel
After refueling, turn the cap to the
tion, causing fuel to overflow the
is not covered under the SUBARU
right until it clicks to ensure that it
tank and creating a fire hazard.
Limited Warranty.
is fully tightened. If the cap is not
Stop refueling when the auto-
securely tightened, fuel may leak
matic stop mechanism on the fuel
out while the vehicle is being
NOTE
nozzle activates. If you continue
driven or fuel spillage could
You will see the “
” sign in the
to add fuel, temperature changes
occur in the event of an accident,
fuel gauge. This indicates that the fuel
or other conditions may cause
creating a fire hazard.
filler lid is located on the right side of
fuel to overflow from the tank and
Do not let fuel spill on the exterior
the vehicle.
create a fire hazard.
surfaces of the vehicle. Because
If the fuel filler cap is not tightened
fuel may damage the paint, be
until it clicks or if the tether is caught
6.
Stop filling the tank after the fuel filler
sure to wipe off any spilled fuel
under the cap, the CHECK ENGINE
pump automatically stops. Do not add any
quickly. Paint damage caused by
warning light/malfunction indicator
more fuel.
spilled fuel is not covered under
light may illuminate. Refer to "CHECK
the SUBARU Limited Warranty.
7. Put the cap back on and turn it clock-
ENGINE Warning Light/Malfunction
wise until you hear a clicking noise. Be
Indicator Light" ) P136.
Always use a genuine SUBARU
certain not to catch the tether under the
To lock the fuel filler lid, perform one
fuel filler cap. If you use the
cap while tightening.
of the operations below. However if
wrong cap, it may not fit or have
these operations are performed when
proper venting and your fuel tank
CAUTION
the fuel filler lid is open, the fuel filler
and emission control system may
lid will not lock when it is subsequently
be damaged. It could also lead to
Make sure that the cap is tightened
closed.
fuel spillage and a fire.
until it clicks to prevent fuel spillage
-
Press the “
” button on the key
in the event of an accident.
fob.
-
Press the lock side of the power
8. Close the fuel filler lid completely.
door locking switch.
State Emission Testing (U.S. Only)
227
Immediately put fuel in the tank
7-2. State Emission Testing
whenever the low fuel warning
(U.S. Only)
light illuminates. Engine misfires
as a result of an empty tank could
CAUTION
cause damage to the engine.
Continuing to operate your
Resultant vehicle damage due to
vehicle at an extremely low fuel
improper testing is not covered
level may result in a reduction of
under the SUBARU Limited War-
engine performance.
ranty and is the responsibility of the
state inspection program or its con-
tractors or licensees.
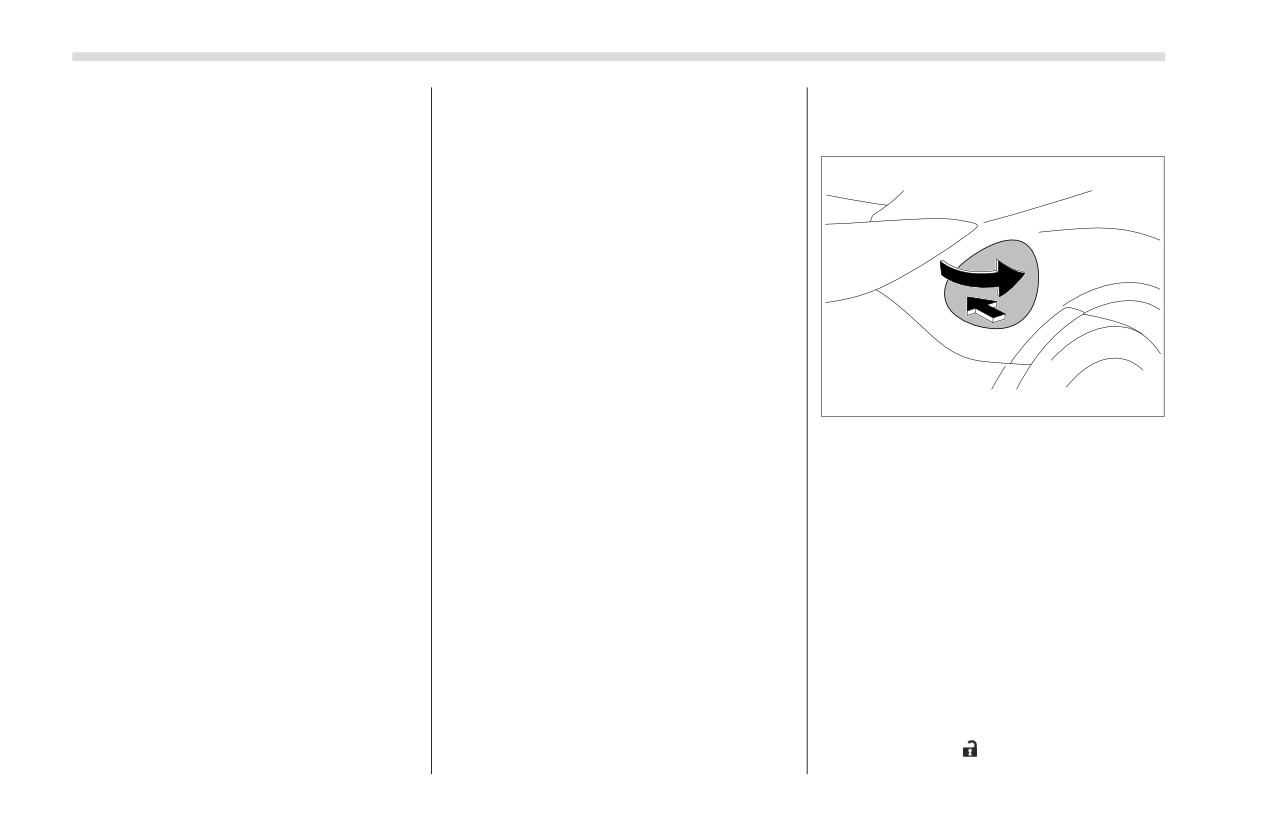
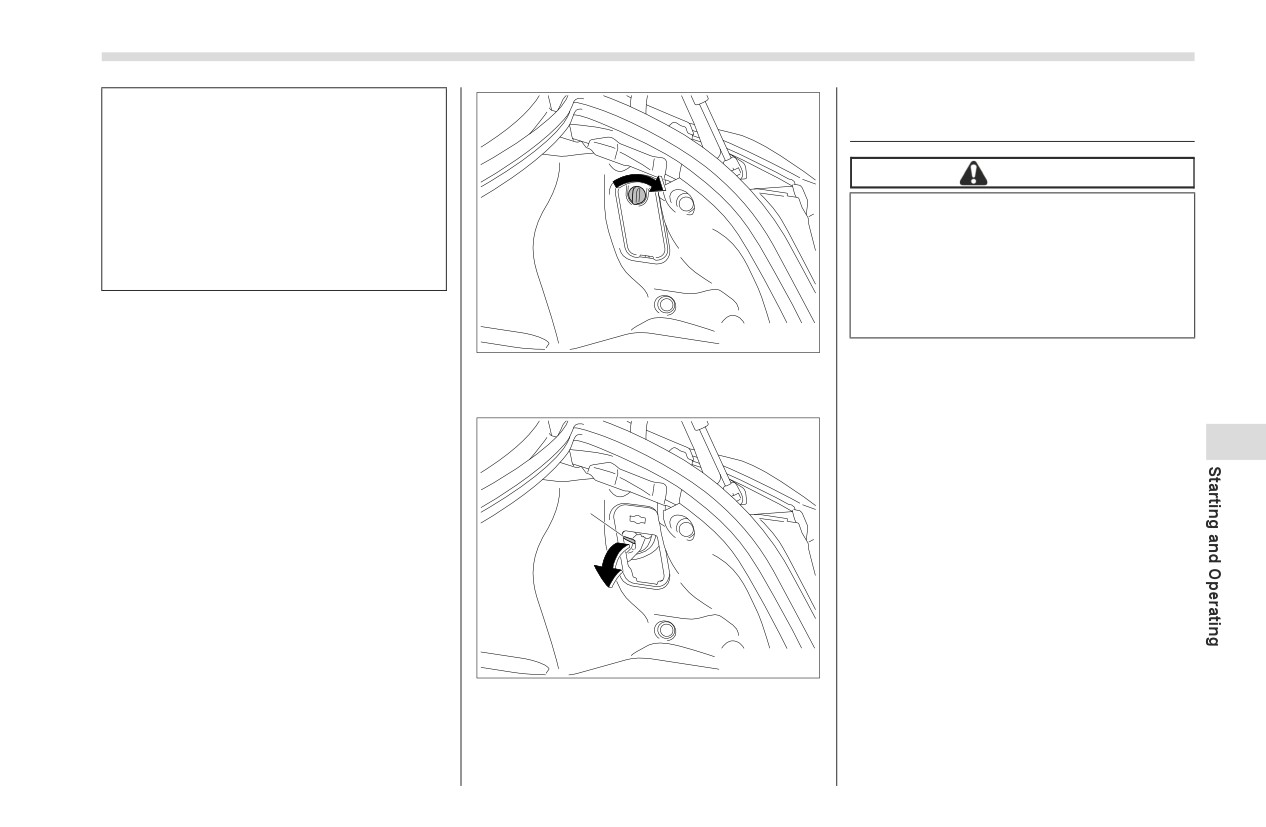
▼ If the fuel filler lid cannot be opened
702789
If the fuel filler lid cannot be opened due to
California and a number of federal states
a malfunction or a dead battery, it can be
1. Remove the access cover at the right-
have Inspection/Maintenance programs
opened from the trunk.
side of the trunk trim.
to inspect your vehicle’s emission control
system. If your vehicle does not pass this
7
test, some states may deny renewal of
your vehicle’s registration.
Your vehicle is equipped with a computer
1
that monitors the performance of the
engine’s emission control system. Certi-
fied emission inspectors will inspect the
On-Board Diagnostic (OBDII) system as
part of the state emission inspection
process. The OBDII system is designed to
detect engine and transmission problems
that might cause the vehicle emissions to
702790
exceed allowable limits. OBDII inspec-
1) Lever
tions apply to all 1996 model year and
newer passenger cars and trucks. Over
2. Push the yellow lever to unlock the fuel
30 states plus the District of Columbia
filler lid.
- CONTINUED -
228
Preparing to Drive
have implemented emission inspection of
Owners of rejected or failing vehicles
7-3. Preparing to Drive
the OBDII system.
should contact their SUBARU Dealer for
The inspection of the OBDII system
service.
You should perform the following checks
consists of a visual operational check of
and adjustments every day before you
the
“CHECK ENGINE” warning light/
start driving.
malfunction indicator light (MIL) and an
1. Check that all windows, mirrors, and
examination of the OBDII system with an
lights are clean and unobstructed.
electronic scan tool.
2. Check the appearance and condition
A vehicle passes the OBDII system
of the tires. Also check tires for proper
inspection if proper operation of the
inflation.
“CHECK ENGINE” warning light is
3. Look under the vehicle for any sign of
observed, there are no stored diagnostic
leaks.
trouble codes, and the OBDII readiness
monitors are all complete.
4. Check that no small animals enter the
engine compartment.
A vehicle fails the OBDII inspection if
the “CHECK ENGINE” warning light is not
5. Check that the hood and trunk are fully
properly operating (light is illuminated or is
closed.
not working due to a burned out bulb) or
6. Check the adjustment of the seat.
there is one or more diagnostic trouble
7. Check the adjustment of the inside
codes stored in the vehicle’s computer.
and outside mirrors.
A state emission inspection may reject
8. Fasten your seatbelt. Check that your
(not pass or fail) a vehicle if the number of
passengers have fastened their seatbelts.
OBDII system readiness monitors “NOT
9. Check the operation of the warning
READY” is greater than one. If the
and indicator lights when the ignition
vehicle’s battery has been recently
switch is turned to the “ON” position.
replaced or disconnected, the OBDII
10. Check the gauges, indicator and
system inspection may indicate that the
warning lights after starting the engine.
vehicle is not ready for the emission test.
Under this condition, the vehicle driver
should be instructed to drive his/her
vehicle for a few days to reset the readi-
ness monitors and return for an emission
re-inspection.
Starting and Stopping Engine
229
7-4. Starting and Stopping
Do not start the engine near dry
CAUTION
foliage, paper, or other flammable
Engine
Small animals trapped in the cool-
substances. The exhaust pipe
ing fan and belt of the engine may
and exhaust emissions can
■ Safety Precautions
result in a malfunction. Check that
create a fire hazard at high
Refer to "Safety Precautions" ) P94.
no small animal enters the engine
temperatures.
compartment and under the vehicle
■ Operating Range for Push-
before starting the engine.
Button Start System
CAUTION
NOTE
Refer to "Operating Range for Push-
If the engine is stopped during
Button Start System" ) P125.
Engine oil, engine coolant, brake fluid,
driving, the catalyst may overheat
washer fluid and other fluid levels
and burn.
■ General Precautions When
should be checked daily, weekly or at
When starting the engine, be sure
fuel stops.
Starting Engine
to sit in the driver’s seat.
WARNING
NOTE
7
Never start the engine from
It may be difficult to start the engine
outside the vehicle. It may result
when the battery has been discon-
in an accident.
nected and reconnected (for mainte-
Do not leave the engine running
nance or other purposes). This
in locations with poor ventilation,
difficulty is caused by the electroni-
such as a garage and indoors.
cally controlled throttle’s self-diag-
The exhaust gas may enter the
nosis function. To overcome it, keep
vehicle or indoors, and it may
the ignition switch in the “ON” position
result in carbon monoxide
for approximately 10 seconds before
poisoning.
starting the engine.
Avoid rapid racing and rapid accel-
eration immediately after the engine
has started.
After the engine starts, the engine
speed will be kept high.
- CONTINUED -
230
Starting and Stopping Engine
On rare occasions, it may be difficult
NOTE
CAUTION
to start the engine depending on the
When pressing the push-button
fuel and the usage condition (repeated
If a system malfunction warning
ignition switch while depressing the
driving of a distance in which the
message is displayed on the
clutch pedal (MT models) or the brake
engine has not warmed up suffi-
combination meter, there may be
pedal (AT models):
ciently). In such a case, it is recom-
a malfunction with the vehicle.
-
The engine starter operates for a
mended that you change to a different
Contact a SUBARU dealer imme-
maximum of 10 seconds and after
brand of fuel.
diately.
starting the engine, the starter stops
On rare occasions, transient
If
a steering lock warning
automatically.
knocking may be heard from the
message is displayed on the
-
The engine can be started
engine when the accelerator is oper-
combination meter after the
regardless of the power status.
ated rapidly such as a rapid start-up
engine has started, it means that
If the engine does not start, check
and a rapid acceleration. This is not a
the steering is still locked. While
the security indicator light. Then press
malfunction.
moving the steering wheel right
the push-button ignition switch
The engine starts more easily when
and left, depress the brake pedal,
without depressing the clutch pedal
the headlights, air conditioner and rear
and press the push-button igni-
(MT models) or the brake pedal (AT
window defogger are turned off.
tion switch.
models) to switch the power to “OFF”.
-
If the light had illuminated, try to
Do not continue pressing the
■ Starting Engine
start the engine again.
push-button ignition switch for
-
If the light had been off, press the
more than 10 seconds. Doing so
WARNING
push-button ignition switch while
could cause a malfunction. If the
engine does not start, stop
depressing the clutch pedal
(MT
There are some general precau-
pressing the push-button ignition
models) or the brake pedal
(AT
tions when starting the engine.
models) more forcefully.
Carefully read the precautions
switch. Instead, press the push-
The engine start procedures may
described in "General Precau-
button ignition switch without
not function depending on the radio
tions When Starting Engine"
depressing the clutch pedal (MT
wave conditions around the vehicle. In
) P229.
models) or the brake pedal (AT
such a case, refer to "Starting Engine"
models) to switch the power
If the steering lock cannot be
) P326.
status to “OFF”. Wait 10 seconds,
released after the engine has
If the vehicle battery is discharged,
and then press the push-button
started, never drive the vehicle.
the steering cannot be unlocked.
ignition switch to start the
The steering is still locked, and it
engine.
Charge the battery.
may result in an accident.
Starting and Stopping Engine
231
After the engine starts, the engine
▼ MT models
▼ AT models
speed will be kept high.
Do not shift the select lever
(AT
1. Carry the access key fob, and sit in the
1. Carry the access key fob, and sit in the
models) while the starter is cranking.
driver’s seat.
driver’s seat.
2. Apply the parking brake.
2. Apply the parking brake.
3. Shift the shift lever to neutral.
3. Make sure the select lever is in the “P”
4. Depress the brake pedal and clutch
position. The engine can also start when
pedal.
the select lever is in the
“N” position,
however, for safety reasons, start in the
5. While depressing the clutch pedal,
“P” position.
press the push-button ignition switch.
1
4. Depress the brake pedal.
NOTE
5. While depressing the brake pedal,
In case the engine does not start by
press the push-button ignition switch.
the normal engine start procedure,
move the shift lever to the neutral
NOTE
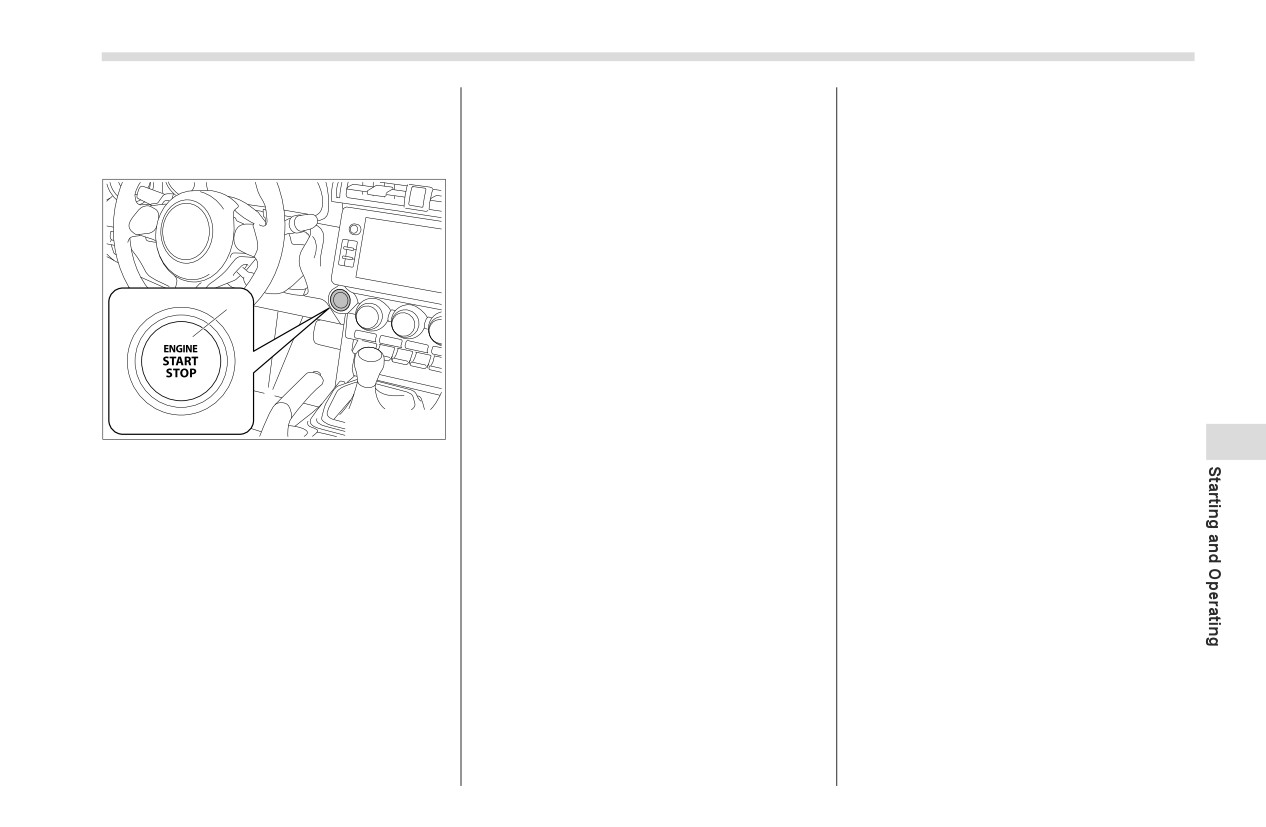
702836
position, and switch the power to
In case the engine does not start by
“ACC”. Depress the clutch pedal, and
the normal engine start procedure,
7
1) Push-button ignition switch
press the push-button ignition switch
move the select lever to the “P” posi-
for at least
15 seconds. The engine
tion, and switch the power to “ACC”.
When the push-button ignition switch is
may start. Only use this engine start
Depress the brake pedal, and press the
pressed while depressing the clutch pedal
procedure in case of emergency.
push-button ignition switch for at least
(MT models) or the brake pedal
(AT
15 seconds. The engine may start. Only
models), the engine will start. The starting
use this engine start procedure in case
procedure for the engine is as follows.
of emergency.
When the engine is not started, the
brake pedal may feel stiff. In such a
case, depress the brake pedal more
forcefully than usual. Press the push-
button ignition switch to start the
engine.
- CONTINUED -
232
Starting and Stopping Engine
■ Stopping Engine
If the engine stops during driving,
NOTE
do not operate the push-button
Although you can stop the engine by
1. Stop the vehicle completely.
ignition switch or open any of the
operating the push-button ignition
2. Move the shift lever to neutral (MT
doors until the vehicle is stopped
switch, do not stop the engine during
models) or select lever to the “P” position
in a safe location. It is dangerous
driving except in an emergency.
(AT models).
because the steering lock may be
3. Press the push-button ignition switch.
activated. Stop the vehicle in a
■ When Access Key Fob Does
The engine will stop, and the power will be
safe place, and contact a
Not Operate Properly
switched off.
SUBARU dealer immediately.
Refer to "Access Key Fob - If Access Key
Fob Does Not Operate Properly" ) P325.
WARNING
Do not touch the push-button
CAUTION
■ Steering Lock
ignition switch during driving.
For AT models:
After stopping the engine and any door is
When the push-button ignition
opened, the steering wheel will be locked
Do not stop the engine while the
switch is operated as follows, the
due to the steering lock function.
select lever is in a position other
engine will stop.
When the engine is restarted, the steering
than the “P” position.
lock will be automatically released.
-The switch is pressed and held
If the engine is stopped while the
for 2 seconds or longer.
select lever is in a position other
than the “P” position, the power
-The switch is pressed briefly 3
will be in “ACC”. If the vehicle is
times or more in succession.
left in this condition, the battery
When the engine stops, the brake
may be discharged.
booster will not function. A
greater foot pressure will be
required on the brake pedal.
The power steering system will
not operate either. A greater
force will be required to steer,
and it may result in an accident.
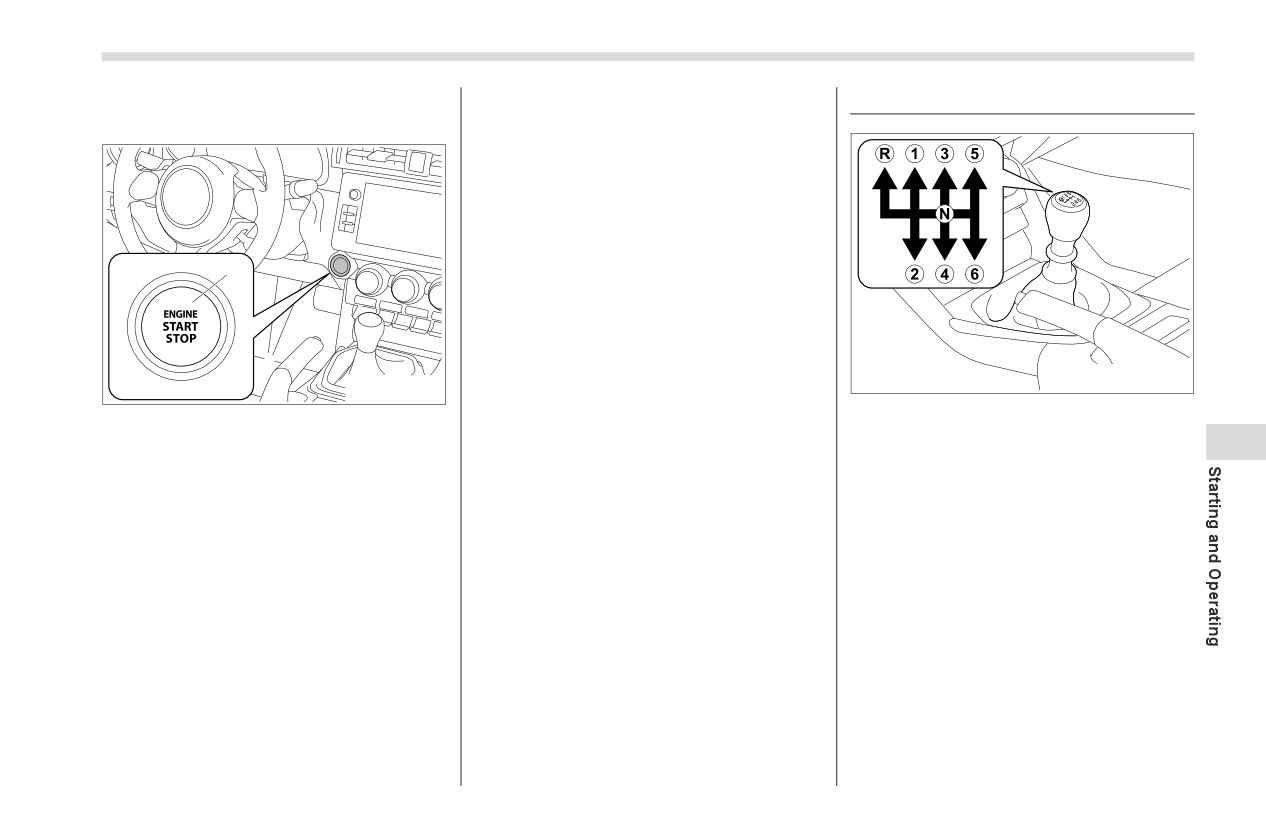
Manual Transmission
233
▼ When the steering lock cannot be
▽ When the display of warning
7-5. Manual Transmission
released
messages
There may be a malfunction in the
steering lock function. Immediately
contact your nearest SUBARU dealer.
1
702834
702836
This manual transmission is a completely
1) Push-button ignition switch
synchromesh,
6-forward-speed and
1-
reverse-speed transmission.
7
When you cannot restart the engine due
to the steering lock, check the status of
The shift pattern is shown on the shift
operation indicator and perform the
lever knob.
following steps.
To change the shift lever position:
▽ How to released steering lock
1. Depress the clutch pedal.
2. To shift into all positions other than
1. Check that the shift lever is set in
“R”, move the shift lever accordingly.
neutral (MT models) or select lever is set
in the “P” position (AT models).
2. Depress the brake pedal and keep it.
3. Press the push-button ignition switch
while turning the steering wheel left and
right.
- CONTINUED -
234
Manual Transmission
Do not engage the clutch (i.e.,
Shift up
mph (km/h)
release the clutch pedal)
4th to 5th
27 (43) to 43 (69)
suddenly when starting the
5th to 6th
35 (56) to 52 (83)
1
vehicle. By doing so the vehicle
might unexpectedly accelerate or
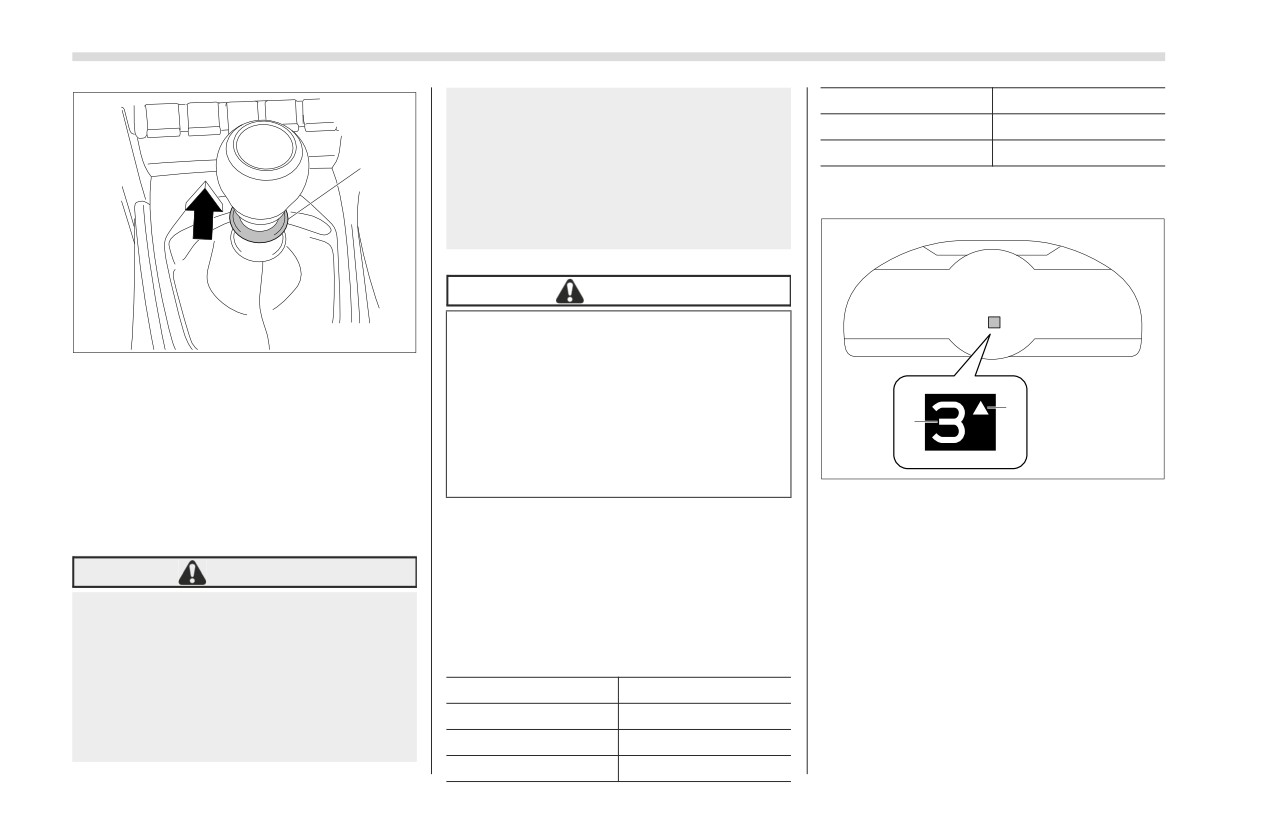
▼ Gear shift indicator
the transmission could malfunc-
tion.
CAUTION
Shift into reverse ONLY when the
702835
vehicle has completely stopped.
1) Slider
It may cause damage to the trans-
mission to try shifting into
3. To shift into the “R” position, hold up
reverse when the vehicle is
1
the slider, move the lever to the “R” posi-
2
moving.
tion, then release the slider.
Do not shift the shift lever without
702767
4. Gradually release the clutch pedal.
depressing the clutch pedal.
If it is difficult to shift into gear, put the
1) Upshift indicator
transmission in neutral, release the clutch
2) Gear position indicator
■ Shifting Speeds
pedal momentarily, and then try again.
The gear position indicator shows the
▼ Recommended shifting speeds
position of the shift lever.
WARNING
The best compromise between fuel
When shifting up is recommended for
Do not drive the vehicle with the
economy and vehicle performance during
good fuel economy, the upshift indicator
clutch disengaged (i.e., when the
normal driving is ensured by shifting up at
blinks.
clutch pedal is depressed) or with
the speeds listed in the following table.
The gear shift indicator can be activated
the shift lever in the neutral posi-
or deactivated. The default setting is
tion. Engine braking has no effect
Shift up
mph (km/h)
deactivated. For details, refer to "Settings
in either of these conditions and
1st to 2nd
12 (19) to 14 (22)
Display" ) P157.
the risk of an accident is conse-
2nd to 3rd
18 (29) to 23 (37)
quently increased.
3rd to 4th
22 (35) to 34 (54)
Automatic Transmission
235
■ Driving Tips
When it is necessary to reduce vehicle
7-6. Automatic Transmission
speed due to slow traffic, turning corners,
or driving up steep hills, downshift to a
The automatic transmission is electroni-
WARNING
lower gear before the engine starts to
cally controlled and provides 6 forward
labor.
speeds and 1 reverse speed. It also has a
When shifting down a gear, ensure
manual mode.
On steep downgrades, downshift the
that the engine speed does not
transmission to 5th, 4th, 3rd or 2nd gear
enter the red zone. Failure to
WARNING
as necessary; this helps to maintain a safe
observe this precaution can lead to
speed and to extend brake pad life.
engine over-revving and this in turn
Do not shift from the “P” or “N”
can result in engine damage.
In this way, the engine provides a braking
position into the “D” or “R” position
effect. Remember, if you “ride” (over use)
while depressing the accelerator
In addition, sudden application of
the brakes while descending a hill, they
pedal. This may cause the vehicle to
engine brakes when the vehicle is
may overheat and not work properly.
lurch forward or backward.
travelling on a slippery surface can
The engine may, on rare occasions, knock
lead to wheel locking; as a conse-
when the vehicle rapidly accelerates or
quence, control of the vehicle may
rapidly pulls away from a standstill. This
CAUTION
be lost and the risk of an accident
phenomenon is not an indication of a
Observe the following precau-
7
increased.
problem in your vehicle.
tions. Failure to observe these
With the exception of cases where sudden
precautions could cause damage
NOTE
acceleration is required, do not drive the
to the transmission.
If the accelerator and brake pedals are
vehicle with the pointer of the tachometer
-
Shift into the “P” or “R” posi-
inside the red area. Failure to observe this
depressed at the same time, driving
tion only after the vehicle has
precaution can lead to excessive engine
torque may be restrained. This is not a
completely stopped.
malfunction.
wear and poor fuel economy.
-
Do not shift from the “D” posi-
Do not drive with your foot resting on the
tion into the “R” position or
clutch pedal and do not use the clutch to
vice versa until the vehicle
hold your vehicle at a standstill on an
has completely stopped.
upgrade. Either of those actions may
cause clutch damage.
Do not drive with your hand resting on the
shift lever. This may cause wear on the
transmission components.
- CONTINUED -
236
Automatic Transmission
Do not race the engine for more
shift to the normal timing after the
■ Select Lever
engine has warmed up.
than 5 seconds in any position
Immediately after transmission fluid
except the “N” or “P” position
is replaced, you may feel that the trans-
when the brake is applied or when
mission operation is somewhat
chocks are used in the wheels.
unusual. This results from invalidation
This may cause the transmission
of data which the on-board computer
fluid to overheat.
has collected and stored in memory to
Never move the vehicle rearward
allow the transmission to shift at the
by inertia with the select lever set
most appropriate times for the current
in a forward driving position or
condition of your vehicle. Optimized
move the vehicle forward by
shifting will be restored as the vehicle
inertia with the select lever set in
continues to be driven for a while.
the “R” position. Doing so may
Place the shift boot to the original
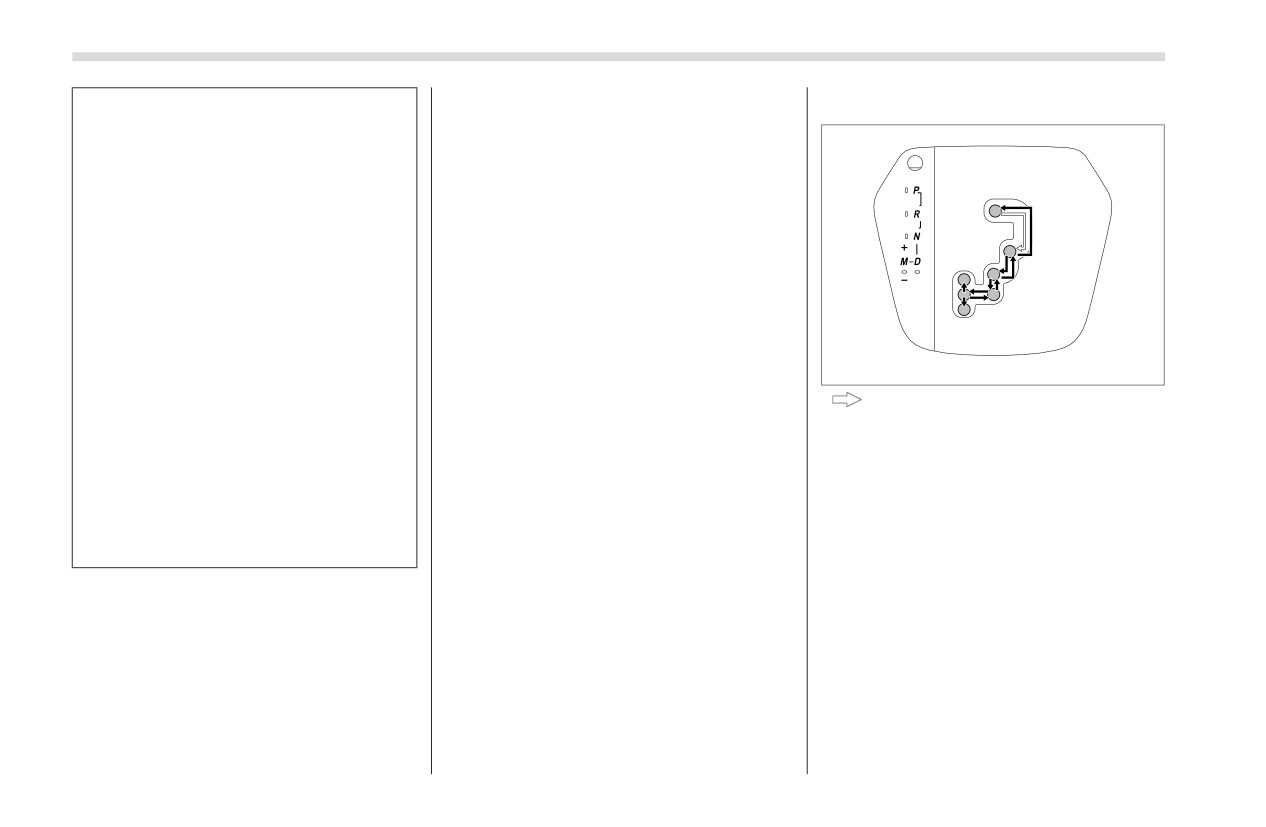
702768
result in an unexpected accident
position after it is lifted. If the shift lever
or malfunction.
: Shift with the brake pedal depressed
is operated with the shift boot in the
When parking the vehicle, first
and push-button ignition switch in the “ON”
rolled up position, the shift boot may
position. When shifting between “P” and “D”,
securely apply the parking brake
have tension and it may disturb the
depress the brake pedal and securely stop
and then place the select lever in
shift lever operation.
the vehicle before shifting.
the “P” position. Do not park for a
When the vehicle is idling at high
The select lever has four positions, “P”,
long time with the select lever in
rpm in order to warm up, and the
“R”, “N”, “D” and also has a manual gate
any other position as doing so
vehicle is on a slippery road, the trans-
for using the manual mode.
could result in a dead battery.
mission may automatically shift to 2nd
gear for stopping and starting off.
NOTE
NOTE
To protect the engine while the select
When the engine coolant tempera-
lever is in the “P” or “N” position, the
ture is still low, the transmission will
engine is controlled so that the engine
shift at higher engine speeds than
speed may not become too high even
when the coolant temperature is suffi-
if the accelerator pedal is depressed
ciently high in order to shorten the
hard.
warm-up time and improve driveability.
The gearshift timing will automatically
Automatic Transmission
237
▼ P (Park)
position using the shift paddles. For
WARNING
details about the manual mode, refer to
This position is for parking the vehicle and
"Selection of Manual Mode"
) P239.
Do not drive the vehicle with the
starting the engine. In this position, the
Once the vehicle speed stabilizes, the
transmission is mechanically locked to
select lever in the
“N”
(neutral)
transmission will switch from the manual
prevent the vehicle from rolling freely.
position. Engine braking has no
mode back to the “D” position for normal
effect in this condition and the risk
When you park the vehicle, first apply the
driving.
of an accident is consequently
parking brake, then shift into the “P” posi-
increased.
tion. Do not hold the vehicle with only the
▽ While climbing a grade
mechanical friction of the transmission.
When driving up a hill, undesired upshift is
To shift the select lever from the “P” to any
▼ D (Drive)
prevented from taking place when the
other position, you should depress the
This position is for normal driving. The
accelerator is released. This minimizes
brake pedal fully then move the select
transmission shifts automatically into a
the chance of subsequent downshifting to
lever. This prevents the vehicle from
suitable gear according to the vehicle
a lower gear when accelerating again.
lurching when it is started.
speed and the acceleration you require.
This prevents repeated upshifting and
Also, while driving up and down a hill, the
downshifting resulting in a smoother oper-
▼ R (Reverse)
transmission assists and controls the
ation of the vehicle.
This position is for backing the vehicle. To
driving performance and engine braking
7
shift from the “N” to “R” position, stop the
while corresponding to the road grade.
NOTE
vehicle completely then move the lever to
When more acceleration is required in “D”
The transmission may downshift,
the “R” position.
position, depress the accelerator pedal
depending on the way the accelerator
fully to the floor and hold that position. The
pedal is depressed to accelerate the
▼ N (Neutral)
transmission will automatically downshift.
vehicle again.
This position is for restarting a stalled
When you release the pedal, the transmis-
sion will return to the original gear posi-
engine. In this position, the transmission is
■ Adaptive Control
tion.
neutral, meaning that the wheels and
In order to realize smoother driving while
transmission are not locked. Therefore,
To use the manual mode, move the lever
driving in “D” position, an appropriate gear
the vehicle will roll freely, even on the
from this position into the manual gate.
is automatically selected by limiting
slightest incline unless the parking brake
If one of the shift paddles behind the
upshifting and performing downshifting
or foot brake is applied.
steering wheel is operated while driving in
operations according to driver operations
the
“D” position, the transmission will
and driving conditions.
temporarily switch to the manual mode. In
this mode, you can shift into any gear
- CONTINUED -
238
Automatic Transmission
When driving uphill, prevents unneces-
Depress the brake pedal first, and then
▼ Shift lock release using the shift
sary upshifting and downshifting.
operate the select lever.
lock release portion
When driving downhill, downshifting is
Only the “P” position allows you to turn
Perform the following procedure to
performed at engine speeds higher than
the push-button ignition switch to the
release the shift lock.
usual.
“OFF” position.
1. Apply the parking brake and stop the
When driving on curves, prevents
▼ Shift lock release
engine.
upshifting even when accelerating.
When the brake pedal is depressed
If the select lever cannot be operated, turn
firmly, downshifting is automatically
the ignition switch back to the “ON” posi-
performed, fully utilizing engine braking.
tion then move the select lever to the “P”
position with the brake pedal depressed.
When the accelerator pedal is
suddenly released, prevents upshifting.
If the select lever does not move after
performing the above procedure, refer to
NOTE
"Shift lock release using the shift lock
Adaptive control operates automati-
release portion" )
P238.
cally when the select lever is in the “D”
position. The function is canceled
when the paddle shift levers are oper-
ated or the select lever is shifted to the
702769
“M” position.
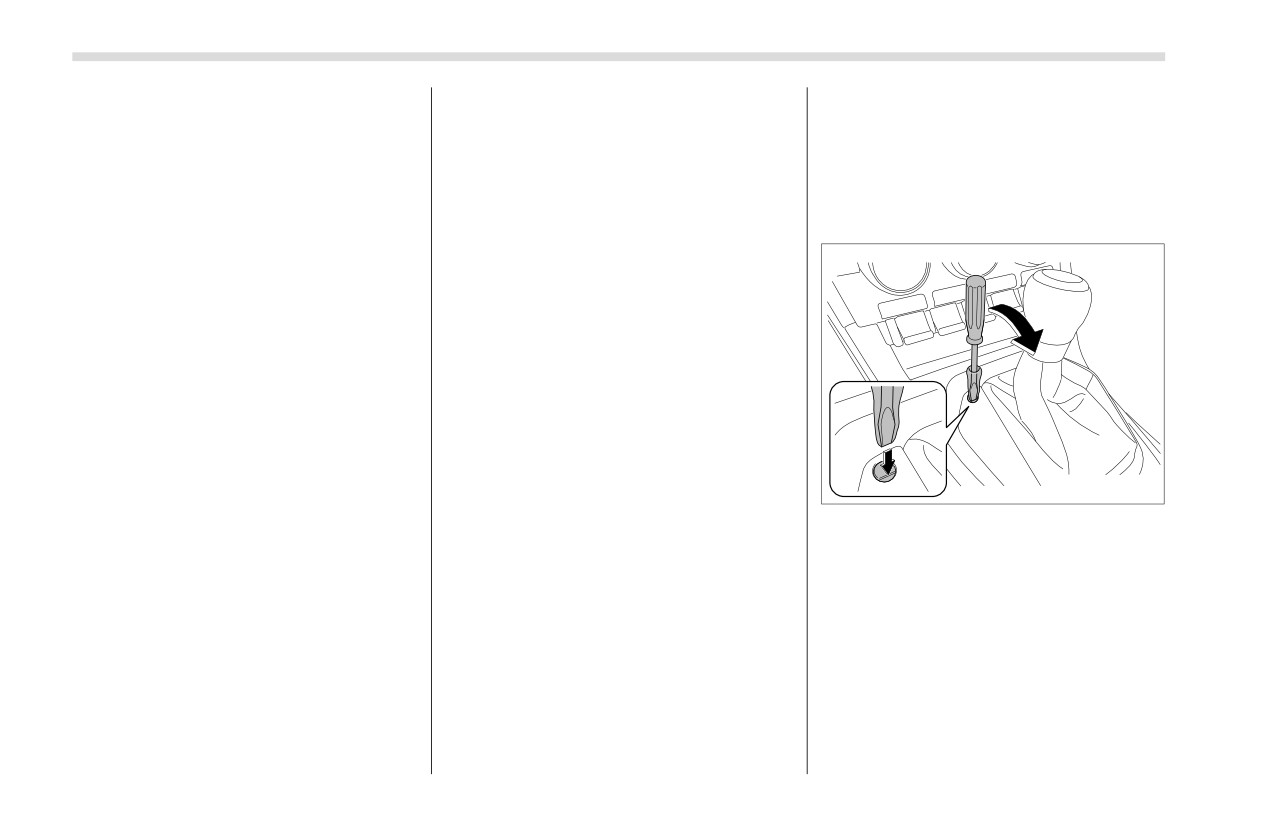
2. Using a flathead screwdriver, remove
the cover. To prevent damage to the
■ Shift Lock Function
vehicle, wrap the tip of the flathead screw-
The shift lock function helps prevent the
driver with a rag, etc.
improper operation of the select lever.
The select lever cannot be operated
unless the ignition switch is turned to the
“ON” position and the brake pedal is
depressed.
The select lever cannot be moved from
the
“P” position to any other position
before the brake pedal is depressed.
Automatic Transmission
239
toward “-” or “+” or operating the “-” or “+”
The gear changes once each time the
shift paddle.
select lever or a shift paddle is operated.
The selected gear, from “M1” to “M6”, will
be displayed on the combination meter.
3
When in manual mode, the gear will not
1
change unless the select lever or a shift
paddle is operated, except in the following
2
situations.
When the vehicle speed drops
4
(downshift only)
When the engine oil temperature is
702770
high and the engine speed approaches
close to the red zone
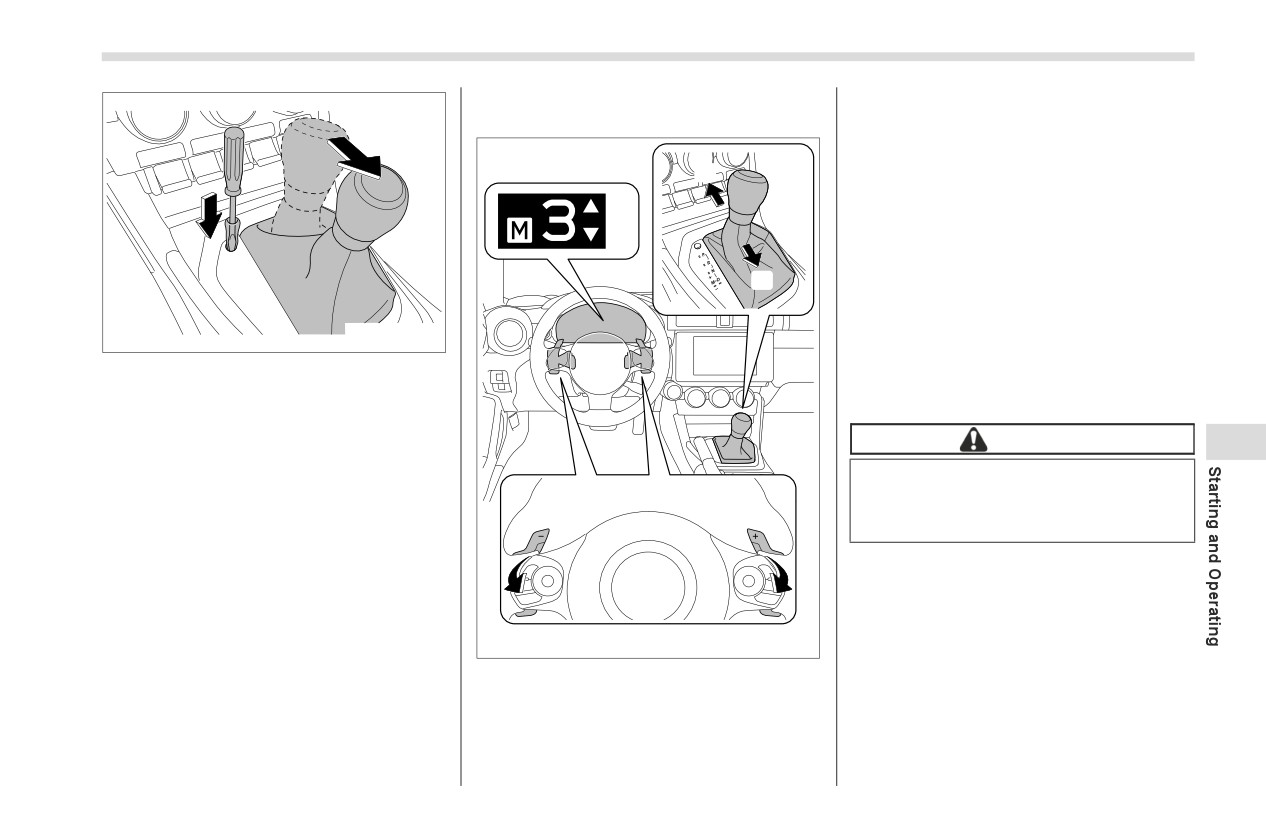
3. While depressing the brake pedal,
If an upshift is attempted while the vehicle
insert the screwdriver into the hole, press
speed is low, the gear will not be changed.
the shift lock release portion using the
screwdriver, and then move the select
lever.
CAUTION
7
If the select lever does not move after
Do not place or hang anything on
performing the above procedure, the shift
the shift paddles. Doing so may
lock system may be malfunctioning.
4
3
result in accidental gear shifting.
Contact a SUBARU dealer for an inspec-
tion as soon as possible.
NOTE
If a downshift is attempted at a
■ Selection of Manual Mode
vehicle speed where a downshift is not
▼ Selecting gears in manual mode
possible
(when the engine speed
702773
Shift the select lever to the “M” position to
would enter the red zone if a downshift
1)
Upshift indicator
is performed), the downshift warning
change to manual mode.
2)
Downshift indicator
buzzer will sound to inform the driver
When the upshift/downshift indicators are
3)
Upshift
that a downshift cannot be performed.
illuminated, the vehicle can be driven in a
4)
Downshift
You can perform a skip-shift (for
selected gear by shifting the select lever
example, from 4th to 2nd) by operating
- CONTINUED -
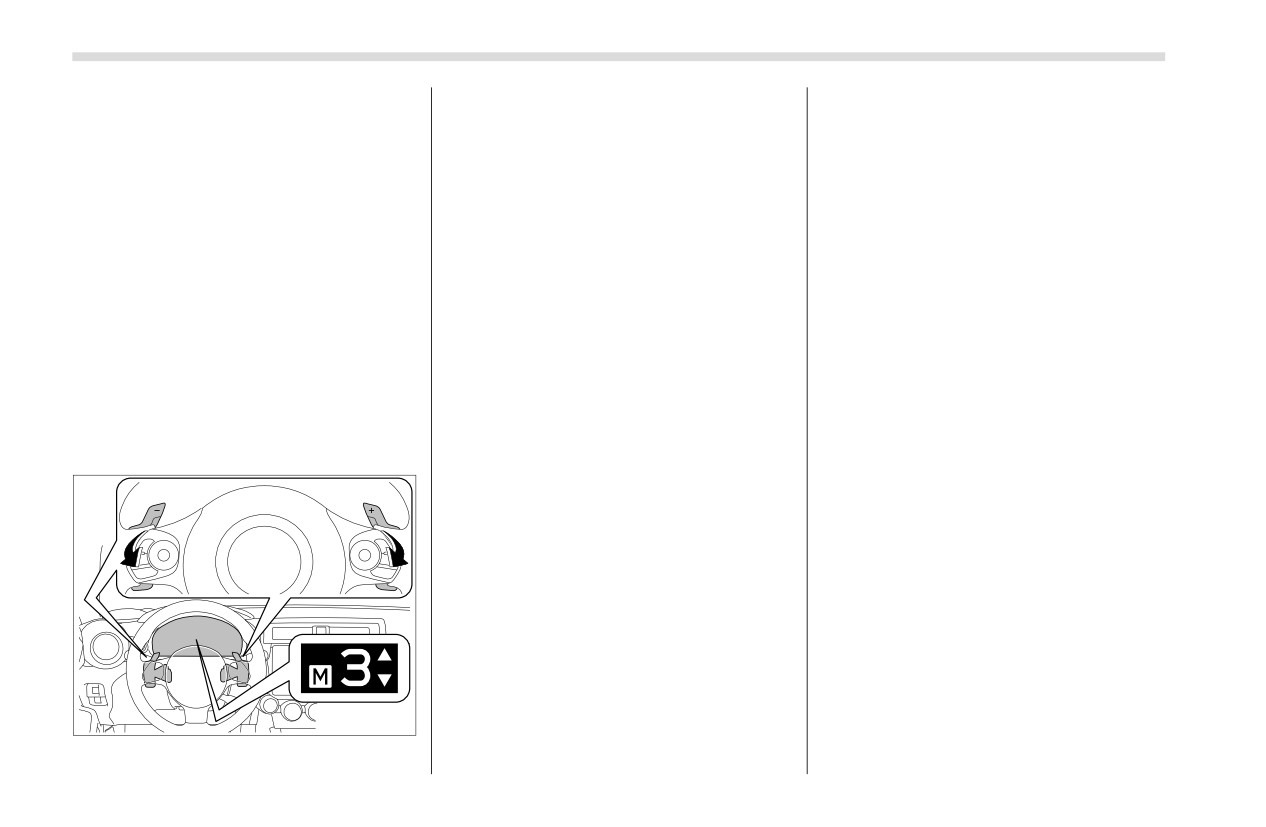
240
Automatic Transmission
the shift paddle twice in rapid succes-
The selected gear, from “M1” to “M6”, will
gravel covered road), you can start off
sion.
be displayed on the combination meter.
from a standstill safely and easily by first
If the temperature of the transmis-
selecting Snow mode.
sion fluid becomes too high, the “AT
NOTE
Always apply the foot or parking brake
OIL TEMP” warning light will illumi-
In the following situations, tempo-
when the vehicle is stopped in the “D” or
nate. Immediately stop the vehicle in a
rary manual mode will be cancelled.
“R” position.
safe place and let the engine idle until
-
When the vehicle speed is low
Make sure to apply the parking brake
the warning light turns off.
-
When the accelerator pedal is
when parking your vehicle. Do not hold
depressed continuously for a
the vehicle with only the transmission.
▼ Temporary manual mode driving
certain amount of time or more
Do not keep the vehicle in a stationary
While driving with the select lever in “D”, if
-
When the accelerator pedal is
position on an uphill grade by using the
a shift paddle is operated, the gear can
depressed heavily
“D” position. Use the brake instead.
temporarily be selected. In this case, “M”
-
When the select lever is shifted
The engine may, on rare occasions,
and the selected gear number will be
to a position other than “D”
knock when the vehicle rapidly acceler-
displayed on the combination meter. (If
-
When the “+” shift paddle switch
ates or rapidly pulls away from a standstill.
the engine speed approaches close to the
is held down for a period of time
This phenomenon does not indicate a
red zone, an upshift will automatically be
When a downshift is attempted at a
malfunction.
performed.)
vehicle speed where a downshift is not
possible
(when the engine speed
2
1
would enter the red zone if a downshift
is performed), the downshift warning
buzzer will sound to inform the driver
that a downshift cannot be performed.
■ Driving Tips
NOTE
If the accelerator and brake pedals are
depressed at the same time, driving
torque may be restrained. This is not a
702766
malfunction.
1) Upshift
On a road surface where there is a risk
2) Downshift
of wheelspin (for example, a snow- or
Driving Mode Select Switch (If Equipped)
241
7-7. Driving Mode Select
If the mode is changed to Sport mode
Use Snow mode for accelerating and
while driving with the select lever in the “D”
driving on slippery road surfaces such as
Switch (If Equipped)
position, the selected gear, from “D1” to
snow.
“D6”, will be displayed on the meter.
By pressing the driving mode select
switch the following modes can be
NOTE
selected to suit driving and usage condi-
NOTE
To prevent slipping, 1st gear cannot be
tions:
In Sport mode, lower gears are used
selected when in Snow mode.
and gears change at a higher engine
■ Normal Mode
speed.
■ Driving Mode Select Switch
Sport mode cannot be changed to
Provides an optimal balance of fuel
when driving with adaptive cruise
economy, quietness, and dynamic perfor-
control/cruise control activated.
mance. Suitable for normal driving.
While the engine is cool, you cannot
change to Sport mode.
■ Sport Mode
If tire slip is detected on a slippery
road surface while in Sport mode,
Sport mode may be cancelled.
7
■ Snow Mode
702775
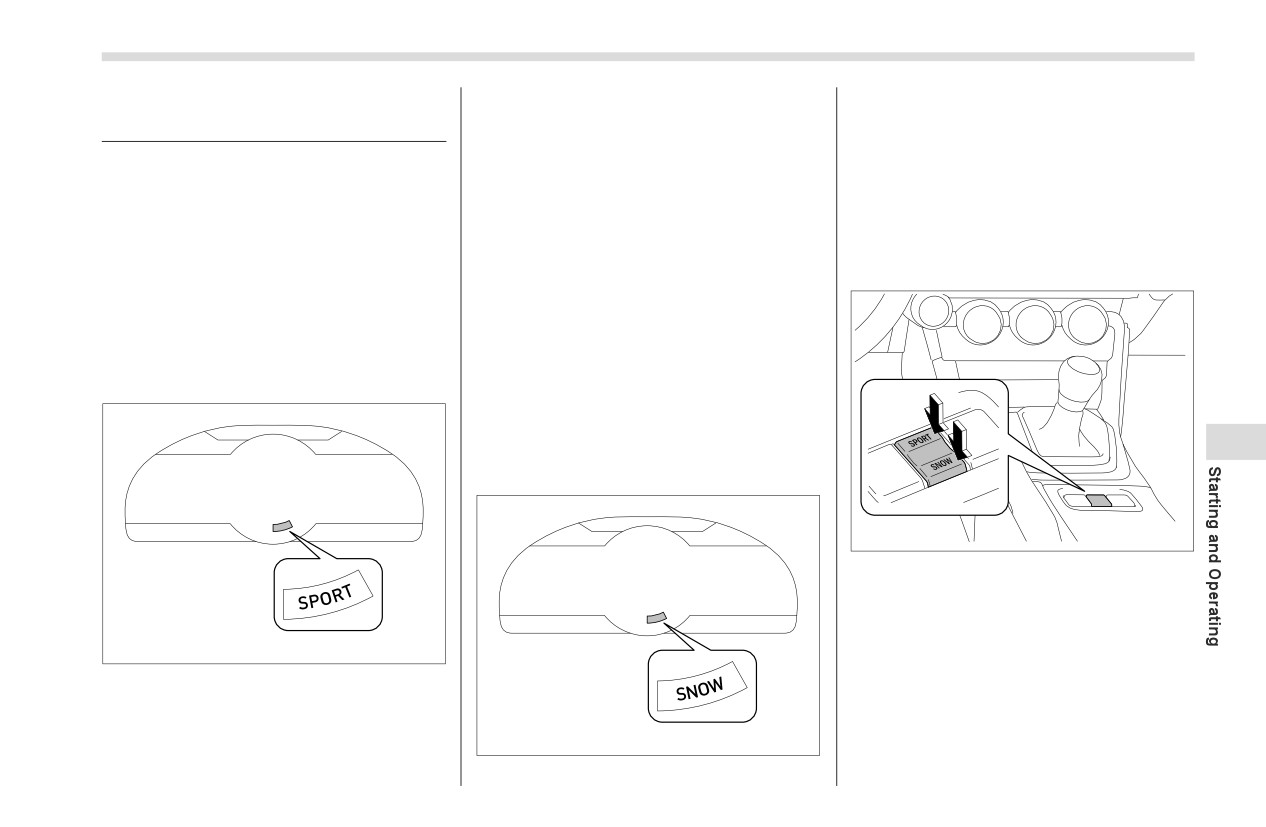
To select the Sport mode, press the
SPORT switch.
To select the Snow mode, press the
SNOW switch.
702776
To cancel Sport mode or Snow mode,
The Sport mode indicator light comes on.
press the same side of the switch again.
Use Sport mode for sporty driving or when
driving in mountainous regions with lots of
702777
curves.
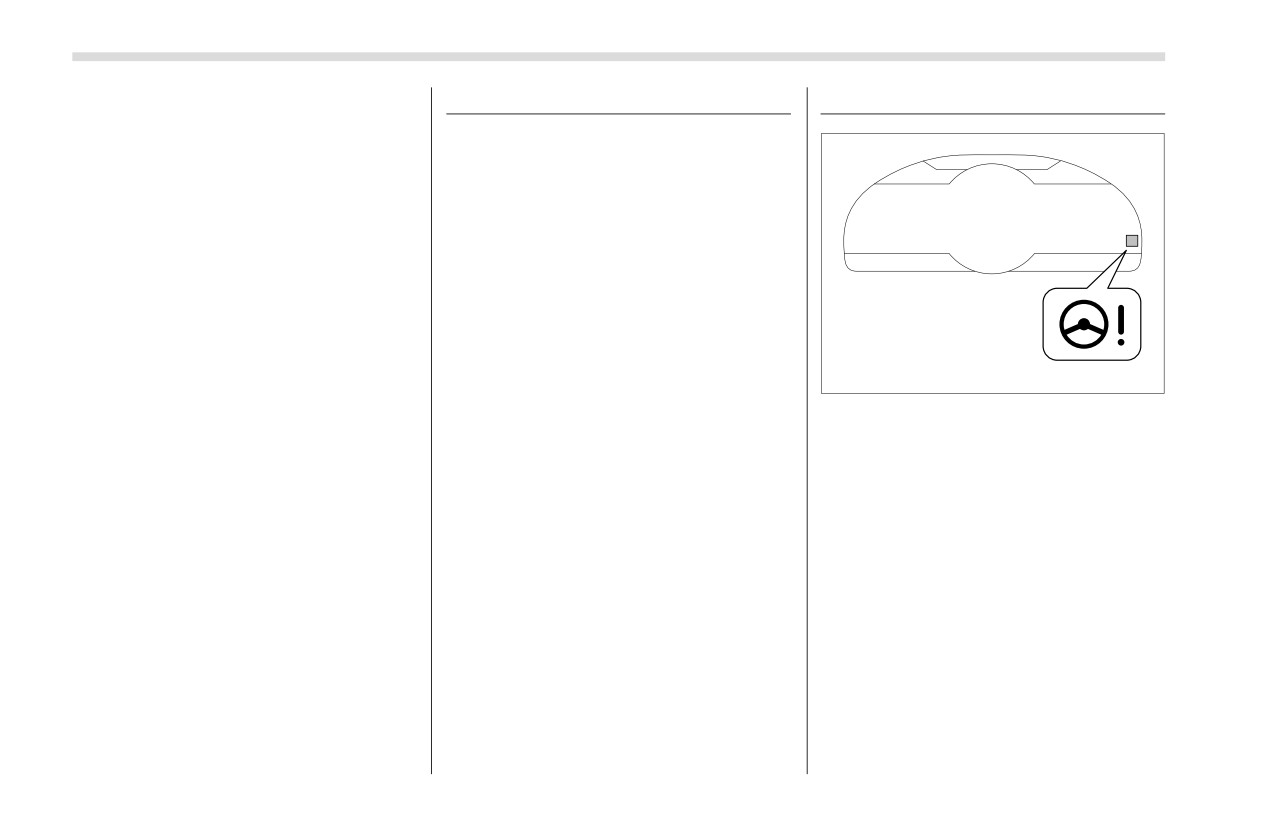
The Snow mode indicator light comes on.
- CONTINUED -
242
Active Sound Control
NOTE
7-8. Active Sound Control
7-9. Power Steering
In the following situations, the driving
The active sound control provides
mode will automatically change to nor-
dynamic engine sounds. When driving
mal mode:
with Sport mode selected, the engine
When the engine is turned off after
sounds will be particularly loud.
driving in Sport mode or Snow mode.
When adaptive cruise control/cruise
NOTE
control is activated while driving in
Sport mode.
The operational/non-operational set-
If a malfunction occurs in the engine
ting of the Active Sound Control can
or automatic transmission electrical
be changed by a SUBARU dealer. Con-
control system while Sport mode or
tact your SUBARU dealer for details.
Snow mode is selected.
When the driving mode is changed,
When in Sport mode and the idling
the sound of the active sound control
702778
speed is high during warm-up or when
will be stopped for approximately 1
the road surface is slippery and stop-
second, this is not a malfunction.
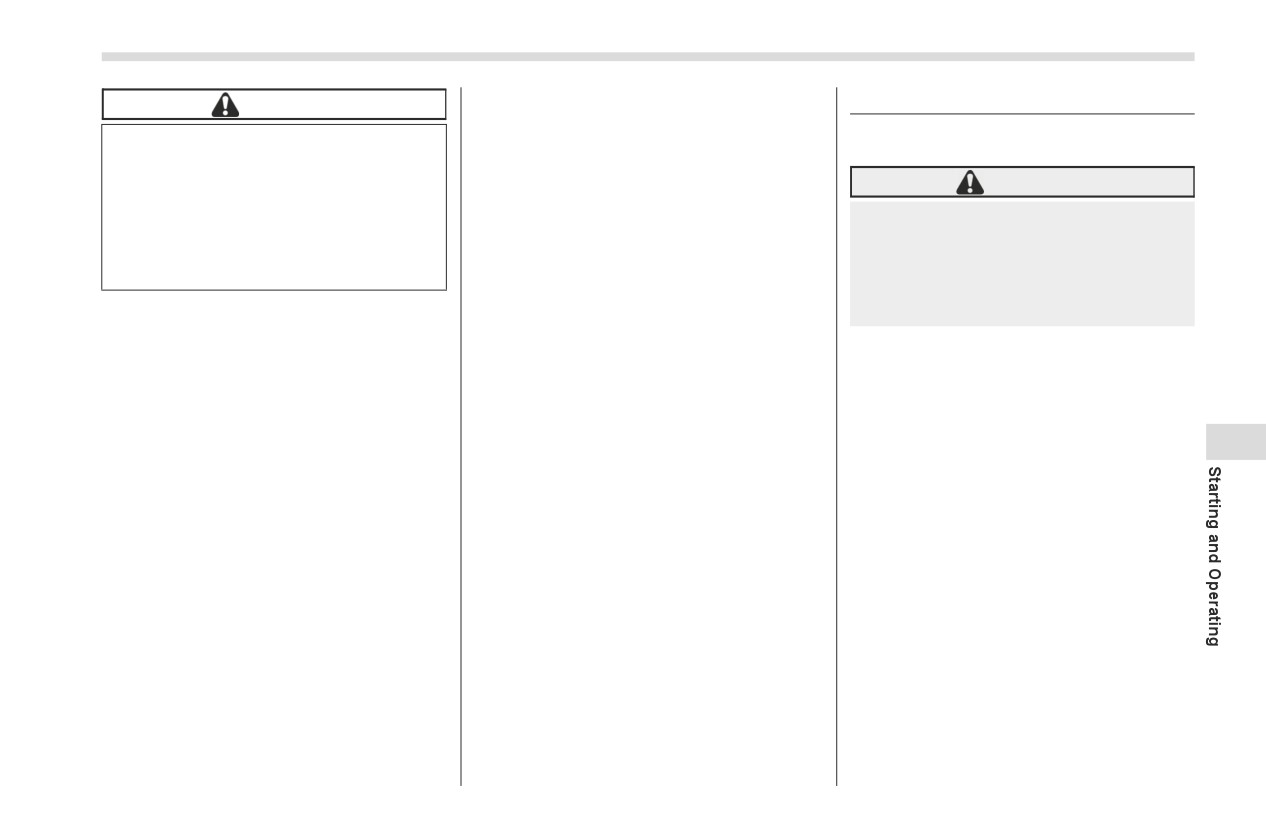
Power steering warning light
ping/starting off is automatically
The vehicle is equipped with an electric
performed in second gear.
power steering system. When the ignition
switch is turned to the “ON” position, the
power steering warning light on the combi-
nation meter illuminates to inform the
driver that the warning system is func-
tioning properly. Then, if the engine
started, the warning light turns off to
inform the driver that the steering power
assist is operational.
Braking
243
the power steering control system has
7-10. Braking
CAUTION
an opportunity to cool down. However,
if the power steering is operated in a
While the power steering warning
■ Braking Tips
non-standard way which causes
light is illuminated, there may be
power assist limitation to occur too
more resistance when the steering
WARNING
frequently, this may result in a mal-
wheel is operated. Drive carefully to
function of the power steering control
Never rest your foot on the brake
the nearest SUBARU dealer and
system.
pedal while driving. This can cause
have the vehicle inspected immedi-
dangerous overheating of the
ately.
brakes and needless wear on the
brake pads.
NOTE
If the steering wheel is operated in the
▼ When the brakes get wet
following ways, the power steering
control system may temporarily limit
When driving in rain or after washing the
the power assist in order to prevent
vehicle, the brakes may get wet. As a
the system components, such as the
result, brake stopping distance will be
control computer and drive motor,
longer. To dry the brakes, drive the
7
from overheating.
vehicle at a safe speed while lightly
The steering wheel is operated
depressing the brake pedal to heat up the
frequently and turned sharply while the
brakes.
vehicle is maneuvered at extremely low
speeds, such as while frequently
▼ Use of engine braking
turning the steering wheel during
Remember to make use of engine braking
parallel parking.
in addition to foot braking. When
The steering wheel remains in the
descending a grade, if only the foot brake
fully turned position for a long period
is used, the brakes may start working
of time.
improperly because of brake fluid over-
At this time, there will be more resis-
heating, caused by overheated brake
tance when steering. However this is
pads. To help prevent this, shift into a
not a malfunction. Normal steering
lower gear to get stronger engine braking.
force will be restored after the steering
wheel is not operated for a while and
- CONTINUED -
244
Braking
▼ Braking when a tire is punctured
harder than normal and the braking
CAUTION
distance will increase.
Do not depress the brake pedal suddenly
When you need to brake suddenly,
when a tire is punctured. This could cause
▼ Supplemental booster function
a loss of control of the vehicle. Keep
continue depressing the brake
when vacuum pressure fails
driving straight ahead while gradually
pedal strongly to bring the effect of
reducing speed. Then slowly pull off the
While the ignition switch is turned “ON”
the brake assist.
road to a safe place.
and the engine is running, the supple-
mental booster function operates when
Brake assist is a driver assistance system.
the brake booster performance is
■ Brake System
It assists the brake power when the driver
decreased due to insufficient vacuum
cannot depress the brake pedal strongly
▼ Two separate circuits
boost.
and the brake power is insufficient.
Your vehicle has a dual circuit brake
When the brake pedal is depressed while
Brake assist generates the brake power
system. Each circuit works diagonally
the supplemental booster function is oper-
according to the speed at which the driver
across the vehicle. If one circuit of the
ating, an operation sound and brake pedal
depresses the brake pedal.
brake system should fail, the other half of
vibration may be generated. This is not a
the system still works. If one circuit fails,
malfunction.
NOTE
the brake pedal will go down much closer
When you depress the brake pedal
to the floor than usual and you will need to
▼ Brake assist system
strongly or suddenly, the following
press it down much harder. And a much
phenomena occur. However, even
longer distance will be needed to stop the
WARNING
though these occur, they do not indi-
vehicle.
Do not be overconfident about the
cate any malfunctions, and the brake
brake assist. It is not a system that
assist system is operating properly.
▼ Brake booster
brings more braking ability to the
You might feel that the brake pedal
The brake booster uses vacuum pump
vehicle beyond its braking capabil-
is applied by lighter force and gener-
system to assist braking force. Do not turn
ity. Always use the utmost care
ates a greater braking force.
off the engine while driving because that
when driving regarding vehicle
You might hear the sound of ABS
will turn off the brake booster, resulting in
speed and safe distance.
operating from the engine compart-
poor braking power.
ment.
The brakes will continue to work even
when the brake booster completely stops
functioning. If this happens, however, you
will have to depress the pedal much