Subaru BRZ (2023 year). Manual in english - page 6
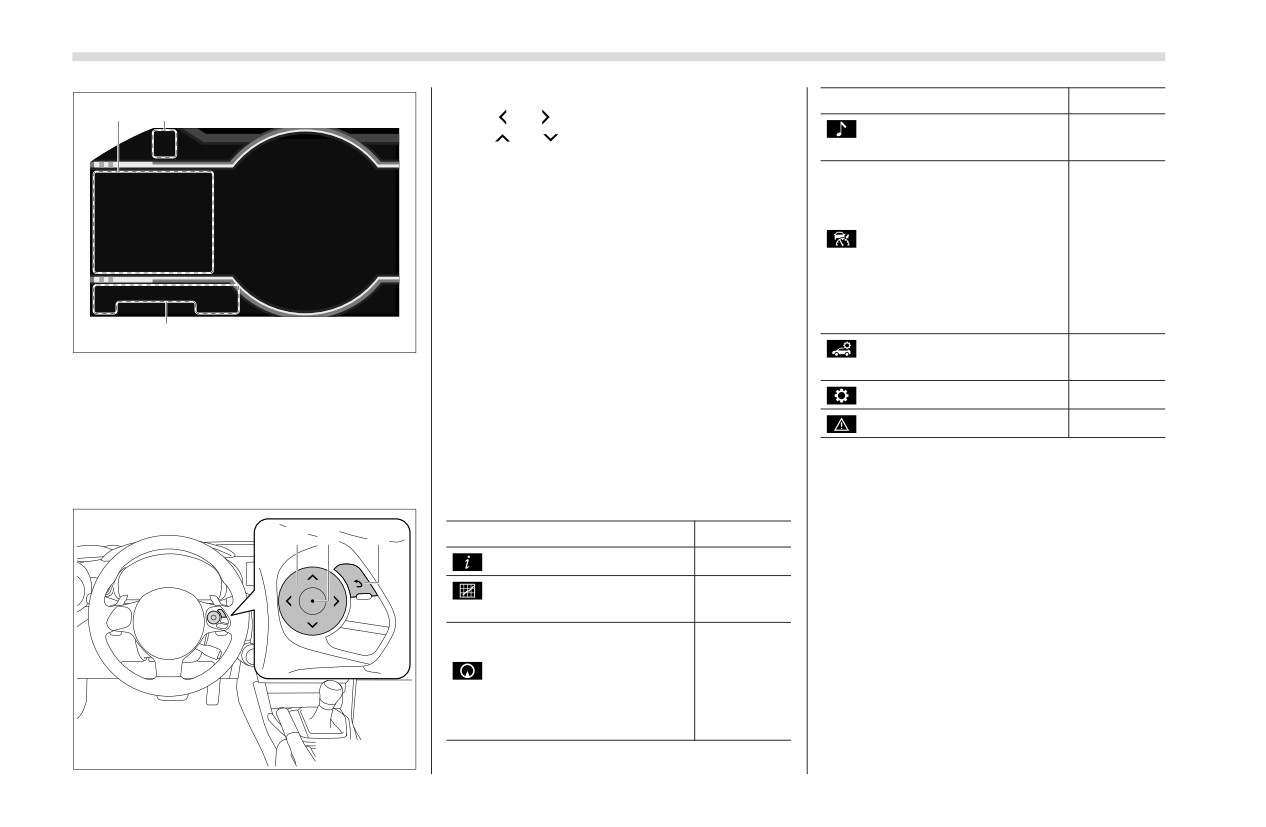
152
Combination Meter Display (Color TFT)
Control switches
Icons
Page
1
2
1)
/
: Select menu icons
Audio system-linked dis-
/
: Change displayed content,
156
play
scroll up/down the screen and move the
cursor up/down
Refer to
2) Press: Enter
the
Press and hold: Reset
Owner’s
Manual
3) Return to the previous screen
EyeSight screen (if
supple-
equipped)
For information pertaining to the content
ment for
the Eye-
of each menu icon, refer to the explana-
Sight sys-
tion of each item under the heading of the
tem.
2
307004
relevant menu icon.
Driving support system set-
157
Combination meter display (color TFT)
tings display
■ Meter Information Screen
1) Meter information screen
(Refer to
Settings display
157
"Meter Information Screen" ) P152.)
The meter information screen can be
2) Telltale screen
(Refer to "Telltale
changed.
Warning message display
159
Screen" ) P159.)
▼ Menu icons
*1: Displayed when the Apple
CarPlay or
Android Auto is operating. For details, refer
■ Basic Operation
Select a menu icon to display its content.
to the separate audio Owner’s Manual.
1
2
3
Icons
Page
Drive information
153
Exclusive content for
154
SUBARU BRZ
156and
refer to the
Navigation system-linked
separate
display*1
audio
Owner’s
Manual.
306809
Combination Meter Display (Color TFT)
153
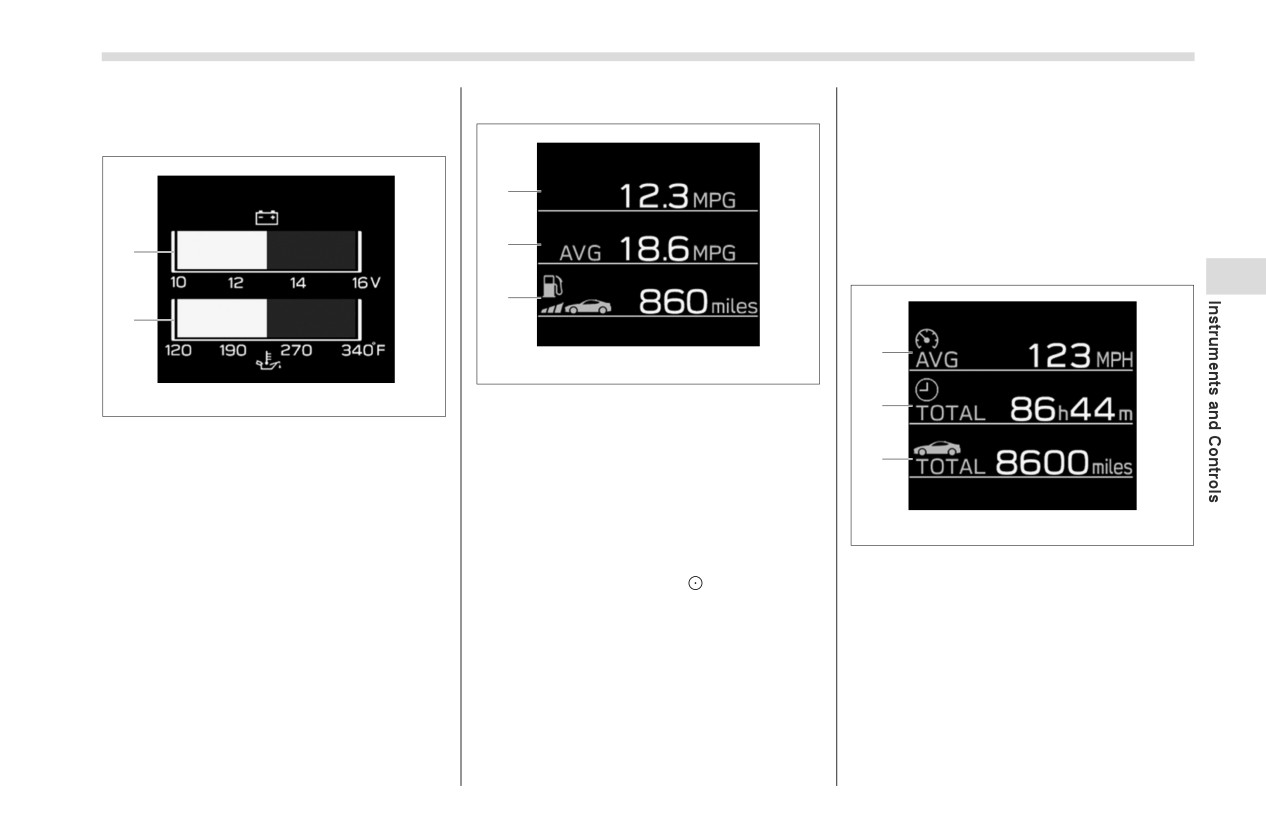
■ Drive Information
▼ Drive information (page 2)
When only a small amount of fuel is
added to the tank, the display may not be
▼ Drive information (page 1)
updated. When refueling, turn the push-
button ignition switch off. If the vehicle is
refueled without turning the push-button
1
ignition switch off, the display may not be
updated.
2
1
▼ Drive information (page 3)
3
3
2
1
306796
306795
1)
Current fuel consumption
2
2)
Average fuel consumption
1)
Voltmeter
3)
Driving range
2)
Engine oil temperature gauge
3
This screen displays the current rate of
This screen displays the charging voltage
fuel consumption, average fuel consump-
and engine temperature.
tion since the function was reset and esti-
As voltage displayed may be different
306797
mated maximum distance that can be
from the actual battery voltage, use the
driven with the quantity of fuel remaining.
1)
Average vehicle speed
voltmeter as a guideline.
2)
Driving time
Pressing and holding
will reset the
average fuel consumption.
3)
Driving distance
Use the displayed fuel consumption as
This screen displays the average vehicle
a reference.
speed since display was reset, cumulative
This distance is computed based on
time the vehicle has been driven since
your average fuel consumption. As a
display was reset and the cumulative
result, the actual distance that can be
distance the vehicle has been driven since
driven may differ from that displayed.
display was reset.
- CONTINUED -
154
Combination Meter Display (Color TFT)
Pressing and holding
will reset the
Immediately adjust the tire pressure
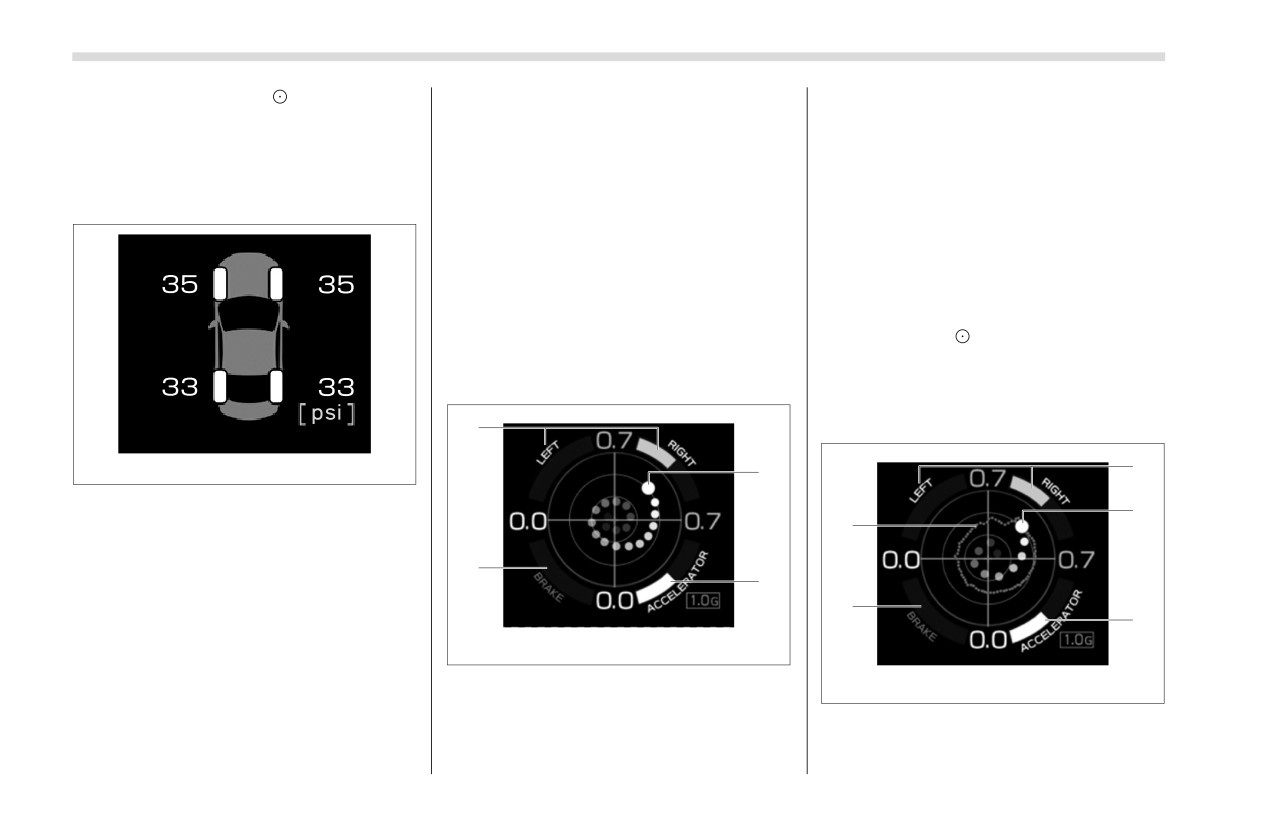
This screen displays lateral G-forces on
average vehicle speed/driving
time/
when the warning light illuminates.
the vehicle.
driving distance.
When the tire pressure monitoring
Also displays, around the periphery of the
system detects the adjusted tire pres-
G-force display, the left and right steering
▼ Drive information (page 4) (if
sure, the warning light will turn off and
amount, accelerator pedal input, and
equipped)
the tire pressure values will turn to
brake fluid pressure.
white.
This display is intended for use as a guide-
For information about the specified
line. Depending on factors such as the
value of the air pressure, refer to
road surface condition, temperature and
"Tires" ) P385
vehicle speed, the display may not show
the actual condition of the vehicle.
■ Exclusive Content for
Press and hold
to change the range of
SUBARU BRZ
the acceleration G-force display between
▼ G-force
1.0 G and 0.5 G.
▼ G-force (peak hold function)
4
702781
1
5
This screen displays each tire pressure.
2
When a tire is deflated, the deflated tire
1
and the tire pressure will be displayed on
the screen in yellow.
3
2
NOTE
4
3
The tire pressure values are
displayed several minutes after
306799
driving.
1)
Acceleration G-force on the vehicle
Once the tire pressure monitoring
306800
2)
Accelerator pedal input
system detects the low tire pressure,
1) Record of the maximum G-forces
3)
Brake fluid pressure
the tire pressure values will display in
4)
Steering amount
2) Acceleration G-force on the vehicle
yellow until the system detects the
3) Accelerator pedal input
normal tire pressure.
Combination Meter Display (Color TFT)
155
4) Brake fluid pressure
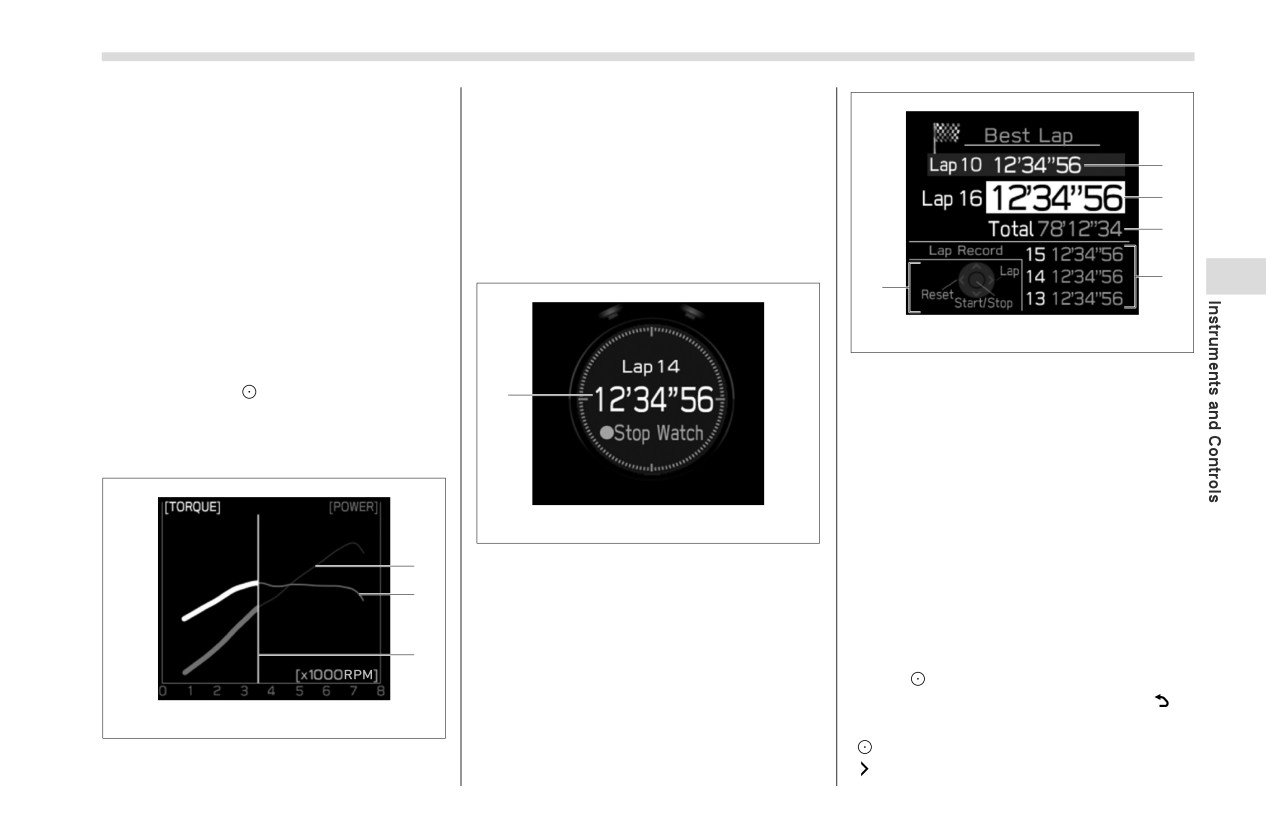
3) Current engine speed
5) Steering amount
The vertical bar will slide laterally
This screen displays lateral G-forces on
according to the current engine speed.
2
the vehicle
This chart is intended for reference only
Also displays, around the periphery of the
and does not show the
actual engine
3
G-force display, the left and right steering
torque or output.
4
amount, accelerator pedal input, and
brake fluid pressure
▼ Stopwatch
5
3
This display is intended for use as a guide-
6
line. Depending on factors such as the
road surface condition, temperature and
306803
vehicle speed, the display may not show
the actual condition of the vehicle.
Measurement screen
1) Fastest lap time (top screen)
Press and hold
to reset the record of
1
2) Fastest lap time (measurement screen)
maximum G-forces.
3) Current lap time
4) Total lap time
▼ Power and torque curve
5) Past lap times
6) Meter control switch operation guide
306802
When the timer is reset, “í í’í í”í í” will
be displayed.
Top screen
1
A maximum of 50 lap times can be
2
recorded.
Changing between the stopwatch
screens
3
To change to the measurement screen:
Press
.
To change to the top screen: Press
306801
Operating the measurement screen
1) Power output
: Start/stop measurement
2) Torque
: Mark off one lap
- CONTINUED -
156
Combination Meter Display (Color TFT)
: Reset measured lap times
■ Navigation System-Linked
■ Audio System-Linked
/
: Scroll through the lap times
Display
Display
Resetting measured lap times
After stopping the measurement, press
To display other content while the stop-
watch is operating
If the measurement screen is displayed,
press
to display the top screen. Then
operate the meter control switches to
display other content. While other items
are displayed, the measurement will
continue but the stopwatch cannot be
operated.
306798
306879
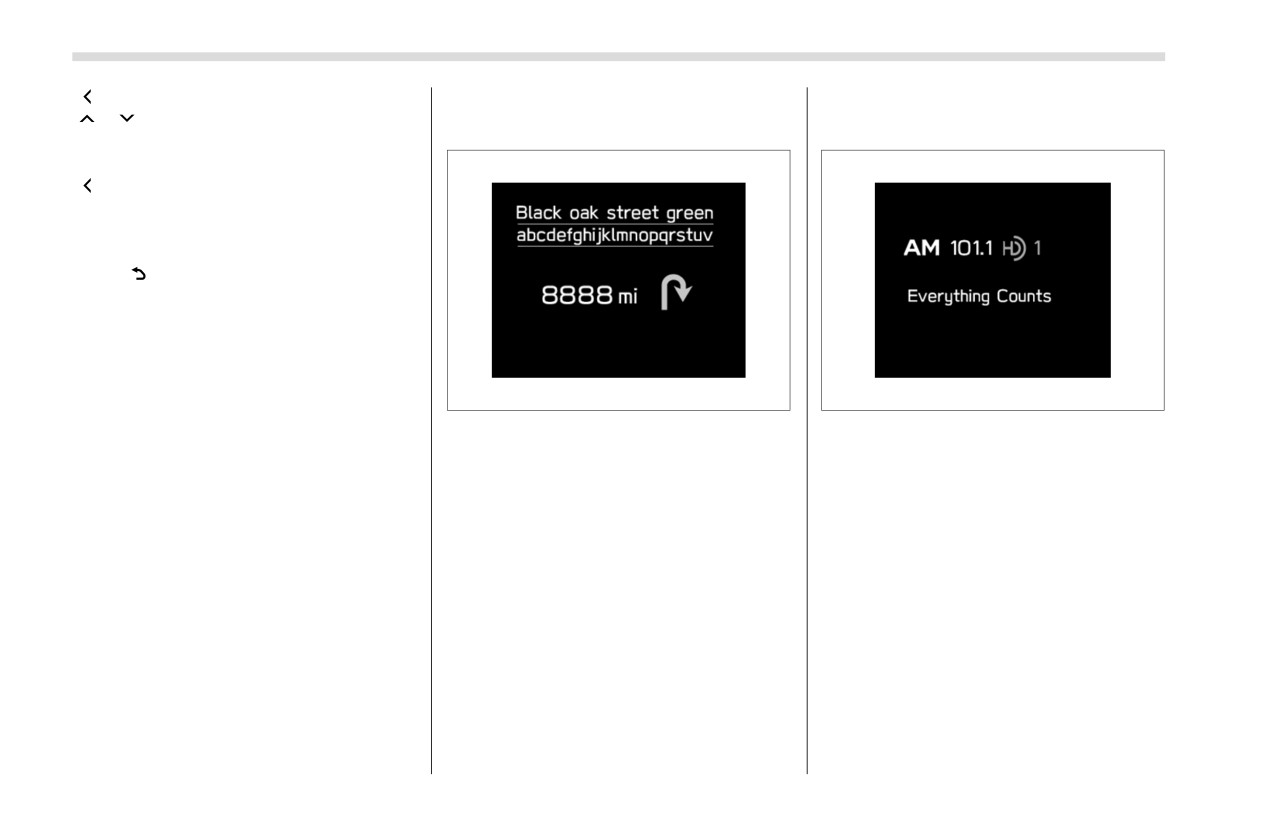
When the route guidance is set in the navi-
This screen displays the status of audio
gation system, this item shows the naviga-
information. For details about the audio
tion route information. For details about
system, refer to the separate audio
the audio system, refer to the separate
Owner’s Manual.
audio Owner’s Manual.
Combination Meter Display (Color TFT)
157
■ Driving Support System
Settings Display
The setting adjustments to the following
systems can be changed to meet your
personal requirements.
LDW (Lane Departure Warning)*1*2
PCB (Pre-Collision Braking)*1*2
BSD/RCTA*1
3
RAB
(Reverse Automatic Braking
system)*1
(Sonar Audible Alarm)*1
SRH
(Steering Responsive Head-
light)*1
*1: If equipped
*2: For details about EyeSight system, refer to
the Owner’s Manual supplement for the
EyeSight system.
■ Settings Display
Use the meter control switches on the
steering wheel to change settings.
1. Press
or
to select
2. Operate the switches to select a
desired item.
3. Press
/
or
/
to change
the setting and then press
to confirm
the change.
- CONTINUED -
158
Combination Meter Display (Color TFT)
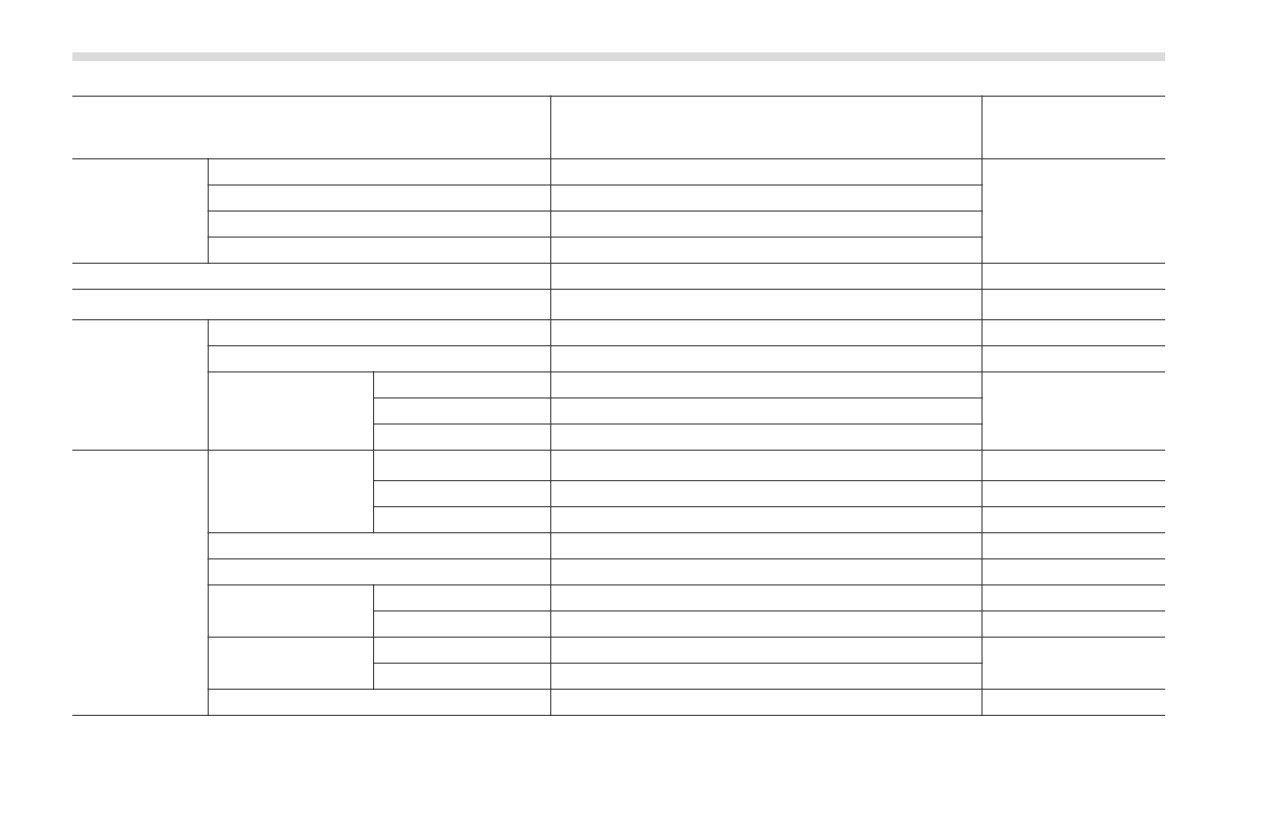
Page reference for
Item
Settings
the vehicle system
operation
Acquisition Sound
ON/OFF
Start Alert
ON/OFF
*2
EyeSight *1
Accel Lv.
Lv.1 (Eco)/Lv.2 (Comfort)/Lv.3 (Standard)/Lv.4 (Dynamic)
Select Drive Lane
Right Lane/Left Lane
Units
km, km/h, l/100km / miles, MPH, MPG
127, 151 and *2
Warning Volume *1
Max/Mid/Min
277 and *2
Startup Scrn
ON/OFF
-
GSI (MT models)
ON/OFF
234
Screen Settings
Indicator
ON/OFF
REV.
RPM
**00rpm
130
Buzzer
ON/OFF
Audible Signal *1
ON/OFF
105 and 110
Keyless Entry
Hazard Flasher
ON/OFF
106 and 110
Driver Door Unlock
Driver Door Only/All
100
Defogger
15 minutes/Continuous
185
Interior Light
7.5 seconds/15 seconds/30 seconds
212
Car Settings
Light Sensitivity
Min/Low/Mid/High/Max
174
Auto Light Sensor
Wiper Link
ON/OFF
175
Approaching Time Set
30 seconds/60 seconds/90 seconds/OFF
Welcome Lighting
175
Leaving Time Set
30 seconds/60 seconds/90 seconds/OFF
1-Touch LN CHGR
ON/OFF
182
*1: If equipped
*2: For details about EyeSight system, refer to the Owner’s Manual supplement for the EyeSight system.
Combination Meter Display (Color TFT)
159
■ Warning Message Display
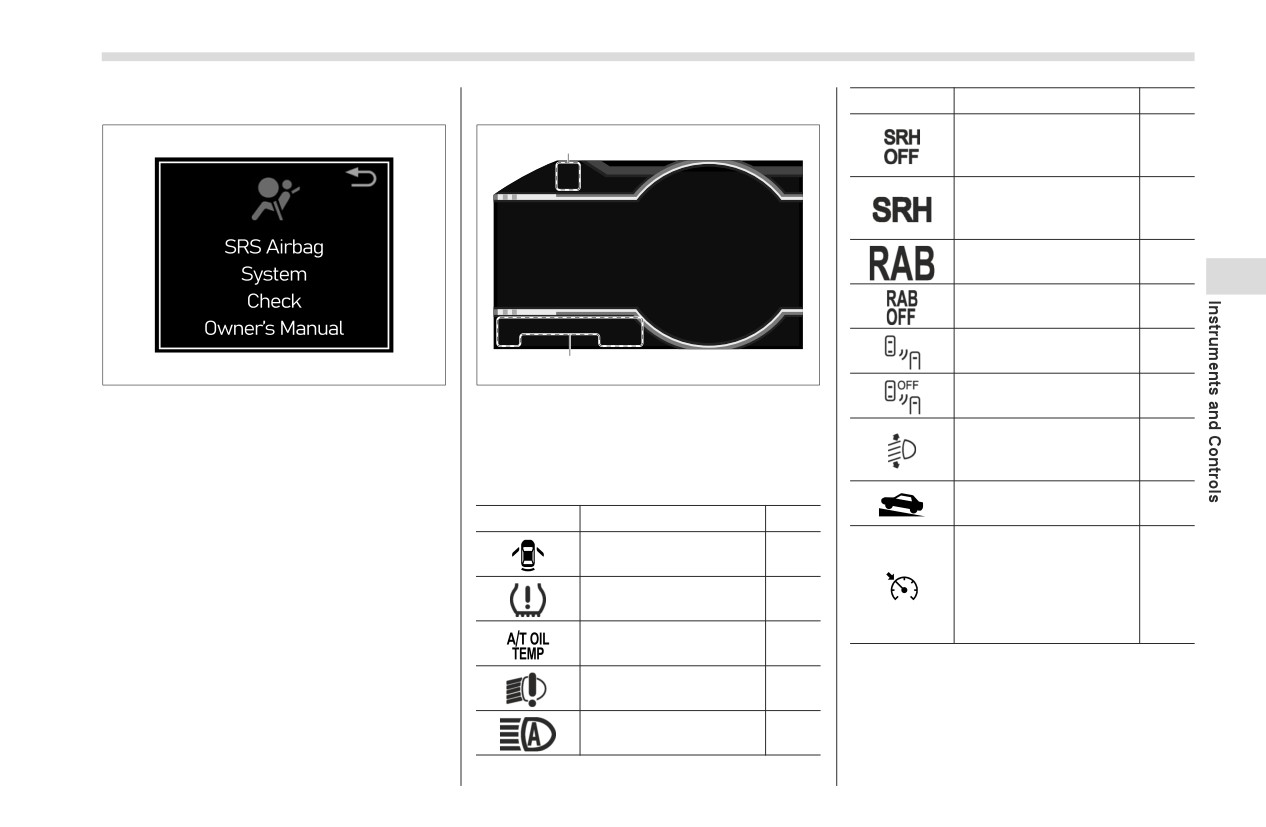
■ Telltale Screen
Mark
Name
Page
Steering Responsive
1
Headlight OFF indica-
150
tor light (if equipped)
Steering Responsive
Headlight warning light
150
(if equipped)
RAB warning light (if
151
equipped)
3
RAB OFF indicator (if
151
equipped)
BSD/RCTA warning
150
indicator (if equipped)
306794
1
307005
BSD/RCTA OFF indi-
Example of warning
1) Telltale screen
150
cator light (if equipped)
If there is a warning message or a mainte-
When the corresponding situation occurs,
Automatic headlight
nance notification, it will appear on combi-
beam leveler warning
150
the following telltales will be displayed on
nation meter display (color TFT). Take the
light
the telltale screen.
appropriate actions based on the
Hill start assist indica-
messages indicated.
150
tor light
Mark
Name
Page
Cruise control indica-
Door open indicator
141
tor light (white/green)/
Cruise control warning
Low tire pressure warn-
149
light (yellow) (models
138
ing light (if equipped)
without the EyeSight
AT OIL TEMP warning
system)
138
light (AT models)
LED headlight warning
150
light
High beam assist indi-
150
cator light (if equipped)
160
Center Information Display (CID)
3-8. Center Information
Items
Page
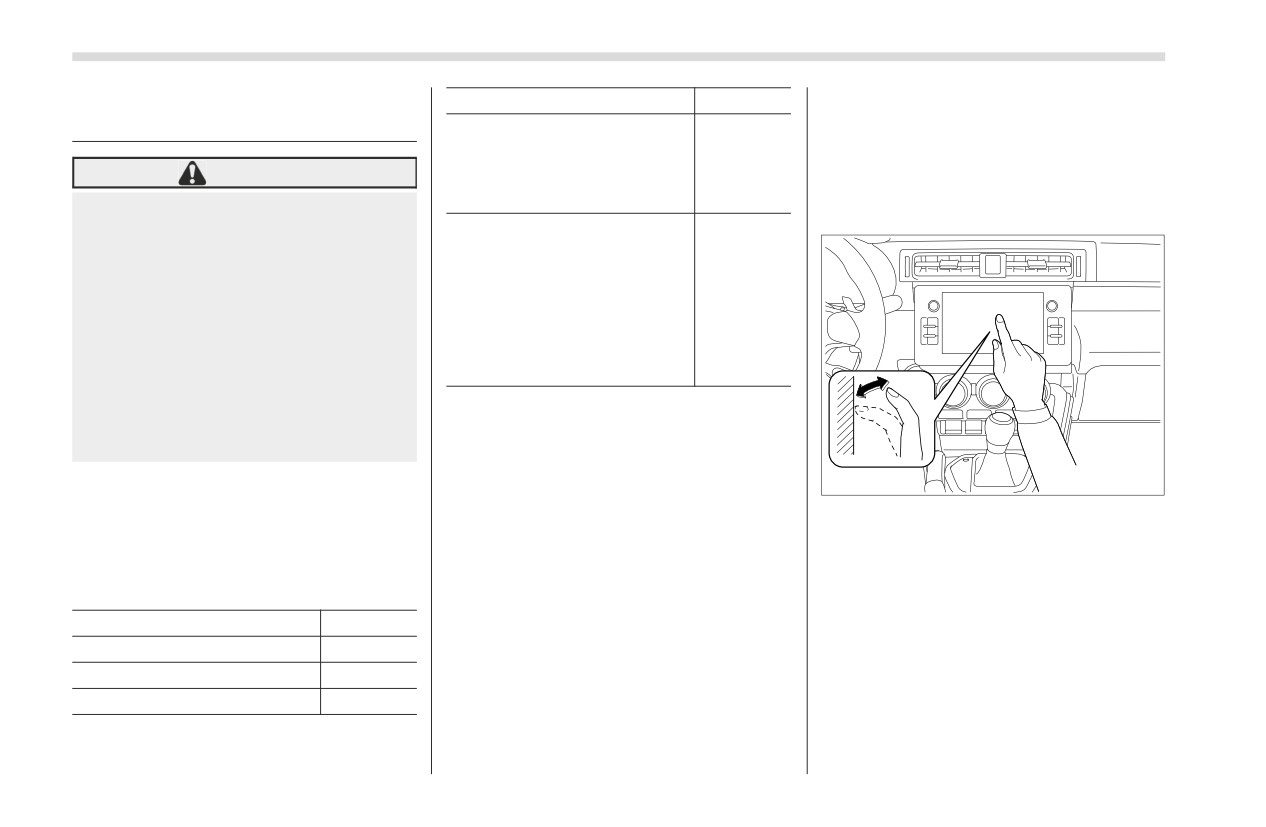
■ Touch Screen Operations
Display (CID)
Refer to
The center information display has a
the sepa-
touch screen. Operations are performed
Audio/telephone
rate audio
by touching the touch screen directly.
WARNING
Owner’s
Manual.
Always pay attention to safe driving
▼ Touch
Refer to
when operating the center informa-
the
tion display while the vehicle is in
Owner’s
motion. When operation of the cen-
Manual
ter information display is disturbing
EyeSight (if equipped)
supple-
your awareness and ability to con-
ment for
centrate on driving, stop the vehicle
the Eye-
in a safe place before performing
Sight sys-
operations on the display. Also, do
tem.
not concentrate on the display
The center information display can also be
while driving. Doing so could result
used to set and initialize the center infor-
in an accident.
mation display itself.
306863
■ Features
NOTE
When the vehicle is in motion,
Quickly touch and release once.
All information is displayed on the center
certain functions and selections may
information display, including vehicle
not be available.
settings, vehicle status, and audio opera-
The language and units for both the
tion.
center information display and the
combination meter display (color TFT)
Items
Page
can be changed. For details, refer to
Maintenance information
171
"Car settings" ) P165.
Vehicle settings
161
The images displayed in this
Rear view camera
263
Owner’s Manual are sample images.
The actual image may vary depending
on the region and vehicle specifica-
tions.
Center Information Display (CID)
161
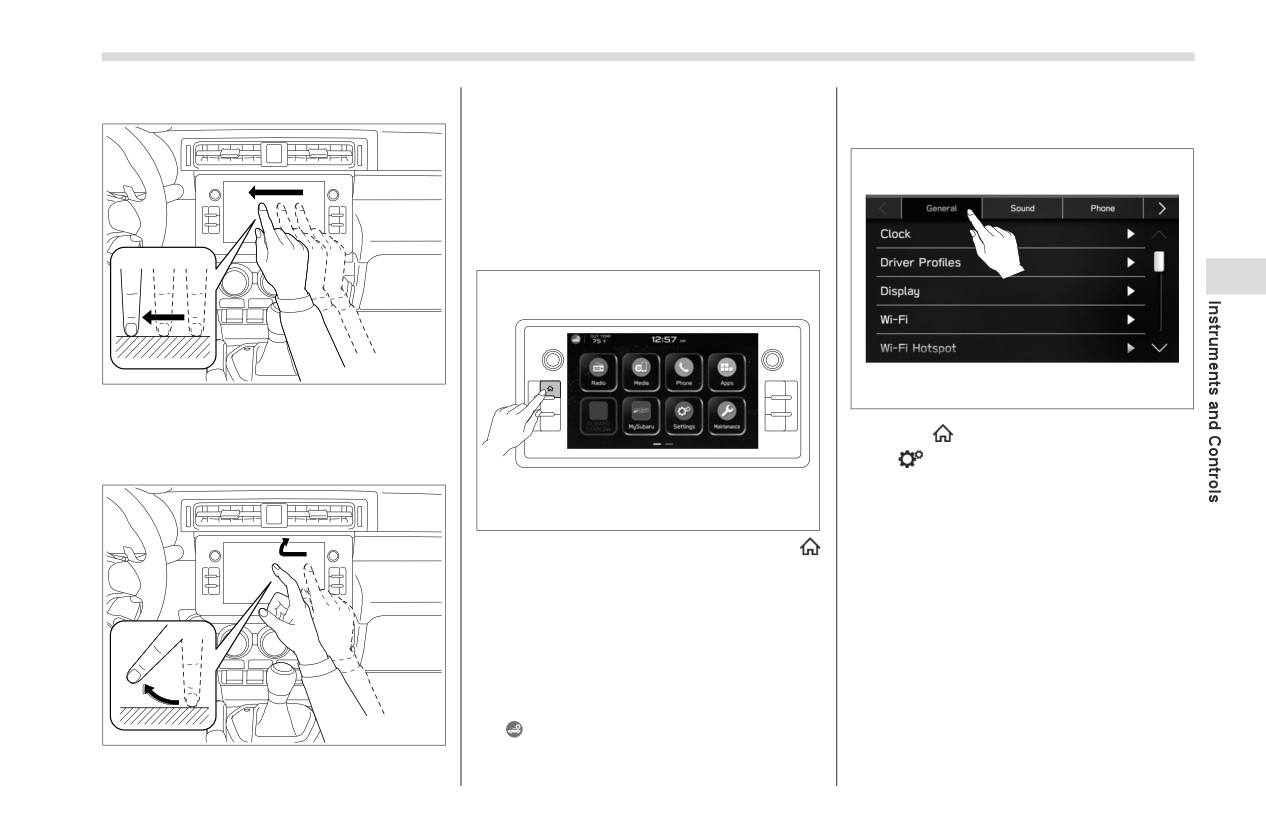
▼ Drag
Quickly move the screen by swiping with
▼ General settings
your finger.
Set the time and display general items.
NOTE
Swipe operations may not be per-
formed smoothly in high altitudes.
■ Main Screen
3
306864
306997
Touch the screen and move the screen to
the desired position.
1.
Press
(HOME).
▼ Swipe
2.
ĺ
(Settings)
3.
ĺ“General”
306804
4.
Select the preferred menu.
To display the main screen, press
(HOME).
In this Owner’s Manual, the following
settings will be explained. For details
about other items, refer to the separate
audio Owner’s Manual.
“Settings”ĺ“General”
“Settings”ĺ“Car”
306865
(Car settings icon)
– CONTINUED -
162
Center Information Display (CID)
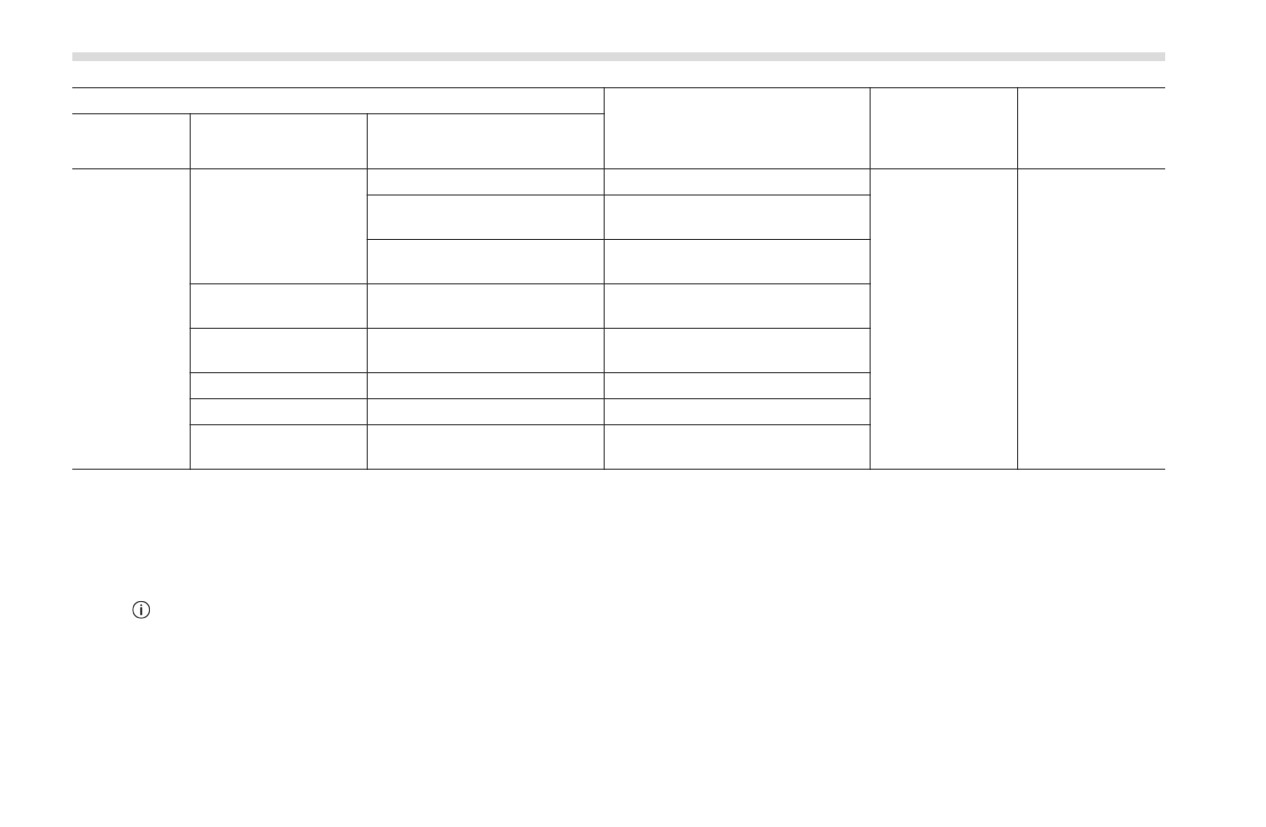
The setting adjustments to the following items can be manually changed to meet your personal requirements.
Item
Page reference
Page reference
for the vehicle
Available settings
for the setting
1st menu
2nd menu
3rd menu
system opera-
procedure
tion
Time Setting *1
Auto/Manual
172
Clock
Time Setting *2
Sync With Phone/Manual
172
172
Clock Format
12H/24H
170
*3
Driver Profiles
ʊ
Default/4 users
ʊ
Display Off
Turn the screen off.
ʊ
170
Brightness Dial
ON/OFF
130
170
Display
Set and adjust the brightness and
Brightness/Contrast
170
170
contrast of the display.
Wi-Fi
ON/OFF
Connected to:
Select the registered devise.
General
Wi-Fi
Available Wi-Fi Networks
Add
*3
ʊ
Wi-Fi Protected Setup
PIN Setup/Push Button Setup
Registered Wi-Fi Networks
ʊ
Wi-Fi Hotspot
ON/OFF
Wi-Fi name (SSID):
ʊ
Security Type:
ʊ
Wi-Fi Hotspot
Password:
ʊ
*4
ʊ
Broadcast Frequency:
2.4 GHz/5 GHz
SSID Broadcast
ON/OFF
Connected Devices:
ʊ
Center Information Display (CID)
163
Item
Page reference
Page reference
for the vehicle
Available settings
for the setting
1st menu
2nd menu
3rd menu
system opera-
procedure
tion
Maintenance
ON/OFF
170
Reminder Screen
Birthday
ON/OFF
*4
170
Anniversary
ON/OFF
170
Startup Screen
ON/OFF
127
170
3
Gear Shift Indicator (MT mod-
Meter Screen
ON/OFF
234
170
els)
Meter Rev. Indicator
Indicator/RPM/Buzzer
130
157
General
Rear Camera Delay Control
ON/OFF
264
170
Camera
Steering Angle Lines
ON/OFF
266
170
Language
ʊ
English/Français/Español
151 and 160
170
Home Screen Short-
*3
ʊ
ON/OFF
170
cuts
Birthday List
ʊ
Set a birthday.
*3
170
Anniversary List
ʊ
Set an anniversary day.
*3
171
- CONTINUED -
164
Center Information Display (CID)
Item
Page reference
Page reference
for the vehicle
Available settings
for the setting
1st menu
2nd menu
3rd menu
system opera-
procedure
tion
Update
Check if a new software update
Automatically Check for
ON/OFF
Software Update
Updates
Automatically Download
ON/OFF
Updates
SUBARU STARLINK
ʊ
OK/Cancel
Apps Recovery
*4
General
ʊ
SUBARU STARLINK
ʊ
ON/OFF
Auto Connect
Factory Data Reset
ʊ
Reset/Cancel
System Information
ʊ
ʊ
Free/Open Source
ʊ
ʊ
Software Information
*1: Models with SUBARU STARLINK Safety and Security
*2: Models without SUBARU STARLINK Safety and Security
*3: For details about the audio system, refer to the Owner’s Manual supplement for the audio system.
*4: For details, refer to the Owner’s Manual supplement for SUBARU STARLINK Safety and Security.
NOTE
Touch to display the explanation of the items.
Center Information Display (CID)
165
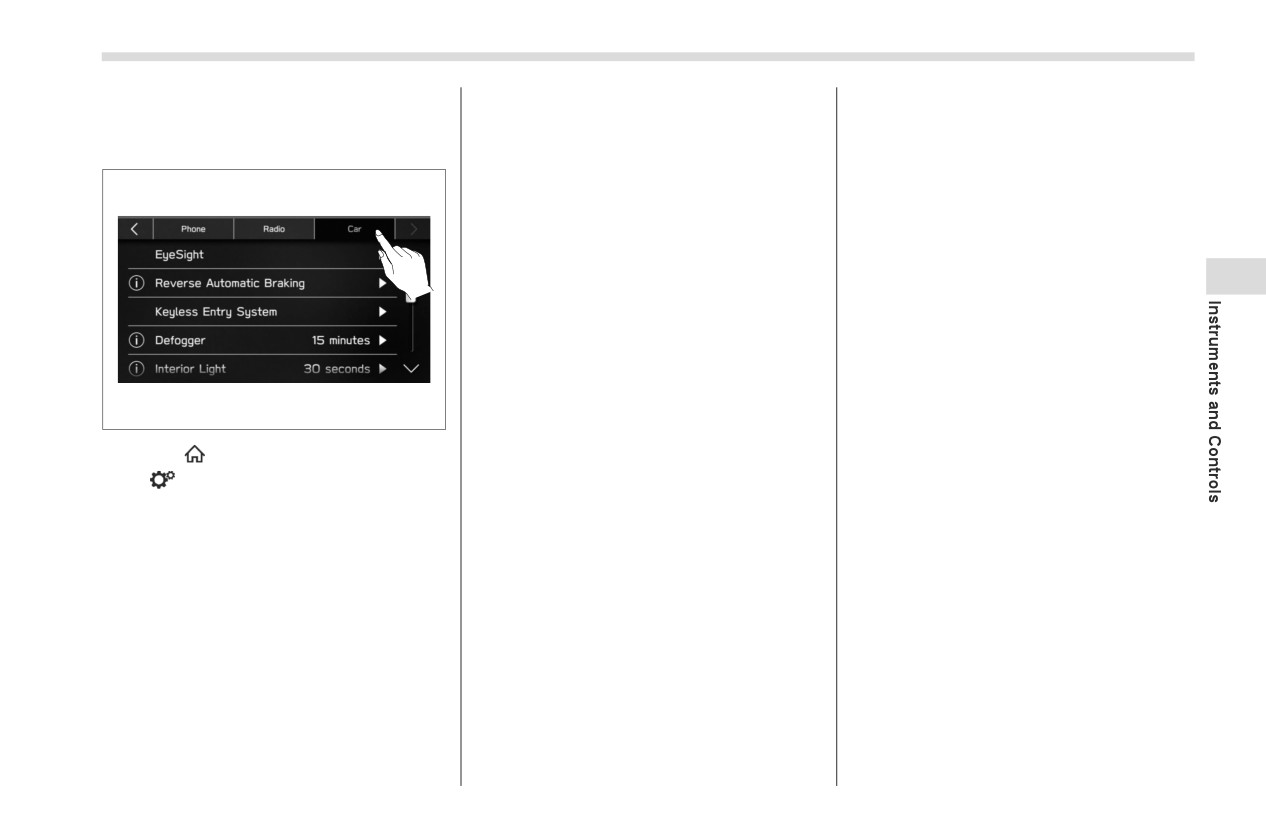
▼ Car settings
Perform the EyeSight system setting and
vehicle setting.
3
306998
1. Press
(HOME).
2. ĺ
(Settings)
3. ĺ“Car”
4. Select the preferred menu.
- CONTINUED -
166
Center Information Display (CID)
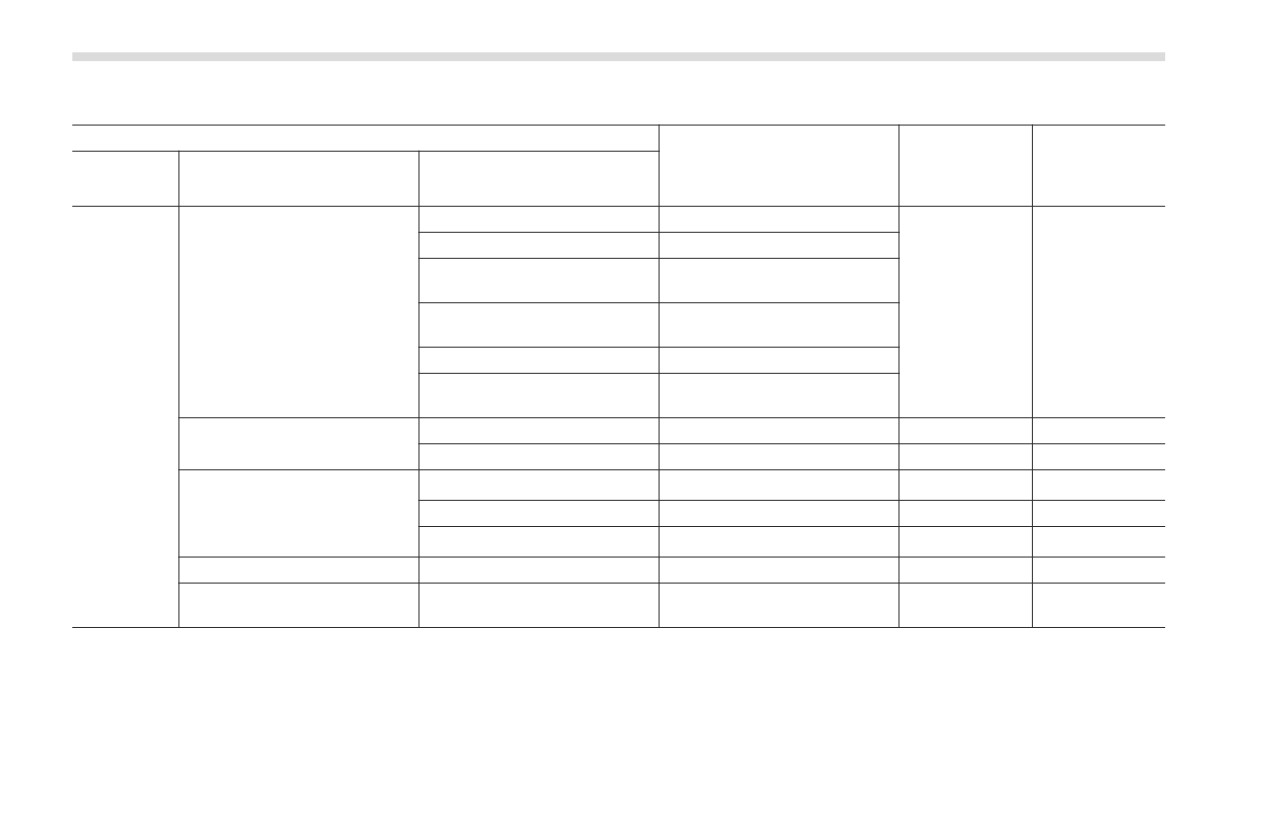
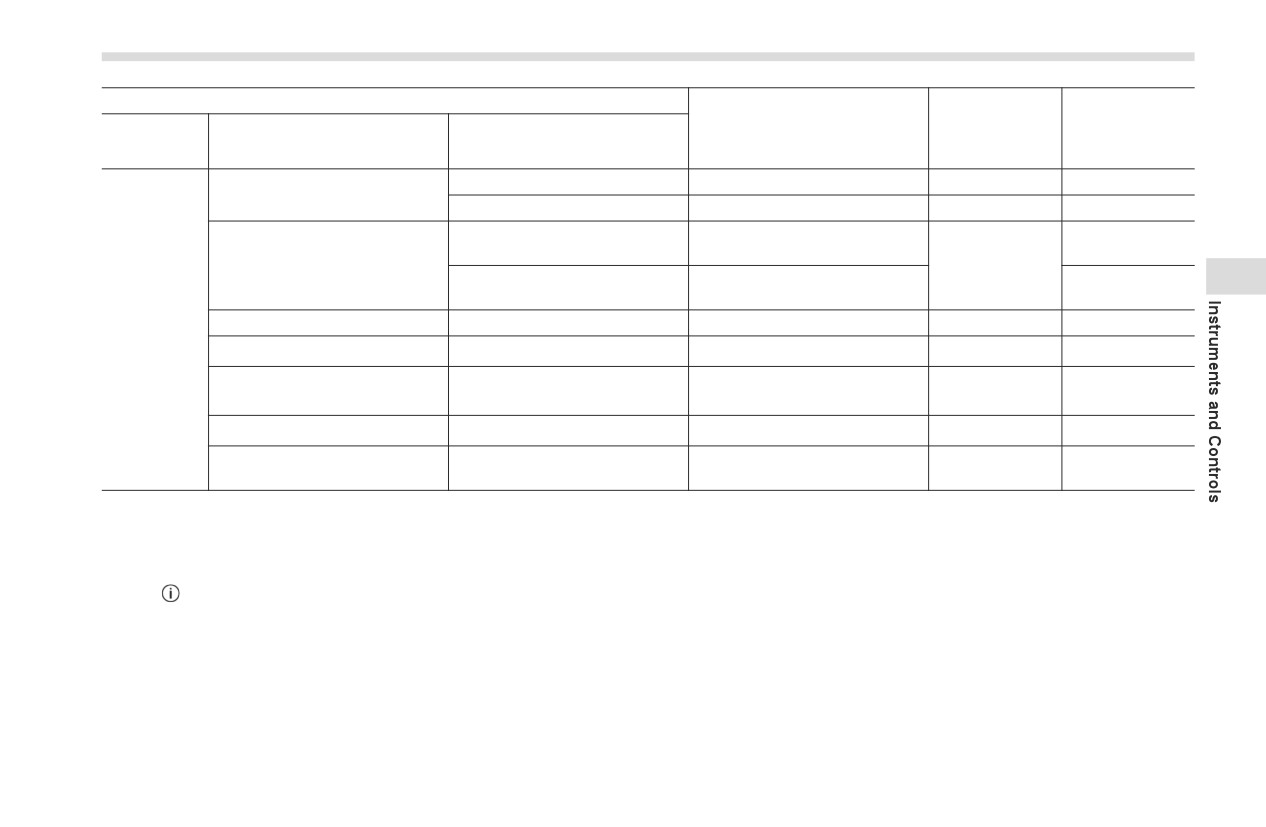
The setting adjustments to the following items can be manually changed to meet your personal requirements.
Item
Page refer-
Page refer-
ence for the
ence for the
Available settings
1st menu
2nd menu
3rd menu
vehicle sys-
setting proce-
tem operation
dure
Pre-Collision Braking
Setting ON/Setting OFF
Lane Departure Warning
ON/OFF
Cruise Control Acceleration
Lv.1 (Eco)/Lv.2 (Comfort)/Lv.3
Characteristics
(Standard)/Lv.4 (Dynamic)
*2
ʊ
EyeSight* 1
Lead Vehicle Acquisition
ON/OFF
Sound
Lead Vehicle Moving Monitor
ON/OFF
Select Drive on Left/Drive on
Right Lane/Left Lane
Right
Car
Sonar Audible Alarm
ON/OFF
277
170
Reverse Automatic Braking *1
Automatic Braking
ON/OFF
277
170
Audible Signal *1
ON/OFF
105 and 110
170
Keyless Entry System
Hazard Warning Flasher
ON/OFF
106 and 110
170
Driver Door Unlock *1
Driver Door Only/All
100
170
Defogger
ʊ
15 minutes/Continuous
185
170
7.5 seconds/15 seconds/30
Interior Light
ʊ
212
170
seconds
Center Information Display (CID)
167
Item
Page refer-
Page refer-
ence for the
ence for the
Available settings
1st menu
2nd menu
3rd menu
vehicle sys-
setting proce-
tem operation
dure
Light Sensitivity
Min/Low/Mid/High/Max
174
170
Auto Light Sensor
Wiper Link
ON/OFF
175
170
30 seconds/60 seconds/90
Approaching Time Set
170
seconds/OFF
Welcome Lighting
175
30 seconds/60 seconds/90
3
Leaving Time Set
170
seconds/OFF
One-Touch Lane Changer
ʊ
ON/OFF
182
170
Car
BSD/RCTA *1
ʊ
ON/OFF
274
170
Steering Responsive Head-
ʊ
ON/OFF
180
170
lights (SRH) *1
Warning Volume *1
ʊ
Min/Mid/Max
272, 286 and *2
170
km, km/h, Liter/
Units
ʊ
127 and 151
170
Miles, MPH, Gallon
*1: If equipped
*2: For details about EyeSight system, refer to the Owner’s Manual supplement for the EyeSight system.
NOTE
Touch to display the explanation of the items.
- CONTINUED -
168
Center Information Display (CID)
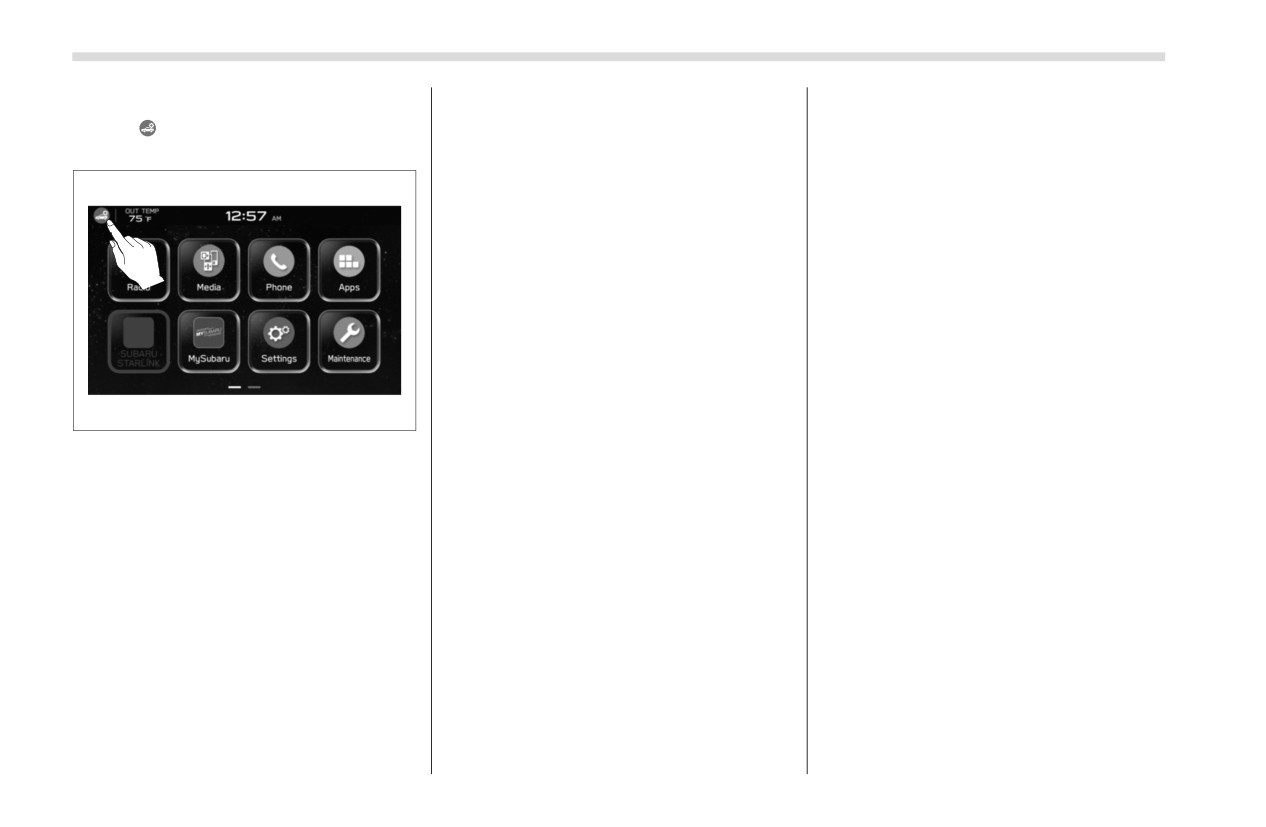
▼ Car settings icon
Touch
to display the items that are
changeable while driving.
307002
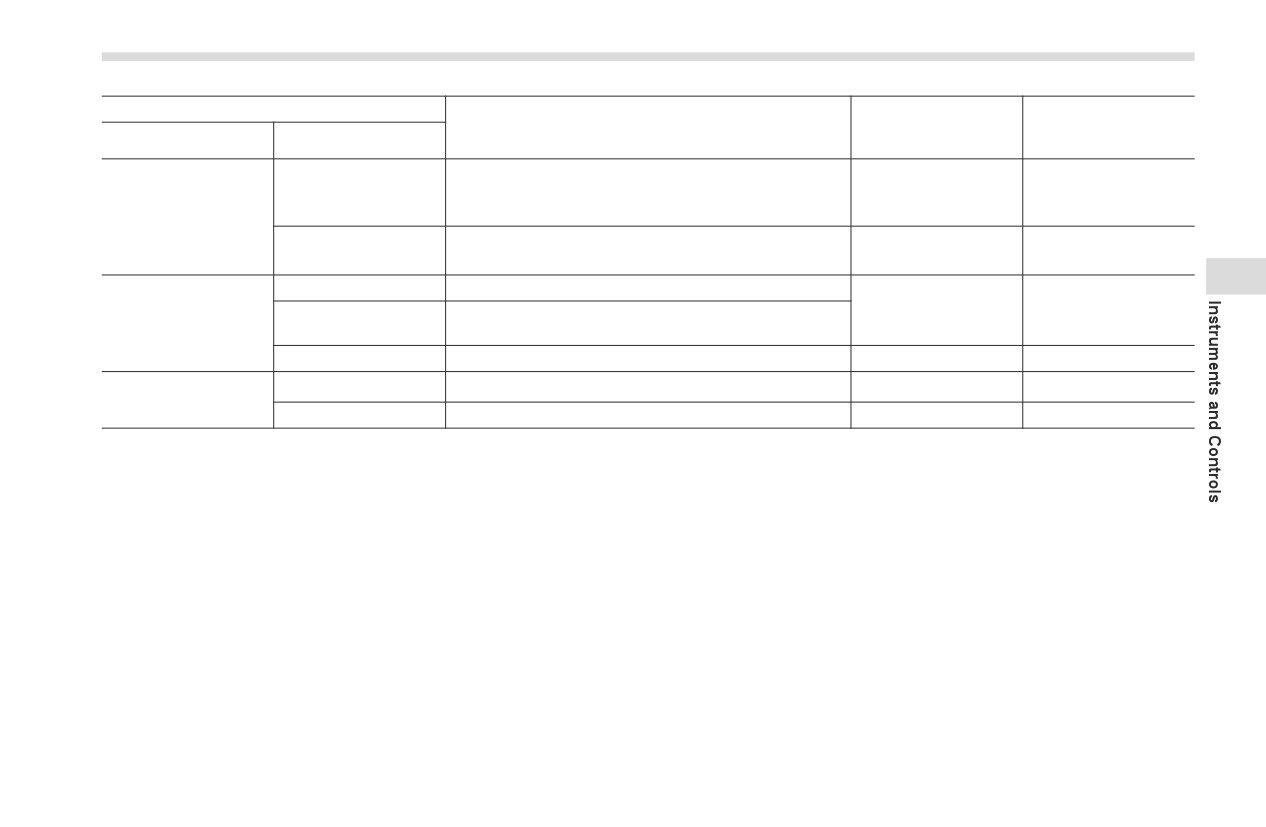
Center Information Display (CID)
169
Item
Page reference for
Page reference for
Available settings
the vehicle system
the setting proce-
1st menu
2nd menu
operation
dure
Cruise Control Accel-
Lv.1 (Eco)/Lv.2 (Comfort)/Lv.3 (Standard)/Lv.4
eration Characteris-
*2
ʊ
(Dynamic)
Vehicle Control
tics *1
Steering Responsive
ON/OFF
180
170
Headlights (SRH) *1
3
Pre-Collision Braking
Setting ON/Setting OFF
*2
ʊ
Lane Departure
Driving Assistance *1
ON/OFF
Warning
BSD/RCTA
ON/OFF
268
170
Warning Volume *1
Min/Mid/Max
277 and *2
ʊ
Others
Units
km, km/h, Liter/Miles, MPH, Gallon
127 and 151
170
*1: If equipped
*2: For details about EyeSight system, refer to the Owner’s Manual supplement for the EyeSight system.
- CONTINUED -
170
Center Information Display (CID)
▼ How to select items on the screen
▽ Selecting
5. ĺ“Brightness/Contrast”
▽ ON/OFF setting
306873
306872
Example
6. Drag
to adjust the brightness and
306871
contrast.
Touch the preferred item.
Example
Touch “Default” to revert to the factory
Touch the changing menu and select ON
▼ How to set items on the screen
setting.
or OFF
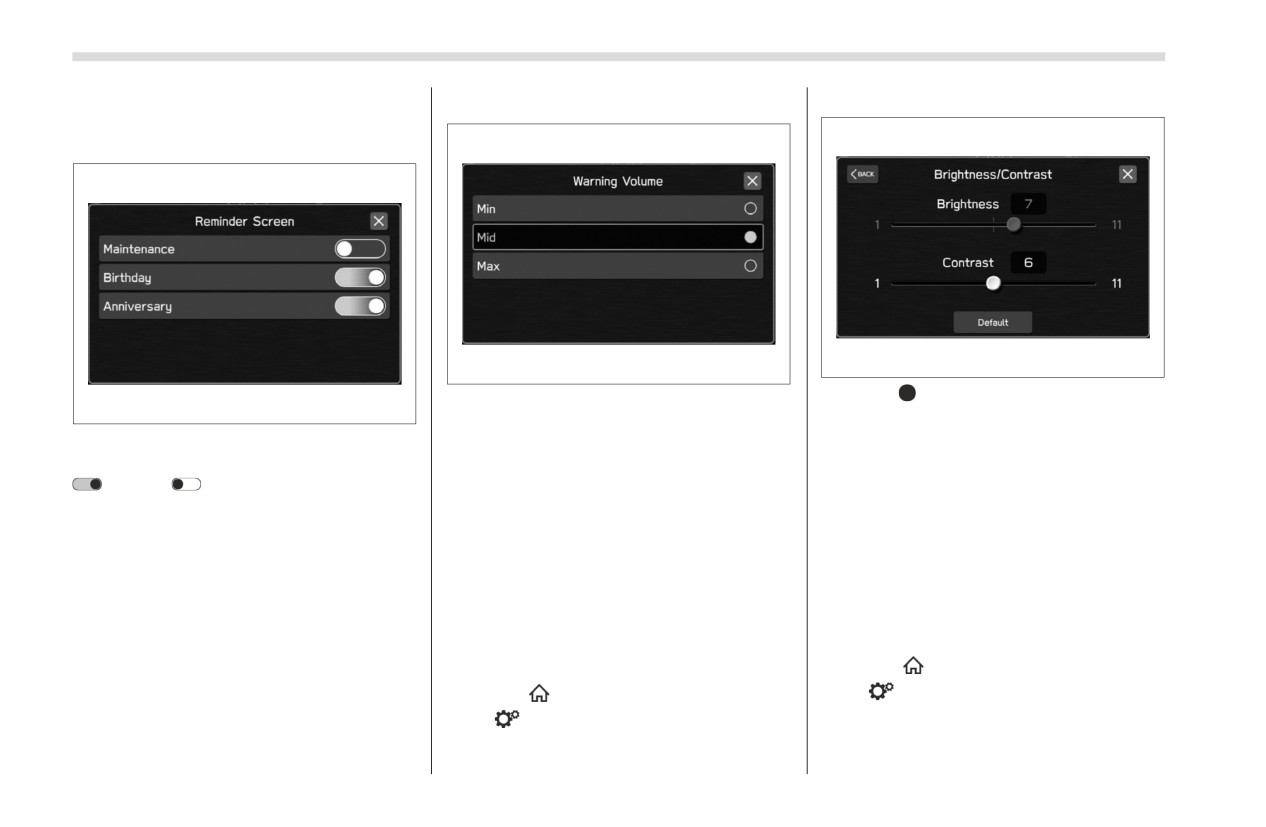
▽ Brightness/Contrast
▽ Birthday List
Set and adjust the brightness and contrast
If
a birthday or anniversary is
of the center information display.
approaching, a message will be shown
when the ignition switch is turned to the
NOTE
“ON” position. This function can be set to
on or off by
“Reminder screen”. For
“Brightness” can only be adjusted
details, refer to "General settings" ) P161
when “Brightness Dial” is off. Refer to
"General settings" ) P161.
1. Press
(HOME).
1. Press
(HOME).
2. ĺ
(Settings)
2. ĺ
(Settings)
3. ĺ“General”
3. ĺ“General”
4. ĺ“Birthday List”
4. ĺ“Display”
Center Information Display (CID)
171
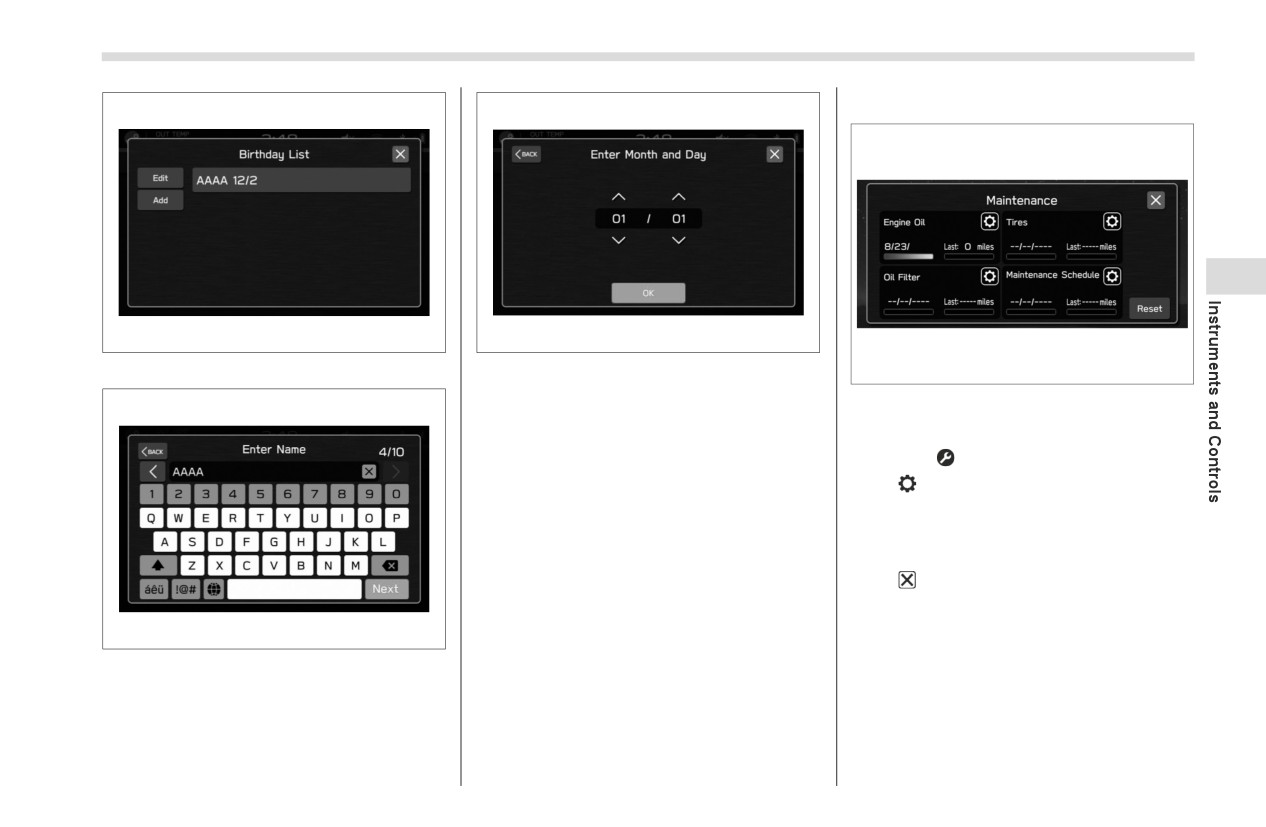
▼ Maintenance
XXXX
3
306999
307001
5.
ĺ“Add”
8. Enter the date.
306164
9. ĺ“OK”
Maintenance reminders can be set.
Engine oil setting:
NOTE
A maximum of 5 birthdays can be
1. Touch
(Maintenance).
stored.
2. ĺ
(Engine Oil)
3. Select “Notification Date” or “Notifica-
▽ Anniversary List
tion Distance” of the reminder.
The procedure for setting an anniversary
4. ĺ“Set”
is the same as "Birthday List" ) P170,
5. ĺ
except that in step 4 “Anniversary List” is
selected.
Oil Filter setting:
307000
The setting procedure is the same as
“Engine Oil” setting, but touch the
“Oil
6.
Enter the name.
Filter” item in step 2.
7.
ĺ“Next”
Tires setting:
The setting procedure is the same as
“Engine Oil” setting, but touch the “Tires”
item in step 2.
- CONTINUED -
172
Clock
Maintenance Schedule setting:
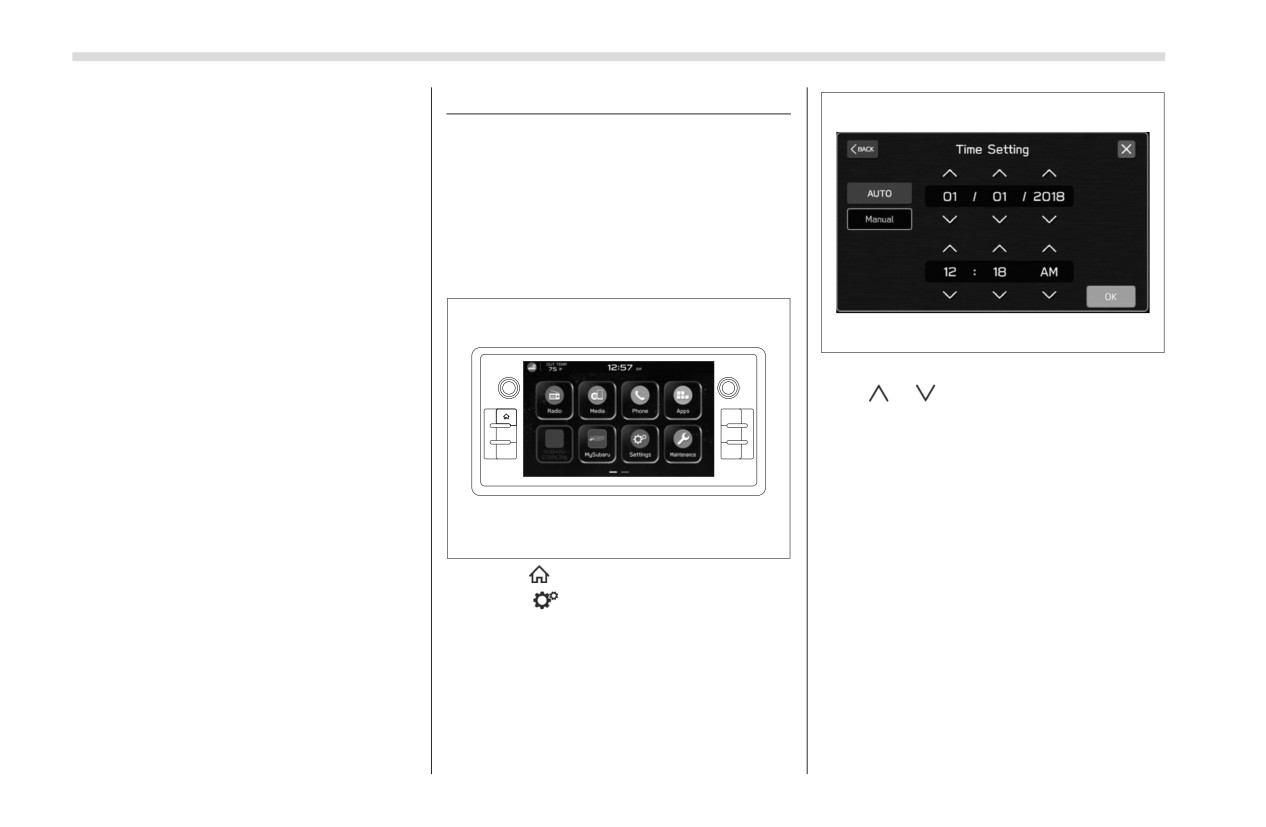
3-9. Clock
The setting procedure is the same as
“Engine Oil” setting, but touch the “Mainte-
For models with a genuine SUBARU
nance Schedule” item in step 2.
audio system, the clock can be adjusted
using either auto mode or manual mode.
NOTE
Touch “Reset” to reset each setting.
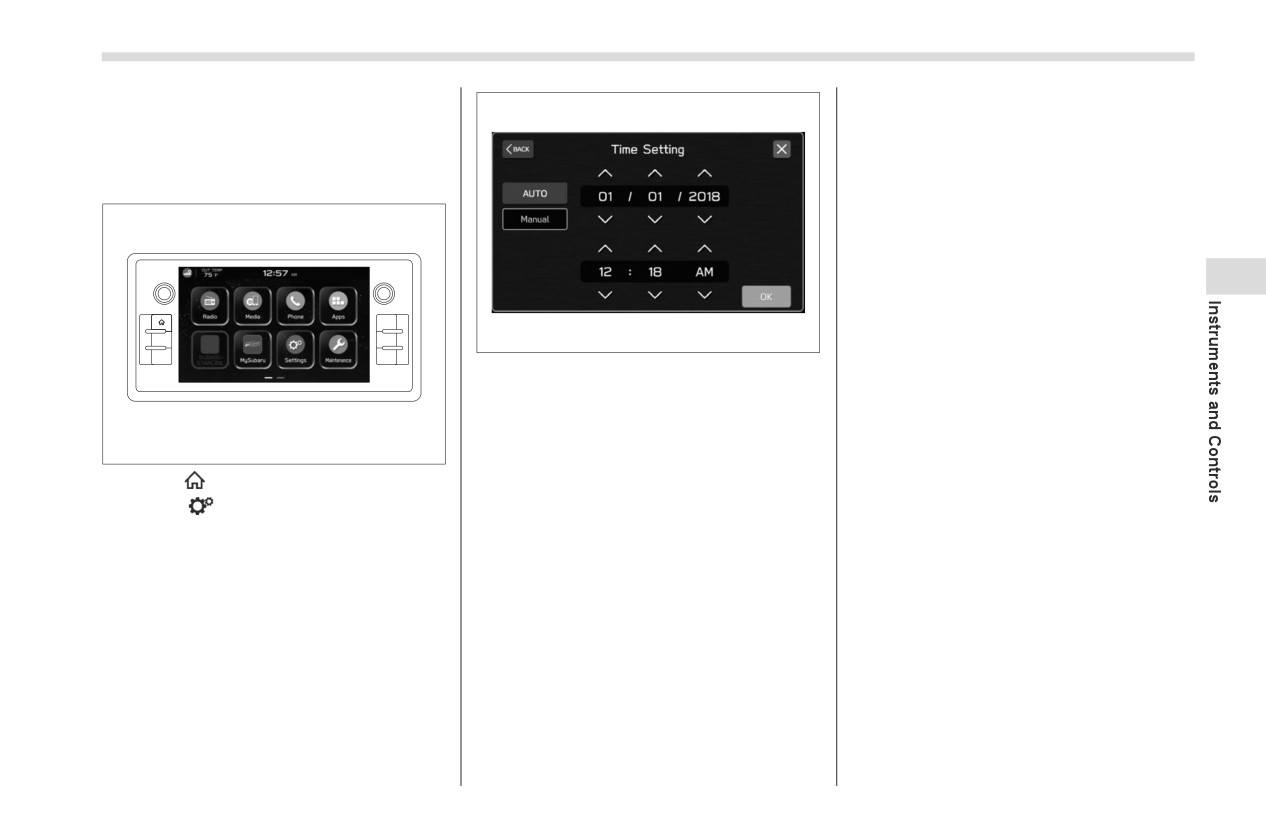
■ Setting the Clock Manually
Touch
“Update” to revert to the
1. Turn the ignition switch to the “ON”
default value.
position.
306875
7. ĺ“Manual”
8. ĺ or
9. ĺ“OK”
NOTE
The clock setting screen can also be
displayed by touching the clock on the
status bar.
306807
2. Press
(HOME).
3. Touch
(Settings).
4. ĺ“General”
5. ĺ“Clock”
6. ĺ“Time Setting”
Clock
173
■ Setting the Clock Automati-
SETTINGS” in the supplemental Owner’s
Manual for the audio system. The clock
cally
will be adjusted automatically.
1. Turn the ignition switch to the “ON”
position.
NOTE
For models without SUBARU STAR-
LINK Safety and Security: Depending
on the model of smartphone, the set-
tings of the connected smartphone
3
may need to be changed. (ex: For iOS
or other models, notification settings
may need to be activated.) For details,
306875
check the instructions on connecting
7.
Models
with
SUBARU
STARLINK
smartphones.
Safety and Security:
ĺ“AUTO”
▼ Models with SUBARU STARLINK
Models without SUBARU
STARLINK
Safety and Security
306807
Safety and Security:
The clock will be set automatically where
ĺ“Sync With Phone”
2.
Press
(HOME).
a DCM (Data Communication Module in
vehicle cellular connection) signal is avail-
3.
Touch
(Settings).
▼ Models without SUBARU STAR-
able.
4.
ĺ“General”
LINK Safety and Security
5.
ĺ“Clock”
The clock will be set and adjusted auto-
6.
ĺ“Time Setting”
matically when a smartphone is
connected via Bluetooth® for transferring
phonebook data.
1. Register the smartphone to the audio
system. For details, refer to
“Bluetooth
SETTINGS” in the supplemental Owner’s
Manual for the audio system.
2. Transfer phonebook data to the
system. For details, refer to
“Bluetooth
174
Light Control Switch
3-10. Light Control Switch
conditions, a chirp sound will inform
For AT models, the select lever is in a
the driver that the lights
are
illumi-
position other than “P” position.
nated.
“
” position:
CAUTION
Instrument panel illumination, headlights,
Use of any lights for a long period
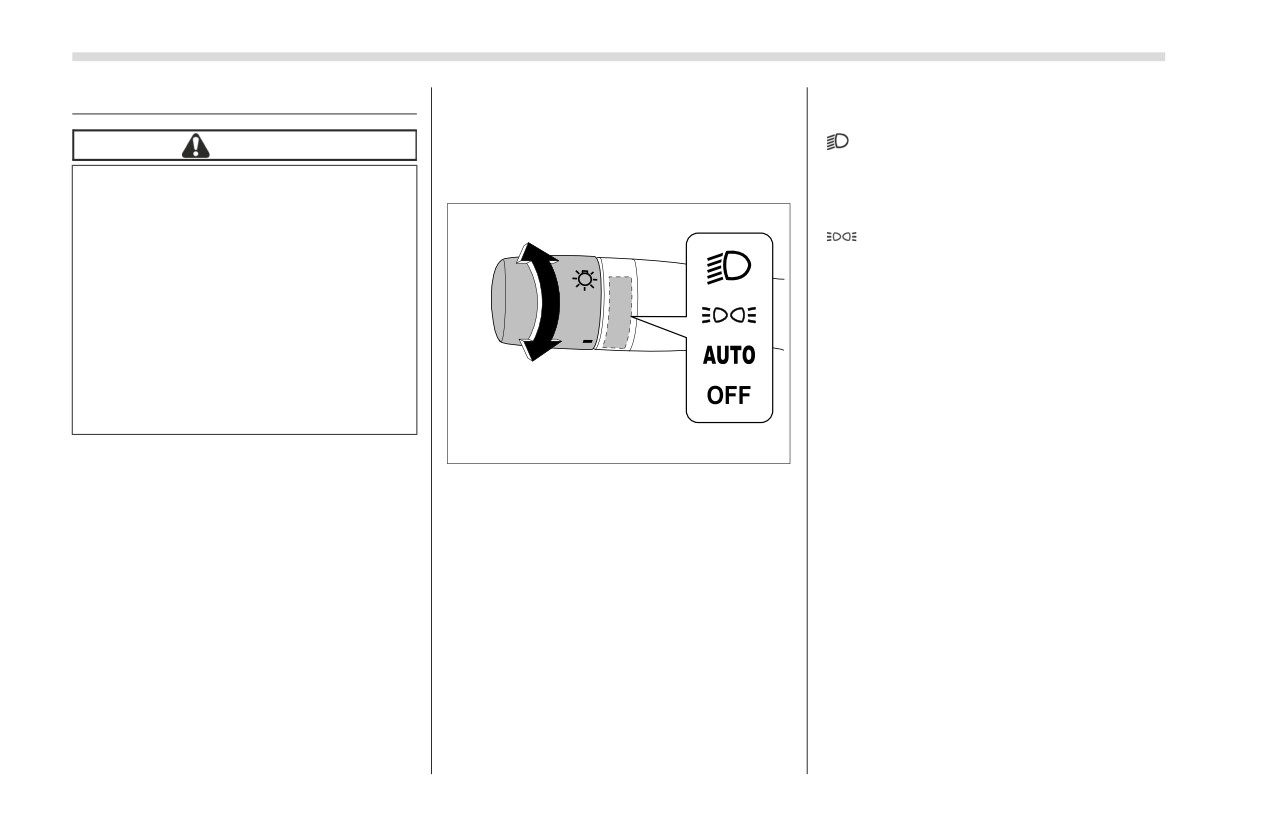
■ Headlights
parking lights, side marker lights, tail lights
of time while the engine is not
and license plate lights are on.
running can cause the battery to
“
” position:
discharge.
Instrument panel illumination, parking
Before leaving the vehicle, make
lights, side marker lights, tail lights and
sure that the light control switch
license plate lights are on.
is turned to the off position. If the
vehicle is left unattended for a
“AUTO” position: auto on/off head-
long time with the light control
lights
switch set to a position other than
When the ignition switch is in the “ON”
the off position, the battery may
position, the instrument panel illumination,
be discharged.
headlights, parking lights, side marker
lights, tail lights and license plate lights
306964
are automatically on or off depending on
The light control switch operates when the
the level of the ambient light.
push-button ignition switch is in the “ACC”
To turn on the headlights, turn the knob on
or “ON” position.
the end of the light control switch.
The light sensitivity of the auto on/off
headlights can be changed by operating
Regardless of the position of the light
“OFF” position:
the combination meter display (color TFT)
control switch, the illuminated lights are
The headlights are all off.*1,*2
or the center information display. For
turned off when the push-button ignition
*1: For Canada models, when the light switch is
details, refer to "Settings Display" ) P157
switch is turned off.
switched to the “OFF” position while the
or "Car settings" ) P165. Also, the setting
vehicle is stopped, the lights turn off. Then
can be changed by a SUBARU dealer.
NOTE
the light switch will automatically return to
the “AUTO” position.
Consult your SUBARU dealer for details.
The light control switch can be oper-
*2: For Canada models, the headlights will
ated (except auto on/off headlights),
automatically change to the AUTO mode
▼ Battery-saving function
even the push-button ignition switch
when the following conditions are met:
If the headlights or tail lights are illumi-
is turned off.
The engine is running.
nated when the push-button ignition
If the driver’s door is opened while the
The parking brake is fully released.
switch is off, in order to prevent the battery
headlights are illuminated under such
from becoming discharged, the lights will
Light Control Switch
175
automatically be turned off after approxi-
The light control switch is in the “AUTO”
▽ When exiting
mately 20 minutes.
position
While the welcome lighting function is acti-
If a door is opened or closed, the battery
It is dark enough to turn on the auto on/
vated, the low beam headlights will remain
saving function will temporarily be
off headlights
illuminated even when the push-button
canceled and the lights will automatically
ignition switch is turned to the
“OFF”
be turned off after approximately
20
NOTE
status.
minutes.
If the engine is turned off after turning
The low beam headlights will turn off
off the light switch, the welcome
under any of the following conditions.
▼ Auto-on/off wiper-linked headlights
lighting function may not operate (for
30 seconds have passed since the
3
While the light control switch is in the
Canada models).
door is opened and closed.*1
“AUTO” position, the headlights will auto-
matically turn on when the windshield
▽ When approaching
The light control switch is turned to a
wipers operate several times. The head-
position other than “AUTO”.
While the welcome lighting function is acti-
lights will automatically turn off approxi-
vated, the low beam headlights will auto-
The locking procedure is performed
mately 1 minute after the wiper stops.
twice. When performing the unlocking
matically illuminate when unlocking the
The ON/OFF setting of this function can
doors by using the remote keyless entry
procedure after performing the locking
be changed by operating the combination
system.
procedure, perform the locking procedure
meter display (color TFT) or the center
twice again.
The low beam headlights will remain illu-
information display. For details, refer to
*1: The setting for the period of time in which
minated for 30 seconds*1 and then turn
"Settings Display"
) P157 or "Car
the low beam headlights remain on by the
off. However, if any of the following opera-
welcome lighting function can be changed
settings" ) P165. Also, the setting can be
tions is done, the low beam headlights will
by a SUBARU dealer. Contact your
changed by a SUBARU dealer. Consult
SUBARU dealer for details. Also, you can
turn off.
your SUBARU dealer for details.
change the setting by operating the combi-
The ignition switch is turned to the “ON”
nation meter display
(color TFT) or the
position.
center information display. For details, refer
▼ Welcome lighting function
to "Settings Display"
) P157 or "Car
The doors are locked.
The welcome lighting function turns on the
settings" ) P165.
The light control switch is turned to a
low beam headlight for smooth
approaching to or exiting from the vehicle
position other than “AUTO”.
at night or in a dark place.
The function is activated while all of the
following conditions are met.
- CONTINUED -
176
Light Control Switch
▼ Sensor for the auto on/off head-
vehicle inspected by your SUBARU
Refer to "High Beam Assist Function (If
lights
dealer as soon as possible.
Equipped)" ) P177.
The light sensor may not operate
When the headlights are on high beam,
correctly for light other than sunlight.
the high beam indicator light “
” on the
combination meter is also on.
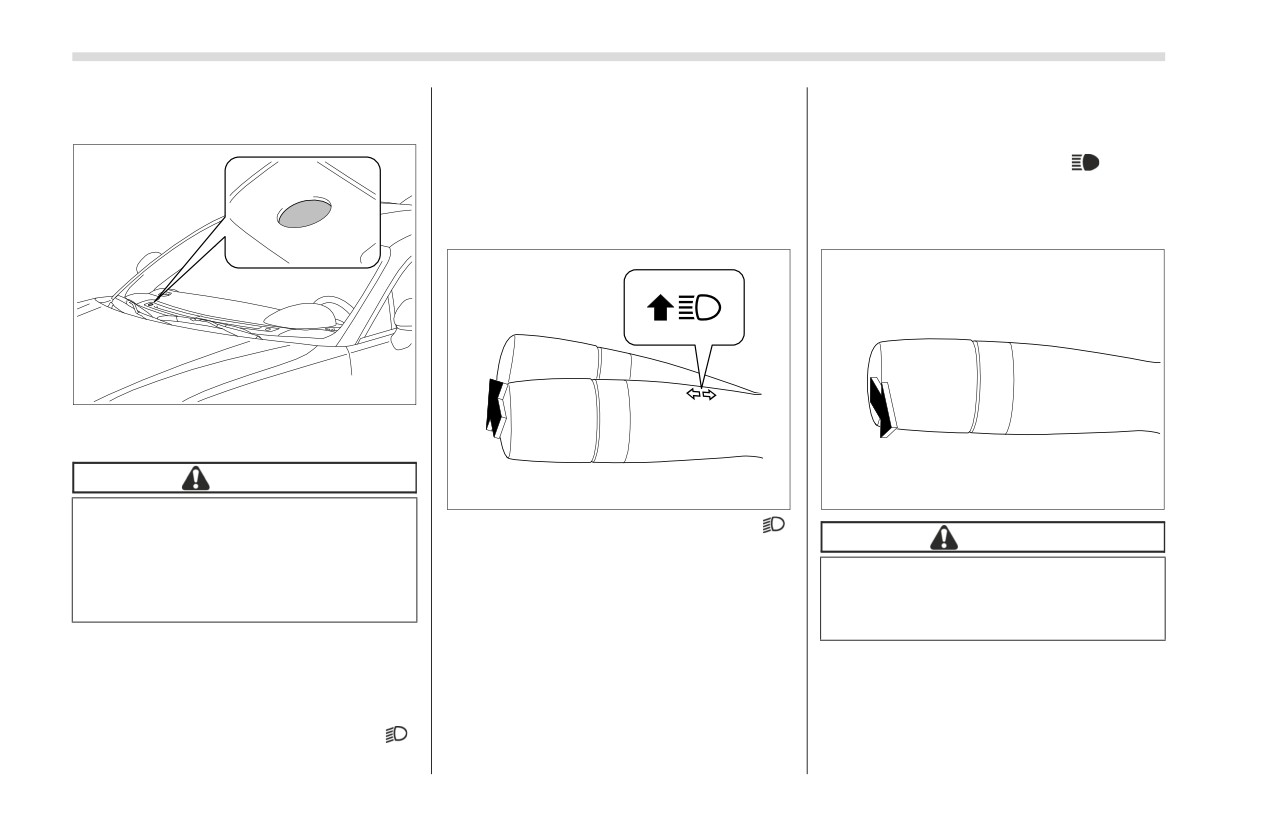
■ High/Low Beam Change
(Dimmer)
■ Headlight Flasher
306810
The sensor is on the instrument panel as
shown in the illustration.
CAUTION
306965
306966
If any object is placed on or near the
While the light control switch is in the “
”
sensor, the sensor may not detect
CAUTION
or “AUTO” position in a dark place, the
the level of the ambient light cor-
headlights will turn on.
rectly and the auto on/off headlights
Do not hold the lever in the flashing
Pushing the lever forward and releasing it
may not operate properly.
position for more than just a few
will activate the high beam. Pulling the
seconds.
lever rearward and releasing it will switch
NOTE
the headlights to low beam.
To flash the headlights, pull the lever
If the light control switch is in the
For models with the High Beam Assist,
toward you and then release it. The high
“AUTO” position and the headlights do
when the light control switch is in the
beam will stay on for as long as you hold
not turn on when it becomes dark
“AUTO” position, pushing the lever
the lever. The headlight flasher works
outside, turn the light switch to “
”
forward turns the High Beam Assist is on.
even though the lighting switch is in the off
position. If this happens, have your
position.
Light Control Switch
177
When the headlights are on high beam,
When the vehicle speed decreases to
the high beam indicator light “
” on the
or below 10 mph (16 km/h).
combination meter also illuminates.
When the forward area of the vehicle is
bright.
■ High Beam Assist Function
When there is a preceding or oncoming
(If Equipped)
vehicle.
When the EyeSight system is malfunc-
NOTE
tioning or is temporarily stopped.
The high beam assist function
3
utilizes the stereo camera installed at
NOTE
the position of the front map lights.
Do not overestimate the capacity of
For details on how to handle the
the high beam assist function. The
306869
stereo camera, refer to the Owner’s
driver always has the responsibility to
High beam assist indicator
Manual supplement for the EyeSight
understand the surrounding situation,
When the high beam assist function is
system.
to drive safely, and to change the head-
activated, the high beam assist indicator
The high beam assist function automati-
light mode manually if necessary.
on the combination meter will illuminate.
cally changes the headlight from high
The factory setting (default setting)
beam to low beam (or vice versa).
for this function is set as “operational”.
NOTE
When all of the following conditions are
This setting can be changed to OFF
If the high beam assist function is mal-
met, the headlight will change to high
(non-operation) at SUBARU dealers.
functioning or is temporarily stopped,
beam.
For more details, contact a SUBARU
the headlight will be fixed at low beam.
dealer.
When the vehicle speed increases to or
above 20 mph (32 km/h).
▼ Temporary stop of high beam
▼ How to use the high beam assist
There is no preceding or oncoming
assist function
function
vehicle.
If the high beam assist function stops
The high beam assist function will be acti-
The forward area of the vehicle is dark.
temporarily due to poor visibility or
vated when all the following conditions are
The road does not have a sharp curve.
abnormal temperature, the message
met.
When any of the following conditions are
appears on the combination meter. Once
The light control switch is in the “AUTO”
met, the headlight will change to low
the conditions have been remedied, drive
position and the low beam headlights are
beam.
the vehicle for a while to restore the
on automatically.
system.
The turn signal lever is pushed forward.
- CONTINUED -
178
Light Control Switch
NOTE
NOTE
on the high beam assist function, push
the lever forward and release it.
Even when the operation conditions of
The sensitivity of the high beam
When manually changing the head-
the high beam assist function are met,
assist function cannot be lowered in
there may be a case in which the high
the following conditions.
light mode to the high beam, if you turn
beam assist indicator does not illumi-
-
Cruise control or Adaptive
the light control switch to the “
”
nate.
Cruise Control indicator is illumi-
position, the parking lights, side
nated.
marker lights, tail lights and license
▼ How to temporarily lower the sensi-
-
The EyeSight warning indicator
plate lights will turn on.
tivity of the high beam assist func-
(yellow) is illuminated
▼ Tips for the high beam assist
tion
The sensitivity of the high beam
system
assist function returns to normal level
The sensitivity of the high beam assist
the next time the ignition switch is
The high beam assist function recog-
function can be lowered by using the
turned to the “OFF” position and the
nizes the condition surrounding the
following operations.
engine is restarted.
vehicle based on the brightness of illumi-
1. After turning the ignition switch to the
nation ahead of your vehicle, etc. There-
“ON” position, set the light control switch
▼ How to change the headlight mode
fore, the headlight mode may switch in
to the
“AUTO” position and push the
manually
some situations that do not match to the
signal lever forward (high beam position).
driver’s sense.
Change to the low beam:
2. After the high beam assist indicator on
A bicycle or cargo cycle may not be
Set the light control switch to “
”.
the combination meter will illuminate, turn
detected.
Pull the lever while the high beam is
the ignition switch to the “OFF” position.
turning on and release it.
Under the following situations, the
3. Turn the ignition switch to the “ON”
brightness of ambient illumination may not
Change to the high beam:
position and within approximately
15
be detected correctly and the high beam
Push the lever forward and release it.
seconds, press the
“
”
(following
assist function may not work properly. As
distance setting) switch more than
10
At this time, the high beam assist function
a result, the glare of the high beam may
times consecutively.
will turn off, the high beam assist indicator
disturb the oncoming vehicle or vehicle
will turn off and the high beam indicator
ahead. Also, the low beam mode may
When the sensitivity of the high beam
light will turn on.
continue although there are no oncoming
assist function is lowered, the high beam
assist indicator light “
” on the combina-
vehicles and vehicles ahead. In the such
NOTE
cases, change the headlight mode manu-
tion meter display (color TFT) will flash.
After manually changing the head-
ally.
light mode to the high beam, if you turn
Light Control Switch
179
- In bad weather
(fog, snow, sand
- When the stereo camera is
- Color or brightness of the headlights
storm, heavy rain, etc.).
deformed or the stereo camera lenses
of an oncoming vehicle or the tail lights
- When the windshield glass is dirty or
are dirty.
of a vehicle ahead.
fogged.
- Immediately after the engine has
- The headlights of the oncoming
- When the windshield is cracked or
started.
vehicle or the tail lights of the vehicle
damaged.
In the following conditions, the head-
ahead are covered with mud, snow,
- If there are lights similar to the head-
light mode will not be automatically
etc.
lights or the tail lights in the surrounding
changed from the high beam to the low
- Movement and direction of an
area.
beam.
oncoming vehicle or a vehicle ahead.
- When an oncoming vehicle or
- When the headlights of an
3
- When your vehicle passes an
vehicle ahead is driven without its
oncoming vehicle suddenly in a blind
oncoming vehicle or the tail lights of a
headlights and tail lights on.
curve.
vehicle ahead illuminate on only one
- If the headlights of an oncoming
- When another vehicle passes in
side.
vehicle or the tail lights of a vehicle
front of your vehicle.
- When the oncoming vehicle or
ahead are dirty or discolored, or if the
- When an oncoming vehicle or
vehicle ahead is a motorcycle.
light beams are not aimed correctly.
vehicle ahead comes in and out of view
- Conditions of a road (slope, curve,
- When a rapid change of brightness
because of continuous curves, median
road surface, etc.).
continues while driving.
strips, roadside trees, etc.
- Number of passengers and weight
- When driving on a road with many
If the stereo camera detects the light of
of loaded cargo.
ups and downs or uneven surfaces.
the front fog lights of an oncoming vehicle,
- Limitation of the detection ability of
- When driving on a road with many
the headlight mode may change from the
the stereo camera.
curves.
high beam to the low beam automatically.
- When there are some objects that
The headlight mode may change from
reflect light strongly, such as a road
the high beam to the low beam, or the low
sign or a mirror in vehicle ahead.
beam mode may continue, when affected
- When the rear part of the vehicle
by a street light, traffic signal, illumination
ahead, such as a container, reflects
of an advertisement board, or a reflective
light strongly.
object such as a road sign and signboard.
- When the headlights of your vehicle
The timing of the change of headlight
are damaged or dirty.
mode may differ due to the following
- When your vehicle is tilted, such as
factors.
in case the vehicle has a flat tire or is
being towed.
- CONTINUED -
180
Steering Responsive Headlight (SRH) (If Equipped)
■ Daytime Running Light
While the headlight switch is in the
3-11. Steering Responsive
“AUTO” position and the headlights
System
Headlight (SRH) (If
turn on automatically, the daytime
running light is deactivated.
Equipped)
WARNING
When the turn signal indicators are
flashing, the daytime running light on
When the daytime running lights are
the side that the turn signals are
illuminated, the tail lights do not
flashing will turn off.
illuminate. When it becomes dark
2
outside, turn the light switch to the
“
” position to illuminate the head-
lights and tail lights. This will
improve visibility and allow other
drivers to see your vehicle more
1
easily.
The daytime running lights will automati-
304837
cally illuminate when the following condi-
tions are fulfilled.
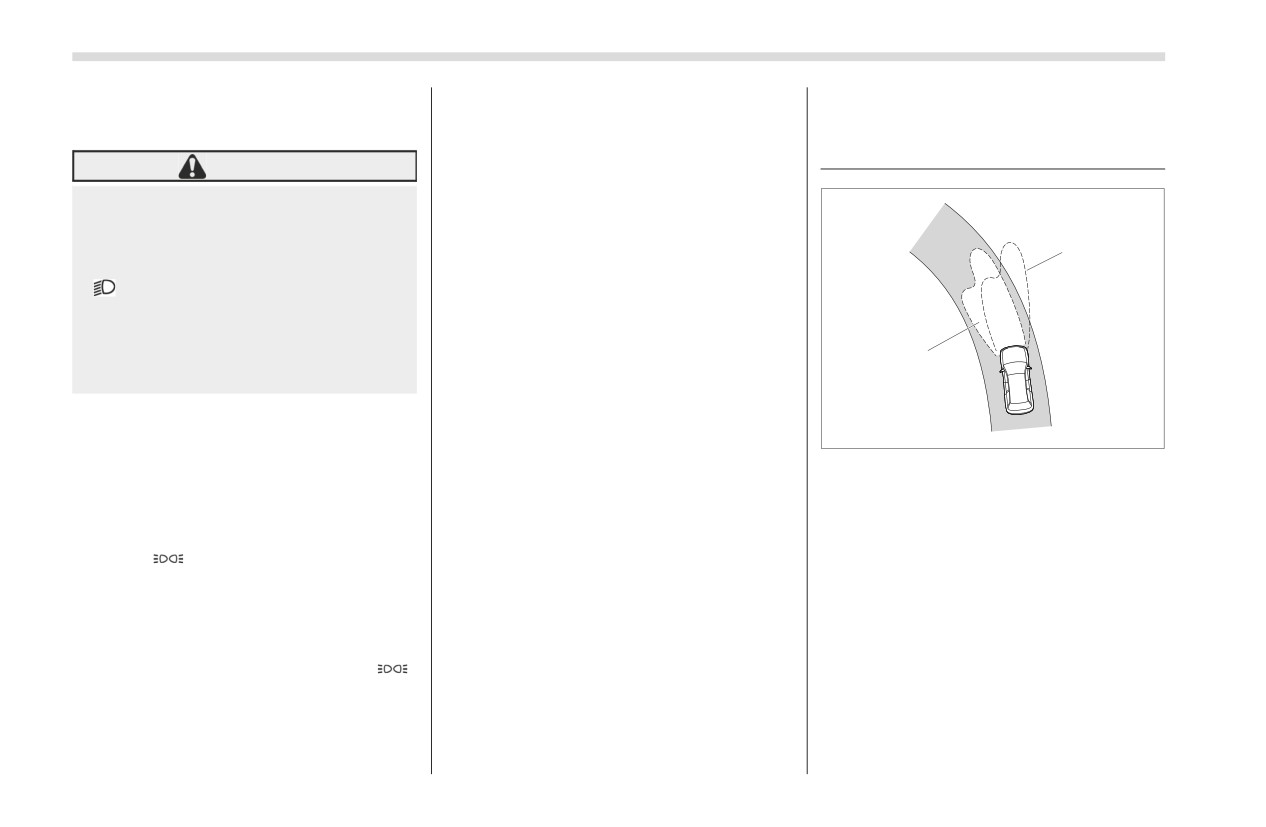
1) The target area of illumination when
The engine is running.
SRH is activated
2) The target area of illumination when
The parking brake is fully released.
SRH is not activated
The light control switch is in the
“AUTO”, “
” or “OFF” position.
SRH is a function that automatically
For AT models, the select lever is in a
moves the headlight beam to the left or
position other than the “P” position.
right in accordance with the steering
angle. This function helps to improve the
NOTE
visibility at night by illuminating the road
When the light switch is in the “
”
ahead at corners and intersections.
position, the instrument panel illumina-
You can turn the SRH function on or off.
tion, side marker lights, tail lights and
The settings can be changed by using the
license plate lights are also illumi-
combination meter display (color TFT) or
nated.
center information display. For details,
Steering Responsive Headlight (SRH) (If Equipped)
181
refer to "Driving Support System Settings
SRH only activates when the vehicle
Display" ) P157, "Car settings" ) P165
is traveling forward at the speed of
approximately 5 mph (8 km/h) or more.
1
3
1
306815
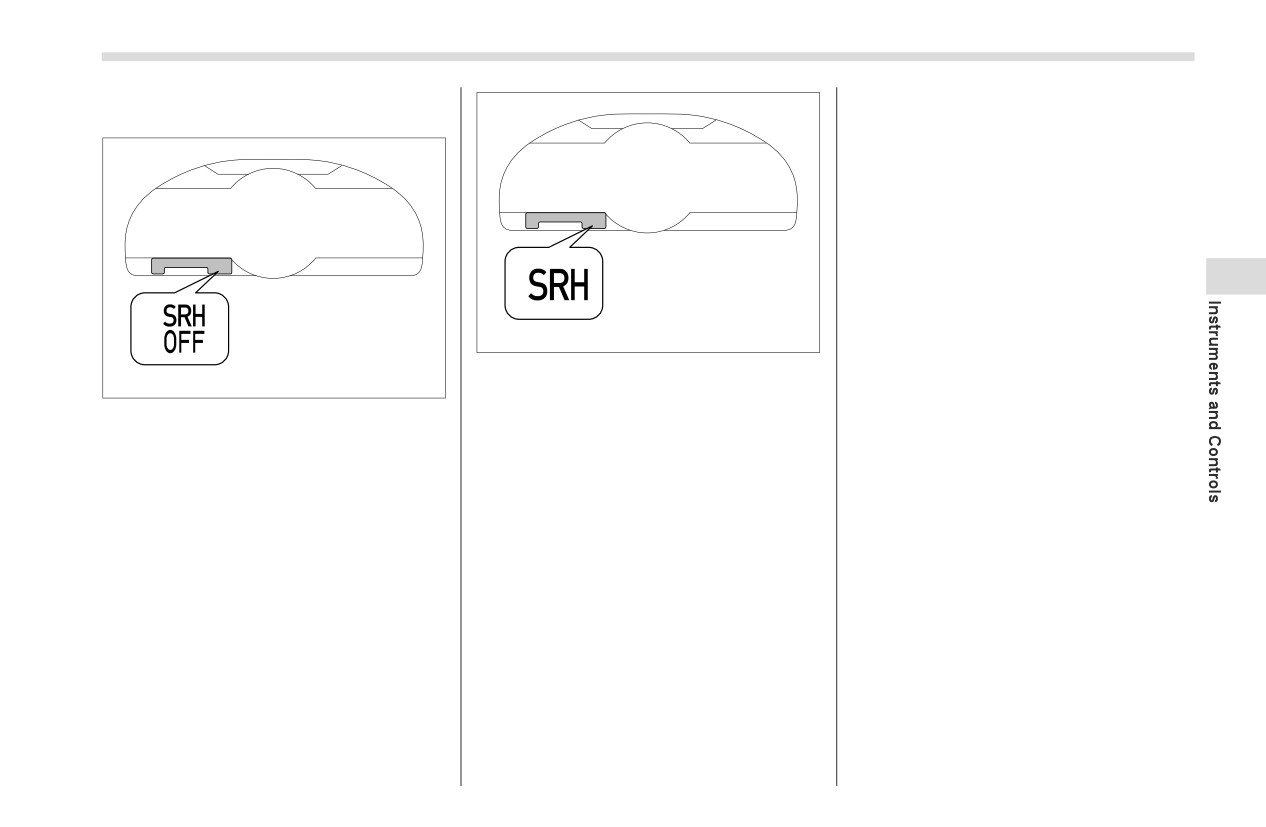
1) SRH warning indicator
306814
If SRH is malfunctioning, the SRH warning
1) SRH OFF indicator
indicator on the combination meter display
The SRH OFF indicator on the combina-
(color TFT) illuminates and a message
tion meter display (color TFT) turns off
appears on the warning screen when the
when SRH is turned on.
ignition switch is in the “ON” position. It
indicates that SRH has been deactivated.
The SRH OFF indicator on the combina-
Contact a SUBARU dealer for an inspec-
tion meter display (color TFT) illuminates
tion.
when SRH is turned off.
NOTE
The SRH function operative/non-
operative status is kept when the
engine is turned off, even if the engine
is restarted.
When you turn the ignition switch to
the “ON” position, the SRH OFF indi-
cator will illuminate and turn off after
several seconds.