Subaru Ascent (2023 year). Manual in english - page 17
492 Spark plugs
cleaner case (rear) into the slits on the
11-8. Spark plugs
11-9. Drive belt
air cleaner case (front).
6. Install in the reverse order of removal.
It may be difficult to replace the spark
It is unnecessary to check the deflection of
plugs. It is recommended that you have the
the drive belt periodically because your
NOTE
spark plugs replaced by your SUBARU
engine is equipped with an automatic belt
Install the air cleaner element so that
dealer.
tension adjuster. However, replacement of
the surface with “UPR” printed on it
the belt should be done according to the
The spark plugs should be replaced
faces upward.
maintenance schedule in the “Warranty
according to the maintenance schedule
and Maintenance Booklet”. Consult your
in the “Warranty and Maintenance Book-
SUBARU dealer for replacement.
let”.
If the drive belt is loose, cracked or worn,
contact your SUBARU dealer.
CAUTION
Make sure the cables are replaced in
the correct order.
& Recommended spark plugs
For the recommended spark plugs, refer to
“Electrical system” FP526.
Continuously variable transmission fluid
493
11-10. Continuously variable
11-11. Front differential gear
11-12. Brake fluid
transmission fluid
oil and rear differential gear
& Checking the fluid level
oil
It is not necessary to check the transmis-
WARNING
sion fluid level. Check that there are no
It is not necessary to check the gear oil
cracks, damage or leakage. However, the
level. Check that there are no cracks,
Never let brake fluid contact your
fluid inspection should be performed ac-
damage or leakage. However, the oil
eyes because brake fluid can be
cording to the maintenance schedule in
inspection should be performed according
harmful to your eyes. If brake
the “Warranty and Maintenance Booklet”.
to the maintenance schedule in the “War-
fluid gets in your eyes, immedi-
Consult your SUBARU dealer for details.
ranty and Maintenance Booklet”. Consult
ately flush them thoroughly with
your SUBARU dealer for details.
clean water. For safety, when
performing this work, wearing
& Recommended grade and
eye protection is advisable.
viscosity
Brake fluid absorbs moisture
Each oil manufacturer has its own base
from the air. Any absorbed moist-
oils and additives. Never use different
ure can cause a dangerous loss
brands together. For details, refer to “Front
of braking performance.
differential and rear differential gear oil”
If the vehicle requires frequent
FP525.
refilling, there may be a leak. If
you suspect a problem, have the
CAUTION
vehicle checked at your SUBARU
dealer.
Using a differential gear oil other
than the specified oil may cause a
decline in vehicle performance.
CAUTION
When adding brake fluid, be care-
ful not to allow any dirt into the
reservoir.
Never splash the brake fluid over
painted surfaces or rubber parts.
- CONTINUED -
494 Brake pedal
Alcohol contained in the brake
& Recommended brake fluid
11-13. Brake pedal
fluid may damage them.
Refer to “Fluids” FP525.
. Be careful not to spill brake fluid
Check the brake pedal free play and
when adding it. If brake fluid
CAUTION
reserve distance according to the main-
touches the exhaust pipe, it may
tenance schedule in the “Warranty and
cause a bad smell, smoke, and/or
Never use different brands of brake
Maintenance Booklet”.
a fire. If brake fluid gets on the
fluid together. Also, avoid mixing
DOT 3 and DOT 4 brake fluids even if
exhaust pipe, be sure to wipe it
they are the same brand.
off.
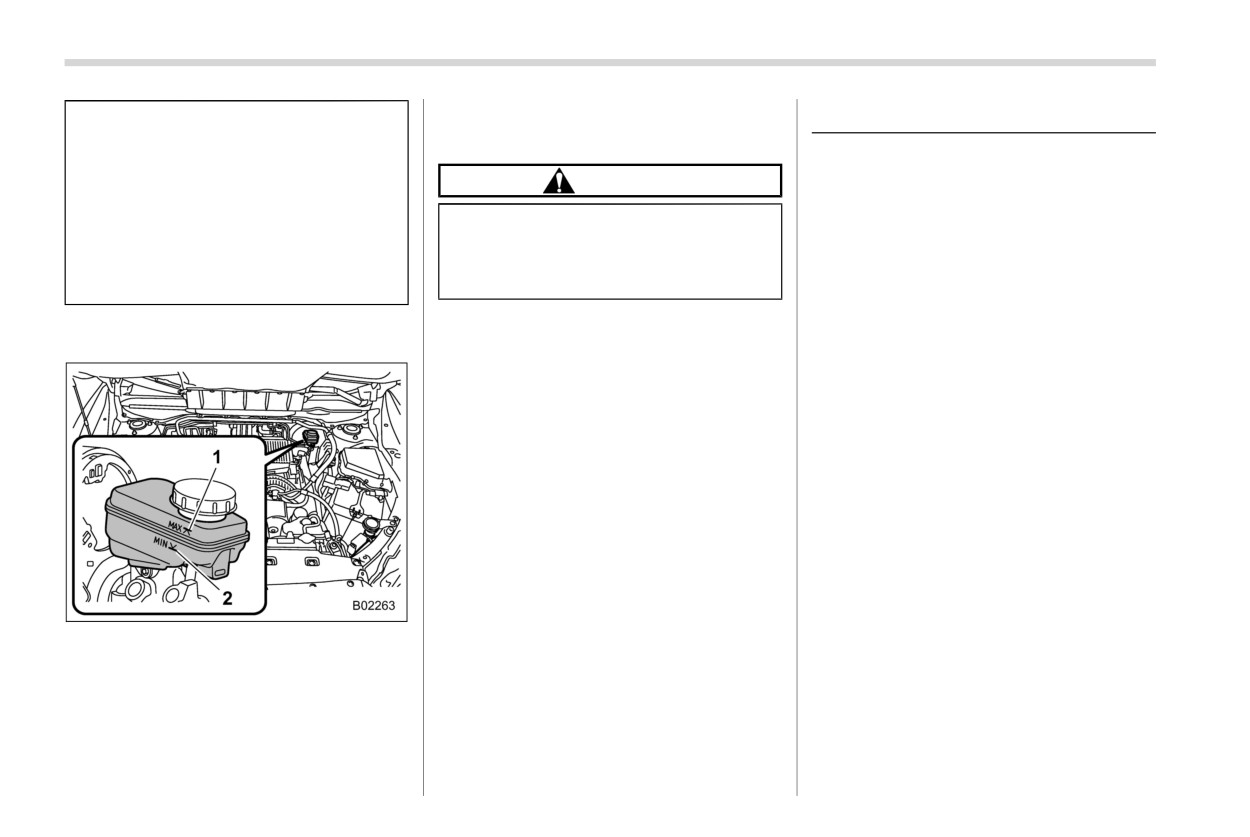
Visually check the brake fluid level of the
reservoir monthly on the even surface.
1
“MAX” level line
2
“MIN” level line
Be sure to check the brake fluid level from
the outside of the reservoir. If the fluid level
is below “MIN”, top up brake fluid to “MAX”.
Use only brake fluid from a sealed contain-
er.
Replacement of brake pad
495
11-14. Replacement of brake
CAUTION
11-15. Tires and wheels
pad
If you continue to drive despite the
& Types of tires
scraping noise from the audible
You should be familiar with the type of tires
brake pad wear indicator, it will
present on your vehicle.
result in the need for costly brake
rotor repair or replacement.
! All season tires
All season tires are designed to provide an
adequate measure of traction, handling
& Breaking-in of new brake
and braking performance in year-round
pads
driving including snowy and icy road
When replacing the brake pad, use only
conditions. However, all season tires do
not offer as much traction performance as
genuine SUBARU parts. After replace-
ment, the new parts must be broken in.
winter (snow) tires in heavy or loose snow
Contact your SUBARU dealer for details.
or on icy roads.
All season tires are identified by
“ALL
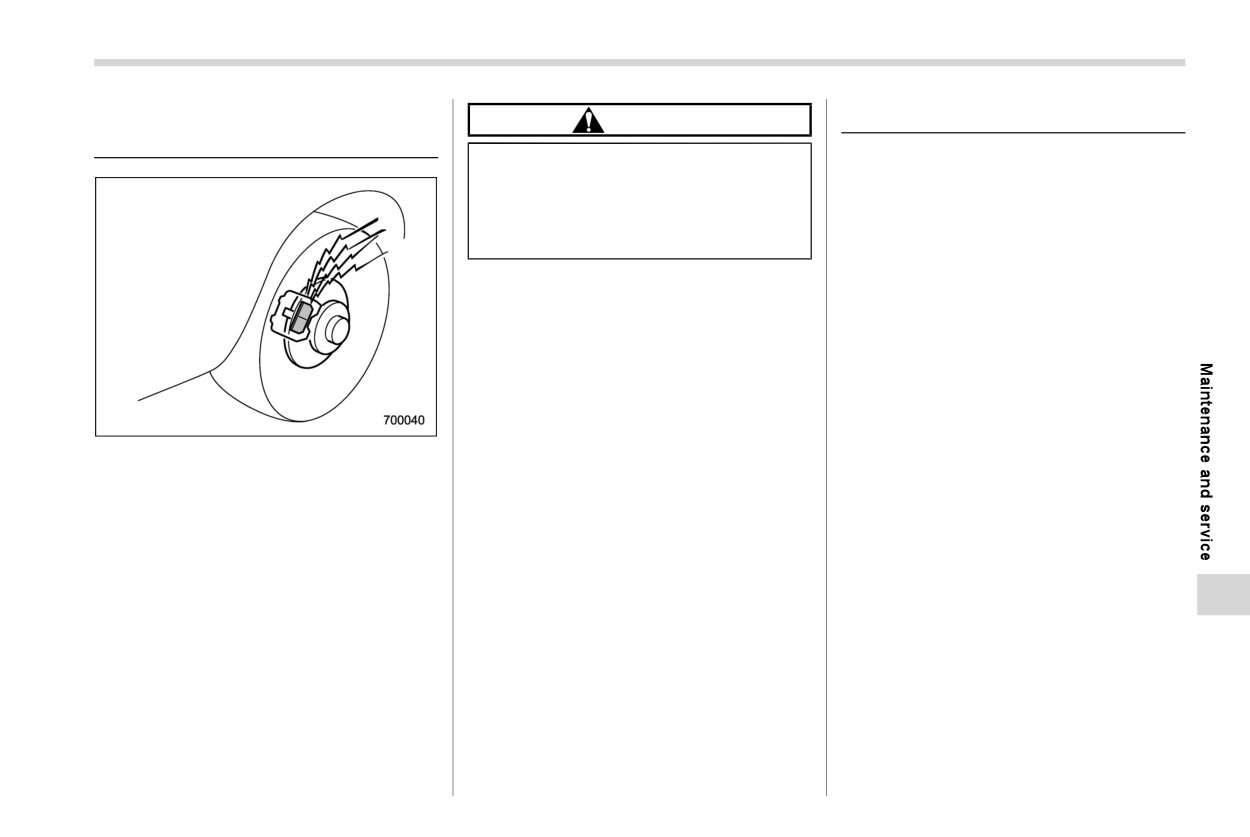
The disc
brakes
have
audible
wear
in-
SEASON” and/or “M+S” (Mud & Snow) on
dicators on the brake pads. If the brake
the tire sidewall.
pads wear close to their service limit, the
! Summer tires
wear indicator makes a very audible
Summer tires are high-speed capability
scraping noise when the brake pedal is
tires best suited for highway driving under
applied.
dry conditions.
If you hear this scraping noise each time
Summer tires are inadequate for driving on
you apply the brake pedal, have the brake
slippery roads such as on snow-covered or
pads serviced by your SUBARU dealer as
icy roads.
soon as possible.
If you drive your vehicle on snow-covered
or icy roads, we strongly recommend the
use of winter (snow) tires.
When installing winter tires, be sure to
replace all four tires.
- CONTINUED -
496 Tires and wheels
! Winter (snow) tires
the garage and the temperature outside.
go to a SUBARU dealer to have the
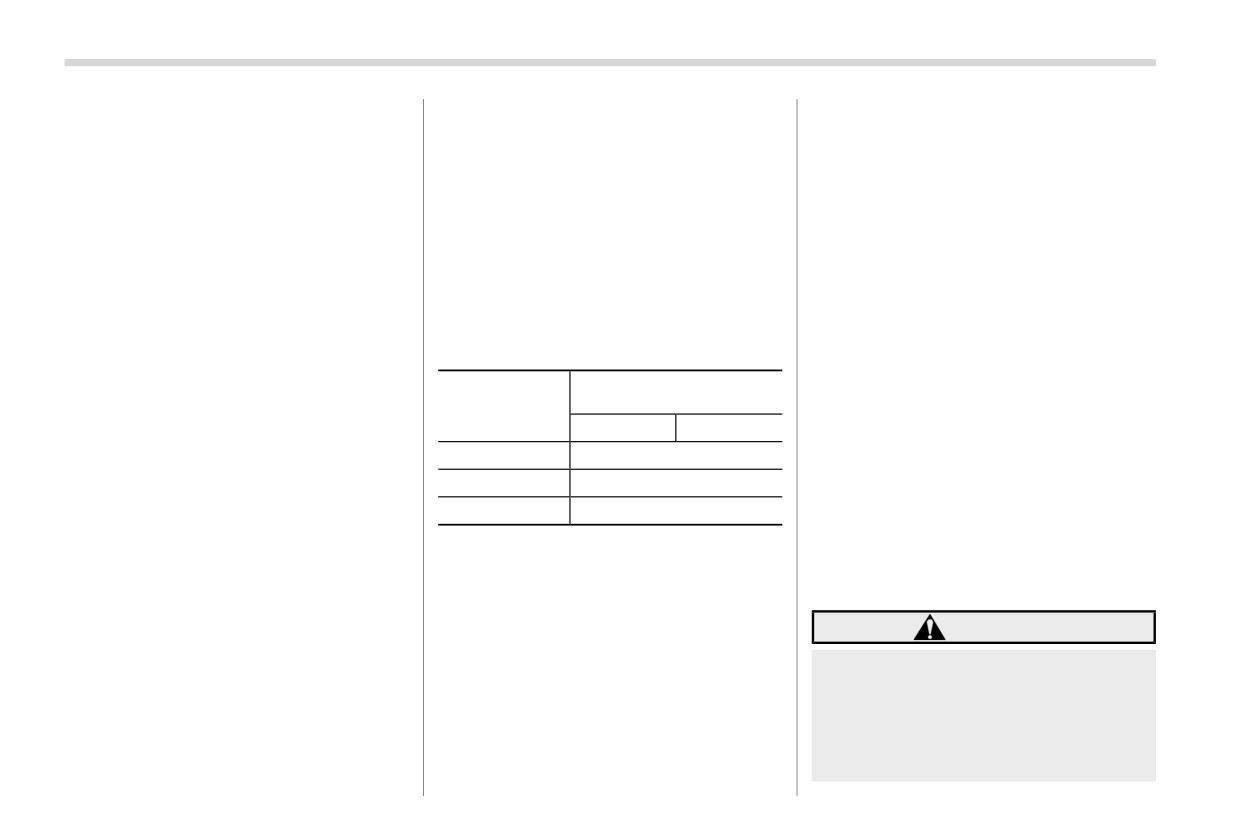
By way of example, the following table
system inspected as soon as possible.
Winter tires are best suited for driving on
shows the required tire pressures that
snow-covered and icy roads. However,
While the vehicle is driven, friction be-
correspond to various outside tempera-
winter tires do not perform as well as
tween tires and the road surface causes
tures when the temperature in the garage
summer tires and all season tires on roads
the tires to warm up. After illumination of
is 608F (15.68C).
other than snow-covered and icy roads.
the low tire pressure warning light, any
Example:
increase in the tire pressures caused by an
& Tire pressure monitoring
Tire size: 245/50R20 102H
increase in the outside air temperature or
system (TPMS) (if equipped)
Standard tire pressures:
by an increase in the temperature in the
Front: 33 psi (230 kPa, 2.3 kgf/cm2)
tires can cause the low tire pressure
The tire pressure monitoring system pro-
Rear: 33 psi (230 kPa, 2.3 kgf/cm2)
warning light to turn off.
vides the driver with a warning message by
sending a signal from a sensor that is
Garage temperature: 608F (15.68C)
It may not be possible to install TPMS
installed in each wheel when tire pressure
Adjusted pressure
valves on certain wheels that are on the
is severely low. The tire pressure monitor-
Outside
[psi (kPa, kgf/cm2)]
market. Therefore, if you change the
temperature
ing system will activate only when the
Front
Rear
wheels (for example, a switch to snow
vehicle is driven. Also, this system may not
tires), use wheels that have the same part
308F (−18C)
36
(250, 2.5)
react immediately to a sudden drop in tire
number as the standard-equipment
pressure (for example, a blow-out caused
108F (−128C)
38
(265, 2.65)
wheels. Without four operational TPMS
by running over a sharp object).
−108F (−238C)
41
(280, 2.8)
valve/sensors on the wheels, the TPMS
will not fully function and the warning light
If you adjust the tire pressures in a warm
If the low tire pressure warning light
on the combination meter will illuminate
garage and will then drive the vehicle in
illuminates when you drive the vehicle in
steadily after blinking for approximately 1
cold outside air, the resulting drop in tire
cold outside air after adjusting the tire
minute.
pressures may cause the low tire pressure
pressures in a warm garage, re-adjust the
warning light to illuminate. To avoid this
tire pressures using the method described
WARNING
problem when adjusting the tire pressures
above. Then, increase the vehicle speed
in a warm garage, inflate the tires to
to at least 20 mph (32 km/h) and check to
If the low tire pressure warning light
pressures higher than those shown on
see that the low tire pressure warning light
does not illuminate briefly after the
the tire inflation pressure label. Specifi-
turns off a few minutes later. If the low tire
ignition switch is turned on or the
cally, inflate them by an extra 1 psi (6.9
pressure warning light does not turn off,
light illuminates steadily after blink-
kPa, 0.07 kgf/cm2) for every difference of
the tire pressure monitoring system may
ing for approximately 1 minute, you
108F (5.68C) between the temperature in
not be functioning normally. In this event,
should have your tire pressure mon-
Tires and wheels
497
itoring system checked at a
SUBARU dealer to have the system
& Tire inspection
SUBARU dealer as soon as possi-
inspected.
Check on a daily basis that the tires
ble.
are free from serious damage,
If this light illuminates while driving,
! TPMS valve self-registration
nails, and stones. At the same time,
never brake suddenly and keep
When the wheels are replaced (such as
driving straight ahead while gradu-
check the tires for abnormal wear.
when installing snow tires) or when a new
ally reducing speed. Then slowly
Contact your SUBARU dealer im-
TPMS valve is mounted on a new installed
pull off the road to a safe place.
wheel, you will need to perform TPMS
mediately if you find any problems.
Otherwise, an accident involving
valve self-registration. Refer to the follow-
serious vehicle damage and serious
NOTE
ing procedure to perform TPMS valve self-
personal injury could occur.
registration.
When the wheels and tires
If this light still illuminates while
1. Install the wheels with TPMS valves on
strike curbs or are subjected
driving after adjusting the tire pres-
the vehicle.
to harsh treatment as when the
sure, a tire may have significant
2. Adjust the tire pressure to the specified
vehicle is driven on a rough
damage and a fast leak that causes
value. For information about the spe-
surface, they can suffer da-
the tire to lose air rapidly. If you have
cified value of the tire pressure, refer to
a flat tire, replace it with a spare tire
mage that cannot be seen with
“Tires” FP526.
as soon as possible.
the naked eye. This type of
3. Drive at speeds above 25 mph (40
When a spare tire is mounted or a
km/h) for at least 4 miles (6 km) or until
damage does not become evi-
wheel rim is replaced without the
the low tire pressure warning light turns
dent until time has passed. Try
original pressure sensor/transmitter
off.
not to drive over curbs, pot-
being transferred, the low tire pres-
holes or on other rough sur-
sure warning light will illuminate
NOTE
faces. If doing so is unavoid-
steadily after blinking for approxi-
mately 1 minute. This indicates the
. When installing TPMS valves, use
able, keep the vehicle’s speed
TPMS is unable to monitor all four
only genuine SUBARU parts.
down to a walking pace or less,
road wheels. Contact your SUBARU
. Registration of TPMS valves can
and approach the curbs as
also be done at a SUBARU dealer.
dealer as soon as possible for tire
Consult your SUBARU dealer.
squarely as possible. Also,
and sensor replacement and/or sys-
make sure the tires are not
tem resetting. If the light illuminates
steadily after blinking for approxi-
pressed against the curb when
mately 1 minute, promptly contact a
- CONTINUED -
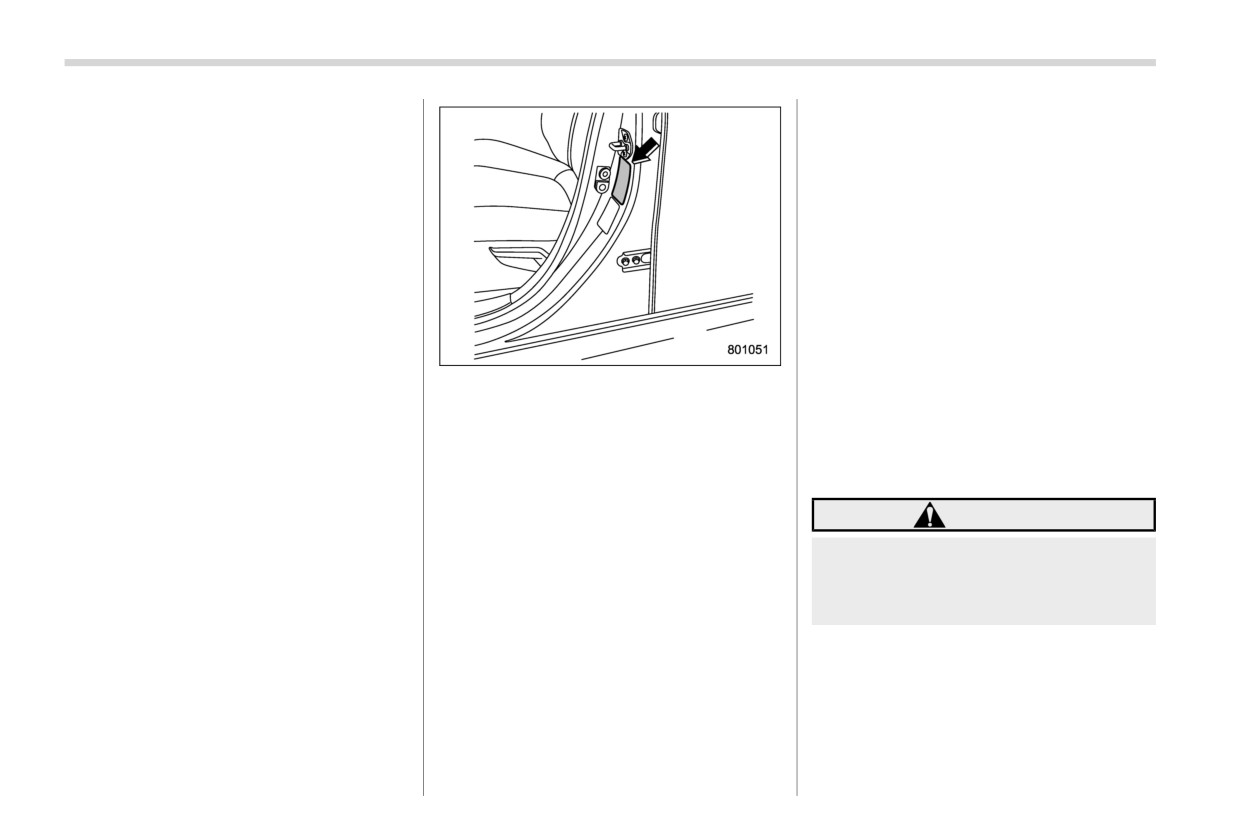
498 Tires and wheels
you park the vehicle.
When a tire becomes warm, the air
. If you feel unusual vibration
inside it expands, causing the tire
while driving or find it difficult
pressure to increase. Be careful not
to steer the vehicle in a
to mistakenly release air from a
straight line, one of the tires
warm tire to reduce its pressure.
and/or wheels may be da-
NOTE
maged. Drive slowly to the
. The air pressure in a tire
nearest authorized SUBARU
increases by approximately
dealer and have the vehicle
4.3 psi (30 kPa, 0.3 kgf/cm2)
inspected.
when the tire becomes warm.
. The tires are considered cold
& Tire pressures and wear
Tire inflation pressure label
when the vehicle has been
Maintaining the correct tire pres-
Check the tire pressures when the
parked for at least three hours
sures helps to maximize the tires’
tires are cold. Use a pressure
or has been driven less than 1
service lives and is essential for
gauge to adjust the tire pressures
mile (1.6 km).
good running performance. Check
to the values shown on the tire
and, if necessary, adjust the pres-
inflation pressure label. The tire
WARNING
sure of each tire and the spare (if
inflation pressure label is located
Do not let air out of warm tires
equipped) at least once a month
on the door pillar on the driver’s
to adjust pressure. Doing so
and before any long journey.
side.
will result in low tire pressure.
Driving even a short distance
warms up the tires and increases
Incorrect tire pressures detract from
the tire pressures. Also, the tire
controllability and ride comfort, and
pressures are affected by the out-
they cause the tires to wear abnor-
side temperature. It is best to check
mally.
tire pressure outdoors before driv-
ing the vehicle.
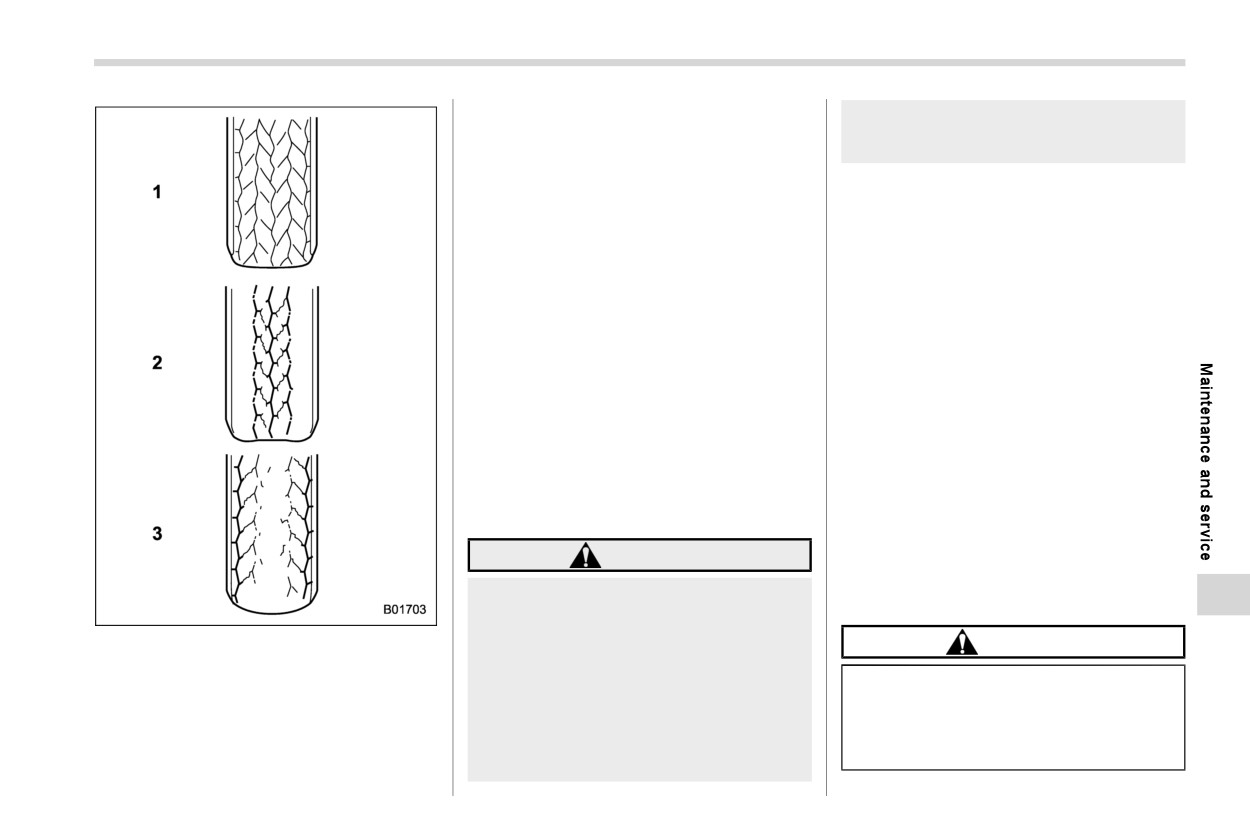
Tires and wheels
499
2
Under inflated tire (tread worn
vehicle control could lead to
on shoulders)
an accident.
Rolling resistance is high, so
fuel consumption is also high-
er.
& Wheel balance
3
Over inflated (tread worn in the
Each wheel was correctly balanced
center)
when your vehicle was new, but the
Ride comfort is poor. Also, the
wheels will become unbalanced as
tire magnifies the effects of
the tires become worn during use.
road-surface bumps and dips,
Wheel imbalance causes the steer-
possibly resulting in vehicle
ing wheel to vibrate slightly at
damage.
certain vehicle speeds and detracts
from the vehicle’s straight-line sta-
If the tire inflation pressure label
bility. It can also cause steering and
shows tire pressures for the vehicle
suspension system problems and
when fully loaded, adjust the tire
abnormal tire wear. If you suspect
pressures to the values that match
that the wheels are not correctly
the loading conditions.
balanced, have them checked and
WARNING
adjusted by your SUBARU dealer.
Also have them adjusted after tire
Driving at high speeds with
repairs and after tire rotation.
excessively low tire pressures
1
Correct
tire
pressure
(tread
can cause the tires to deform
CAUTION
worn evenly)
severely and to rapidly heat
Loss of correct wheel align-
Roadholding is good, and
up. A sharp increase in tem-
ment causes the tires to wear
steering is responsive. Rolling
perature could cause tread
on one side and reduces the
resistance is low, so fuel con-
separation and destruction of
vehicle’s running stability.
sumption is also lower.
the tires. The resulting loss of
- CONTINUED -
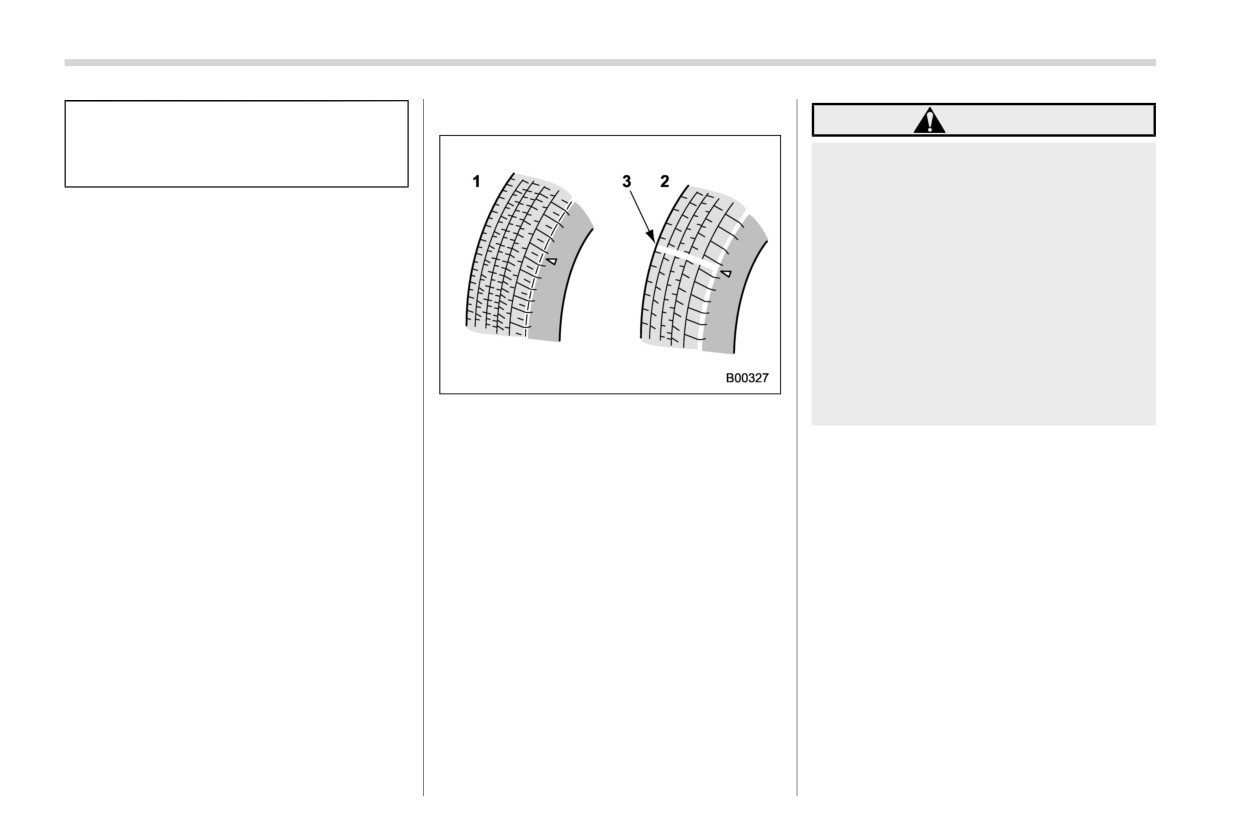
500 Tires and wheels
Contact your SUBARU dealer
& Wear indicators
WARNING
if you notice abnormal tire
When a tire’s tread wear indi-
wear.
cator becomes visible, the tire
is worn beyond the acceptable
NOTE
limit and must be replaced
The suspension system is de-
immediately. With a tire in this
signed to hold each wheel at a
condition, driving at high
certain alignment (relative to the
speeds in wet weather can
other wheels and to the road) for
cause the vehicle to hydro-
optimum straight-line stability
plane. The resulting loss of
and cornering performance.
vehicle control can lead to an
accident.
1
New tread
2
Worn tread
NOTE
3
Tread wear indicator
For safety, inspect tire tread
Each tire incorporates a tread wear
regularly and replace the tires
indicator, which becomes visible
before their tread wear indicators
when the depth of the tread grooves
become visible.
decreases to 0.063 in (1.6 mm). A
tire must be replaced when the
tread wear indicator appears as a
solid band across the tread.
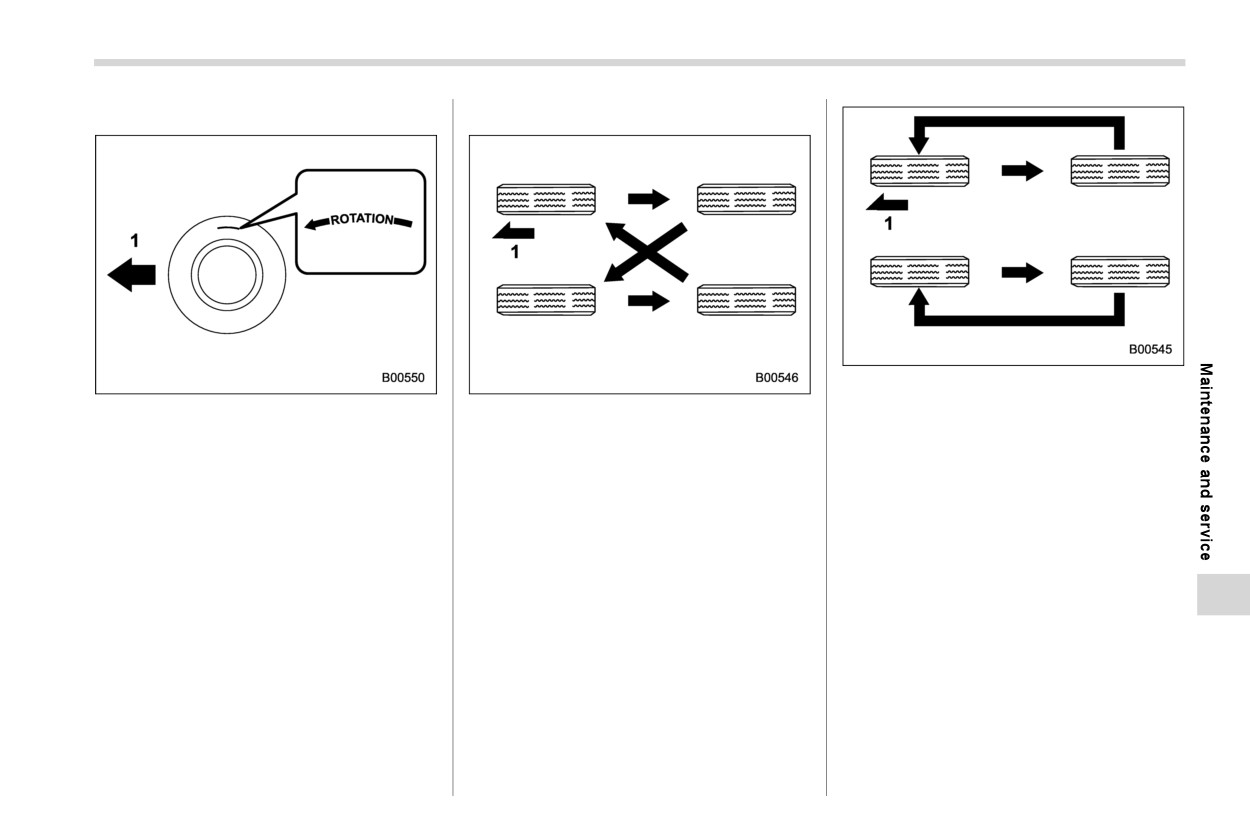
Tires and wheels
501
& Rotational direction of tires
& Tire rotation
Vehicles equipped with unidi-
Example of rotational direction
Vehicles equipped with 4 non-
rectional tires
marked on the sidewall
unidirectional tires
1
Front
1
Front
1
Front
Tire wear varies from wheel to
If the tires have specific rotational
wheel. Move the tires to the posi-
direction, refer to the arrow marked
tions shown in the illustration each
on the side wall.
time they are rotated. For the tire
rotation schedule, refer to the “War-
The arrow should be pointing for-
ranty and Maintenance Booklet”.
ward direction when the wheels are
fitted.
Replace any damaged or unevenly
worn tires at the time of rotation.
After tire rotation, adjust the tire
pressures and make sure the wheel
nuts are correctly tightened.
- CONTINUED -
502 Tires and wheels
After driving approximately
600
All four tires must be the same in terms of
If all the four tires are not the
manufacturer, brand (tread pattern), con-
same for items (a) to (h), serious
miles (1,000 km), check the wheel
struction, and size. You are advised to
mechanical damage could be
nuts again and retighten any nut
replace the tires with new ones that are
caused to the drivetrain of the
that has become loose.
identical to those fitted as standard equip-
car, and affect the followings.
ment.
For handling alloy wheels, refer to “Alloy
- Ride
wheels” FP503.
For safe vehicle operation, SUBARU
- Handling
recommends replacing all four tires at the
- Braking
& Tire replacement
same time.
- Speedometer/Odometer cali-
The wheels and tires are important and
bration
WARNING
integral parts of your vehicle’s design; they
cannot be changed arbitrarily. The tires
- Clearance between the body
When replacing or installing
fitted as standard equipment are optimally
and tires
tire(s), all four tires must be the
matched to the characteristics of the
It also may be dangerous and
same for following items.
vehicle and were selected to give the best
lead to loss of vehicle control,
possible combination of running perfor-
(a) Size
and it can lead to an accident.
mance, ride comfort, and service life. It is
(b) Speed symbol
Use only radial tires. Do not use
essential for every tire to have a size and
(c) Load index
radial tires together with belted
construction matching those shown on the
bias tires and/or bias-ply tires.
(d) Circumference
tire inflation pressure label and to have a
Doing so can dangerously re-
speed symbol and load index matching
(e) Construction
duce controllability, resulting in
those shown on the tire inflation pressure
(f) Manufacturer
an accident.
label.
(g) Brand (tread pattern)
Using tires of a non-specified size detracts
(h) Degree of wear
from controllability, ride comfort, braking
& Wheel replacement
For items (a) to (c), you must
performance, speedometer accuracy and
When replacing wheels due, for example,
obey the specification that is
odometer accuracy. It also creates incor-
to damage, make sure the replacement
printed on the tire inflation pres-
rect body-to-tire clearances and inappro-
wheels match the specifications of the
sure label. The tire inflation pres-
priately changes the vehicle’s ground
wheels that are fitted as standard equip-
sure label is located on the dri-
clearance.
ment. Replacement wheels are available
ver’s door pillar.
at your SUBARU dealer.
Alloy wheels
503
WARNING
11-16. Alloy wheels
11-17. Windshield washer
fluid
Use only those wheels that are
Alloy wheels can be scratched and da-
specified for your vehicle. Wheels
maged easily. Handle them carefully to
not meeting specifications could
maintain their appearance, performance,
interfere with brake caliper opera-
and safety.
tion and may cause the tires to rub
When any of the wheels are removed
against the wheel well housing dur-
and replaced for tire rotation or to
ing turns. The resulting loss of
change a flat tire, always check the
vehicle control could lead to an
tightness of the wheel nuts after driving
accident.
approximately 600 miles (1,000 km). If
any nut is loose, tighten it to the
NOTE
specified torque.
Never apply oil to the threaded parts,
When any of the wheels are removed
wheel nuts, or tapered surface of the
and replaced for tire rotation or for any
wheel.
other reason, always check the tight-
When there
is
only
a
small
amount
of
ness of the wheel nuts after driving
Never let the wheel rub against sharp
washer fluid
remaining, the
windshield
approximately 600 miles (1,000 km). If
protrusions or curbs.
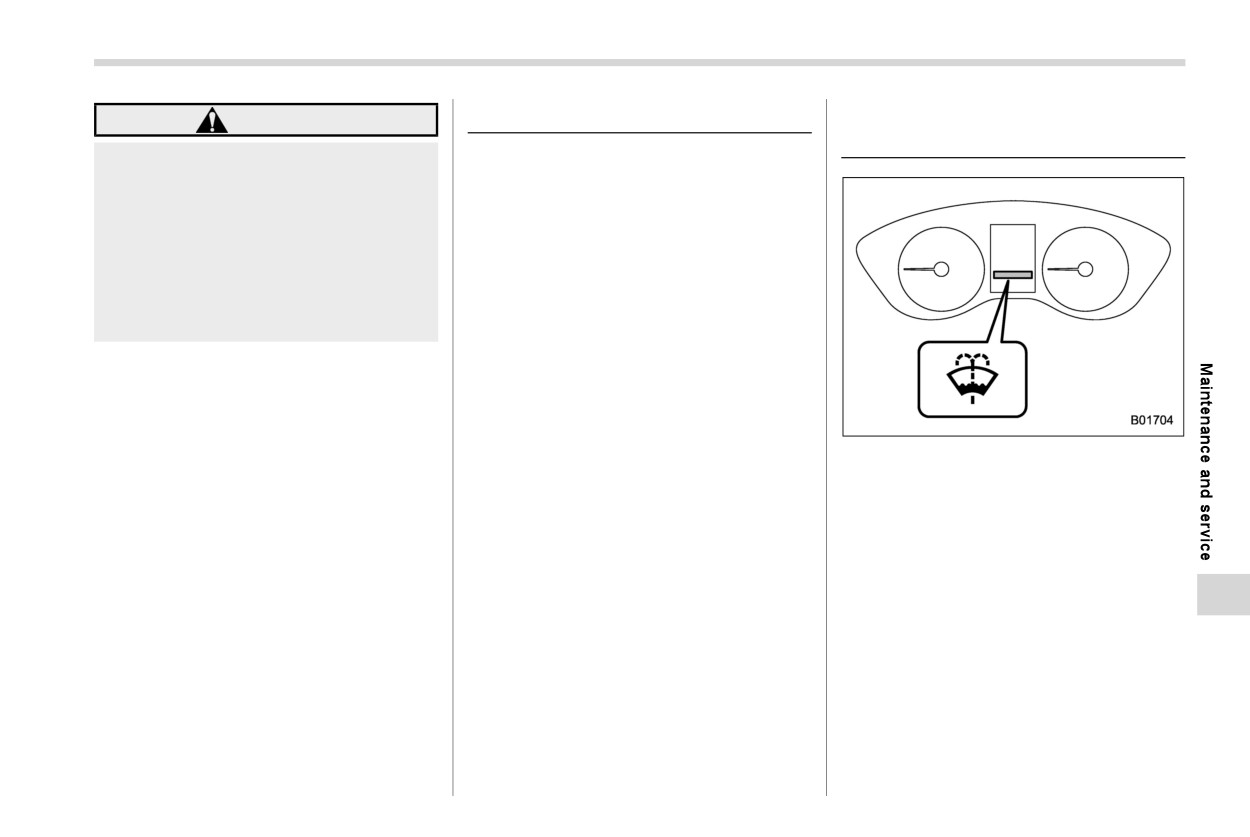
washer fluid warning light will illuminate.
any nut is loose, tighten it to the
When wheel nuts, balance weights, or
When this occurs, refill the washer fluid.
specified torque.
the center cap are replaced, be sure to
replace them with genuine SUBARU
parts designed for alloy wheels.
When stacking and storing removed
tires, place shock-absorbing material
between the tires to protect the wheels
from becoming scratched.
- CONTINUED -
504 Replacement of wiper blades
& Adding the windshield
If you fill the reservoir tank with a fluid with
11-18. Replacement of wiper
washer fluid
a different concentration from the one
blades
used previously, purge the old fluid from
the piping between the reservoir tank and
CAUTION
Grease, wax, insects, or other material on
washer nozzles by operating the washer
the windshield or the wiper blade results in
Never use engine coolant as washer
for a certain period of time. Otherwise, if
the concentration of the fluid remaining in
jerky wiper operation and streaking on the
fluid because it
could cause paint
the piping is too low for the outside
glass. If you cannot remove the streaks
damage.
after operating the windshield washer or if
temperature, it may freeze and block the
the wiper operation is jerky, clean the outer
nozzles.
surface of the windshield and rear window
CAUTION
using a sponge or soft cloth with a neutral
detergent or mild-abrasive cleaner. Do not,
Adjust the washer fluid concen-
however, use detergent to clean the blade
tration appropriately for the out-
rubbers. Use only a sponge or soft cloth
side temperature. If the concen-
(and no neutral detergent or mild abrasive
tration is inappropriate, sprayed
cleaner) when you clean the blade rub-
washer fluid may freeze on the
bers. If you wipe the rubber of the blade
windshield and obstruct your
strongly, the black coating component will
view, and the fluid may freeze in
peel off, which will cause the wiper to
the reservoir tank.
judder. Also, after wiping it off, check that
State or local regulations on
the rubber has not come loose. After
volatile organic compounds may
cleaning the window glass and wiper blade
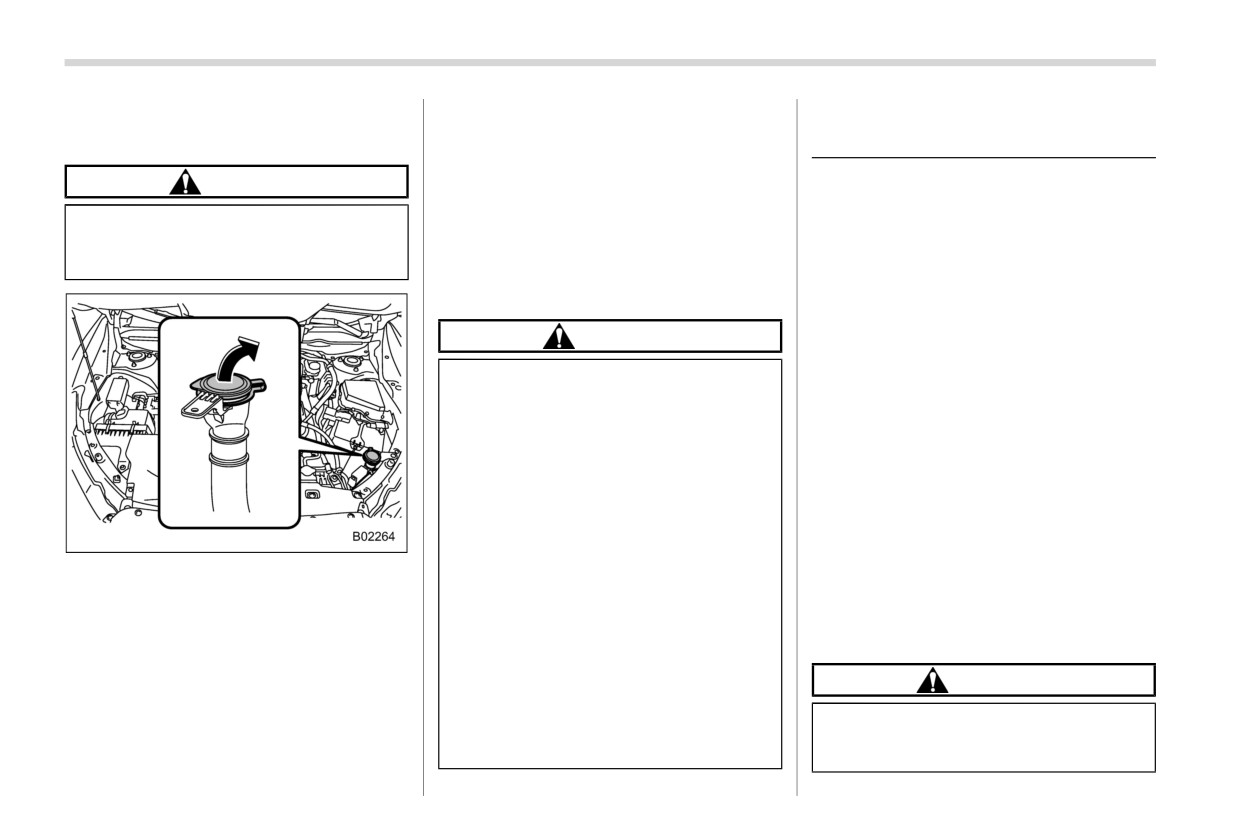
Remove the washer tank filler cap, then
rubbers, be sure to rinse them with clean
add windshield washer fluid.
restrict the use of methanol, a
water. Rinse the window until the water
common windshield washer anti-
freeze additive. Washer fluids
does not form beads on the glass. This
& Windshield washer fluid
containing non-methanol anti-
indicates that the glass is clean.
Use windshield washer fluid. If windshield
freeze agents should be used
washer fluid is unavailable, use clean
CAUTION
only if they provide cold weather
water.
protection without damaging
. Do not clean the wiper blades
In areas where water freezes in winter, use
your vehicle’s paint, wiper blades
with gasoline or a solvent, such
an anti-freeze type windshield washer
or washer system.
as paint thinner or benzine. This
fluid.
Replacement of wiper blades
505
will cause deterioration of the
& Windshield wiper blade as-
wiper blades.
sembly
While removing the wiper blades
1.
Raise the wiper arm off the windshield.
from the wiper arms, do not
return the wiper arms to the
original positions. Otherwise,
the windshield surface may be
scratched.
When returning the raised wiper
arms to the original positions,
carefully return the wiper arms
on the windshield by hand. You
should not return the wiper arms
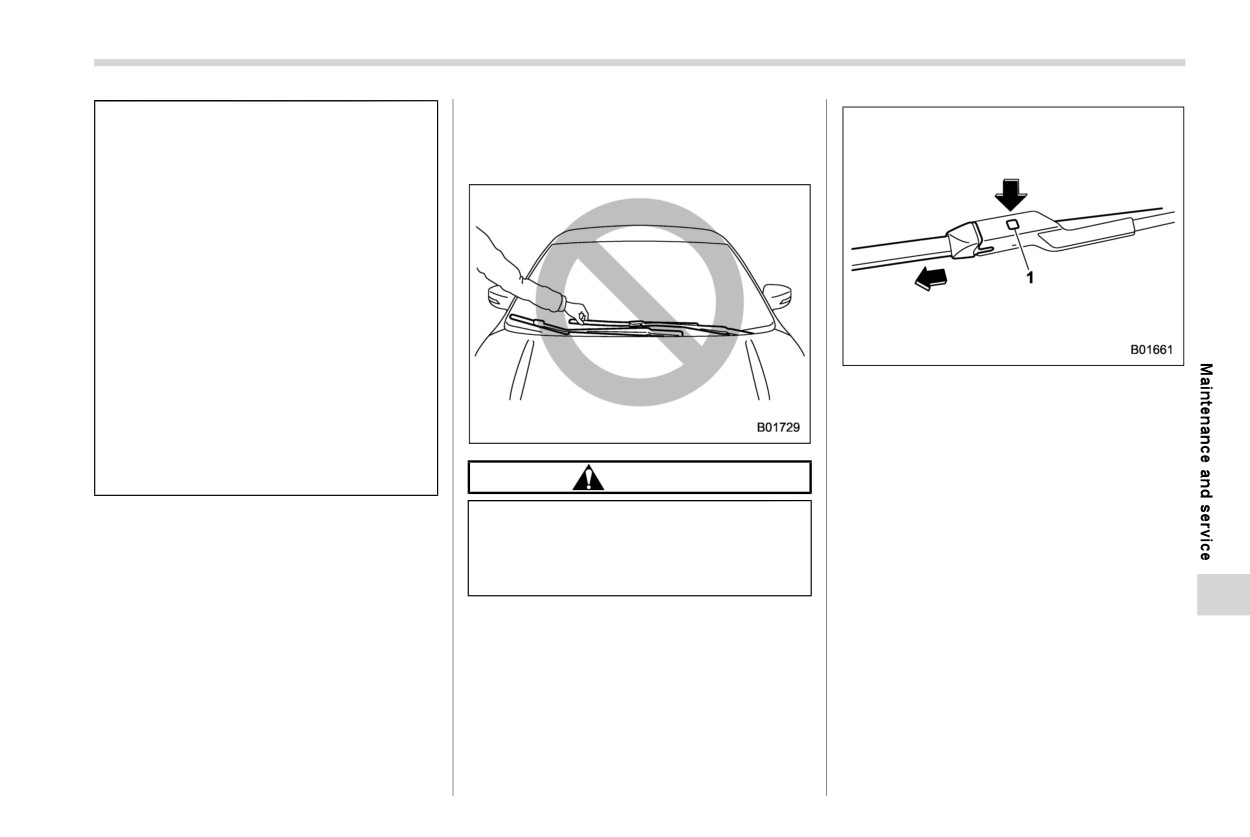
1
Lock knob
to the windshield only by the
return spring. Otherwise, the wi-
2.
Hold the wiper blade connection by
per arms may be deformed and/or
hand, push the lock knob to release the
the windshield surface may be
lock, and then pull out the wiper blade
scratched.
CAUTION
assembly.
If you cannot eliminate the streaking even
Hold the wiper arm when replacing
NOTE
after following this method, replace the
the wiper blade. Holding the wiper
Do not use a hard object to push the
wiper blades using the following proce-
blade, may result in blade deforma-
lock knob. The lock knob may be
dures.
tion.
scratched.
- CONTINUED -
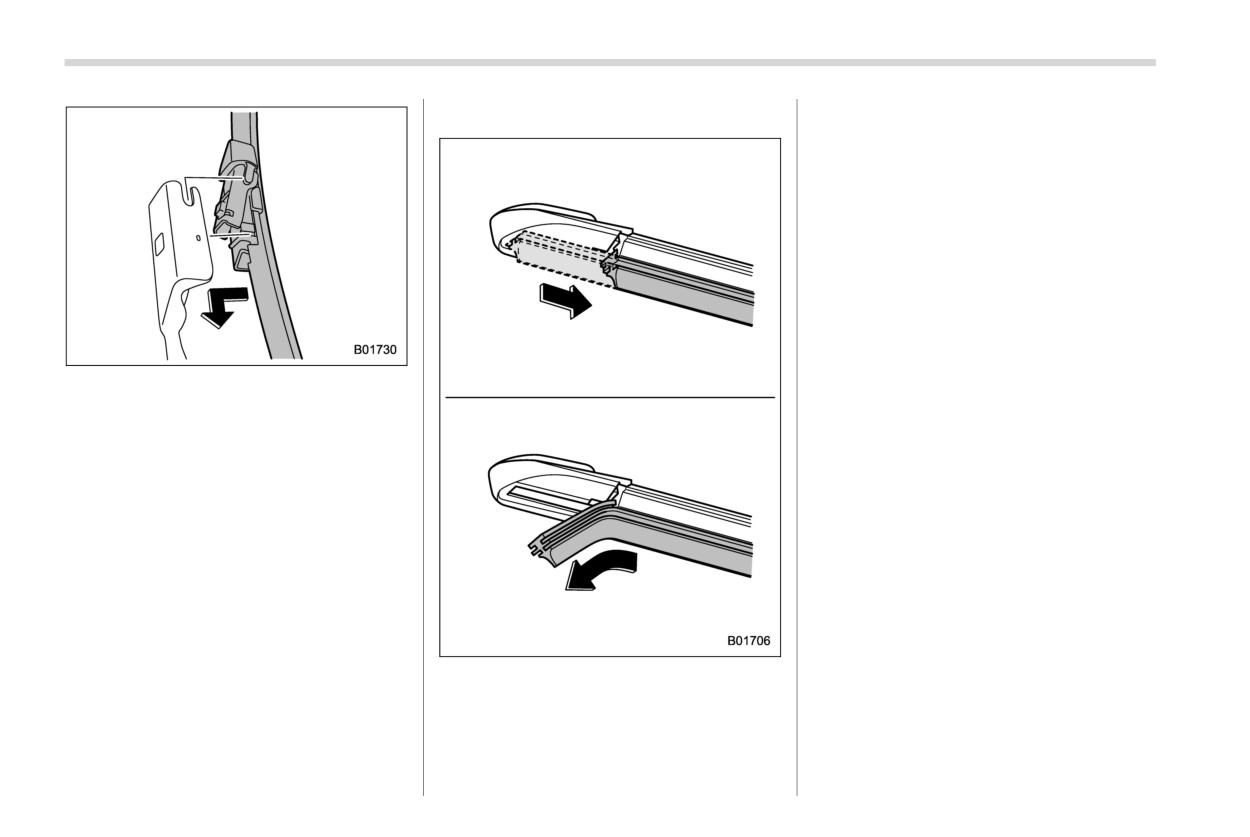
506 Replacement of wiper blades
& Window wiper blade rubber
illustration, so that it can be removed.
2. Pull the end of the wiper blade rubber
through the slit to remove it.
3. To install a new wiper blade rubber,
perform the removal procedure in the
reverse order. After installation, check
that the tip of the wiper rubber has
reached the end of the cap.
NOTE
It may be difficult to perform the wiper
blade rubber replacement. We recom-
mend that you contact your SUBARU
3. When installing the wiper blade as-
dealer for wiper blade rubber replace-
sembly, align it with the wiper arm
ment if necessary.
connection part and then slide it in the
opposite direction of removal to install.
After installing the wiper blade assem-
bly, check that the connection part is
locked completely.
4. Hold the wiper arm by hand and slowly
lower it in position.
Replace the wiper blade rubber according
to the following procedure.
1. Pull the wiper blade rubber until the slit
on the underside of the wiper blade is
in the removal position, as shown in the
Replacement of wiper blades
507
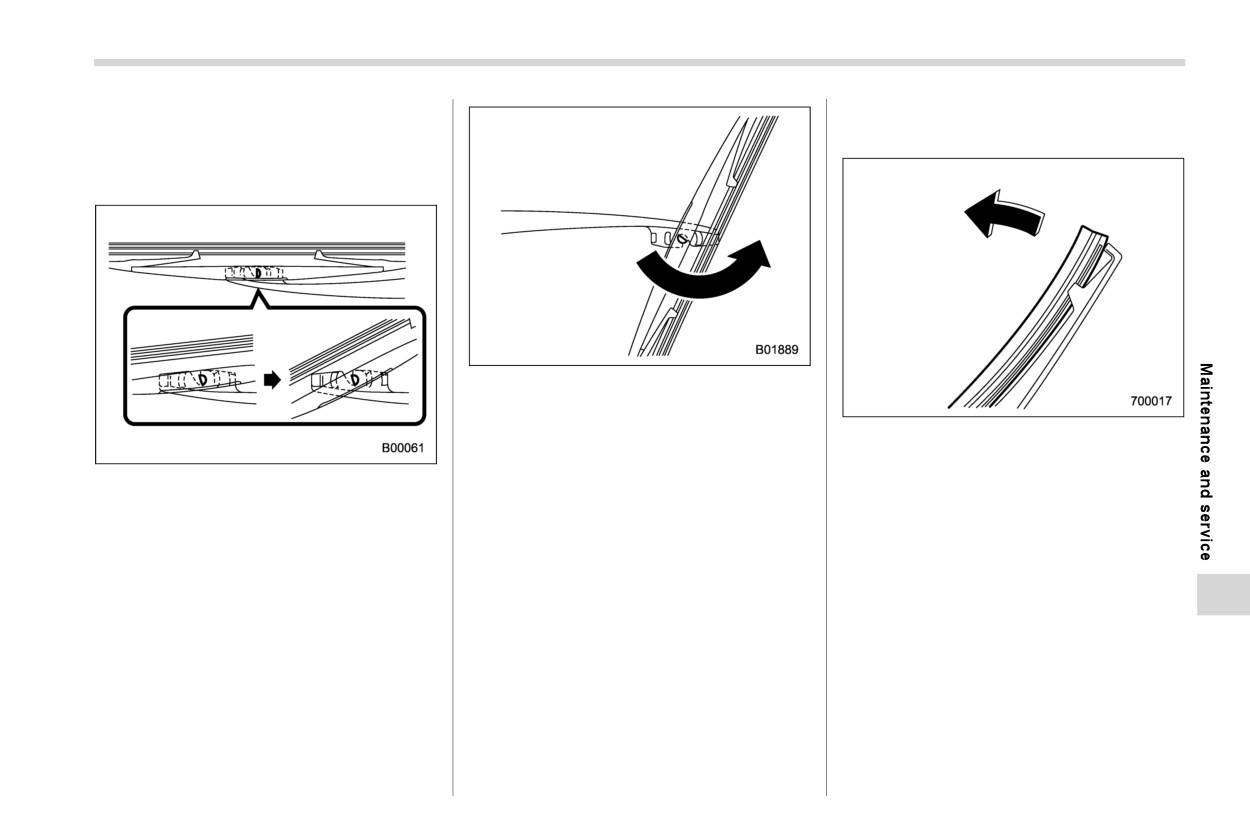
& Rear window wiper blade as-
& Rear window wiper blade
sembly
rubber
1. Raise the wiper arm off the rear
window.
3. Pull the wiper blade assembly toward
you to remove it from the wiper arm.
4. Install the wiper blade assembly to the
1. Pull out the end of the blade rubber
wiper arm. Make sure that it locks in
assembly to unlock it from the plastic
place.
2. Turn the wiper blade assembly coun-
support.
5. Hold the wiper arm by hand and slowly
terclockwise.
lower it in position.
- CONTINUED -
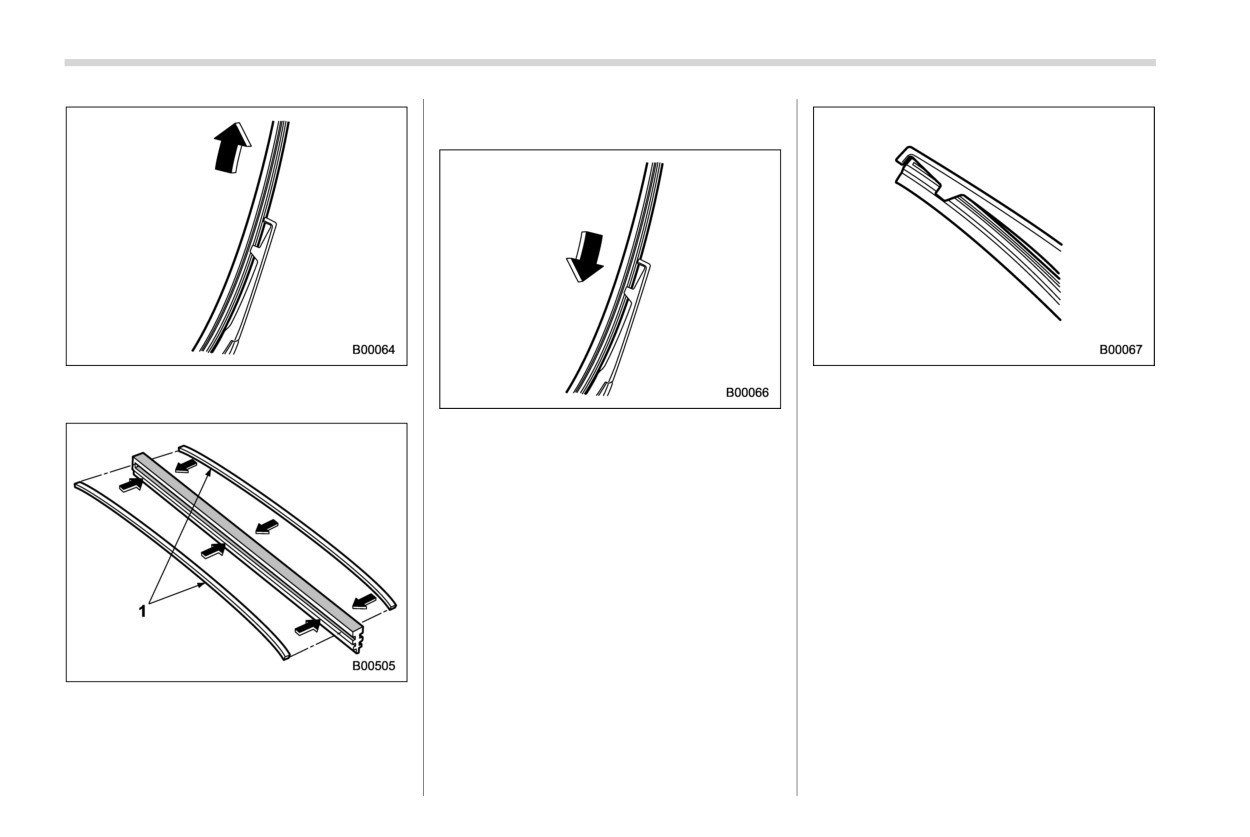
508 Replacement of wiper blades
and install them in the new blade
rubber.
2. Pull the blade rubber assembly out of
Securely retain both ends of the rubber
the plastic support.
with the stoppers on the plastic support
4. Align the claws of the plastic support
ends. If the rubber is not retained properly,
the wiper may scratch the rear window
with the grooves in the blade rubber
glass.
assembly, then slide the blade rubber
assembly into place.
5. Install the wiper blade assembly to the
wiper arm. Make sure that it locks in
place.
6. Hold the wiper arm by hand and slowly
lower it in position.
1
Metal spines
3. If the new blade rubber is not provided
with two metal spines, remove the
metal spines from the old blade rubber
Battery
509
To lessen the risk of sparks,
It is unnecessary to periodically check the
11-19. Battery
remove rings, metal watchbands,
battery fluid level or periodically refill with
and other metal jewelry. Never
distilled water.
WARNING
allow metal tools to contact the
positive battery terminal and any-
Before beginning work on or near
thing connected to it WHILE you
any battery, be sure to extinguish
are at the same time in contact
all cigarettes, matches, and light-
with any other metallic portion of
ers. Never expose a battery to an
the vehicle because a short cir-
open flame or electric sparks.
cuit will result.
Batteries give off a gas which is
Keep everyone including children
highly flammable and explosive.
away from the battery.
For safety, in case an explosion
Charge the battery in a well-
does occur, wear eye protection
ventilated area.
or shield your eyes when working
near any battery. Never lean over
Battery posts, terminals and re-
a battery.
lated accessories contain lead
and lead compounds, chemicals
Do not let battery fluid contact
known to the State of California
eyes, skin, fabrics, or paint be-
to cause cancer and reproductive
cause battery fluid is a corrosive
harm. Batteries also contain
acid. If battery fluid gets on your
other chemicals known to the
skin or in your eyes, immediately
State of California to cause can-
flush the area with water thor-
cer. Wash hands after handling.
oughly. Seek medical help imme-
diately if acid has entered the
eyes.
CAUTION
If battery fluid is accidentally
swallowed, immediately drink a
Never use more than 10 amperes
large amount of milk or water,
when charging the battery because
and seek medical attention im-
it will shorten battery life.
mediately.
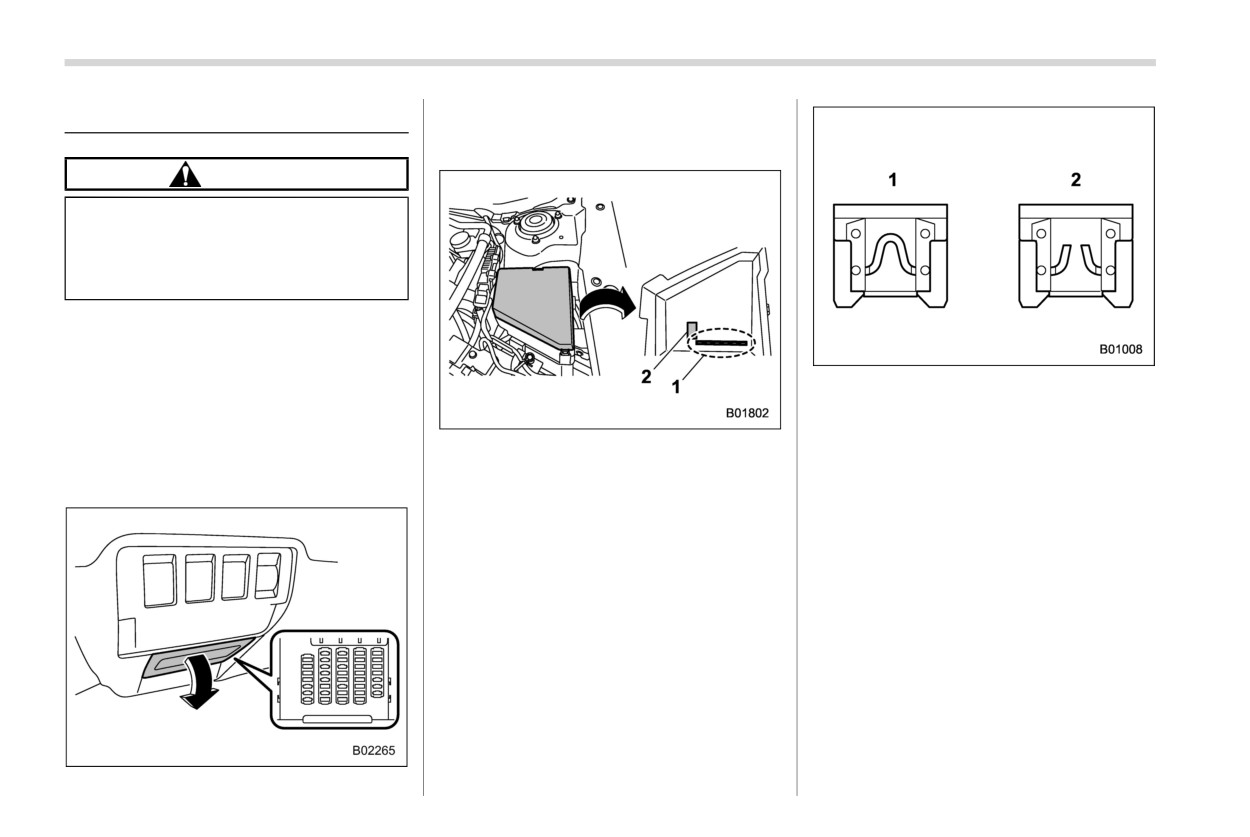
510 Fuses
One is located under the instrument panel
11-20. Fuses
behind the fuse box cover on the driver’s
seat side. To remove the cover, pull it out.
CAUTION
Never replace a fuse with one having
a higher rating or with material other
than a fuse because serious damage
or a fire could result.
NOTE
Fuse rating and using circuit are de-
scribed on each behind the fuse box
1
Good
cover.
2
Blown
The fuses are designed to melt during an
If any lights, accessories or other electrical
1
Spare fuses
overload to prevent damage to the wiring
controls do not operate, inspect the corre-
2
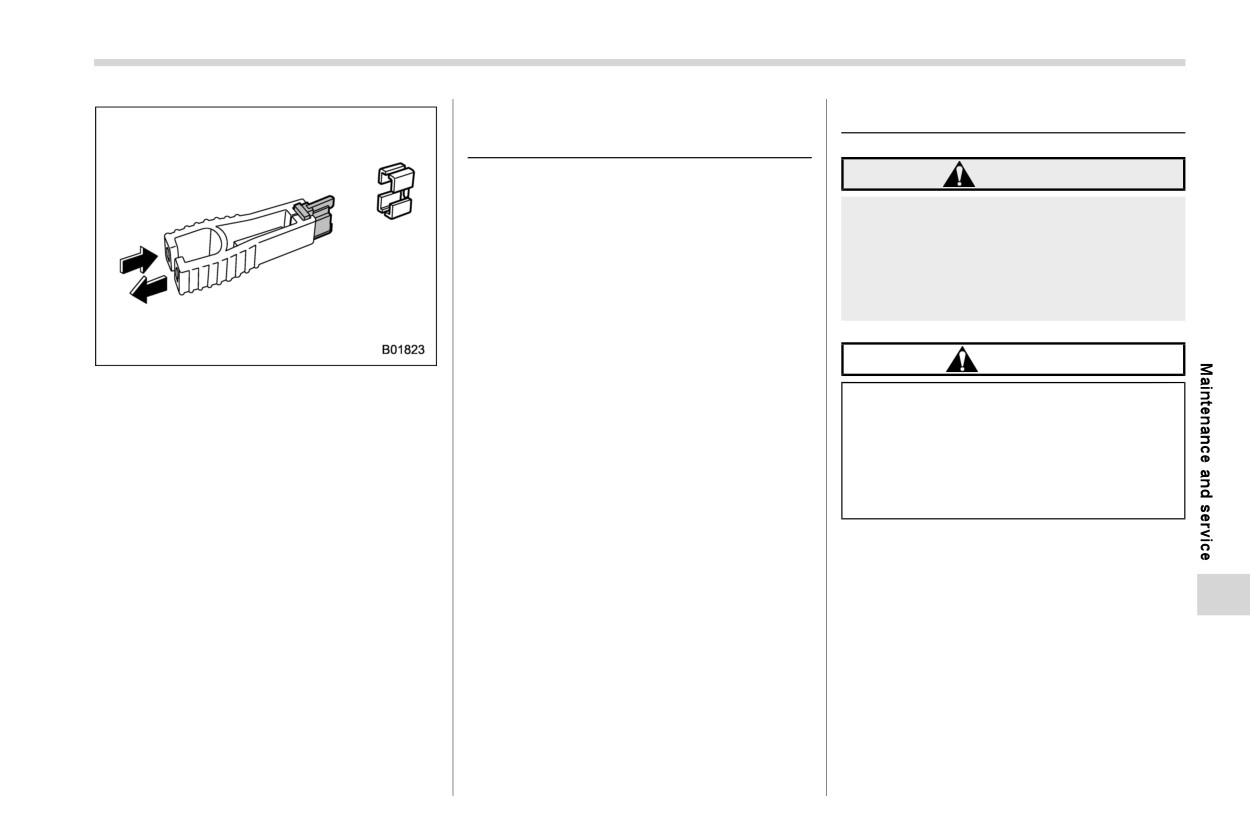
Fuse puller
harness and electrical equipment. The
sponding fuse. If a fuse has blown, replace
fuses are located in two fuse boxes.
The other one (main fuse box) is housed in
it.
the engine compartment. Also, the spare
1. Turn the ignition switch to the “LOCK”/
fuses and fuse puller are stored in the fuse
“OFF” position and turn off all electrical
box cover.
accessories.
Pinch the upper part of the fuse puller
2. Remove the cover.
when removing it from the main fuse box.
3. Determine which fuse may be blown.
Look at the back side of each fuse box
cover.
Installation of accessories
511
11-21. Installation of acces-
11-22. Replacing bulbs
sories
WARNING
Always consult your SUBARU dealer
before installing fog lights or any other
Bulbs may become very hot while
electrical equipment in your vehicle. Such
illuminated. Before replacing bulbs,
accessories may cause the electronic
turn off the lights and wait until the
system to malfunction if they are incor-
bulbs cool down. Otherwise, there is
rectly installed or if they are not suited for
a risk of sustaining a burn.
the vehicle.
CAUTION
4. Pull out the fuse with the fuse puller.
Replace any bulb only with a new
5. Inspect the fuse. If it has blown,
bulb of the specified wattage. Using
replace it with a spare fuse of the same
a bulb of different wattage could
rating.
result in a fire. For the specified
6. If the same fuse blows again, this
wattage of each bulb, refer to “Bulb
indicates that its system has a pro-
chart” FP528.
blem. Contact your SUBARU dealer for
repairs.
- CONTINUED -
512 Replacing bulbs
& Headlights
& Front turn signal light
Right-hand side
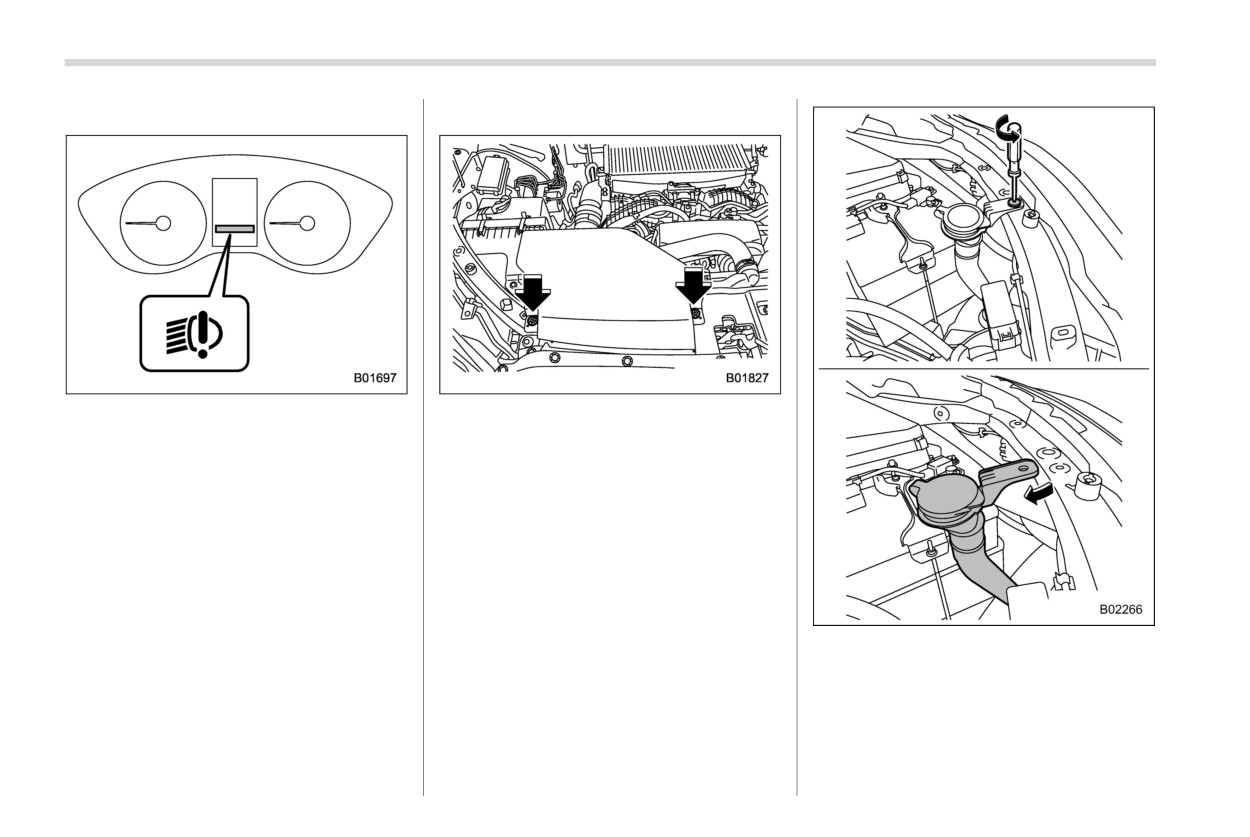
The LED headlight warning light illumi-
nates if the LED headlights malfunction.
1. Use a screwdriver to undo the clips on
Have your vehicle inspected at a SUBARU
the air intake duct, then remove it.
dealer as soon as possible.
Left-hand side
2. Use a screwdriver to remove the
secured clip of the washer tank. To
make it easy to access the bulb, turn
the neck of the washer fluid filler pipe
as illustrated.
Replacing bulbs
513
& Rear combination lights
sembly.
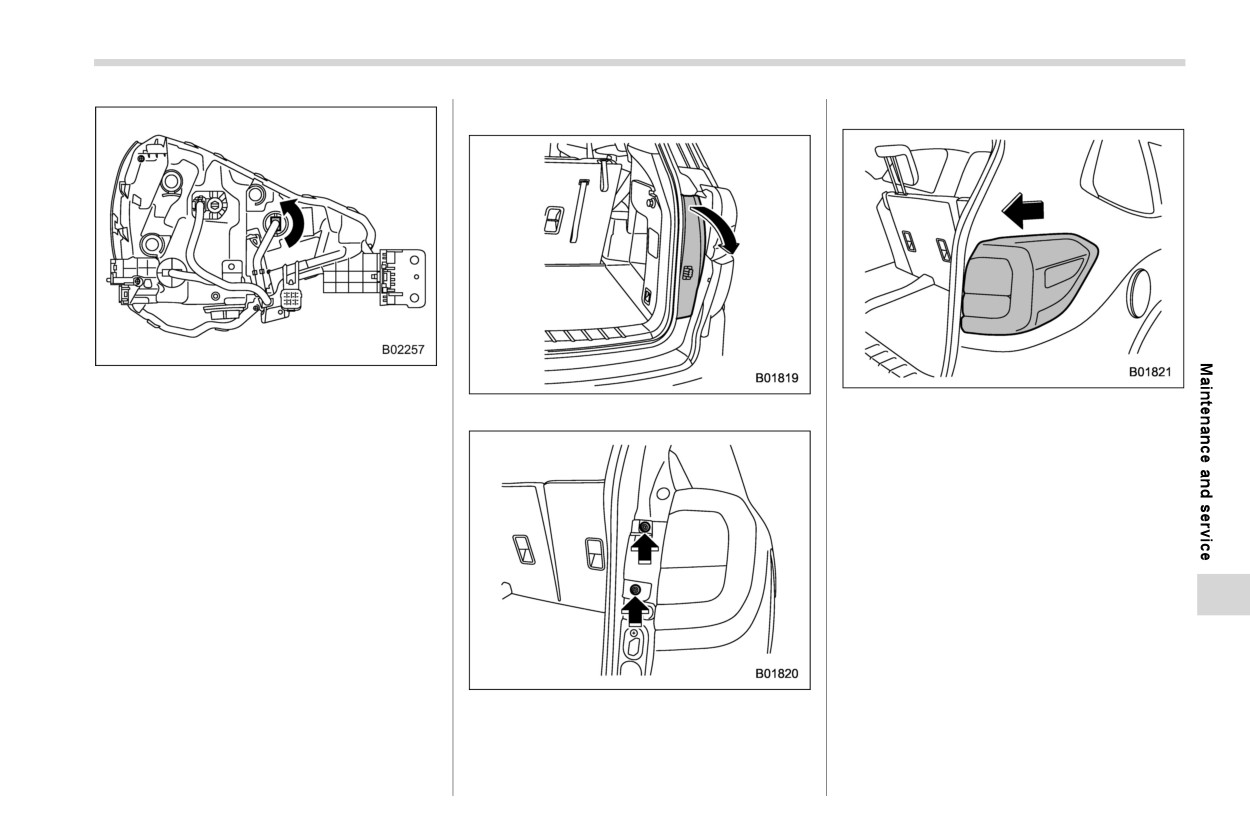
3. Remove the bulb from the headlight
assembly by turning it counterclock-
3. Slide the rear combination light as-
1. Remove the covers.
wise.
sembly rearward and remove it from
4. Replace the bulb with a new one. At
the vehicle.
this time, use care not to touch the bulb
4. Disconnect the electrical connector.
surface.
5. To install the bulb to the headlight
assembly, turn it clockwise until it
clicks.
6. Install the air intake duct with clips
(right-hand side).
7. Set the washer tank to the original
place and secure it with a clip (left-
hand side).
2. Using a Phillips screwdriver, remove
the upper and lower screws that
secure the rear combination light as-
- CONTINUED -
514 Replacing bulbs
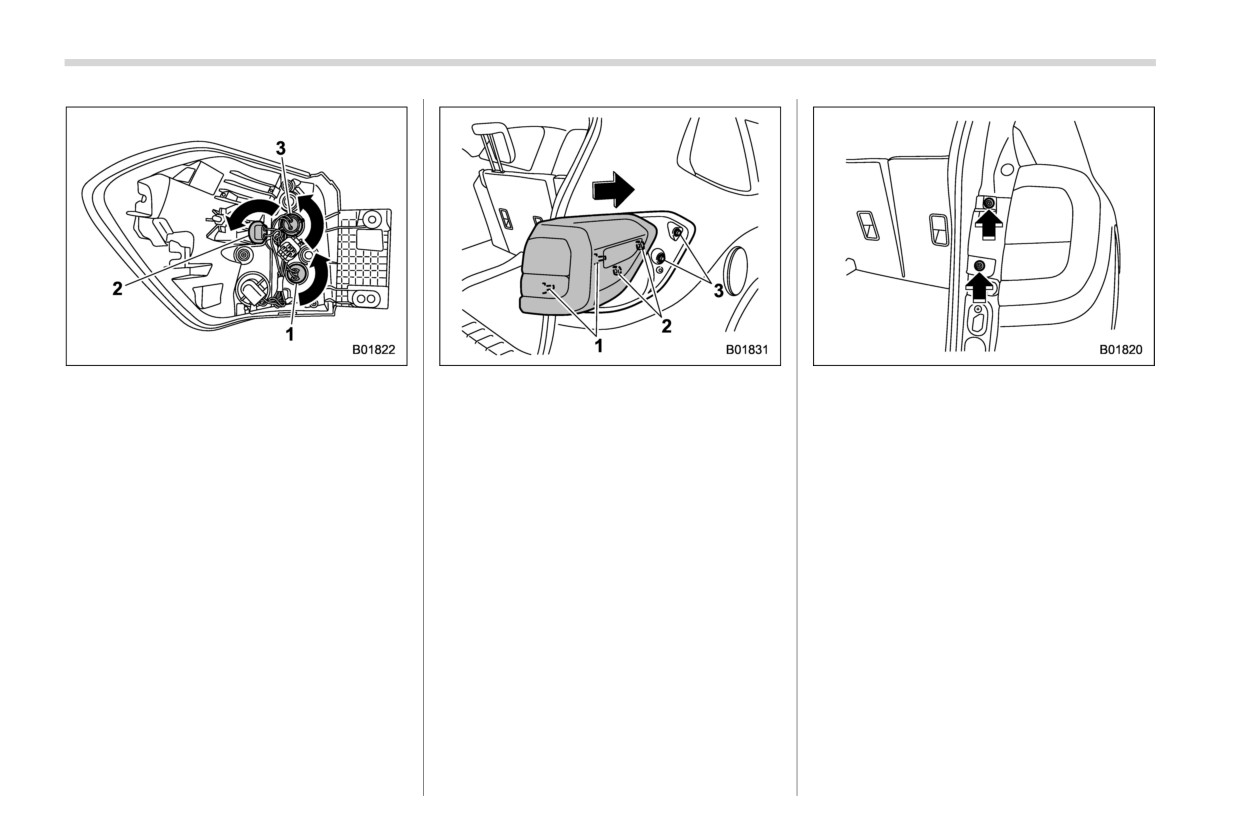
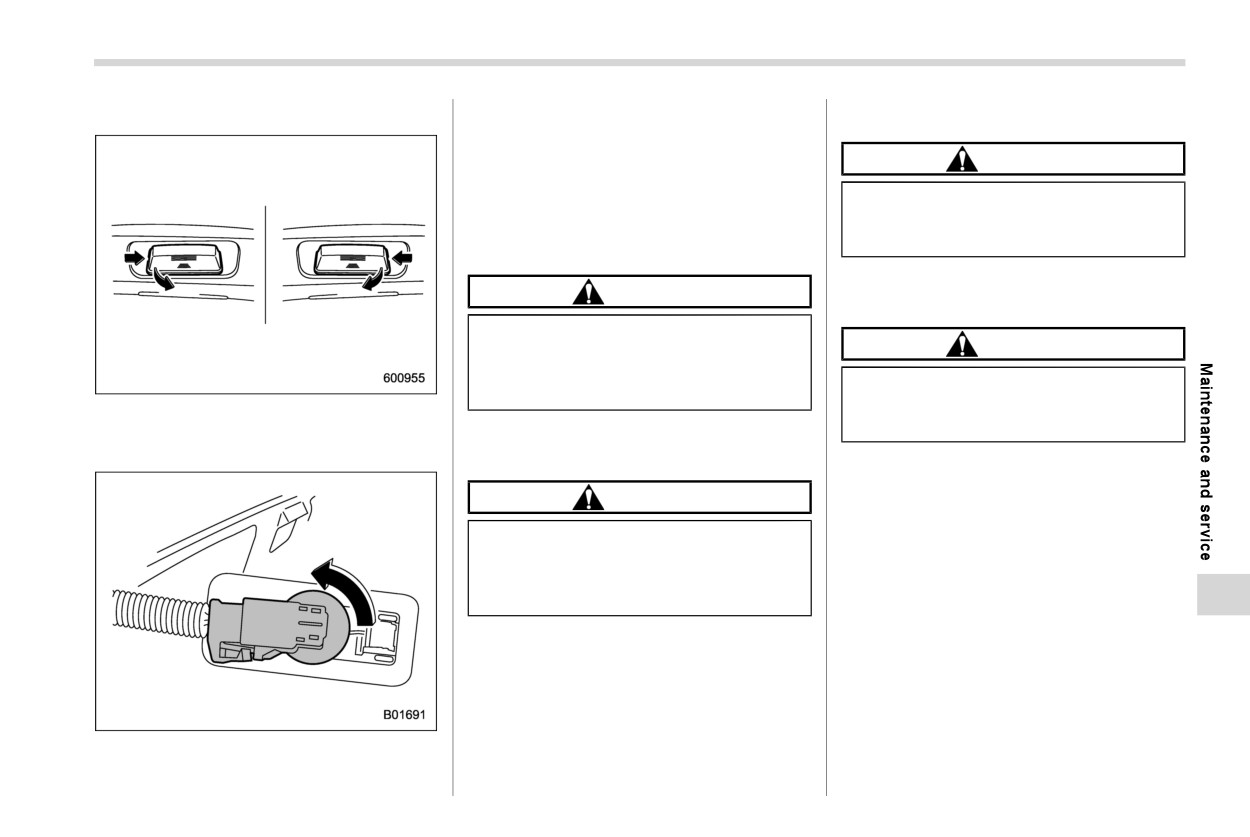
1
Backup light
1
Guide pins
10. Tighten the upper and lower screws.
2
Rear side marker light
2
Catches
11. Reinstall the covers.
3
Rear turn signal light
3
Clips
5. Remove the bulb socket from the rear
9. Put the rear combination light assem-
combination light assembly by turning
bly into place while aligning the guide
it counterclockwise.
pins and catches with the guide holes
6. Pull the bulb out of the bulb socket and
and clips on the vehicle.
replace it with a new one.
7. Set the bulb socket into the rear
combination light assembly and turn it
clockwise until it locks.
8. Reconnect the electrical connector.
Replacing bulbs
515
& License plate light
and pull out the socket.
& Door step light
3. Pull the bulb out of the socket.
4. Install a new bulb.
CAUTION
5. Reinstall the bulb socket and the
Replacing the bulb could cause a
license plate light cover.
short circuit. Have the bulb replaced
by your SUBARU dealer.
& Map light
CAUTION
& Reading light
Replacing the bulb could cause
burns since the bulb may be very
CAUTION
hot. Have the bulb replaced by your
Replacing the bulb could cause a
SUBARU dealer.
short circuit. Have the bulb replaced
1.
The license plate lights must be
by your SUBARU dealer.
pushed inside, and then pulled out to
be removed.
& Vanity mirror light
CAUTION
Replacing the bulb could cause
burns since the bulb may be very
hot. Have the bulb replaced by your
SUBARU dealer.
2. Turn the bulb socket counterclockwise
- CONTINUED -
516 Replacing key battery
& Cargo area light
11-23. Replacing key battery
swallow them.
. There is a danger of an explosion
The access key fob/transmitter battery
if the battery is incorrectly re-
may be discharged under the following
placed. Replace only with the
conditions.
same or equivalent type of the
battery.
. The operation of the keyless access
function is unstable.
. Batteries should not be exposed
. The operating distance of the remote
to excessive heat such as bright
keyless entry system is unstable.
sunlight, fire or the like.
. The transmitter does not operate prop-
erly when used within the standard
NOTE
distance.
Replace only with the same or
Replace the battery with a new one.
equivalent type of battery recom-
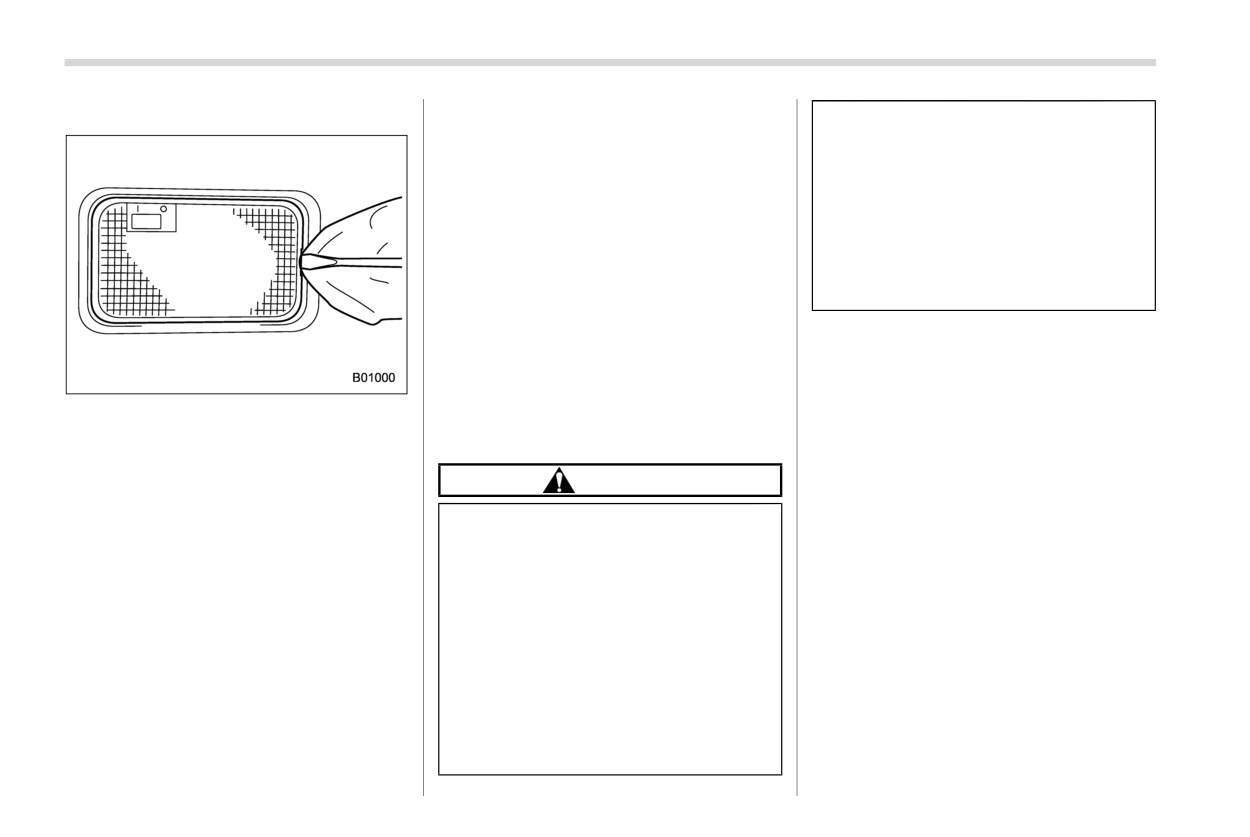
1.
Remove the lens by prying the edge of
mended by the manufacturer.
the lens with a flat-head screwdriver.
& Safety precautions
Dispose of used batteries according
2.
Pull the bulb out of the socket.
to local laws.
Mount the battery in the correct
3.
Install a new bulb.
CAUTION
orientation to prevent fluid leakage.
4.
Reinstall the lens.
Do not let dust, oil or water get on
Be careful not to bend the terminals.
or in the access key fob/transmit-
It may result in a malfunction.
& Other bulbs
ter when replacing the battery.
It is recommended that the battery
It may be difficult to replace the bulbs.
be replaced by a SUBARU dealer.
Before replacing the battery, re-
Have the bulbs replaced by your
Use a new battery.
move any static electricity.
SUBARU dealer if necessary.
After replacing the battery, confirm
Be careful not to touch or damage
that the transmitter functions prop-
the printed circuit board in the
erly.
access key fob/transmitter when
replacing the battery.
Be careful not to allow children to
touch the battery and any re-
moved parts; children could
Replacing key battery
517
& Replacing battery of access
key fob
CAUTION
When removing or reinstalling the
access key fob cover, make sure that
the plastic part does not come off or
become misaligned.
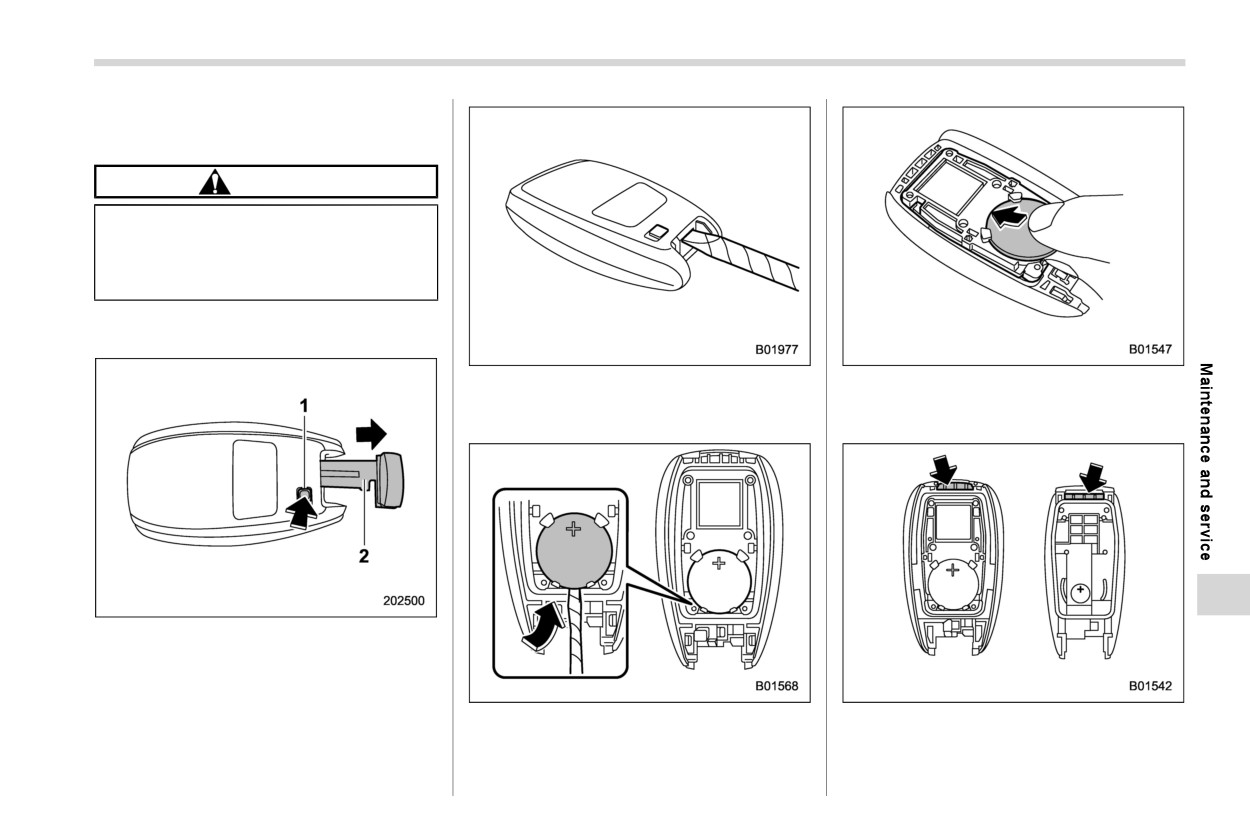
Battery: Button battery CR2032
or
equivalent
2. Wrap a flat-head screwdriver with vinyl
4. Insert a new battery with its positive (+)
tape or a cloth, and insert it in the gap
side facing upward as shown in the
to remove the cover.
figure.
1
Release button
2
Emergency key
1. Take out the emergency key.
3. Take out the battery using a flat-head
5. Attach the cover to the access key fob
screwdriver with vinyl tape or a cloth.
by fitting the projections and recesses
together.
- CONTINUED -
518 Replacing key battery
& Replacing transmitter battery
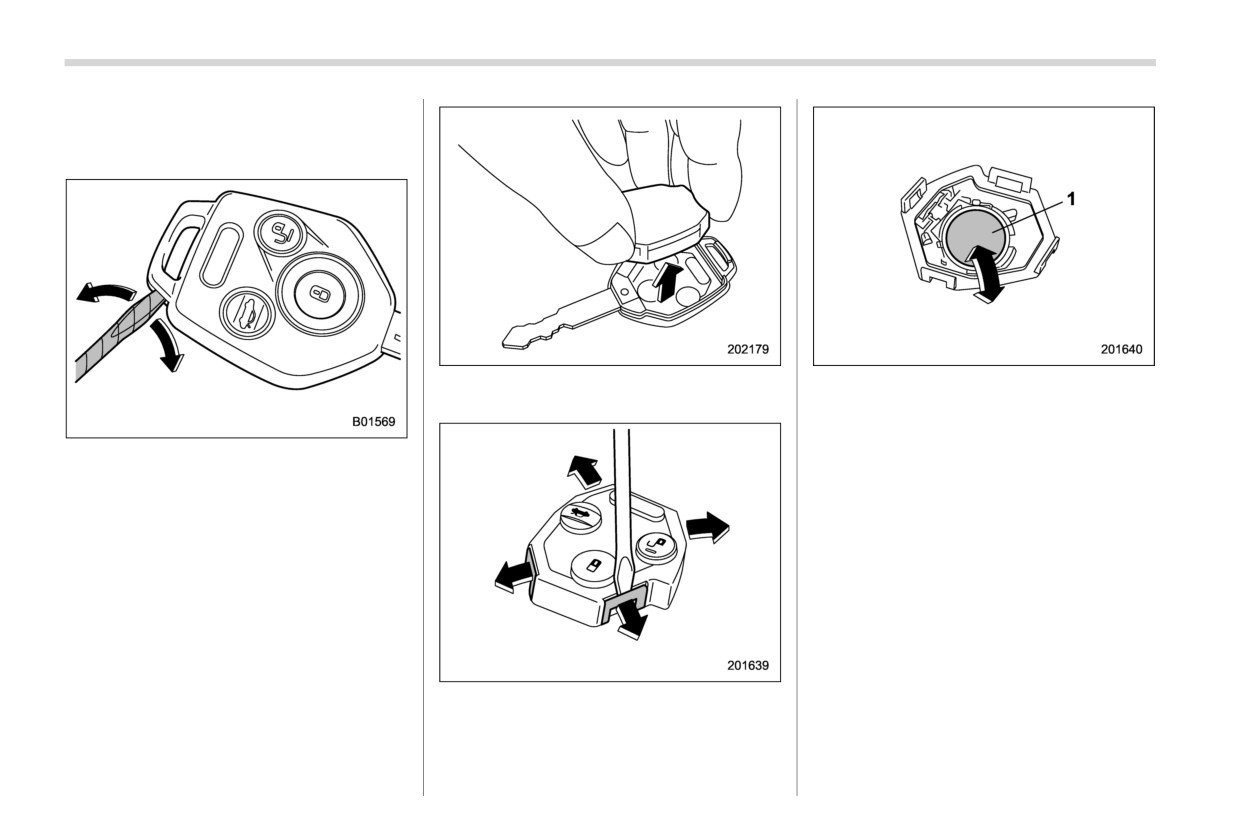
Battery: Button battery CR1620
or
equivalent
1
Negative (−) side facing up
2. Remove the transmitter case from the
key head.
4. Replace the old battery with a new
battery making sure to install the new
1. Wrap a flat-head screwdriver with vinyl
battery with the negative (−) side facing
tape or a cloth. Open the key head
up.
using a flat-head screwdriver.
5. Put together the transmitter case by
fitting the hooks on the case.
6. Reinstall the transmitter case in the
key head.
7. Refit the removed half of the key head.
3. Open the transmitter case by releasing
the hooks.
Specifications
Tires
526
12-1. Specifications
522
Dimensions
522
Temporary spare tires
527
Brake pedal
527
Engine
522
Brake disc
527
Fuel
523
Brake pad
527
Engine oil
523
Front differential and rear differential gear oil
525
12-2. Bulb chart
528
Fluids
525
Safety precautions
528
Engine coolant
526
Bulb chart
529
Electrical system
526
12-3. Vehicle identification
531
12
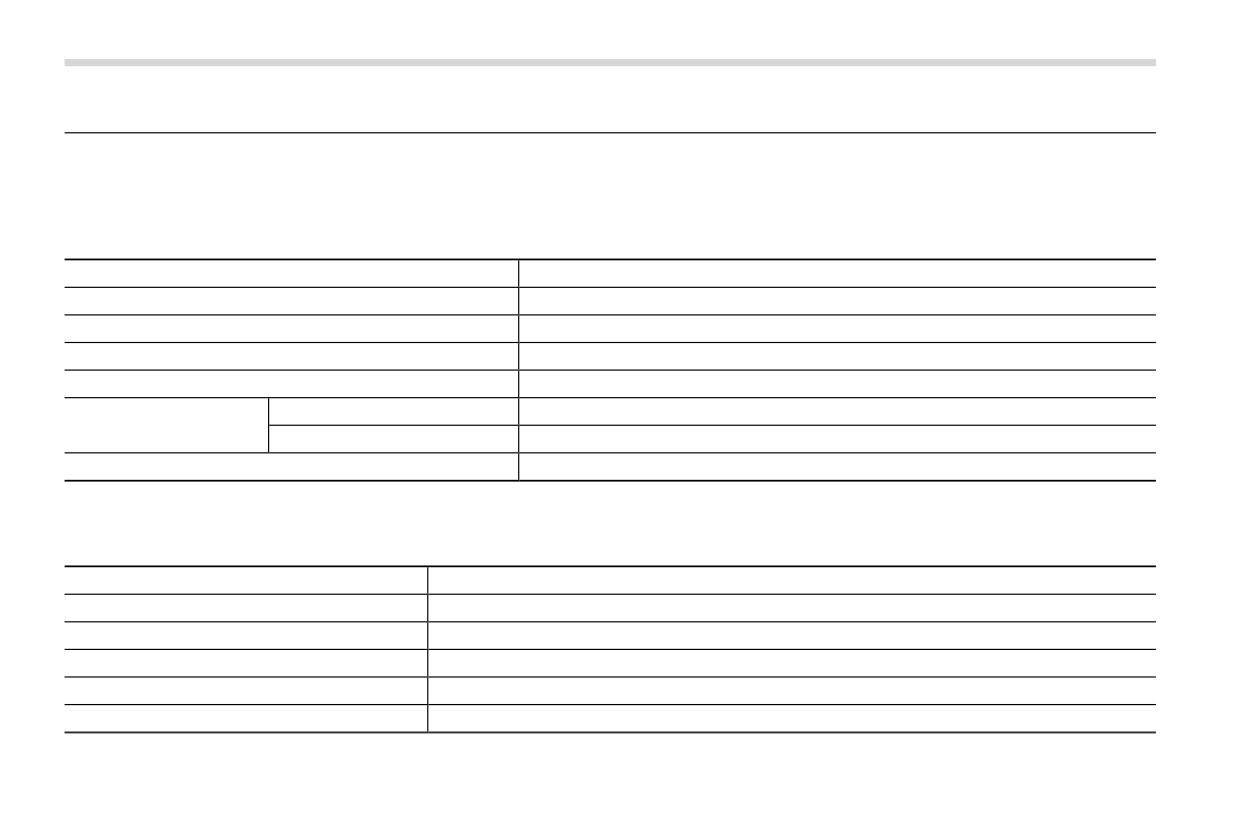
522 Specifications
12-1. Specifications
These specifications are subject to change without notice.
& Dimensions
in (mm)
Item
Overall length
196.8
(4,998)
Overall width
76.0
(1,930)
Overall height
71.6
(1,819)
Wheel base
113.8
(2,890)
Front
64.4
(1,635)
Tread
Rear
64.2
(1,630)
Ground clearance*1
8.7
(220)
*1: Measured with vehicle empty
& Engine
Engine model
FA24 (2.4 L, DOHC, turbo)
Engine type
Horizontally opposed, liquid cooled 4 cylinder, 4-stroke direct injection gasoline engine
Displacement cu-in (cc)
146
(2,387)
Bore 6 Stroke in (mm)
3.70 6 3.39 (94.0 6 86.0)
Compression ratio
10.6 : 1
Firing order
1-3-2-4
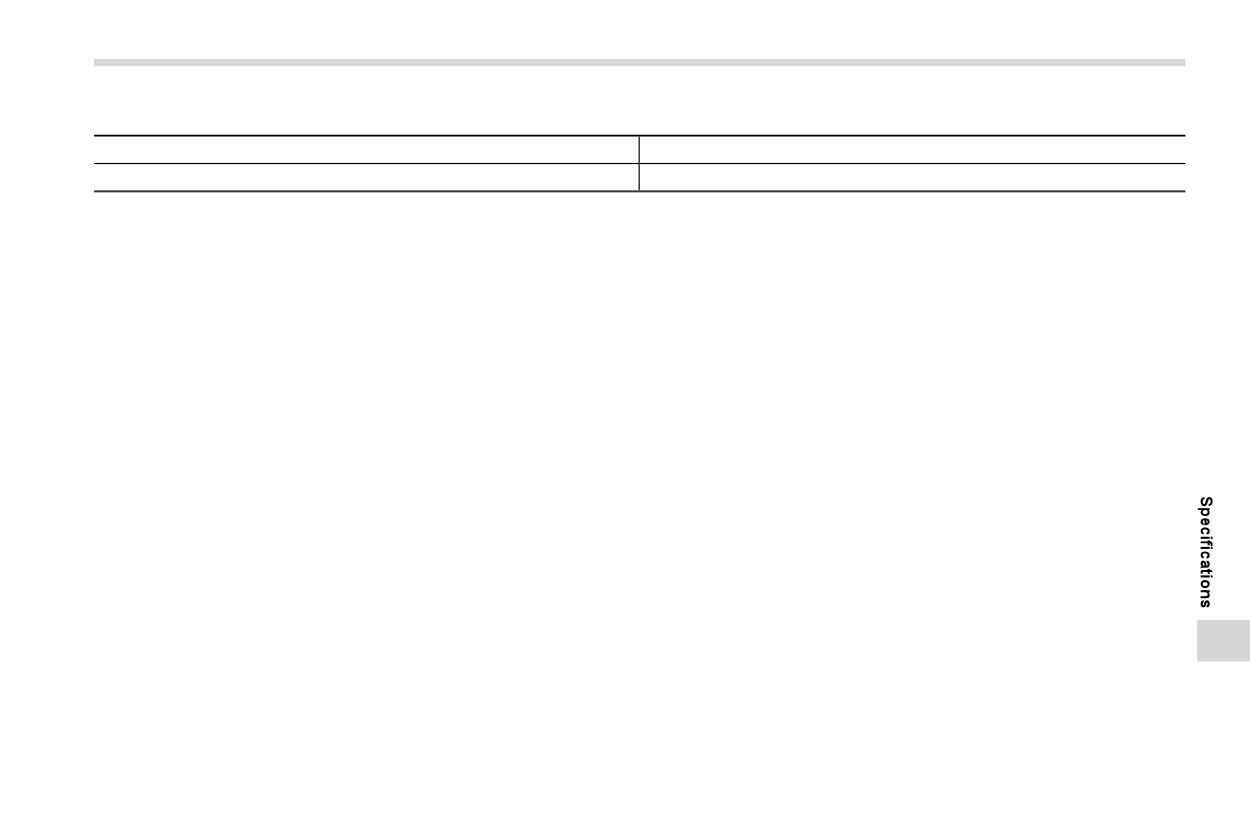
Specifications
523
& Fuel
Fuel requirement
Fuel tank capacity
Unleaded gasoline with 87 AKI (90 RON) or higher
19.3 US gal (73 liters, 16.1 Imp gal)
For more details, refer to “Fuel” FP337.
& Engine oil
For the checking, adding and replacing procedure or other details, refer to “Engine oil” FP486.
NOTE
The procedure for changing the engine oil and oil filter should be performed by a properly-trained expert. It is recommended
that you have this service performed by your SUBARU dealer.
! Approved engine oil
Always use the SUBARU approved engine oil. For further details, please contact your SUBARU dealer.
If the approved engine oil is unavailable, use the alternative engine oil described on the next page.
- CONTINUED -