Subaru Ascent (2023 year). Manual in english - page 16
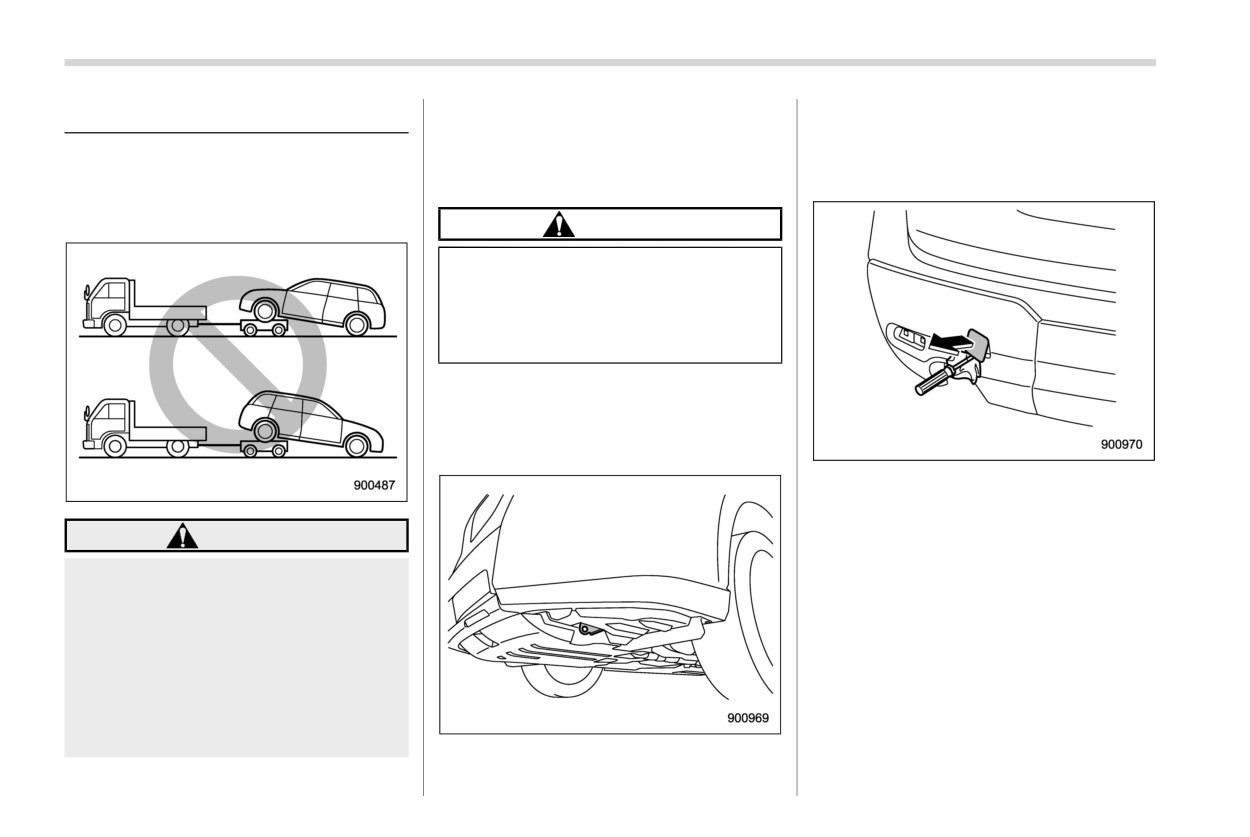
460 Towing
9-8. Towing
& Towing hooks and tie-down
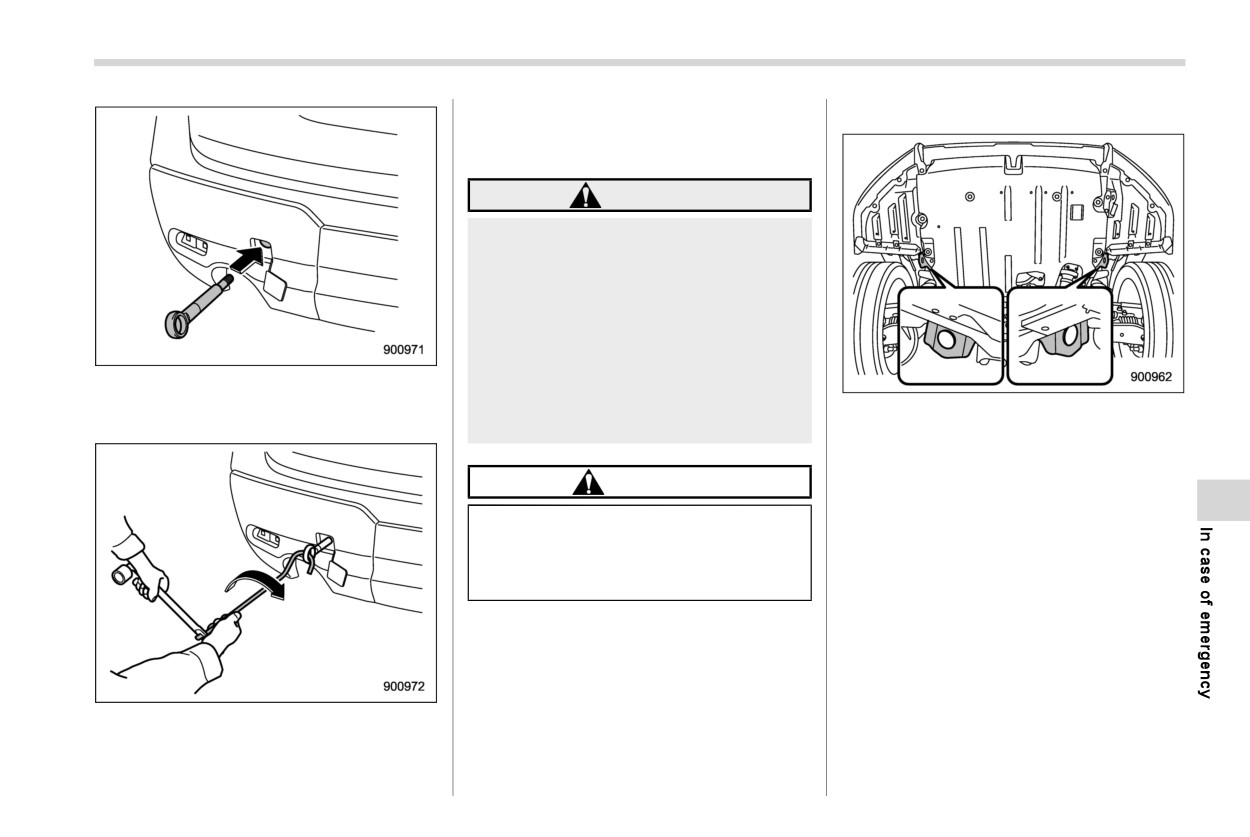
! Rear towing hook
hooks/holes
1. Take the towing hook and screwdriver
If towing is necessary, it is best done by
The towing hooks should be used only in
out of the tool bucket. Take the jack
your SUBARU dealer or a commercial
an emergency.
handle out of the cargo area.
towing service. Observe the following
procedures for safety.
CAUTION
Use only the specified towing hooks
and tie-down hooks/holes. Never
use suspension parts or other parts
of the body for towing or tie-down
purposes.
! Front towing hook
The front towing hook is located on the
bottom of the body on the front left side of
the vehicle.
2.
Cover the tip of a flat-head screwdriver
with vinyl tape or cloth so that it will not
scratch the bumper. Pry off the cover
WARNING
on the rear bumper using a screwdri-
ver, and you will find a threaded hole
Never tow AWD models with the
for attaching the towing hook.
front wheels raised off the ground
while the rear wheels are on the
ground, or with the rear wheels
raised off the ground while the front
wheels are on the ground. This will
cause the vehicle to spin away due
to the operation or deterioration of
the center differential.
Towing
461
After towing, remove the towing hook from
! Front tie-down hooks
the vehicle and stow it in the tool bucket.
Fit the towing hook cover on the bumper.
WARNING
. Do not use the towing hook for
purposes other than towing your
vehicle.
. Be sure to remove the towing
hook after towing. Leaving the
towing hook mounted on the
vehicle could interfere with prop-
3.
Screw the towing hook into the thread
er operation of the fuel pump
hole until its thread can no longer be
shut off function when the vehi-
The front tie-down hooks are
located
seen.
cle is struck from behind.
between each of the front tires
and the
front bumper.
CAUTION
To prevent deformation to the bum-
per and the towing hook, do not
apply an excessive load to the tow-
ing hook.
4. Tighten the towing hook securely using
the jack handle and wheel nut wrench.
- CONTINUED -
462 Towing
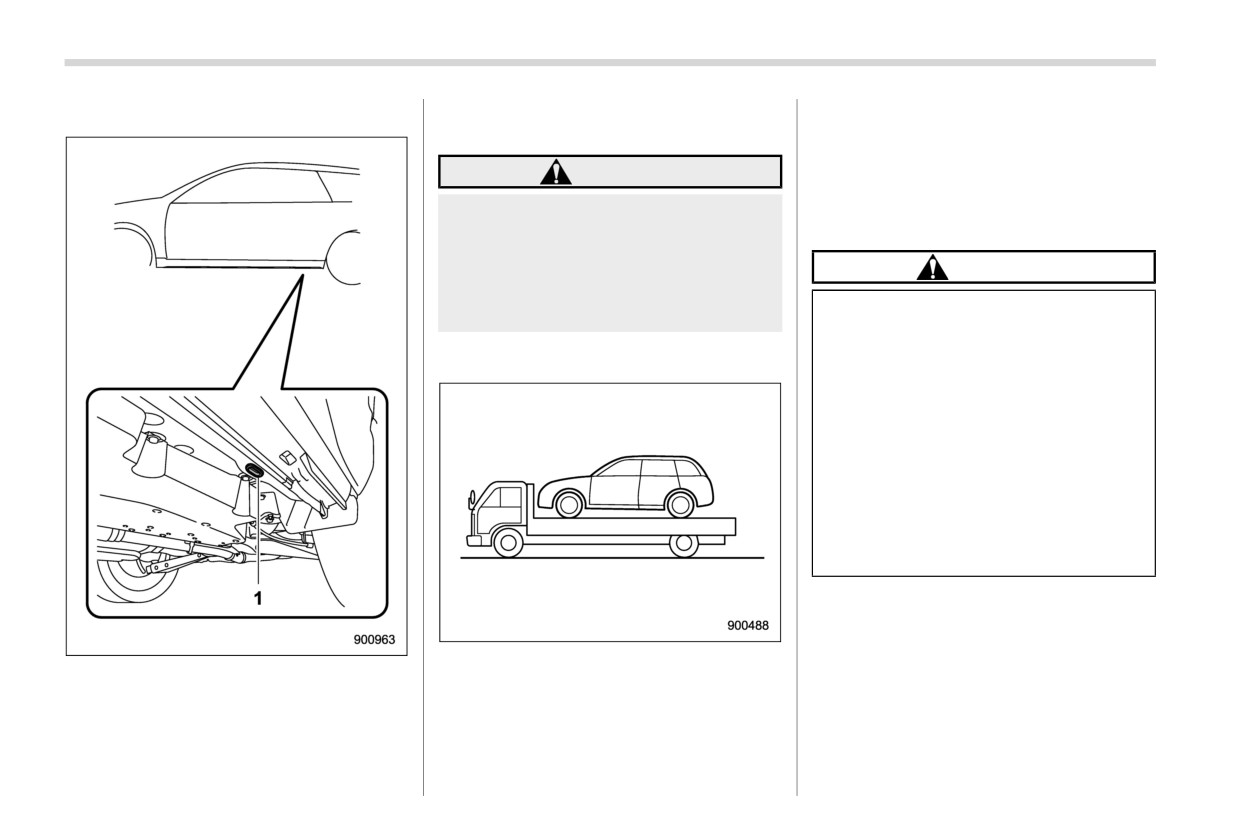
! Rear tie-down holes
plugs. After using the rear tie-down holes,
3.
Secure the vehicle onto the carrier
return the plugs to their original places.
properly with safety chains. Each
safety chain should be equally tigh-
WARNING
tened and care must be taken not to
pull the chains so tightly that the
Use the rear tie-down holes only for
suspension bottoms out.
downward anchoring. If they are
used to anchor the vehicle in any
other direction, cables may slip out
CAUTION
of the holes, possibly causing a
If your vehicle has a bumper
dangerous situation.
under guard (optional), be careful
not to scrape it when placing the
& Using a flat-bed truck
vehicle on the carrier and when
removing the vehicle from the
carrier.
Transport by flat-bed truck may
cause the headlights to become
misaligned. In such a case, have
the headlight alignment checked
by a SUBARU dealer after trans-
porting the vehicle by flat-bed
truck.
This is the best way to transport your
1
Rear tie-down hole
vehicle. Use the following procedures to
The rear tie-down holes are located near
ensure safe transportation.
each of the jack-up reinforcements.
1. Shift the select lever into the
“P”
There is a plug in each rear tie-down hole.
position.
To use the rear tie-down holes, remove the
2. Apply the parking brake firmly.
Towing
463
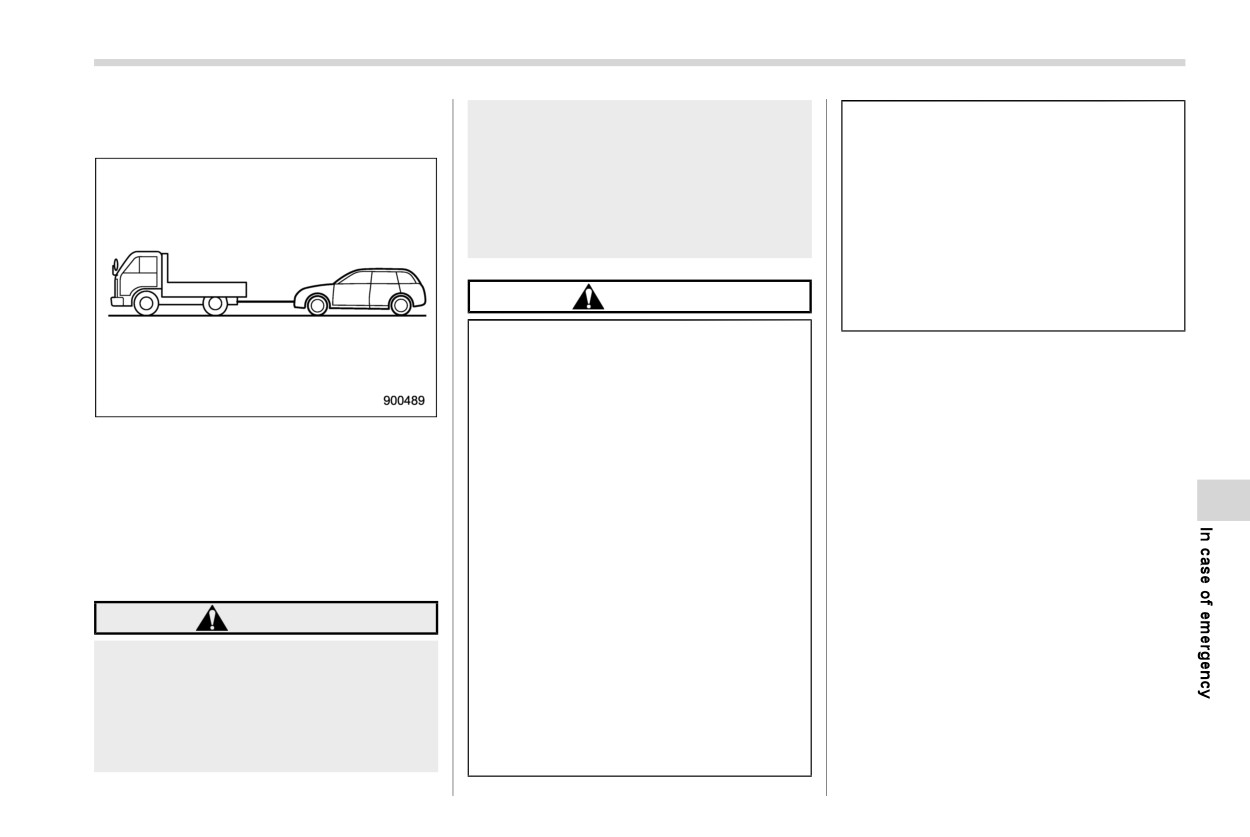
& Towing with all wheels on the
Remember that the brake booster
so could overheat the brake.
ground
and power steering do not func-
Drive carefully and do not make
tion when the engine is not run-
an impact on the towing rope by
ning. Because the engine is
suddenly starting.
turned off, it will take greater
Use a specific towing rope for
effort to operate the brake pedal
towing. If wire ropes and metal
and steering wheel.
chains are needed to be used for
towing, wrap the contact portion
of the bumper with cloth to pro-
CAUTION
tect it from damage.
If transmission failure occurs,
transport your vehicle on a flat-
bed truck.
Sometime damaged vehicles can-
not be towed because of their
1.
Release the parking brake and put the
damaged condition. In that case,
transmission in the neutral position.
use a flat-bed truck for transpor-
2.
The ignition switch should be in the
tation.
“ON” position while the vehicle is being
The traveling speed must be
towed.
limited to less than 20 mph (32
3.
Take up slack in the towline slowly to
km/h) and the traveling distance
prevent damage to the vehicle.
to less than 31 miles (50 km). For
greater speeds and distances,
transport your vehicle on a flat-
WARNING
bed truck.
Never turn the ignition switch to
Use a flat-bed truck if there are
the “LOCK”/“OFF” position while
long distance downgrades or
the vehicle is being towed be-
steep slopes. However, do not
cause the steering wheel and the
apply the brake pedal for a long
direction of the wheels will be
time because the engine braking
locked.
will not work while towing. Doing
464 Electronic parking brake - if the electronic parking brake cannot be released
9-9. Electronic parking brake
9-10. Access key fob - if ac-
& Locking and unlocking
– if the electronic parking
cess key fob does not operate
brake cannot be released
properly
Contact your SUBARU dealer and have
CAUTION
your SUBARU dealer release the electro-
nic parking brake.
Keep metallic objects, magnetic
sources and signal transmitters
away from the area between the
access key fob and the push-button
ignition switch. They may interfere
with the communication between
the access key fob and the push-
button ignition switch.
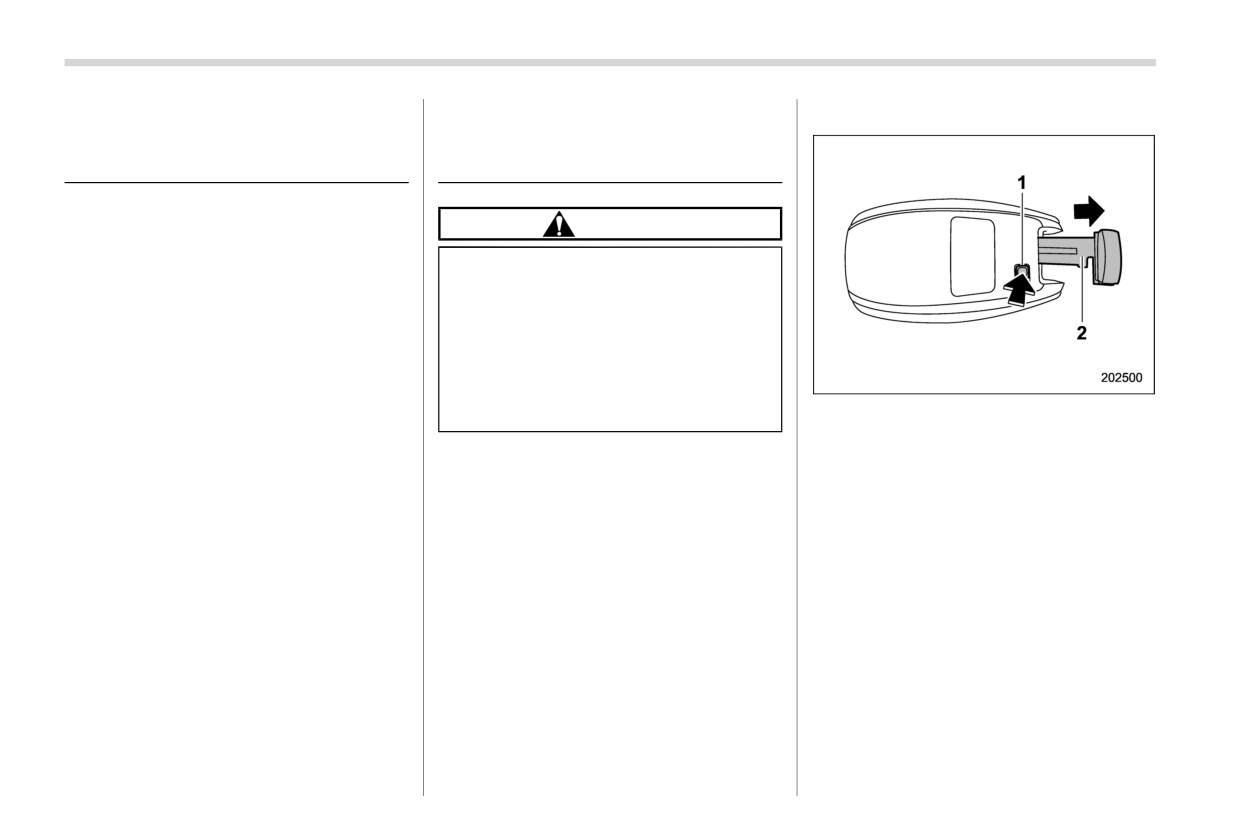
1
Release button
2
Emergency key
The following functions may be inoperable
While pressing the release button of the
because of strong radio signals in the
access key fob, take out the emergency
surrounding area or a low battery condition
key.
of the access key fob.
Lock or unlock the driver’s door with the
. Locking/unlocking doors (including the
emergency key in the procedure described
rear gate)
in “Locking and unlocking from the out-
. Switching power status
side” FP137.
. Starting engine
NOTE
In such cases, perform the following
After locking or unlocking, be sure to
procedure. When the battery of the access
attach the emergency key back to the
key fob is discharged, replace it with a new
access key fob.
one. Refer to “Replacing battery of access
key fob” FP517.
Access key fob - if access key fob does not operate properly
465
& Switching power status
5. When the keyless access with push-
button start system is deactivated,
1. Apply the parking brake.
press the push-button ignition switch
2. Shift the select lever to the “P” (Park)
with the brake pedal released. The
position.
status of the push-button ignition
3. Depress the brake pedal.
switch then changes to “ON”.
NOTE
If the power does not switch even
though the above procedure was fol-
lowed precisely, contact your SUBARU
dealer.
& Starting engine
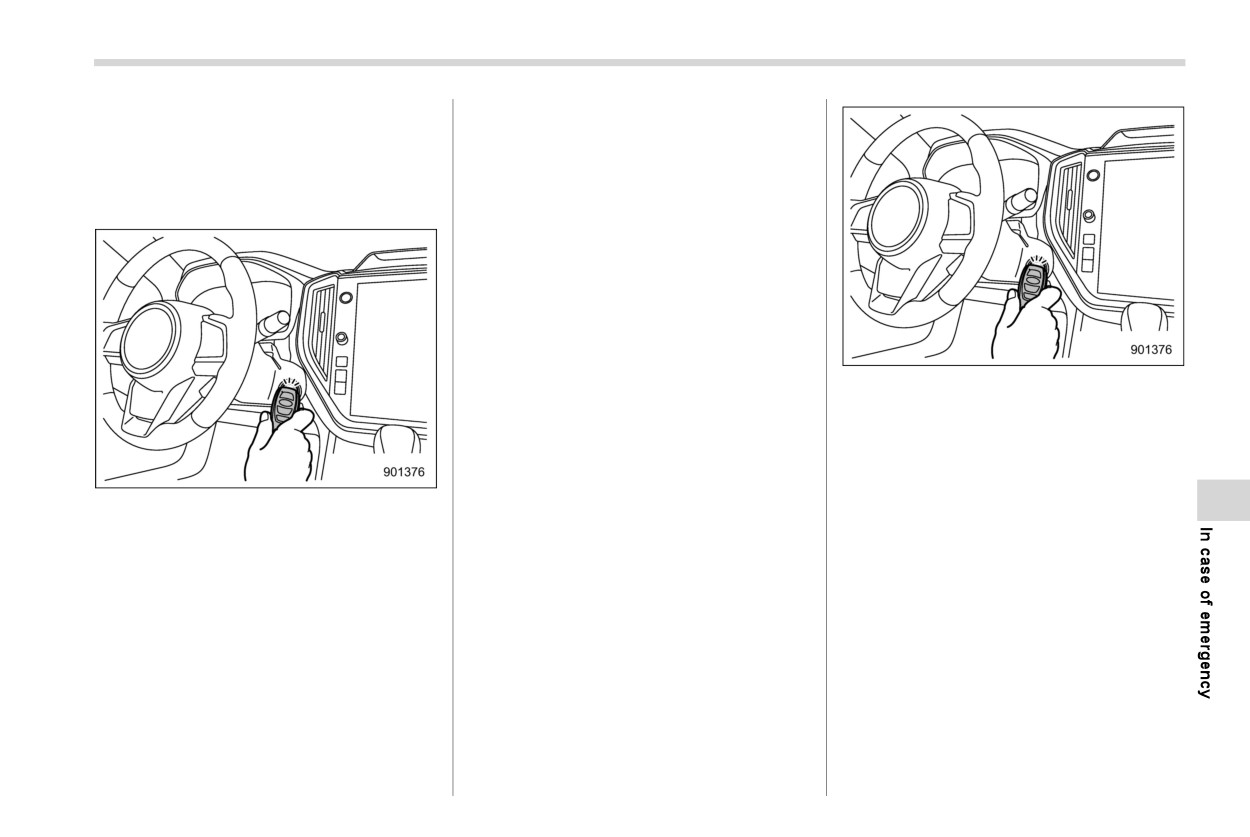
4.
Hold the access key fob with the
buttons facing you, and touch the
1.
Apply the parking brake.
push-button ignition switch with it.
2.
Shift the select lever to the “P” (Park)
When the communication between the
position.
access key fob and the vehicle is
3.
Depress the brake pedal.
completed, a chime (ding) will sound.
4.
Hold the access key fob with the
At the same time, the push-button
buttons facing you, and touch the
ignition switch turns to the “ACC” or
push-button ignition switch with it.
“ON” position.
When the communication between the
5.
After the push-button ignition switch
access key fob and the vehicle is
turns to the “ACC” or “ON” position,
completed, a chime (ding) will sound.
while depressing the brake pedal,
At the same time, the status of the
press the push-button ignition switch.
push-button ignition switch changes to
either of the following.
NOTE
. When the keyless access with push-
If the engine does not start even though
button start system is deactivated:
the above procedure was followed
“ACC”
precisely, contact your SUBARU dealer.
. Under other conditions: “ON”
466 Rear gate - if the rear gate cannot be opened
9-11. Rear gate - if the rear
CAUTION
gate cannot be opened
Never operate the rear gate open
lever with fingers because doing so
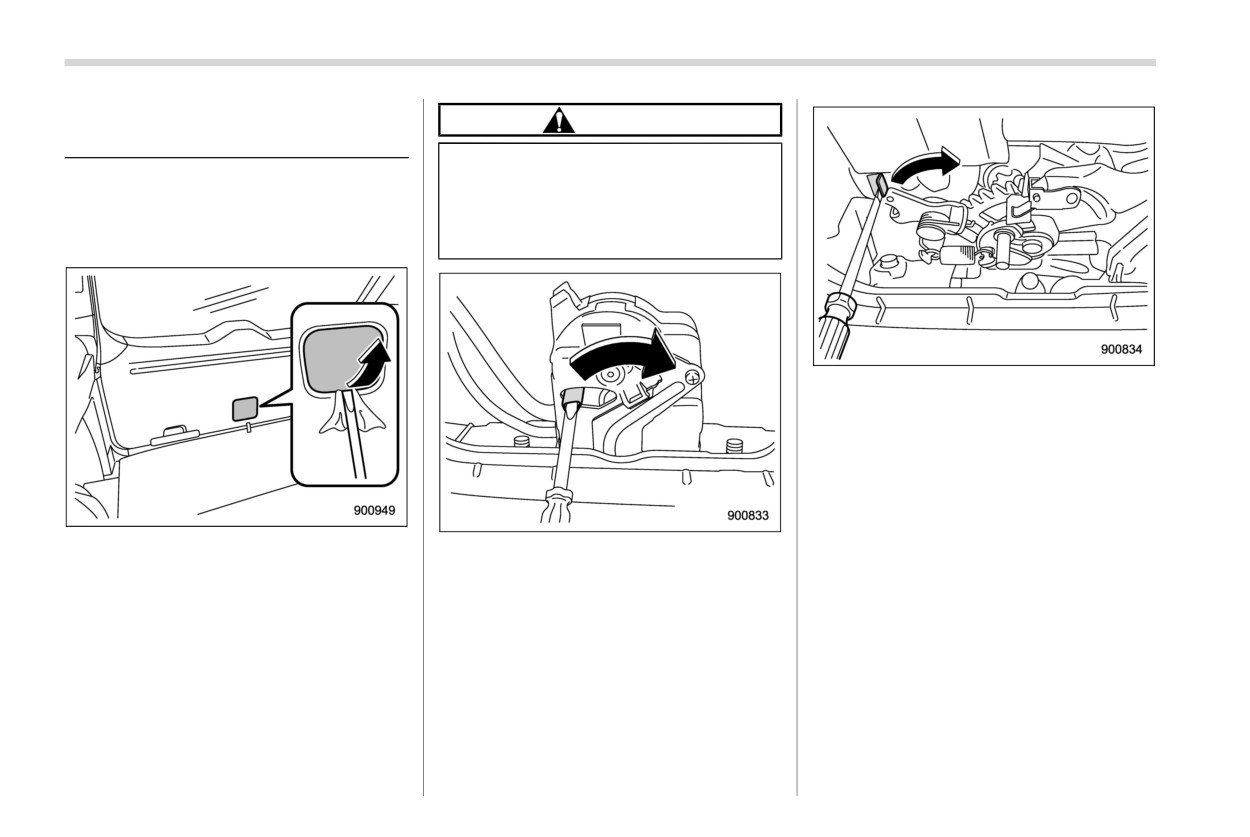
In the event that you cannot open the rear
may cause an injury. Always use a
gate by operating the rear gate opener
flat-head screwdriver or a similar
button, you can open it from inside the
tool.
cargo area.
Models with power rear gate
3. To open the rear gate, turn the lever to
the right position.
1. Remove the access cover at the
Models without power rear gate
bottom-center of the rear gate trim
using a flat-head screwdriver wrapped
with vinyl tape or a cloth.
2. Locate the rear gate open lever behind
the rear gate trim.
Malfunctions of the center information display
467
9-12. Malfunctions of the
center information display
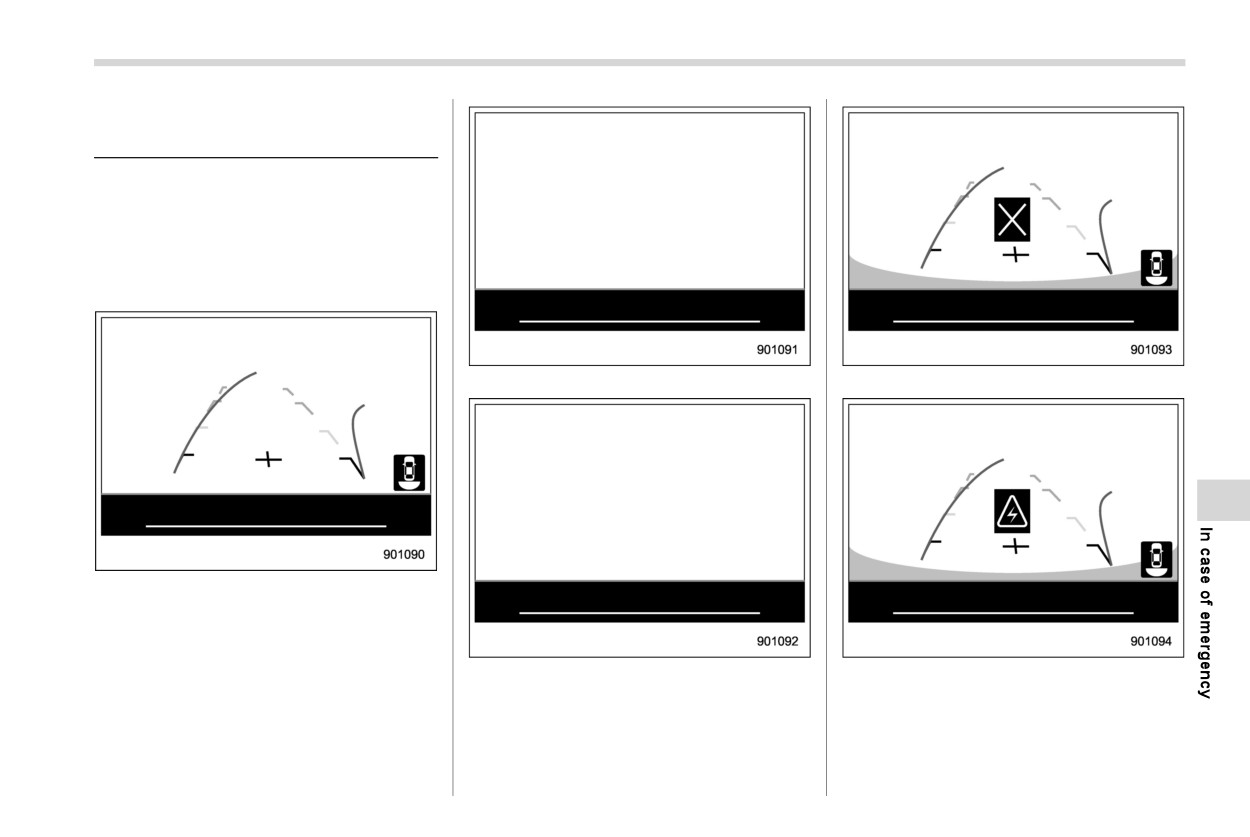
If the following screens are displayed,
temporary errors or malfunctions may
occur in the center information display.
If they are only temporary errors, the
following procedure may help to eliminate
them.
Freezing the screen
Error A
Shutting down the screen
Blacking out the screen
Error B
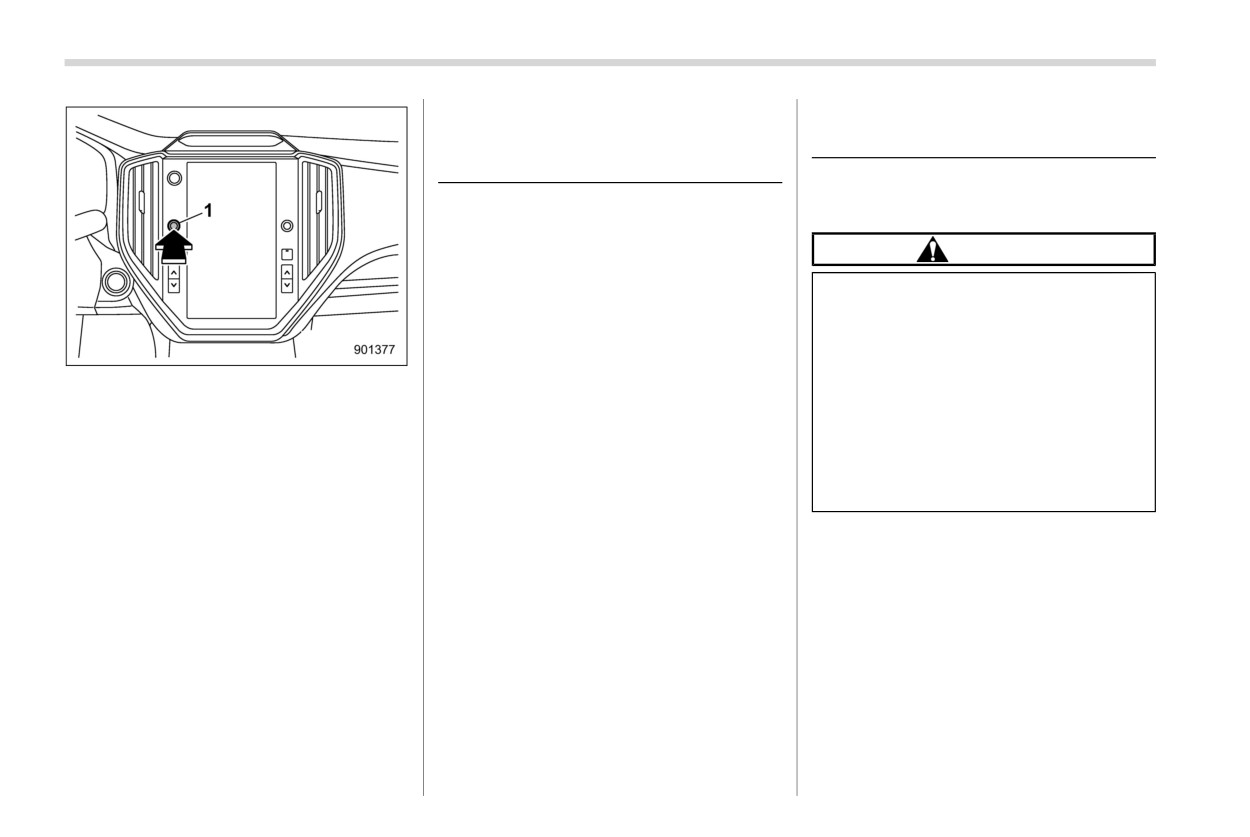
1. Park the vehicle in a safe place.
2. Turn the ignition switch once to the
“LOCK/OFF” position, then start the
engine.
- CONTINUED -
468 Moonroof - if the moonroof does not close
9-13. Moonroof (if equipped)
9-14. If your vehicle is in-
- if the moonroof does not
volved in an accident
close
& To restart the engine when
involved in an accident
If the moonroof does not close, we
recommend that you have the
system
CAUTION
checked by a SUBARU dealer.
If your vehicle is involved in an
accident, be sure to inspect the
ground under the vehicle before
restarting the engine. If you find that
fuel has leaked on the ground, do
1
Volume button
not try to restart the engine. The fuel
3.
If the center information display cannot
system has been damaged and is in
be recovered even though the engine
need of repair. Immediately contact
the nearest automotive service facil-
has been restarted, press and hold the
volume button for more than 10 sec-
ity. We recommend that you consult
onds. The center information display
your SUBARU dealer.
will start up again.
Your vehicle has a fuel pump shut off
4.
If the center information display is not
system. When the vehicle sustains an
recovered by restarting it, contact your
impact in an accident, etc., the fuel pump
SUBARU dealer.
shut off system stops supplying the fuel in
order to minimize fuel leakage. However,
depending on the impact conditions at the
time of collision, the fuel pump shut-off
system may not operate.
Perform the following procedures to restart
the engine after the system is activated.
If your vehicle is involved in an accident
469
Models without “keyless access with
suspended and the doors will remain
The doors unlock automatically
push-button start system”:
unlocked.
while driving.
1. Turn the ignition switch to the “LOCK”
Confirm the safety of the surroundings first
With all doors shut, the doors
or “ACC” position.
and carry out the following to retrieve the
unlock when pressing the lock
2. Restart the engine.
automatic door locking/unlocking function.
side of the power door locking
switch.
Models without “keyless access with
Models with “keyless access with
push-button start system”:
The automatic door locking/un-
push-button start system”:
locking function does not oper-
1. Turn the ignition switch to the “LOCK”
1. Turn the push-button ignition switch to
ate.
position.
the “ACC” or “OFF” position.
2. Turn the ignition switch to the “ON”
2. Restart the engine.
position.
Models with
“keyless access with
& Automatic door locking/un-
push-button start system”:
locking operation when in-
1. Turn the push-button ignition switch to
volved in an accident
the “OFF” position.
When the automatic door locking/unlock-
2. Turn the push-button ignition switch to
ing function is ON, all the doors will be
the “ON” position.
locked automatically while driving. For
further details, refer to
“Automatic door
locking/unlocking” FP139.
NOTE
When the vehicle sustains a strong impact
Depending on the severity of the im-
which may trigger the airbags to deploy,
pact, the emergency unlocking may not
the door locks may be unlocked automa-
function.
tically to enable emergency escape. Gen-
erally, an impact sustained from a rear end
CAUTION
collision does not trigger the airbags to
deploy. However if the impact is strong
If the following occur, there may be a
enough to deploy the airbags, it can also
malfunction in the system.
trigger the unlocking function.
Have the system inspected by a
Under such circumstance, the automatic
SUBARU dealer.
door locking/unlocking function will be
Appearance care
10-1. Exterior care
472
10-3. Cleaning the interior
475
Washing
472
Seat fabric
475
Waxing and polishing
473
Leather seat materials
476
Cleaning alloy wheels
474
Synthetic leather upholstery
476
10-2. Corrosion protection
474
Water repellent seat material (if equipped)
476
Seatbelt
476
Most common causes of corrosion
474
To help prevent corrosion
475
Instrument panel, console panel, switches,
combination meter, rear climate control panel,
and other plastic surfaces
476
Center information display
477
10
472 Exterior care
10-1. Exterior care
the cover surface may be da-
NOTE
maged.
. When having your vehicle washed in
& Washing
Since your vehicle is equipped
an automatic car wash, make sure
with a rear wiper, automatic car-
beforehand that the car wash is of
CAUTION
wash brushes could become
suitable type.
tangled around it, damaging the
. The rear view camera lens has a hard
When washing the vehicle, the
wiper arm and other compo-
coating to help prevent scratches.
brakes may get wet. As a result,
nents. Ask the automatic car-
However, when washing the vehicle
the brake stopping distance will
wash operator not to let the
or cleaning the camera lens, be
be longer. To dry the brakes, drive
brushes touch the wiper arm or
careful not to scratch the camera
the vehicle at a safe speed while
to fix the wiper arm on the rear
lens. Do not use a washing brush
lightly depressing the brake ped-
window glass with adhesive tape
directly on the camera lens. The
al to heat up the brakes.
before operating the machine.
image quality of the rear view cam-
Do not wash the engine compart-
Models with the automatic rain
era may deteriorate.
ment and area adjacent to it. If
sensing windshield wipers:
The best way to preserve your vehicle’s
water enters the engine air intake
When washing the vehicle, turn
beauty is frequent washing. Wash the
or electrical parts, it will cause
off the wipers. If the wiper switch
vehicle at least once a month to avoid
engine trouble or a malfunction
is in the
“AUTO” position, the
contamination by road grime.
of electrical equipment.
wipers may operate unexpect-
Wash dirt off with a wet sponge and plenty
When washing inner fenders, un-
edly while washing the vehicle
of lukewarm or cold water. Do not wash the
derbody, bumpers and protrud-
and cause injury.
vehicle with hot water and in direct sun-
ing objects such as exhaust
When washing a vehicle
light.
pipes and exhaust finishers, be
equipped with the automatic rain
careful to prevent injuries from
sensing windshield wipers, make
Salt, chemicals, insects, tar, soot, tree sap,
contacting sharp ends.
sure that the wipers are turned
and bird droppings should be washed off
Do not use any organic solvents
off. If the wiper switch is in the
using a light detergent, as required. If you
when washing the surface of the
“AUTO” position, the wipers may
use a light detergent, make certain that it is
bulb assembly cover. However, if
operate unexpectedly while
a neutral detergent. Do not use strong
a detergent with organic solvents
washing the vehicle and the wi-
soap or chemical detergents. All cleaning
is used to wash the cover sur-
per blades could be damaged.
agents should be promptly flushed from
face, completely rinse off the
the surface and not allowed to dry there.
detergent with water. Otherwise,
Rinse the vehicle thoroughly with plenty of
Exterior care
473
lukewarm water. Wipe the remaining water
other parts when washing sus-
wax on a painted surface leads to loss of
off with a chamois or soft cloth. Wear
pension components.
the original luster and also quickens the
rubber gloves and use a hand brush when
deterioration of the surface. It is recom-
. Be careful not to flush the engine
washing down underbody, inner fenders
mended that a coat of wax be applied at
bottom for a long time. It may
and suspension to effectively remove mud
least once a month, or whenever the
cause damage of some electrical
and dirt off.
surface no longer repels water.
parts.
! Washing the underbody
If the appearance of the paint has dimin-
Chemicals, salts and gravel used for
! Using a warm water washer
ished to the point where the luster or tone
deicing road surfaces are extremely cor-
cannot be restored, lightly polish the sur-
. Keep a good distance of 12 in (30 cm)
rosive, accelerating the corrosion of un-
face with a fine-grained compound. Never
or more between the washer nozzle
derbody components, such as the exhaust
polish just the affected area, but include
and the vehicle.
system, fuel and brake lines, brake cables,
the surrounding area as well. Always
. Do not wash the same area continu-
floor pan and fenders, and suspension.
polish in only one direction. A No. 2000
ously.
grain compound is recommended. Never
Thoroughly flush the underbody and inside
. If a stain will not come out easily, wash
use a coarse-grained compound. Coarse-
of the fenders with lukewarm or cold water
by hand. Some warm water washers
grained compounds have a smaller grain-
at frequent intervals to reduce the harmful
are of the high temperature, high
size number and could damage the paint.
effects of such agents.
pressure type, and they can damage
After polishing with a compound, coat with
or deform the resin parts such as
Mud and sand adhering to the underbody
wax to restore the original luster. Frequent
components may accelerate their corro-
moldings, or cause water to leak into
polishing with a compound or an incorrect
sion.
the vehicle.
polishing technique will result in removing
After driving off-road or on muddy or sandy
the paint layer and exposing the under-
roads, wash the mud and sand off the
& Waxing and polishing
coat. When in doubt, it is always best to
underbody. Carefully flush the suspension
Always wash and dry the vehicle before
contact your SUBARU dealer or an auto
and axle parts, as they are particularly
waxing and polishing.
paint specialist.
prone to mud and sand buildup. Do not use
Use a good quality polish and wax and
a sharp-edged tool to remove caked mud.
CAUTION
apply them according to the manufac-
turer’s instructions. Wax or polish when
Do not use any agents with organic
CAUTION
the painted surface is cool.
solvents on the surface of the bulb
. Be careful not to damage brake
Be sure to polish and wax the chrome trim,
assembly cover. However, if a polish
hoses, sensor harnesses, and
as well as the painted surfaces. Loss of
or wax with organic solvents is
- CONTINUED -
474 Corrosion protection
applied to the cover surface, com-
oughly with water. Do not clean the
10-2. Corrosion protection
pletely wipe off the polish or wax.
wheels with a stiff brush or expose them
Otherwise, the cover surface may be
to a high-speed washing device.
Your SUBARU has been designed and
damaged.
Clean the vehicle (including the alloy
built to resist corrosion. Special materials
wheels) with water as soon as possible
and protective finishes have been used on
when it has been splashed with sea
most parts of the vehicle to help maintain
NOTE
water, exposed
to sea
breezes,
or
fine appearance, strength, and reliable
Be careful not to block the wind-
driven on roads
treated
with
salt
or
operation.
shield washer nozzles with wax
other agents.
when waxing the vehicle.
& Most common causes of cor-
Do not wipe the rear view camera
rosion
with alcohol, benzine or paint thin-
ner. Otherwise, discoloration may
The most common causes of corrosion
occur. To remove contamination,
are:
wipe the camera with a cloth mois-
. The accumulation of moisture retaining
tened with diluted neutral detergent
dirt and debris in body panel sections,
and then wipe it with a soft, dry cloth.
cavities, and other areas.
When waxing the vehicle, be careful
. Damage to paint and other protective
not to apply the wax to the rear view
coatings caused by gravel and stone
camera. If it comes in contact with
chips or minor accidents.
the camera, moisten a clean cloth
with diluted neutral detergent to
Corrosion is accelerated on the vehicle
remove the wax.
when:
. It is exposed to road salt or dust control
& Cleaning alloy wheels
chemicals, or used in coastal areas
where there is more salt in the air, or in
. Promptly wipe the alloy wheels clean of
areas where there is considerable
any kind of grime or agent. If dirt is left
industrial pollution.
on too long, it may be difficult to clean
. It is driven in areas of high humidity,
off.
especially when temperatures range
. Do not use soap containing grit to clean
just above freezing.
the wheels. Be sure to use a neutral
cleaning agent, and later rinse thor-
Cleaning the interior
475
. Dampness in certain parts of the
of maintenance and treatment if you need
10-3. Cleaning the interior
vehicle remains for a long time, even
assistance.
though other parts of the vehicle may
Repair chips and scratches in the paint as
Use a soft, damp cloth to clean the climate
be dry.
soon as you find them.
control panel, audio equipment, instru-
. High temperatures will cause corrosion
ment panel, center console, combination
to parts of the vehicle which cannot dry
Check the interior of the vehicle for water
meter panel, and switches. (Do not use
quickly due to lack of proper ventilation.
and dirt accumulation under the floor mats
organic solvents.)
because that could cause corrosion. Oc-
& To help prevent corrosion
casionally check under the mats to make
CAUTION
sure the area is dry.
Wash the vehicle regularly to prevent
Keep your garage dry. Do not park your
Do not use sharp instruments or
corrosion of the body and suspension
vehicle in a damp, poorly ventilated gar-
window cleaner containing abra-
components. Also, wash the vehicle
age. In such a garage, corrosion can be
sives to clean the inner surface of
promptly after driving on any of the
caused by dampness. If you wash the
the rear window. They may damage
following surfaces.
vehicle in the garage or put the vehicle into
the conductors printed on the win-
. Roads that have been salted to prevent
the garage when wet or covered with
dow.
them from freezing in winter
snow, that can cause dampness.
. Mud, sand, or gravel
. Coastal roads
If your vehicle is operated in cold weather
& Seat fabric
and/or in areas where road salts and other
After the winter has ended, it is recom-
Remove loose dirt, dust or debris with a
corrosive materials are used, the door
mended that the underbody be given a
vacuum cleaner. If the dirt is caked on the
hinges and locks, rear gate lock, and hood
very thorough washing.
fabric or hard to remove with a vacuum
latch should be inspected and lubricated
cleaner, use a soft brush then vacuum it.
periodically.
Before the beginning of winter, check the
Wipe the fabric surface with a tightly wrung
condition of underbody components, such
cloth and dry the seat fabric thoroughly. If
as the exhaust system, fuel and brake
the fabric is still dirty, wipe using a solution
lines, brake cables, suspension, steering
of mild soap and lukewarm water then dry
system, floor pan, and fenders. If any of
thoroughly.
them are found to be rusted, they should
be given an appropriate rust prevention
If the stain does not come out, try a
treatment or should be replaced. Contact
commercially-available fabric cleaner.
your SUBARU dealer to perform this kind
Use the cleaner on a hidden place and
- CONTINUED -
476 Cleaning the interior
make sure it does not affect the fabric
slightly damp cloth to remove soap residue
cleaner or fuel must never be used
adversely. Use the cleaner according to its
and dry with a soft cloth.
on leather or synthetic interior ma-
instructions.
Minor surface blemishes or difficult dirt
terials. Doing so could damage the
spots may be treated with a commercial
surface and cause the color to
CAUTION
leather spray. Never use alcohol, cleaning
deteriorate.
solvents, leather oils, varnishes or
When cleaning the seat, do not use
polishes on your leather as it will dry out
benzine, paint thinner, or any similar
the leather finish.
& Water repellent seat material
materials. Doing so could damage
If your SUBARU is to be parked for a long
(if equipped)
the surface and cause the color to
time in bright sunlight, it is recommended
deteriorate.
The water repellency of the seat fabric will
that the seats and headrests be covered,
decrease over time. Do not apply addi-
or the windows shaded, to prevent fading
tional water repellent coating.
or shrinkage.
& Leather seat materials
You will discover that each leather seat
& Seatbelt
The leather used by SUBARU is a high
section will develop soft folds or wrinkles,
quality natural product which will retain its
For details about how to clean the seatbelt,
which is characteristic of genuine leather.
distinctive appearance and feel for many
refer to “Seatbelt maintenance” FP61.
years with proper care.
& Synthetic leather upholstery
Allowing dust or road dirt to build up on the
& Instrument panel, console
The synthetic leather material used on the
surface can cause leather to become
panel, switches, combination
SUBARU may be cleaned using mild soap
brittle and wear prematurely. To maintain
meter, rear climate control
or detergent and water, after first vacuum-
its resiliency, leather should be cleaned
panel, and other plastic sur-
ing or brushing away loose dirt. Allow the
monthly or whenever it becomes soiled.
faces
soap to soak in for a few minutes and wipe
Before cleaning leather upholstery, va-
off with a clean, damp cloth. Commercial
Use a soft, damp cloth to clean the climate
cuum it to remove dust. Use a soft and
foam-type cleaners suitable for synthetic
control panel, audio equipment, instru-
lint-free cloth dampened with lukewarm
leather materials may be used when
ment panel, center console, combination
water and mild soap, taking care not to
necessary.
meter panel, and switches.
soak the leather or allow water to pene-
trate the stitched seams. Use a gentle
CAUTION
CAUTION
circular motion while cleaning the leather -
do not rub or apply extreme pressure.
Strong cleaning agents such as
. Do not use organic solvents such
Wipe the leather again with another clean,
solvents, paint thinners, window
as paint thinners or fuel, or
Cleaning the interior
477
strong cleaning agents that con-
contains thinner, fuel, or any
tain those solvents. Doing so
other volatile substance. Such
could damage the surface and
cleaning fluid could erase the
cause the color to deteriorate.
lettering on the switches at the
. Do not use chemical solvents that
bottom of the monitor.
contain silicone on the vehicle
audio system, electrical compo-
nents of the air-conditioner or
any switches. If silicone adheres
to these parts, it may cause
damage to electrical compo-
nents.
& Center information display
To clean the center information display,
wipe it with a silicone cloth or with a soft
cloth. If the monitor is extremely dirty,
clean it with a soft cloth moistened with
neutral detergent then carefully wipe off
any remaining detergent.
CAUTION
. Do not spray neutral detergent
directly onto the monitor. Doing
so could damage the monitor’s
components.
. Do not wipe the monitor with a
hard cloth. Doing so could
scratch the monitor.
. Do not use cleaning fluid that
Maintenance and service
11-1. Maintenance schedule
481
11-11. Front differential gear oil and rear
differential gear oil
493
11-2. Maintenance precautions
481
Recommended grade and viscosity
493
Before checking or servicing in the engine
compartment
482
11-12. Brake fluid
493
When checking or servicing in the engine
Checking the fluid level
493
compartment
483
Recommended brake fluid
494
When checking or servicing in the engine
11-13. Brake pedal
494
compartment while the engine is running
483
11-14. Replacement of brake pad
495
11-3. Engine hood
483
Breaking-in of new brake pads
495
11-4. Engine compartment overview
485
11-15. Tires and wheels
495
11-5. Engine oil
486
Types of tires
495
Engine oil consumption
486
Tire pressure monitoring system (TPMS)
Locations of the oil level gauge, oil filler cap
(if equipped)
496
and oil filter
486
Tire inspection
497
Checking the oil level
486
Tire pressures and wear
498
Changing the oil and oil filter
488
Wheel balance
499
Recommended grade and viscosity
488
Wear indicators
500
Synthetic oil
488
Rotational direction of tires
501
11-6. Cooling system
489
Tire rotation
501
Safety precautions
489
Tire replacement
502
Cooling fan, hose and connections
489
Wheel replacement
502
Engine coolant
489
11-16. Alloy wheels
503
11-7. Air cleaner element
491
11-17. Windshield washer fluid
503
11
Replacing the air cleaner element
491
Adding the windshield washer fluid
504
11-8. Spark plugs
492
Windshield washer fluid
504
Recommended spark plugs
492
11-18. Replacement of wiper blades
504
11-9. Drive belt
492
Windshield wiper blade assembly
505
11-10. Continuously variable transmission
Window wiper blade rubber
506
fluid
493
Rear window wiper blade assembly
507
Rear window wiper blade rubber
507
Maintenance and service
11-19. Battery
509
Vanity mirror light
515
11-20. Fuses
510
Door step light
515
Reading light
515
11-21. Installation of accessories
511
Cargo area light
516
11-22. Replacing bulbs
511
Other bulbs
516
Headlights
512
11-23. Replacing key battery
516
Front turn signal light
512
Safety precautions
516
Rear combination lights
513
Replacing battery of access key fob
517
License plate light
515
Replacing transmitter battery
518
Map light
515
Maintenance schedule
481
11-1. Maintenance schedule
11-2. Maintenance precau-
Your vehicle should only be ser-
viced by persons fully competent
tions
to do so. Serious personal injury
U.S. models
may result to persons not experi-
The scheduled maintenance items re-
When maintenance and service are re-
enced in servicing vehicles.
quired to be serviced at regular intervals
quired, it is recommended that all work be
Always use the proper tools and
are shown in the “Warranty and Mainte-
done by an authorized SUBARU dealer.
make certain that they are well
nance Booklet”. For details, read the
If you perform maintenance and service by
maintained.
separate
“Warranty and Maintenance
yourself, you should familiarize yourself
Booklet”.
Never get under the vehicle sup-
with the information provided in this sec-
ported only by a jack. Always use
Canada models
tion on general maintenance and service
safety stands to support the
The scheduled maintenance items re-
for your SUBARU.
vehicle.
quired to be serviced at regular intervals
Incorrect or incomplete service could
Never keep the engine running in
are shown in the “Warranty and Service
cause improper or unsafe vehicle opera-
a poorly ventilated area, such as
Booklet”. For details, read the separate
tion. Any problems caused by improper
a garage or other closed areas.
“Warranty and Service Booklet”.
maintenance and service performed by
Do not smoke or allow open
Except for U.S. and Canada models
you are not eligible for warranty coverage.
flames around the fuel or battery.
Some items of your vehicle are required to
This will cause a fire.
WARNING
be serviced at scheduled intervals. For
Because the fuel system is under
details about your maintenance schedule,
. Always select a safe area when
pressure, replacement of the fuel
read the separate “Warranty and Main-
performing maintenance on your
filter should be performed only
tenance Booklet”.
vehicle.
by your SUBARU dealer.
. Always be very careful to avoid
Wear adequate eye protection to
injury when working on the vehi-
guard against getting oil or fluids
cle. Remember that some of the
in your eyes. If something does
materials in the vehicle may be
get in your eyes, thoroughly
hazardous if improperly used or
wash them out with clean water.
handled, for example, battery
Do not tamper with the wiring of
acid.
the SRS airbag system or seat-
belt pretensioner system, or at-
- CONTINUED -
482 Maintenance precautions
tempt to take its connectors
& Before checking or servicing
operation indicator on the
apart, as that may activate the
in the engine compartment
switch is turned off. Then take
system or it can render it inop-
the access key fob out from
erative. NEVER use a circuit tes-
the vehicle.
WARNING
ter for these wiring. If your SRS
- Models without push-button
airbag or seatbelt pretensioner
Always stop the engine and apply
start system:
needs service, consult your near-
the parking brake firmly to pre-
Always remove the key from
est SUBARU dealer.
vent the vehicle from moving.
the ignition switch.
. Check the inside of the engine
Always let the engine cool down.
Before performing any servicing
compartment to see if there are
Engine parts become very hot
on a vehicle equipped with a
any cloths and tools left. If they
when the engine is running and
remote engine start system (a
are left inside, they may be a
remain hot for some time after the
dealer option), temporarily place
cause of malfunction and fire.
engine has stopped.
the remote engine start system in
Do not spill engine oil, engine
service mode to prevent it from
coolant, brake fluid or any other
unexpectedly starting the engine.
NOTE
fluid on hot engine components.
SUBARU does not endorse the use of
This may cause a fire.
non-SUBARU approved flushing sys-
When the ignition switch is in the
tems and strongly advises against
“ON” position, the cooling fan
performing these services on a
SUBARU vehicle. Non-SUBARU ap-
may operate suddenly even when
proved flushing systems use chemi-
the engine is stopped. If your
body or clothes come into con-
cals and/or solvents which have not
tact with a rotating fan, that could
been tested or approved by SUBARU.
result in serious injury. To avoid
SUBARU warranties do not cover any
risk of injury, perform the follow-
part of the vehicle which is damaged by
ing precautions.
adding or applying chemicals and/or
solvents other than those approved or
- Models with push-button start
recommended by SUBARU.
system:
Always turn the push-button
ignition switch to the “OFF”
position and confirm that the
Engine hood
483
& When checking or servicing
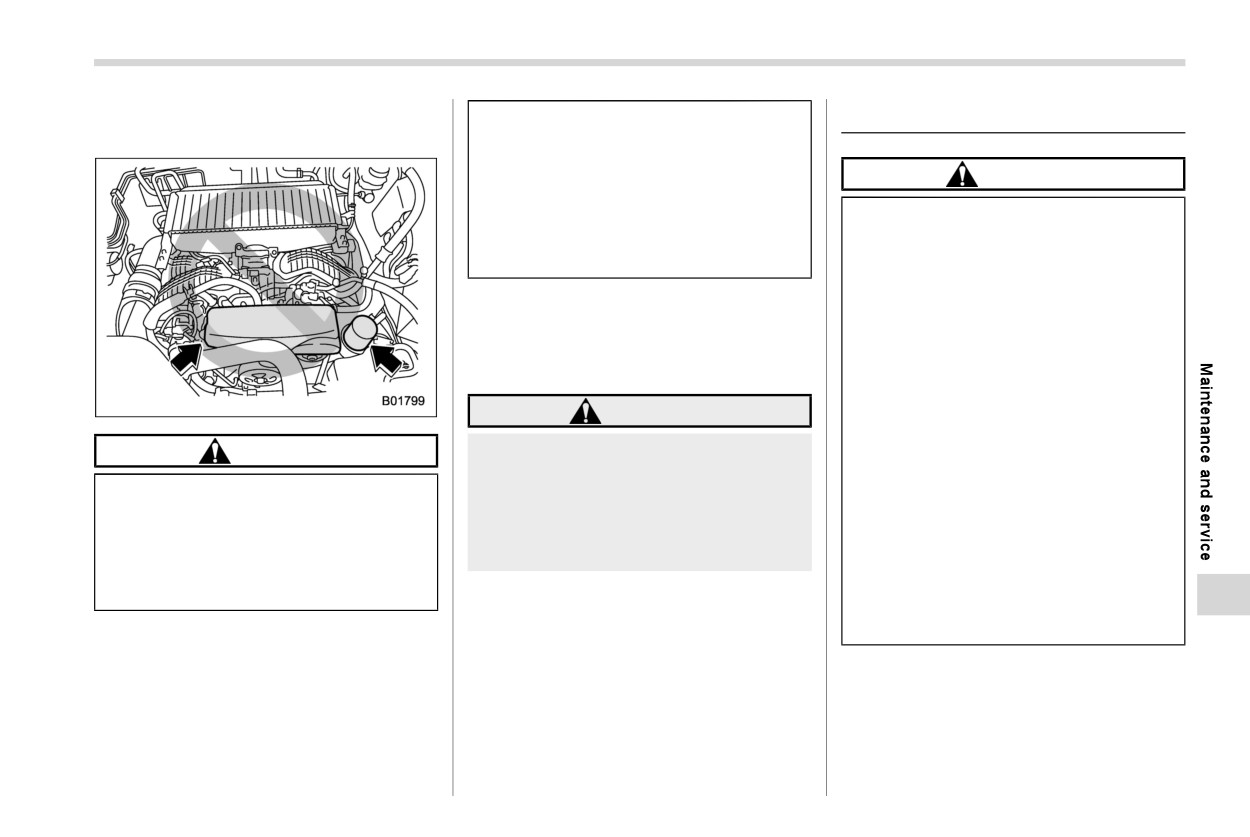
. Do not touch the oil filter until the
11-3. Engine hood
in the engine compartment
engine has cooled down comple-
tely. Doing so may result in a burn
or other injury. Note that the oil
CAUTION
filter becomes very hot when the
Be extremely careful not to catch
engine is running and remains
fingers or other objects when
hot for some time after the engine
closing the engine hood.
has stopped.
Do not push the hood forcibly to
close it. It could deform the metal.
& When checking or servicing
Be extremely careful opening the
in the engine compartment
engine hood when the wind is
while the engine is running
strong. The engine hood could
close suddenly, possibly causing
WARNING
injuries from slamming.
Do not install accessories other
CAUTION
A running engine can be dangerous.
than genuine SUBARU parts to
Keep your fingers, hands, clothing,
the engine hood. If the engine
Do not
contact the drive
belt
hair and tools away from the cooling
hood becomes too heavy, the
cover while checking the compo-
fan, drive belt and any other moving
stay may not be able to support
nents in the engine compartment.
engine parts. Removing rings,
holding it open.
Doing so may cause your hand to
watches and ties is advisable.
Check that the end of the hood
slip off the cover and result in an
stay is inserted into the slot. If it is
unexpected injury.
not inserted properly, the hood
may drop and cause injury.
- CONTINUED -
484 Engine hood
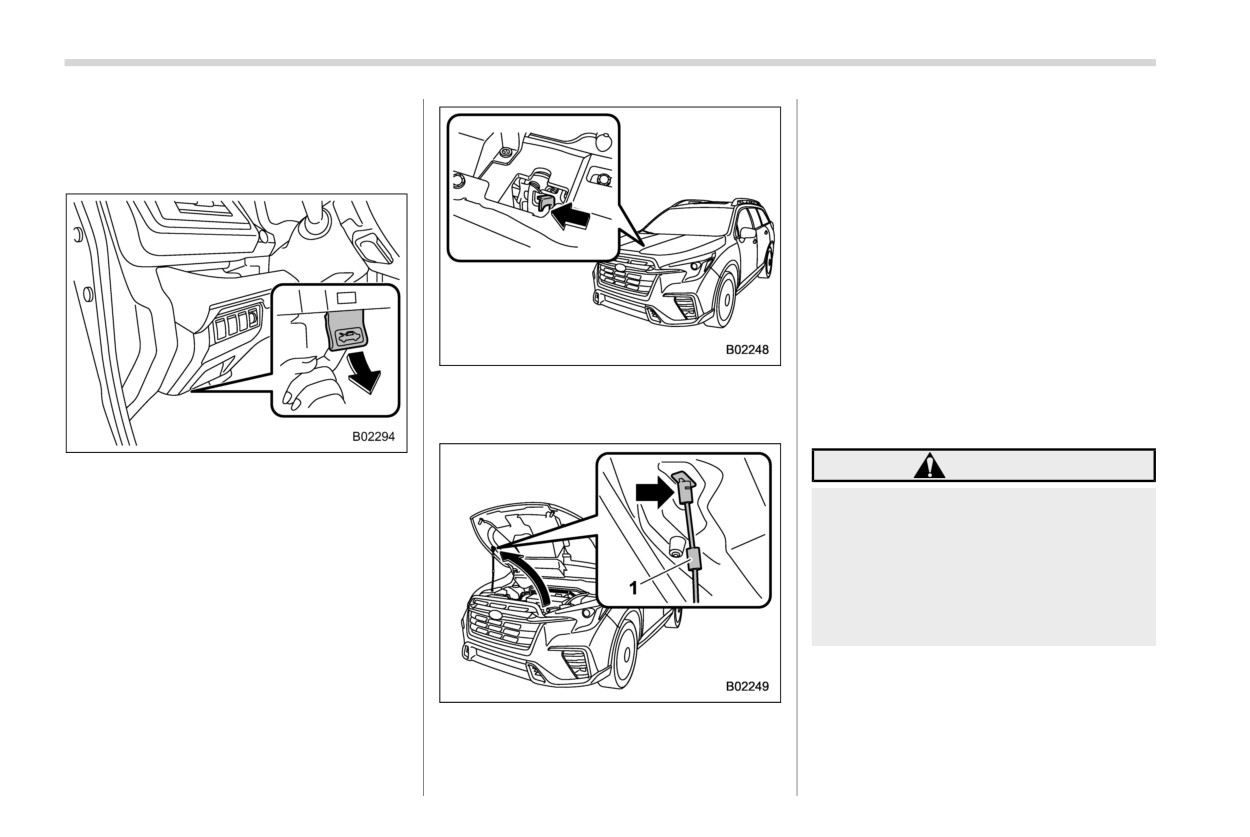
To open the hood:
hood prop into the slot in the hood.
1.
If the wiper blades are lifted off the
Hold the grip to handle the hood prop.
windshield, return them to their original
To close the hood:
position.
1. Lift the hood slightly and remove the
hood prop from the slot in the hood and
return the prop to its retainer.
2. Lower the hood to a height of approxi-
mately 7.8 to 11.8 in (20 to 30 cm)
above its closed position and then let it
drop.
3. After closing the hood, be sure the
hood is securely locked.
3.
Release the secondary hood release
by moving the lever between the front
If this does not close the hood, release it
grille and the hood toward the left.
from a slightly higher position.
WARNING
2.
Pull the hood release knob under the
instrument panel.
Always check that the hood is
properly locked before you start
driving. If it is not, it might fly open
while the vehicle is moving and
block your view, which may cause
an accident and serious bodily in-
jury.
1
Grip
4. Lift up the hood, release the hood prop
from its retainer and put the end of the
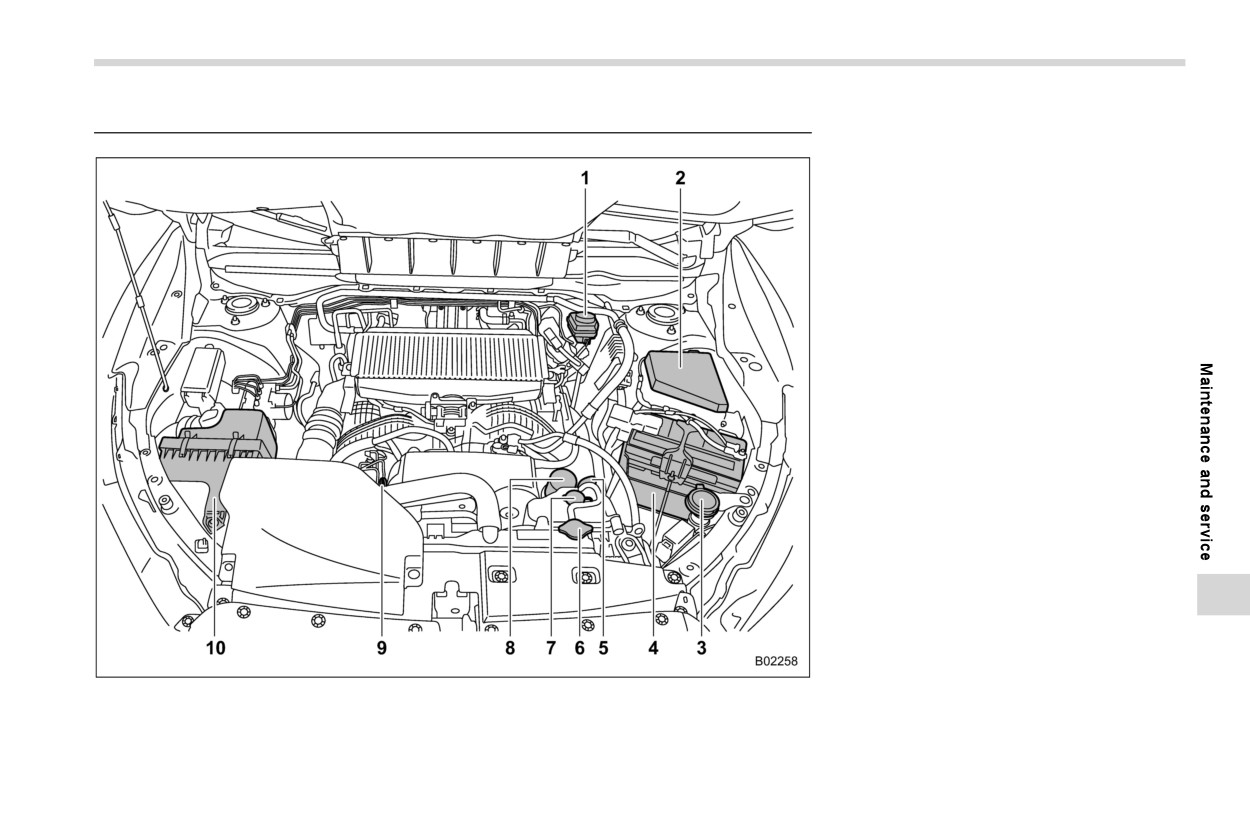
Engine compartment overview
485
11-4. Engine compartment overview
1
Brake fluid reservoir (page 493)
2
Fuse box (page 510)
3
Windshield washer tank (page 503)
4
Battery (page 509)
5
Engine oil filler cap (page 486)
6
Radiator cap (page 489)
7
Engine coolant reservoir (page 489)
8
Engine oil filter (page 488)
9
Engine oil level gauge (page 486)
10
Air cleaner case (page 491)
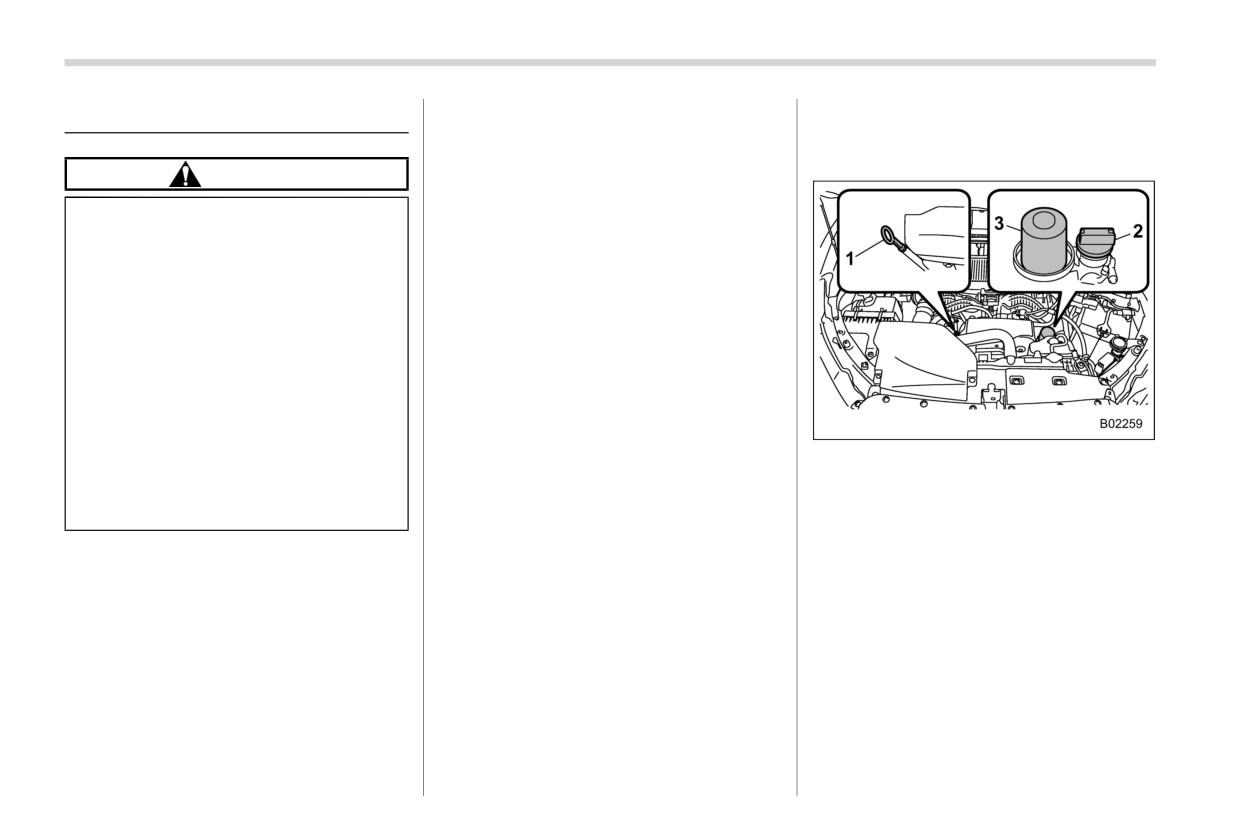
486 Engine oil
When the engine is new and within the
& Locations of the oil level
11-5. Engine oil
break-in period
gauge, oil filler cap and oil
When the engine oil is of lower quality
filter
CAUTION
When the incorrect oil viscosity is used
When engine braking is employed
If the level gauge cannot be
(repeatedly)
pulled out easily, twist the level
gauge right and left, then gently
When the engine is operated at high
pull it out. Otherwise, you may be
engine speeds (for extended periods of
injured accidentally straining
time)
yourself.
When the engine is operated under
heavy loads (for extended periods of
Use only engine oil with the
time)
recommended grade and vis-
cosity.
When towing a trailer
When the engine idles for extended
Be careful not to spill engine oil
periods of time
when adding it. If oil touches the
When the vehicle is operated in stop-
exhaust pipe, it may cause a bad
1
Oil level gauge
smell, smoke, and/or a fire. If
and-go and/or heavy traffic situations
2
Oil filler cap
engine oil gets on the exhaust
When the vehicle is used under severe
3
Oil filter
pipe, be sure to wipe it off.
thermal conditions
When the vehicle accelerates and
& Checking the oil level
decelerates frequently
& Engine oil consumption
1.
Park the vehicle on a level surface and
Under these or similar conditions, you
Some engine oil will be consumed while
turn the ignition switch to the “LOCK”/
should check your oil at least every 2nd
driving. The rate of consumption can be
“OFF” position. If you check the oil
fuel fill-up and change your engine oil more
affected by such factors as transmission
level just after turning the ignition
frequently. Different drivers in the same
type, driving style, terrain and tempera-
switch to the “LOCK”/“OFF” position,
car may experience different results. If
ture. Under the following conditions, oil
wait for at least 5 minutes for the oil to
your oil consumption rate is greater than
consumption can be increased and may
drain back into the oil pan before
expected, contact your authorized
require refilling between maintenance in-
checking the level.
SUBARU dealer who may perform a test
tervals.
under controlled conditions.
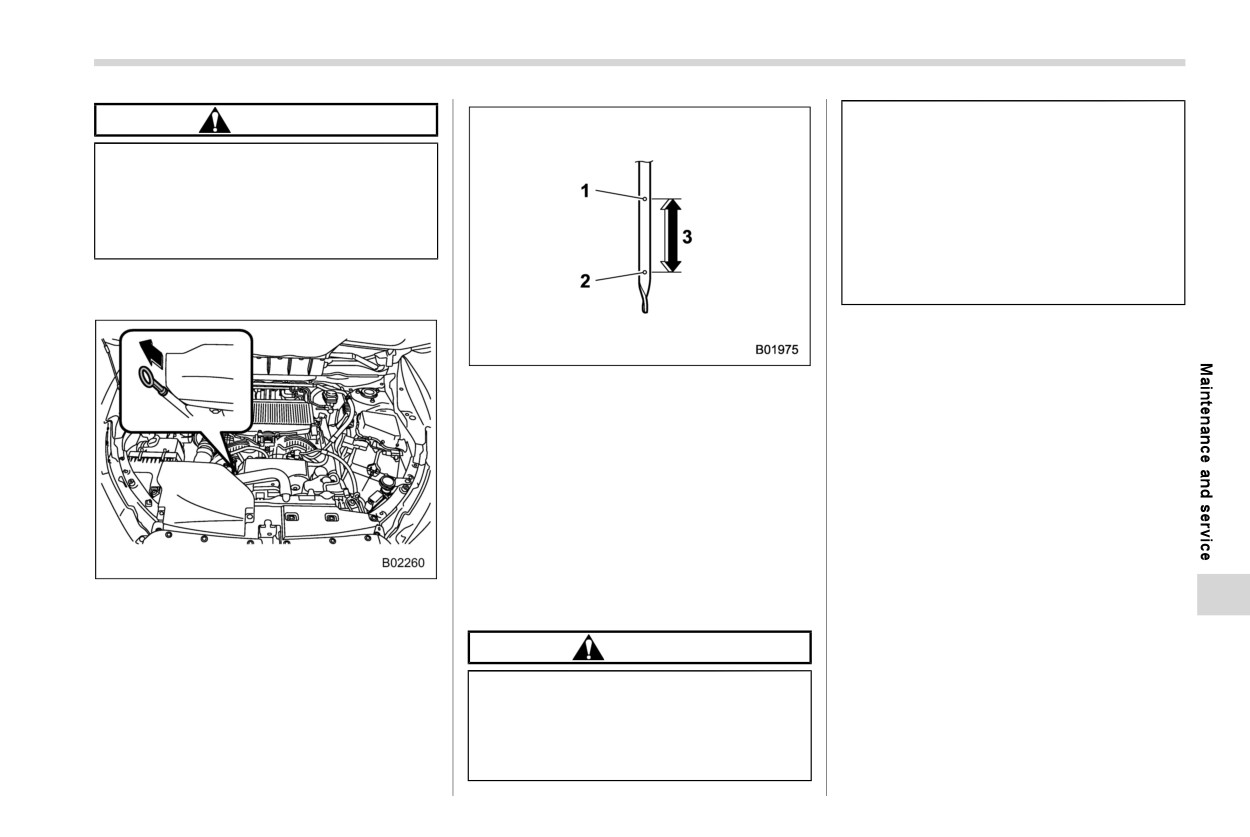
Engine oil
487
. Use only engine oil with the
CAUTION
recommended grade and vis-
If the level gauge cannot be pulled
cosity.
out easily, twist the level gauge right
. Be careful not to spill engine oil
and left, then gently pull it out.
when adding it. If oil touches the
Otherwise, you may be injured acci-
exhaust pipe, it may cause a bad
dentally straining yourself.
smell, smoke, and/or a fire. If
engine oil gets on the exhaust
2.
Pull out the level gauge, wipe it clean,
pipe, be sure to wipe it off.
and insert it again.
To add engine oil, remove the engine oil
filler cap and slowly pour engine oil
through the filler neck. After pouring oil
1
Full level
into the engine, you must use the level
2
Low level
gauge to confirm that the oil level is
3
Approximately 1.1 US qt (1.0 liters,
0.9
correct.
Imp qt) from low level to full level
NOTE
4.
Pull out the oil level gauge again.
5.
Check the oil levels on both sides of the
. To prevent overfilling the engine oil,
level gauge. The engine oil level must
do not add any additional oil above
the upper level when the engine is
be judged by the lowest of the two
levels. If the oil level is below the low
cold.
level mark, add oil so that the full level
. The engine low oil level warning light
is reached.
may stay illuminated when the en-
3.
Be sure the level gauge is
correctly
gine is started straight after topping
inserted until it stops.
up or changing the engine oil. In
CAUTION
such cases, park the vehicle on a
level surface and wait for more than
Be careful not to touch the engine
a minute until the oil level settles,
oil filter when removing the oil
after which the warning light will turn
filler cap. Doing so may result in a
off. Refer to “Engine low oil level
burn, a pinched finger, or may
warning light” FP177.
cause some other injury.
- CONTINUED -
488 Engine oil
& Changing the oil and oil filter
& Recommended grade and
mended engine oil for optimum engine
viscosity
performance. Conventional oil may be
Change the oil and oil filter according to
used if synthetic oil is unavailable.
the maintenance schedule in the “War-
ranty and Maintenance Booklet”.
CAUTION
The engine oil and oil filter must be
Use only engine oil with the recom-
changed more frequently than listed in
mended grade and viscosity.
the maintenance schedule when driving
on dusty roads, when short trips are
Refer to “Engine oil” FP523.
frequently made, or when driving in ex-
tremely cold weather.
NOTE
NOTE
Engine oil viscosity (thickness) affects
fuel economy. Oils of lower viscosity
Changing the engine oil and oil filter
provide better fuel economy. However,
should be performed by a well-
in hot weather, oil of higher viscosity is
trained expert. Contact your
required to properly lubricate the en-
SUBARU dealer for changing the
gine.
engine oil and oil filter. Fully trained
mechanics are on standby at a
SUBARU dealer to utilize the special
& Synthetic oil
tools, spare parts and recom-
You should use synthetic engine oil that
mended oil for this work, and also,
meets the same requirements given for
used oils are properly disposed of.
conventional engine oil. When using syn-
If performing oil replacement your-
thetic oil, you must use oil of the same
self, observe the local regulations
classification, viscosity and grade shown
and dispose of waste oil properly.
in this Owner’s Manual. Refer to “Engine
oil” FP523. Also, you must follow the oil
and filter changing intervals shown in the
“Warranty and Maintenance Booklet”.
NOTE
Synthetic oil of the grade and viscosity
noted in chapter
12 is the recom-
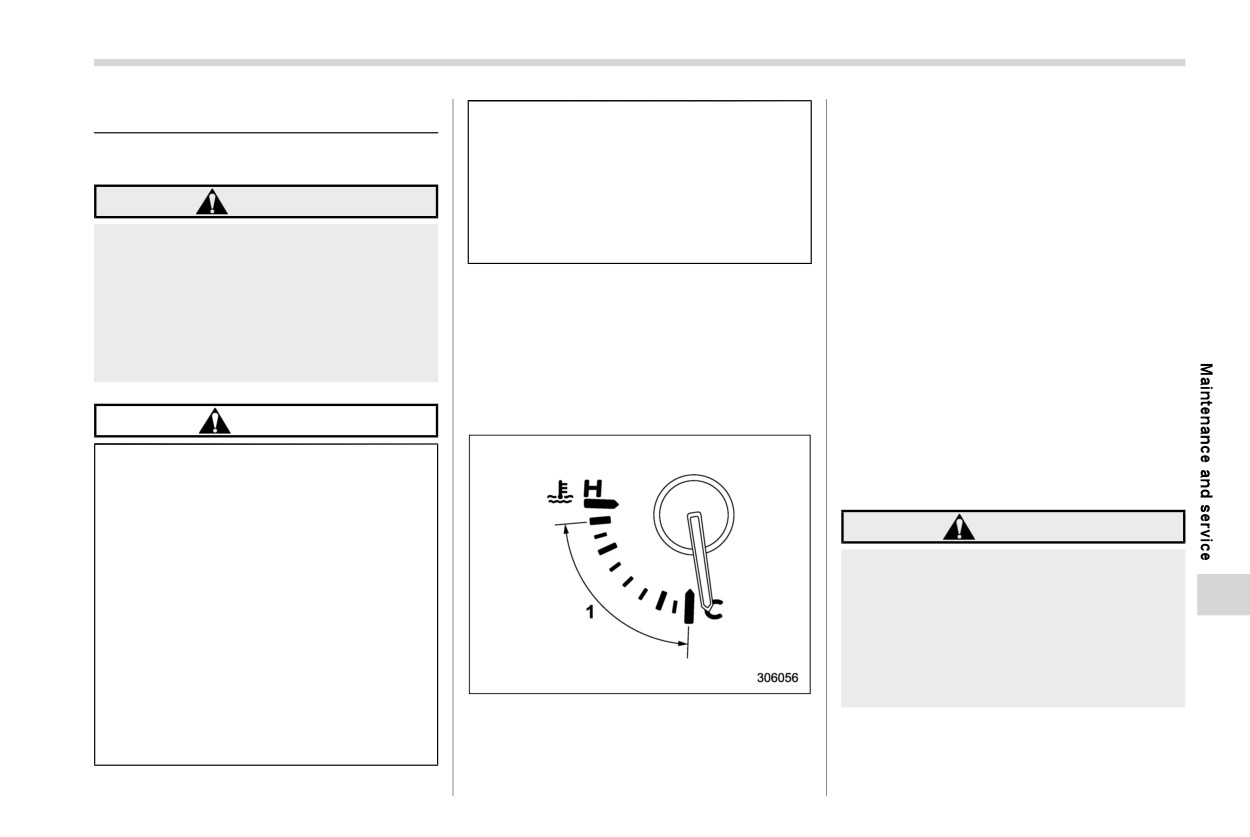
Cooling system
489
type, the maintenance interval is
ture gauge exceeds the normal operating
11-6. Cooling system
shortened to that of the mixing
range, the cooling fan circuit may be
& Safety precautions
coolant.
defective. Refer to “Engine coolant tem-
perature gauge” FP170.
. Do not splash the engine coolant
WARNING
over painted parts. The alcohol
Check the fuse and replace it if necessary.
contained in the engine coolant
Refer to “Fuses” FP510.
Never remove the radiator cap until
may damage the paint surface.
If the fuse is not blown, have the cooling
the engine has been shut off and has
system checked by your SUBARU dealer.
cooled down completely. Since the
coolant is under pressure, you may
& Cooling fan, hose and con-
If the frequent addition of coolant is
suffer serious burns from a spray of
necessary between vehicle service visits,
nections
boiling hot coolant when the cap is
it is recommended that you have your
Your vehicle employs an electric cooling
removed.
vehicle inspected by an authorized
fan which is thermostatically controlled to
SUBARU dealer to check for leaks, da-
operate when the engine coolant reaches
mage, or looseness.
CAUTION
a specific temperature.
& Engine coolant
Vehicles are filled at the factory
with SUBARU SUPER COOLANT
! Checking the coolant level
that does not require the first
change for
11
years/137,500
WARNING
miles (11 years/220,000 km). This
coolant should not be mixed with
Never remove the radiator cap until
any other brand or type of cool-
the engine has been shut off and has
ant during this period. Mixing
cooled down completely. Since the
with a different coolant will re-
coolant is under pressure, you may
duce the life of the coolant. When
suffer serious burns from a spray of
necessary add up the coolant for
boiling hot coolant when the cap is
any reason, use only SUBARU
removed.
SUPER COOLANT.
1
Normal operating range
If SUBARU SUPER COOLANT is
If the radiator cooling fan does not operate
diluted with another brand or
even when the engine coolant tempera-
- CONTINUED -
490 Cooling system
CAUTION
. Be careful not to spill engine
coolant when adding it. If coolant
touches the exhaust pipe, it may
cause a bad smell, smoke, and/or
a fire. If engine coolant gets on
the exhaust pipe, be sure to wipe
it off.
. Do not splash the engine coolant
over painted parts. The alcohol
contained in the engine coolant
may damage the paint surface.
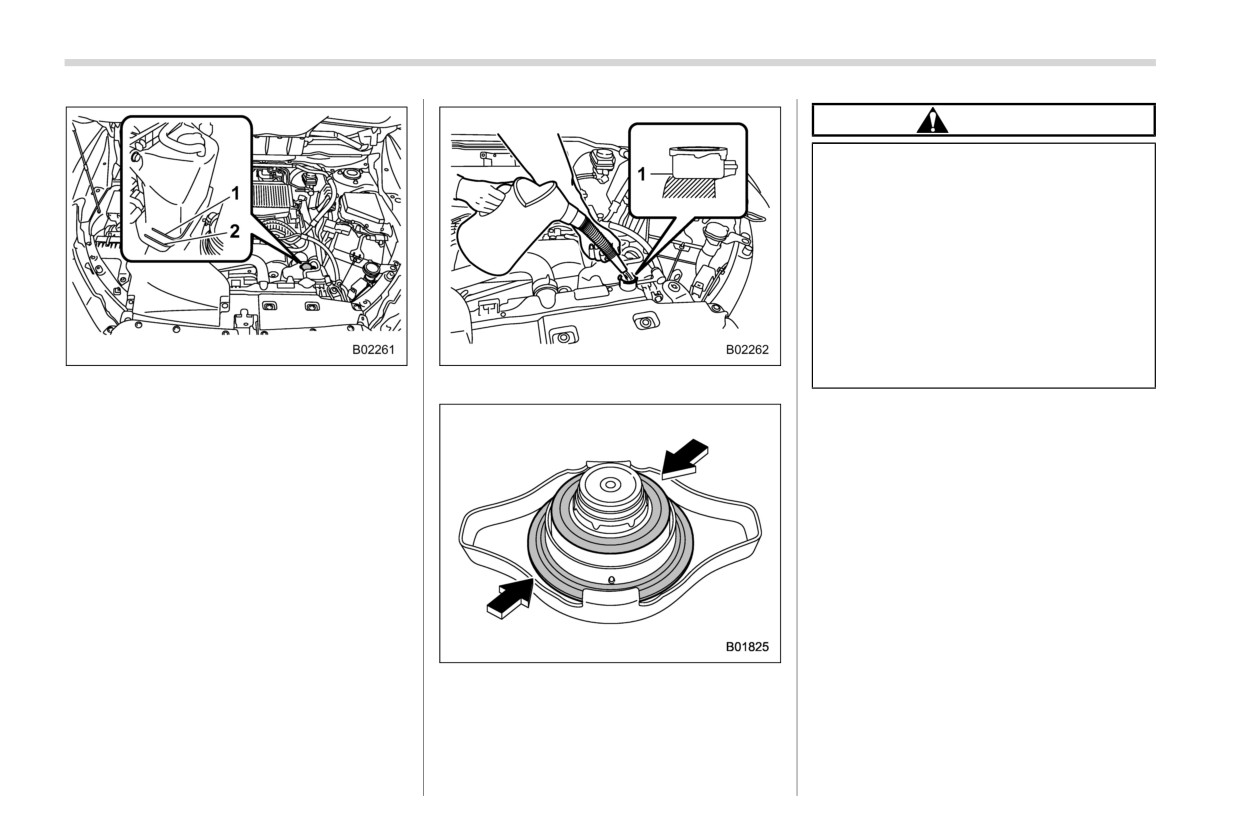
1
“FULL” level mark
1
Fill up to this level.
2
“LOW” level mark
! Changing the coolant
Check the coolant level at each fuel stop.
It may be difficult to change the coolant.
1. Check the coolant level on the outside
Have the coolant changed by your
of the reservoir while the engine is
SUBARU dealer if necessary.
cool.
2. If the level is close to or lower than the
The coolant should be changed according
“LOW” level mark, add coolant up to
to the maintenance schedule in the “War-
the “FULL” level mark. If the reserve
ranty and Maintenance Booklet”.
tank is empty, remove the radiator cap
and refill coolant up to just below the
filler neck as shown in the following
illustration.
3.
After refilling the reserve tank and the
radiator, reinstall the cap and check
that the rubber gaskets inside the
radiator cap are in the proper position.
Air cleaner element
491
11-7. Air cleaner element
& Replacing the air cleaner ele-
ment
Replace the air cleaner element according
WARNING
to the maintenance schedule in the “War-
ranty and Maintenance Booklet”. Under
Do not operate the engine with the
extremely dusty conditions, replace it
air cleaner element removed. The air
more frequently. It is recommended that
cleaner element not only filters in-
you always use genuine SUBARU parts.
take air but also stops flames if the
engine backfires. If the air cleaner
element is not installed when the
engine backfires, you could be
burned.
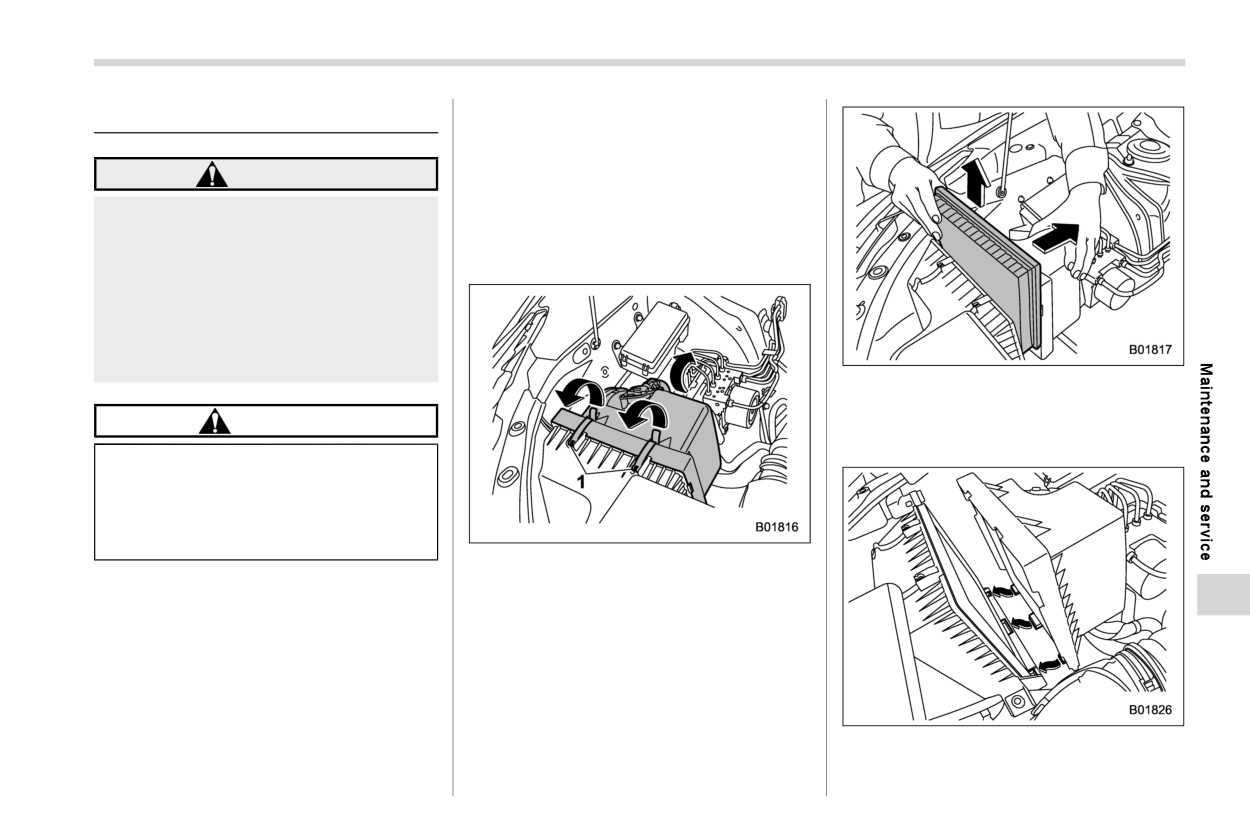
3.
Remove the air cleaner element.
4.
Clean the inside of the air cleaner case
CAUTION
(both front and rear) with a damp cloth
and install a new air cleaner element.
When replacing the air cleaner ele-
ment, use a genuine SUBARU air
cleaner element. If it is not used, it
will cause a negative effect to the
engine.
1
Clips
The air cleaner element functions as a filter
1.
Unsnap the two clips holding the air
screen. When the element is perforated or
cleaner case (rear).
removed, engine wear will be excessive
2.
Open the air cleaner case and pull the
and engine life shortened.
cover rearward while lifting it up.
It is not necessary to clean or wash the air
cleaner element.
5. To install the air cleaner case (rear),
insert the three projections on the air
- CONTINUED -