Subaru Ascent (2023 year). Manual in english - page 15
Loading your vehicle
429
crossbars and carrying attach-
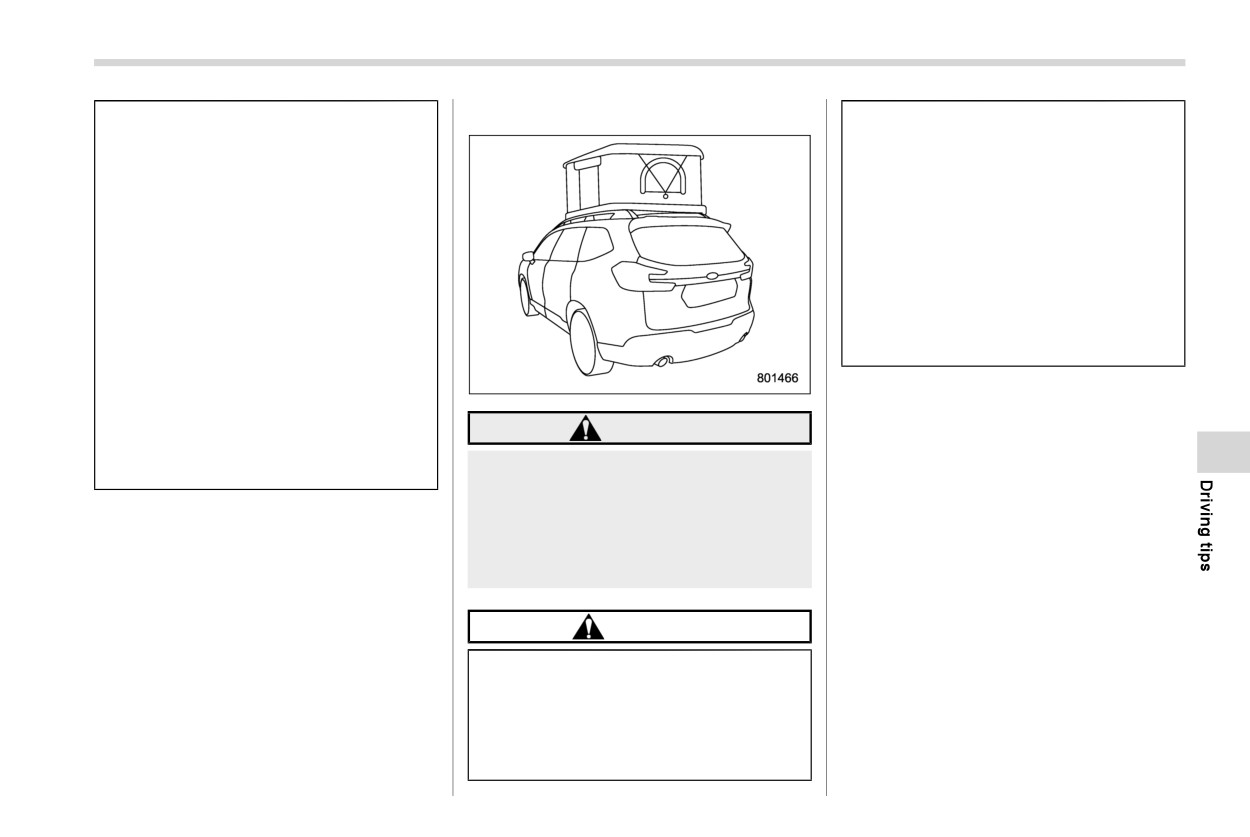
& Roof tent
roof tent are tightly secured to
ments does not exceed 176 lbs
the vehicle. If these conditions
(80 kg). Overloading may cause
are not met, the load limit will be
damage to the vehicle. Read the
lower.
manufacturer’s instructions and
. The maximum load limit of the
pay attention to not exceed the
roof crossbars must be obtained
load limit of the parts.
from the manufacturer or retailer
For cargo carrying purposes, the
of the roof rack. When driving the
roof rails must be used together
vehicle, the maximum roof rail
with the SUBARU recommended
load is 176 lbs (80 kg) or the
roof crossbars and any appropri-
crossbar load limit (whichever is
ate carrying attachment that may
lower).
be needed. The roof rails must
never be used alone to carry
Roof tents may be used under certain
cargo. Otherwise, damage to the
conditions at your own risk.
roof or paint, or a dangerous road
WARNING
! When driving the vehicle
hazard due to loss of cargo could
Adding weight to the vehicle’s roof
The total weight on the roof rails, including
result.
can adversely affect handling, brak-
the roof crossbars and roof tent, must not
ing, and rollover resistance. The
exceed the vehicle’s roof rail load of 176
NOTE
vehicle must never be driven with a
lbs (80 kg), evenly distributed.
Remember that the vehicle’s center of
total roof rail load in excess of 176
gravity is altered with the weight of the
lbs (80 kg).
load on the roof, thus affecting driving
characteristics.
CAUTION
Drive carefully. Avoid rapid starts, hard
cornering and abrupt stops. Crosswind
. The roof rail load limit for sta-
effects will be increased.
tionary vehicles (700 lbs (317 kg))
applies only when the vehicle is
parked and the load is evenly
distributed left/right and front/
rear and the roof crossbars and
- CONTINUED -
430 Loading your vehicle
! When the vehicle is parked on level
The total weight on the roof rails
-
ground
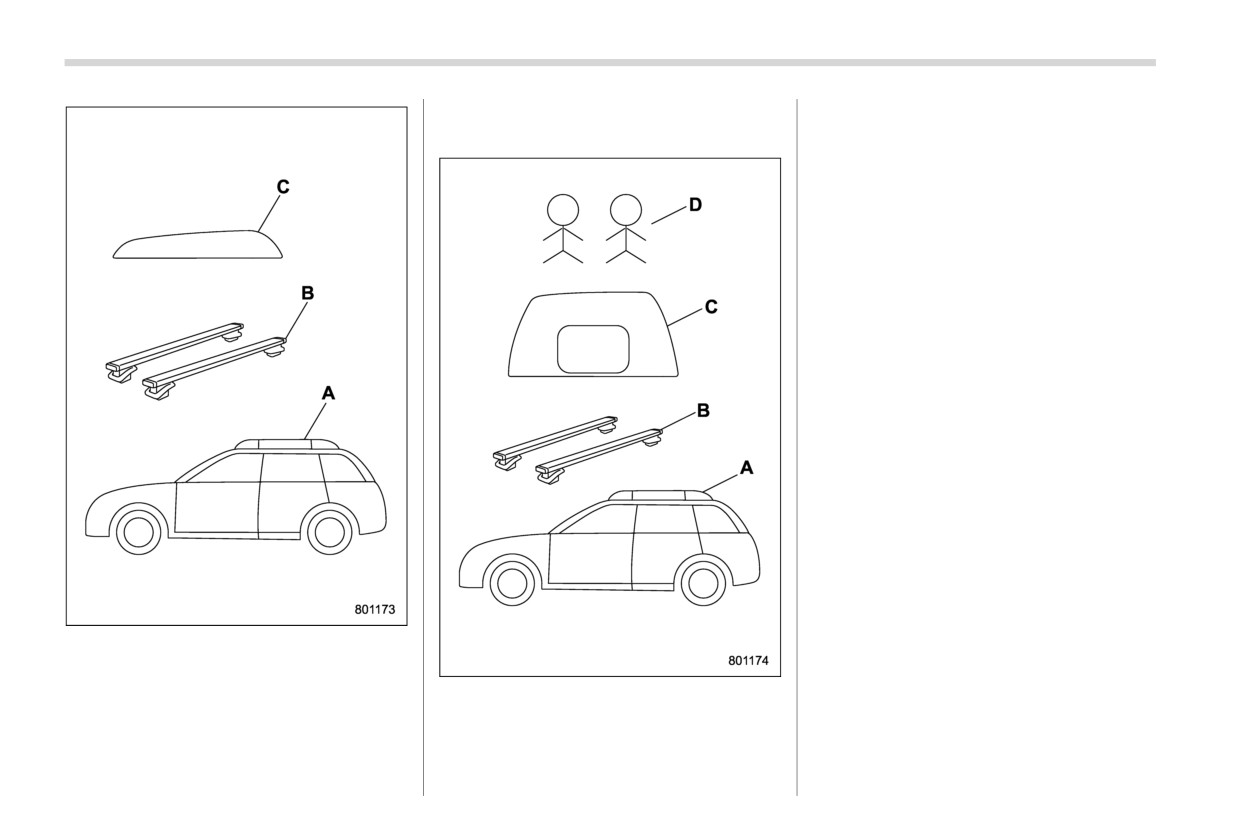
including the roof crossbars, roof tent,
and all occupants and contents in the roof
tent - must not exceed either the vehicle’s
roof rail load limit (700 lbs (317 kg)), evenly
distributed, or the load limit of the roof
crossbars, whichever is lower.
Load limit of the roof rail (A).
B + C + D < 700 lbs (317 kg)
Exceeding this load limit could cause
damage to the vehicle or racking system.
The vehicle must never be driven with
occupants in the roof tent. Before the
vehicle is driven, occupants and cargo
must be removed from the roof tent and
the roof rail load must be restored to within
the roof rail load limit of 176 lbs (80 kg).
Refer to the user manual that accompa-
nied the roof tent for important safety
information and instructions on the proper
installation and use of the tent.
A: Roof rails
B: Roof crossbars
C: Roof tent
A: Roof rails
B + C < 176 lbs (80 kg)
B: Roof crossbars
C: Roof tent
D: Occupants in the roof tent
Trailer hitch (dealer option)
431
8-11. Trailer hitch (dealer op-
get loose and create a traffic
bumper beam if you do not have
safety hazard.
the original.
tion)
Although towing regulations for
. Safety performance is decreased
trailer or caravan vehicles vary
and there is increased risk of
WARNING
by state/region, all regulations
injury to passengers in the case
agree that specifications such
of an accident if the trailer hitch
Never exceed the maximum
as the maximum gross trailer
or a standard bumper beam is not
weight specified for the trailer
weight must not exceed the les-
installed. One of them must al-
hitch. Exceeding the maximum
ser of the following:
ways be installed on the vehicle.
weight could cause an accident
- Maximum gross trailer weight
. If a trailer hitch is installed, it is
resulting in serious personal in-
not possible to install the rear
juries. Permissible trailer weight
- Maximum gross tongue
towing hook.
changes depending on the situa-
weight
tion. For possible recommenda-
- GVWR
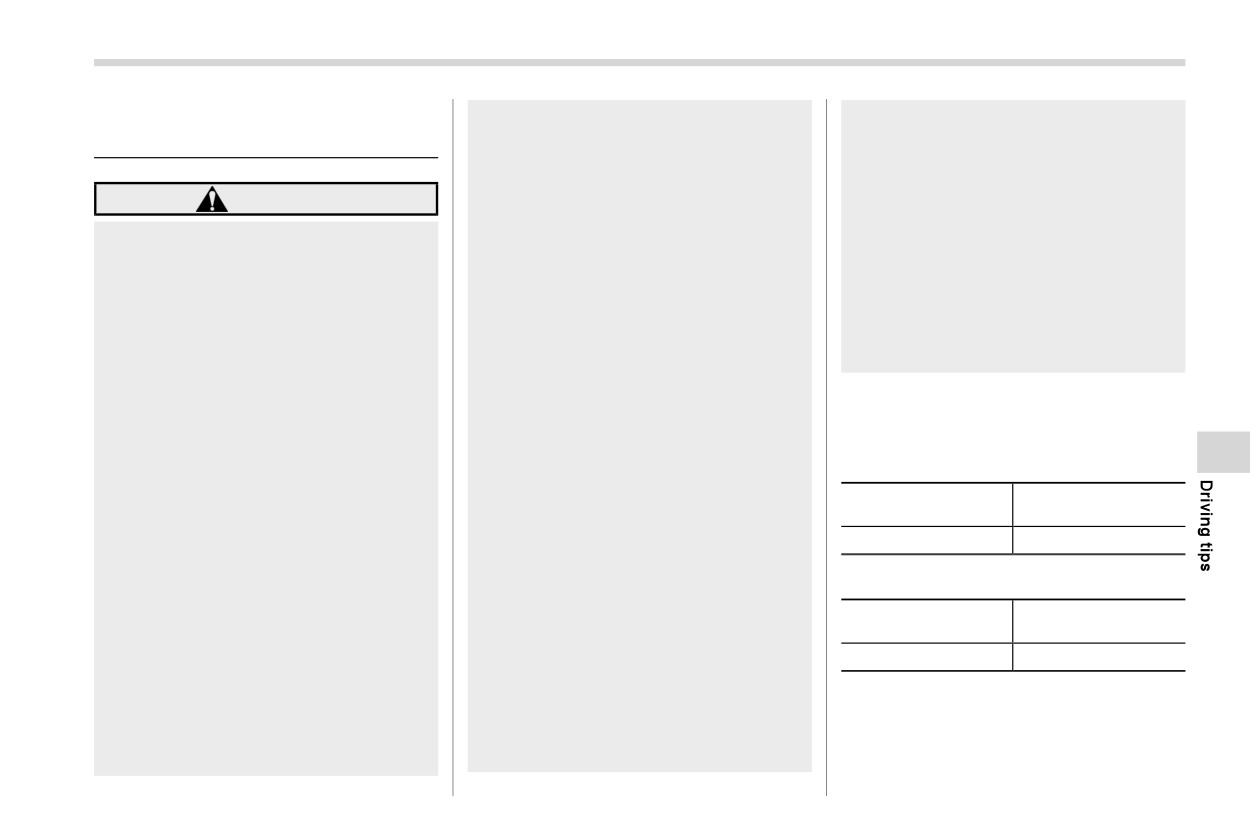
The maximum gross trailer weight and
tions and limitations, refer to
- GAWR
maximum gross tongue weight are indi-
“Trailer towing” FP434.
Failure to comply with the proce-
cated in the following table.
Trailer brakes are required when
dures set forth will not only
Models with air-cooled continuously variable
the towing load exceeds 1,000 lbs
transmission fluid cooler*1:
compromise your safety, but will
(453 kg). Be sure your trailer has
Maximum gross trai-
Maximum gross ton-
also negate your insurance cov-
safety chains and that each chain
ler weight
gue weight
erage and/or may violate the state
will hold the trailer’s maximum
road and traffic acts and regula-
5,000 lbs (2,268 kg)
500 lbs (227 kg)
gross weight. Towing trailers
tions.
without safety chains could cre-
Models without air-cooled continuously variable
ate a traffic safety hazard if the
Use only the ball mount supplied
transmission fluid cooler*2:
trailer separates from the hitch
with this hitch. Use the hitch only
Maximum gross trai-
Maximum gross ton-
as a weight carrying hitch. Do not
ler weight
gue weight
due to coupling damage or hitch
ball damage.
use with any type of weight dis-
2,000 lbs (907 kg)
200 lbs (91 kg)
tributing hitch.
Be sure to check the hitch pin and
The standard bumper beam must
*1: Continuously variable transmission type
safety pin for positive locking
be installed after you remove the
TR690SXXXX (To check the model number
placement before towing a trailer.
trailer hitch. Consult a SUBARU
label for the continuously variable transmis-
If the ball mount comes off the
dealer for purchase of a standard
sion type, refer to “Vehicle identification”
hitch receiver, the trailer could
- CONTINUED -
432 Trailer hitch (dealer option)
FP531.)
*2: Continuously variable transmission type
TR690GXXXX (To check the model number
label for the continuously variable transmis-
sion type, refer to “Vehicle identification”
FP531.)
When towing a trailer, refer to
“Trailer
towing” FP434.
& Connecting a trailer
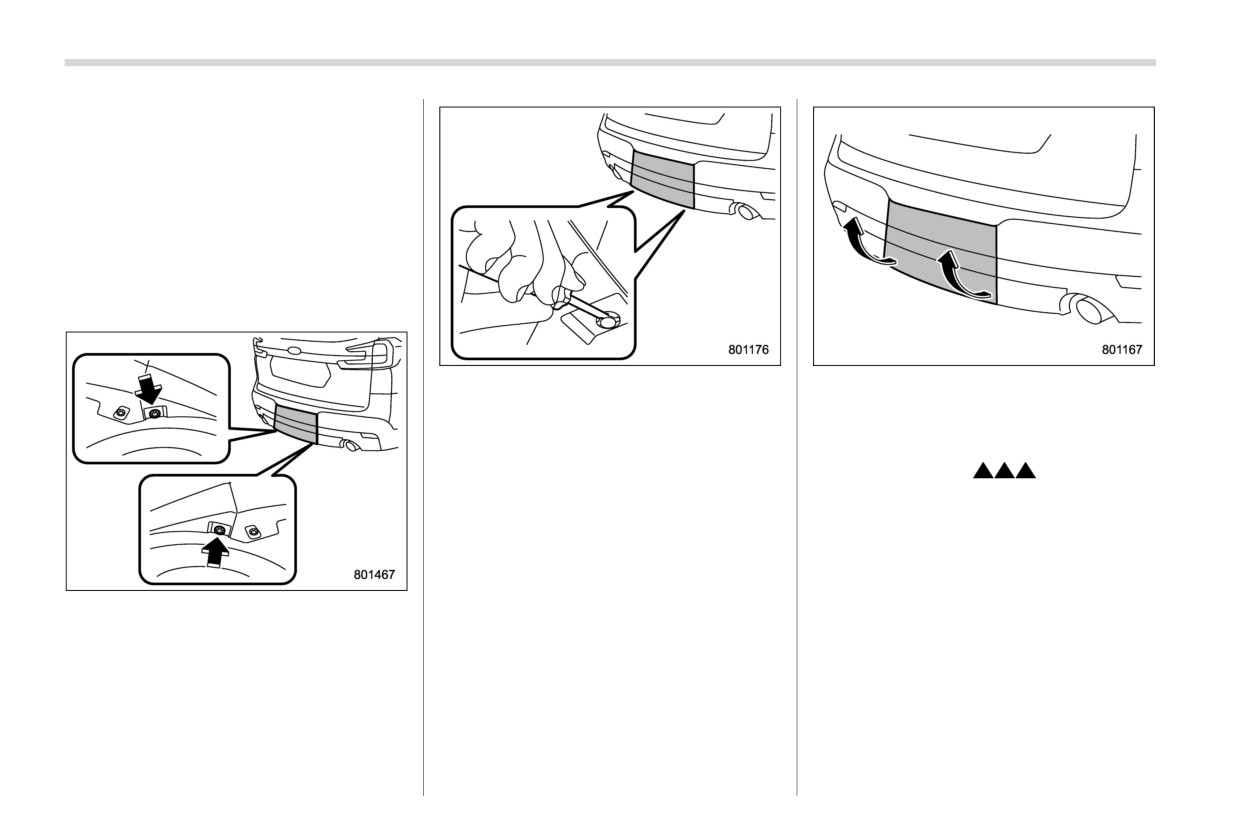
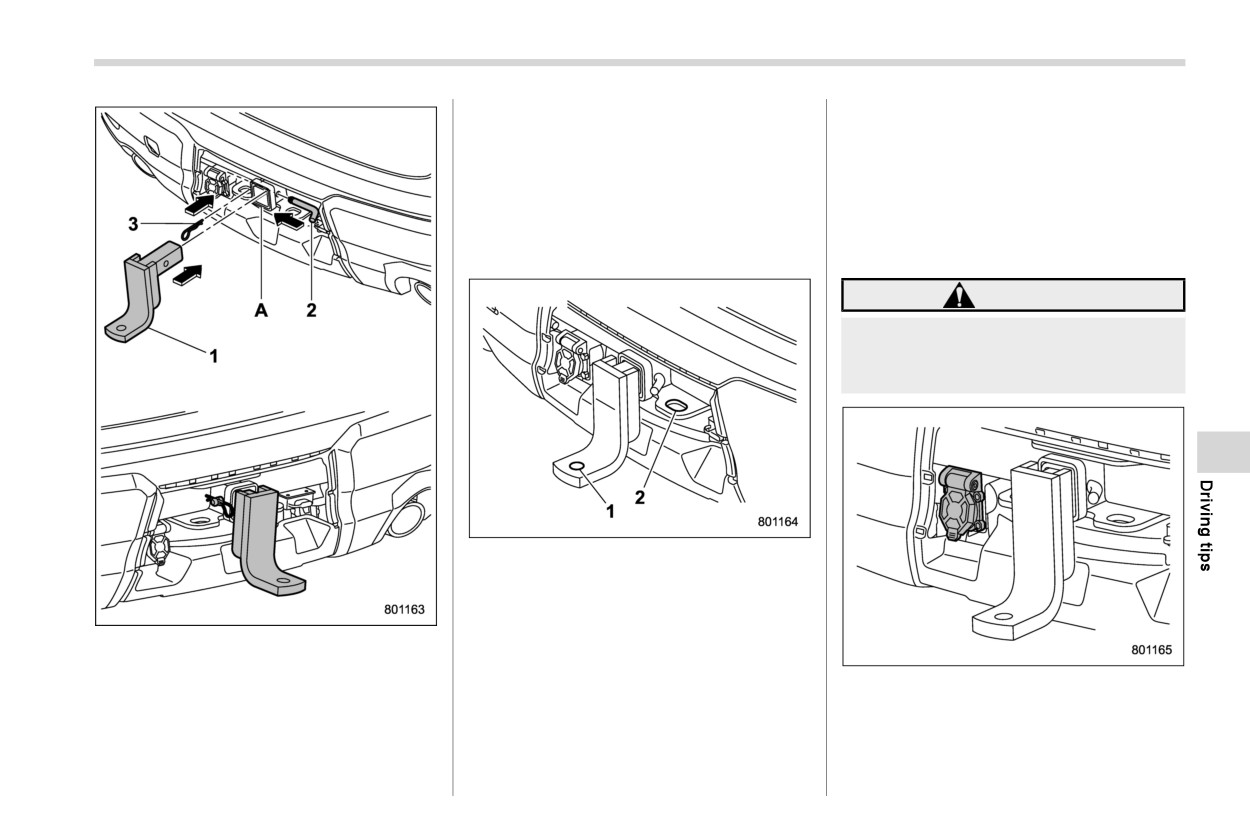
1. Remove the 2 clips from the bottom of
2. Remove the cover.
the cover.
NOTE
NOTE
Pull the bottom of the cover from where
Looking under the cover from bottom,
the triangle mark “
” is located to
there are 2 clips fixed under the cover
remove it.
fastened on each side.
Remove the clips one by one that are
fastened under the vehicle.
Trailer hitch (dealer option)
433
4. Insert the hitch pin into the hole located
should cross under the trailer tongue to
on the hitch receiver tube so that the
prevent the tongue from dropping onto
pin passes through the ball mount.
the ground in case it should disconnect
5. Insert the safety clip to the groove on
from the hitch ball. Allow sufficient
the hitch pin securely.
slack in the chains taking tight turn
6. Check the ball mount assembly by
situations into account; however, be
careful not to let them drag on the
pulling on it to make sure it does not
ground.
come off the hitch receiver.
WARNING
Do not connect safety chains to any
part of the vehicle other than the
safety chain hooks.
1
Hitch ball installation point
2
Hooks for safety chains
7. Attach a hitch ball. Use only a hitch ball
that is appropriate for the ball mount
1
Ball mount
and your trailer. The hitch ball must be
2
Hitch pin
securely installed on the ball mount.
3
Safety clip
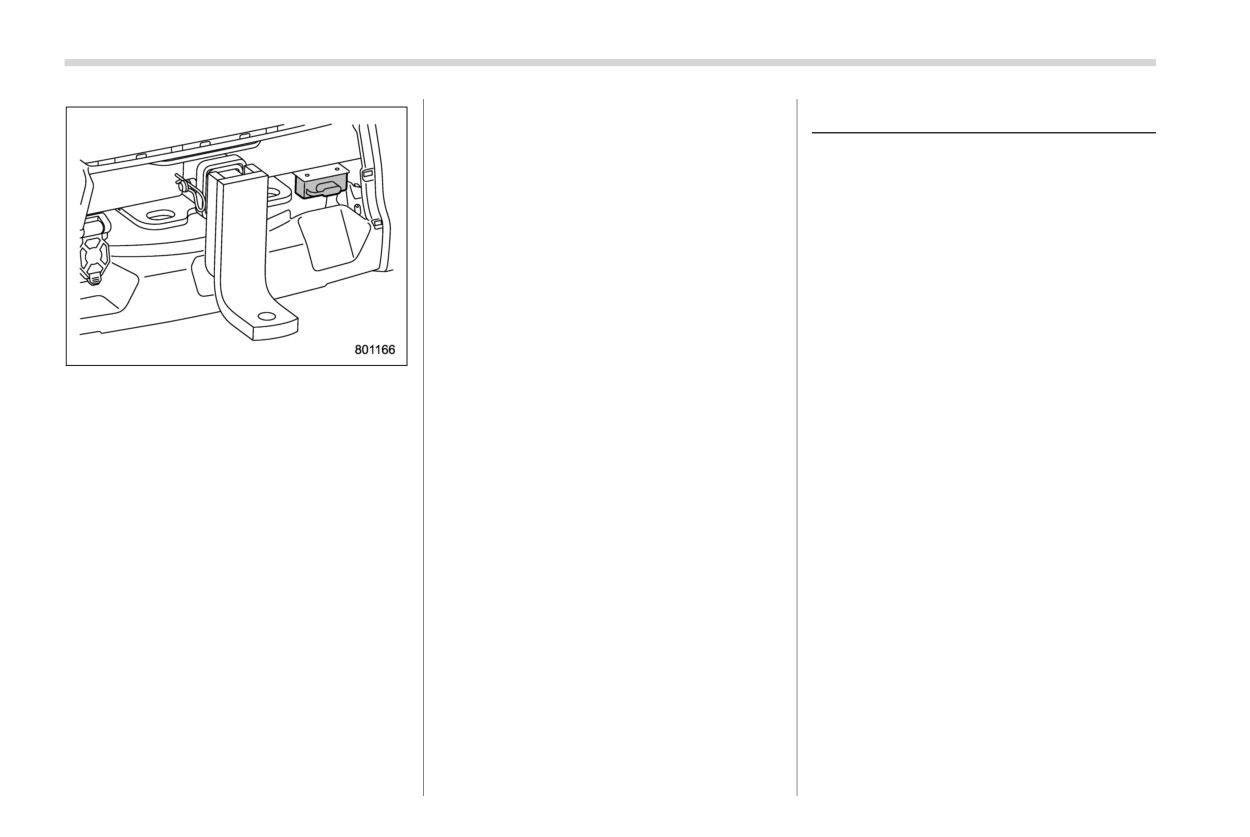
Hitch harness connector (7-pin type)
8. Connect your trailer to the hitch ball.
A
Hitch receiver tube
9. Connect the trailer and the hitch with
3. Insert the ball mount into the hitch
safety chains that will hold the trailer’s
receiver tube.
maximum gross weight. The chains
- CONTINUED -
434 Trailer towing
& If not towing a trailer
8-12. Trailer towing
Remove the ball mount from the hitch
receiver tube and insert the receiver
Your vehicle is designed and intended to
cover onto the hitch receiver tube and/
be used primarily as a passenger-carrying
or install bumper cover.
vehicle. Towing a trailer puts additional
Place the dust cap over the 4-pin or 7-
loads on your vehicle’s engine, drivetrain,
pin connector of the hitch wire harness
brakes, tires and suspension and has an
to protect against possible damage.
adverse effect on fuel economy.
Occasionally lubricate terminals of the
If you do decide to tow a trailer, your safety
4-pin or 7-pin connector using terminal
and satisfaction depend upon proper use
grease.
of correct equipment and cautious opera-
tion of your vehicle.
Hitch harness connector (4-pin type)
Drive carefully when towing a trailer, and
always consider the following conditions.
10. Connect the hitch wire harness’s black
. Road conditions
4-pin or 7-pin wire connector to the
. Weather conditions
towing trailer’s wire harness.
. Vehicle load weight
11. Confirm proper function of the hitch
wire harness by individually activating
. Trailer load weight
the brake, stop and turn signal lights on
Seek the advice of your SUBARU dealer to
the trailer.
assist you in purchasing a hitch and other
necessary towing equipment appropriate
NOTE
for your vehicle. Do not use towing equip-
Always disconnect the trailer wire har-
ment other than genuine SUBARU towing
ness before launching or retrieving a
equipment. In addition, be sure to follow
watercraft.
the instructions for proper installation and
use provided by the trailer or caravan’s
manufacturer.
SUBARU assumes no responsibility for
injuries or vehicle damage that result from
trailer towing equipment, or from any
Trailer towing
435
errors or omissions in the instructions
& Maximum load limits
! Total trailer weight
accompanying such equipment or for your
failure to follow the proper instructions.
WARNING
Regularly check that the hitch mounting
bolts and nuts are tightened securely.
Never exceed the maximum load
limits explained in the following.
& Warranties and maintenance
Exceeding the maximum load limits
could cause personal injury and/or
SUBARU warranties do not apply to
vehicle damage.
vehicle damage or malfunction caused by
trailer towing. If you use your vehicle to tow
a trailer, more frequent maintenance will
CAUTION
be required due to the additional load.
(Refer to “Maintenance schedule under
. Adequate size trailer brakes are
severe driving conditions” in the “Warranty
required when the trailer and its
and Maintenance Booklet”.)
Total trailer weight
cargo exceed 1,000 lbs (453 kg)
Under no circumstances should a trailer be
total weight.
The total trailer weight (trailer weight plus
towed with a new vehicle or a vehicle with
its cargo load) must
never exceed the
. Before towing a trailer, check the
any new powertrain component (engine,
maximum total trailer weight in the follow-
trailer total weight, GVW, GAWs
transmission, differential, wheel bearings,
ing table.
and tongue load. Make sure the
etc.) for the first 1,000 miles (1,600 km) of
load and its distribution in your
driving.
vehicle and trailer are acceptable.
- CONTINUED -
436 Trailer towing
Conditions
Maximum total trailer weight
! Gross Vehicle Weight (GVW) and
When towing a trailer without brakes.
1,000 lbs (453 kg)
Gross Vehicle Weight Rating
(GVWR)
Models with air-cooled continuously variable
transmission fluid cooler*
1:
5,000 lbs (2,268 kg)
When towing a trailer with brakes.
Models without air-cooled continuously variable
transmission fluid cooler*2:
2,000 lbs (907 kg)
*1: Continuously variable transmission type TR690SXXXX (To check the model number label for the
continuously variable transmission type, refer to “Vehicle identification” FP531.)
*2: Continuously variable transmission type TR690GXXXX (To check the model number label for the
continuously variable transmission type, refer to “Vehicle identification” FP531.)
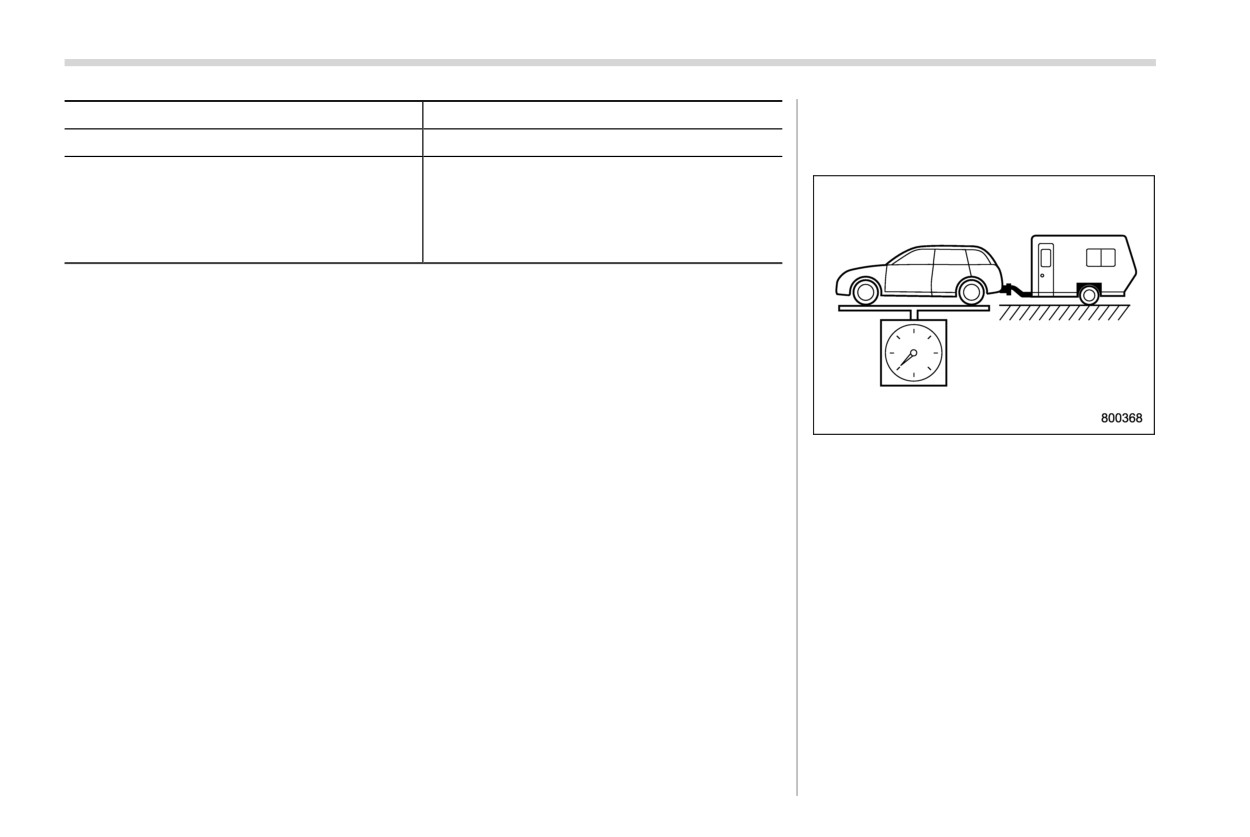
Gross Vehicle Weight
The Gross Vehicle Weight (GVW) must
never exceed the Gross Vehicle Weight
Rating (GVWR).
Gross Vehicle Weight (GVW) is the com-
bined total of the weight of the vehicle,
driver, passengers, luggage, trailer hitch,
trailer tongue load and any other optional
equipment installed on your vehicle.
Therefore, the GVW changes depending
on the situation. Determine the GVW each
time before going on a trip by putting your
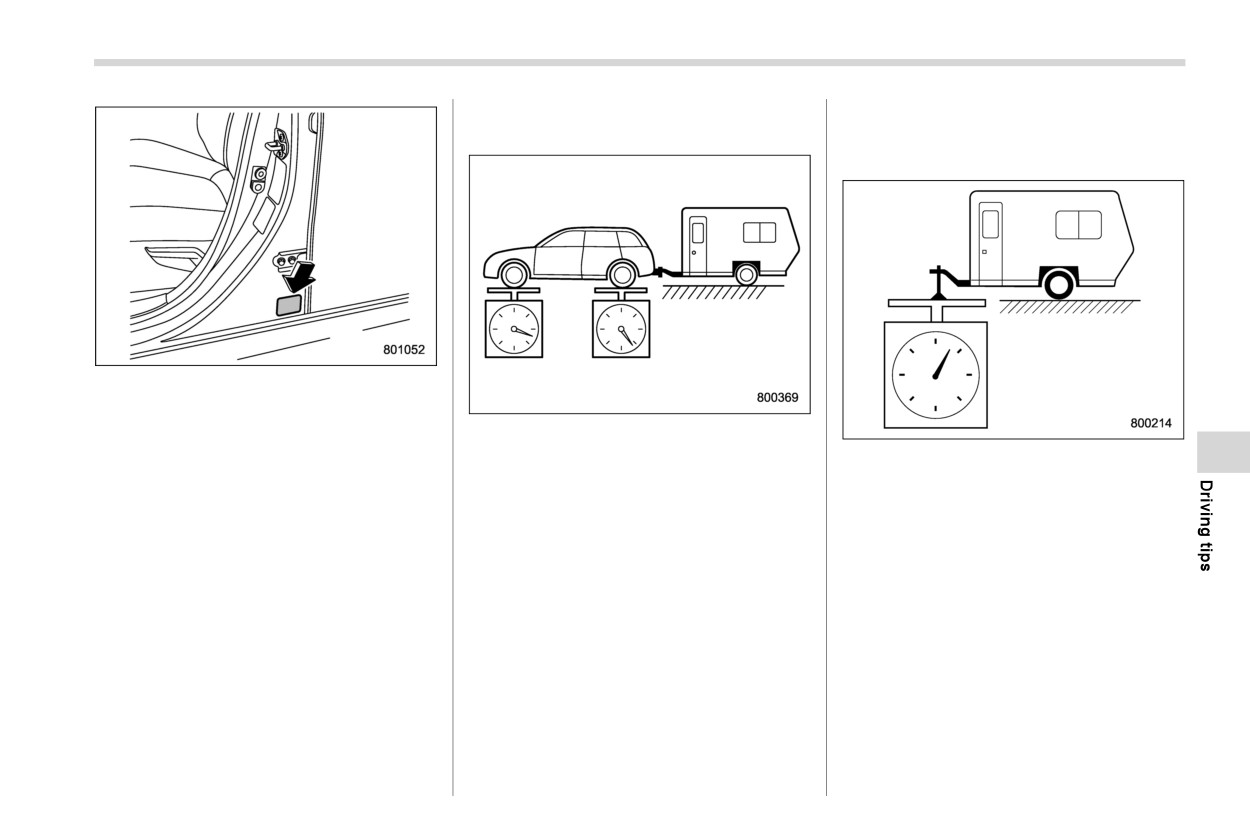
vehicle and trailer on a vehicle scale.
Trailer towing
437
! Gross Axle Weight (GAW) and
prevent a change in weight distribution
Gross Axle Weight Rating (GAWR)
while driving.
! Tongue load
Certification label
GVWR of your vehicle that is given by
SUBARU is shown on the
certification
Gross Axle Weight
label located at the bottom of driver’s side
The total weight applied to each axle
Tongue load
door pillar of your vehicle.
(GAW) must never exceed the Gross Axle
Ensure that the trailer tongue load is from 8
Weight Rating (GAWR). The front and rear
to 11 percent of the total trailer weight and
GAWs can be adjusted by relocating
does not exceed the maximum value of the
passengers and luggage inside the vehi-
following.
cle. The front and rear GAWR of your
. Models with air-cooled continuously
vehicle that is given by SUBARU are also
variable transmission fluid cooler: 500
shown on the certification label located at
lbs (227 kg)
the bottom of driver’s side door pillar.
. Models without air-cooled continuously
To check both GVWR and GAWR and to
variable transmission fluid cooler: 200
confirm that the total weight and weight
lbs (91 kg)
distribution are within safe driving limits,
you should have your vehicle and trailer
weighed at a commercial weighing station.
Be sure that all cargo is firmly secured to
- CONTINUED -
438 Trailer towing
This may cause the rear wheels to
skid, especially during braking or
when vehicle speed is reduced dur-
ing cornering, resulting in over-
steer, spin out and/or jackknifing.
& Trailer Hitches
WARNING
Never drill the frame or under-body
of your vehicle to install a commer-
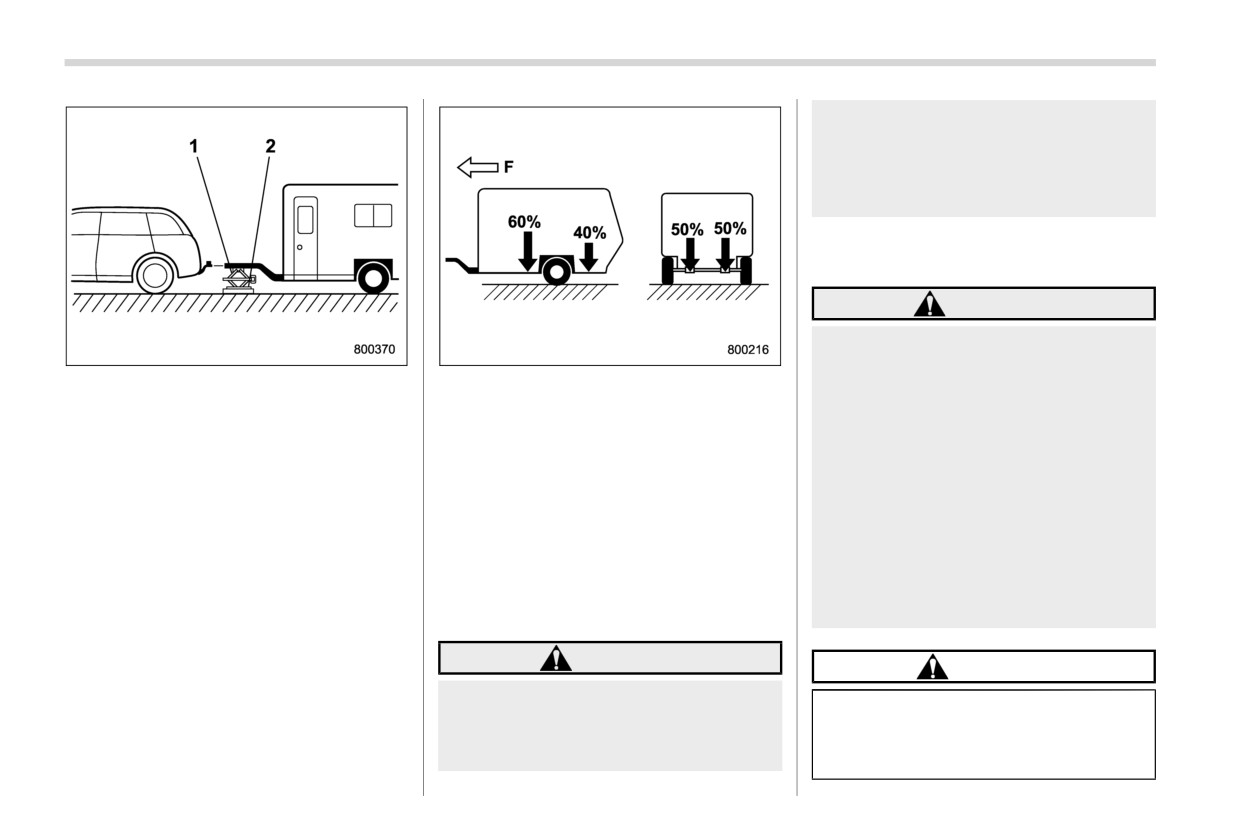
1
Jack
F: Front
cial trailer hitch. If you do, danger-
2
Bathroom scale
ous exhaust gas, water or mud may
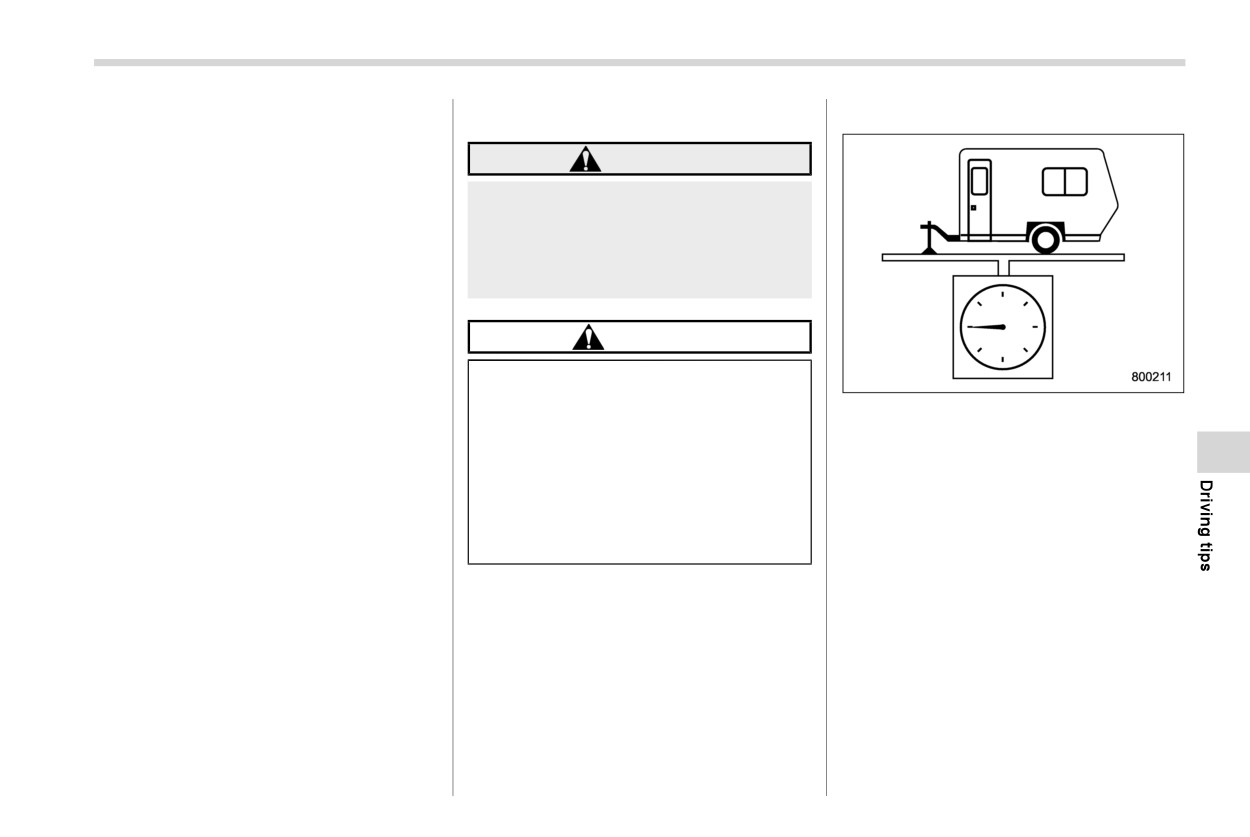
The tongue load can be adjusted by proper
enter the passenger compartment
The tongue load can be weighed with a
distribution of the load in the trailer. Never
through the drilled hole. Exhaust
bathroom scale as shown in the illustration
load the trailer with more weight in the
gas contains carbon monoxide, a
above. When weighing the tongue load, be
back than in the front; approximately 60
colorless and odorless gas which is
sure to position the towing coupler at the
percent of the trailer load should be in the
dangerous, or even lethal, if inhaled.
height at which it would be during actual
front and approximately 40 percent in the
Also, drilling the frame or under-
towing, using a jack as shown.
rear. Also, distribute the load as evenly as
body of your vehicle could cause
possible on both the left and right sides.
deterioration of strength of your
Be sure that all cargo is firmly secured to
vehicle and cause corrosion around
prevent a change in weight distribution
the drilled hole.
while driving.
WARNING
CAUTION
If the trailer is loaded with more
. Do not modify the vehicle ex-
weight in the back of trailer’s axle
haust system, brake system, or
than in the front, the load is taken off
other systems when installing a
the rear axle of the towing vehicle.
hitch or other trailer towing
Trailer towing
439
equipment.
& Connecting a trailer
! Trailer safety chains
. Do not use axle-mounted hitches
! Trailer brakes
as they can cause damage to the
WARNING
axle housing, wheel bearings,
WARNING
Always use safety chains between
wheels or tires.
your vehicle and the trailer. Towing
Adequate size trailer brakes are
trailer without safety chains could
Do not use a trailer hitch other than a
required when the trailer and its
create a traffic safety hazard if the
genuine SUBARU trailer hitch. A genuine
cargo exceed 1,000 lbs (453 kg)
trailer separates from the hitch due
SUBARU trailer hitch is available from
total weight.
to coupling damage or hitch ball
your SUBARU dealer.
Do not directly connect your
damage.
trailer’s hydraulic brake system
& When you do not tow a trailer
to the hydraulic brake system in
In case the trailer hitch connector or hitch
your vehicle. Direct connection
ball should break or become discon-
CAUTION
would cause the vehicle’s brake
nected, the trailer could get loose and
performance to deteriorate and
create a traffic safety hazard.
The housing should be kept dirt
could lead to an accident.
For safety, always connect the towing
and corrosion-free at the points
of contact. The surfaces only
vehicle and trailer with trailer safety
If your trailer’s total weight (trailer weight
require cleaning with a cloth.
chains. Two chains should be used in
plus its cargo weight) exceeds 1,000 lbs
Grease or other lubricants
total, one to the right side and the other to
(453 kg), the trailer is required to be
the left side trailer tongue. Pass the chains
should never be used.
equipped with its own brake system.
crossing each other under the trailer
If the ball is not installed, the
Electric brakes or surge brakes are re-
tongue to prevent the trailer from dropping
plastic insert and/or bumper cov-
commended, and must be installed prop-
onto the ground in case the trailer tongue
er should then be installed for
erly. Check that your trailer’s brakes con-
should disconnect from the hitch ball.
protection and to prevent it from
form with Federal, state/province and/or
Allow sufficient slack in the chains taking
getting dirty.
other applicable regulations. Your
tight turn situations into account; however,
SUBARU’s brake system is not designed
be careful not to let them drag on the
When the ball is not used, place the ball
to be tapped into the trailer’s hydraulic
ground.
cap and store securely.
brake system. Please ask your SUBARU
dealer and professional trailer supplier for
more information about the trailer’s brake
system.
- CONTINUED -
440 Trailer towing
! Side mirrors
Connection of trailer lights to your vehicle’s
In the event your vehicle gets a flat tire
electrical system requires modifications to
when towing a trailer, ask a commercial
the vehicle’s lighting circuit to increase its
road service representative or profes-
capacity and accommodate wiring
sional to repair the flat tire.
changes. To ensure the trailer lights are
If you carry a regular size spare tire in your
connected properly, please consult your
vehicle or trailer as a precaution against
SUBARU dealer. Check for proper opera-
getting a flat tire, be sure that the spare tire
tion of the turn signals and the brake lights
is firmly secured.
each time you connect a trailer to your
vehicle.
& Trailer towing tips
! Tires
CAUTION
WARNING
For models equipped with the
After hitching a
trailer to
your
vehicle,
Never tow a trailer when the tempor-
BSD (Blind Spot Detection) and
check that the
standard
side
mirrors
ary spare tire is used. The temporary
RCTA (Rear Cross Traffic Alert)
spare tire is not designed to sustain
provide a good
rearward
field
of view
driving support systems, when
the towing load. Use of the tempor-
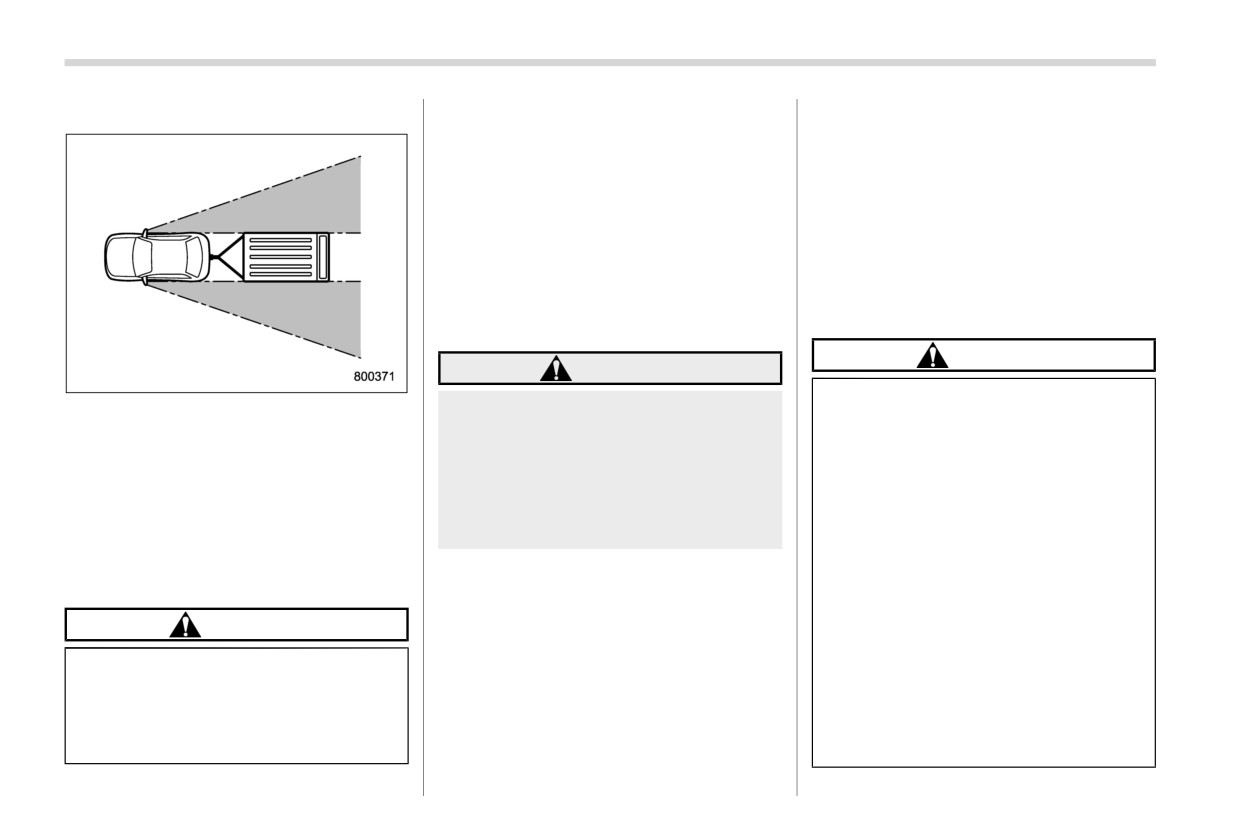
without significant blind spots. If significant
towing a trailer, touch
“BSD/
blind spots occur with the vehicle’s stan-
ary spare tire when towing can result
RCTA” to deactivate the system.
dard side mirrors, use towing mirrors that
in failure of the spare tire and/or less
The system may not operate
conform with Federal, state/province and/
stability of the vehicle.
properly due to the blocked radar
or other applicable regulations.
waves. For details about how to
Make sure that all the tires on your vehicle
! Trailer lights
turn on/off the BSD/RCTA, refer
are properly inflated. Refer to
“Tires”
to “Car settings” FP215.
FP526.
CAUTION
For models equipped with Re-
Trailer tire condition, size, load rating and
verse Automatic Braking (RAB)
Direct splicing or other improper
proper inflation pressure should be in
system, consult your SUBARU
connection of trailer lights may
accordance with the trailer manufacturer’s
dealer for additional information
damage your vehicle’s electrical
specifications. Also check federal, state,
about towing a trailer.
system and cause a malfunction of
province and/or other applicable regula-
Towing a trailer in high tempera-
your vehicle’s lighting system.
tions.
tures, or on long or steep grades,
Trailer towing
441
may cause the vehicle to over-
any problems are apparent, do not tow
area free of traffic, practice turning,
heat. Refer to “Engine overheat-
the trailer.
stopping and backing up.
ing” FP459.
Check that the vehicle rests horizon-
! Driving with a trailer
tally with the trailer attached. If the
When towing a trailer, steering,
You should allow for considerably more
stability, stopping distance and
vehicle is tipped sharply up at the front
stopping distance when towing a trailer.
braking performance will be dif-
and down at the rear, check the total
Avoid sudden braking because it may
ferent when compared to normal
trailer weight, GVW, GAWs and tongue
result in skidding or jackknifing and loss
operation. For safety’s sake, you
load again, then confirm that the load
of control.
should employ extra caution
and its distribution are acceptable.
Avoid uneven steering, sharp turns and
when towing a trailer and you
Check that the tire rating and pressures
rapid lane changes.
should never drive at excessive
are correct.
Slow down before turning. Make a
speeds. You should also keep the
Check that the vehicle and trailer are
longer than normal turning radius be-
following tips in mind:
connected properly. Confirm that:
cause the trailer wheels will be closer
When parking on a steep slope
-
The trailer tongue is connected
than the vehicle wheels to the inside of
with a trailer attached to your
properly to the hitch ball.
the turn. In a tight turn, the trailer could
vehicle, the braking power of the
-
The trailer lights connector is con-
hit your vehicle.
electronic parking brake may not
nected properly and trailer’s brake
Crosswinds will adversely affect the
be sufficient since strong braking
lights illuminate when the vehicle’s
handling of your vehicle and trailer,
power is needed.
brake pedal is pressed, and that the
causing sway. Crosswinds can be due
trailer’s turn signal lights flash when
to weather conditions or the passing of
the vehicle’s turn signal lever is
! Before starting out on a trip
large trucks or buses. If swaying oc-
operated.
Check the towing regulations for trailer
curs, firmly grip the steering wheel and
-
The safety chains are connected
or caravan vehicles that vary by state/
promptly begin decelerating your vehi-
properly.
cle at a gradual pace.
region. Failure to comply with the
-
All cargo in the trailer is secured
procedures set forth will not only
When passing other vehicles, consider-
safely in position.
compromise your safety, but will also
able distance is required because of the
-
The side mirrors provide a good
negate your insurance coverage and/or
added weight and length caused by
rearward field of view without a
may violate the state road and traffic
attaching the trailer to your vehicle.
significant blind spot.
acts and regulations.
Reversing the vehicle with a trailer can
Sufficient time should be taken to learn
Check that the vehicle and vehicle-to-
be difficult and requires experience.
the “feel” of the vehicle/trailer combina-
hitch mounting are in good condition. If
Never accelerate or steer rapidly, and
tion before starting out on a trip. In an
- CONTINUED -
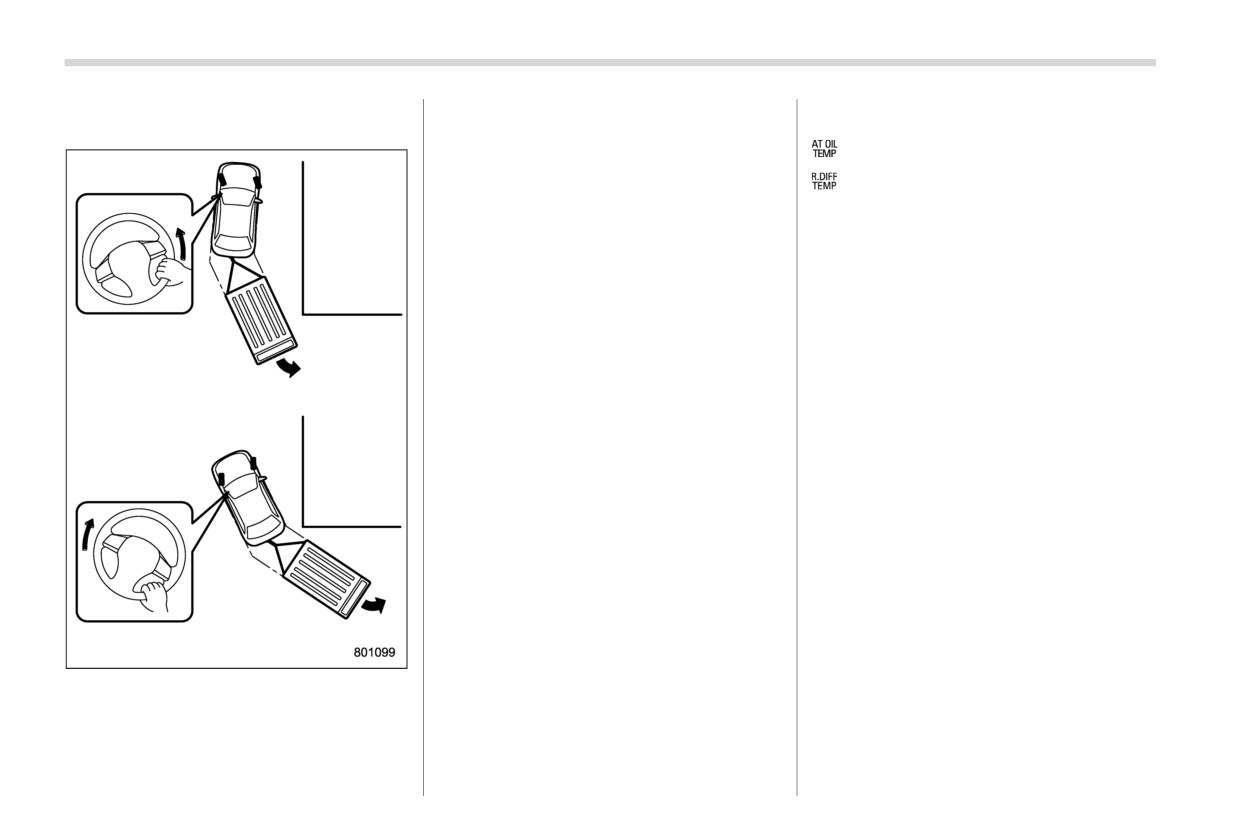
442 Trailer towing
grip
the bottom of the steering wheel
turn.
Temperature gauge
with one hand.
2.
Once the trailer begins to swing
: AT OIL TEMP warning light
around, straighten the steering wheel.
3.
Turn the wheel in the opposite direc-
: Rear differential oil temperature warn-
tion.
ing light (if equipped)
4.
Steer the vehicle around to be in line
If any of the following conditions occur,
with the trailer, then straighten the
immediately turn off the air conditioner and
steering again.
stop the vehicle in the nearest safe
location. For further instructions and addi-
If the ABS warning light illuminates
tional information, refer to the following
while the vehicle is in motion, stop
sections.
towing the trailer and have repairs
performed immediately by your nearest
- “If you park your vehicle in case of
SUBARU dealer.
an emergency” FP446
- “Engine overheating” FP459
! Driving on grades
- Temperature gauge needle ap-
Before going down a steep hill, slow
proaches the OVERHEAT zone.
down and shift to a lower gear
(if
Refer to “Engine coolant tempera-
necessary, use 1st gear) in order to
ture gauge” FP170.
utilize the engine braking effect and
- AT OIL TEMP warning light illumi-
prevent overheating of your vehicle’s
nates. Refer to
“AT OIL TEMP
brakes. Do not make sudden down-
warning light” FP178.
shifts.
- Rear differential oil temperature
When driving uphill in hot weather, the
warning light
(if equipped) illumi-
air conditioner may turn off automati-
nate. Refer to “Rear differential oil
cally to protect the engine from over-
temperature warning light” FP178.
heating.
When driving uphill in hot weather, pay
Avoid using the accelerator pedal to
attention to the following items because
stay stationary on an uphill slope
To reverse around a corner, perform the
the engine and transmission are rela-
instead of using the parking brake or
following procedure.
tively prone to overheating.
foot brake. That may cause the trans-
1. Reverse slowly and steer in the oppo-
mission fluid to overheat.
site direction to the way you want to
Trailer towing
443
! Parking on a grade
Always block the wheels under both
vehicle and trailer when parking. Apply
the parking brake firmly. You should not
park on a hill or slope. If parking on a hill or
slope cannot be avoided, you should take
the following steps:
1. Apply the brakes and hold the pedal
down.
2. Have someone place wheel blocks
under both the vehicle and trailer
wheels.
3. When the wheel blocks are in place,
release the regular brakes slowly until
the blocks absorb the load.
4. Apply the regular brakes and then
apply the parking brake; slowly release
the regular brakes.
5. Shift into “P” position and shut off the
engine.
In case of emergency
Using a flat-bed truck
462
9-1. If you park your vehicle in case of
an emergency
446
Towing with all wheels on the ground
463
9-2. Maintenance tools
446
9-9. Electronic parking brake - if the electronic
parking brake cannot be released
464
Jack and jack handle
447
9-10. Access key fob - if access key fob does
9-3. Spare tire
447
not operate properly
464
Removing the spare tire
447
Locking and unlocking
464
Re-storage of spare tire
450
Switching power status
465
9-4. Temporary spare tire
451
Starting engine
465
9-5. Flat tires
452
9-11. Rear gate - if the rear gate cannot be
Changing a flat tire
452
opened
466
Tire pressure monitoring system (TPMS)
(U.S.-spec. models)
455
9-12. Malfunctions of the center information
display
467
9-6. Jump starting
457
9-13. Moonroof (if equipped) - if the moonroof
How to jump start
457
does not close
468
9-7. Engine overheating
459
9-14. If your vehicle is involved in an accident ...468
If steam is coming from the engine
compartment
459
To restart the engine when involved in
an accident
468
If no steam is coming from the engine
9
compartment
459
Automatic door locking/unlocking operation
when involved in an accident
469
9-8. Towing
460
Towing hooks and tie-down hooks/holes
460
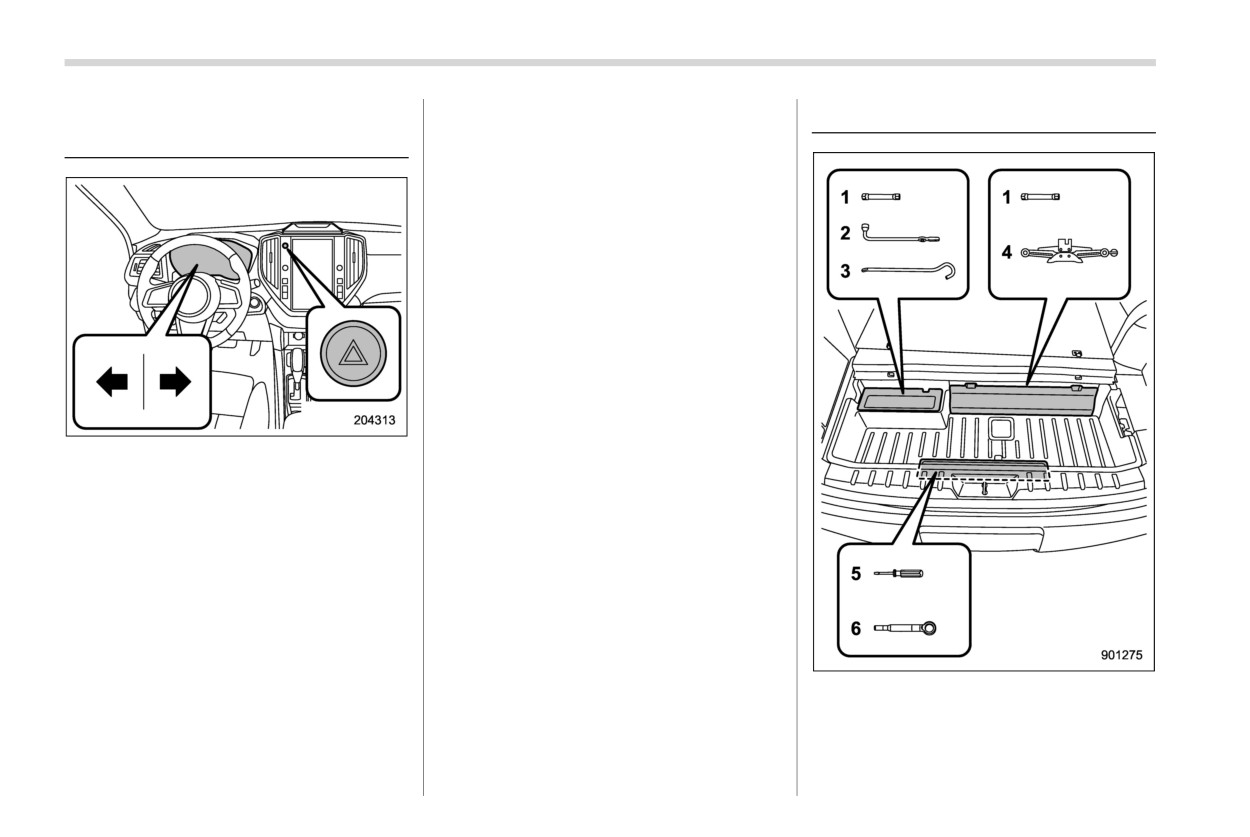
446 If you park your vehicle in case of an emergency
9-1. If you park your vehicle in
NOTE
9-2. Maintenance tools
case of an emergency
When the hazard warning flasher is on,
the turn signals do not work.
The hazard warning flasher should be
used in day or night to warn other drivers
when you have to park your vehicle under
emergency conditions.
Avoid stopping on the road. It is best to
safely pull off the road if a problem occurs.
The hazard warning flasher can be acti-
vated regardless of the ignition switch
position.
Turn on the hazard warning by pushing the
hazard warning flasher switch. Turn it off
Your vehicle is equipped with the following
by pushing the switch again.
maintenance tools.
1
Extension62
2
Wheel nut wrench
3
Jack handle
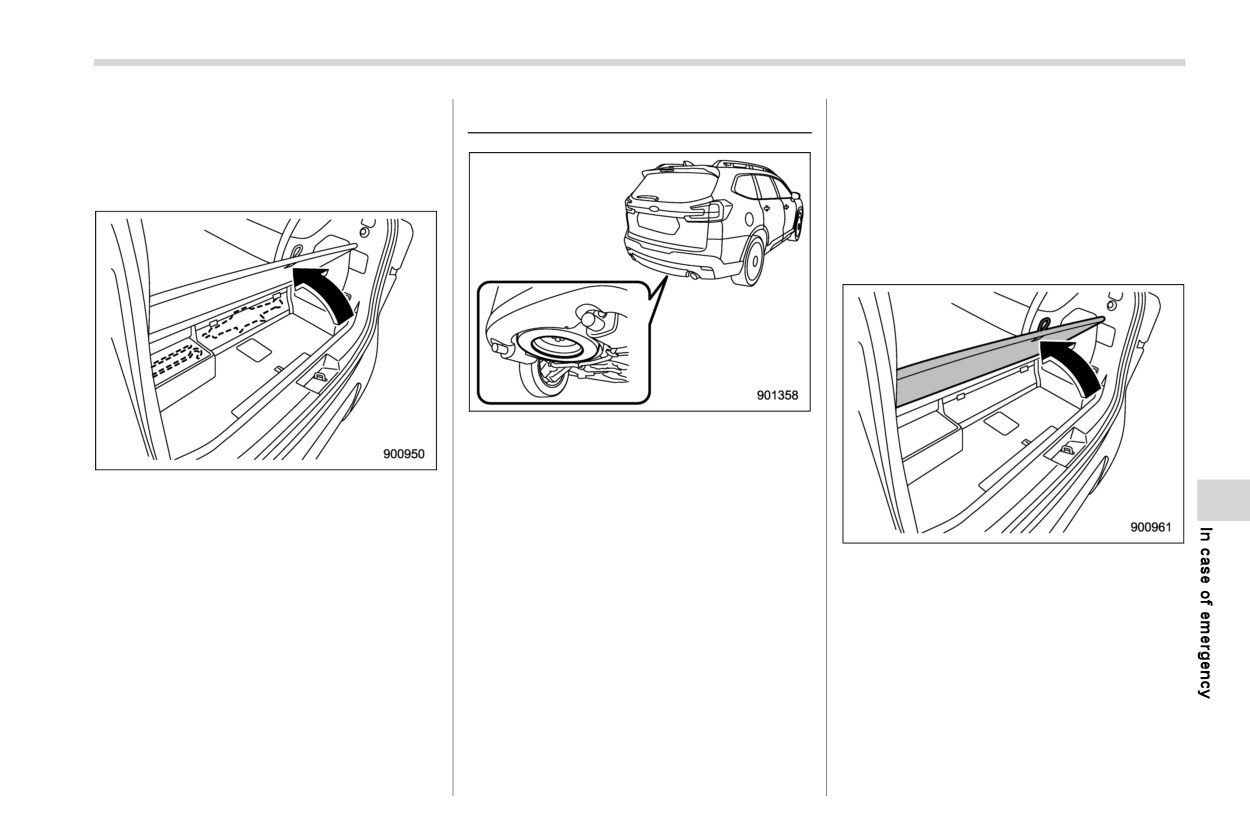
Spare tire
447
4
Jack
Before using the temporary spare tire,
9-3. Spare tire
5
Screwdriver
carefully read
“Temporary spare tire”
6
Towing hook (eye bolt)
FP451 for instructions and precautions.
& Jack and jack handle
& Removing the spare tire
1. Take the wheel nut wrench, screwdri-
ver, and extension out of the tool box.
Refer to “Maintenance tools” FP446.
The spare tire is stored in the spare tire
holder located under the cargo area.
The spare tire holder has a hoist mechan-
The jack and jack handle is stored under
ism that can lower and raise the spare tire
the cargo area.
easily.
For how to use the jack, refer to “Flat tires”
The spare tire holder is designed to carry
FP452.
only the following kinds of tires.
2. Remove the subfloor storage lid in the
. The temporary spare tire that came with
cargo area.
your vehicle
3. Take out the jack.
. A full-size flat tire
A full size flat tire should be stowed in the
spare tire holder in an emergency only.
After having the full-size flat tire repaired,
immediately swap it with the temporary
spare tire.
- CONTINUED -
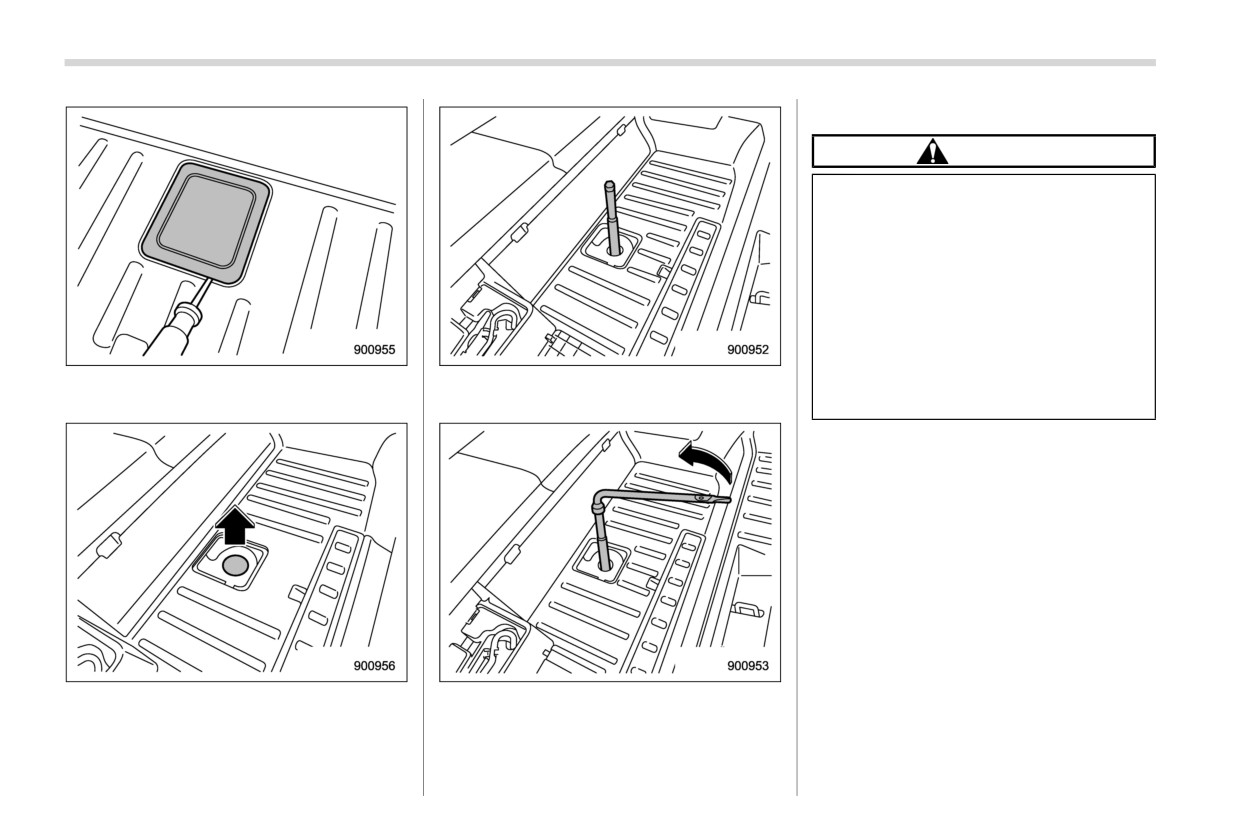
448 Spare tire
the cable is extracted fully.
CAUTION
. Be sure to remove (not simply
keep it open) the subfloor storage
lid before turning the wheel nut
wrench, otherwise the lid may be
damaged.
. Do not put your fingers into the
center hole of the temporary
spare tire while pulling it out,
because they might be pinched
in between the wheel and the
4. Open the cover located at the center of
6. Fit the two extensions onto the hex-
retainer.
the luggage floor by screwdriver.
head hoist shaft end.
5. Remove the rubber cap.
7. Fit the wheel nut wrench onto the
extension.
8. Turn the hoist shaft end counterclock-
wise with the wheel nut wrench until
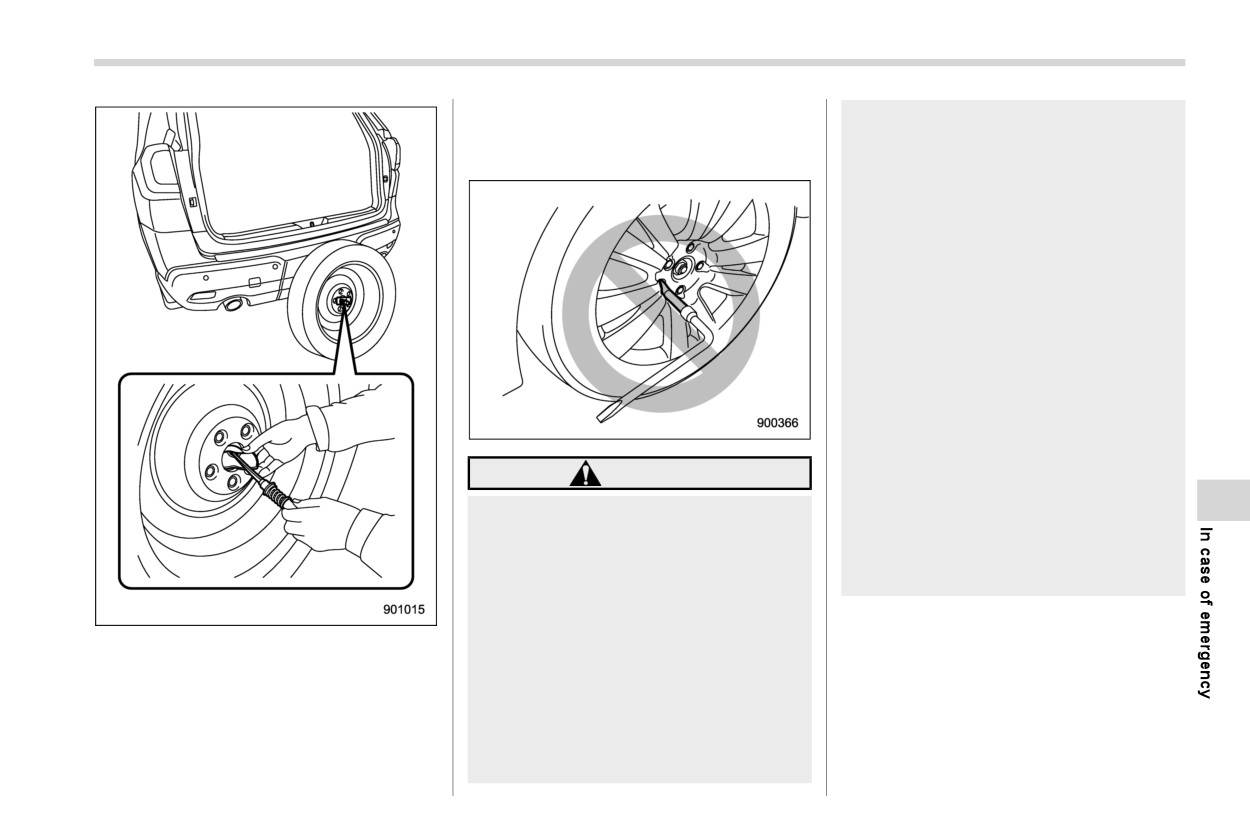
Spare tire
449
a clicking sound. Also visually inspect
hicle. Driving with the cable not
the cable to make certain that there is
retracted fully could result in
no longer any slack present.
damage to the adjacent under
floor parts and lead to a serious
accident.
The spare tire holder is designed
to carry only the following kinds
of tires.
- The temporary spare tire that
came with your vehicle
- A full-size flat tire
A full size flat tire should be
stowed in the spare tire holder
in an emergency only. After hav-
ing the full-size flat tire repaired,
immediately swap it with the
temporary spare tire.
WARNING
Never stow a full-size tire that is
Do not use the extension when
not flat in the spare tire holder.
turning the wheel nuts. If you did,
Doing so can result in damage to
you would not be able to achieve
adjacent under floor parts and
sufficient tightening torque. The
can lead to a serious accident.
wheel nuts could then come
loose, resulting in a serious acci-
dent.
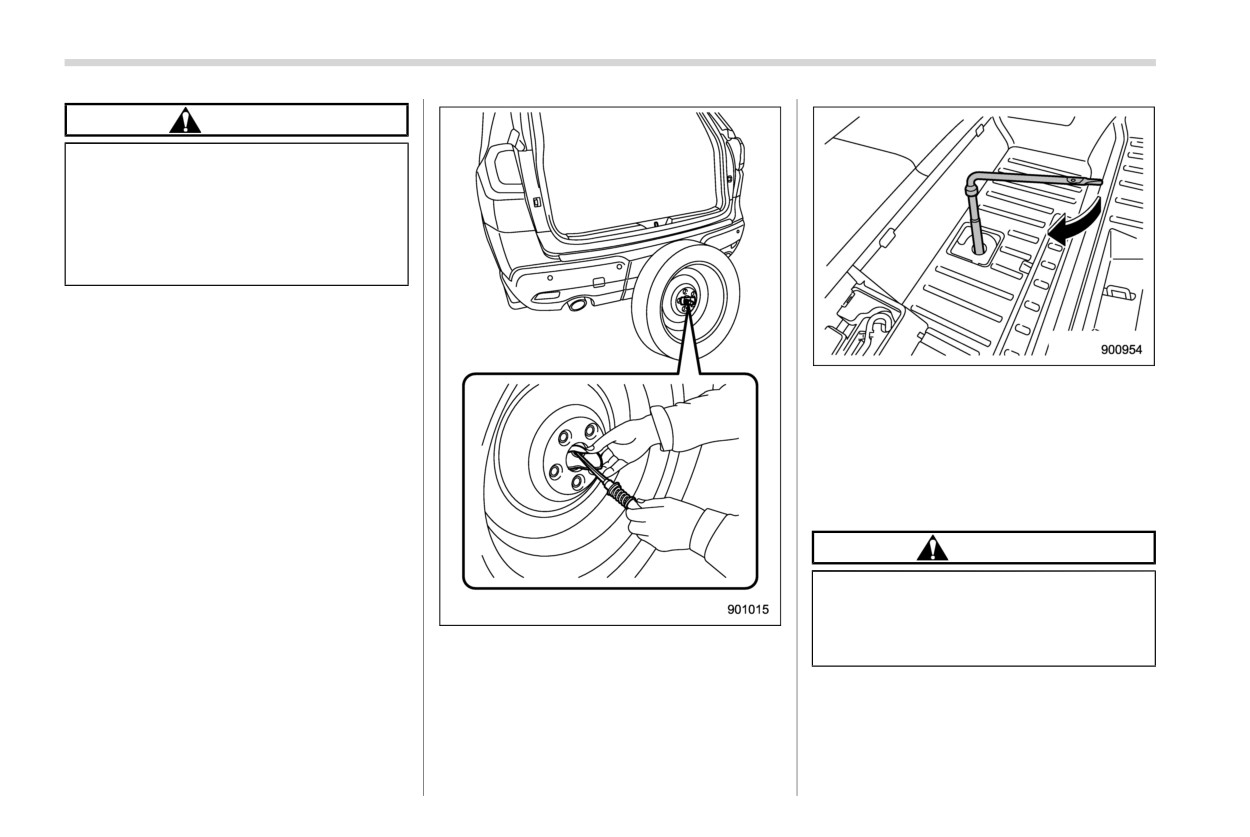
9.
Tilt up the spare tire, then remove the
When using the spare tire hoist:
tire retainer as showing in the figure.
10. After the temporary spare tire is re-
After the temporary spare tire is
moved from the cable, the cable must
removed from the cable, wind the
be wound up completely by turning the
cable up completely until the
hoist nut shaft clockwise until you hear
retainer at end of the cable sits
against the underside of the ve-
- CONTINUED -
450 Spare tire
CAUTION
When using the spare tire hoist:
Do not use air tools or power tools to
turn the spare tire hoist shaft end. If
you do, it could result in severe
mechanical damage to the spare tire
hoist.
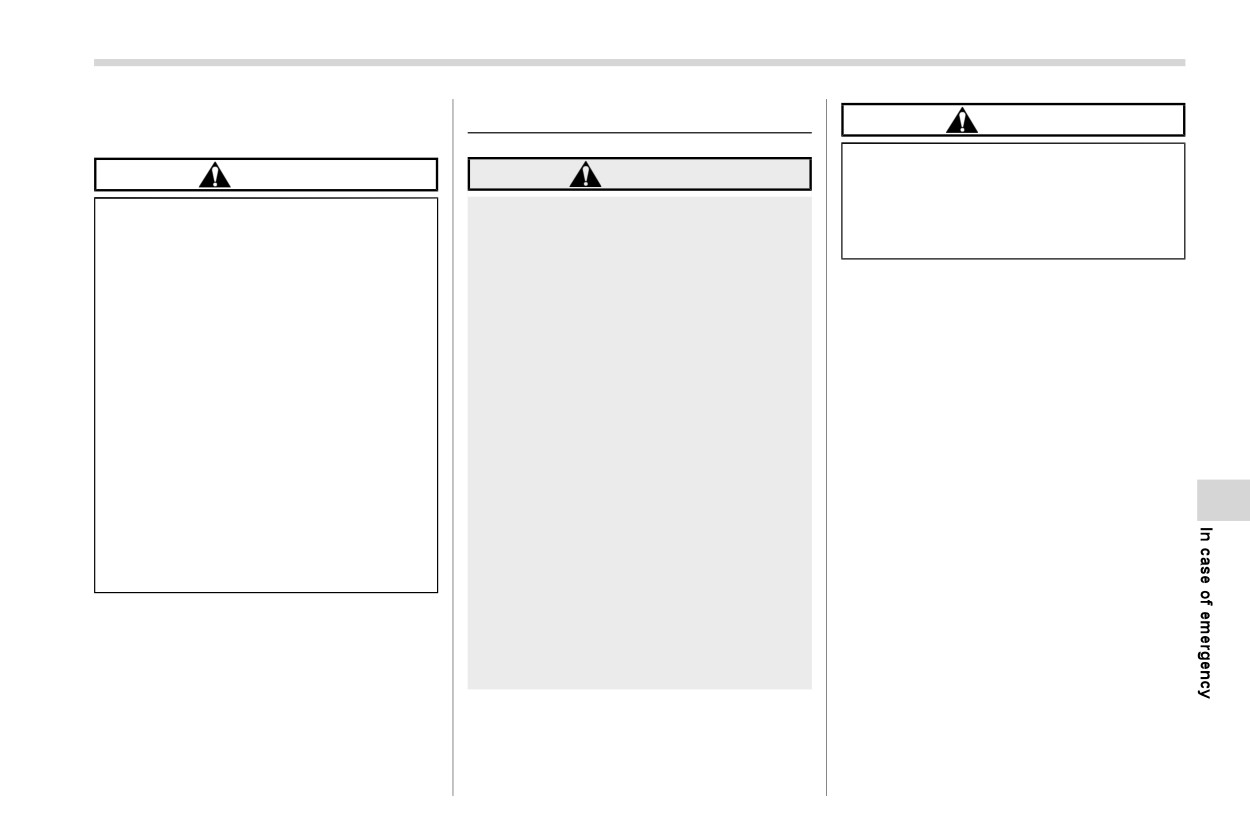
& Re-storage of spare tire
1.
Turn the spare tire hoist shaft end
counterclockwise with the wheel nut
wrench to loosen the cable sufficiently
3. Turn the hoist shaft end clockwise with
enough to allow the cable end retainer
the wheel nut wrench to wind the cable
go through center hole of the tempor-
up completely until you hear a few
ary spare tire.
clicking sounds. Confirm that the tem-
porary spare tire holding cable has
been wound up completely by shaking
the temporary tire.
CAUTION
If the temporary spare tire is not
stored securely, it could damage
adjacent areas of the vehicle and
2.
Insert the retainer through the center
make an abnormal noise.
hole of the temporary tire as showing in
the figure.
4. Install the rubber cap.
5. Install the cover.
6. Store the wheel nut wrench, two
extensions, jack and jack handle in
Temporary spare tire
451
their storage locations.
9-4. Temporary spare tire
CAUTION
7.
Fit the lid of the cargo area.
Never use any temporary spare tire
CAUTION
WARNING
other than the original. Using other
sizes may result in severe mechan-
When stowing a flat tire in the
Never tow a trailer when the
ical damage to the drivetrain of your
spare tire holder, turn the hoist
temporary spare tire is used.
vehicle.
shaft end only slowly. If it is
The temporary spare tire is not
turned quickly, the wheel disc of
designed to sustain the towing
The temporary spare tire is smaller and
the flat tire could be damaged.
load. Use of the temporary spare
lighter than a conventional tire and is
tire when towing can result in
A full-size flat tire should be
designed for emergency use only. Re-
failure of the spare tire and/or
stowed in the spare tire holder
move the temporary spare tire and re-
less stability of the vehicle and
in an emergency only. After hav-
install the conventional tire as soon as
may lead to an accident.
ing the flat tire repaired, immedi-
possible because the spare tire is de-
ately swap it with the temporary
When a spare tire is mounted or a
signed only for temporary use.
spare tire.
wheel rim is replaced without the
Check the inflation pressure of the tem-
original pressure sensor/trans-
Remember that the tread width of
porary spare tire periodically to keep the
mitter being transferred, the low
a flat tire is wider than that of the
tire ready for use. For the correct tire
tire pressure warning light will
temporary spare tire. When car-
pressure, refer to “Temporary spare tires”
illuminate steadily after blinking
rying a flat tire stowed in the
FP527.
for approximately one minute.
spare tire holder, make sure the
tire does not touch any obsta-
This indicates the tire pressure
When using the temporary spare tire, note
cles.
monitoring system (TPMS) is un-
the following.
able to monitor all four road
. Drive with caution when the temporary
wheels. Contact your SUBARU
spare tire is installed. Avoid hard
dealer as soon as possible for
acceleration and braking, or fast cor-
tire and sensor replacement and/
nering, as control of the vehicle may be
or system resetting.
lost.
. Do not exceed 50 mph (80 km/h).
. Do not put a tire chain on the temporary
spare tire. Because of the smaller tire
size, a tire chain will not fit properly.
- CONTINUED -
452 Flat tires
Do not use two or more temporary
Do not jack up the vehicle with an
9-5. Flat tires
spare tires at the same time.
object on or underneath the jack.
Do not drive over obstacles. This tire
The jack can be unstable and this
If you have a flat tire while driving, never
has a smaller diameter, so road clear-
can result in a severe accident.
brake suddenly; keep driving straight
ance is reduced.
Always turn off the engine before
ahead while gradually reducing speed.
Then slowly pull off the road to a safe
raising the flat tire off the ground
place.
using the jack. Never swing or
push the vehicle supported with
& Changing a flat tire
the jack. The jack can come out of
the jacking point due to a jolt and
this can result in serious injury or
WARNING
death.
Use only the jack and the jack
All passengers must exit the
handle provided with your vehi-
vehicle before you raise it with
cle. The jack supplied with the
the jack. Raising the vehicle with
vehicle is designed only for chan-
someone inside of it could result
ging a tire. Never put any part of
in serious injury or death.
your body under the vehicle while
Do not start the vehicle while it is
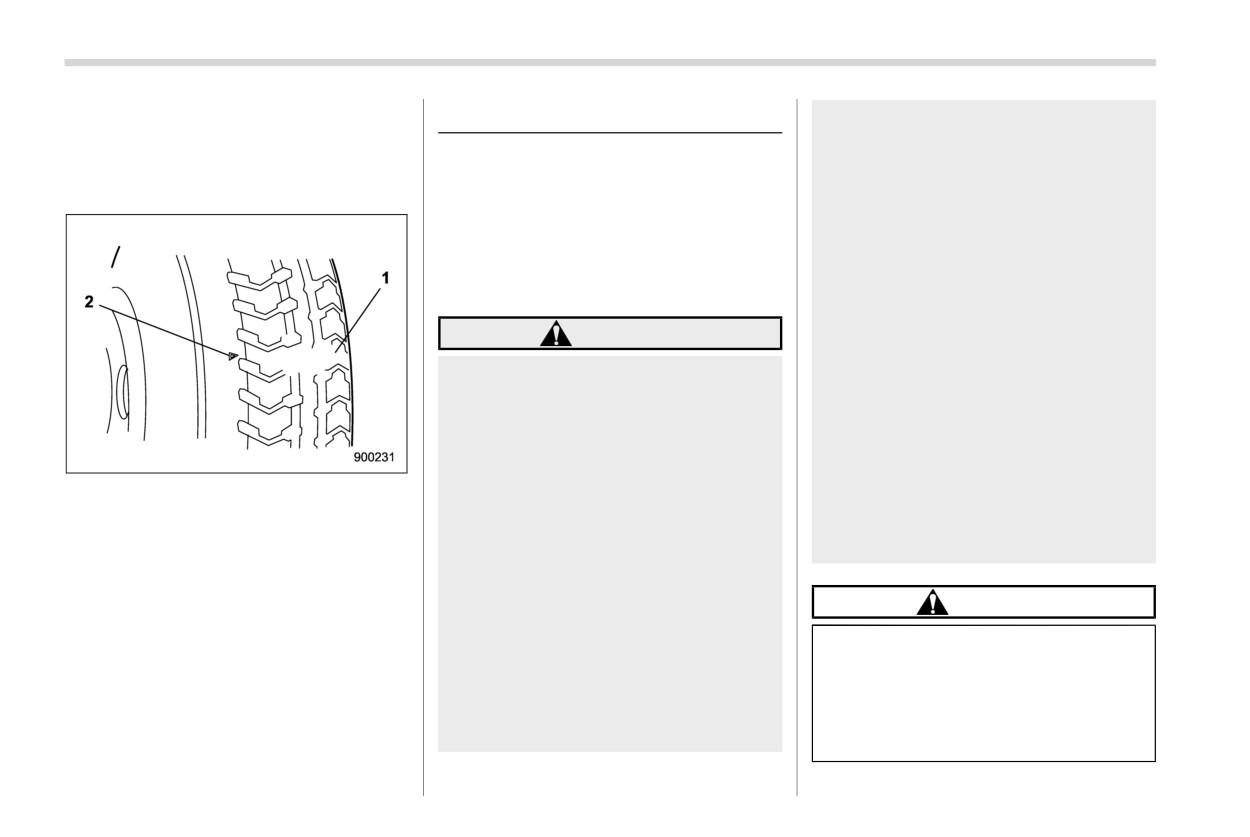
1
Tread wear indicator bar
the vehicle is being supported by
2
Indicator location mark
supported by the jack. Doing so
the jack. Doing so could result in
could result in serious injury or
When the wear indicator appears on
serious injury or death.
death.
the tread, replace the tire.
Do not jack up the vehicle on an
The temporary spare tire must be used
incline or a loose road surface.
only on a rear wheel. If a front wheel tire
The jack can come out of the
CAUTION
gets punctured, replace the wheel with
jacking point or sink into the
a rear wheel and install the temporary
ground and this can result in
Do not hit and bend the disc rotor
spare tire in place of the removed rear
serious injury or death.
backing plate when removing and
wheel.
installing the tire. A bent backing
Before jacking up the vehicle, be
plate may scrape against the disc
sure that there are no occupants
rotor and cause noise while the
or cargo on board.
vehicle is in motion.
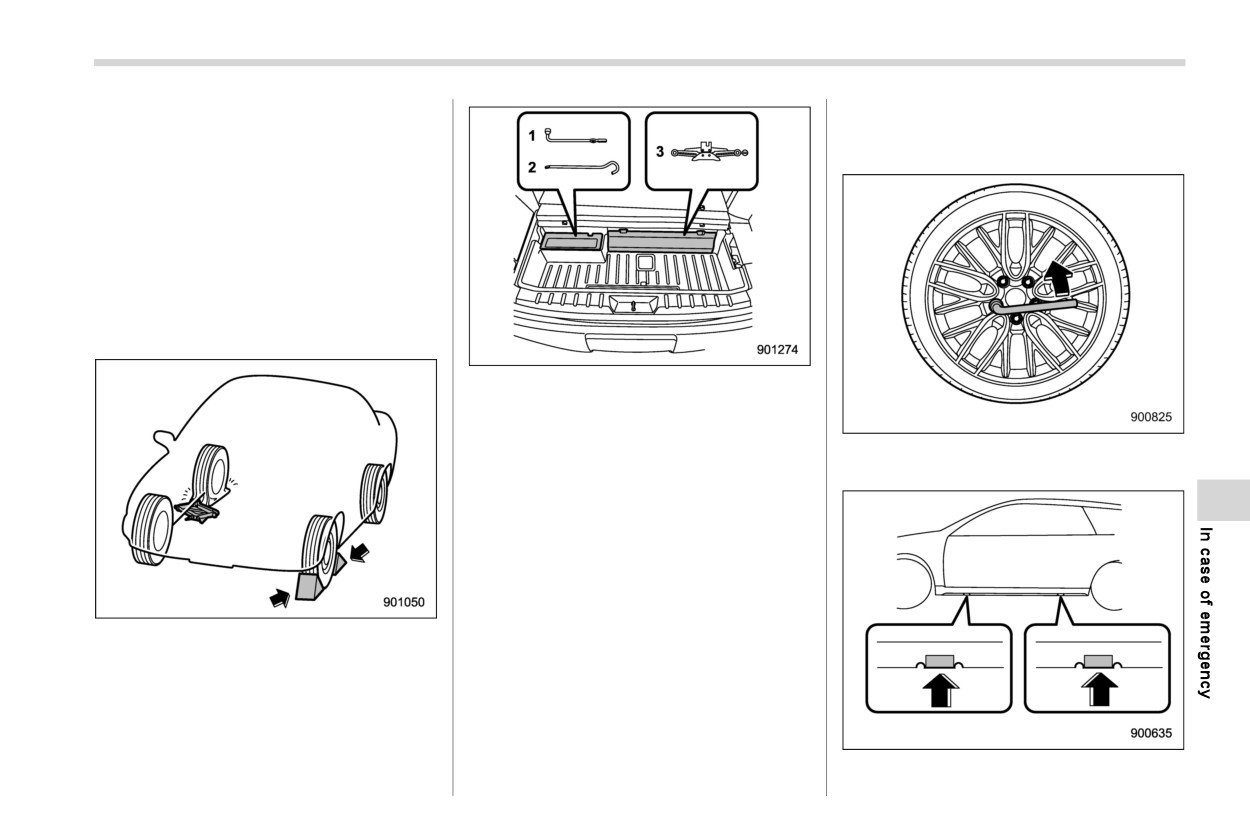
Flat tires
453
NOTE
is a temporary spare tire, carefully read
“Temporary spare tire” FP451
and
Contact a SUBARU dealer when jacking
strictly follow the instructions.
up the vehicle using a garage jack.
1.
Park on a hard, level surface, when-
ever possible, then stop the engine.
2.
Apply the parking brake securely and
shift the select lever to the “P” (Park)
position.
3.
Turn on the hazard warning flasher and
unload all occupants and luggage from
the vehicle.
1
Wheel nut wrench
2
Jack handle
3
Jack
5.
Take out the jack,
jack
handle
and
7.
Loosen the wheel nuts using the wheel
wheel nut wrench.
nut wrench but do not remove the nuts.
The tools are stored under the cargo
area. Refer to
“Maintenance tools”
FP446.
NOTE
Make sure that the jack is well lubri-
cated before using it.
4.
Put wheel blocks at the front and rear
6. Remove the spare tire.
of the tire diagonally opposite the flat
Refer to
“Removing the spare tire”
tire.
FP447
and strictly follow the instruc-
tions.
NOTE
Jack-up points
If the spare tire provided in your vehicle
- CONTINUED -
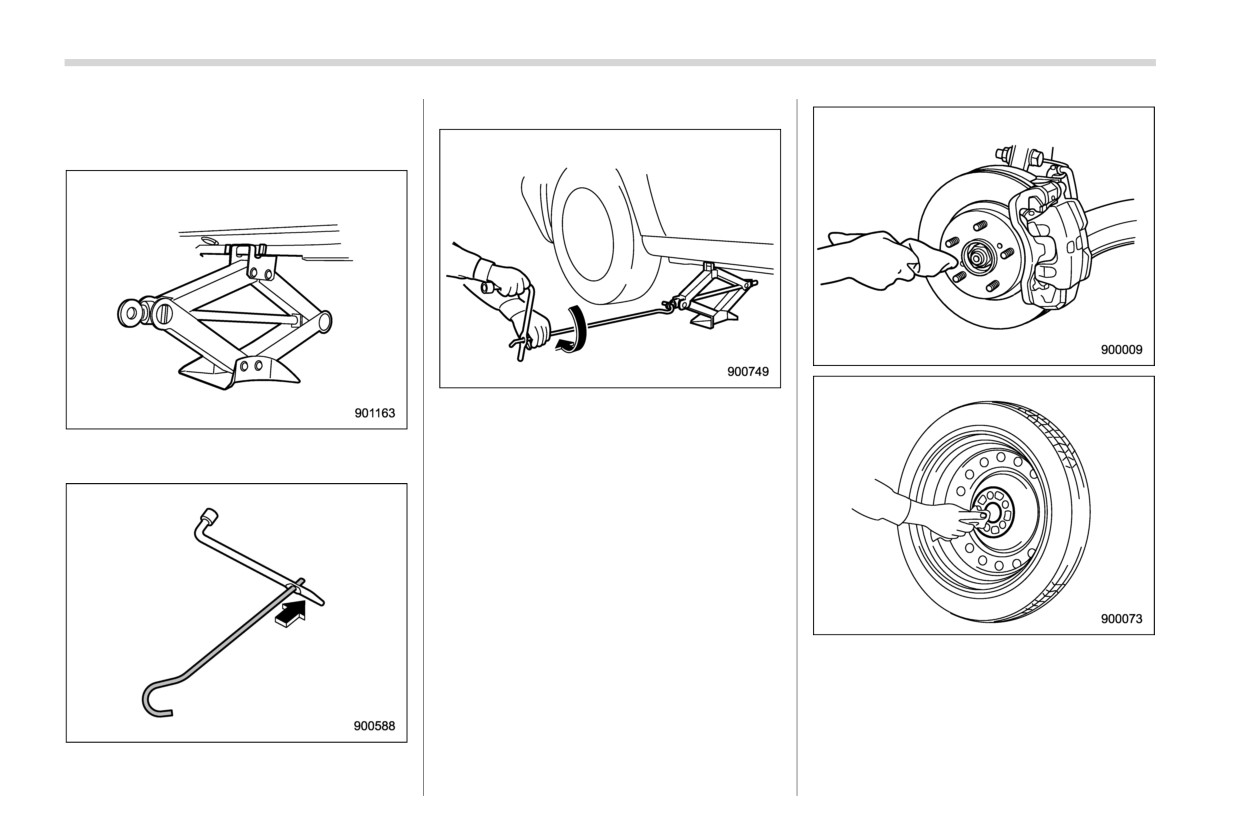
454 Flat tires
8. Place the jack under the side sill at the
the wheel nut wrench.
front or rear jack-up point closest to the
flat tire.
10. Insert the jack handle into the jack-
screw, and turn the handle until the tire
Turn the jackscrew by hand until the jack
clears the ground. Do not raise the
head engages firmly into the jack-up point.
vehicle higher than necessary.
11. Remove the wheel nuts and the flat
tire.
12. Before putting the spare tire on, clean
the mounting surface of the wheel and
hub with a cloth.
13. Put on the spare tire. Replace the
wheel nuts. Tighten them by hand.
9. Insert the jack handle into the hole of
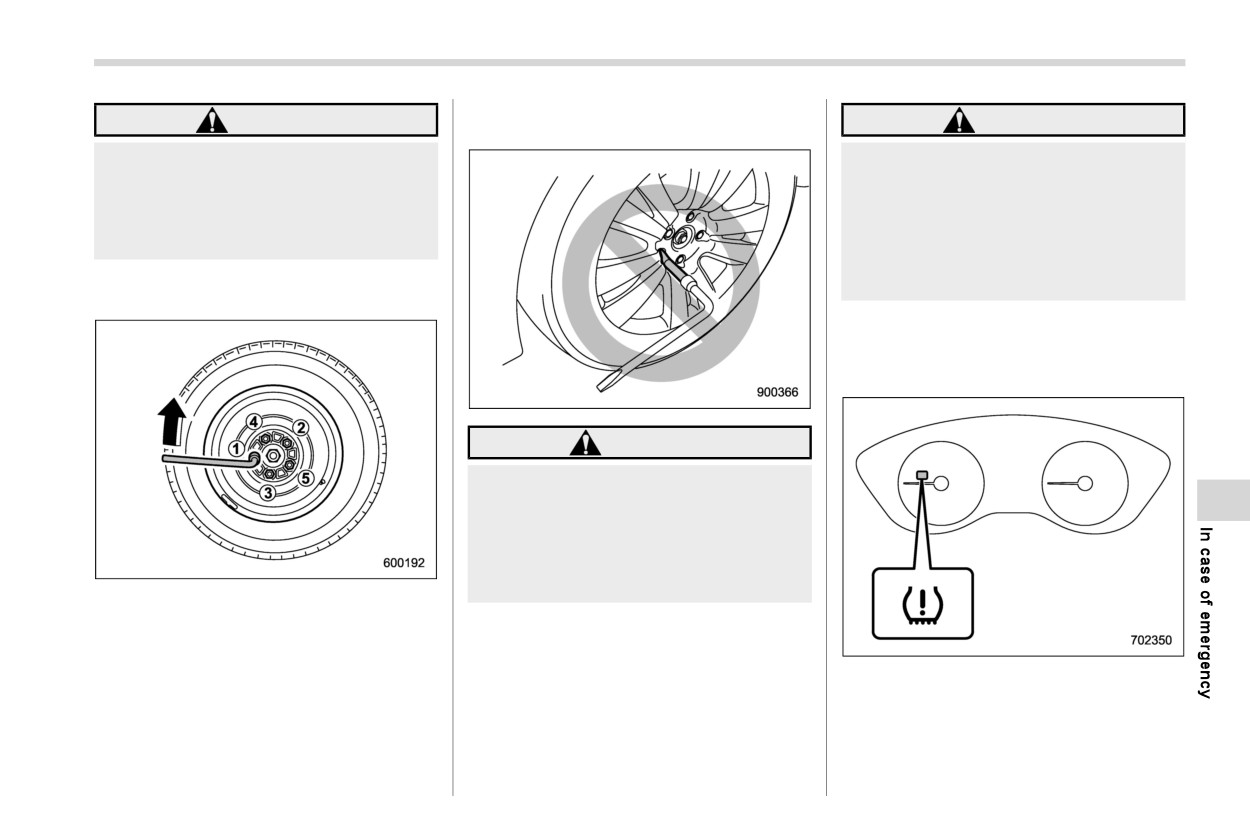
455
Flat tires
the wheel nut torque checked at the
WARNING
WARNING
nearest automotive service facility.
Do not use oil or grease on the wheel
Never place a tire or tire changing
studs or nuts when the spare tire is
tools in the passenger compartment
installed. This could cause the nuts
after changing wheels. In a sudden
to become loose and lead to an
stop or collision, loose equipment
accident.
could strike occupants and cause
injury. Store the tire and all tools in
14. Turn the jack handle counterclockwise
the proper place.
to lower the vehicle.
& Tire pressure monitoring
system (TPMS) (U.S.-spec.
models)
WARNING
Do not use the extension when
turning the wheel nuts. If you did,
you would not be able to achieve
sufficient tightening torque. The
wheel nuts could then come loose,
resulting in a serious accident.
15. Use the wheel nut wrench to securely
tighten the wheel nuts to the specified
16. Store the flat tire in the spare tire
torque, following the tightening order in
holder.
the illustration.
Refer to
“Removing the spare tire”
The tire pressure monitoring system pro-
For the wheel nut tightening torque,
FP447
for its location, instructions
vides the driver with the warning message
refer to “Tires” FP526. Never use your
and precautions.
indicated by sending a signal from a
foot on the wheel nut wrench or a pipe
17. Store the jack, jack handle and wheel
sensor that is installed in each wheel when
extension on the wrench because you
nut wrench in their storage locations.
tire pressure is severely low.
may exceed the specified torque. Have
- CONTINUED -
456 Flat tires
The tire pressure monitoring system will
If you have a flat tire, replace it
one minute, promptly contact a
activate only when the vehicle is driven.
with a spare tire as soon as
SUBARU dealer to have the sys-
Also, this system may not react immedi-
possible.
tem inspected.
ately to a sudden drop in tire pressure (for
When a spare tire is mounted or a
example, a blow-out caused running over
wheel rim is replaced without the
a sharp object).
original pressure sensor/trans-
mitter being transferred, the low
WARNING
tire pressure warning light will
illuminate steadily after blinking
If the low tire pressure warning
for approximately one minute.
light illuminates while driving,
This indicates the TPMS is unable
never brake suddenly. Instead,
to monitor all four road wheels.
perform the following procedure.
Contact your SUBARU dealer as
(1) Keep driving straight ahead
soon as possible for tire and
while gradually reducing
sensor replacement and/or sys-
speed.
tem resetting.
(2) Slowly pull off the road to a
When a tire is repaired with liquid
safe place. Otherwise an acci-
sealant, the tire pressure warning
dent involving serious vehicle
valve and transmitter may not
damage and serious personal
operate properly. If a liquid sea-
injury could occur.
lant is used, contact your nearest
(3) Check the pressure for all four
SUBARU dealer or other qualified
tires and adjust the pressure
service shop as soon as possi-
to the COLD tire pressure
ble. Make sure to replace the tire
shown on the tire inflation
pressure warning valve and
pressure label on the door
transmitter when replacing the
pillar on the driver’s side.
tire. You may reuse the wheel if
If this light still illuminates while
there is no damage to it and if the
driving after adjusting the tire
sealant residue is properly
pressure, a tire may have signifi-
cleaned off.
cant damage and a fast leak that
If the light illuminates steadily
causes the tire to lose air rapidly.
after blinking for approximately
Jump starting
457
9-6. Jump starting
protectors, and remove metal
& How to jump start
objects such as rings, bands or
1.
Make sure the booster battery is 12
other metal jewelry.
volts and the negative terminal is
WARNING
Be sure the jumper cables and
grounded.
clamps on them do not have
Battery fluid is SULFURIC ACID.
2.
If the booster battery is in another
loose or missing insulation.
Do not let it come in contact with
vehicle, do not let the two vehicles
the eyes, skin, clothing or the
Do not jump start unless cables
touch.
vehicle.
in suitable condition are avail-
3.
Turn off all unnecessary lights and
able.
accessories.
If battery fluid gets on you, thor-
oughly flush the exposed area
A running engine can be danger-
4.
Connect the jumper cables exactly in
with water immediately. Get med-
ous. Keep your fingers, hands,
the sequence illustrated.
ical help if the fluid has entered
clothing, hair and tools away
your eyes.
from the cooling fan, belts and
any other moving engine parts.
If battery fluid is accidentally
Removing rings, watches and
swallowed, immediately drink a
ties is advisable.
large amount of milk or water,
and obtain immediate medical
Jump starting is dangerous if it
help.
done incorrectly. If you are un-
sure about the proper procedure
Keep everyone including chil-
for jump starting, consult a com-
dren away from the battery.
petent mechanic.
The gas generated by a battery
explodes if a flame or spark is
When your vehicle does not start due to a
brought near it. Do not smoke or
run down (discharged) battery, the vehicle
light a match while jump starting.
may be jump started by connecting your
Never attempt jump starting if the
battery to another battery
(called the
discharged battery is frozen. It
booster battery) with jumper cables.
could cause the battery to burst
or explode.
Whenever working on or around a
battery, always wear suitable eye
- CONTINUED -
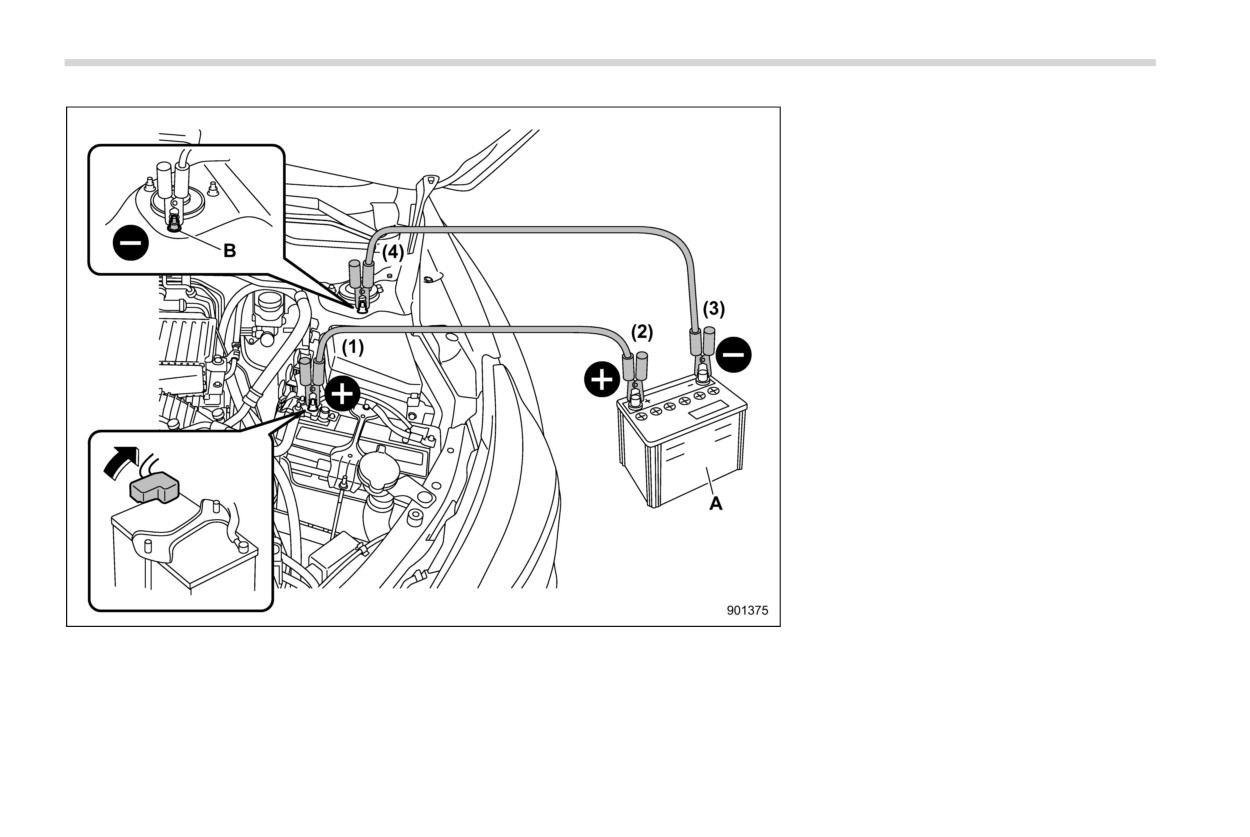
458 Jump starting
(1) Connect one jumper cable to the
positive
(+) terminal on the dis-
charged battery.
(2) Connect the other end of the
jumper cable to the positive (+)
terminal of the booster battery.
(3) Connect one end of the other cable
to the negative (−) terminal of the
booster battery.
(4) Connect the other end of the cable
to the strut mounting nut of the
vehicle with the discharged bat-
tery.
Make sure that the cables are not near any
moving parts and that the cable clamps are
not in contact with any other metal.
5. Start the engine of the vehicle with the
booster battery and run it at moderate
speed. Then start the engine of the
vehicle that has the discharged battery.
6. When finished, carefully disconnect
the cables in exactly the reverse order.
A Booster battery
B Strut mounting nut
Engine overheating
459
& If no steam is coming from the
If you remove the radiator cap from a hot
9-7. Engine overheating
engine compartment
radiator, first wrap a thick cloth around the
radiator cap, then turn the cap counter-
1.
Keep the engine running at idling
WARNING
clockwise slowly without pressing down
speed.
until it stops. Release the pressure from
2.
Open the engine hood to ventilate the
Never remove the radiator cap until
the radiator. After the pressure has been
engine compartment. Refer to “Engine
fully released, remove the cap by pressing
the engine has been shut off and has
hood” FP483.
down and turning it.
fully cooled down. When the engine
Confirm that the cooling fan is turning.
is hot, the coolant is under pressure.
If the fan is not turning, immediately
Removing the cap while the engine
turn off the engine and contact an
is still hot could release a spray of
authorized SUBARU dealer for repair.
boiling hot coolant, which could
burn you very seriously.
3.
After the engine coolant temperature
has dropped, turn off the engine. If the
temperature gauge stays in the over-
CAUTION
heated zone, turn off the engine.
4.
After the engine has fully cooled down,
If the engine overheats, the engine
check the coolant level in the reserve
speed or the vehicle speed may be
tank. If the coolant level is below the
reduced. Stop the vehicle in a safe
“LOW” mark, add coolant up to the
place immediately.
“FULL” mark.
NOTE
& If steam is coming from the
For details about how to check the
engine compartment
coolant level or how to add coolant,
. Turn the ignition switch to the “LOCK”/
refer to “Engine coolant” FP489.
“OFF” position and get everyone away
5. If there is no coolant in the reserve
from the vehicle until it cools down.
tank, add coolant to the reserve tank.
. Contact an authorized SUBARU deal-
Then remove the radiator cap and fill
er.
the radiator with coolant.