Subaru Solterra (2023 year). Manual in english - page 15
 

  Index      Manuals     Subaru Solterra (2023 year). Manual in english


Search            copyright infringement  


Content      ..     13      14      15      16     ..


Subaru Solterra (2023 year). Manual in english - page 15


241

5-2. Driving procedures

5

Dri
vin

g

Using regenerative brake

When driving at a high speed, the 

feeling of deceleration with regen-

erative braking is less than that on 

conventional vehicles.

If “Regenerative Braking Limited 

Press Brake to Decelerate” 

appears on the multi-information 

display, firmly depress the brake 

pedal to decelerate the vehicle.

Acceleration/deceleration con-
trol can be performed only by 
operating the accelerator pedal, 
and the frequency of switching 
to the brake pedal can be 
greatly reduced. Since the 
deceleration when the accelera-
tor pedal is released is stronger 
than that of a conventional vehi-
cle, the vehicle can be deceler-
ated smoothly by slowly 
releasing the pedal the acceler-
ator pedal without completely 
releasing it.

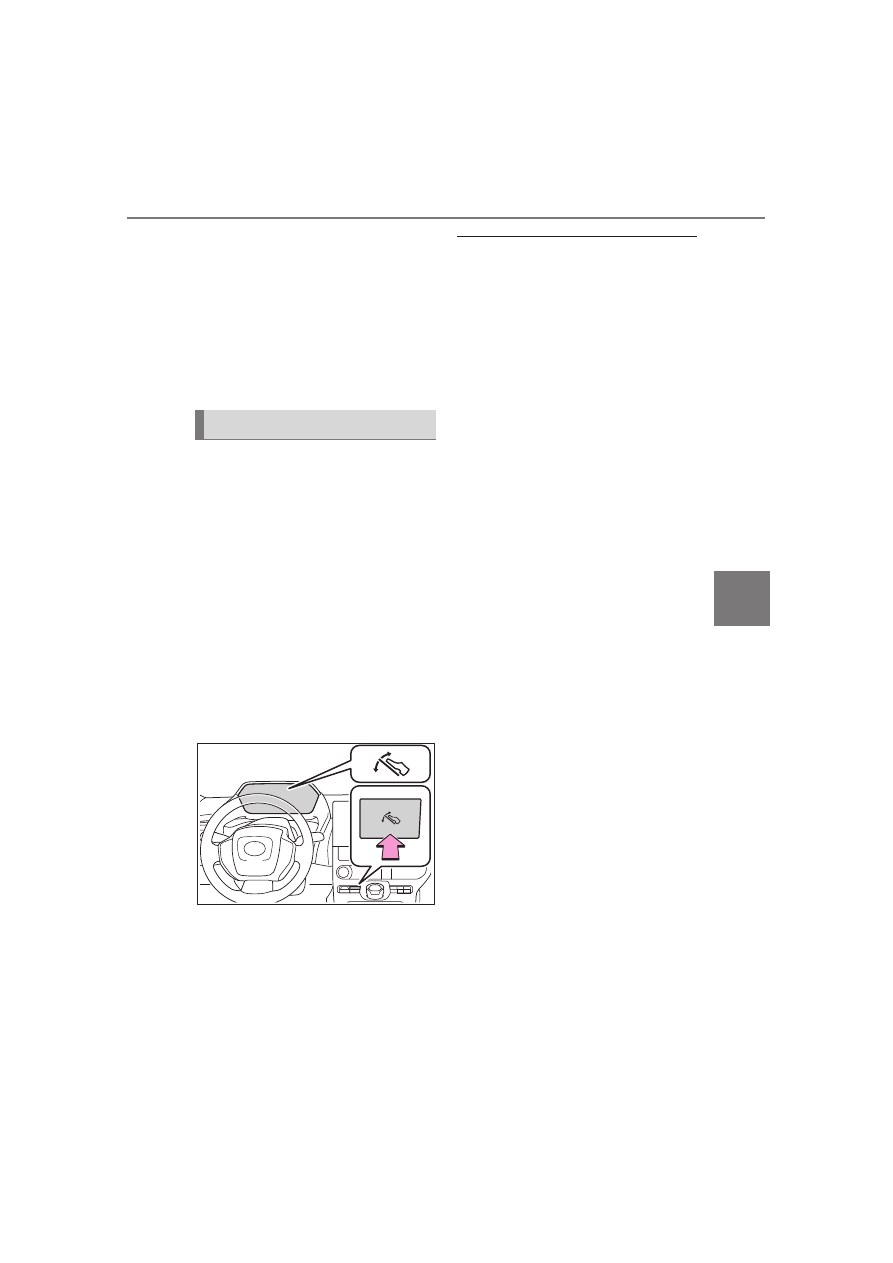
When the “S PEDAL DRIVE” 
switch is pressed, the regenera-
tive braking force, when the 
accelerator pedal is released, 
becomes stronger than usual.

When “S PEDAL DRIVE” cannot 

be used In the following cases, 

the system does not operate.

When “X-MODE” is activated

When the brake system or EV 

system is malfunctioning

When regenerative braking is lim-

ited

Regenerative braking may be 
restricted in the following situations:
• When the amount of charge of the 

traction battery is high

• When the temperature of the trac-

tion battery is low or extremely 

high

• When the temperature of the elec-

tric motor or power control unit is 

extremely high

• When regenerative braking is con-

tinually used for a long time

Regenerative Braking

The vehicle cannot be stopped by 

just releasing the accelerator 

pedal. Step on the brake pedal 

when the vehicle is stopped.

If the power switch is turned off 

and then the EV system is 

restarted, the “S PEDAL DRIVE” 

will be turned off.

When driving at high speeds, the 

feeling of deceleration due to 

regenerative braking is smaller 

than in a normal car.

The maximum deceleration varies 

depending on the vehicle speed.

“S PEDAL DRIVE” cannot be 

used when the following message 

is displayed on the multi-informa-

tion display.

When decelerating, firmly step on 

the brake to decelerate.

• “S PEDAL DRIVE Unavailable 

XMODE Activated”

• “S PEDAL DRIVE Temporarily 

Unavailable Press Brake to Decel-

erate”

• “S PEDAL DRIVE Temporarily 

Unavailable See Owner’s Manual”

“S PEDAL DRIVE” switch

242

5-2. Driving procedures

Stop lights turning ON

When the regenerative braking 

force exceeds a certain level, the 

stop lights turns on.

1

Right turn

2

Lane change to the right 
(move the lever partway and 
release it)

The right hand signals will flash 3 
times.

3

Lane change to the left 
(move the lever partway and 
release it)

The left hand signals will flash 3 
times.

4

Left turn

Turn signals can be operated 

when

The power switch is in ON.

If the indicator flashes faster 

than usual

Check that a light bulb in the front or 

rear turn signal lights has not 

Turn signal lever

Operating instructions

243

5-2. Driving procedures

5

Dri
vin

g

burned out.

If the turn signals stop flashing 

before a lane change has been 

performed

Operate the lever again.

Using the manual mode

The parking brake can be set 
and released manually.
and a message is shown on the 
multi-information display.

Parking brake indicator light 
(U.S.A.)
Parking brake indicator light 
(Canada)

1

Pull the switch to set the 
parking brake

Parking brake

The parking brake can be 
set or released automati-
cally or manually.
In automatic mode, the 
parking brake can be set or 
released automatically. 
Also, even in automatic 
mode, the parking brake can 
be set or released manually.

Operating instructions

244

5-2. Driving procedures

The parking brake indicator light 
will turn on.
Pull and hold the parking brake 
switch if an emergency occurs and 
it is necessary to operate the park-
ing brake while driving.

2

Push the switch to release 
the parking brake

• Operate the parking brake switch 

while depressing the brake pedal.

• Using the parking brake auto-

matic release function, the park-
ing brake can be released by 
depressing the accelerator pedal. 
(

P.244)

Make sure that the parking brake 
indicator light turn off.
If the parking brake indicator light 
flash, operate the switch again. 
(

P.521)

Turning the automatic 
mode on

While the vehicle is stopped, 
pull and hold the parking brake 
switch until a buzzer sounds and 
a message is shown on the 
multi-information display.
When the automatic mode is 
turned on, the parking brake 
operates as follows.

When the shift position is 
shifted from P, the parking 
brake will be released, and 
the parking brake indicator 
light will turn off.

When the shift position is 
shifted to P, the parking brake 
will be set, and the parking 
brake indicator light will turn 
on.

Operate the shift position with 
the vehicle stopped and the 
brake pedal depressed.

The auto function may not operate 
if the shift position is moved 
extremely quickly. In this situation, 
apply the parking brake manually. 
(

P.243)

Turning the automatic 
mode off

While the vehicle is stopped and 
depressing the brake pedal, 
press and hold the parking 
brake switch until a buzzer 
sounds and message is shown 
on the multi-information display.

Parking brake operation

When the power switch is not in 

ON, the parking brake cannot be 

released using the parking brake 

switch.

When the power switch is not in 

ON, automatic mode (automatic 

brake setting and releasing) is not 

available.

Parking brake automatic 

release function

When all of the following conditions 

are met in manual mode, the park-

ing brake can be released by 

depressing the accelerator pedal.

The driver’s door is closed

The driver is wearing the seat belt

The shift position is in a forward 

driving position or reverse driving 

position

The malfunction indicator lamp or 

brake system warning light is not 

illuminated.

When depressing the accelerator 

pedal, depress it slowly.
If the parking brake is not released 

245

5-2. Driving procedures

5

Dri
vin

g

when the accelerator pedal is 

depressed, release the parking 

brake manually.

Parking brake automatic lock 

function

The parking brake will be set auto-

matically under the following condi-

tions:

The brake pedal is not depressed

The driver’s door is open

The driver’s seat belt is not fas-

tened

The shift position is in a position 

other than P or N

(The shift position is in P during 

advanced park operation.) (If 

equipped)

The malfunction indicator lamp or 

brake system warning light are not 

illuminated

If “Parking Brake Temporarily 

Unavailable” is displayed on 

the multi-information display

If the parking brake is operated 

repeatedly over a short period of 

time, the system may restrict opera-

tion to prevent overheating. If this 

happens, refrain from operating the 

parking brake. Normal operation will 

return after about 1 minute.

If “Parking Brake Unavailable” 

is displayed on the multi-infor-

mation display

Operate the parking brake switch. If 

the message does not disappear 

after operating the switch several 

times, the system may be malfunc-

tioning. Have the vehicle inspected 

by your SUBARU dealer.

Parking brake operation sound

When the parking brake operates, a 

motor sound (whirring sound) may 

be heard.
This does not indicate a malfunc-

tion.

Parking brake indicator light

Depending on the power switch 

mode, the parking brake indicator 

light will turn on and stay on as 

described below:

ON: Comes on until the parking 

brake is released.

Not in ON: Stays on for approxi-

mately 15 seconds.

When the power switch is turned 

off with the parking brake set, the 

parking brake indicator light will 

stay on for about 15 seconds.

This does not indicate a malfunc-

tion.

When the parking brake switch 

malfunctions

Automatic mode (automatic brake 

setting and releasing) will be turned 

on automatically.

Parking the vehicle

P.243

Parking brake engaged warning 

buzzer

A buzzer will sound if the vehicle is 

driven with the parking brake 

engaged. “Parking Brake ON” is dis-

played on the multi-information dis-

play. (with the vehicle reached a 

speed of 3 mph [5 km/h])

If the brake system warning 

light comes on

P.516

Usage in winter time

P.397

WARNING

When parking the vehicle

Do not leave a child in the vehicle 

alone. The parking brake may be 

released unintentionally and there 

is the danger of the vehicle mov-

ing that may lead to an accident 

resulting in death or serious injury.

246

5-2. Driving procedures

WARNING

Parking brake switch

Do not set any objects near the 

parking brake switch.

Objects may interfere with the 

switch and may lead the parking 

brake to unexpectedly operate.

Parking brake automatic lock 

function

Never use the automatic parking 

brake engagement function in 

place of normal parking brake 

operation. This function is 

designed to reduce the risk of a 

collision due to the driver forget-

ting to engage the parking brake. 

Over-reliance on this function to 

park the vehicle safely may lead 

to an accident resulting in death 

or serious injury. (

P.217)

NOTICE

When parking the vehicle

Before you leave the vehicle, shift 

the shift position to P, set the park-

ing brake and make sure that the 

vehicle does not move.

When the system malfunc-

tions

Stop the vehicle in a safe place 

and check the warning messages.

When the vehicle 12-volt bat-

tery is discharged

The parking brake system cannot 

be activated. (

P.544)

When the parking brake can-

not be released due to a mal-

function

Driving the vehicle with the park-

ing brake set will lead to brake 

components overheating, which 

may affect braking performance 

and increase brake wear.
Have the vehicle inspected by 

your SUBARU dealer immediately 

if this occurs.

247

5-2. Driving procedures

5

Dri
vin

g

Turns the brake hold system on

The brake hold standby indicator 
(green) 

 comes on. While the 

system is holding the brake, the 
brake hold operated indicator (yel-
low) 

 comes on.

Brake hold system operating 

conditions

The brake hold system cannot be 

turned on in the following condi-

tions:

The driver’s door is not closed.

The driver is not wearing the seat 

belt.

“Parking Brake Unavailable” or 

“Parking Brake Malfunction Visit 

Your Dealer” is displayed on the 

multi-information display.

If any of the conditions above are 

detected when the brake hold sys-

tem is enabled, the system will turn 

off and the brake hold standby indi-

cator light will go off. In addition, if 

any of the conditions are detected 

while the system is holding the 

brake, a warning buzzer will sound 

and a message will be shown on the 

multi-information display. The park-

ing brake will then be set automati-

cally.

Brake hold function

If the brake pedal is left released 

for a period of about 3 minutes 

after the system has started hold-

ing the brake, the parking brake 

will be set automatically. In this 

case, a warning buzzer sounds 

and a message is shown on the 

multi-information display.

The brake hold function may not 

hold the vehicle when the vehicle 

is on a steep incline. In this situa-

tion, it may be necessary for the 

driver to apply the brakes. A warn-

ing buzzer will sound and the 

multi-information display will 

inform the driver of this situation. If 

a warning message is shown on 

the multi-information display, read 

the message and follow the 

instructions.

To turn the system off while the 

system is holding the brake, firmly 

depress the brake pedal and 

press the button again.

When the parking brake is set 

automatically while the system 

is holding the brakes

Perform any of the following opera-

tions to release the parking brake:

Depress the accelerator pedal. 

(The parking brake will not be 

released automatically if the seat 

Brake Hold

The brake hold system 
keeps the brake applied 
when the shift position is in 
D or N with the system on 
and the brake pedal has 
been depressed to stop the 
vehicle. The system 
releases the brake when the 
accelerator pedal is 
depressed with the shift 
position in D to allow 
smooth start off.

Enabling the system

248

5-2. Driving procedures

belt is not fastened.)

Operate the parking brake switch 

with the brake pedal depressed.

Make sure that the parking brake 
indicator light goes off. (

P.243)

When an inspection at your 

SUBARU dealer is necessary

When the brake hold standby indi-

cator (green) does not illuminate 

even when the brake hold switch is 

pressed with the brake hold system 

operating conditions met, the sys-

tem may be malfunctioning. Have 

the vehicle inspected at your SUB-

ARU dealer.

If “Brake Hold Malfunction 

Press Brake to Deactivate Visit 

Your Dealer” or “Brake Hold 

Malfunction Visit Your Dealer” 

is displayed on the multi-infor-

mation display

The system may be malfunctioning. 

Have the vehicle inspected by your 

SUBARU dealer.

Warning messages and buzzers

Warning messages and buzzers are 

used to indicate a system malfunc-

tion or to inform the driver of the 

need for caution. If a warning mes-

sage is shown on the multi-informa-

tion display, read the message and 

follow the instructions.

If the brake hold operated indi-

cator flashes

P.522

WARNING

When the vehicle is on a 

steep incline

When using the brake hold sys-

tem on a steep incline, exercise 

caution. The brake hold function 

may not hold the vehicle in such a 

situation.

When stopped on a slippery 

road

The system cannot stop the vehi-

cle when the gripping ability of the 

tires has been exceeded. Do not 

use the system when stopped on 

a slippery road.

NOTICE

When parking the vehicle

The brake hold system is not 

designed for use when parking 

the vehicle for a long period of 

time. Turning the power switch off 

while the system is holding the 

brake may release the brake, 

which would cause the vehicle to 

move. When operating the power 

switch, depress the brake pedal, 

shift the shift position to P and set 

the parking brake.

249

5-3. Operating the lights and wipers

5

Dri
vin

g

5-3.Operating the lights and wipers

Operating the 

 switch turns 

on the lights as follows:

U.S.A.

Canada

1

 The side marker, parking, 

tail, license plate, instrument 
panel lights, daytime running 
lights (

P.249) turn on.

2

 The headlights and all 

lights listed above (except 
daytime running lights) turn 
on.

3

 The headlights, daytime 

running lights (

P.249) and 

all the lights listed above turn 
on and off automatically.

4

 Off (for the U.S.A. only)

AUTO mode can be used when

The power switch is in ON.

Daytime running light system

The daytime running lights illumi-

nate using the same lights as the 

parking lights and illuminate but at 

a higher intensity.

To make your vehicle more visible 

to other drivers during daytime 

driving, the daytime running lights 

turn on automatically when all of 

the following conditions are met. 

(The daytime running lights are 

not designed for use at night.)

• The EV system is operating

• The parking brake is released
• : The headlight switch is in the 

 or 

 position

• The surroundings are bright
The daytime running lights remain 
on after they illuminate, even if the 
parking brake is set again.

For the U.S.A.: Daytime running 

lights can be turned off by operat-

ing the switch.

Compared to turning on the head-

lights, the daytime running light 

system offers greater durability 

and consumes less electricity, so 

it can help improve electricity con-

sumption.

Headlight control sensor

The sensor may not function prop-

erly if an object is placed on the sen-

sor, or anything that blocks the 

sensor is affixed to the windshield. 

Doing so interferes with the sensor 

detecting the level of ambient light 

and may cause the automatic head-

light system to malfunction.

Headlight switch

The headlights can be oper-
ated manually or automati-
cally.

Turning on the headlights

250

5-3. Operating the lights and wipers

Automatic light off system

When the headlights are on: The 
lights turn off 30 seconds after the 
power switch is turned to ACC or 
OFF and a door is opened and 
closed. (The lights turn off immedi-
ately if 

 on the key is 

pressed after all the doors are 
closed.)

When only the tail lights are on: 

The tail lights turn off automati-

cally if the power switch is turned 

to ACC or OFF and the driver’s 

door is opened.

To turn the lights on again, turn the 
power switch to ON, or turn the light 
switch to the 

 or 

 position 

once and then back to 

 or 


position.

Light reminder buzzer

A buzzer sounds when the power 

switch is turned to ACC or OFF and 

the driver’s door is opened while the 

lights are turned on.

Automatic headlight leveling 

system

The level of the headlights is auto-

matically adjusted according to the 

number of passengers and the load-

ing condition of the vehicle to 

ensure that the headlights do not 

interfere with other road users.

Windshield wiper linked head-

light illumination

When driving during daytime with 
the headlight switch turned to 

, if 

the windshield wipers are used, the 
headlights will turn on automatically 
after several seconds to help 
enhance the visibility of your vehi-
cle.

12-volt battery-saving function

In order to prevent the 12-volt bat-

tery of the vehicle from discharging, 

if the headlights and/or tail lights are 

on when the power switch is turned 

to OFF, the battery saving function 

will operate and automatically turn 

off all the lights after approximately 

20 minutes.
When any of the following are per-

formed, the 12-volt battery-saving 

function is canceled once and then 

reactivated. All the lights will turn off 

automatically 20 minutes after the 

12-volt battery-saving function has 

been reactivated:

When the headlight switch is oper-

ated

When a door is opened or closed

If “Headlight System Malfunc-

tion Visit Your Dealer” is dis-

played on the multi-information 

display

The system may be malfunctioning. 

Have the vehicle inspected by your 

SUBARU dealer.

Customization

Settings (e.g. light sensor sensitiv-

ity) can be changed.

(Customizable features: 

P.576)

NOTICE

To prevent 12-volt battery dis-

charge

Do not leave the lights on longer 

than necessary when the EV sys-

tem is not operating.

251

5-3. Operating the lights and wipers

5

Dri
vin

g

1

With the headlights on, push 
the lever away from you to 
turn on the high beams.

Pull the lever toward you to the 
center position to turn the high 
beams off.

2

Pull the lever toward you and 
release it to flash the high 
beams once.

You can flash the high beams with 
the headlights on or off.

1

Press the Automatic High 
Beam switch.

Turning on the high beam 
headlights

AHB (Automatic High 

Beam)

The Automatic High Beam 
uses a front camera located 
on the upper portion of the 
windshield to detect the 
brightness of the lights of 
vehicles ahead, street-
lights, etc., and automati-
cally changes the head 
lights between the high 
beams and low beams.

WARNING

For safe use

Do not overly rely on the Auto-

matic High Beam. Always drive 

safely, taking care to observe your 

surroundings and turning the high 

beams on or off manually if nec-

essary.

To prevent unintentional 

operation of the Automatic 

High Beam

When it is necessary to disable 

the system: 

P.261

Using the Automatic High 
Beam system

252

5-3. Operating the lights and wipers

2

Turn the headlight switch to 

the 

 or 

 position.

When the headlight switch lever is 

in the low beam position, the AHB 

system will be enabled and the 

AHB indicator will illuminate.

Automatic operating condi-

tions of the high beams

When all of the following condi-

tions are met, the high beams will 

illuminate automatically:

• Vehicle speed is approximately 21 

mph (34 km/h) or more.

• The area ahead of the vehicle is 

dark.

• There are no vehicles ahead with 

lights on.

• There are few streetlights or other 

lights on the road ahead.

If any of the following conditions 

are met, the headlights will 

change to the low beams:

• Vehicle speed drops below 

approximately 17 mph (27 km/h).

• The area ahead of the vehicle is 

not dark.

• There is a vehicle ahead with 

lights on.

• There are many streetlights or 

other lights on the road ahead.

Front camera detection

In the following situations, the high 

beams may not be automatically 

changed to the low beams:

• When a vehicle cuts in front of 

your vehicle

• When another vehicle crosses in 

front of the vehicle

• When vehicles ahead are repeat-

edly detected and then hidden 

due to repeated curves, road 

dividers or roadside trees

• When a vehicle ahead 

approaches from a far lane

• When a vehicle ahead is far away

• When a vehicle ahead has no 

lights

• When the lights of a vehicle ahead 

are dim

• When a vehicle ahead is reflecting 

strong light, such as own head-

lights

• Situations in which the sensors 

may not operate properly: 

P.264

The headlights may change to the 

low beams if a vehicle ahead that 

is using fog lights without its head-

lights turned on is detected.

House lights, street lights, traffic 

signals, and illuminated billboards 

or signs may cause the high 

beams to change to the low 

beams, or the low beams to 

remain on.

The following may change the the 

timing at which the headlights 

change to the low beams:

• The brightness of lights of vehi-

cles ahead

• The movement and direction of 

vehicles ahead

• The distance between the vehicle 

and a vehicle ahead

• When a vehicle ahead only has 

lights illuminated on one side

• When a vehicle ahead is a two-

wheeled vehicle

• The condition of the road (gradi-

ent, curve, condition of the road 

surface, etc.)

• The number of passengers and 

amount of luggage

The headlights may change 

between the high beams and low 

beams unexpectedly.

Bicycles and other small vehicles 

may not be detected.

In the following situations, the sys-

tem may not be able to correctly 

253

5-3. Operating the lights and wipers

5

Dri
vin

g

detect the brightness of the sur-

roundings. This may cause the 

low beams to remain on or the 

high beams to flash or dazzle 

pedestrians or vehicles ahead. In 

such a case, it is necessary to 

manually change between the 

high beams and low beams.

• When there are lights similar to 

headlights or tail lights in the sur-

rounding area

• When headlights or tail lights of 

vehicles ahead are turned off, 

dirty, changing color, or not aimed 

properly

• When the headlights are repeat-

edly changing between the high 

beams and low beams.

• When use of the high beams is 

inappropriate or when the high 

beams may be flashing or daz-

zling pedestrians or other drivers.

• When the vehicle is used in an 

area in which vehicles travel on 

the opposite side of the road of 

the country for which the vehicle 

was designed, for example using 

a vehicle designed for right-hand 

traffic in a left-hand traffic area, or 

vice versa

• When it is necessary to disable 

the system: 

P.261

• Situations in which the sensors 

may not operate properly: 

P.264

Temporarily reducing front 

camera sensitivity

The sensitivity of the front camera 

can be temporarily reduced.

1

Turn the power switch off with 

the following conditions met.

The headlight switch is in 

 or 

 position.

The headlight switch lever is in the 

low beam position.

The Automatic High Beam switch 

is on.

2

Turn the power switch to ON.

3

Within 60 seconds after perform-

ing step 

2

, push the headlight 

switch lever to the high beam 

position then pull it to the original 

position quickly 10 times, then 

leave the lever in its original posi-

tion.

4

If the sensitivity is changed, the 

Automatic High Beam indicator 

will blink 3 times.

Changing to the high 
beams

Push the lever forward.

The Automatic High Beam indicator 
will turn off and the high beam indi-
cator will turn on.
Pull the lever to its original position 
to enable the Automatic High Beam 
system again.

Changing to the low beams

Press the Automatic High Beam 
switch.

The Automatic High Beam indicator 
will turn off.
Press the switch to enable the 
Automatic High Beam system 
again.

Turning the high beams 
on/off manually

254

5-3. Operating the lights and wipers

It is recommended to switch to 
the low beams when use of the 
high beams is inappropriate or 
when the high beams may 
cause problems or distress to 
other drivers or pedestrians 
nearby.
Pull the lever rearward and then 
return it to its original position.
The high beams will illuminate 
while the lever is pulled, how-
ever, after the lever is returned 
to its original position, the low 
beams will remain on for a cer-
tain amount of time. After this, 
the Automatic High Beam sys-
tem will operate.

*

: If equipped

1

*1

 or 

*2

 Turns the 

front fog lights off

2

 Turns the front fog lights 

on

*1

:For the U.S.A.

*2

:For Canada

Fog light can be used when

The headlights are turned on.

Temporarily changing to 
the low beams

Fog light switch

*

When in difficult driving 
conditions, such as in rain 
and fog, turn on the front 
fog lights to secure front 
visibility.

Turning on the fog lights

255

5-3. Operating the lights and wipers

5

Dri
vin

g

Operating the 

 lever oper-

ates the wipers or washer as fol-
lows:

Intermittent windshield wipers

1

*1

 or 

*2

 Off

2

*1

 or 

*2

 Intermittent 

operation

3

*1

 or 

*2

 Low speed 

NOTICE

To prevent 12-volt battery dis-

charge

Do not leave the lights on longer 

than necessary when the EV sys-

tem is off.

Windshield wipers and 

washer

Operating the lever can 
switch between automatic 
operation and manual oper-
ation, or can use the 
washer.

NOTICE

When the windshield is dry

Do not use the wipers, as they 

may damage the windshield.

Operating the wiper lever

256

5-3. Operating the lights and wipers

operation

4

*1

 or 

*2

 High speed 

operation

5

*1

 or 

*2

 Temporary 

operation

*1

:For the U.S.A.

*2

:For Canada

Wiper intervals can be adjusted 
when intermittent operation is 
selected.

6

Increases the intermittent 
windshield wiper frequency

7

Decreases the intermittent 
windshield wiper frequency

8

 Washer/wiper dual 

operation

Pulling the lever operates the wip-
ers and washer.
The wipers will automatically oper-
ate a couple of times after the 

washer squirts.

Rain-sensing windshield wip-
ers

1

*1

 or 

*2

 Off

2

 Rain-sensing opera-

tion

3

*1

 or 

*2

 Low speed 

operation

4

*1

 or 

*2

 High speed 

operation

5

*1

 or 

*2

 Temporary 

operation

*1

:For the U.S.A.

*2

:For Canada

When “AUTO” is selected, the wip-
ers will operate automatically when 
the sensor detects falling rain. The 
system automatically adjusts wiper 
timing in accordance with rain vol-
ume and vehicle speed.

The sensor sensitivity can be 
adjusted when “AUTO” is 
selected.


Content      ..     13      14      15      16     ..