Subaru Outback (2019 year). Instruction - part 13


  Index      Subaru     Subaru Outback - instruction 2019 year in english


Search            


Content   ..  11  12  13  14   ..


Subaru Outback (2019 year). Instruction - part 13


(202,1)

北米Model "A2550BE-A" EDITED: 2018/ 5/ 9

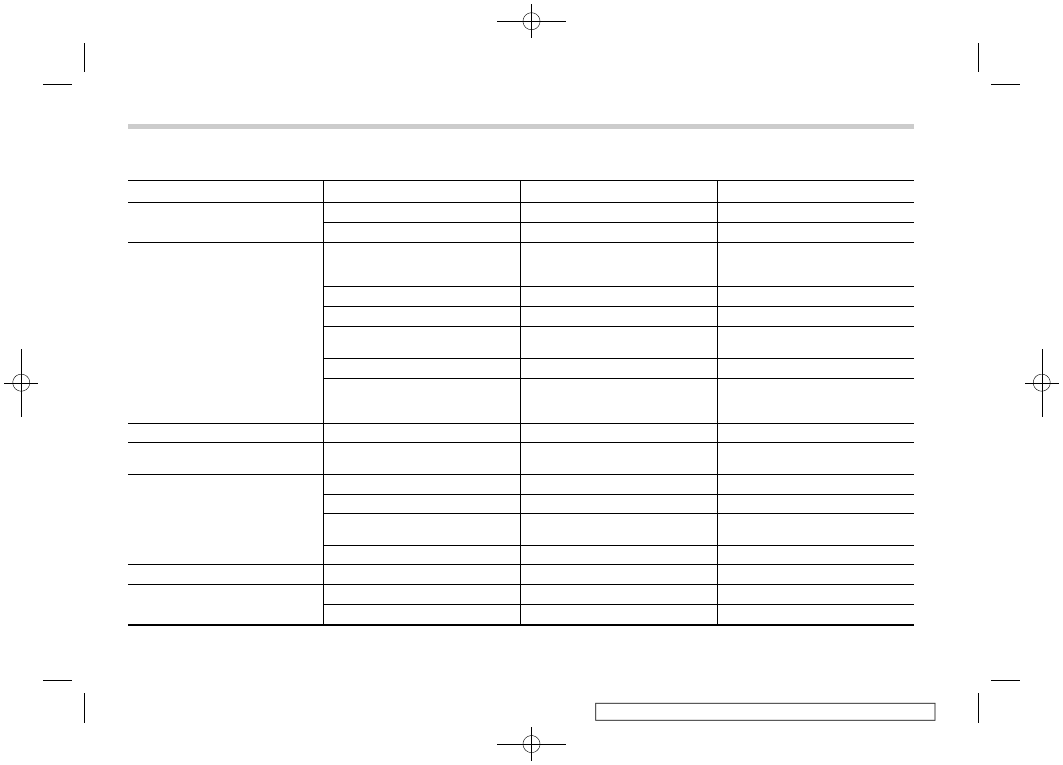
The menu list is as follows.

First menu

Second menu

Third menu

Settings

Clock

Display Format

12-hour/24-hour

Adjust Time (if not set automatically)

3-46

Screen Settings

Welcome Screen

.

ON (with sound)

.

ON (without sound)

.

OFF

Good-bye Screen

ON/OFF

Gauge Initial Movement

ON/OFF

Units

.

km, km/h, Liter

.

miles, MPH, Gallon

Tire Pressure Units

kPa/psi

Languages

.

English

.

Spanish

.

French

SRH (if equipped)

OFF/ON

Combination Meter Illumination (if
equipped)

Meter Ring Illumination

ON/OFF

EyeSight (models with EyeSight
system)

Warning Volume

Max/Mid/Min

Lead Vehicle Acquisition Sound

ON/OFF

Lead Vehicle Moving Monitor Func-
tion

ON/OFF

Vehicle Icon

ON/OFF

BSD/RCTA (if equipped)

Warning Volume

Max/Mid/Min

RAB (if equipped)

Warning Volume

Max/Mid/Min

Sonar Audible Alarm

ON/OFF

Instruments and controls/Combination meter display

3-44

(203,1)

北米Model "A2550BE-A" EDITED: 2018/ 5/ 9

First menu

Second menu

Third menu

Settings

Vehicle Setting

Keyless Entry System

Audible Signal*

1

ON/OFF

Hazard Warning Flasher

ON/OFF

Driver Door Unlock*

1

*

2

Driver Door Only, All

Rear Gate/Trunk Unlock*

1

*

2

*

3

Rear Gate Only, All

Defogger

15 minutes/Continuous

Interior Light

10 seconds – 30 seconds, OFF

Auto Door Lock and Unlock

Auto Door Lock

Off/Vehicle Speed/Shift Into or Out
of PARK

Auto Door Unlock

Off/Shift Into or Out of PARK/Ignition
OFF/Driver Door Open

Auto Headlights

Light Sensitivity

Max/Mid/Low/Min

Wiper Link

ON/OFF

Welcome Lighting

Approaching Time Set

30 seconds – 90 seconds, OFF

Leaving Time Set

30 seconds – 90 seconds, OFF

Default Settings

OK To Reset?

Yes/No

*1: The setting menu is available only for models with “keyless access with push-button start system”.
*2: The setting can only be changed for the “keyless access” entry function. For details, refer to “Door unlock selection function” F2-18.
*3: For Outback only

– CONTINUED –

Instruments and controls/Combination meter display

3-45

3

(204,1)

北米Model "A2550BE-A" EDITED: 2018/ 5/ 9

!

Clock

This menu can be used to set the clock
settings.

!

Display Format

Set to 12-hour or 24-hour display.

!

Adjust Time (if not set automati-
cally)

Set the time.

!

Screen Settings

After entering the “Screen Settings” menu,
select one of the following menus.

!

Welcome Screen

The welcome screen can be activated or
deactivated. Select “On (with Sound)” to
activate the screen and sound. Select “On
(without Sound)” to activate the screen
and deactivate the sound. Select “Off” to
deactivate the screen.

!

Good-bye Screen

The Good-bye screen can be activated or
deactivated. Select “On” to activate the
screen. Select “Off” to deactivate the
screen.

!

Gauge Initial Movement

The movement of the meter needles and
gauge needles that occurs when the
ignition switch is turned to the “ON”

position can be activated or deactivated.
Select “On” to activate. Select “Off” to
deactivate.

!

Units

You can select the displayed units of the
distance, vehicle speed and volume. Op-
erate the “

” or “

” switch on the steering

wheel to display the preferred units. Then
pull the “

/SET” switch to select the

displayed units.

!

Tire Pressure Unit (if equipped)

Change the units displayed in the Tire
Pressure Monitoring system.

!

Languages

Operate the “

” or “

” switch on the

steering wheel to display the preferred
language. Then pull the “

/SET” switch to

select the displayed language.

!

SRH (if equipped)

The Steering Responsive Headlight (SRH)
can be set to on or off.

!

EyeSight (models with EyeSight
system)

NOTE

For models with the EyeSight system,
refer to the Owner’s Manual supple-
ment for the EyeSight system.

!

BSD/RCTA (if equipped)

After entering the “BSD/RCTA” menu,
select the “Warning Volume” menu. You
can set the volume of the warning buzzer
for RCTA (Rear Cross Traffic Alert). You
can select “Max”, “Mid” or “Min”.

!

RAB (if equipped)

After entering the “RAB” menu, select one
of the following menus.

NOTE

For models with RAB (Reverse Auto-
matic Braking) system, refer to “Re-
verse Automatic Braking System” 
F7-
59.

!

Warning Volume

The volume of the warning buzzer that
sounds when the RAB (Reverse Auto-
matic Braking) system is in operation can
be set in 3 stages (“Max”, “Mid” and “Min”).

!

Sonar Audible Alarm

When the RAB (Reverse Automatic Brak-
ing) system is in operation, the buzzer that
sounds if an obstacle is detected in the
rear or if detection is not possible can be
activated or deactivated. Select “On” to
activate the buzzer. Select “Off” to deac-
tivate the buzzer.

Instruments and controls/Combination meter display

3-46

(205,1)

北米Model "A2550BE-A" EDITED: 2018/ 5/ 9

!

Vehicle Setting

After entering the “Vehicle Setting” menu,
select one of the following menus.

!

Keyless Entry System

After entering the “Keyless Entry System”
menu, select one of the following menus.
.

Audible Signal (models with “key-

less access with push-button start
system”):
The audible signal can be activated or
deactivated. Select “On” to activate. Select
“Off” to deactivate.

.

Hazard Warning Flasher:

The hazard warning flasher operation can
be activated or deactivated. Select “On” to
activate. Select “Off” to deactivate.

.

Driver Door Unlock (models with

“keyless access with push-button start
system”):
The door unlock selection function is
available for the “keyless access” entry
function. For details, refer to “Door unlock
selection function” F2-18. 
On this setting
menu, the door unlock selection function
for the driver’s door can be customized.
Select “Driver Door Only” to set as
“Operational”. Select “All” to set as “Non-
operational”.

.

Rear Gate Unlock (Outback with

“keyless access with push-button start
system”):
The door unlock selection function is
available for the “keyless access” entry
function. For details, refer to “Door unlock
selection function” F2-18. 
On this setting
menu, the door unlock selection function
for the rear gate can be customized. Select
“Rear Gate/Trunk Only” to set as “Opera-
tional”. Select “All” to set as “Non-opera-
tional”.

!

Defogger

The defogger and deicer system can be
set for the continuous operation mode or
automatic shut-off mode. Select “Contin-
uous” to select the continuous operation
mode. Select “15 minutes” to select the
automatic shut-off mode.

!

Interior Light

The setting for the period of time in which
the interior lights remain on (OFF delay
timer) after closing the doors and/or the
rear gate can be set or customized. Select
the preferred seconds to customize the
operation period. Select “Off” to deactivate
the OFF delay timer.

!

Auto Door Lock and Unlock

Setting conditions for Auto Door Lock and
Unlock
.

Auto Door Lock:

Set the condition of the following items to
lock the door automatically.

– Vehicle Speed: When the vehicle
speed reaches more than 12 mph (20
km/h).
– Shift Into or Out of PARK: When the
select lever is shifted into a position
other than the “P” position.
– Off: When the function is set to OFF.

.

Auto Door Unlock:

Set the conditions of the following items to
unlock the door automatically.

– Shift Into or Out of PARK: When the
select lever is shifted into the “P”
position.
– Ignition OFF: When the ignition
switch is turned to OFF.
– Driver Door Open: When the dri-
ver’s door is open.
– Off: When the function is set to OFF.

– CONTINUED –

Instruments and controls/Combination meter display

3-47

3

(206,1)

北米Model "A2550BE-A" EDITED: 2018/ 5/ 9

!

Auto Headlights

.

Light Sensitivity:

The operational sensitivity of the auto on/
off headlights can be set. You can select
“Max”, “Mid”, “Low” or “Min”.

.

Wiper Link:

The automatic headlight turn on function
that is linked with the wiper operation can
be activated or deactivated. Select “On” to
activate. Select “Off” to deactivate.

!

Welcome Lighting

After entering the “Welcome Lighting”
menu, select either of the following menus.
.

Approaching Time Set:

The setting for the period of time in which
the low beam headlights remain on when
approaching the vehicle can be set or
customized. Select the preferred seconds
to customize the operation period. Select
“Off” to deactivate the welcome lighting
function when approaching.

.

Leaving Time Set:

The setting for the period of time in which
the low beam headlights remain on when
exiting the vehicle can be set or custo-
mized. Select the preferred seconds to
customize the operation period. Select
“Off” to deactivate the welcome lighting
function when exiting.

!

Default Settings

Select “Yes” to use the menu screen to
restore customized settings to the factory
default settings. Select “No” to return to the
previous screen without restoring to the
factory default settings.

Light control switch

CAUTION

.

Use of any lights for a long period

of time while the engine is not
running can cause the battery to
discharge.

.

Before leaving the vehicle, make

sure that the light control switch
is turned to the off position. If the
vehicle is left unattended for a
long time with the light control
switch set to a position other
than the off position, the battery
may be discharged.

Models with “keyless access with
push-button start system”:
The light control switch operates when the
push-button ignition switch is in the “ACC”
or “ON” position.
Regardless of the position of the light
control switch, the illuminated lights are
turned off when the push-button ignition
switch is turned off.

Models without “keyless access with
push-button start system”:
The light control switch operates when the
key is inserted in the ignition switch.

Instruments and controls/Light control switch

3-48

(207,1)

北米Model "A2550BE-A" EDITED: 2018/ 5/ 9

Regardless of the position of the light
control switch, the illuminated lights are
turned off when the key is removed from
the ignition switch.

NOTE

The light control switch can be oper-
ated (except auto on/off headlights),
even under the following conditions.
.

when the push-button ignition

switch is turned off (models with “key-
less access with push-button start
system”)
.

when the key is not inserted into the

ignition switch (models without “key-
less access with push-button start
system”)

If the driver’s door is opened while the
headlights are illuminated under such
conditions, a chirp sound will inform
the driver that the lights are illuminated.

&

Headlights

To turn on the headlights, turn the knob on
the end of the turn signal lever.

“ ” position:
The headlights are all off.

” position:

Instrument panel illumination, headlights,
parking lights, front side marker lights, rear
side marker lights, tail lights and license
plate lights are on.

” position:

Instrument panel illumination, parking
lights, front side marker lights, rear side
marker lights, tail lights and license plate
lights are on.

” position: auto on/off headlights

When the ignition switch is in the “ON”
position, the instrument panel illumination,
headlights, parking lights, front side mar-
ker lights, rear side marker lights, tail lights
and license plate lights are automatically
on or off 
depending on the level of the
ambient light.

The light sensitivity of the auto on/off
headlights can be changed by operating
the combination meter display. For details,
refer to “Auto Headlights” F3-48. Also, the
setting can be changed by a SUBARU
dealer. Consult your SUBARU dealer for
details.

!

Auto-on/off wiper-linked headlights

While the light control switch is in the
“AUTO” position, the headlights will auto-
matically turn on when the windshield
wipers operate several times. The head-
lights will automatically turn off when the
wipers stop.

The ON/OFF setting of this function can be
changed by operating the combination
meter display. For details, refer to “Auto
Headlights” F3-48. 
Also, the setting can
be changed by a SUBARU dealer. Consult
your SUBARU dealer for details.

– CONTINUED –

Instruments and controls/Light control switch

3-49

3

(208,1)

北米Model "A2550BE-A" EDITED: 2018/ 5/ 9

!

Welcome lighting function

The welcome lighting function turns on the
low beam headlight for smooth approach-
ing to or exiting from the vehicle at night or
in a dark place.

The function is activated while all of the
following conditions are met.
.

The light control switch is in the “AUTO”

position
.

It is dark enough to turn on the auto on/

off headlights

When approaching:
While the welcome lighting function is
activated, the low beam headlights will
automatically illuminate when unlocking
the doors (for Outback, including the rear
gate) by using the remote keyless entry
system.

The low beam headlights will remain
illuminated for 30 seconds

*1

and then turn

off. However, if any of the following
operations is done, the low beam head-
lights will turn off.
.

The doors are locked.

.

The light control switch is turned to a

position other than “AUTO”.
.

The ignition switch is turned to the “ON”

position.

When exiting:
While the welcome lighting function is
activated, the low beam headlights will
remain illuminated even when either of the
following operation is done.
.

The push-button ignition switch is

turned to the “OFF” status (models with
“keyless access with push-button start
system”)
.

The key is pulled out from the ignition

switch (models without “keyless access
with push-button start system”)

The low beam headlights will turn off under
any of the following conditions.
.

3 minutes have passed since the low

beam headlights were illuminated by the
welcome lighting function.
.

30 seconds have passed since the door

is opened and closed.

*1

.

The light control switch is turned to a

position other than “AUTO”.
.

The locking procedure is performed

twice. When performing the unlocking
procedure after performing the locking
procedure, perform the locking procedure
twice again.

*1: The setting for the period of time in which the
low beam headlights remain on by the welcome
lighting function can be changed by a SUBARU
dealer. Contact your SUBARU dealer for de-

tails. Also, you can change the setting by
operating the combination meter display. For
details, refer to “Welcome Lighting” F3-48. For
models with the genuine SUBARU navigation
system, you can change the setting by using the
navigation system. For details, refer to the
Owner’s Manual supplement for the navigation
system.

!

Sensor for the auto on/off head-
lights

The sensor is on the instrument panel as
shown in the illustration.

CAUTION

If any object is placed on or near the
sensor, the sensor may not detect
the level of the ambient light cor-
rectly and the auto on/off headlights

Instruments and controls/Light control switch

3-50

(209,1)

北米Model "A2550BE-A" EDITED: 2018/ 5/ 9

may not operate properly.

&

High/low beam change
(dimmer)

To change from low beam to high beam,
push the turn signal lever forward. When
the headlights are on high beam, the high
beam indicator light “

” on the combina-

tion meter is also on.
To switch back to low beam, pull the lever
back to the center position.

&

High beam assist function (if
equipped)

Type A
1)

Camera for high beam assist function

Type B
1)

Stereo camera for high beam assist

The high beam assist function automati-
cally changes the headlight between high
beam and low beam. When all of the
following conditions are met, the headlight
will change to high beam.
.

When the vehicle speed increases to or

above 20 mph (32 km/h).
.

There is no preceding vehicle.

.

The forward area of the vehicle is dark.

.

The road does not have a sharp curve.

When any of the following conditions is
met, the headlight will change to low beam.
.

When the vehicle speed decreases to

or below 10 mph (16 km/h).
.

When the forward area of the vehicle is

bright.
.

When there is a preceding or oncoming

vehicle.
.

When the EyeSight system is malfunc-

tioning or is temporarily stopped (Type B).

NOTE

.

The factory setting (default setting)

for this function is set as “operational”.
This setting can be changed to OFF
(non-operation) at SUBARU dealers.
For more details, contact a SUBARU
dealer.
.

Do not overestimate the capacity of

the high beam assist function. The
driver always has the responsibility to

– CONTINUED –

Instruments and controls/Light control switch

3-51

3

(210,1)

北米Model "A2550BE-A" EDITED: 2018/ 5/ 9

understand the surrounding situation,
to drive safely, and to change the
headlight mode manually if necessary.
Type A:
.

Observe the following points in

order to operate the high beam assist
function properly.

– Do not touch the camera or the
lens.
– Do not apply any strong impact to
the camera or the inside mirror.
– Do not disassemble the camera
or inside mirror.
– Do not spill liquid on the inside
mirror and camera.
– Do not place any objects over the
dashboard.
– Do not carry excessive luggage.
– Do not modify the vehicle.
– When replacing the windshield
glass, use the genuine SUBARU
parts (or equivalent products).

Type B:
.

The high beam assist function uti-

lizes the stereo camera installed at the
position of the front map lights.
.

For details on how to handle the

stereo camera, refer to the Owner’s
Manual supplement for the EyeSight
system.

NOTE

Observe the following points in order to
operate the high beam assist function
properly.
Type A:
.

Do not attach labels or stickers to

the windshield glass near the camera.
.

Do not attach any accessories near

the inside mirror and camera.

If it is necessary to attach a label,
sticker or accessory in the position
shown above, consult your SUBARU
dealer.
Type B:
For details, refer to the Owner’s Manual
supplement for the EyeSight system.

!

How to use the high beam assist
function

The high beam assist function will be
activated when all the following conditions
are met.
.

The light control switch is in the “AUTO”

position and the low beam headlights are
on automatically.
.

The turn signal lever is pushed forward.

High beam assist indicator (green)

When the high beam assist function is
activated, the high beam assist indicator
on the combination meter will illuminate.

Instruments and controls/Light control switch

3-52

(211,1)

北米Model "A2550BE-A" EDITED: 2018/ 5/ 9

!

Malfunction of the high beam assist
function

If the high beam assist function is mal-
functioning or is temporarily stopped, the
headlight will be fixed at low beam.

High beam assist warning indicator (yel-
low)

When the high beam assist function
malfunctions, the high beam assist warn-
ing indicator on the combination meter will
appear. In this case, have your vehicle
inspected by your SUBARU dealer.

!

Temporary stop of high beam assist
function

If the high beam assist function stops
temporarily due to poor visibility or abnor-
mal temperature, the message appears on
the combination meter. Once the condi-

tions have been remedied, drive the
vehicle for a while to restore the system.

NOTE

Even when the operation conditions of
the high beam assist function are met,
there may be a case in which the high
beam assist indicator does not illumi-
nate.
Type A:
In this case, turn the ignition switch to
the “LOCK”/“OFF” position and then to
the “ON” position again. Check if the
high beam assist indicator illuminates.
If the indicator does not illuminate,
have the vehicle inspected at a
SUBARU dealer.
Type B:

For details, refer to the Owner’s Manual

supplement for the EyeSight system.

!

How to temporarily lower the sensi-
tivity of the high beam assist func-
tion

The sensitivity of the high beam assist
function can be lowered by using the
following operations.
Type A:
1. Turn the ignition switch to the “ON”
position.

1)

Automatic dimming on/off button

2. Press and hold the automatic dimming
on/off button for 15 to 20 seconds.

When the sensitivity of the high beam
assist function is lowered, the LED indi-
cator on the automatic dimming on/off
button will flash.

NOTE

.

The sensitivity of the high beam

assist function cannot be lowered while
driving.
.

You can resume the sensitivity of the

high beam assist function by using
either of the following operations.

– Turn the ignition switch to the
“LOCK”/“OFF” position and then
start the engine.

– CONTINUED –

Instruments and controls/Light control switch

3-53

3

(212,1)

北米Model "A2550BE-A" EDITED: 2018/ 5/ 9

– Press and hold the automatic
dimming on/off button for 15 to 20
seconds again.

Type B:
1. Before turning the ignition switch to the
“ON” position, set the light control switch to
the “AUTO” position and push the signal
lever forward (high beam position).
2. Turn the ignition switch to the “ON”
position and within approximately 15 sec-
onds, press the “

/

” (following distance

setting) switch more than 10 times con-
secutively.

When the sensitivity of the high beam
assist function is lowered, the high beam
assist indicator light “

” (yellow) on the

combination meter will flash.

NOTE

.

The sensitivity of the high beam

assist function cannot be lowered in
the following conditions.

– Cruise control or Adaptive Cruise
Control is in operation
– The EyeSight warning indicator
(yellow) is illuminated

.

The sensitivity of the high beam

assist function returns to normal level
the next time the ignition switch is
turned to the “LOCK”/“OFF” position
and the engine is restarted.

!

How to change the headlight mode
manually

Change to the low beam:
When you return the turn signal lever to the
center position, the high beam assist
function will turn off and the high beam
assist indicator will turn off.

Change to the high beam:
When you turn the light control switch to
the “

” position, the headlight mode will

be changed to the high beam.
At this time, the high beam assist function
will turn off, the high beam assist indicator
will turn off and the high beam indicator
light will turn on.

NOTE

.

After manually changing the head-

light mode to the high beam, if you turn
on the high beam assist function,
return the light control switch to the
“AUTO” position.
.

When manually changing the head-

light mode to the high beam, if you turn
the light control switch to the “

position, the parking lights, front side

marker lights, rear side marker lights,
tail lights and license plate lights will
turn on.

!

Tips for the high beam assist sys-
tem

.

The high beam assist function recog-

nizes the condition surrounding the vehicle
based on the brightness of illumination
ahead of your vehicle, etc. Therefore, the
headlight mode may switch in some
situations that do not match to the driver’s
sense.
.

A bicycle or cargo cycle may not be

detected.
.

Under the following situations, the

brightness of ambient illumination may
not be detected correctly and the high
beam assist function may not work prop-
erly. As a result, the glare of the high beam
may disturb the oncoming vehicle or
vehicle ahead. Also, the low beam mode
may continue although there are no
oncoming vehicles and vehicles ahead.
In the such cases, change the headlight
mode manually.

– In bad weather (fog, snow, sand
storm, heavy rain, etc.).
– When the windshield glass is dirty or
fogged.
– When the windshield is cracked or
damaged.

Instruments and controls/Light control switch

3-54

(213,1)

北米Model "A2550BE-A" EDITED: 2018/ 5/ 9

– If there are lights similar to the
headlights or the tail lights in the
surrounding area.
– When an oncoming vehicle or ve-
hicle ahead is driven without its head-
lights and tail lights on.
– If the headlights of an oncoming
vehicle or the tail lights of a vehicle
ahead are dirty or discolored, or if the
light beams are not aimed correctly.
– When a rapid change of brightness
continues while driving.
– When driving on a road with many
ups and downs or uneven surfaces.
– When driving on a road with many
curves.
– When there are some objects that
reflect light strongly, such as a road
sign or a mirror in vehicle ahead.
– When the rear part of the vehicle
ahead, such as a container, reflects
light strongly.
– When the headlights of your vehicle
are damaged or dirty.
– When your vehicle is tilted, such as
in case the vehicle has a flat tire or is
being towed.
– When the inside mirror or the
camera is deformed or dirty (Type A).
– When the stereo camera is de-
formed or the stereo camera lenses
are dirty (Type B).

– Immediately after the engine has
started (Type B).

.

In the following conditions, the head-

light mode will not be automatically chan-
ged from the high beam to the low beam.

– When your vehicle passes an on-
coming vehicle suddenly in a blind
curve.
– When another vehicle passes in
front of your vehicle.
– When an oncoming vehicle or ve-
hicle ahead comes in and out of view
because of continuous curves, median
strips, roadside trees, etc.

.

If the camera (Type A)/stereo camera

(Type B) detects the light of the front fog
lights of an oncoming vehicle, the head-
light mode may change from the high
beam to the low beam automatically.
.

The headlight mode may change from

the high beam to the low beam, or the low
beam mode may continue, when affected
by a street light, traffic signal, illumination
of an advertisement board, or a reflective
object such as a road sign and signboard.
.

The timing of the change of headlight

mode may differ due to the following
factors.

Type A:
– the vehicle condition (e.g., number
of passengers or weight of loaded
cargo).

– surrounding situation (e.g., move-
ment and direction of an oncoming
vehicle or vehicle ahead).
– detection limitations of the camera
angle.
Type B:
– Color or brightness of the headlights
of an oncoming vehicle or the tail lights
of a vehicle ahead.
– The headlights of the oncoming
vehicle or the tail lights of the vehicle
ahead are covered with mud, snow,
etc.
– Movement and direction of an on-
coming vehicle or a vehicle ahead.
– When the headlights of an oncom-
ing vehicle or the tail lights of a vehicle
ahead illuminate on only one side.
– When the oncoming vehicle or
vehicle ahead is a motorcycle.
– Conditions of a road (slope, curve,
road surface, etc.).
– Number of passengers and weight
of loaded cargo.
– Limitation of the detection ability of
the stereo camera.

– CONTINUED –

Instruments and controls/Light control switch

3-55

3

(214,1)

北米Model "A2550BE-A" EDITED: 2018/ 5/ 9

&

Headlight flasher

CAUTION

Do not hold the lever in the flashing
position for more than just a few
seconds.

To flash the headlights, pull the lever
toward you and then release it. The high
beam will stay on for as long as you hold
the lever. The headlight flasher works even
though the lighting switch is in the off
position.

When the headlights are on high beam, the
high beam indicator light “

” on the

combination meter also illuminates.

&

Daytime running light system

WARNING

The brightness of the illumination of
the high beam headlights is reduced
by the daytime running light system.
The light switch must always be
turned to the “

” position when it

is dark outside.

The high beam headlights will automati-
cally illuminate at reduced brightness
when the engine has started, under the
following conditions.
.

The parking brake is fully released.

.

The light switch is in the off or “

position.
.

The light switch is in the “AUTO”

position and the headlights do not turn on
automatically.
.

The select lever is in a position other

than the “P” position.

NOTE

.

When the light switch is in the “

position, the front side marker lights,
tail lights and license plate lights are
illuminated.
.

While the turn signal is flashing, the

high beam headlight on the side which
the turn signal is flashing turns off.

.

While the hazard warning flasher is

on, the high beam headlights turn off.

Instruments and controls/Light control switch

3-56

(215,1)

北米Model "A2550BE-A" EDITED: 2018/ 5/ 9

Steering Responsive Head-
light (SRH) (if equipped)

1)

The target area of illumination when SRH
is activated

2)

The target area of illumination when SRH
is not activated

SRH is a function that automatically moves
the headlight beam to the left or right in
accordance with the steering angle. This
function helps to improve the visibility at
night by illuminating the road ahead at
corners and intersections.
You can turn the SRH function on or off.
The settings can be changed by using the
combination meter display. For details,
refer to “SRH” F3-46.

1)

Warning screen

2)

SRH OFF indicator

The SRH OFF indicator on the combina-
tion meter turns off when SRH is turned on.
The SRH OFF indicator on the combina-
tion meter illuminates when SRH is turned
off.

If SRH is malfunctioning, the SRH OFF
indicator on the combination meter blinks
and a message appears on the warning
screen when the ignition switch is in the
“ON” position. It indicates that SRH has
been deactivated. Contact a SUBARU
dealer for an inspection.

NOTE

.

If you turn the ignition switch to the

“OFF” position with SRH turned off and

then start the engine again, SRH will
automatically turn on.
.

When you turn the ignition switch to

the “ON” position, the SRH OFF indi-
cator will illuminate and turn off after
several seconds.
.

SRH only activates when the vehicle

is traveling forward at the speed of
approximately 5 mph (8 km/h) or more.

Instruments and controls/Steering Responsive Headlight (SRH)

3-57

3

(216,1)

北米Model "A2550BE-A" EDITED: 2018/ 5/ 9

Headlight beam leveler
(models with LED headlights)

The LED headlights generate more light
than conventional halogen headlights.
Therefore a driver of an oncoming vehicle
may experience too much glare when your
headlight beam height adjustment is high
due to the vehicle carrying heavy load.
The automatic headlight beam leveler
adjusts the headlight beam height auto-
matically and optimally according to the
load being carried by the vehicle.

Turn signal lever

To activate the right turn signal, push the
turn signal lever up. To activate the left turn
signal, push the turn signal lever down.
When the turn is finished, the lever will
return automatically. If the lever does not
return after cornering, return the lever to
the neutral position by hand.

To signal a lane change, push the turn
signal lever up or down slightly and hold it
during the lane change. The turn signal
indicator lights will flash in the direction of
the turn or lane change. The lever will
return automatically to the neutral position
when you release it.

&

One-touch lane changer

To flash the turn signal and turn signal
indicator light three times, push the turn
signal lever up or down slightly and
immediately release it.

The operational/non-operational setting of
the one-touch lane changer’s can be
changed by a SUBARU dealer. Contact
the nearest SUBARU dealer for details.

Instruments and controls/Headlight beam leveler (models with LED headlights)

3-58

(217,1)

北米Model "A2550BE-A" EDITED: 2018/ 5/ 9

Illumination brightness con-
trol

The illumination brightness of the instru-
ment panel dims under the following
conditions.
.

when the light switch is in the “

” or

” position

.

when the light switch is in the “AUTO”

position and the headlights illuminate
automatically

You can adjust the illumination brightness
for better visibility.
To brighten, turn the control dial upward.
To darken, turn the control dial downward.

NOTE

.

When the control dial is turned fully

upward, the illumination brightness
becomes the maximum and the auto-
matic dimming function does not work
at all.
.

The brightness setting is not can-

celed even when the ignition switch is
turned to the “LOCK”/“OFF” position.

&

Auto dimmer cancel function

When the ambient light is bright, the
illumination brightness is set to the max-
imum regardless of the position of the
control dial. In this case, you cannot adjust
the illumination brightness by using the
control dial. When the ambient light is dark,
you can dim the illumination brightness as
described above.

The operational/non-operational setting
and sensitivity of the auto dimmer cancel
function can be changed by your SUBARU
dealer. Contact your SUBARU dealer for
details.

Front fog light switch
(if equipped)

1)

Headlight switch

2)

Fog light switch

To turn on the front fog lights:
Turn the fog light switch to the “

” position

while the headlights are in either of the
following conditions.
.

while the headlight switch is in the “

position with the low beam mode selected
.

while the headlight switch is in the

“AUTO” position and the low beam head-
lights turn on automatically

To turn off the front fog lights:
Turn the fog light switch back down to the
“ ” position.

– CONTINUED –

Instruments and controls/Illumination brightness control

3-59

3


Content   ..  11  12  13  14   ..