Subaru Impreza 3 / Impreza WRX / Impreza WRX STI. Manual - part 673


  Index      Subaru     Subaru Impreza 3 / Impreza WRX / Impreza WRX STI - service repair manual 2008-2014 year


Search            


Content   ..  671  672  673  674   ..


Subaru Impreza 3 / Impreza WRX / Impreza WRX STI. Manual - part 673


LI-15

Headlight Assembly

LIGHTING SYSTEM

12.Headlight Assembly
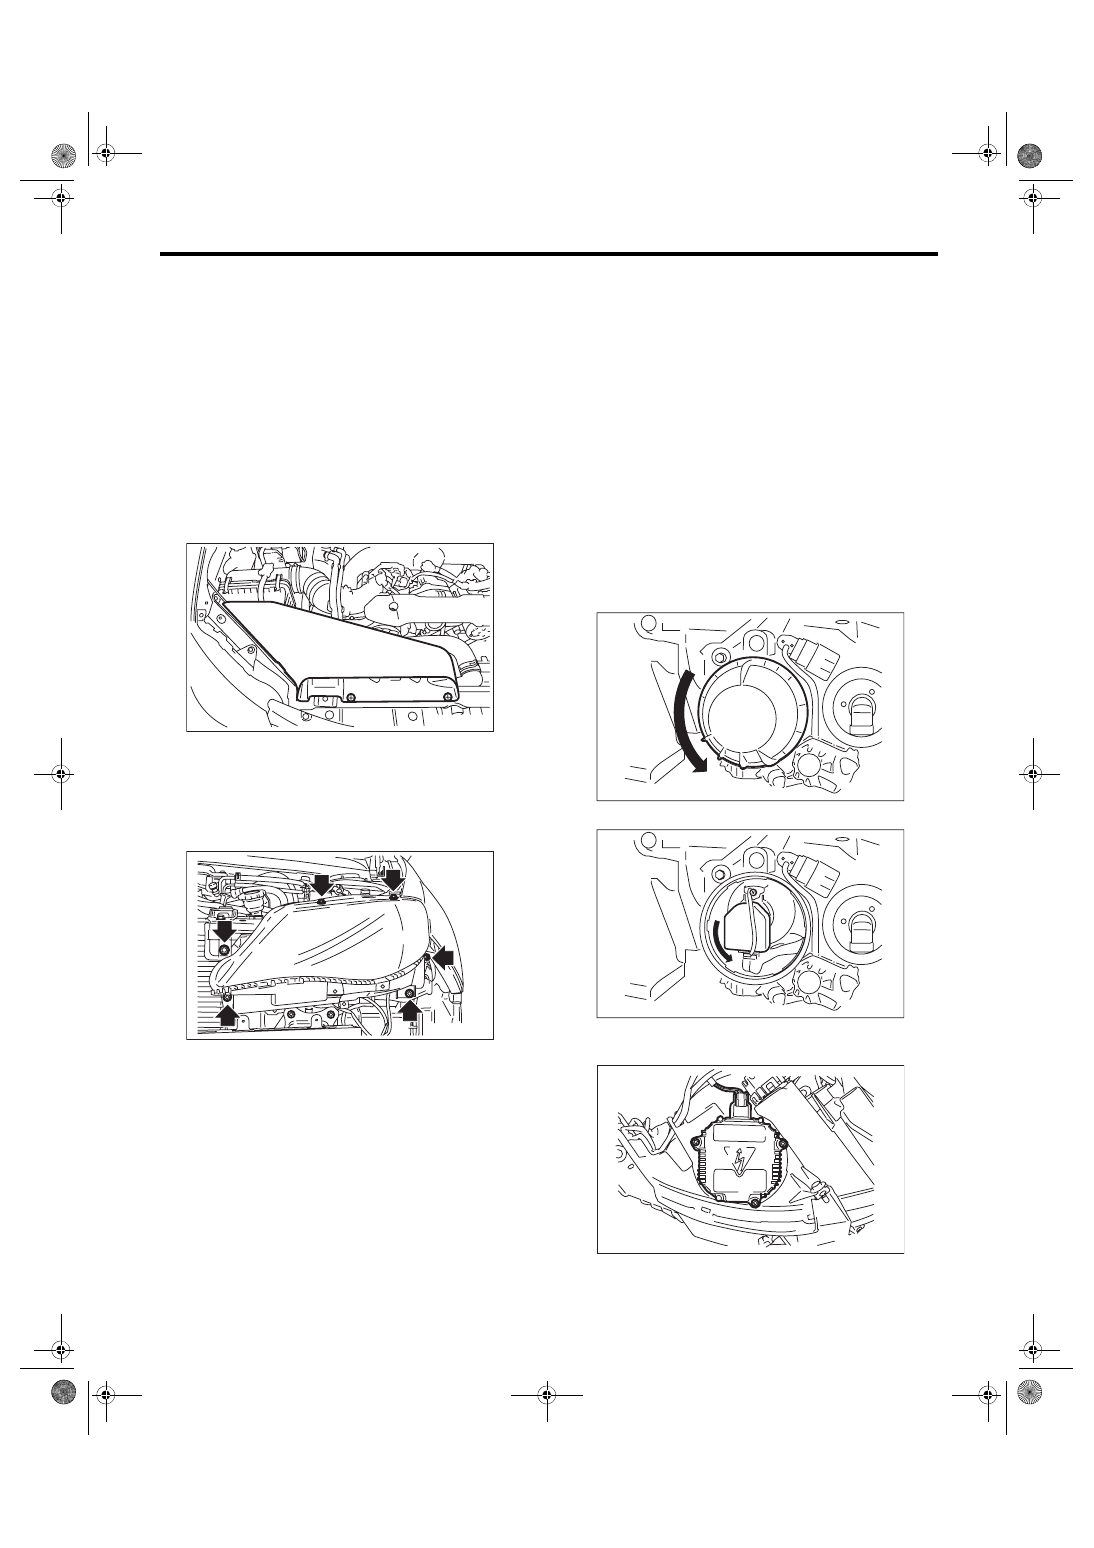
A: REMOVAL

WARNING:

Because the headlight system uses high volt-

age,  be  careful  not  to  perform  work  with  wet

hands. There is a possibility of electrical shock.
CAUTION:

The HID headlight uses very high voltages for

the lighting circuit. Make sure that the power is

turned OFF before working.

1) Disconnect the ground cable from battery.

2) Remove the clips and remove the air intake duct.

(When removing the headlight RH)

3) Remove the front bumper face. <Ref. to EI-31,

FRONT  BUMPER  FACE,  REMOVAL,  Front

Bumper.>

4) Disconnect harness connectors.

5) Remove  the  bolts  and  clips,  and  remove  the

headlight assembly.

B: INSTALLATION

1) Install each part in the reverse order of removal.
Tightening torque:

7.5 N·m (0.76 kgf-m, 5.5 ft-lb)

2) Adjust the headlight beam and fog light beam.

• Adjust  the  headlight  beam.  <Ref.  to  LI-16,

HEADLIGHT  BEAM  ADJUSTMENT,  ADJUST-

MENT, Headlight Assembly.>

• Adjust the fog light beam. (Model with fog light)

<Ref.  to  LI-21,  FOG  LIGHT  AIMING,  ADJUST-

MENT, Front Fog Light Assembly.>

C: DISASSEMBLY

1. HID HEADLIGHT BALLAST

WARNING:

Because the headlight system uses high volt-

age,  be  careful  not  to  perform  work  with  wet

hands. There is a possibility of electrical shock.
CAUTION:

• The HID headlight uses very high voltages for

the lighting circuit. Make sure that the power is

turned OFF before working.

• Do not leave the headlight without the ballast

for a long time. Dust, moisture, etc. entering the

headlight may affect its performance.

1) Disconnect the ground cable from battery.

2) Remove the headlight assembly. <Ref. to LI-15,

REMOVAL, Headlight Assembly.>

3) Remove the back cover.

4) Disconnect the bulb connector.

5) Remove  the  harness  connector  and  screws  to

pull out the ballast.

IN-02274

LI-00801

LI-00802

LI-00803

LI-00804

LI-16

Headlight Assembly

LIGHTING SYSTEM

6) Remove the harness connector and screws on

the back to remove the headlight ballast.

D: ASSEMBLY

1. HID HEADLIGHT BALLAST

CAUTION:

• When installing the ballast cover, be sure to

install the gasket.

• After installing the ballast to the vehicle, be

sure to perform beam adjustment.

Assemble each part in the reverse order of disas-

sembly.
Tightening torque:

1.3 N·m (0.13 kgf-m, 0.96 ft-lb)

NOTE:

Adjust the projector lens to near the center of the

extension opening before installing the ballast. This

makes the beam adjustment work easier.

E: ADJUSTMENT

1. HEADLIGHT BEAM ADJUSTMENT

CAUTION:

Turn off the light before adjusting the headlight

beam  level.  If  it  is  necessary  to  inspect  the

beam level, do not keep the light on for two min-

utes or more.

1) Before  checking  the  headlight  beam  level,  be

sure of the following:

• The area around the headlight has not sustained

any scratches, damage or other type of deforma-

tion.

• Vehicle is parked on a level surface.

• The inflation pressure of tires is correct.

• Vehicle’s fuel tank is fully filled.

2) For vehicle with a manual leveler, set the head-

light beam leveler switch to the “0” position.

3) Bounce  the  vehicle  several  times  to  normalize

the suspension.

4) Make certain that someone is seated in the driv-

er’s seat.

5) Measure  the  distance  between  the  low  beam

bulb centers and the height of the bulb center.

6) Turn the headlights on and then adjust the low

beam pattern.

(1) Adjust the vertical beam level (A).

(2) Adjust the horizontal beam level (B).

LI-00805

(A) Vehicle center
(B) Bulb center marking

(C) 3 m (10 ft)
(D) Height of headlight center

W mm (in)

h mm (in) at 3 m (10 ft)

1,160 (45.67)

30 (1.18)

LI-00806

(B)

(A)

LI-00941

W

W2

W1

(A)

(C)

(B)

h

(D)

W1

W

W2

(A)

h

(D)

LI-17

Headlight Bulb

LIGHTING SYSTEM

13.Headlight Bulb

A: REMOVAL

1. HIGH BEAM & HALOGEN TYPE LOW 

BEAM

WARNING:

Because the headlight system uses high volt-

age,  be  careful  not  to  perform  work  with  wet

hands. There is a possibility of electrical shock.
CAUTION:

• Because the halogen bulb operates at a high

temperature, dirt and oil on the bulb surface re-

duces  the  bulb’s  service  life.  Hold  the  flange

portion  when  replacing  the  bulb.  Never  touch

the glass portion.

• Do not leave the headlight without a bulb for

a  long  time.  Dust,  moisture,  etc.  entering  the

headlight may affect its performance.

1) Disconnect the ground cable from battery.

2) Remove the clips and remove the air intake duct.

(When removing the headlight bulb RH)

3) Remove the battery cover. (When removing the

headlight bulb LH)

4) Tilt the washer tank filler neck. (When removing

the headlight bulb LH)

5) Disconnect the bulb connector.

6) Remove the bulb assembly (A) then remove the

high beam. To remove the low beam, remove the

back cover (B), and then go to step 7.

7) Remove the bulb connector and retaining spring

(A), and remove the bulb.

2. HID TYPE LOW BEAM

WARNING:

Because the headlight system uses high volt-

age,  be  careful  not  to  perform  work  with  wet

hands. There is a possibility of electrical shock.
CAUTION:

• Because  the  HID  lighting  circuit  uses  high

voltage, be sure to confirm that the power sup-

ply is turned off before operation.

• When replacing bulb, hold the flange area. Be

careful not to touch the glass area.

• Do not leave the headlight without a bulb for

a  long  time.  Dust,  moisture,  etc.  entering  the

headlight may affect its performance.

1) Disconnect the ground cable from battery.

2) Remove the headlight assembly. <Ref. to LI-15,

REMOVAL, Headlight Assembly.>

3) Remove the back cover.

4) Disconnect the bulb connector.

IN-02274

LI-00807

(A)

(B)

LI-00808

(A)

LI-00802

LI-00803

LI-18

Headlight Bulb

LIGHTING SYSTEM

5) Remove the retaining spring of bulb, and remove

the bulb.

B: INSTALLATION

Install each part in the reverse order of removal.

C: INSPECTION

1. HALOGEN TYPE

WARNING:

Because the headlight system uses high volt-

age,  be  careful  not  to  perform  work  with  wet

hands. There is a possibility of electrical shock.
CAUTION:

• Because the halogen bulb operates at a high

temperature, dirt and oil on the bulb surface re-

duces  the  bulb’s  service  life.  Hold  the  flange

portion  when  replacing  the  bulb.  Never  touch

the glass portion.

• Do not leave the headlight without a bulb for

a  long  time.  Dust,  moisture,  etc.  entering  the

headlight may affect its performance.

1) Visually check the bulb for blow out.

2) Check  the  bulb  specification.  <Ref.  to  LI-2,

SPECIFICATION, General Description.>

3) Replace the bulb if it is found defective.

2. HID TYPE

WARNING:

Because the headlight system uses high volt-

age,  be  careful  not  to  perform  work  with  wet

hands. There is a possibility of electrical shock.
CAUTION:

• When lit (lighting switch is ON), do not touch

the  harness,  light  internals,  or  metal  parts  of

the light.

• When  performing  a  lighting  test,  make  sure

that  the  headlight  is  mounted  on  the  vehicle,

and the power supply is connected to the con-

nector on the vehicle’s side.

1) Check  the  bulb  specification.  <Ref.  to  LI-2,

SPECIFICATION, General Description.>

2) Install the factory HID bulb to check whether it

lights properly.

3) If it fails to illuminate normally, replace the bulb

with a new part.

4) Inspect the HID ballast.

Inspect the ballast in the following manner, and de-

termine whether or not to reuse.

(1) Perform cold starts (light the headlight after

turning  off  for  10  minutes  or  more),  and  hot

starts  (light  the  headlight  for  15  minutes  or

more, then turn off for 1 minute and relight) sev-

eral times, to make sure that the headlight lights

properly.

(2) Monitor  the  lighting  condition  right  after  a

cold start up to a stable state (approx. 5 min.), to

see if there are any unstable conditions such as

flickering.

(3) Install bulbs with the same number of oper-

ating hours on both headlights, and light for ap-

proximately  30  minutes.  Check  for  whether

there is a difference in brightness on the right

and left sides.

5) Replace the ballast if it is found defective.

LI-00809


Content   ..  671  672  673  674   ..