Subaru Legacy (2005 year). Manual - part 955
 

  Index      Subaru     Subaru Legacy - service repair manual 2005 year


Search            


Content   ..  953  954  955  956   ..


Subaru Legacy (2005 year). Manual - part 955


GW-27

GLASS/WINDOWS/MIRRORS

Windshield Glass

13.Windshield Glass

A: REMOVAL

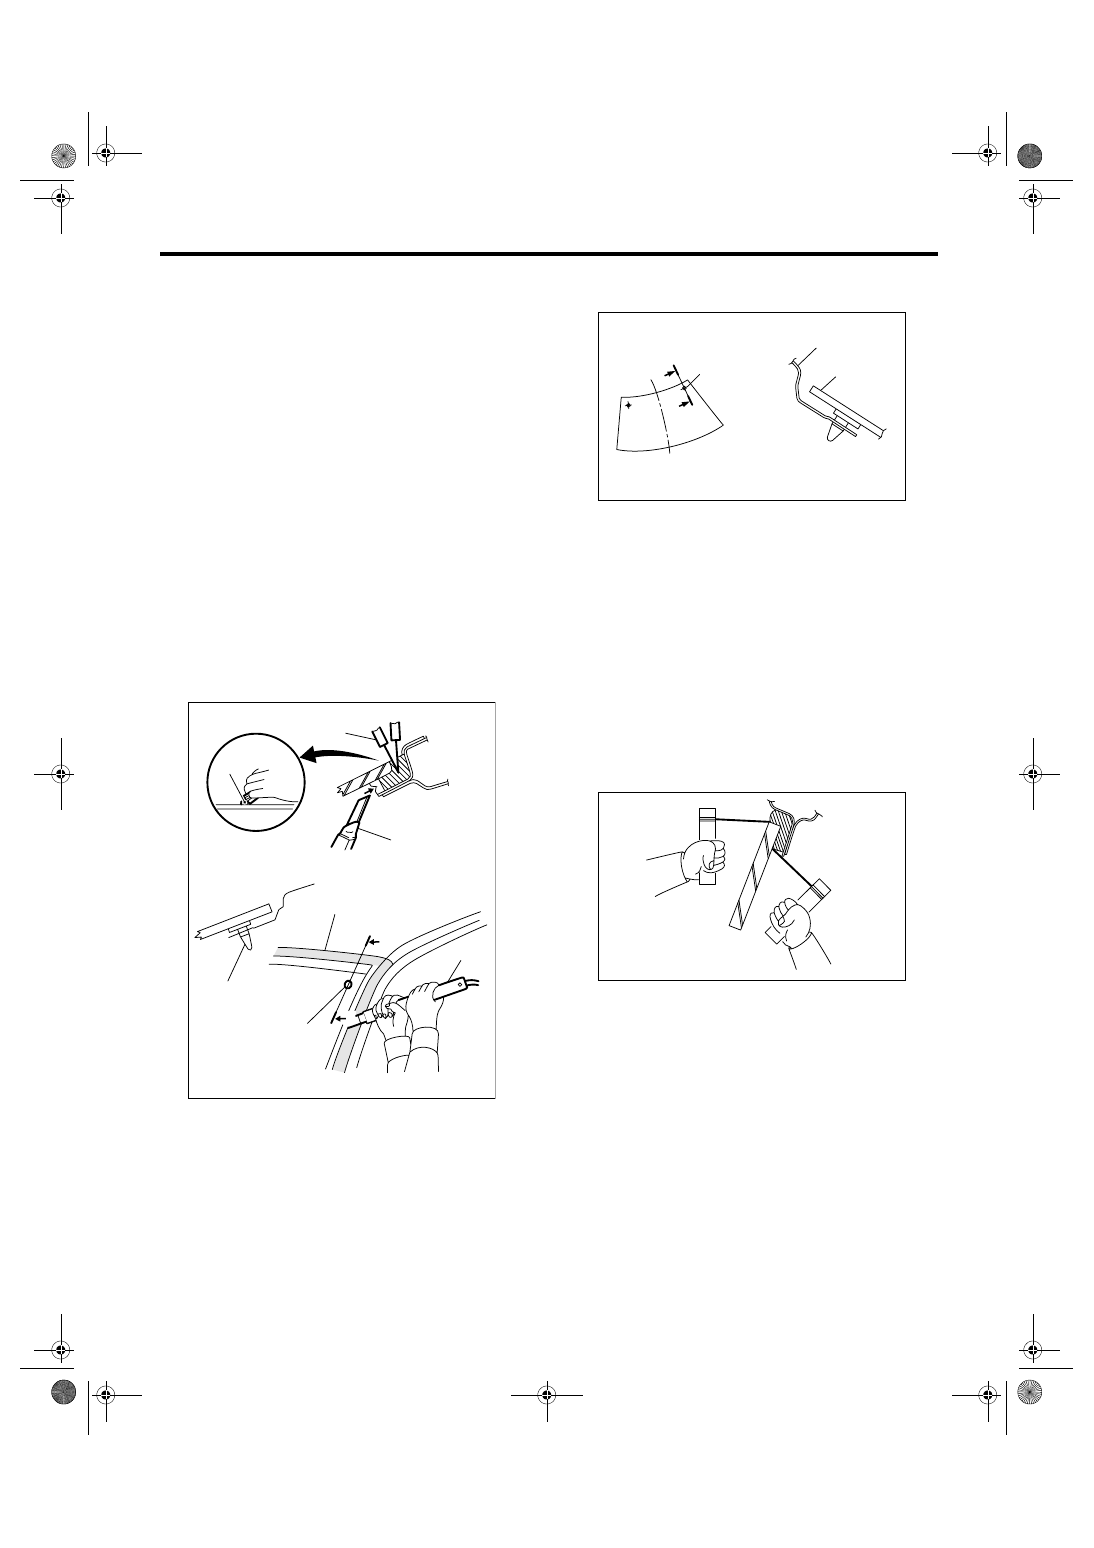
1. USING WINDSHIELD GLASS KNIFE

1) Remove the cowl panel. <Ref. to EI-39, RE-
MOVAL, Cowl Panel.>
2) Remove the glass molding.
3) Tape the circumference of windshield glass for
protection from the body side.
4) Apply sufficient amount of soapy water to the ad-
hesive part.
5) Insert the windshield glass knife into adhesive
part.
6) Holding the knife edge and windshield glass
edge at a right angle, cut in the adhesive part with
the windshield glass knife in the way to move par-
allel to the windshield glass edge along the face
and edge of windshield glass.

NOTE:
• Do not twist the windshield glass knife.
• Cutting of adhesive part shall be started with wid-
er gap between windshield glass and body.

• The locating pins are bonded to the corners of
glass. Use piano wire to disconnect the pins. 

2. USING PIANO WIRE

1) Remove the cowl panel. <Ref. to EI-39, RE-
MOVAL, Cowl Panel.>
2) Remove the molding.
3) Tape the circumference of windshield glass for
protection from the body side.
4) Make a hole in the adhesive part using drill or
knife.
5) Pass the piano wire through the hole, and attach
both the wire ends securely to pieces of wood.

6) Pull the wire ends alternately to cut off the adhe-
sive part.

CAUTION:
• Do not tightly pull the piano wire against the
windshield glass edge.
• Be careful not to damage the interior and ex-
terior parts.
• When removal is made for the area close to
instrument panel, place a protection plate over
it. Pay particular attention to the removal.
• Do not cross piano wires. Otherwise they
may be cut.

(1) Windshield glass knife

(2) Tape for protection

(3) Locating pin

GW-00410

(1)

(1)

(1)

(3)

(3)

(2)

(1)

A

A-A

A

(1) Locating pin

(2) Body panel

(3) Windshield glass

(1)

(2)

(3)

A

A

GW-00070

A-A

GW-00039

GW-28

GLASS/WINDOWS/MIRRORS

Windshield Glass

B: INSTALLATION

1) Clean the external circumference of windshield
glass with alcohol or white gasoline.
2) Remove the adhesive layer on the body using
cutter knife to obtain a smooth face of 2 mm (0.08
in) thick.

CAUTION:
Be careful not to damage the body and paint 
surface. 

3) Clean the body with alcohol or white gasoline to
eliminate cutting powder, dust and dirt completely
from body.
4) Install the dam rubber.
5) Fit the mark (B) on molding to the notch (A) of
glass side, and install the molding to entire perime-
ter of glass.

6) Apply two types of primers to the adhesive layer
of glass using sponge.

Glass primer:

Dow Automotive’s
Betawipe VP 04604
Betaprime 5001

7) Apply primer to the adhesive layer of body.

Painted surface primer:

Dow Automotive’s
Betaprime 5402

NOTE:
• Primer once attached to the painted surface of
the body and internal trim is hard to wipe off. Mask
the circumference of such area.
• Let primer dry for about ten minutes before in-
stalling glass.
• Do not touch the surface coated with primer.

8) Cut off the cartridge nozzle tip as shown and set
it in sealant gun.

(1) Adhesive

(2) 2 mm (0.08 in)

(3) Dam rubber

(4) Glass

(4)

(2)

(1)

(3)

GW-00071

GW-00316

(A)

(B)

(1) Primer application surface

(2) Glass side

(3) Body side

(1) 10 mm (0.39 in)

(2) 15 mm (0.59 in)

(3)

(2)

(1)

GW-00073

(1)

(2)

GW-00238

GW-29

GLASS/WINDOWS/MIRRORS

Windshield Glass

9) Apply adhesive to the glass end surface as
shown.

Adhesive:

Dow Automotive’s
Gurit-ESSEX Betaseal 1502 or equivalent

10) Fit the locating pins using suction rubber cup to
install windshield glass.

11) Lightly press the windshield glass for tight fit.
12) Make flush the adhesive surface jutted out us-
ing spatula.
13) After completion of all work, allow the vehicle to
stand for about 24 hours.

NOTE:
• When the door is opened/closed after glass
bonded, always lower the door glass and then
open/close it carefully.
• Move the vehicle slowly.
• For minimum time for drying after bonding and
leaving vehicle before driving, follow instructions or
instruction manual from the manufacturer of adhe-
sive. 
14) After curing of adhesive, pour water on the ex-
ternal surface of vehicle to check that there are no
water leaks.

NOTE:
When returning the vehicle to the owner, tell him or
her that the vehicle should not be subjected to
heavy impact for at least three days. 
15) Install the cowl panel. <Ref. to EI-39, INSTAL-
LATION, Cowl Panel.>

(1) 9 — 12 mm (0.35 — 0.47 in)

(1)

GW-00239

GW-00045

GW-30

GLASS/WINDOWS/MIRRORS

Rear Gate Glass

14.Rear Gate Glass

A: REMOVAL

1) Remove the rear wiper motor. <Ref. to WW-22,
REMOVAL, Rear Wiper Motor.>
2) Disconnect the connectors from rear defogger
terminal.
3) Remove the glass in the same procedure for
windshield glass. <Ref. to GW-27, REMOVAL,
Windshield Glass.>

B: INSTALLATION

1) Apply adhesive in the same procedure for wind-
shield glass. <Ref. to GW-28, INSTALLATION,
Windshield Glass.>
2) Insert the glass clip pin into rear gate hole, push
on the area around the clip pin to secure it, and
then push lightly all around the area to seal it.
3) About one hour after installation, conduct a leak
test.

4) After completion of all work, allow the vehicle to
stand for about 24 hours.

NOTE:
• When the door is opened/closed after glass
bonded, always lower the door glass and then
open/close it carefully.
• Move the vehicle slowly.
• For minimum time for drying after bonding and
leaving vehicle before driving, follow instructions or
instruction manual from the manufacturer of adhe-
sive. 
• When returning the vehicle to the owner, tell him
or her that the vehicle should not be subjected to
heavy impact for at least three days. 
5) Connect the rear defogger terminals.
6) Install the rear wiper. <Ref. to WW-22, INSTAL-
LATION, Rear Wiper Motor.>

(1) Upside

(2) Molding

(3) Glass

(4) Adhesive

(5) Downside

(6) Glass

(7) Molding

(8) Adhesive

(1)

(5)

(4)

(8)

(2)

(3)

(7)

(6)

GW-00240


Content   ..  953  954  955  956   ..