Seat Toledo (2019 year). Manual in english - page 16
 

  Index      Manuals     Seat Toledo (2019 year). Manual in english


Search            copyright infringement  


Content      ..     14      15      16      17     ..


Seat Toledo (2019 year). Manual in english - page 16


Checking and refilling levels

Window washer system

Topping up windscreen washer flu-
id

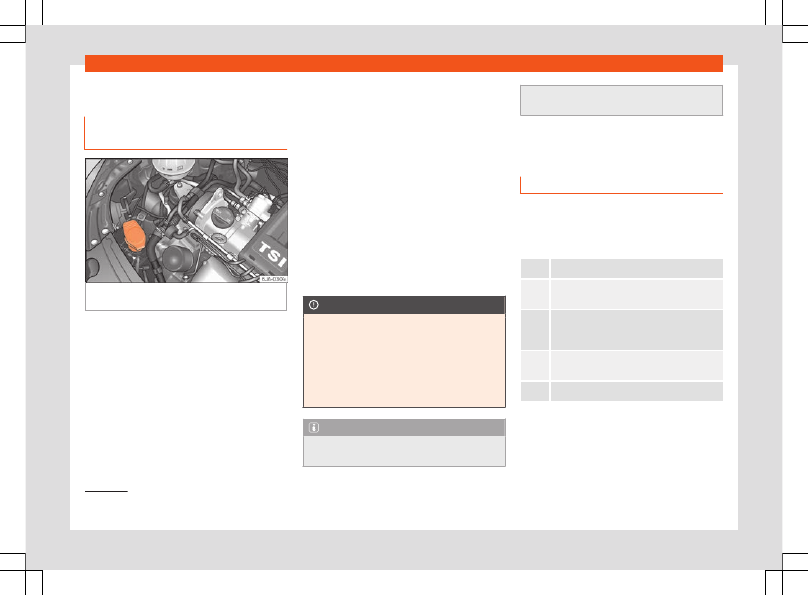
Fig. 247 

Engine compartment: windscreen

cleaning fluid tank.

Read the additional information carefully

››› 

page 44

The container for the windscreen washer
contains the cleaning fluid for the windscreen
or rear window and the headlight washer
system. The container is located in the engine
compartment.

The 

capacity

 of the reservoir is approximate-

ly 3.5 litres; in vehicles with a headlight wash-
er system, it is approximately 5.4 litres

1)

.

Plain water on its own is not enough to clean
the glass and the headlights properly. We
therefore recommend using clean water with
a glass cleaning product to eliminate any
stubborn dirt 

(with an anti-freeze additive

in winter)

.

Although your vehicle has heated windscreen
washer jets, anti-freeze should always be
added to the water in winter.

Ethanol can be used where glass cleaner
with anti-freeze is unavailable. The concen-
tration of ethanol must be no greater than 15
%. However, remember that anti-freeze in this
proportion only protects down to -5°C
(+23°F).

CAUTION

Never mix the windscreen washing water

with anti-freeze used for the cooling sys-
tem or other additives.

If the vehicle is equipped with a headlight

washer system, only mix in with the water a
detergent that does not damage polycar-
bonates.

Note

When topping up the fluid, do not move the
filter from the container opening, as this

could contaminate the fluid hoses and lead
to a windscreen washer malfunction.

Battery

Introduction

Read the additional information carefully

››› 

page 44

.

Warning symbols on the battery

Always wear safety glasses!

Battery acid is extremely corrosive. Always
wear gloves and hearing protection!

Keep open flames, sparks, uncovered lights

and lit cigarettes away when working on the

battery!

A highly explosive mixture of gases is re-
leased when the battery is under charge!

Keep children away from the battery!

Incorrect handling of the vehicle battery
could lead to damage. We therefore recom-
mend all work on the vehicle battery be per-
formed by an authorised SEAT dealer.

»

1)

Valid only for certain countries. 5.4 litres for

both versions.

251

Practical tips

Always be aware of the danger of injury and
scalding as well as the risk of accident or fire
when working on the battery and the electri-
cal system. Therefore, always observe the
warnings and follow all general safety pre-
cautions.

WARNING

Battery acid is very corrosive, therefore,

the battery must be handled with the ut-
most care. Wear protective gloves and pro-
tect your eyes and skin when handling bat-
teries. The corrosive fumes in the air irritate
and inflame the respiratory tract and cause
conjunctivitis. It corrodes tooth enamel.
Causes deep and difficult-to-heal wounds
when it comes in contact with the skin. Re-
peated contact with diluted acids causes
skin disease (inflammation, ulcers and fis-
sures). When in contact with water, acids
dilute and develop a great deal of heat.

Do not tilt the battery, as acid could leak

out of the vapour vents. Protect your eyes
with glasses or a protective helmet! Risk of
blindness! If acid should splash into the
eyes, rinse the affected eye immediately
for several minutes using clean water. Then
seek medical care immediately.

Neutralize any acid splashes on the skin

or clothing with soap solution as quickly as
possible and rinse off with plenty of water.
If acid is swallowed by mistake, consult a
doctor immediately.

Keep children away from the battery.

Hydrogen is released and a highly explo-

sive mixture of gases is generated when the
battery is under charge. Sparks when dis-
connecting or releasing cable terminals
with the ignition switched on could also
cause an explosion.

A short circuit is produced if the battery

terminals are bridged, e.g. using metal ob-
jects, cables, etc. Possible consequences
in the event of a short-circuit: melting of
lead plates, battery explosion and fire,
splashing acid.

The following is forbidden during work:

fire and open flames, smoking and activi-
ties that could produce sparks. Avoid caus-
ing sparks when handling cables or electri-
cal apparatus. Risk of injury in the event of
large sparks.

Before working on the electrical system,

you must switch off the engine, the ignition
and all electrical components and discon-
nect the cable from the negative terminal
(-) of the battery. To change a bulb, simply
switch off the corresponding light.

Never charge a frozen or thawed out bat-

tery. Risk of explosion and acid burns! Re-
place a frozen battery.

Never use the jump leads on batteries in

which the electrolyte level is too low. Risk
of explosion and acid burns!

Never use a damaged battery. Risk of ex-

plosion! Replace a damaged battery imme-
diately.

CAUTION

Never disconnect the battery when the

ignition is switched on, as the electrical
system (electronic components) of the ve-
hicle could be damaged. When discon-
necting the battery from the vehicle elec-
trical system, disconnect its negative ter-
minal (-) first. Only then may the positive
terminal (+) be disconnected.

When connecting the battery, first con-

nect the positive terminal (+) and then the
negative terminal (-). The battery cables
must never be connected to the wrong bat-
tery terminals. Risk of burning the electrical
installation!

Make sure the battery acid does not

come into contact with the bodywork. Risk
of paintwork damage.

Do not expose the battery to direct sun-

light to protect it from ultraviolet radiation.

If the vehicle is not used for 3 or 4 weeks,

the battery could run flat. This is because
some components use electricity even in
standby mode (e.g. control units). Prevent
the battery from running flat by discon-
necting its negative terminal or leave it
charging at a low current.

If you frequently use the vehicle for short

trips, the battery may not fully charge and
could run flat.

252

Checking and refilling levels

For the sake of the environment

A flat battery is particularly harmful waste
for the environment. It must therefore be
disposed of according to current local law.

Note

Replace a battery once it is older than 5
years.

Warning lamp

It lights up

Alternator fault.

The control lamp lights up when the ignition is
switched on. It should go out when the engine
has started running.

If the control lamp 

 lights up while driving,

the alternator is no longer charging the bat-
tery. You should immediately drive to the
nearest specialised workshop.

You should avoid using electrical equipment
that is not absolutely necessary because this
will drain the battery.

CAUTION

Additionally, if the warning lamp 

 lights

up while driving, the warning lamp 

 also

lights up (cooling system fault). Stop the

vehicle and switch off the engine – Risk of
engine damage!

Lifting the battery cover

Fig. 248 

Battery: opening the cover.

The battery is located beneath a plastic cov-
er in the engine compartment.

Open the battery cover in the direction indi-
cated by the arrow 

››› 

Fig. 248

.

The positive terminal (+) of the battery is
connected in reverse order.

Checking the battery electrolyte
level

Fig. 249 

Battery: electrolyte level indicator.

We recommend you have the acid level regu-
larly checked at an official technical service,
particularly in the following cases.

At high outside temperatures.

On long daily trips.

Whenever the vehicle is loaded

››› 

page 254, Charging the battery

.

In vehicles equipped with a battery with col-
our indicator, the so-called magic eye

››› 

Fig. 249

 changes colour to indicate the

acid level.

Air bubbles can influence the colour of the in-
dicator. Therefore, carefully knock the indica-
tor before checking the acid level.

Black – the acid level is correct.

»

253

Practical tips

Colourless or light yellow – acid level too

low, battery must be changed.

Note

The battery acid level is also regularly

checked during servicing at authorised
SEAT dealers.

The electrolyte level on “AGM” batteries

cannot be checked for technical reasons.

Vehicles equipped with the “Start-Stop”

system include a battery control unit to
control the battery level for repeated en-
gine starting.

Winter service

At low temperatures the battery provides only
a fraction of the starting power it has at nor-
mal temperatures.

A flat battery can also freeze at tempera-
tures slightly below 0°C (+32°F).

We therefore recommend you have the bat-
tery checked and, if necessary, charged at
an official SEAT technical service before the
start of winter.

Charging the battery

A fully-charged battery is essential for relia-
ble starting.

Switch off the ignition and all electrical
equipment.

Only in the case of “fast charge”: discon-
nect both battery connection cables (first
the “negative” terminal and then the “posi-
tive”).

Connect the charger cables to the battery
terminals (red = “positive”, black = “nega-
tive”).

Plug in the battery charger and switch on.

At the end of the charging process: turn off
and unplug the charger.

Remove the charger cables.

If necessary, reconnect both battery ca-
bles to the battery (first the “positive” cable,
then the “negative” cable).

When charging with a low current (e.g. with a

small battery charger

), the battery does not

normally have to be disconnected. 

The in-

structions of the battery charger manu-
facturer must be followed.

Use a current equivalent to or lower than 10%
of the battery capacity to fully charge the
battery.

Before “

fast-charging

” the battery however,

both battery cables must be disconnected.

“Fast-charging” a battery is 

dangerous

 and

requires a battery charger and special knowl-

edge. Fast charges should be performed by
an official technical service.

The battery caps should not be opened while
the battery is being charged.

CAUTION

In vehicles fitted with the “Start-Stop” sys-
tem, the charger cable cannot be directly
connected to the negative terminal of the
vehicle battery but must be attached to the
engine ground point 

››› 

page 54

.

Disconnecting and connecting the
battery

The following functions will either be inopera-
tive or will not work properly after discon-
necting and reconnecting the battery:

Function

Installation

Setting the clock

››› 

page 99

The multifunction display
data is deleted

››› 

page 101

Note

We recommend having the vehicle checked
by an authorised SEAT dealer to guarantee
the correct working order of all electrical
systems.

254

Wheels and tyres

Changing the battery

A replacement battery must have the same
capacity, voltage, current rating and size as
the original. The appropriate types of battery
can be acquired from authorised SEAT deal-
ers.

We recommend having the battery changed
by an authorised SEAT dealer, where the new
battery will be correctly installed and the
original disposed of in line with regulations.

Automatic disconnection of elec-
trical equipment

When heavily-charging a battery, the pro-
gramme selected by the electrical system
control unit prevents the battery from auto-
matically discharging. This may result in the
following:

Increase in idling speed so that the alterna-

tor can supply more current to the electrical
system.

The performance of certain electrical com-

ponents could be limited or some may switch
off temporarily, e.g. the heated seats, the
heated rear window, the 12 V power socket.

Note

Despite any measures taken by the control
unit, the battery could drain. e.g. with the

engine is switched off, the key is turned in
the ignition for a long period or the side
lights or parking lights are switched on. The
switching off of certain electrical compo-
nents does not impair driving comfort and
often the driver will not even notice.

Wheels and tyres

Tyres

Introduction

WARNING

During the first 500 km, new tyres do not

give maximum grip, therefore you should
drive carefully. Risk of accident!

Never drive with damaged tyres. Risk of

accident!

Only use wheels and tyres that been au-

thorised by SEAT or your vehicle model.
Failure to do so could impair road safety.
Risk of accident!

Never exceed the maximum speed per-

mitted for your tyres. Risk of accident due
to tyre damage and loss of vehicle control!

Under-inflated tyres are submitted to

greater rolling resistance. This means that
they can overheat at high speeds. This can
cause tread separation and even tyre
blow-out.

For driving safety, tyres should be re-

placed at least in pairs according to the
axle and not individually. The tyres with the
deepest tread should always be used on
the front wheels.

Never fit used tyres of an unknown age or

prior use.

»

255

Practical tips

Tyres must be immediately changed at

the very latest when they have worn down
to the tread wear indicators.

Worn tyres reduce the necessary grip at

high speeds on damp surfaces. This could
lead to “aquaplaning” (uncontrolled vehi-
cle movement –“skidding” on damp surfa-
ces).

Damaged wheels and tyres must be re-

placed immediately.

Do not use summer or winter tyres that

are more than 6 or 4 years old respectively.

Wheel bolts should be clean and screw

easily. However, they must never be trea-
ted with grease or oil.

If the tightening torque of the wheel bolts

is too low, they could loosen while the vehi-
cle is moving. Risk of accident! If the tight-
ening torque of the wheel bolts is too high,
the bolts and threads could be damaged,
leading to the permanent deforming of the
rim support surfaces.

Incorrectly handled wheel bolts could

lead to a wheel coming loose while the ve-
hicle is moving. Risk of accident!

Observe the national legal requirements

regarding the use of snow tyres and chains.

CAUTION

Where a spare wheel that is not compati-

ble with the wheels fitted is used, follow the
instructions 

››› 

page 259

.

The prescribed tightening torque for

wheel bolts on steel and alloy wheels is
120 Nm.

Protect your tyres from coming into con-

tact with oil, grease and fuel.

Replace any lost valve caps immediately.

For the sake of the environment

Under-inflated tyres increases fuel con-
sumption.

Note

We recommend having all work on tyres

and wheels carried out by an authorised
SEAT dealer.

We recommend using wheels, tyres, hub

caps and snow chains from the SEAT Origi-
nal Accessories programme.

Service life of tyres

Fig. 250 

Side view of tyres with tread wear in-

dicators.

Fig. 251 

Location of the tyre pressure sticker.

256

Wheels and tyres

Tread wear indicator

The base of the side of the original tyres on
your vehicle show 1.6 mm high tread wear in-
dicators 

››› 

Fig. 250

. The position of these in-

dicators is given on the tyre sidewalls by the
letters “TWI”, triangular symbols or other
symbols.

The useful life of the tyres depends pri-
marily on the following factors:

Tyre pressure values

Under-inflation or over-inflation will consider-
ably reduce the useful life of the tyres and im-
pair the vehicle's handling. Therefore, check
the tyre pressure, including the spare wheel,
at least once a month and before any long
journey.

Inflation pressures for 

summer tyres

 are lis-

ted on a sticker inside the fuel tank flap

››› 

Fig. 251

. The pressures for 

winter tyres

 are

0.2 bar (2.9 psi/20 kPa) above the summer
values.

Always check the pressure when the tyre is
cold. Do not reduce over-pressure in warm
tyres. The tyre pressures must be altered to
suit notable changes in the load being car-
ried.

Depending on the vehicle, tyre pressure can
be adjusted to medium load to improve driv-
ing comfort (“comfort” tyre pressure). When

driving with comfort tyre pressure fuel con-
sumption may increase slightly.

Driving style

Fast cornering, heavy acceleration and hard
braking all increase tyre wear.

Wheel balancing

The wheels on new vehicles are balanced.
Various factors encountered when driving
can cause them to become unbalanced,
which results in vibration of the steering
wheel.

The wheel must be rebalanced if a new tyre is
fitted or if a tyre is repaired.

Incorrect wheel alignment

Incorrect front or rear wheel alignment cau-
ses excessive tyre wear, frequently on one
side, and also impairs vehicle safety. If tyre
wear is very irregular, contact an Official
Service.

Tyre damage

To avoid damage to tyres and wheels, only
drive over kerbs or similar obstacles slowly
and at a right angle if possible.

Check tyres and wheels regularly for dam-
age (punctures, cracks, blisters, deformities,
etc.). Remove any foreign objects embedded
in outside of the treads.

Unusual vibration or the car pulling to one
side may indicate that one of the tyres is
damaged. 

Reduce speed immediately and

stop if you suspect that a wheel may have
been damaged!

 Check the tyres for damage

(blisters, cracks, etc.). If no external damage
is visible, drive slowly and carefully to the
nearest Official Service and have the vehicle
inspected.

Low profile tyres

Low profile tyres, compared to other rim and
tyre combinations, offer a broader tread and
a greater rim diameter along with a lower
height of the tyre sidewall. This results in a
more agile driving behaviour. However, on
roads that are in poor condition, this might af-
fect comfort and cause more noise.

Low profile tyres may deteriorate more quick-
ly than standard tyres, for instance due to
strong knocks, potholes, manhole covers and
kerbs. Therefore, maintaining the correct tyre
pressure is particularly important

››› 

page 257

.

To avoid damage to tyres and wheels, drive
with special care when driving on roads in
poor condition.

Visually inspect your tyres every 3,000 km re-
garding damage, e.g. flattening/cracks on
the tyre sidewall or deformations/cracks on
the rims.

»

257

Practical tips

If the rims and tyres have received a heavy
impact or have been damaged, have them
checked and, if required, replaced at a speci-
alised workshop.

Low profile tyres may deteriorate more quick-
ly than standard tyres.

Interchanging tyres

Fig. 252 

Interchanging tyres.

Changing wheels around

If the wear is visibly greater on the front tyres,
they should be exchanged for the rear tyres
as shown in the diagram 

››› 

Fig. 252

. All the

tyres will then last for about the same time.

To ensure that the wear is equal on all tyres
and maintain their optimum useful life, they
should be changed around every 10
10,000 km.

Storing tyres

When you remove the tyres, mark them in or-
der to maintain the same direction of rotation
when they are installed again.

When removed, the wheels and/or tyres
should be stored in a cool, dry and preferably
dark location. Store tyres in a vertical posi-
tion, if they are not fitted on wheel rims.

New tyres or wheels

All four wheels must be fitted only with tyres
of the same type, size and the same tread
pattern.

The correct tyre/wheel combinations speci-
fied for your vehicle are listed in its documen-
tation.

Understanding the tyre designations makes it
easier to choose the correct tyres. The tyre
designation is marked on the sidewall. For ex-
ample.

195/55 R 15 85 H

This contains the following information:

195

Tyre width in mm

55

Height/width ratio in %

R

identifying tyre construction letter

– 

R

adial

15

Rim diameter in inches

85

Load rating code

H

Speed rating code letter

The tyres are subject to the following 

maxi-

mum speed limits

:

Speed rating code

letter

Maximum speed lim-

it

Q

160 km/h (99 mph)

R

170 km/h (106 mph)

S

180 km/h (112 mph)

T

190 km/h (118 mph)

U

200 km/h (124 mph)

H

210 km/h (130 mph)

V

240 km/h (149 mph)

W

270 km/h (168 mph)

The 

manufacturing date

 is also indicated on

the tyre sidewall (possibly only on the outer
side of the wheel).

DOT … 27 16…

258

Wheels and tyres

means, for example, that the tyre was pro-
duced in the 27th week of 2016.

Follow the instructions 

››› 

page 259

 if you on-

ly have a temporary spare wheel.

Note

A SEAT Service Centre should be consulted
to find out whether wheels or tyres of dif-
ferent sizes to those originally fitted by
SEAT can be fitted, and to find out about
the combinations allowed between the
front axle (axle 1) and the rear axle (axle 2).

Tyres with directional tread pattern

The direction of rotation is indicated by the

arrows on the tyre sidewall

. The direction of

rotation indicated must be respected. This
guarantees optimum grip and helps avoid ex-
cessive noise, wear and aquaplaning.

In the event of a flat tyre, a spare wheel with
an undetermined tread pattern or an oppo-
site tread pattern must be used and you must
drive carefully, as in these cases the tyres no
longer offer maximum performance.

Spare wheel

Spare wheel location*

Fig. 253 

Boot: spare wheel.

The spare wheel is housed in a well under the
floor panel in the luggage compartment and
is secured by a special bolt 

››› 

Fig. 253

.

Take out the tool box before removing the
spare wheel.

The tyre pressure of the spare wheel must be
checked (preferably whenever the tyre pres-
sure is checked – see sticker on fuel tank flap

››› 

page 256

) to ensure the spare wheel re-

mains ready for use.

If the spare wheel is not the same size or de-
sign as the tyres that are mounted on the car
(for example if the car has winter tyres or
tyres with direction tread), only use the spare
tyre for a short period of time in the event of

breakdown and drive with the corresponding
care 

››› 

.

It must be replaced as soon as possible for
a wheel with a normal size and finish.

Temporary spare wheel

If the vehicle is equipped with a temporary
spare wheel, there will be a warning sign on
the rim of the wheel.

Follow the instructions below when driving
with this wheel fitted.

After fitting the wheel, the warning sign

must not be covered.

Do not drive faster than 80 km/h (50 mph)

with the spare wheel and take great care
while driving. Avoid heavy acceleration, hard
braking and fast cornering.

The tyre pressure is the same as that of the

standard tyres.

Only use this spare wheel to reach the

nearest Official Service, as it is not designed
for permanent use.

WARNING

Under no circumstances must damaged

spare wheels be used.

If the spare wheel is different in size or

design to the tyres currently fitted, never
drive faster than 80 km/h (50 mph). Avoid
heavy acceleration, hard braking and fast
cornering.

»

259

Practical tips

CAUTION

Follow the instructions given on the tempo-
rary spare wheel label.

Note

The tyre pressure of the spare wheel must
always correspond to the highest pressure
prescribed for the model of vehicle in ques-
tion.

Tyre monitoring system

Control lamp

It lights up

The tyre pressure of a wheel is much lower than the

value set by the driver 

››› 

.

Flashes

Fault in the tyre pressure gauge. Contact a special-

ised service to have it fixed.

WARNING

If the warning lamp 

 lights up, slow

down immediately and avoid any severe
braking or steering manoeuvres. Stop and
check the tyres and their pressure as soon
as possible.

Under certain conditions (e.g. sporty

driving style, driving on loose surfaces or in
winter) the warning lamp 

 may take a

while to light up or may remain switched
off.

Note

If the battery is disconnected the warning
lamp 

 lights up when the ignition is

switched on. This warning lamp must switch
off after covering a short distance.

Tyre pressure*

The tyre pressure monitoring system uses ABS
sensors to compare the revolutions and the
circumference of each wheel. Should the cir-
cumference of any wheel change, the warn-
ing lamp 

 on the general instrument panel

will light up and an audible warning will be
heard.

Tyre circumference may change if:

Tyre pressure is too low

Tyre structure is damaged

Vehicle load not evenly distributed

wheels on one axle are subjected to great-

er load, (e.g. driving with trailer, uphill, down-
hill);

Snow chains are fitted

The temporary spare wheel is fitted

One wheel on the axle has been changed

Basic system settings

Should the tyre pressure change or if one or
more wheels are changed or the position of
the wheel on the vehicle is changed, e.g.
changing round the front and rear wheels, or
where a warning lamp lights up when driving,
the system must be adjusted as follows:

Inflate all tyres to the prescribed pressures

››› 

page 256

.

Switch the ignition on.

Store the new tyre pressure in the Easy

Connect system with the 



 button and the

SETTINGS

 function button 

››› 

page 24

.

In vehicles without a radio

: press and hold

down the 



 button , with the ignition on,

until an acoustic signal is heard.

WARNING

Despite the tyre pressure monitoring sys-
tem, the driver remains responsible for
maintaining the correct tyre pressure. You
must therefore check the tyre pressure of-
ten.

Note

The tyre pressure monitoring system is

not a replacement for regularly checking
the tyre pressure, as it is unable to recog-
nise an even drop in pressure.

260

Wheels and tyres

The tyre pressure monitoring system is

unable to warn of a sudden drop in tyre
pressure, e.g. a puncture. In this case, try to
stop the vehicle carefully with no severe
braking or steering manoeuvres.

To ensure the tyre pressure monitoring

system works correctly, the basic setting
must be performed every 10 000 km (6000
miles) or once a year.

Winter service

Winter tyres

Winter tyres will significantly improve han-
dling of the vehicle in winter road conditions.
The design of summer tyres (width, rubber
compound, tread pattern) gives less grip at
temperatures below +7°C (+45°F), on ice and
snow. This applies particularly to vehicles
equipped with 

wide section tyres

 or 

high

speed tyres

 (code letters H or V on the side-

wall).

In order to preserve the performance of the
vehicle as much as possible, winter tyres must
be fitted on all four wheels, the minimum
depth of the tread must be 4 mm and the
maximum age must be 4 years.

You can use winter tyres of a lower speed rat-
ing if the maximum speed limit of these tyres

will not be exceeded, even if the maximum
speed limit for the vehicle is higher.

For the sake of the environment

Summer tyres should be fitted again in
time, as they give better handling on roads
free of snow and ice and at temperatures
over +7°C (+45°F). Summer tyres have a
shorter braking distance, produce less roll-
ing noise and do not wear as quickly. They
also reduce fuel consumption.

261

Maintenance

Maintenance

Service

Service intervals

Servicing and Digital Maintenance
Plan

Log of services performed (“Digital Main-
tenance Plan”)

The SEAT dealership or a specialised work-
shop records Service receipts in a central
system. Thanks to this comprehensive docu-
mentation of the service history, it is possible
to reproduce the services performed any
time. SEAT recommends requesting a Service
receipt after every service carried out con-
taining all the services carried out on the sys-
tem.

Whenever there is a new service the receipt is
replaced with a current one.

The Digital Maintenance Plan is not avail-
able in some markets. In this case, your
SEAT dealer will inform you about the cur-
rent documentation of the work.

Service works

In the Digital Maintenance Plan, your SEAT
authorised service or specialised workshop
documents the following information:

When each one of the services was carried

out.

Whether a specific repair has been sugges-

ted, e.g. changing the brake pads in the near
future.

If you have expressed a special request for

the maintenance. Your Service Advisor will
write the work order.

The components or fluids that were

changed.

The date of the next service.

The Long Life Mobility Warranty is valid until
the next inspection. This information is docu-
mented in all checks performed.

The type and the volume of the service may
vary from one vehicle to another. A special-
ised workshop will be able to provide specific
information on the jobs for your vehicle.

WARNING

If the services are insufficient or not per-
formed and if the service intervals are not
observed, the vehicle may be immobilised
in traffic cause an accident and severe in-
juries.

Make sure that any repairs are carried

out by a SEAT authorised service or speci-
alised workshop.

CAUTION

SEAT cannot be held liable for any damage
to the vehicle due to insufficient work or of
lack of availability of spare parts.

Note

Regular services on the vehicle not only
maintain its value, but also its correct oper-
ation and road safety. For this reason, con-
duct the services in accordance with SEAT
guidelines.

Fixed Service or Flexible Service

Services are classified as 

oil change service

and 

inspection

. The service interval display

on the instrument panel display serves as a
reminder of the next service.

Depending on the features, the engine and
the conditions of use of the car, either the

Fixed service

 or the 

Flexible service

 will be

applied for an oil change service..

How to know which type of service needs
to his vehicle

Check the tables below:

262

Service

Oil change service

a)

PR No.

Type of

service

Service interval

QI1

Fixed

Every 

5000 km

 or after

1 year

b)

QI2

Every 

7500 km

 or after

1 year

b)

QI3

Every 

10000 km

 or after

1 year

b)

QI4

Every 

15000 km

 or after

1 year

b)

QI6

Flexible

According to the service in-
terval display

a)

The data are based on normal conditions of use.

b)

Whatever happens first.

Inspection Service

a)

According to the service interval display

a)

The data are based on normal conditions of use.

Bear in mind the information about the speci-
fications of the engine oil according to the
VW standard 

››› 

page 42

.

Particular characteristics of the Flexible
Service

Regarding the 

Flexible Service

, the oil

change service only has to be performed
when the vehicle needs it. To calculate when

you have to carry out this service, take into
account the individual conditions of use and
personal driving style. A major component of
the flexible service the use of LongLife oil in-
stead of conventional engine oil.

Bear in mind the information about the speci-
fications of the engine oil according to the
VW standard 

››› 

page 42

.

If you do not want to the flexible service
you can select the fixed service However,
a fixed service may affect service costs

The Service Advisor will gladly advise you.

Service intervals display

At SEAT, the dates of the services are indica-
ted by the service interval display on the in-
strument panel 

››› 

page 33

 or in the 

Ve-

hicle settings

 menu of the infotainment

system 

››› 

page 24

. The service interval

display gives information for service dates
that involve an engine oil change or an in-
spection. When the time for the correspond-
ing service comes, additional work required,
such as the change of brake fluid and the
spark plugs, can be carried out.

Information on the conditions of
use

The service intervals and groups are usually
based on 

normal conditions of use

.

If, on the other hand, the vehicle is under 

ad-

verse conditions of use

, some of the work

must be carried out before the next service
period or even between service intervals.

Conditions of use adverse include:

The use of fuel with a high sulphur content.

Frequent short trips.

Letting the engine idle for a long period of

time, as in the case of taxis.

Using the vehicle in areas with thick dust.

Frequent driving with a trailer (depending

on equipment).

Using the vehicle mostly in situations with a

lot of traffic and stops (e.g. in a city).

Using the vehicle mostly in winter.

This applies especially for the following
parts (depending on equipment):

Dust and pollen filter

Air Care allergen filter

Air filter

Toothed chain

Particulate filter

Engine oil

The Service Advisor of your specialised
workshop will gladly inform you

 about the

need of performing service work between

»

263

Maintenance

normal service intervals, always considering
the conditions of use of your vehicle.

WARNING

If the services are insufficient or not per-
formed and if the service intervals are not
observed, the vehicle may be immobilised
in traffic and cause accidents and severe
injuries.

Have the services conducted at author-

ised SEAT services or specialised work-
shops.

CAUTION

SEAT cannot be held liable for any damage
to the vehicle due to insufficient work or of
lack of availability of spare parts.

Sets of services

Sets of services include all the 

maintenance

works

 needed to ensure the safety and the

smooth running of the vehicle (

depending on

the conditions of use and the features of
the vehicle

, such as the engine, gearbox, or

operating fluids). Maintenance services are
divided into 

inspection

 and 

review

 services.

Consult the details of the jobs required for
your vehicle at:

Your SEAT authorised service

Your specialised workshop

Due to technical reasons (continuous devel-
opment of components) the sets of services
may vary. Your SEAT authorised service or
specialised workshop is always receiving up-
dates in time.

Additional service offers

Approved spare parts

Original SEAT Spare Parts have been con-
ceived for their vehicles and approved by
SEAT, with a special emphasis on safety.
These parts correspond exactly to the manu-
facturer's requirements in terms of design,
accuracy of the measurements and materi-
als. The original SEAT Spare Parts have been
conceived exclusively for your vehicle. For this
reason, we always recommend the use of
Original SEAT Spare Parts. SEAT cannot be
held liable for the safety and suitability of
parts from other manufacturers.

Approved spare parts

Approved spare parts, following the manu-
facturer's requirements, are an additional
service to you, offering the possibility of re-
placing complete sets, such as: light engine,
gearboxes, heads, control units, electrical
components, etc.

These parts are, 

approved parts

, and are the

same as the factory parts, which are also ap-
proved spare parts.

Original accessories

We recommend you only use SEAT Original
Accessories and SEAT approved accessories
for your vehicle. The reliability, safety and
suitability of these accessories have been in-
spected specifically for this type of vehicle.
SEAT cannot be held liable for the safety and
suitability of parts from other manufacturers.

SEAT Service Mobility (SEAT
Service Mobility)

Since the moment you purchase your SEAT
vehicle you will be able to enjoy the benefits
and coverage of the SEAT Mobility Service.

For the first two years after the purchase,
your new SEAT vehicle is automatically cov-
ered by the SEAT Mobility Service without ad-
ditional costs.

If you wish to enjoy this service after this peri-
od, you can extend SEAT Mobility as long as
you carry out the recommended Inspection
and Maintenance Services at a SEAT Author-
ised Service.

264

Vehicle maintenance

If your SEAT vehicle is immobilised due to a
fault or an accident, our assistance services
will help you keep moving.

Take into account that the SEAT Mobility
Service differs depending on the country in
which the vehicle was purchased. For further
information ask your SEAT dealership or the
SEAT website in your country.

Warranty

Fault-free operation warranty

SEAT Authorised Services ensure the perfect
condition of new vehicles. Check the pur-
chase agreement or complementary addi-
tional documentation provided by your Tech-
nical Service to see the conditions and the
terms of the warranty. Consult further infor-
mation in this regard in your SEAT Official
Service.

Vehicle maintenance

Maintenance and cleaning

Basic considerations

Regular and careful care helps to maintain
the value of your vehicle. In addition, it may
become a prerequisite to demand the war-
ranty in the event of corrosion damage and
deficiencies in the paint coat of the body-
work.

Specialised workshops have the necessary
care products. Please follow the instructions
for application on the packaging.

WARNING

Cleaning products and other materials

used for car care can be damaging to your
health if misused.

Always keep care products in a safe

place, out of the reach of children. Danger
of poisoning!

For the sake of the environment

When purchasing car care products,

chose products that are compatible with
the environment.

The waste from car-care products should

not be disposed of with ordinary household
waste.

Washing the vehicle

The longer you take to clean the tanks, e.g.
remains of insects, bird excrements, tree resin
or anti frost salt adhered to your vehicle, the
more damage it can cause to the surface.
High temperatures, for instance strong sun-
light, further intensify the damage.

Before washing the car, soften the dirt using
plenty of water.

To remove encrusted dirt such as insects, bird
droppings or tree resin, use a lot of water and
a microfibre cloth.

Have the underside of the vehicle washed af-
ter the end of the anti frost salts in winter.

High pressure cleaners

When washing the vehicle with a high-pres-
sure cleaner, always follow the operating in-
structions for the equipment. This applies
particularly to the operating pressure and the
distance between the spraying water. Do not
aim the jet directly to the side window gas-
kets, doors, covers or the panoramic sun-
roof*; the same applies to tyres, rubber ho-
ses, soundproofing material, sensors* or
camera lenses*. Keep a distance of at least
40 cm.

Do not remove snow and ice with a high-
pressure cleaner.

»

265

Maintenance

Do not use a nozzle that sprays the water out
in a direct stream or one that has a rotating
jet for forcing off dirt.

The water temperature must not exceed
60°C.

Automatic car wash tunnels

Spray the vehicle before starting the car
wash.

Make sure that the windows and the panor-
amic sunroof* are closed and the windscreen
wipers are deactivated. Bear in mind the in-
structions of the car wash tunnel operator,
especially if your vehicle has detachable
parts.

Use of car washes without brushes if possible.

Washing by hand

Clean your vehicle from top to bottom with a
soft sponge or with a brush. Only use clean-
ing products that do not contain solvents.

Washing vehicles with a matte paint by
hand

To prevent damage to the vehicle when
washing it, first remove the thicker dust and
dirt. To remove traces of insects, grease and
fingerprints, it is best to use a special cleaner
for matte paint.

Apply the product with a microfibre cloth. To
avoid damaging the surface of the paint, do
not apply too much pressure.

Rinse with plenty of water. Then clean it with
a neutral cleaning product and a soft microfi-
bre cloth.

Rinse the vehicle again with plenty of water
and then leave it to dry. Remove traces of
water with a leather cloth.

WARNING

Only wash the vehicle with the ignition

switched off or according to the specifica-
tions of the car wash tunnel operator. Risk
of accident!

When cleaning the underbody or the in-

side of the wheel arches, protect yourself
from sharp or pointy metal parts. Risk of
cut!

After cleaning the brakes could act more

slowly due to moisture or, in winter, the ice
on the brake discs and pads. Risk of acci-
dent! In this case the brakes should be
dried by pressing the brake pedal several
times.

CAUTION

Before washing the vehicle in an auto-

matic car wash, please make sure to re-
tract the exterior mirrors to prevent them
from being damaged. Electric exterior rear-

view mirrors must always be folded/de-
ployed electrically!

Do not wash the vehicle in direct sunlight.

Risk of damaging the paint job!

Do not use sponges, abrasive household

sponges or similar to clean insect remains.
Risk of damaging the surface!

Vehicle parts with matte paint:

Do not use polish or hard wax. Risk of
damaging the surface!

Never select washing programs that in-
clude the use of wax. This could dam-
age the appearance of matte paint.

Do not put stickers or magnets on parts
with matte paint, as removing them
may damage the paint.

For the sake of the environment

The car should only be washed in special
wash bays. These places are prepared to
prevent oily water from getting into the
public drains.

Cleaning and maintenance instruc-
tions

The cleaning and maintenance of individual
components of the vehicle can be checked in
the following tables. The contents should be
understood merely as a recommendation. Go
to your specialised workshop if you have

266


Content      ..     14      15      16      17     ..