Seat Toledo (2019 year). Manual in english - page 13
 

  Index      Manuals     Seat Toledo (2019 year). Manual in english


Search            copyright infringement  


Content      ..     11      12      13      14     ..


Seat Toledo (2019 year). Manual in english - page 13


Start and driving

If the control lamp 

 flashes, the ASR is work-

ing.

If the 

 warning lamp illuminates on ignition,

the TCS system may have switched off due to
technical reasons. Turn off the ignition and
turn it on again. Upon switching on the igni-
tion again, if the warning lamp has switched
off, this means the TCS is functioning correct-
ly again.

If the 

 warning lamp remains illuminated,

there is a fault in the TCS.

The informative display indicates:

Fault: traction control system
(ASR)

Go to a technical service.

Electronic differential lock

If one of the wheels starts to skid, the EDL
brakes that wheel, transmitting the driving
force to the other wheels. This increases vehi-
cle stability and improves driving stability.

To prevent the disc brake of the braking
wheel from overheating, the EDL cuts out au-
tomatically if subjected to excessive loads.
The vehicle will continue to function normally
without EDL. The EDL will switch on again au-
tomatically when the brake has cooled down.

Manual gearbox

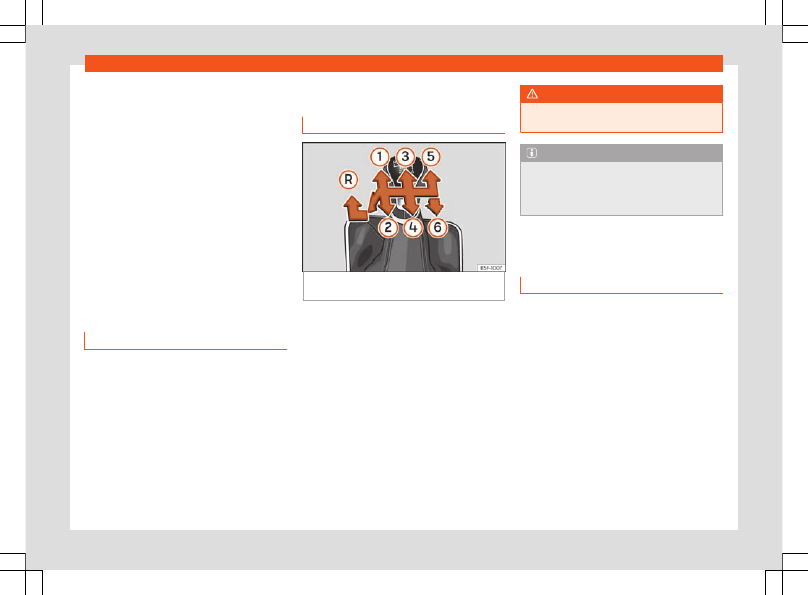
Changing gears

Fig. 215 

Gear shift diagram of a 5- or 6-speed

manual gearbox

Read the additional information carefully

››› 

page 36

When changing gear, always depress the
clutch pedal fully and keep it pressed down
to avoid excessive clutch wear.

In order to drive at an optimum RPM, follow
the gear change indications 

››› 

page 208

.

Engage reverse gear only when the vehicle is
stopped. On engaging reverse gear while the
engine is running, first wait a moment with the
clutch pedal pressed down fully to limit gear
shift noise.

The reverse lights switch on when the reverse
gear is selected and the ignition is on.

WARNING

Never engage reverse gear when moving
forward. Risk of accident!

Note

Do not rest your hand on the gear lever
while driving. The pressure of your hand
could lead to premature wear of the gear
system.

Automatic gearbox

Basic information

The gearbox changes up and down automat-
ically. The gearbox can be set to 

Tiptronic

mode. The gears can be changed manually
in this mode 

››› 

page 206

.

The engine can be 

started

 only in position 

P

or 

N

. If the selector lever is not in these posi-

tions when locking the steering, switching the
ignition on or off or starting the engine, the in-
formation display will show 

¡Move the se-

lector lever to the P/N!

 position, or on

the general instrument panel 

 P/N

.

At temperatures below -10°C (14°F), the en-
gine can only be started in position 

P

.

If you park your vehicle in a flat surface, move
the selector lever to position 

P

. On a slop, first

»

203

Driving

engage the handbrake firmly and the move
the selector lever to the parking position. This
reduces the load on the lock mechanism
while making it easier to move the selector
lever from position 

P

.

If, while the vehicle is moving, the selector lev-
er is accidentally moved to position 

N

, re-

lease the accelerator and wait for the engine
to idle before moving it back into position.

WARNING

Never press the accelerator when select-

ing the automatic gearbox operating mode
when the vehicle is stationary. Risk of acci-
dent!

Never move the selector lever to posi-

tions R or P when driving. Risk of accident!

If the vehicle is to be stopped with a gear

selected and the engine idling (e.g. waiting
or moving slowly at traffic lights), press
down on the brake pedal because the
transmission is not entirely interrupted
when the engine is idling and the vehicle
will tend to start moving.

Apply the handbrake firmly and put the

selector lever in position P before opening
the bonnet and working on the vehicle with
the engine running. Risk of accident! Strict-
ly follow the safety instructions

››› 

page 244, Engine compartment

.

When stopping on a slope (hill), try not to

stop the vehicle from moving by pressing
the “accelerator” with a gear selected.

This could overheat the clutch. If the clutch
risks being burnt due to this force, it would
switch off and the vehicle could move
backwards. Risk of accident!

If you have to stop on a hill, press down

on the brake pedal to stop the vehicle from
moving.

The drive wheels could lose traction on a

slippery road surface when the kick-down
function is activated. Risk of sliding!

CAUTION

In DSG automatic gearboxes, the double

clutch is protected from overloads. If the
hill hold control is used, the clutches are
subjected to greater force if the vehicle is
at a standstill on a slope or suddenly ac-
celerating on a slope.

Should the clutches overheat, the 

symbol is shown on the informative display
with a warning message 

Gear overheated.

Stop! Instruction Manual!

 An audible

warning is also heard. Stop the vehicle in
this case, stop the engine and wait until the
symbol 

 has switched off. Danger of dam-

age to the gearbox! You can continue driv-
ing once the symbol is switched off.

Control lamps

It lights up green

The brake pedal is not engaged.
To select a range of gears, press the brake pedal.

Flashes green

The interlock button on the selector lever is not
pressed.
Movement of the vehicle is prevented. Engage the se-

lector lever lock.

Starting and driving

Starting

Press and hold the brake pedal.

Press and hold the interlock button on the
selector lever knob and move the selector
lever to position 

››› 

page 205

 before re-

leasing the interlock button.

Release the brake and press the accelera-
tor.

Stopping

The selector lever does not have to be
moved to position 

N

 if the vehicle is stopped

for a short period, e.g. at intersections. It is
enough to step on the brake pedal. Howev-
er, the engine must remain idling.

204

Start and driving

Parking

Press the brake pedal.

Apply the handbrake.

Press the interlock button, move the selec-
tor lever to position 

P

 and release the but-

ton.

Kick-down feature

The kick-down feature allows maximum ac-
celeration to be reached.

In any gear programme, press down fully on
the accelerator for the automatic gearbox to
activate the kick-down feature. This function
takes priority over the gear programmes
without taking into account the position of the
selector lever (

D

S

 or 

Tiptronic

) and is used

to reach maximum acceleration, using full en-
gine power. Depending on the road speed
and engine speed, the automatic gearbox
shifts down and the vehicle accelerates. It
only shifts up after the maximum engine
speed has been reached.

Selector lever positions

Fig. 216 

Gear selector lever

Fig. 217 

Information display: selector lever po-

sitions.

Read the additional information carefully

››› 

page 36

The current position of the selector lever is
shown on the general instrument panel dis-
play 

1


››› 

Fig. 217

.

P – Parking position

In this position, the driven wheels are me-
chanically locked.

The parking position can only be selected
when the vehicle is stationary.

If you want to move the selector lever from
this position, press the interlock button on the
selector lever knob while pressing down on
the brake pedal.

If the battery is drained, the selector lever
cannot be moved from position 

P

.

R – Reverse gear

Reverse gear must be engaged only when
the vehicle is stationary and the engine is
idling.

To move the selector lever to position 

R

 from

positions 

P

 or 

N

, press the interlock button on

the selector lever knob and press down on
the brake pedal.

The reverse lights come on when the selector
lever is in position 

R

 and the ignition is on.

N – Neutral (idling)

Neutral (idling) is engaged in this position.

To move the selector lever from position 

N

 (if

the lever has remained in this position for
more than 2 seconds) to position 

D

 or 

R

 at

speeds of less than 5 km/h (3 mph) and when

»

205

Driving

the vehicle is stationary, press down on the
brake pedal.

D/S – Permanent drive (forward) position

The selector lever in the D/S position enables
the gears to be controlled in normal mode
(D) or Sport (S) mode. To select Sport mode
(S), move the selector lever backwards. Mov-
ing the lever again will select normal mode
(D). The selected driving mode is shown on
the instrument panel display.

In 

normal mode

 (D), the gearbox automati-

cally selects the best gear ratio. This de-
pends on the engine load, the road speed
and the dynamic gear control programme
(DCP).

Sport mode

 (S) must be selected for a sporty

driving style. This setting makes use of the en-
gine's maximum power output. When accel-
erating the gear shifts will be noticeable.

Press the brake pedal to move the selector
lever from N to D/S when the vehicle is sta-
tionary or at speeds below 3 km/h (2 mph)

››› 

 in Basic information on page 204

.

Under certain circumstances (e.g. when driv-
ing in mountains) it can be advantageous to
switch temporarily to tiptronic mode

››› 

page 206

, in order to 

manually select

gear ratios to suit the driving conditions.

Tiptronic gearbox

Fig. 218 

Selector lever: Tiptronic.

The Tiptronic gearbox allows the driver to
change gears manually using the selector
lever.

Activating the manual gearbox

From position 

D

, push the selector lever to

the right. The selected position of the selec-
tor lever is shown on the general instrument
panel display together with the gear en-
gaged 

1


››› 

Fig. 217

.

Shifting up

Push the selector lever gently forwards 

+

››› 

Fig. 218

.

Shifting down

Push the selector lever gently backwards

-


››› 

Fig. 218

.

The manual gearbox can be activated when
the vehicle is either moving or stationary.

When accelerating, the gearbox automati-
cally shifts up shortly before the maximum
engine speed is reached.

On shifting up, the gear is only engaged
when there is no risk of engine damage.

When the accelerator pedal is pressed down
to the kick-down zone, the gearbox will shift
down in line with the road speed and engine
speed.

Note

The kick-down function is also available in
manual shift mode.

Selector lever lock

Automatic selector lever lock 

The selector lever is locked in the positions 

P

and 

N

 when the ignition is on. Press the brake

pedal to unlock it. Remember, if the selector
lever is in positions 

P

 and 

N

, the warning lamp

 will light up on the general instrument pan-

el.

When the selector lever merely moves
through position 

N

 (e.g. when moved from 

R

to 

D

), the lever lock is not applied. This makes

it possible, for example, to rock a stuck vehi-
cle backwards and forwards. The lock is only

206

Start and driving

applied if the brake is not pressed and the se-
lector lever is moved to position 

N

 for more

than 2 seconds.

The selector lever only locks when the is vehi-
cle stationary or driving at a speed lower
than 5 km/h (3 mph). At a higher speed, it au-
tomatically disconnects in the 

N

 position.

Interlock button

The interlock button on the selector lever
knob prevents the driver from inadvertently
engaging a gear. Press the button to unlock
the selector lever.

Safety interlock for ignition key

1)

After switching the ignition off, the ignition key
can be removed only when the selector lever
is in position 

P

. If the key is not in the ignition,

the selector lever is locked in position 

P

.

Driving programmes

Your vehicle is equipped with an electronical-
ly-controlled automatic gearbox. Shifting up
or down depends on the programme selec-
ted.

For a 

calm driving style

, the gearbox uses

the most economic programme. The gearbox

shifts up as quickly as possible and shifts
down as late as possible, thus increasing driv-
ing economy.

With a 

sporty driving style

, characterised by

sudden acceleration, heavy acceleration,
speeds that often increase and decrease and
maximum speed, the gearbox adapts to this
driving style when the accelerator is pressed
down fully (kick-down) by shifting down as
quickly as possible and can even shift down
by several gears at once.

Selecting the best driving programmes is an
endless job. Regardless of this, the driver can
also make the gearbox switch to a more dy-
namic gear shift programme by pressing the
accelerator quickly. This makes the automat-
ic gearbox shift down into a lower gear than
the one that would normally apply to the cur-
rent speed, allowing for more rapid accelera-
tion (e.g. to overtake another vehicle) without
having to press the accelerator until the kick-
down position. On shifting up in a corre-
sponding driving style, the gearbox returns to
the original programme.

When driving along mountain roads, the
gearbox adapts to the gradients. This avoids
having to frequently change gears when driv-
ing uphill. In Tiptronic mode, it is possible to
shift down manually when driving downhill to
use the braking effect of the engine.

Emergency program

A back-up programme exists in case of faults.

In the event of a fault in the gearbox electron-
ics, it will continue to work in one of the corre-
sponding back-up programmes. All segments
of the screen are lit up or switched off.

The fault can be seen as follows:

The gearbox only engages certain gears

Reverse gear 

R

 cannot be engaged

The manual gearbox switches off in the

back-up programme

Note

If the gearbox switches to the back-up pro-
gramme, visit an Authorised Service as
soon as possible to solve the problem.

Gearbox malfunctions

 Gearbox: Fault! Stop the vehicle

and place the lever in the posi-
tion P.

There is a fault in the gearbox. Stop the vehi-
cle in a safe place and do not continue driv-
ing. Seek specialist assistance.

»

1)

Valid only for certain countries.

207

Driving

 Gearbox: System fault! You may

continue driving.

Have the fault corrected by a specialised
workshop without delay.

 Gearbox: System fault! You can

continue driving with restric-
tions. Reverse gear disabled

Take the vehicle to a specialised workshop
and have the fault repaired without delay.

 Gearbox: System fault! You can

continue driving in D until
switching off the engine

Stop the vehicle in a safe place well away
from moving traffic. Seek specialist assis-
tance.

 Gearbox: too hot. Adapt your

driving accordingly

Continue driving at moderate speeds. When
the warning lamp switches off, you can con-
tinue driving in a normal manner.

 Gearbox: press the brake and en-

gage a gear again.

If the fault was caused by a gearbox with a
high temperature, this driver message will be
displayed when the gearbox has cooled
again.

Gear-change indicator

Choosing the ideal gear

Fig. 219 

Instrument panel: gear-change indi-

cator (manual gearbox).

A gear change will be recommended if the
gear you are in is not the most economical
choice. If no gear-change is recommended, it
means that you are already in the most eco-
nomical gear.

Vehicles with a manual gearbox

The following display symbols 

››› 

Fig. 219

mean:


Changing to a higher gear

: the sugges-

ted gear appears to the 

right

 of the current

gear when a 

higher gear is recommended

.


Changing to a lower gear

: the sugges-

ted gear appears to the 

left

 of the current

gear when a 

lower gear is recommended

.

The gear recommendation may occasionally
skip a gear (2nd 

 4th).

Vehicles with an automatic gearbox*

The display is only visible in tiptronic mode

››› 

page 206

.

The following display symbols mean:


Shifting up a gear


Shifting down a gear

CAUTION

The gear-change indicator is intended to
help save fuel, but it is not intended to rec-
ommend the right gear for all driving situa-
tions. In certain situations, only the driver
can choose the correct gear (for instance
when overtaking, driving up a steep gradi-
ent or towing a trailer).

Note

The display disappears from the instrument
panel when you press the clutch pedal.

208

Start and driving

Steering

Information relating to vehicle
steering

Electro-mechanical power steering assists
the driver when steering.

Electro-mechanical power steering adapts

electronically

 to the speed of the car, torque

and turning angle.

If the power steering should fail at any time or
the engine is switched off (for instance when
being towed), the car can still be steered, as
long as the key remains in the ignition. How-
ever, more effort than normal will be required
to turn the steering wheel.

WARNING

If the power steering does not work, you
will need much more strength to turn the
wheel. This has a considerable effect on
vehicle safety.

The power steering only works when the

engine is running.

Never allow the vehicle to move when the

engine is switched off.

Never remove the key from the ignition

while the vehicle is moving. The steering
lock could be engaged and vehicle steer-
ing would not work.

CAUTION

Turning the steering wheel fully in either di-
rection when the vehicle is stationary and
the engine is in gear puts the electrome-
chanical steering under great stress. This
could lead to noise. Never leave the steer-
ing wheel turned fully in either direction for
more than 15 seconds. Risk of damage to
the electromechanical steering system!

Note

The ignition of the vehicle being towed
must be switched on to prevent the steering
wheel from locking and also to allow the
use of the turn signals, horn, windscreen
wipers and washers.

Control lamp

It lights up red

The electromechanical steering is damaged.

Do not continue driving

. Stop the vehicle safely and

as soon as possible.

Have the steering checked immediately by a special-
ised workshop.

It lights up yellow

The operation of the electromechanical steering is

limited.
See a specialised workshop immediately and have
the steering checked.

If the yellow warning lamp does not light up again af-

ter the engine is restarted and the vehicle has travel-
led a short distance, you do 

not

 need to take it to a

specialised workshop.

Or

: The 12-volt battery was disconnected and has

been connected again.
Drive for a short time at 15-20 km/h (9-12 mph).

It flashes yellow

The steering column is tight.

Turn the wheel a little to both sides.

Or

: Not unlocked or blocked steering column.

Remove the key from the ignition and then switch the

ignition back on. If necessary, check the messages

displayed on the instrument panel display.

Do not drive on if

 the steering column remains

locked after the ignition has been switched on. Seek
specialist assistance.

The control lamp should light up for a few
seconds when the ignition is switched on. It
should go out once the engine is started.

WARNING

If the warning lamps and the corresponding
messages are ignored when they light up,
the vehicle may stall in traffic. It could case

»

209

Driving

damage to the vehicle and cause acci-
dents and severe injuries.

Never ignore the warning lamps or mes-

sages.

Stop the vehicle at the next opportunity

and in a safe place.

Run-in and economical driv-
ing

The first 1,500 km

Over the first 1,500 kilometres the engine
must be run in.

Up to 1000 kilometres

Do not drive at more than 3/4 of the maxi-
mum speed corresponding to the engaged
gear, i.e. up to 3/4 of the maximum permit-
ted engine speed.

Do not drive at full speed.

Avoid high engine speeds.

Do not tow a trailer.

From 1000 to 1500 kilometres (600 to
900 miles)

Slowly

 increase the engine speed until

reaching the maximum permitted speed of

the engaged gear, i.e. the maximum permit-
ted engine speed.

During its first few hours of running, the inter-
nal friction in the engine is greater than later
on, when all the moving parts have bedded
in. How the vehicle is driven over approxi-
mately the first 1,500 kilometres (900 miles),
determines the success of the process of run-
ning in the engine.

Even after running in, the vehicle should not
be unnecessarily driven at 

high engine

speeds

. The maximum permitted engine

speed is marked at the start of the red zone
on the rev counter dial. The gear must be
changed up when the red area is reached in
vehicles with a manual gearbox. 

Extremely

high engine speeds when accelerating are
automatically limited, however the engine is
not protected against high engine speeds
produced by incorrectly changing to a lower
gear, which could cause the engine to run at
revs above the maximum permitted amount,
and consequently result in damage to the
engine.

Additionally, vehicles with a manual gearbox
must also bear the following in mind: do not
drive at excessively 

low

 speeds. Change

down to a lower gear when the engine no
longer runs smoothly. Observe the recom-
mendations for changing gear 

››› 

page 208

.

New tyres

New tyres must be submitted to “running in”,
given that initially their grip is not yet at the
maximum level. During the first 500 km (120
miles) drive very carefully.

New brake pads

New brake pads do not yet provide maximum
friction capacity. First they must be “run in”.
During the first 200 km (120 miles) drive very
carefully.

CAUTION

All the information for speed and engine
speed refers to an engine that operates at
operating temperature. Do not run the en-
gine at high engine speeds, neither when
stopped or while driving.

For the sake of the environment

Do not drive at unnecessarily high engine
speeds; changing to a higher gear sooner
contributes to saving fuel, reduces operat-
ing noise and protects the environment.

Environmental compatibility

Environmental protection is a top priority in
the design, choice of materials and manufac-
ture of your new SEAT.

210

Start and driving

Constructive measures to encourage re-
cycling

Joints and connections designed for easy

dismantling.

Modular construction to facilitate disman-

tling.

Increased use of single-grade materials.

Plastic parts and elastomers are marked in

accordance with ISO 1043, ISO 11469 and
ISO 1629.

Choice of materials

Use of recycled materials.

Use of compatible plastics in the same part

if its components are not easily separated.

Use of recycled materials and/or materials

originating from renewable sources.

Reduction of volatile components, including

odour, in plastic materials.

Use of CFC-free coolants.

Ban on heavy metals, with the exceptions
dictated by law (Annex II of ELV Directive
2000/53/EC):

 cadmium, lead, mercury,

hexavalent chromium.

Manufacturing methods

Reduction of the quantity of thinner in the

protective wax for cavities.

Use of plastic film as protection during vehi-

cle transport.

Use of solvent-free adhesives.

Use of CFC-free coolants in cooling sys-

tems.

Recycling and energy recovery from resi-

dues (RDF).

Improvement in the quality of waste water.

Use of systems for the recovery of residual

heat (thermal recovery, enthalpy wheels,
etc.).

The use of water-soluble paints.

Economical and environmentally-
friendly driving

Fuel consumption, environmental pollution
and wear to the engine, brakes and tyres de-
pends in large part on your driving style. By
adopting an economical driving style and an-
ticipating the traffic situation ahead, you can
easily reduce fuel consumption by 10-15%.
Some tips on how to help you reduce pollu-
tion while saving money are listed below.

Drive anticipating the traffic situation

A vehicle uses most fuel when accelerating.
When you anticipate situations, you have to
brake less often and, thus, accelerate less. If it
is possible, let the vehicle roll with a 

gear en-

gaged

, for example, if you see a red light

ahead. The braking effect achieved in this
way helps to reduce the wear of brakes and

tyres; emissions and fuel consumption are re-
duced to zero (disconnection due to inertia).

Change gear early to save energy

An effective way of saving fuel is to change
up 

quickly

 through the gears. Running the en-

gine at high rpm in the lower gears uses an
unnecessary amount of fuel.

Manual transmission

: shift up from first to

second gear as soon as possible. We recom-
mend that, whenever possible, you change to
a higher gear upon reaching 2000 rpm. Fol-
low the “recommended gear” indication that
appears on the instrument panel

››› 

page 208

.

Avoid driving at high speed

We advise you not to drive at the top speed
permitted by the vehicle. Fuel consumption,
exhaust emissions and noise levels all in-
crease very rapidly at higher speeds. Driving
at moderate speeds will help to save fuel.

Avoid idling

It is worthwhile switching off the engine when
waiting in a traffic jam, at level crossings or at
traffic lights with a long red phase. The fuel
saved after only 30 - 40 seconds is greater
than the amount of fuel needed to restart the
engine.

The engine takes a long time to warm up
when it is idling. Mechanical wear and

»

211

Driving

pollutant emissions are also especially high
during this initial warm-up phase. It is there-
fore best to drive off immediately after start-
ing the engine. Avoid running the engine at
high speed.

Periodic maintenance

Periodic maintenance work guarantees that,
before beginning a journey, you will not con-
sume more than the required amount of fuel.
A well-serviced engine gives you the benefit
of 

improved fuel efficiency

 as well as maxi-

mum reliability and an enhanced resale val-
ue.

A badly serviced engine can consume up to
10% more fuel than necessary.

Avoid short journeys

To reduce the consumption and emission of
polluting exhaust gases, the engine and the
exhaust gas filtration systems should reach
the optimum 

operating temperature

.

With the engine cold, fuel consumption is pro-
portionally higher. The engine does not warm
up and fuel consumption does not normalise
until having driven approximately 

four

 kilome-

tres (2.5 miles). This is why we recommend
avoiding short trips whenever possible.

Maintain the correct tyre pressures

Bear in mind that keeping the tyres at an ade-
quate pressure saves fuel. If the tyre pressure

is just one bar (14.5 psi/100 kPa) too low, fuel
consumption can increase by as much as 5%.
Due to the greater rolling resistance, under-
inflation also increases tyre 

wear

 wear and

impairs handling.

The tyre pressures should always be checked
when the tyres are 

cold

.

Do not use 

winter tyres

 all year round as

they increase fuel consumption by up to 10%.

Avoid unnecessary weight

Given that every kilo of 

extra weight

 will in-

crease the fuel consumption, it is advisable to
always check the luggage compartment to
make sure that no unnecessary loads are be-
ing transported.

A roof rack is often left in place for the sake of
convenience, even when it is no longer nee-
ded. At a speed of 100 km/h (62 mph) and
120 km/h (75 mph) your vehicle will use about
12% more fuel as a result of the extra wind re-
sistance caused by the roof rack even when it
is not in use.

Save electricity

The engine activates the alternator, which
produces electricity. With the need for elec-
tricity, fuel consumption also increases. Be-
cause of this, always turn off electrical devi-
ces when you do not need them. Examples of
devices that use a lot of electricity are: the

fan at high speeds, the rear window heating
and the seat heaters*.

Note

If you vehicle has 

Start-Stop

, it is not rec-

ommended to switch this function off.

It is recommended that you 

close the

windows

 when driving at more than

60 km/h (37 mph).

Do not drive with your foot resting 

on the

clutch pedal,

, as the pressure can make the

plate spin, more fuel will be used and it can
burn the clutch plate lining, causing a seri-
ous fault.

Do not hold the vehicle on a hill with the

clutch, use the foot brake or hand brake,
using the latter to start. The fuel consump-
tion will be lower and you will prevent the
clutch plate from being damaged.

On descents, use the engine brake,

changing to the gear that is more suitable
for the slope. Fuel consumption will be
“zero” and the brakes will not suffer.

212

Start and driving

Engine management and
emission control system

Introduction

WARNING

Because of the high temperatures which

can occur in the exhaust purification sys-
tem (catalytic converter or diesel particu-
late filter), do not park the vehicle where
the exhaust can come into contact with
flammable materials under the car (e.g. on
grass or at the forest edge). Fire hazard!

Do not apply wax underneath the vehicle

around the area of the exhaust system: Fire
hazard!

Control lamps

It lights up

Fault in the emission control system. (e.g. faulty
lambda sensor).
Reduce speed and drive carefully to the nearest spe-
cialised workshop to have the engine checked.

Flashes

Combustion fault which could damage the catalytic
converter.
Reduce speed and drive carefully to the nearest spe-
cialised workshop to have the engine checked.

It lights up

Particulate filter blocked 

››› 

page 214

.



It lights up

Fault in the management of the petrol engine.
Have the engine checked by a specialised workshop

as soon as possible.

The warning lamp 



 (Electronic Power Control)

lights up when the ignition is switched on while sys-
tem operation is being verified. It should go out once
the engine is started.

It lights up

Diesel engine glow plug system.

The engine glow plug system has been activated.
The engine can be started straight away when the
lamp switches off.

Flashes

Fault in the management of the diesel engine.
Have the engine checked by a specialised workshop

as soon as possible.

Note

While the control lamps are on  



or 

 there might be faults in the engine,

fuel consumption may go up and the en-
gine might lose power.

Catalytic converter

3

 Applies to vehicles with petrol engine

To maintain the useful life of the catalytic
converter

Use only unleaded petrol with petrol en-

gines, as lead damages the catalytic con-
verter.

Do not let the fuel get too low in the tank.

For engine oil changes, do not replenish

with too much engine oil 

››› 

page 247

.

Never tow the vehicle to start it, use jump

leads if necessary 

››› 

page 54

.

If you notice misfiring, uneven running or loss
of power when the vehicle is moving, reduce
speed immediately and have the vehicle in-
spected at the nearest specialised workshop.
In general, the exhaust warning lamp will light
up when any of the described symptoms oc-
cur 

››› 

page 213

. If this happens, unburnt fuel

can enter the exhaust system and escape in-
to the environment. The catalytic converter
can also be damaged by overheating.

CAUTION

Never run the fuel tank completely dry be-
cause the irregularity of the fuel supply
may cause ignition problems. This allows
unburnt fuel to enter the exhaust system,
which could cause overheating and dam-
age the catalytic converter.

»

213

Driving

For the sake of the environment

Even when the emission control system is
working perfectly, there may be a smell of
sulphur from the exhaust gas under some
conditions. This depends on the sulphur
content of the fuel used. Quite often the
problem can be solved by changing to an-
other brand of fuel.

Particulate filter

3

 Applies to vehicles with diesel engine

The diesel engine particulate filter eliminates
most of the soot from the exhaust gas system.
Under normal driving conditions, the filter
cleans itself. The particulate filter is cleaned
automatically without need for indication by
the warning lamp 

. This may be noticed

because the engine idle speed increases and
an odour may be detected.

If automatic filter purification cannot be car-
ried out (because only short trips are taken,
for example), soot will accumulate on the fil-
ter and the particulate filter warning lamp will

 switch on.

Facilitate the automatic filter cleaning proc-
ess by driving in the following manner:

Drive for approximately 15 minutes at a

minimum speed of 60 km/h (37 mph) in 4th or
5th gear (automatic gearbox: S gear range).

Maintain the engine speed at approximate-

ly 2,000 rpm.

The rise in temperature causes the soot on
the filter to burn. On completion of the clean-
ing the warning lamp will switch off. If the
warning lamp does not switch off, go immedi-
ately to a specialised workshop to rectify the
problem.

CAUTION

While the warning lamp 

 is lit up, the fuel

consumption is high, and in certain condi-
tions, the engine power is reduced.

Note

In order for the particulate filter to burn

off soot in a correct manner, avoid carrying
out frequent short journeys.

Using diesel fuel with a high sulphur

count can considerably reduce the useful
life of the particulate filter. The specialised
service provides information about the
countries where fuel with a high sulphur
content is used.

Driving tips

Driving through flooded roads

Fig. 220 

Driving through water.

To prevent the vehicle from being damaged
when driving through water (i.e. flooded
roads), please observe the following:

Determine the depth of the water before

entering. Water can reach a maximum height
of below the door sill 

››› 

Fig. 220

.

Drive at a maximum pace of walking speed.

Driving at a higher speed can cause a wave
in front of the vehicle, which can cause water
to enter the engine air intake system or other
parts of the vehicle.

Never stop in the water, never reverse and

never stop the engine.

Before driving through water deactivate the

Start-Stop system 

››› 

page 215

.

214

Driver assistance systems

WARNING

Driving through water, dirt and mud can

reduce braking capability and prolong the
braking distance – Risk of accident!

Do not carry out any sudden or strong

braking manoeuvres after driving through
water.

Clean and dry the brakes as soon as pos-

sible after driving through water by break-
ing intermittently. Carry out braking in or-
der to dry the brakes and clean the brake
discs only if traffic so permits. Do not put
other drivers at risk.

CAUTION

In the event of driving through water,

parts of the vehicle can be seriously dam-
aged, such as the engine, gearbox, catalyt-
ic converter, suspension or the electrical
system.

Oncoming vehicles that drive through

water can cause waves that exceed your
vehicle's permitted level for driving through
water.

There may be pot-holes mud or rocks un-

der the water that can hinder or prevent
driving through water.

Do not drive through salt water. The salt

can cause rust. All components that are ex-
posed to salt water must be rinsed immedi-
ately with fresh water.

Note

After driving through water we recommend
that you contact a specialised service for
an inspection.

Preventing damage to the vehicle

In order to prevent damage to the vehicle,
take special care:

on roads that are in poor condition,

when mounting kerbs,

when approaching very steep ramps, etc.,

with the parts of the vehicle situated on the

lower part of the vehicle, i.e. the spoiler, the
exhaust pipe.

This applies especially to vehicles with a very
low suspension (sport) and when the vehicle
is fully loaded.

Driver assistance systems

Start-Stop system*

Control lamps

It lights up

The Start-Stop system is available, the automatic en-
gine shutdown is active.

It lights up

The Start-Stop system is not available.

Description and operation

Fig. 221 

Instrument panel: Start-stop button.

The Start-Stop system helps save fuel and
reduce harmful and CO

2

 emissions.

»

215

Driving

The system is automatically switched on ev-
ery time the ignition is switched on.

The system automatically switches off the
engine when the vehicle is stationary, e.g.
waiting at traffic lights.

The current status of the Start-Stop system is
displayed on the general instrument panel
display.

Automatic engine shut down (Stop phase)

Stop the vehicle (if necessary using the

handbrake).

Shift to neutral.

Release the clutch pedal.

Automatic engine start up (Start phase)

Press the clutch.

Switching the Start-Stop system on and
off

The Start-Stop system can be switched on
and off by pressing the 

 button

››› 

Fig. 221

.

The warning lamp in the button will light up
when the system is switched off.

If the vehicle is in Stop phase when the button
is pressed, the engine will start immediately.

The Start-Stop system works under complex
driving conditions that are difficult to detect
without specialist technology. The set of nec-

essary conditions for the correct operating of
the Start-Stop system are indicated below.

Conditions for automatic engine shut
down (Stop phase)

Selector lever in neutral.

Clutch pedal not pressed.

Driver with seat belt fastened.

Driver door closed.

The bonnet closed.

Vehicle stationary.

The factory-fitted towing bracket is not

electrically connected to a trailer.

Engine at operating temperature.

Vehicle's battery sufficiently charged.

Vehicle not on a very steep slope

Engine speed below 1,200 rpm.

Vehicle battery temperature is neither too

high nor too low.

Sufficient brake system pressure.

Difference between outside temperature

and set interior temperature not too great

Vehicle speed since the last time the engine

started was above 3 km/h (2 mph).

Particulate filter not being cleaned

››› 

page 214

.

Front wheels not overly turned (steering

wheel turned less than three quarters of a
turn)

Conditions for engine start up (Start
phase)

Clutch pedal pressed.

Max./min. temperature set.

Windscreen defrost function switched on.

High blower speed.

Start-Stop button pressed.

Conditions for automatic engine start up
without driver involvement

Vehicle moving at a speed of over 3 km/h (2

mph).

Difference between outside temperature

and interior temperature is too great

Vehicle's battery insufficiently charged.

Insufficient brake system pressure.

If the driver seat belt is unfastened for more
than 30 seconds in Stop phase, the engine
must be started using the ignition key. Please
observe the messages on the general instru-
ment panel display.

Warnings on the instrument panel display
(valid for vehicles not fitted with an infor-
mative display)

FAULT: Start-Stop

Fault in the Start-Stop
system

START-STOP IMPOS-
SIBLE

Engine cannot be auto-
matically shut down

216

Driver assistance systems

START-STOP ACTIVE

Automatic engine shut

down (Stop phase)

SWITCH OFF IGNI-
TION

Switch the ignition off

START MANUALLY

Start the engine manual-
ly

WARNING

If the engine is switched off, neither the

brake servo nor the power steering will
work.

Do not move the vehicle when the engine

is switched off.

CAUTION

Switch off the Start-Stop system

››› 

page 214

 before driving through a pool

of water on the road.

Note

The battery temperature may reflect

changes in outside temperature after sev-
eral hours. If the vehicle has been stopped
outside at temperatures below zero or in di-
rect sunlight, for example, the battery tem-
perature may take several hours to reach
the values required for the correct operat-
ing of the Start-Stop system.

If the Climatronic system is operating au-

tomatically, this could impair automatic
engine shut down under certain conditions.

Cruise control (CCS)*

Control lamp

It lights up green

The Cruise Control System (GRA) is switched on and
active.

Several warning and control lamps light up
for a few seconds when the ignition is switch-
ed on, signalling that the function is being
verified. They will switch off after a few sec-
onds.

WARNING

Observe the safety warnings 

››› 

 in Con-

trol and warning lamps on page 103

.

Cruise control operation

Fig. 222 

Turn signal and main beam headlight

lever: cruise control buttons.

Read the additional information carefully

››› 

page 34

The cruise control system allows you to drive
at a constant speed of 30 km/h (19 mph) or
higher without having to press the accelera-
tor. However, the speed is only maintained
within the margin permitted by the engine
power and the braking effect of the engine.

Setting speed

Move knob 

1


››› 

Fig. 222

 to the 



 position.

Briefly press rocker switch 

2

 in 



 position

when you have reached the speed you wish
to set.

»

217

Driving

On releasing rocker switch 

2

 from 



, the

current speed is stored and will remain con-
stant without having to press the accelerator
pedal.

Increasing speed by pressing the acceler-
ator pedal

Press the accelerator to increase the speed

of the vehicle.

Release the accelerator and the previously

programmed speed will be resumed.

If, when pressing the accelerator, the vehicle
exceeds the programmed speed by more
than 10 km/h (6 mph) for more than 3 mi-
nutes, the set speed will be deleted. The
speed will have to be stored again.

Increasing speed by pressing switch 

2

Press rocker switch 

2


››› 

Fig. 222

››› 

page 217

 in position 



.

If the button is held down in the 



 position,

the speed increases continuously. Release
the switch when the required speed is
reached. The speed is stored.

Setting a lower speed

The set speed can be 

reduced

 by pressing

switch 

2


››› 

Fig. 222


››› 

page 217

 in 



.

If the button is held down in the 



 position,

the speed decreases continuously. Release

the switch when the required speed is
reached. The speed is stored.

On releasing the switch at speeds of less

than 30 km/h (19 mph), no speed will be set
and the memory will be deleted. The vehicle
must be moving at a speed of over 30 km/h
(19 mph) and switch 

2

 pressed again to 



for it to be set.

The speed can be reduced by pressing the
brake pedal, which temporarily switches off
the cruise control.

Temporary deactivation of cruise control

Cruise control 

is switched off temporarily

by pressing switch 

1


››› 

Fig. 222

››› 

page 217

 in 



 or by pressing the brake

or clutch pedal.

The set speed is stored.

To 

recover

 the set speed, briefly press the

button 

2

 in 



 position once you have re-

leased the brake pedal.

Turning off the cruise control system

Move knob 

1


››› 

Fig. 222


››› 

page 217

 to

the 



 position.

WARNING

For safety reasons the cruise control sys-

tem must not be used in dense traffic or
where roads conditions are poor (e.g. due

to ice, aquaplaning, loose grit, snow) - Risk
of accident!

The programmed speed can only be re-

established if it is not too high for current
traffic conditions.

Always switch the cruise control system

off after using it in order to avoid involunta-
ry use.

CAUTION

The cruise control cannot maintain a

constant speed when the vehicle is moving
downhill. The vehicle tends to accelerate
under its own weight. Therefore, shift down
or use the brake pedal in good time to slow
the vehicle.

Note

In vehicles with an automatic gearbox,

the cruise control system cannot be
switched on if the selector lever is in posi-
tion P, N or R.

In vehicles with a manual gearbox, the

cruise control cannot be switched on if first
gear or reverse gear is engaged.

218


Content      ..     11      12      13      14     ..