Renault Laguna Tourer (2012 year). Instruction - part 3


  Index      Renault     Renault Laguna Tourer - instruction 2012 year in english


Search            


Content   ..  1  2  3  4   ..


Renault Laguna Tourer (2012 year). Instruction - part 3


1.34

ENG_UD25512_2

Sécurité enfants : choix de la fixation du siège enfant (X91 - B91 - K91 - Renault)

ENG_NU_936-5_BK91_Renault_1

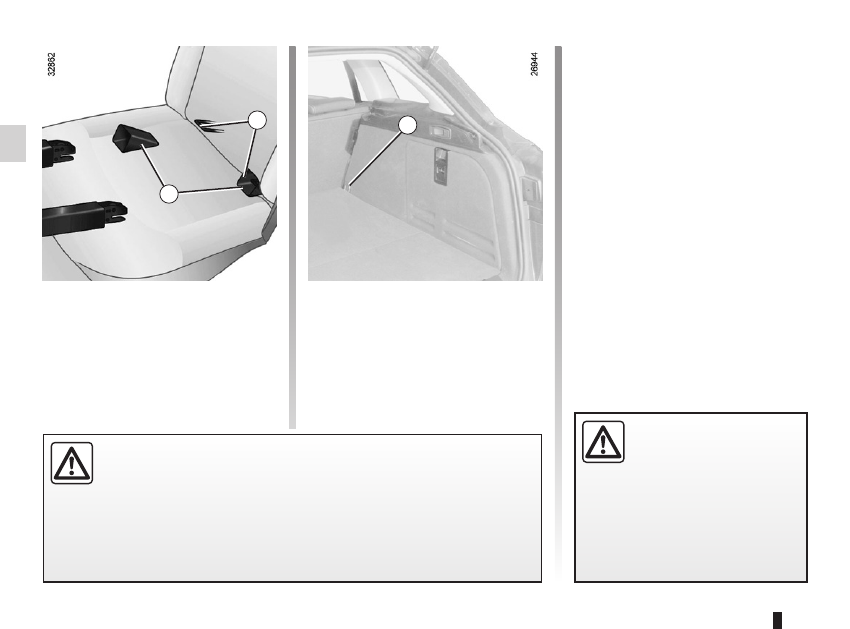
cHILd sAfETY: choosing a child seat mounting 

(2/2)

The ISOFIX anchorage points have been exclusively designed for child 

seats with the ISOFIX system. Never fit a different type of child seat, seat 

belt or other objects to these fittings.
Check that nothing is obstructing the anchorage points.

If your vehicle has been involved in a road accident, have the ISOFIX fittings 

checked and replace your child seat.

Check  that  the  seatback 

of  the  forward-facing  child 

seat  is  in  contact  with  the 

seatback  of  the  vehicle 

seat.
In this case, the child seat may not 

always rest on the seat base of the 

vehicle seat.

The  third  ring  is  used  to  attach  the 

upper strap on some child seats.
Fix the hook of the strap onto ring 3 and 

pull the strap so that the seatback of the 

child seat comes into contact with the 

seatback of the vehicle seat.

The  two  rings 1  are  located  between 

the seatback and the seat base of the 

seat and are identified by a marking.
To ensure your child seat can be easily 

fitted and locked on rings 1, use access 

guides 2 on the child seat.

3

1

2

child restraint/seat ................................(up to the end of the DU)

child restraint/seat ................................(up to the end of the DU)

child restraint/seat ................................(up to the end of the DU)

child safety............................................(up to the end of the DU)

transporting children .............................(up to the end of the DU)

child seats.............................................(up to the end of the DU)

1.35

ENG_UD23633_2

Sécurité enfants: installation du siège enfant (X91 - B91 - K91 - Renault)

ENG_NU_936-5_BK91_Renault_1

Fitting a child seat

cHILd sAfETY: fitting a child seat 

(1/3)

In the rear side seat

A carrycot can be installed across the 

vehicle  and  will  take  up  at  least  two 

seats. Position the child with his or her 

feet nearest the door.
Move the front seat as far forward as 

possible  to  install  a  rear-facing  child 

seat, then move back the seat in front 

as far as it will go, although without al-

lowing it to come into contact with the 

child seat.
For  the  safety  of  the  child  in  the  for-

ward-facing seat, do not move the seat 

in  front  back  past  the  middle  of  the 

runner, do not tilt the seatback too far 

(maximum of 25° ) and raise the seat as 

much as possible.
Check that the forward-facing child seat 

is resting against the back of the vehi-

cle seat and that the headrest of the ve-

hicle is not obstructing its use.

In the front seat

The  laws  concerning  children  travel-

ling in the front passenger seat differ in 

every country. Consult the legislation in 

force and follow the indications on the 

diagram on the following page.
Before fitting a child seat in this seat (if 

authorised):

–  lower the seat belt as far as possible;

–  move the seat as far back as possi-

ble;

–  gently  tilt  the  seatback  away  from 

vertical (approximately 25°);

–  on equipped vehicles, raise the seat 

base as far as possible.

Do not change these settings after the 

child seat is installed.

RIsK  Of  dEATH  OR 

sERIOUs INJURY: before 

fitting  a  rear-facing  child 

seat  in  this  seat,  check 

that  the  air  bag  has  been  deacti-

vated  (refer  to  the  information  on 

“Deactivating  the  front  passenger 

air bags” in Section 1).

Some seats are not suitable for fitting 

child seats. The diagram on the follow-

ing  page  shows  you  how  to  attach  a 

child seat.
The types of child seats indicated may 

not be available. Before using a differ-

ent child seat, check with the manufac-

turer that it can be fitted.

Fit the child seat in a rear 

seat wherever possible.
Check that when installing 

the child seat in the vehicle 

it is not at risk of coming loose from 

its base.
If you have to remove the headrest, 

check that it is correctly stored so 

that it does not come loose under 

harsh braking or impact.
Always attach the child seat to the 

vehicle even if it is not in use so that 

it does not come loose under harsh 

braking or impact.

1.36

ENG_UD23633_2

Sécurité enfants: installation du siège enfant (X91 - B91 - K91 - Renault)

ENG_NU_936-5_BK91_Renault_1

cHILd sAfETY: fitting a child seat 

(2/3)

child seat attached using the IsOfIX 

mounting

ü

  Seat  which  allows  an  ISOFIX 

child seat to be fitted.

±

  The  rear  seats  are  fitted  with 

an  anchorage  point  which  allows  a 

forward-facing ISOFIX child seat with 

universal approval to be fitted. The an-

chorage points are located at the back 

of the rear bench seat.
The size of the ISOFIX child seat is in-

dicated by a letter:

–  A, B and B1: for forward-facing seats 

in group 1 (9 to 18 kg);

–  C: rear-facing seats in group 1 (9 to 

18 kg);

–  D  and  E:  shell  seat  or  rear-facing 

seats  in  group  0  or  0+  (less  than 

13 kg);

–  F and G: cots in group 0 (less than 

10 kg).

child seat attached using the belt

¬

 Seat which allows a child seat 

with “Universal” approval to be attached 

by a seat belt.

 Seat which 

only allows a rear-

facing seat with “Universal” approval 

to be attached with a seat belt.

Using a child safety system 

which  is  not  approved  for 

this vehicle will not correctly 

protect  the  baby  or  child. 

They risk serious or even fatal injury.

child seat installation 

diagram

³

 Check the status of the air bag 

before fitting a child seat or allowing a 

passenger to use the seat.

²

 Seat not suitable for fitting child 

seats.

RIsK Of dEATH OR sERIOUs INJURY: before installing a rear-facing 

child seat in the front passenger seat, make sure the air bag has been 

deactivated (refer to the information on “Child safety: front passenger air 

bag deactivation/activation” Section 1).

1.37

ENG_UD23633_2

Sécurité enfants: installation du siège enfant (X91 - B91 - K91 - Renault)

ENG_NU_936-5_BK91_Renault_1

cHILd sAfETY: fitting a child seat 

(3/3)

Type of child seat

Weight of 

the child

seat size

IsOfIX

front passenger 

seat (1) (5)

Rear side seats

Rear centre 

seat

carrycot fitted across the ve-

hicle

Group 0

< 10 kg

F, G

X

U - IL (2)

X

shell seat/rear-facing seat

Group 0, 0+ and 1

<  13 kg  and  9  to 

18 kg

C, D, E

U

U - IL (3)

X

forward-facing seat

Group 1

9 to 18 kg

A, B, B1

X

U - IUF - IL (4)

X

Booster seat

Group 2 and 3

15  to  25 kg  and 

22 to 36 kg

X

U (4)

X

X  =  Seat not suitable for fitting child seats.

U  =  Seat which allows a child seat with “Universal” approval to be installed using a seat belt; check that it can be fitted.

IUf/IL =   On equipped vehicles, seat which allows an approved “Universal”/“semi-universal” or “vehicle specific” child seat to be 

attached using the ISOFIX system; check that it can be fitted.

(1)  Only a rear-facing child seat can be fitted in this seat: raise the seat to the maximum and position it as far back as possible, 

tilting the seatback slightly (approximately 25°).

(2)  A carrycot can be installed across the vehicle and will take up two seats. Position the child with his or her feet nearest the door.

(3)  Move the front seat as far forward as possible to install a rear-facing child seat, then move back the seat in front as far as it will 

go, although without allowing it to come into contact with the child seat.

(4)  Forward-facing child seat; position the seatback of the child seat in contact with the seatback of the vehicle seat. Adjust the 

height of the headrest or remove it if necessary; do not push the seat in front of the child more than halfway back on its runners 

and do not recline the seatback more than 25°.

(5) RIsK Of dEATH OR sERIOUs INJURY: before installing a rear-facing child seat in the front passenger seat, 

make sure the air bag has been deactivated (refer to the “Child safety: front passenger air bag deactivation/activation” 

paragraph in Section 1).

The table below summarises the information already shown on the diagram on the previous page, to ensure the regula-

tions in force are respected.

air bag

deactivating the front passenger air bags ........(current page)

front passenger air bag deactivation .....................(current page)

1.38

ENG_UD28945_7

Sécurité enfants : désactivation, activation airbag passager avant (X91 - B91 - K91 - D91 - Renault)

ENG_NU_936-5_BK91_Renault_1

deactivating, activating the front passenger airbag

2

deactivating the front 

passenger air bag

(on equipped vehicles)
You 

must deactivate the front passen-

ger air bag before fitting a child seat on 

the front passenger seat.

To deactivate the air bag: when the 

vehicle  is  stationary,  push  and  turn 

lock 1 to the Off position.
With the ignition on, you 

must check 

that  the  warning  light  2 

]

  is  lit 

on  the  central  display  and,  depend-

ing  on  the  vehicle,  that  the  message 

“Passenger airbag off” is displayed.
This  indicator  light  remains  con-

stantly lit while the air bag is deac-

tivated.

cHILd sAfETY: deactivating/activating the front passenger air bag 

(1/3)

1

The passenger air bag must 

only be deactivated or acti-

vated 

with the ignition off.

If it is interfered with when 

the vehicle is being driven, indicator 
lights 

å

 and 

©

 will come 

on.
Switch the ignition off then on again 

to reset the air bag in accordance 

with the lock.

1.39

ENG_UD28945_7

Sécurité enfants : désactivation, activation airbag passager avant (X91 - B91 - K91 - D91 - Renault)

ENG_NU_936-5_BK91_Renault_1

cHILd sAfETY: deactivating/activating the front passenger air bag 

(2/3)

B

A

3

c

dANgER
Since  front  passenger 

airbag  triggering  and  the 

position  of  a  rear-facing 

child seat are incompatible, 

NEvER 

use  a  restraining  device  for  rear-

facing  children  on  a  seat  with  an 

AcTIvATEd AIRBAg in front of it. 

This  provides  a  risk  of 

dEATH  or 

sERIOUs INJURY to the cHILd.

The  markings  on  the  dashboard  and 

labels B or C at A on each side of the 

passenger sun visor 3 (example: label 

shown above) remind you of these in-

structions.

air bag

activating the front passenger air bags ............(current page)

1.40

ENG_UD28945_7

Sécurité enfants : désactivation, activation airbag passager avant (X91 - B91 - K91 - D91 - Renault)

ENG_NU_936-5_BK91_Renault_1

Activating the front 

passenger air bag

Reactivate the front passenger air bag 

as soon as you remove the child seat 

from the front passenger seat to ensure 

the protection of the front passenger in 

the event of an impact.

To reactivate the air bag: when the 

vehicle  is  stationary,  push  and  turn 

lock 1 to the ON position.

With the ignition on, you 

must check 

that the 2 warning light 

]

, is off.

The front passenger air bag has been 

activated.

Operating faults

It is forbidden to fit a rear-facing child 

seat to the front seat if a fault is noted 

when  activating/deactivating  the  front 

passenger air bag.
Allowing any other passenger to sit in 

that seat is not recommended.
Contact your approved dealer as soon 

as possible.

The passenger air bag must 

only be deactivated or acti-

vated 

with the ignition off.

If it is interfered with when 

the vehicle is being driven, indicator 
lights 

å

 and 

©

 will come 

on.
Switch the ignition off then on again 

to reset the air bag in accordance 

with the lock.

1

2

cHILd sAfETY: deactivating/activating the front passenger air bag 

(3/3)

dANgER
Since  front  passenger 

airbag  triggering  and  the 

position  of  a  rear-facing 

child seat are incompatible, 

NEvER 

use  a  restraining  device  for  rear-

facing  children  on  a  seat  with  an 

AcTIvATEd AIRBAg in front of it. 

This  provides  a  risk  of 

dEATH  or 

sERIOUs INJURY to the cHILd.

steering wheel

adjustment ......................................(up to the end of the DU)

power-assisted steering........................(up to the end of the DU)

power-assisted steering........................(up to the end of the DU)

1.41

ENG_UD17430_4

Volant de direction (X91 - B91 - K91 - Renault)

ENG_NU_936-5_BK91_Renault_1

Steering wheel

Power-assisted steering

sTEERINg WHEEL/pOWER-AssIsTEd sTEERINg

Height and reach adjustment

Pull  lever 1  and  move  the  steering 

wheel to the required position.
Then, push the lever beyond the point 

of resistance to lock the steering wheel.
Make  sure  that  the  steering  wheel  is 

correctly locked.

For  safety  reasons,  only 

adjust  the  steering  wheel 

when the vehicle is station-

ary.

1

Never  switch  off  the  igni-

tion  when  travelling  down-

hill,  and  avoid  doing  so  in 

normal  driving  (assistance 

is not provided).

variable power-assisted 

steering

The  variable  power-assisted  steering 

system is equipped with an electronic 

control system which alters the level of 

assistance to suit the vehicle speed.
Steering is made easier during parking 

manoeuvres (for added comfort) whilst 

the  force  needed  to  steer  increases 

progressively  as  the  speed  rises  (for 

enhanced safety at high speeds).

Never leave the steering wheel on 

full lock when the vehicle is station-

ary.
Do  not  drive  with  a  low  battery 

charge. The steering wheel may not 

operate correctly.
With  the  engine  switched  off,  or  if 

there is a system fault, it is still pos-

sible to turn the steering wheel. The 

force required will be greater.
A  noise  may  be  heard  when  the 

steering  wheel  is  moved  quickly. 

This is normal.

With  the  engine  switched  off,  or  if 

there is a system fault, it is still pos-

sible to turn the steering wheel. The 

force required will be greater.

driver’s position ....................................(up to the end of the DU)

controls .................................................(up to the end of the DU)

dashboard.............................................(up to the end of the DU)

1.42

ENG_UD29752_2

Poste de conduite direction à gauche (X91 - B91 - K91 - Renault)

ENG_NU_936-5_BK91_Renault_1

Driving position

dRIvINg pOsITION, LEfT-HANd dRIvE 

(1/2)

1

2

3

4

5

6

7

10

11 12

13

14

15

16

25

26

20

23

17

18

22 21

8 9

24

19

1.43

ENG_UD29752_2

Poste de conduite direction à gauche (X91 - B91 - K91 - Renault)

ENG_NU_936-5_BK91_Renault_1

dRIvINg pOsITION, LEfT-HANd dRIvER 

(2/2)

1  Side air vent.
2  Side window demister outlet.
3  Stalk for:

–  direction indicator lights;
–  exterior lights;
–  front fog lights;
–  rear fog light.

4  Instrument panel.
5  Driver’s air bag and horn location.
6  –   Steering  column  stalk  for  wind-

screen  and  rear  screen  wash/

wipe;

–   On-board  computer  information 

read-out control and vehicle set-

tings customisation menu.

7  Centre air vents.
8  Heating and ventilation controls.

The equipment fitted, described below, dEpENds ON THE vERsION ANd cOUNTRY.

19 Cruise control/speed limiter control.
20 Control for some multimedia equip-

ment.

21 Hazard warning lights switch.
22 Engine  start/stop  button  and 

RENAULT card reader.

23 Control for adjusting steering wheel 

height and reach.

24 Cruise control/speed limiter controls.
25 Bonnet release.
26 Controls for:

–   headlight beam height remote ad-

justment;

–   lighting rheostat for control instru-

ments;

–   activation/deactivation of the trac-

tion control;

–   activation/deactivation  of  the 

function Stop and Start.

9  –   Display  of  time,  temperature, 

radio  information,  navigation 

system information, etc.

–   Driver and front passenger seat 

belt  unfastened  and  passenger 

airbag deactivated warning lights.

10 Location for passenger air bag.
11 Side window demister outlet.
12 Side air vent.
13 Glove box.
14 Central opening element locking/un-

locking switch.

15 Location  for  radio,  navigation 

system, etc.

16 Storage  compartment/accessories 

socket or ashtray/cigar lighter.

17 Gear lever.
18 Assisted  parking  brake  or  manual 

parking brake control.

driver’s position ....................................(up to the end of the DU)

controls .................................................(up to the end of the DU)

dashboard.............................................(up to the end of the DU)

1.44

ENG_UD29753_2

Poste de conduite direction à droite (X91 - B91 - K91 - Renault)

ENG_NU_936-5_BK91_Renault_1

dRIvINg pOsITION, RIgHT-HANd dRIvE 

(1/2)

2

3

7

8

11 12

15

19

25

26

1

4

5

6

10

16

17
18

13

24

22

20

9

23

14

21

1.45

ENG_UD29753_2

Poste de conduite direction à droite (X91 - B91 - K91 - Renault)

ENG_NU_936-5_BK91_Renault_1

dRIvINg pOsITION, RIgHT-HANd dRIvE 

(2/2)

The equipment fitted, described below, dEpENds ON THE vERsION ANd cOUNTRY.

1  Side air vent.
2  Side window demister outlet.
3  Location for passenger air bag.
4  –   Display (depending on the vehi-

cle)  of  time,  temperature,  radio 

information, navigation system in-

formation, etc.

–   Driver and front passenger seat 

belt  unfastened  and  passenger 

airbag deactivated warning lights.

5  Heating and ventilation controls.
6  Centre air vents.
7  Stalk for:

–  direction indicator lights;
–  exterior lights;
–  front fog lights;
–  rear fog light.

8  Instrument panel.
9  Location  for  driver’s  air  bag  and 

horn.

17 Central door locking/unlocking con-

trols.

18 Storage  compartment,  accesso-

ries socket or ashtray and cigarette 

lighter.

19 Control for some multimedia equip-

ment.

20 Electronic parking brake or manual 

parking brake control.

21 Cruise control/speed limiter control.
22 Gear lever.
23 Location  for  radio,  navigation 

system, etc.

24 Hazard warning lights switch.
25 Glove box.
26 Bonnet release.

10 –   Steering  column  stalk  for  wind-

screen  and  rear  screen  wash/

wipe;

–   On-board  computer  information 

read-out control and vehicle set-

tings customisation menu.

11 Side window demister outlet.
12 Side air vent.
13 Controls for:

–   headlight beam height remote ad-

justment;

–   lighting rheostat for control instru-

ments;

–   activation/deactivation of the trac-

tion control;

–   activation/deactivation  of  the 

function Stop and Start.

14 Cruise control/speed limiter controls.
15 Control for adjusting steering wheel 

height and reach.

16 Engine  start/stop  control  and  card 

reader RENAULT.

instrument panel ...................................(up to the end of the DU)

warning lights........................................(up to the end of the DU)

driver’s position ....................................(up to the end of the DU)

trip computer and warning system........(up to the end of the DU)

indicators:

instrument panel .............................(up to the end of the DU)

display ..................................................(up to the end of the DU)

operating faults .....................................(up to the end of the DU)

control instruments ...............................(up to the end of the DU)

indicators ...............................................................(current page)

lights:

fog lights ..........................................................(current page)

lights:

dipped beam headlights ...................................(current page)

lights:

direction indicators ...........................................(current page)

lights:

main beam headlights ......................................(current page)

1.46

ENG_UD27624_4

Témoins lumineux (X91 - B91 - K91 - Renault)

ENG_NU_936-5_BK91_Renault_1

á

main beam headlight tell-tale 

light 


k

dipped beam headlight tell-

tale light

g

front fog light tell-tale light 

f

Rear fog light tell-tale light 

c

Left-hand direction indicator 

tell-tale light

b

Right-hand direction indica-

tor tell-tale light

Control instruments

WARNINg LIgHTs 

(1/4)

A

If no lights or sounds are ap-

parent, this indicates a fault 

in the instrument panel. This 

indicates that it is essential 

to stop immediately (as soon as traf-

fic conditions allow). Ensure that the 

vehicle is correctly immobilised and 

contact an approved Dealer.

Instrument  panel  A:  lights  up  when 

the ignition is switched on.

In  some  cases,  the  appearance  of  a 

warning light is accompanied by a mes-

sage.

The  warning  light 

©

  means 

you should 

drive very carefully to 

an  authorised  dealer  as  soon  as 

possible. If you fail to follow this rec-

ommendation,  you  risk  damaging 

your vehicle.

Warning  light 

®

  re-

quires you to stop immedi-

ately,  for  your  own  safety, 

as soon as traffic conditions allow. 

Switch off the engine and do not re-

start it. Contact an approved Dealer.

The presence and operation of the warning lights dEpENd ON THE EQUIpmENT ANd cOUNTRY.

handbrake..............................................................(current page)

warning buzzer ......................................................(current page)

battery....................................................................(current page)

engine oil ...............................................................(current page)

electronic parking brake ........................................(current page)

1.47

ENG_UD27624_4

Témoins lumineux (X91 - B91 - K91 - Renault)

ENG_NU_936-5_BK91_Renault_1

®

sTOp light
This lights up when the ignition 

is switched on and goes out as soon as 

the engine is started. It comes on with 

other warning lights and/or messages, 

and is accompanied by a beep.
It requires you to stop immediately, for 

your own safety, as soon as traffic con-

ditions allow. Switch off the engine and 

do not restart it.
Contact an approved Dealer.

D

Electronic  parking  brake 

and brake circuit fault warn-

ing light
If it comes on during braking and is ac-

companied by the 

®

 warning light 

and  a  beep,  it  indicates  that  the  fluid 

level in the circuit is low or that there is 

a braking system fault. Stop as soon as 

traffic conditions allow and contact an 

authorised dealer.

WARNINg LIgHTs 

(2/4)

Ú

Battery charge warning light
If it comes on together with the 

®

 warning light and a beep, it in-

dicates that the electrical circuit is over-

charged or undercharged.

À

Oil pressure warning light
If  it  comes  on  when  you  are 

driving  accompanied  by  the 

®


warning light and a beep, it is essential 

to stop and switch off the ignition.
Check the oil level (refer to the informa-

tion on the “Engine oil level” in Section 

4). If the level is normal, the light has 

come on for another reason: contact an 

authorised dealer.

}

Handbrake  “on”  or  elec-

tronic  parking  brake  warn-

ing light
Refer  to  the  information  on  the 

“Handbrake”  or  “Electronic  parking 

brake” in Section 2.

©


Warning light

This  lights  up  when  the  ignition  is 

switched on and goes out as soon as 

the engine is started. It can light up in 

conjunction  with  other  indicator  lights 

and/or  messages  on  the  instrument 

panel.
It means you should drive 

very care-

fully to an authorised dealer as soon 

as possible. If you fail to follow this rec-

ommendation, you risk damaging your 

vehicle.

The presence and operation of the warning lights dEpENd ON THE EQUIpmENT ANd cOUNTRY.

A

speed limiter ..........................................................(current page)

cruise control .........................................................(current page)

air bag....................................................................(current page)

seat belts ...............................................................(current page)

fuel

filling .................................................................(current page)

1.48

ENG_UD27624_4

Témoins lumineux (X91 - B91 - K91 - Renault)

ENG_NU_936-5_BK91_Renault_1

front  seat  belt  reminder 

warning light

This comes on when starting the engine 

then, if the driver’s or front passenger’s 

seat belt (if this seat is occupied) is not 

fastened and the vehicle has reached 

approximately  12  mph  (20  km/h),  it 

flashes and a bleep sounds for around 

120 seconds.
Note: an object placed on the passen-

ger seat base may activate the warning 

light in some cases.

Rear seat belt reminder

The number of rear seat belts fastened 

appears on instrument panel A for ap-

proximately 30 seconds each time:

–  the vehicle is started;

–  a door is opened;

–  a rear seat belt is fastened or unfas-

tened.

Check  that  the  rear  passengers  are 

wearing seat belts and that the number 

of seat belt shown as fastened corre-

sponds  to  the  number  of  rear  bench 

seat places occupied.

WARNINg LIgHTs 

(3/4)

ã

passenger air bag Off 

Please  refer  to  the  informa-

tion  on  “Child  safety:  deactivating/ac-

tivating the front passenger airbag” in 

Section 1.

å

Air bag warning light
This comes on when the igni-

tion is switched on and goes out after a 

few seconds.
If it does not light up when the ignition 

is switched on, or comes on when the 

engine is running, there is a fault in the 

system.
Contact your approved Dealer as soon 

as possible.

Φ

speed limiter and cruise 

control indicator lights

See the information on the “Speed lim-

iter” and “Cruise control” in Section 2.

L

Low fuel level warning light
This lights up when the ignition 

is switched on and goes out after a few 

seconds. If it lights up when driving, fill 

up with fuel as soon as possible. There 

is only approximately 30 miles (50 km) 

worth of fuel left after the first indicator 

light comes on.

The presence and operation of the warning lights dEpENd ON THE EQUIpmENT ANd cOUNTRY.

A

filter

particle filter .....................................................(current page)

heated seats ..........................................................(current page)

ABS .......................................................................(current page)

1.49

ENG_UD27624_4

Témoins lumineux (X91 - B91 - K91 - Renault)

ENG_NU_936-5_BK91_Renault_1

The presence and operation of the warning lights dEpENd ON THE EQUIpmENT ANd cOUNTRY.

WARNINg LIgHTs 

(4/4)

driving  correction  device 

warning light

Refer to the information on “Driving cor-

rection devices” in Section 2.

Ä

Toxic  fume  filter  system 

Warning Light

This  lights  up  when  the  ignition  is 

switched  on  and  goes  out  when  the 

engine is started.
–  If  it  lights  up  continuously,  consult 

your  approved  Dealer  as  soon  as 

possible;

–  if it flashes, reduce the engine speed 

until the light stops flashing. Contact 

your  approved  Dealer  as  soon  as 

possible.

Refer  to  the  information  on 

“Antipollution, fuel economy and driv-

ing” in Section 2.

ð

Heated seats operating indi-

cator

This  indicates  that  one  of  the  heated 

seats is in operation.

Ü

Not used 


A

É

preheating  warning  light 

(diesel version)

This  should  come  on  when  the  igni-

tion is switched on. It indicates that the 

heater plugs are in operation. This goes 

out as soon as the engine starts.

x

Anti-lock  braking  warning 

light

This  lights  up  when  the  ignition  is 

switched on and goes out after a few 

seconds.
If it does not go out after the ignition is 

switched on, or lights up when driving, 

there is a fault with the ABS. Braking 

will then be as normal, without the ABS 

system.
Contact an approved Dealer as soon as 

possible.


Content   ..  1  2  3  4   ..