Renault Koleos (2018 year). Instruction - part 15


  Index      Renault     Renault Koleos - instruction 2018 year in english


Search            


Content   ..  13  14  15  16   ..


Renault Koleos (2018 year). Instruction - part 15


3.36

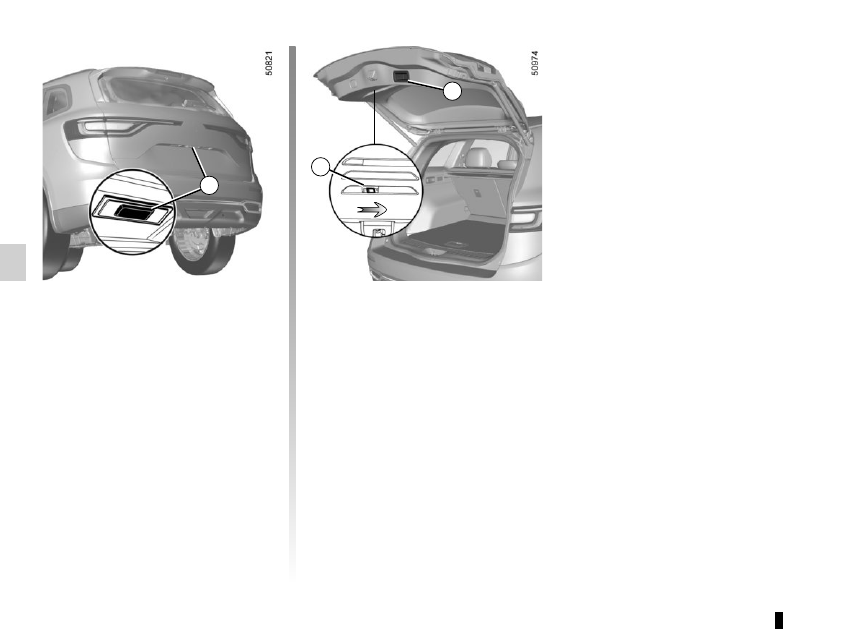
Opening the doors manually 

from the inside

If it is impossible to unlock the tailgate, 

it can be done manually from inside:
–  access the luggage compartment by 

tilting the rear bench seatback(s),

–  insert a pencil or similar object in 

recess 3 and slide the unit as shown 

in the illustration;

–  push the tailgate to open it.

BOOT

To open

Press button 1 and lift the tailgate.

To close

Lower the tailgate using the handles 2 

inside the tailgate to help you.

2

1

3

3.37

If fitted on the vehicle, the tailgate locks 

and unlocks at the same time as the 

doors.
Depending on the vehicle, you have se-

veral different ways to manoeuvre the 

tailgate:
–  using the RENAULT card remote 

control;

–  using the controls on the tailgate;
–  using the dashboard control;
–  using the hands-free function.

AUTOMATIC TAILGATE 

(1/5)

Conditions of use

–  Immobilise the vehicle.
–  If there is any ice or snow prevent-

ing the tailgate from opening, this ice 

or snow must be removed to free the 

tailgate.

–  In the event that the battery is dis-

charged or if it is changed, the tail-

gate should be closed (manually 

if necessary) to restart the tailgate 

motor.

Ensure that nobody is close 

to the moving parts when 

opening/closing the tail-

gate.

Risk of injury.

Opening/Closing

Activating the automatic tailgate ope-

ning or closing using the dashboard 

control or using the RENAULT card 

causes  three beeps to sound just 

before the tailgate begins to move.

When opening or closing the tail-

gate, ensure that nothing interferes 

with the manoeuvre.

To avoid damaging the tailgate 

system, do not manually force the 

tailgate to open or close while it is 

moving.

The attaching of any 

carrying device (bike rack, 

luggage box, etc.) resting 

on the luggage compart-

ment lid is prohibited. To install a 

carrying device on your vehicle, 

contact an Approved Dealer.

3.38

AUTOMATIC TAILGATE 

(2/5)

Using the tailgate interior closing 

control
Press control 3.

Using the tailgate exterior opening 

control
Press control 2.

1

Using the RENAULT card remote 

control
With the ignition off, press and hold 

switch 1 on the RENAULT card.

As a safety precaution, 

the doors should only be 

opened or closed when the 

vehicle is stationary.

Risk of injury.

2

3

3.39

Do not keep your foot in the air. Carry 

out the movement without stopping.
Note: With the tailgate open, after de-

tecting a closure control, it waits around 

3 seconds before triggering the closure 

(a beep is emitted every second).

Using the dashboard control

Depending on the vehicle, press and 

hold switch 4.

Using the hands-free function
The hands-free function grants access 

to the boot or allows it to be closed 

while you have your hands full.
With the RENAULT card on your person 

and with the ignition off, perform a for-

wards/backwards movement with your 

foot under the rear bumper.
The sensor detects the approach and 

removal of your foot and triggers the 

opening or closing of the tailgate.

AUTOMATIC TAILGATE 

(3/5)

Activation/deactivation of the 

hands-free function
Using the multifunction screen, select 

menu “Vehicle”, “User settings” then 

“Use handsfree card: open/close”. 

Select “ON” or “OFF” to activate or de-

activate the function.

Usage features of the hands-free 

function
–  the hands-free function is no longer 

available after a few days of lack of 

movement of the vehicle, or after 

around 15 minutes if the vehicle is 

unlocked. To reactivate it, use the 

unlocking button on the RENAULT 

card.

–  The “Hands-free” function is only 

available if the vehicle is stationary 

and the engine is switched off (and 

not on standby with the Stop and 

Start function).

–  The «hands-free» feature may not 

work if the vehicle is equipped with a 

towbar or is in an area of high elec-

tromagnetic radiation.

4

3.40

AUTOMATIC TAILGATE 

(4/5)

Stopping the tailgate 

manoeuvre

The automatic tailgate manoeuvre can 

be stopped at any time by a short press 

on one of the controls. Depending on 

the opening position, the tailgate hatch 

can however continue to be opened 

manually.
If the tailgate is stationary in the inter-

mediate position, your next press will 

move the tailgate in the opposite direc-

tion to when you stopped it.

Manual mode

After stopping the tailgate, you can per-

form the manoeuvre manually if you 

wish.
You can switch to automatic movement 

at any time by pressing one of the con-

trols.

Obstacle detection

When the tailgate window encounters 

an obstacle (presence of an object or 

person) when it is moving, it stops. 

Depending on the opening position, the 

tailgate hatch can however continue to 

be opened manually.
Press the tailgate opening/closing con-

trol to reperform the tailgate movement 

in the same direction as before encoun-

tering the obstacle.

Limiting the tailgate opening 

angle

You can adjust the maximum tailgate 

opening height It will always stop at the 

chosen position:

–  open the tailgate to an intermediate 

position;

–  manually adjust the tailgate to the 

chosen position;

–  press the automatic tailgate control 3 

for more than 3 seconds to save the 

position.

Two beeps will sound to notify you 

that the position has been saved.

3

The obstacle detection is an 

aid to opening and closing 

the tailgate, it does not in 

any way replace the user’s 

care or responsibility.

3.41

AUTOMATIC TAILGATE 

(5/5)

Operating faults

If you activate the automatic tailgate 

continuously for around a minute (se-

quence of opening and closing), it will 

stop in order to avoid overheating. The 

operation will return to normal after 

about a minute.
The automatic tailgate will not operate 

if the battery is on low charge. In this 

case, operate the automatic tailgate 

with the engine started.

Note
In very cold weather conditions, the au-

tomatic opening may not operate if the 

trunk lid joints are frozen.

Precautions during use

Before opening/closing the tailgate, 

ensure that the surrounding space is 

sufficient to allow the tailgate to ope-

rate. If not, stop the tailgate movement 

with the external tailgate control and 

hold the tailgate in position by hand 

(the tailgate may continue to open ma-

nually).
If the tailgate is moving and the engine 

is started, the movement will stop for a 

seconds before continuing.
Avoid multiple manual stops during the 

automatic tailgate movement (risk of 

damaging the tailgate system).
Make sure that the sensors are not 

obscured (by dirt, mud, snow, road salt 

etc.).

Driver’s responsibility 

when parking or stopping 

the vehicle
Never leave your vehicle 

with a child, an adult who is not self-

sufficient or a pet inside or at the 

rear of the tailgate, even for a short 

while.
They may pose a risk to themselves 

or to others by starting the engine, 

activating equipment such as the 

electric windows, the automatic 

tailgate or by locking the doors.
RISK OF DEATH OR SERIOUS 

INJURY.

Disable the «hands-free» function before washing the vehicle manually 

or handling the emergency spare wheel or the towbar.
Risk of accidental opening or closing of the tailgate which may 

cause injury.

3.42

To remove the flexible 

section of the luggage 

compartment cover 2

Pull handle 1 gently then lift it while un-

folding the luggage compartment cover.

LUGGAGE COMPARTMENT COVER

3

2

Do not place any heavy or 

solid objects on the luggage 

cover. These may pose a 

risk to the vehicle occu-

pants if the driver has to brake sud-

denly or if the vehicle is involved in 

an accident.

1

1

To unfold the luggage 

compartment cover 2

Pull handle 1 located under the cover 

and place each end of the cover in the 

notch 3.

Removing/refitting the 

luggage cover 2

Press the two ends 4 to maximum and 

move them towards the centre of the 

luggage compartment cover, then tilt 

the cover. 
To fit the luggage cover, carry out this 

procedure in reverse. 

4

The luggage compartment cover is 

heavy. 

3.43

Fitting the luggage net 

behind the front seats

Inside the vehicle on each side:
–  lift the cover 1 to access the anchor-

ing point;

–  latch the hook 2  of luggage net to  

the anchoring point;

LUGGAGE NET 

(1/2)

–  open the U-shaped area to access 

the anchoring point 4; 

–  rotate the anchoring point 4 up to 90 

degrees using the tool;

–  latch the hook 3 to the anchoring 

point 4;

–  adjust the net strap 5 so that it is taut;

–  fit the luggage net in the same way 

for the other side. 

Depending on the vehicle, this may be 

used when transporting animals or lug-

gage to isolate them from the passen-

ger section.
It can be positioned:
–  A: behind the rear seats;
–  B: behind the front seats.

The luggage net is de-

signed to retain a maximum 

weight of 10 kg.
Risk of injury.

Do not install the luggage 

net in this position when a 

passenger is occupying a 

rear seat.

A

B

1

2

6

4

3

5

3.44

LUGGAGE NET 

(2/2)

7

–  latch the hook 10 to the anchoring 

point 11;

–  adjust the net strap 9 so that it is taut. 

The seatbacks must not touch the 

luggage net;

–  fit the luggage net in the same way 

for the other side. 

Fitting the luggage net 

behind the rear seats

Inside the vehicle on each side:
–  lift the cover 7 to access the anchor-

ing point;

–  latch the hook of luggage net to the 

anchoring point;

8

7

9

11

10

3.45

BOOT FITTINGS

Bag hooks 1

Maximum weight per hook: 3kg.

Anchorage points

Attachment points 2.

If your vehicle is not equipped with 

anchorage points, you can get them 

from an authorised dealer.

1

2

3

Maximum weight on trunk 

board 3 is 60kg.

3.46

Always position the heavi-

est items directly on the 

floor. Use the lashing 

points 1 on the boot floor, if 

these are fitted to the vehicle. The 

luggage should be loaded in such a 

way that no items will be thrown for-

ward and strike the occupants if the 

driver has to brake suddenly. Fasten 

the rear seat belts, even if the seats 

are not occupied.

TRANSPORTING OBJECTS IN THE LUGGAGE COMPARTMENT 

Always position the objects transported 

so that the largest surface is against:

–  The rear bench seatback for normal 

loads (example A).

– The front seatbacks with the rear 

seatbacks folded down, the mobile 

floor in the flat-floor position (exam-

ple B).

– The front seatbacks with the rear 

seatbacks folded down, the mobile 

floor in the stored-away position, as is 

the case for maximum loads (exam-

ple C).

If you have to place objects on the folded 

seatback, it is necessary that you lower 

the headrests before folding the seat-

back so that it can be folded as flat as 

possible against the seat.

B

A

1

C

3.47

Permissible nose weight, maxi-

mum permissible towing weight, 

braked and unbraked: refer to 

the information on “Weights” in 

Section 6.

Choice and fitting of towing 

equipment

Maximum weight of towing equip-

ment: 37 kg
For fitting and conditions of use, 

refer to the equipment’s fitting in-

structions.

Please keep these instructions with 

the rest of the vehicle documenta-

tion.

TRANSPORTING OBJECTS towbar

A

Maximum dimension A: 1115 mm.

If the towbar ball obscures the regis-

tration plate or the rear fog lights, it 

should be removed when not in use.
In all cases, comply with local leg-

islation.

3.48

Accessing the mounting 

points

Vehicles fitted with longitudinal roof 

bars
The attachment inserts 2 are located on 

the longitudinal roof bars 1.

ROOF BARS, SPOILER

If original roof bars, ap-

proved by our Technical 

Department, are supplied 

with screws, only use these 

screws for attaching the roof bars to 

the vehicle.

1

2

A

Spoiler A

It is forbidden to fix objects 

and/or accessories (bike 

racks, etc.) to the spoiler.

For information on the range of 

equipment adapted to your vehi-

cle, we advise you to consult an ap-

proved Dealer.
Refer to the fitting instructions for in-

formation on how to fit roof bars and 

conditions of use.
Please keep these instructions with 

the rest of the vehicle documenta-

tion.
Maximum permissible load on 

roof rack: refer to the information 

on “Weights” in Section 6.

Precautions during use

Handling the tailgate
Before handling the tailgate, check the 

objects and/or accessories (bike rack, 

roof box, etc.) fitted to the roof bars: 

these must be correctly positioned and 

secured, so as not to hinder the opera-

tion of the tailgate.

3.49

Hands-free telephone 

integrated control

For equipped vehicles, use the steering 

wheel controls 3.

MULTIMEDIA EQUIPMENT (1/2)

Using the telephone
We remind you of the need 

to conform to the legislation 

in force concerning the use 

of such equipment.

Multimedia systems

1 Multimedia screen;

2  Steering column controls;

3  Steering wheel controls;

4 Microphone.

1

3

2

Refer to the equipment instructions 

for information on how to operate 

this equipment.

4

3.50

MULTIMEDIA EQUIPMENT (2/2)

Multimedia sockets 5

You can use sockets USB or the SD 

card reader to access the multime-

dia content of your accessories and 

the system update (please refer to the 

equipment instructions).
The various sources can be selected 

from the multifunction screen and from 

the steering column controls.

Multimedia sockets 6

Sockets USB can only recharge acces-

sories with a maximum power rating of 

10.5 Watts (voltage: 5V) per socket, 

which have been approved by our 

Technical Department.
The JACK socket enables the radio to 

be used with an auxiliary cable.

The sockets USB can also recharge 

accessories with a maximum power 

rating of 10.5 Watts (voltage: 5V) per 

socket, which have been approved by 

our Technical Department.
The JACK socket enables the radio to 

be used with an auxiliary cable.

5

6

4.1

Section 4: Maintenance

Bonnet . . . . . . . . . . . . . . . . . . . . . . . . . . . . . . . . . . . . . . . . . . . . . . . . . . . . . . . . . . . . . . . . . . . . . . . .  

4.2

Engine oil level: general information . . . . . . . . . . . . . . . . . . . . . . . . . . . . . . . . . . . . . . . . . . . . . . . . .  

4.4

Engine oil level: topping up, filling . . . . . . . . . . . . . . . . . . . . . . . . . . . . . . . . . . . . . . . . . . . . . . . . . . .  

4.5

Engine oil change . . . . . . . . . . . . . . . . . . . . . . . . . . . . . . . . . . . . . . . . . . . . . . . . . . . . . . . . . . . . . . .  

4.7

Levels  . . . . . . . . . . . . . . . . . . . . . . . . . . . . . . . . . . . . . . . . . . . . . . . . . . . . . . . . . . . . . . . . . . . . . . . .  

4.8

engine coolant . . . . . . . . . . . . . . . . . . . . . . . . . . . . . . . . . . . . . . . . . . . . . . . . . . . . . . . . . . . . 

4.8

brake fluid . . . . . . . . . . . . . . . . . . . . . . . . . . . . . . . . . . . . . . . . . . . . . . . . . . . . . . . . . . . . . . . . 

4.9

windscreen washer reservoir . . . . . . . . . . . . . . . . . . . . . . . . . . . . . . . . . . . . . . . . . . . . . . . . . 

4.10

Filters . . . . . . . . . . . . . . . . . . . . . . . . . . . . . . . . . . . . . . . . . . . . . . . . . . . . . . . . . . . . . . . . . . . . . . . . .   4.10

Tyre pressure. . . . . . . . . . . . . . . . . . . . . . . . . . . . . . . . . . . . . . . . . . . . . . . . . . . . . . . . . . . . . . . . . . .   4.11

Battery . . . . . . . . . . . . . . . . . . . . . . . . . . . . . . . . . . . . . . . . . . . . . . . . . . . . . . . . . . . . . . . . . . . . . . . .   4.13

Bodywork maintenance . . . . . . . . . . . . . . . . . . . . . . . . . . . . . . . . . . . . . . . . . . . . . . . . . . . . . . . . . . .   4.15

Interior trim maintenance . . . . . . . . . . . . . . . . . . . . . . . . . . . . . . . . . . . . . . . . . . . . . . . . . . . . . . . . . .   4.17


Content   ..  13  14  15  16   ..