Renault Koleos (2018 year). Instruction - part 16


  Index      Renault     Renault Koleos - instruction 2018 year in english


Search            


Content   ..  14  15  16  17   ..


Renault Koleos (2018 year). Instruction - part 16


4.2

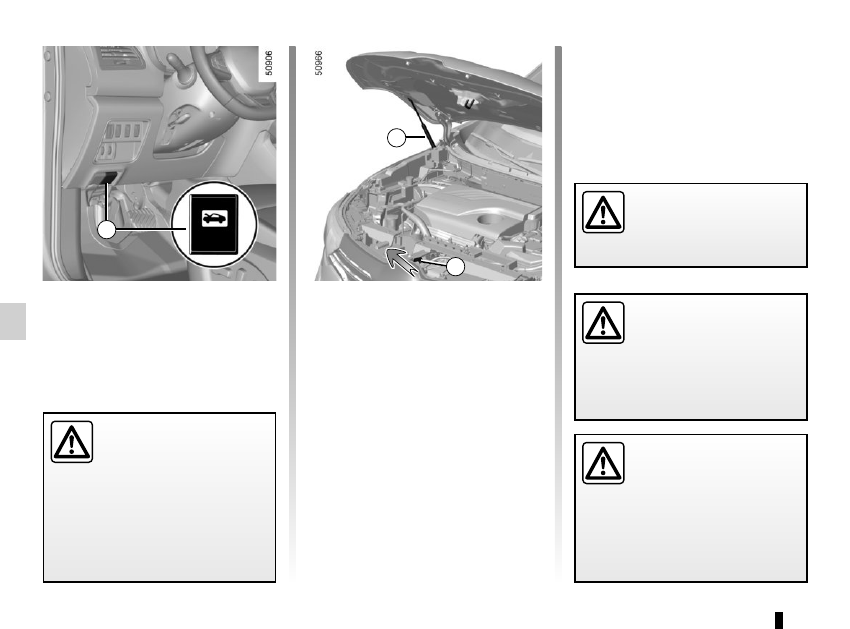
To open, pull handle 1.

BONNET 

(1/2)

The engine may be hot 

when carrying out opera-

tions in close proximity. In 

addition, the engine cooling 

fan can come on at any moment.

Risk of injury.

Unlocking the bonnet catch

To unlock, push tab 2 at the same time 

as opening the bonnet.

Opening the bonnet

Lift the bonnet, guiding it up, and it 

will rest in position with the help of two 

struts 3.

2

When working in the engine 

compartment, ensure that 

the windscreen wiper stalk 

is in the park position.

Risk of injury.

Before performing any 

action in the engine com-

partment, the ignition must 

be switched off by pressing 

the engine stop button (please see 

the information on “Starting, stop-

ping the engine” in Section 2).

3

1

Do not press down on the 

bonnet: there is a risk that 

the bonnet may accidentally 

close.

4.3

BONNET 

(2/2)

Closing the bonnet

Check that nothing has been left in the 

engine compartment.
To close the bonnet again, hold the 

bonnet in the middle and guide it down, 

allowing a 30 cm gap before it is closed, 

then release it. It will latch automatically 

under its own weight.

After carrying out any work 

in the engine compart-

ment, check that nothing 

has been left behind (cloth, 

tools, etc.).

These may damage the engine or 

cause a fire.

Ensure that the bonnet is 

properly locked.

Check that nothing is pre-

venting the catch from lock-

ing (gravel, cloth, etc.).

In the event of even a slight 

impact involving the radia-

tor grille or bonnet, have 

the bonnet lock checked by 

an approved dealer as soon as pos-

sible.

4.4

–  Remove the dipstick and wipe with a 

clean, lint-free cloth;

–  push the dipstick in as far as it will 

go (for vehicles equipped with a cap-

type dipstick C, screw the cap in as 

far as it will go);

–  take out the dipstick again;

–  read the level: it should never fall 

below minimum mark A or exceed 

maximum mark B.

Once the operation has been com-

pleted, ensure that the dipstick is 

pushed in as far as it will go or that 

the “cap-type dipstick” is completely 

screwed in.

Reading the oil level

The oil level should be read with the ve-

hicle on level ground, after the engine 

has been switched off for some time.

The dipstick must be used to read 

the exact oil level and make sure 

that the maximum level has not been 

exceeded (risk of engine damage). 

Refer to the following pages.

The instrument panel display only 

alerts the driver when the oil level is at 

its minimum.

It is normal for an engine to use oil for 

lubrication and cooling of moving parts 

and it is normal to top up the level be-

tween oil changes.

However, contact your approved 

Dealer if more than 0.5 litres is being 

consumed every 600 miles (1,000 km) 

after the running in period.

Oil change frequency: check the oil 

level from time to time and certainly 

before any long journey to avoid the 

risk of damaging your engine.

ENGINE OIL LEVEL: general information

A

B

A

B

C

Exceeding the maximum 

engine oil level
Under no circumstances 

must the maximum fill 

level B be exceeded: risk of damage 

to the engine and catalytic con-

verter.

If the level exceeds the maximum 

level, do not start your vehicle and 

contact an authorised dealer.

In order to prevent splashback, it is 

recommended that a funnel be used 

when topping up/filling with oil.

Before performing any 

action in the engine com-

partment, the ignition must 

be switched off by pressing 

the engine stop button (please see 

the information on “Starting, stop-

ping the engine” in Section 2).

4.5

Topping up/filling

The vehicle must be parked on level 

ground and the engine should be cold 

(for instance, before the engine is 

started up for the first time in the day).

– Unscrew cap 1;
–  top up the level (as a guide, the ca-

pacity between the minimum and 

maximum reading on the dipstick 2 

is between 1.5 and 2 litres, depend-

ing on the engine);

–  wait for approximately 10 minutes to 

allow the oil to flow into the engine;

–  check the level using the dipstick 2 

(as described above).

Once the operation has been com-

pleted, ensure that the dipstick is 

pushed in as far as it will go and that 

the cap is completely screwed in.

ENGINE OIL LEVEL: topping up, filling (1/2)

1

2

Before performing any 

action in the engine com-

partment, the ignition must 

be switched off by pressing 

the engine stop button (please see 

the information on “Starting, stop-

ping the engine” in Section 2).

1

2

4.6

ENGINE OIL LEVEL: topping up, filling (2/2)

Do not exceed the max level and 

do not forget to refit cap 1 and dip-

stick 2.

In order to prevent splashback, it is 

recommended that a funnel be used 

when topping up/filling with oil.

1

2

1

2

4.7

Engine oil grade

Refer to the maintenance document for 

your vehicle.

ENGINE OIL LEVEL: OIL CHANGE

Never run the engine in an 

enclosed space as exhaust 

gases are poisonous.

Engine oil change: if you 

are changing the oil when 

the engine is hot, be careful 

not to scald yourself if the 

oil overflows.

Filling: take care when 

topping up the oil that 

no oil drips onto engine 

components - risk of fire. 

Remember to refit the cap securely 

as there is a risk of fire if oil splashes 

onto hot engine components.

When working in the engine 

compartment, ensure that 

the windscreen wiper stalk 

is in the park position.

Risk of injury.

The engine may be hot 

when carrying out opera-

tions in close proximity. In 

addition, the engine cooling 

fan can come on at any moment.
Risk of injury.

Oil change

Service interval: refer to the 

Maintenance Document for your vehi-

cle.

Oil change capacity

Please refer to the maintenance docu-

ment for your vehicle, or contact an au-

thorised dealer. 

Always check the engine oil level using 

the dipstick, as explained previously (it 

should never fall below the minimum 

level, or be over the maximum level on 

the dipstick).

Consult your approved dealer at 

once if you notice an abnormal or 

repeated drop in any of the fluid 

levels.

Exceeding the maximum 

engine oil level
Under no circumstances 

must the maximum fill level 

be exceeded: risk of damage to the 

engine and catalytic converter.

If the oil level exceeds the maximum 

level, do not start your vehicle and 

contact an approved Dealer.

4.8

Frequency of checking coolant level
Check the coolant level regularly
 

(very severe damage is likely to be 

caused to the engine if it runs out of 

coolant).
If the level needs to be topped up, only 

use products approved by our Technical 

Department which ensure:
–  protection against freezing;
–  an anti-corrosion protection for the 

cooling system.

Consult your approved dealer at 

once if you notice an abnormal or 

repeated drop in any of the fluid 

levels.

No operations should be 

carried out on the cooling 

circuit when the engine is 

hot.

Risk of burns.

Replacement interval
Refer to the Maintenance Document for 

your vehicle.

Coolant level

With the engine switched off and on 

level ground, the level when cold must 

be between the MINI and MAXI marks 

on reservoir 1.
Top this level up when cold before it 

reaches the MINI mark.

LEVELS 

(1/3)

1

When working in the engine 

compartment, ensure that 

the windscreen wiper stalk 

is in the park position.

Risk of injury.

Before performing any 

action in the engine com-

partment, the ignition must 

be switched off by pressing 

the engine stop button (please see 

the information on “Starting, stop-

ping the engine” in Section 2).

4.9

Level 2
It is normal for the level to drop as the 

brake shoes become worn, but it must 

never drop lower than the “MINI” warn-

ing line.
If you wish to check the disc and drum 

wear yourself, you should obtain the 

document explaining the checking pro-

cedure from the manufacturer’s net-

work or web site.

Topping up
After any operation on the hydraulic cir-

cuit, a specialist must replace the brake 

fluid.
Only use fluids approved by our 

Technical Department (and taken from 

a sealed container).

Replacement interval
Refer to the Maintenance Document for 

your vehicle.

Brake fluid level

The level should be read with the engine 

switched off and on level ground.
This should be checked frequently, 

and immediately if you notice even the 

slightest loss in braking efficiency.

LEVELS 

(2/3)

2

The engine may be hot 

when carrying out opera-

tions in close proximity. In 

addition, the engine cooling 

fan can come on at any moment.
Risk of injury.

Consult your approved dealer at 

once if you notice an abnormal or 

repeated drop in any of the fluid 

levels.

4.10

Checking the level
Use the “dropper cap”. To do this, plug 

the hole 4 with your finger, remove the 

cap then read the gauge attached to 

the cap.
Note: Regularly check the reservoir 

level by topping up the liquid before 

taking a trip.

Jets
To adjust the windscreen washer jets, 

please consult an authorised dealer.

Filters

The replacement of filter components 

(air filter, cabin filter, diesel filter, etc.) 

is scheduled in the maintenance opera-

tions for your vehicle.
Replacement intervals for filter el-

ements:  refer to the Maintenance 

Document for your vehicle.

Windscreen washer reservoir

Topping up

With the engine switched off, open the 

cap  3. Fill until you can see the fluid, 

then replace the cap.

Liquid

Screen wash product (product with 

antifreeze in winter).

LEVELS 

(3/3)

/FILTERS

3

When working in the engine 

compartment, ensure that 

the windscreen wiper stalk 

is in the park position.

Risk of injury.

The engine may be hot 

when carrying out opera-

tions in close proximity. In 

addition, the engine cooling 

fan can come on at any moment.
Risk of injury.

Before performing any 

action in the engine com-

partment, the ignition must 

be switched off by pressing 

the engine stop button (please see 

the information on “Starting, stop-

ping the engine” in Section 2).

4

4.11

TYRE PRESSURE (1/2)

B: dimension of the tyres fitted to the 

vehicle.

C: intended driving speed.
D: recommended pressure for optimis-

ing fuel consumption.

 NB: driving comfort may be altered.

A

C

D

F

E

G

B

C

E

E

F

F

E: front tyre pressure.
F: rear tyre pressure.
G: tyre pressure for the emergency 

spare wheel.

Vehicle fitted with a tyre pressure 

monitoring system 
In cases of under-inflation (puncture, 

low pressure, etc.), warning light 


lights up on the instrument panel. 

Please refer to the information on the 

“Tyre pressure monitoring system” in 

Section 2.

Label A

Open the driver’s door to read it.
Tyre pressures should be checked 

when the tyres are cold.
If the tyre pressures cannot be checked 

when the tyres are cold, increase the 

pressures from 0.2 to 0.3 bar (or 3 PSI). 

Never deflate a hot tyre.

A

4.12

TYRE PRESSURE (2/2)

Special note concerning fully laden 

vehicles (Maximum Permissible All-Up 

Weight) and towing a trailer: the maxi-

mum speed must be limited to 60 mph 

(100 kph) and the tyre pressure in-

creased by 0.2 bar.
Please refer to the information on 

“Weights” in Section 6.
Tyre safety and use of snow chains: 

Refer to the information on “Tyres” in 

Section 5 for the servicing conditions 

and, depending on the version, the use 

of chains.

For your safety, please re-

spect the speed limit.
When they need to be re-

placed, only tyres of the 

same make, size, type and profile 

should be used on a single axle.
They must: either have a load ca-

pacity and speed rating at least 

equal to those of the original 

tyres, or conform to those recom-

mended by an authorised dealer.
Failure to heed these instructions 

could endanger your safety and 

affect your vehicle’s roadworthi-

ness.
Risk of loss of control of the ve-

hicle.

4.13

BATTERY 

(1/2)

1

Battery 1 does not require any mainte-

nance. You should not open it or add 

any fluid.

Handle the battery with care 

as it contains sulphuric acid 

which must not come into 

contact with the eyes or 

skin. If it does, wash the affected 

area with plenty of cold water. If 

necessary, consult a doctor.
Ensure that naked flames, red hot 

objects and sparks do not come into 

contact with the battery as there is a 

risk of explosion.

Depending on the vehicle, a system 

continuously checks the battery charge 

status. If this decreases, the message 

“Battery low start engine” is displayed 

on the instrument panel. In this case, 

start the engine. The message will go 

off.
The charge status of your battery can 

decrease especially if you use your ve-

hicle:
–  for short journeys;
–  for driving in town;
–  when the temperature drops;
–  after extended use of energy-con-

suming devices (radio, etc.) with the 

engine switched off.

The engine may be hot 

during operations in close 

proximity. In addition, the 

engine cooling fan may 

start at any moment.
Risk of injury.

Before performing any 

action in the engine com-

partment, the ignition must 

be switched off by pressing 

the engine stop button (please see 

the information on “Starting, stop-

ping the engine” in Section 2).

4.14

Replacing the battery

As this operation is complex, we advise 

you to contact an approved Dealer.

BATTERY 

(2/2)

The battery is a specific 

type, please ensure it is 

replaced with the same 

type. Consult an approved 

dealer.

A

2

3

4

5

6

7

Label A

Observe the indications on the battery:

–  2  Naked flames and smoking are for-

bidden;

–  3 eye protection required;

–  4 keep away from children;

–  5 explosive materials;

–  6 refer to the handbook;

–  7 corrosive materials.

4.15

BODYWORK MAINTENANCE 

(1/2)

You should

Wash your car frequently, with the 

engine off, with cleaning products rec-

ommended by the manufacturer (never 

use abrasive products). Rinse thor-

oughly beforehand with a jet:

–  

spots of tree resin and industrial 

grime;

–  

mud in the wheel arches and under-

neath the body which forms damp 

patches;

–  

bird droppings, which cause a 

chemical reaction with the paint that 

rapidly discolours paintwork and 

may even cause the paint to peel 

off;

   wash the vehicle immediately to 

remove these marks since it is im-

possible to remove them by polish-

ing;

–  

salt, particularly in the wheel arches 

and underneath the body after driv-

ing in areas where the roads have 

been gritted.

Remove any plant matter (resin, leaves, 

etc.) from the vehicle regularly.

What you should not do

Do not degrease or clean mechani-

cal components (e.g. the engine com-

partment), underneath the body, parts 

with hinges (e.g. inside the doors) and 

painted plastic external fittings (e.g. 

bumpers) using high-pressure clean-

ing equipment or by spraying on prod-

ucts not approved by our Technical 

Department. Doing this could give rise 

to corrosion or operational faults.
Wash the vehicle in bright sunlight or 

freezing temperatures.
Do not scrape off mud or dirt without 

pre-wetting.
Allow dirt to accumulate on the exterior.
Allow rust to form following minor im-

pacts.
Do not use solvents not approved by 

our Technical Department to remove 

stains as this could damage the paint-

work.
Do not drive in snow or muddy condi-

tions without washing the vehicle, par-

ticularly under the wheel arches and 

body.

A well-maintained vehicle will last 

longer. It is therefore recommended to 

maintain the exterior of the vehicle reg-

ularly.
Your vehicle has been treated with very 

effective anti-corrosion products. It is 

nevertheless subject to various outside 

influences.

Corrosive agents in the atmosphere

–  

atmospheric pollution (built-up and 

industrial areas),

–  

saline atmospheres (near the sea, 

particularly in hot weather),

–  

seasonal and damp weather condi-

tions (e.g. road salt in winter, water 

from road cleaners, etc.).

Minor impacts

Abrasive action

Dust and sand in the air, mud, road grit 

thrown up by other vehicles, etc.
You should take a number of minor pre-

cautions in order to safeguard your ve-

hicle against such risks.

4.16

Respect local regulations about wash-

ing vehicles (e.g. do not wash your ve-

hicle on a public highway).
Observe the vehicle stopping distances 

when driving on gravelled surfaces to 

prevent paint damage.
Repair, or have repaired quickly, areas 

where the paint has been damaged, to 

prevent corrosion spreading.
Remember to visit the body shop pe-

riodically in order to maintain your 

anti-corrosion warranty. Refer to the 

Maintenance Document.
If it is necessary to clean mechani-

cal components, hinges, etc., spray 

them with products approved by our 

Technical Department to protect them 

after they have been cleaned.

BODYWORK MAINTENANCE 

(2/2)

We have selected special products 

to care for your vehicle and you can 

obtain these from the manufactur-

er’s accessory outlets.

Using a roller type car wash

Return the windscreen wiper stalk to 

the Park position (refer to the informa-

tion on the “Windscreen washer, wiper” 

in Section 1). Check the mounting of 

external accessories, additional lights 

and mirrors, and ensure that the wiper 

blades are secured with adhesive tape.

Remove the radio aerial mast if your 

vehicle is fitted with this equipment. 

Remember to remove the tape and refit 

the antenna after washing.

Cleaning the headlights

As the headlights are made of plastic 

“glass”, use a soft cloth or cotton wool 

to clean them. If this does not clean 

them properly, moisten the cloth with 

soapy water, then wipe clean with a soft 

damp cloth or cotton wool.

Finally, carefully dry off with a soft dry 

cloth.
Cleaning products containing alco-

hol must not be used.

Vehicles with a matte paint 

finish

This type of paint requires certain pre-

cautions.

Do not do the following
–  

use wax-based products (polishing);

–  

rub hard;

–  

wash the vehicle in a roller-type car 

wash;

–  

wash the vehicle using a high-pres-

sure device;

–  

attach stickers to the paintwork (risk 

of leaving marks).

You should do the following
Wash the vehicle by hand using plenty 

of water, using a soft cloth or a gentle 

sponge.

4.17

Glass instrument panel

(e.g.: instrument panel, clock, exterior 

temperature display, radio display, mul-

timedia or multifunction display etc.)
Use a soft cloth (or cotton wool).

If this does not clean them properly, 

use a soft cloth (or cotton wool) slightly 

moistened with soapy water and then 

wipe clean with another soft damp cloth 

or cotton wool.

Finally, carefully dry off with a soft dry 

cloth.
Do not use products containing alco-

hol and/or spray fluids on the area.

Seat belts

These must be kept clean.

Use products selected by our Technical 

Department (Approved outlets) or 

warm, soapy water and a sponge and 

wipe with a dry cloth.

Detergents or dyes must not be used 

under any circumstances.

INTERIOR TRIM MAINTENANCE 

(1/2)

Textiles (seats, door trim, etc)

Vacuum-clean the textiles regularly.

Liquid stain
Use soapy water.
Dab lightly (never rub) with a soft cloth, 

rinse and remove the excess.

Solid or pasty stain
Carefully remove the excess solid or 

pasty material immediately  with a 

spatula (working from the edges to the 

centre to avoid spreading the stain).

Clean as for a liquid stain.

Special instructions for sweets or 

chewing gum
Put an ice cube on the stain to solidify 

it, then proceed as for a solid stain.

A well-maintained vehicle will last 

longer. It is therefore recommended to 

maintain the interior of the vehicle regu-

larly.
A stain should always be dealt with 

swiftly.
Whatever type of stain is on the trim, 

use cold (or warm) soapy water with 

natural soap.
Detergents (washing-up liquid, pow-

dered products, alcohol-based prod-

ucts) should not be used.
Use a soft cloth.
Rinse and soak up the excess.

For further recommendations for 

maintaining the interior, and/or for 

any unsatisfactory results, please 

see an authorised dealer.


Content   ..  14  15  16  17   ..