Peugeot 5008 (2024 year). Manual in english - page 6
 

  Index      Manuals     Peugeot 5008 (2024 year). Manual in english


Search            copyright infringement  


Content      ..     4      5      6      7     ..


Peugeot 5008 (2024 year). Manual in english - page 6


162

Driving

alone or combined with the "Driver Attention 

Warning by Camera" system.

These systems are in no way designed 

to keep the driver awake or to prevent 

the driver from falling asleep at the wheel. 

It is the driver’s responsibility to stop if feeling 

tired.

Take a break if you are feeling tired or at least 

every 2 hours.

Driver Attention Warning

The system triggers an alert when it 

detects that the driver has not taken a 

break after two hours of driving at a speed above 

43 mph (70 km/h).

This alert is issued via the display of a message 

encouraging the driver to take a break, 

accompanied by an audible signal.

If the driver does not follow this advice, the alert 

is repeated hourly until the vehicle is stopped.

The system resets itself if one of the following 

conditions is met:

–  With the engine running, the vehicle has been 

stationary for more than 15 minutes.

–  The ignition has been switched off for a few 

minutes.

–  The driver's seat belt is unfastened and their 

door is opened.

As soon as the speed of the vehicle 

drops below 43 mph (70 km/h), the 

system goes into standby.

Driving time starts being counted again once 

the speed reaches above 43 mph (70 km/h).

Driver Attention Warning by 

Camera

Depending on version, the Driver Attention 

Warning system may be combined with the 

Driver Attention Warning by Camera system.


The system assesses the driver's level of 

alertness, fatigue and distraction by 

identifying trajectory changes in relation to the 

lane markings.

To do this, the system uses a camera, placed on 

the upper part of the windscreen.

This system is particularly suited to fast roads 

(speed higher than 43 mph (70 km/h)).

The system may perform a learning 

procedure for up to 30 minutes after the 

start of the monitoring.

During this period, the driver's individual 

driving behaviour is analysed and no alert is 

given.

At a first alert level, the driver is warned by the 

message "

Be vigilant!

", accompanied by an 

audible signal.

After three first-level alerts, the system triggers 

a further alert with the message "

Dangerous 

driving: take a break

", accompanied by a more 

pronounced audible signal.

In certain driving conditions (poor road 

surface or strong winds), the system may 

give alerts independent of the driver's level of 

vigilance.

The following situations may interfere 

with the operation of the system or 

prevent it from working:

–  Lane positioning assist is active.

–  poor visibility (e.g. inadequate street 

lighting, heavy rain, thick fog, snowfall).

–  dazzle (e.g. headlamps of an oncoming 

vehicle, low sun, reflections on a damp road, 

leaving a tunnel, alternating shade and light).

–  windscreen area located in front of the 

camera (e.g. dirty, misted, frost-covered, 

snow-covered, damaged or masked by a 

sticker).

163

Driving

6

–  lane markings absent, worn, hidden 

(e.g. snow, mud, dead leaves) or multiple 

(roadworks).

–  close to the vehicle ahead (lane markings 

not detected).

–  roads that are narrow, winding.

Deactivation/Activation

The function is activated by default when the 

ignition is switched on.

The settings are changed via the 

Driving

/

Vehicle

 touch screen menu.

Deactivation is confirmed by the 

illumination of this indicator lamp on the 

instrument panel.

Malfunction

This warning lamp lights up on the 

instrument panel with the message 

"

Audible Warning System fault: Repair 

needed

" if the audible warning system is in 

failure.

The system may be disturbed or unavailable.

Have it checked by a PEUGEOT dealer or a 

qualified workshop.

In the event of a malfunction, this warning 

lamp lights up on the instrument panel, 

accompanied by the display of a message and 

an audible signal.

Have it checked by a PEUGEOT dealer or a 

qualified workshop.

This warning lamp lights up on the 

instrument panel with the message 

"

Driving Assistance Sensor blind: Clean 

sensor, see User Manual

" if the sensor is 

masked.

This is a normal behavior, which does not 

request the support of a qualified workshop.

In this case, stop the vehicle and verify if the 

front camera is covered by dirt, mud, sand, 

snow, ice or anything preventing the sensing.

The system is operational again after the 

detection field has been cleaned.

Blind spot monitoring

For more information, refer to the 

General recommendations on the use 

of driving and manoeuvring aids

.


This system warns the driver of a potential 

danger posed by the presence of another vehicle 

(car, lorry, motorcycle) in the vehicle's blind 

spots (areas hidden from the driver's field of 

vision) using sensors located on the sides of the 

bumpers.


A warning lamp appears in the door mirror on the 

side in question:

– 

fixed

, immediately, when being overtaken.

– 

flashing

, after a delay of about one second, 

when overtaking a vehicle slowly, and when the 

direction indicator is used.

Activation/Deactivation

It is set via the 

Driving/Vehicle

 touch 

screen menu.

When the function is activated, this 

indicator lamp comes on in the instrument 

panel.

When starting the vehicle, the warning lamp 

comes on in each mirror to indicate that the 

system is activated.

The status of the system is memorised when the 

ignition is switched off.

The system is automatically deactivated 

when towing with a towing device 

approved by PEUGEOT.

164

Driving

Operating conditions

–  All vehicles are moving in the same direction 

and in adjacent lanes.

–  The speed of your vehicle must be between 7 

and 87 mph (12 and 140 km/h).

–  When overtaking a vehicle, the speed 

difference is less than 6 mph (10 km/h).

–  When overtaken by a vehicle, the speed 

difference is less than 16 mph (25 km/h).

–  Traffic is flowing normally.

–  Overtaking a vehicle over a certain period of 

time and the vehicle being overtaken remains in 

the blind spot.

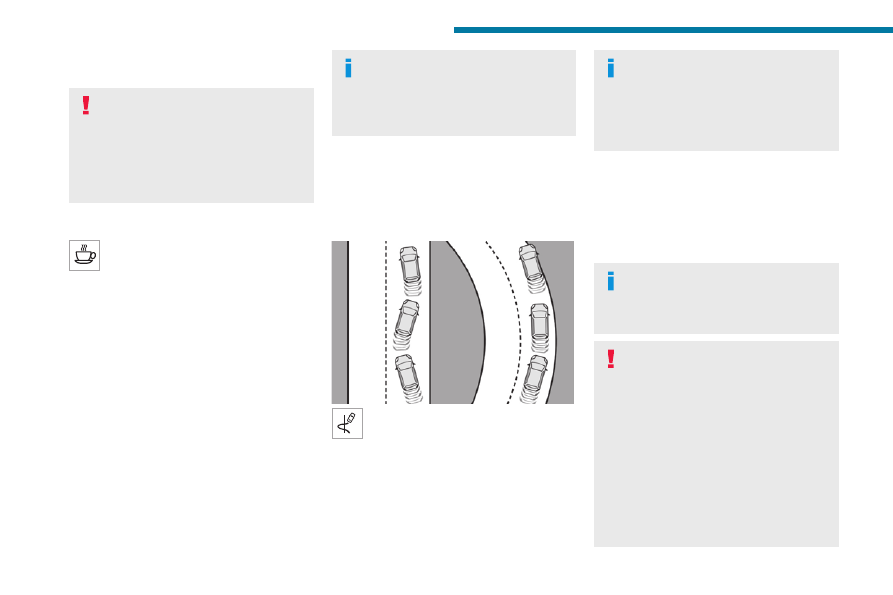
–  You are driving on a straight or slightly curved 

road.

–  Your vehicle is not pulling a trailer, a caravan, 

etc.

Operating limits


No alert is triggered in the following conditions:

–  presence of stationary objects (e.g. parked 

vehicles, safety rails, lampposts, signs).

–  vehicles travelling in the opposite direction.

–  on winding roads or in case of sharp turns.

–  when overtaking or being overtaken by a 

very long vehicle (e.g. truck, bus), which is both 

detected in a blind spot from behind and present 

in the driver's field of vision from the front.

–  quick overtaking manoeuvre.

–  very heavy traffic: vehicles detected in front 

and behind are confused with a lorry or a 

stationary object.

–  activation of the Park Assist function. 

Malfunction

In the event of a malfunction, this 

warning lamp flashes for a few 

moments in the instrument panel, accompanied 

by the Service warning lamp coming on and the 

display of a message.

Have it checked by a PEUGEOT dealer or a 

qualified workshop.

The system may be temporarily disturbed 

by certain climatic conditions (e.g. rain, 

hail).

In particular, driving on a wet road or going 

from a dry to a wet area can cause false 

alerts (e.g. presence of a cloud of water 

droplets in the blind spot interpreted as a 

vehicle).

In bad or wintry weather, ensure that the 

sensors are not covered by mud, ice or snow.

165

Driving

6

Take care not to cover the warning zone in 

the door mirrors, or the detection zones on 

the front and rear bumpers with adhesive 

labels or other objects; they may hamper 

correct operation of the system.

Parking sensors

For more information, refer to the 

General recommendations on the use 

of driving and manoeuvring aids

.


This system detects and signals the proximity of 

obstacles (e.g. pedestrian, vehicle, tree, barrier) 

using sensors located in the bumper.

Rear parking sensors

System startup is available under the following 

conditions:

–  when reverse gear is engaged.

–  when the vehicle is moving backwards 

(e.g. downhill, in neutral).

It is indicated by an audible confirmation signal 

and a display indication.

If an obstacle is detected as soon as the 

reverse gear is engaged, an audible 

detection signal is given directly instead of the 

audible confirmation signal.

If no audible signal is given, the display 

indication is not shown or a warning message 

appears, the system has a failure.

Audible assistance


The system signals the presence of obstacles 

within the sensors’ detection zone.

The proximity information is given by an 

intermittent audible signal, the frequency of 

which increases as the vehicle approaches the 

obstacle.

When the distance between the vehicle and 

the obstacle becomes less than about thirty 

centimetres, the audible signal becomes 

continuous.

The sound emitted by the speaker (right or 

left) indicates the side on which the obstacle is 

located.

The audible signal is automatically suspended 

when the vehicle is stationary for a few seconds.

The audible signal is automatically restored 

when the vehicle is moving again or if the 

obstacle approaches the vehicle.

Adjusting the audible signal

Depending on version, with 

PEUGEOT Connect Radio or 

PEUGEOT Connect Nav, pressing this button 

opens the window for adjusting the volume of 

the audible signal.

Visual assistance


This supplements the audible signal by 

displaying bars on the screen whose location 

represents the distance between the obstacle 

and the vehicle (white: more distant, orange: 

close, red: very close).

When the obstacle is very close, the "

Danger

symbol is displayed on the screen.

Closing the system display window

Pressing this button closes the 

system display window.

This warning lamp flashes during obstacle 

detection on the instrument panel.

166

Driving

Muting the audible assistance / 

Closing the visual assistance

If the audible detection signal is muted or the 

system display window is closed manually by 

the driver with the button above during the 

obstacle detection, only the warning lamp 

continues to flash on the instrument panel.

Front parking sensors

Supplementing the rear parking sensors, the 

front parking sensors are triggered when an 

obstacle is detected in front and the speed of the 

vehicle is below 6 mph (10 km/h).

Front parking sensor operation is suspended if 

the vehicle stops for more than three seconds in 

forward gear, if an obstacle is no longer detected 

or the vehicle speed exceeds 6 mph (10 km/h).

The sound emitted by the speaker (front 

or rear) locates the obstacle relative to 

the vehicle, whether in front of or behind it on 

its path.

Deactivation/Activation

(Depending on country of sale)

By default, the audible signal is automatically 

activated at each time the reverse gear is 

engaged.

The system cannot be deactivated. 

You can start the system manually and 

activate/deactivate the audible signal in 

the 

Driving

/

Vehicle

 touch screen menu.

The rear parking sensors system will be 

deactivated automatically if a trailer or 

bicycle carrier is connected to a towing device 

installed in accordance with the 

manufacturer's recommendations.

When starting the vehicle, the graphic 

and audible aids are only available after 

the touch screen has started up.

Operating limits

If the boot is heavily loaded, the vehicle may tilt, 

affecting distance measurements.

In case of a gearbox failure, the system is not 

active, when the reverse gear is engaged.

Malfunction

In case of display or speakers 

malfunction (e.g. frozen image, black 

screen), the system may be disturbed or 

unavailable.

In the event of vehicle malfunction that 

requires the vehicle to be stopped, the 

system may be deactivated.

In the event of a malfunction when 

changing into reverse gear, this warning 

lamp lights up on the instrument panel, 

accompanied by the display of a message and 

an audible signal (short beep).

Have it checked by a PEUGEOT dealer or a 

qualified workshop.

This warning lamp lights up on the 

instrument panel with the message 

"

Parking Assistance Sensor blind: Clean 

sensor, see User Manual

" if the sensor is 

masked.

This is a normal behavior, which does not 

request the support of a qualified workshop.

In this case, stop the vehicle and verify if the 

front and/or rear sensors are covered by dirt, 

mud, sand, snow, ice or anything preventing the 

sensing.

The system is operational again after the 

detection field has been cleaned.

Visiopark 1 - Visiopark 2

For more information, refer to the 

General recommendations on the use 

of driving and manoeuvring aids

.


167

Driving

6


With the engine running, these systems allow 

views of your vehicle’s close surroundings to be 

displayed on the touch screen using one camera 

for Visiopark 1 and two cameras for Visiopark 2.


The screen is divided into two parts with a 

contextual view and a view from above the 

vehicle in its close surroundings.

The parking sensors supplement the information 

on the view from above the vehicle.

Various contextual views may be displayed:

–  Standard view.

–  180° view.

–  Zoom view.

AUTO mode is activated by default.

In this mode, the system chooses the best 

view to display (standard or zoom).

You can change the type of view at any time 

during a manoeuvre.

►  Press the button in the bottom left-hand 

corner of the touch screen.

►  Select the type of view:

• "

Standard view

".

• "

180° view

".

• "

Zoom view

".

• "

AUTO view

".

The display is immediately updated with the type 

of view selected.

The system status is not saved when the ignition 

is switched off.

Operating principle


Using one or two cameras, the close 

surroundings of the vehicle are recorded whilst 

manoeuvring at low speed.

An image from above your vehicle in its close 

surroundings is reconstructed (represented 

between the brackets) in real time and as the 

manoeuvre progresses.

It facilitates the alignment of your vehicle when 

parking and allows obstacles close to the vehicle 

to be seen. It is automatically deleted if the 

vehicle remains stationary for too long.

With Visiopark 2, the image is created using 

both cameras, when going forward and when 

reversing.

When the function is activated, it is possible 

that the view from above is not displayed. If 

the system is activated when the vehicle has 

already moved, the view from above can be fully 

displayed.

168

Driving

Visiopark 1

Rear view


To activate the camera located on the tailgate, 

engage reverse gear and do not exceed a speed 

of 6 mph (10 km/h).

The system is deactivated:

–  Automatically, at speeds above approximately 

6 mph (10 km/h),

–  Automatically, if the tailgate is opened.

–  Upon changing out of reverse gear (the image 

remains displayed for 7 seconds).

–  By pressing the white arrow in the upper-left 

corner of the touch screen.

AUTO mode


This mode is activated by default.

Using sensors in the rear bumper, the automatic 

view changes from the rear view (standard) to 

the view from above (zoom) as an obstacle is 

approached at the level of the red line (less than 

30 cm) during a manoeuvre.

Standard view


The area behind the vehicle is displayed on the 

screen.

The blue lines 

1

 represent the width of your 

vehicle, with the mirrors unfolded; their direction 

changes according to the position of the steering 

wheel.

The red line 

2

 represents a distance of 30 cm 

from the rear bumper; the two blue lines 

3

 and 

4


represent 1 m and 2 m, respectively.

This view is available with AUTO mode or in the 

view selection menu.

Zoom view


The camera records the vehicle's surroundings 

during the manoeuvre in order to create a 

view from above the rear of the vehicle in its 

near surroundings, allowing the vehicle to be 

manoeuvred around nearby obstacles.

This view is available with AUTO mode or in the 

view selection menu.

Obstacles may appear further away than 

they actually are.

It is important to monitor the sides of the 

vehicle during the manoeuvre, using the 

mirrors.

Parking sensors also provide additional 

information about the area around the vehicle.

169

Driving

6

180° view


The 180° view facilitates reversing out of a 

parking space, making it possible to see the 

approach of vehicles, pedestrians and cyclists.

This view is not recommended for carrying out a 

complete manoeuvre.

It features 3 areas: left 

A

, centre 

B

 and right 

C

.

This view is only available via the view selection 

menu.

Visiopark 2

The vehicle has a camera at the front, fitted in 

the grille, and a camera at the rear, located close 

to the tailgate opening control.

Using these cameras, the system displays the 

vehicle's near surroundings on the touch screen, 

offering views from the rear of the vehicle (rear 

vision) when reverse gear is engaged and views 

from the front of the vehicle (front vision) when 

the gearbox is in neutral or a gear is engaged.

Rear vision


The system activates automatically when 

reverse gear is engaged.

The system is deactivated:

–  Automatically, at speeds above approximately 

12 mph (20 km/h).

–  When shifting out of reverse (the front vision 

image replaces the rear vision image for 7 

seconds).

–  By pressing the white arrow in the upper-left 

corner of the touch screen.

If a trailer or a bicycle carrier is fitted to 

the towball, the area behind the vehicle 

on the view from above goes dark.

The surroundings are reconstructed by the 

front camera only.

The rear vision views are similar to those for the 

Visiopark 1 function.

For more information on the 

Visiopark 

1

 function, refer to the corresponding section.

Front and rear vision


With the engine running and the speed 

below 12 mph (20 km/h), the system is 

activated via the 

Driving/Vehicle

 touch screen 

menu:

►  Select "

Visual parking assistance

".

AUTO mode is displayed by default, with front 

vision, if the gearbox is in neutral or with a 

gear engaged, or with rear vision, if reverse is 

engaged.

The system is deactivated:

–  Automatically above about 19 mph (30 km/h) 

(the image disappears temporarily from 12 mph 

(20 km/h)).

–  By pressing the white arrow in the upper-left 

corner of the touch screen.

170

Driving

AUTO mode


This mode is activated by default.

Using sensors in the front bumper, the automatic 

view changes from the front view (standard) to 

the view from above (zoom) as an obstacle is 

approached during a manoeuvre.

Standard view


The area in front of your vehicle is displayed on 

the screen.

The orange lines 

1

 represent the width of your 

vehicle, with the mirrors unfolded; their direction 

changes according to the position of the steering 

wheel.

The red line 

2

 represents a distance of 30 cm 

from the front bumper; the two orange lines 

3


and 

4

 represent 1 m and 2 m, respectively.

This view is available with AUTO mode or by 

selecting it in the view change menu.

Zoom view


The camera records the vehicle's surroundings 

during the manoeuvre in order to create a 

view from above the front of the vehicle in its 

near surroundings, allowing the vehicle to be 

manoeuvred around obstacles nearby.

This view is available with AUTO mode or in the 

view selection menu.

Obstacles may appear further away than 

they actually are.

It is important to check the sides of the 

vehicle during the manoeuvre, using the 

mirrors.

The parking sensors also supplement the 

information on the vehicle's surroundings.

180° view


The 180° view assists with exiting from a parking 

space in forward gear, making it possible to 

see the approach of vehicles, pedestrians and 

cyclists.

This view is not recommended for carrying out a 

complete manoeuvre.

It consists of 3 areas: left 

A

, centre 

B

 and right 

C

.

This view is available only from the view 

selection menu.

171

Driving

6

Park Assist

For more information, refer to the 

General recommendations on the use 

of driving and manoeuvring aids

.

This system provides active parking assistance: 

it detects a parking space then operates the 

steering system to park in this space.

With a 

manual gearbox

, the driver manages the 

accelerator, brakes, gears and clutch.

With an 

automatic gearbox

, the driver manages 

the accelerator, brakes and gears.

During phases of entry into and exit from a 

parking space, the system provides visual and 

audible information to the driver in order to make 

the manoeuvres safe. Several forward and 

reverse manoeuvres may be required.

At any time, the driver can take back control by 

holding the steering wheel.


The Park Assist system provides assistance for 

the following manoeuvres:

A.

Entry into a "parallel" parking space

B.

Exit from a "parallel" parking space

C.

Entry into a "bay" parking space

The Park Assist system cannot operate 

with the engine switched off.

When Park Assist is activated, it prevents 

Stop & Start from going into STOP mode. In 

STOP mode, activation of Park Assist restarts 

the engine.

The Park Assist system takes control of 

the steering for a maximum of 4 

manoeuvring cycles. It is deactivated after 

these 4 cycles. If the vehicle is not positioned 

correctly, take back control to complete the 

manoeuvre.

The sequence of manoeuvres and the 

driving instructions are displayed in the 

instrument panel.

The assistance is activated: the display 

of this symbol and a speed limit 

indicate that the steering manoeuvres are 

controlled by the system: do not touch the 

steering wheel.

The assistance is deactivated: the 

display of this symbol indicates that the 

steering manoeuvres are no longer controlled 

by the system: take over the steering.

Activation of Park Assist deactivates the 

Blind spot monitoring.

The Parking sensors function is not 

available during parking space 

measurement. It intervenes later when 

manoeuvring to warn that the vehicle is 

approaching an obstacle: the audible signal 

becomes continuous when the obstacle is 

less than 30 centimetres away.

If the Parking sensors function has 

been deactivated, it will be automatically 

reactivated during the assisted manoeuvring 

phases.

During parking and exit from parking 

manoeuvres, the Visiopark 1 - Visiopark 

2 functions may come into operation. They 

allow better monitoring of the surroundings of 

the vehicle, by displaying additional 

information in the touch screen.

For more information on the 

Visiopark 

1 - Visiopark 2

 functions, refer to the 

corresponding section.

In some circumstances, the sensors may 

not detect small obstacles located in their 

blind spots.

Any object exceeding the size of the vehicle 

(e.g. roof ladder, towball) is not taken 

into account by the Park Assist during a 

manoeuvre.

172

Driving

Always check the surroundings of the 

vehicle before starting a manoeuvre.

If the lateral distance between the vehicle and 

the space is too great, the system may not be 

able to measure the space.

During manoeuvring phases, the steering 

wheel performs rapid turns: do not hold 

the steering wheel or put your hands between 

the spokes of the steering wheel.

Beware of any object likely to block the 

manoeuvre (e.g. loose clothing, scarves, ties) 

- risk of injury!

Assistance with "parallel" 

parking manoeuvres

►  When parking, select "

Park Assist

" in 

the 

Driving/Vehicle

 touch screen menu 

to activate the function.

►  Limit the vehicle speed to a maximum 

of 12 mph (20 km/h) and select "

Enter 

parallel parking space

" on the touch screen.

To enter a "parallel" parking space, the 

system does not identify spaces that are 

clearly smaller or larger than the vehicle.

►  Operate the direction indicator on the 

side you have chosen to park in order to 

activate the measurement function. The vehicle 

must drive at a distance of between 0.5 m and 

1.5 m from the row of parked vehicles.

20

►  Drive at a speed below 12 mph (20 

km/h) following the instructions until the 

system finds an available space.

►  Move forwards slowly until a message 

is displayed, accompanied by an audible 

signal, asking you to engage reverse gear.

►  Engage reverse gear, release the 

steering wheel and move without 

exceeding a speed of 4 mph (7 km/h).

The assisted parking manoeuvre is in 

progress.

7

►  Without exceeding 5 mph (7 km/h), 

move forwards and backwards, aided by 

the warnings from the "Parking sensors" system, 

until the end of the manoeuvre is indicated.

The end of the manoeuvre is confirmed 

by a message and an audible signal.

Parking assistance is deactivated: you can take 

over the controls again.

Assistance with "bay" 

parking manoeuvres

►  When parking, select “

Park Assist

” in 

the 

Driving/Vehicle

 touch screen menu 

to activate the function.

►  Limit the vehicle speed to a maximum 

of 12 mph (20 km/h) and select “

Enter 

bay parking space

” on the touch screen.

►  Operate the direction indicator on the 

parking side chosen to activate the 

measurement function. The vehicle should drive 

at a distance of between 0.5 m and 1.5 m from 

the row of parked vehicles.

20

►  Drive at a speed below 12 mph (20 

km/h) following the instructions until the 

system finds an available space.

When several successive spaces are 

found, the vehicle will be directed 

towards the last one.

►  Move forwards slowly until a message 

is displayed, accompanied by an audible 

signal, asking you to engage reverse gear.

►  Engage reverse gear, release the 

steering wheel and move without 

exceeding the speed of 5 mph (7 km/h).

The assisted parking manoeuvre is in 

progress.

7

►  Without exceeding 5 mph (7 km/h), 

follow the instructions and the warnings 

from the "Parking sensors" system, until the end 

of the manoeuvre is indicated.

The end of the manoeuvre is confirmed 

by a message and an audible signal.

The system is deactivated: it is possible to retake 

control.

During a "bay" parking manoeuvre, the 

Park Assist system is automatically 

deactivated once the rear of the vehicle is 

within 50 cm of an obstacle.

173

Driving

6

Assistance with "parallel" 

parking exit manoeuvres 

►  To leave a "parallel" parking space, switch 

the engine on.

►  With the vehicle stationary, select 

"

Park Assist

" in the 

Driving/Vehicle


touch screen menu to activate the function.

►  Press "

Exit parking slot

" on the touch 

screen.

►  Operate the direction indicator for the 

exit side chosen.

►  Engage reverse or forward 

gear and release the steering 

wheel.

The assisted parking manoeuvre is in 

progress.

5

►  Without exceeding 3 mph (5 km/h), 

move forwards and backwards, aided by 

the warnings from the "Parking sensors" system, 

until the end of the manoeuvre is indicated.

The manoeuvre is complete when the vehicle's 

front wheels are clear of the parking space.

The end of the manoeuvre is confirmed 

by a message and an audible signal.

The system is deactivated: it is possible to retake 

control.

Deactivation

The system is deactivated via the 

Driving / 

Vehicle

 touch screen menu.

The system is automatically deactivated:

–  when the ignition is switched off.

–  if the engine stalls.

–  if the driver's seat belt is not fastened.

–  on opening the driver's door.

–  if no manoeuvre is performed within 5 minutes 

of selecting the type of manoeuvre.

–  after a prolonged stop of the vehicle during a 

manoeuvre.

–  if the wheel anti-slip regulation (ASR) is 

triggered.

–  if the speed of the vehicle is above 43 mph 

(70 km/h).

–  when the driver interrupts the rotation of the 

steering wheel.

–  after 4 manoeuvring cycles.

–  if one of the front wheels encounters an 

obstacle.

–  when towing a trailer, connected electrically.

Deactivation is confirmed by a message and an 

audible signal.

The driver should then take back control of the 

vehicle's steering.

If the system is deactivated during a 

manoeuvre, the driver should reactivate 

it to repeat the measurement.

To switch the system off for a prolonged period, 

contact a PEUGEOT dealer or a qualified 

workshop.

Malfunctions

If the parking sensor malfunction occurs 

during use, indicated by this warning lamp 

coming on, it causes the function to deactivate.

In the event of a malfunction, have the system 

checked by a PEUGEOT dealer or a qualified 

workshop.

In the event of a power steering 

malfunction, this warning lamp is 

displayed on the instrument panel, accompanied 

by a warning message.

You must stop as soon as it is safe to do so. 

Contact a PEUGEOT dealer or a qualified 

workshop.


* 1L & 5L produced in Europe

PEUGEOT & TotalEnergies,
a partnership in performance !

Keep your engine younger for longer !

Quartz  Ineo  Xtra  First  0W-20

  is  a  very  high  performance  lubricant 

resulting from the common work of the PEUGEOT and TotalEnergies R&D 
teams. Its innovative technology extends your engine’s life while reaching 
significant  fuel  savings  and  thus  limiting  CO

2

  emissions.  The  product  is 

now  available  in  new  packaging*  made  of  50%  recycled  material  and 
100% recyclable. 

For  more  than  25  years  of  partnership,  TotalEnergies  and  PEUGEOT 
have pushed the limits of performance in sports competition with historic 
victories,  in  endurance  racing.  Today,  the  two  brands  continue  their 
common  motorsport  adventure  by  setting  out  to  conquer  the  24h  of 
Le  Mans  and  the  FIA    World  Endurance  Championship  in  the  Hypercar 
category. PEUGEOT recommends high-tech Quartz lubricants exclusively 
for  the  protection  of  its  engines  throughout  their  life.  TotalEnergies 
therefore equips PEUGEOT vehicles with Quartz lubricants from their first 
filling in the factory to the approved maintenance networks to guarantee 
them optimal day-to-day operation. PEUGEOT & TotalEnergies: official 
partners in performance ! 


175

Practical information


* 1L & 5L produced in Europe

PEUGEOT & TotalEnergies,
a partnership in performance !

Keep your engine younger for longer !

Quartz  Ineo  Xtra  First  0W-20

  is  a  very  high  performance  lubricant 

resulting from the common work of the PEUGEOT and TotalEnergies R&D 
teams. Its innovative technology extends your engine’s life while reaching 
significant  fuel  savings  and  thus  limiting  CO

2

  emissions.  The  product  is 

now  available  in  new  packaging*  made  of  50%  recycled  material  and 
100% recyclable. 

For  more  than  25  years  of  partnership,  TotalEnergies  and  PEUGEOT 
have pushed the limits of performance in sports competition with historic 
victories,  in  endurance  racing.  Today,  the  two  brands  continue  their 
common  motorsport  adventure  by  setting  out  to  conquer  the  24h  of 
Le  Mans  and  the  FIA    World  Endurance  Championship  in  the  Hypercar 
category. PEUGEOT recommends high-tech Quartz lubricants exclusively 
for  the  protection  of  its  engines  throughout  their  life.  TotalEnergies 
therefore equips PEUGEOT vehicles with Quartz lubricants from their first 
filling in the factory to the approved maintenance networks to guarantee 
them optimal day-to-day operation. PEUGEOT & TotalEnergies: official 
partners in performance ! 


7

Compatibility of fuels


Petrol fuels conforming to the EN228 standard 

containing up to 5% and 10% ethanol 

respectively.


Diesel fuels conforming to the EN590, EN16734 

and EN16709 standards and containing up to 

7%, 10%, 20% and 30% fatty acid methyl ester 

respectively. The use of B20 or B30 fuels, even 

occasionally, imposes special maintenance 

conditions referred to as "Arduous conditions".


Paraffinic Diesel fuel conforming to the EN15940 

standard.

The use of any other type of (bio) fuel 

(e.g. pure or diluted vegetable or animal 

oils, domestic fuel) is strictly prohibited - risk 

of damaging the engine and fuel system!

The only fuel additives authorised for use 

are those that meet the B715001 (Petrol) 

or B715000 (Diesel) standards.

Diesel at low temperature

At temperatures below 0 °C (+32 °F), the 

formation of paraffins in summer-type Diesel 

fuels could prevent the engine from operating 

correctly. In these temperature conditions, use 

winter-type Diesel fuel and keep the fuel tank 

more than 50 % full.

At temperatures below -15 °C (+5 °F) to avoid 

problems starting, it is best to park the vehicle 

under shelter (heated garage).

Travelling abroad

Certain fuels could damage your vehicle’s 

engine.

In certain countries, the use of a particular 

fuel may be required (specific octane rating, 

specific trade name, etc.) to ensure correct 

operation of the engine.

For all additional information, consult a dealer.

Refuelling

Fuel tank capacity: 

approximately 53 litres (Petrol, 

Diesel or Hybrid) or 43 litres 

(Rechargeable hybrid).
Fuel tank capacity: 

approximately 56 litres.

Reserve level: approximately 6 litres.

Low fuel level

When the low fuel level is reached, this 

warning lamp lights up on the instrument 

panel, accompanied by the display of a message 

and an audible signal. When it first comes on, 

about 6 litres

 of fuel remain.

Until sufficient fuel is added, this warning lamp 

appears every time the ignition is switched on, 

accompanied by the message and the audible 

signal. When driving, this message and audible 

signal are repeated with increasing frequency as 

the fuel level drops towards 

0

.

You must refuel as soon as possible to avoid 

running out of fuel.

For more information on 

Running out of fuel 

(Diesel)

, refer to the corresponding section.

A small arrow by the warning lamp 

indicates which side of the vehicle the 

fuel filler flap is located on.

Stop & Start / e-Auto mode

Never refuel with the engine in STOP 

mode or in stand-by; you must switch off the 

ignition.

Refuelling

Any addition of fuel must be in quantities of at 

least 10 litres, in order to be registered by the 

fuel gauge.

Opening the filler flap may create a noise caused 

by an inrush of air. This vacuum is entirely 

normal, resulting from the sealing of the fuel 

system.

176

Practical information

The filler cap is built into the filler flap or must be 

unscrewed (depending on version).

To refuel in complete safety:

► 

Always switch off the engine.


►  To open the filler flap, press the flap opening 

button for more than 2 seconds or, with the 

vehicle unlocked, press the rear of the filler flap 

(depending on version).

Rechargeable hybrid vehicles

After pressing the button on the 

dashboard, the filler flap may not open for 

several minutes. A sound is emitted when the 

filler flap opens.

If the flap becomes stuck, press and hold 

the button on the dashboard for more than 

3 seconds.

►  Select a pump that delivers the correct fuel 

type for the vehicle's engine (see a reminder 

label on the inside of the filler flap).


►  Turn the filler cap to the left, remove it 

and place it on its support on the filler flap 

(depending on version).

►  Insert the filler nozzle and push it in as far as 

possible before starting to refuel (to minimise the 

risk of splashing).

►  Fill the tank.

Do not continue after the nozzle’s third cut-

out. Doing so may cause malfunctions.

►  Put the filler cap back in place and turn it to 

the right (depending on version).

►  Push the fuel filler flap to close it.

The vehicle is fitted with a catalytic converter, 

which helps to reduce the level of harmful 

emissions in the exhaust gases.

For petrol engines, you must use unleaded 

fuel.

The filler neck is narrower, allowing only 

unleaded petrol nozzles to be inserted.

If you have put in the wrong fuel for 

the vehicle, you must have the fuel 

tank drained and filled with the correct fuel 

before starting the engine.

Misfuel prevention (Diesel)

(Depending on country of sale.)

This mechanical device prevents filling the tank 

of a Diesel vehicle with petrol.

Located in the filler neck, the misfuel prevention 

device is visible when the filler cap is removed.

Operation


When a petrol filler nozzle is introduced into the 

fuel filler neck of a Diesel vehicle, it comes into 

contact with the flap. The system remains closed 

and prevents filling.

Do not persist but introduce a Diesel type 

filler nozzle.

The misfuel prevention device does not 

prevent filling with a jerrycan, regardless 

of the fuel type.

177

Practical information

7

Travelling abroad

As Diesel fuel pump nozzles may be 

different in other countries, the presence 

of the misfuel prevention device may make 

refuelling impossible.

Before travelling abroad, it is advisable to 

check with a PEUGEOT dealer if the vehicle 

is suitable for the distribution equipment of the 

countries visited.

Hybrid system

Electrical system

The electrical circuit of the hybrid system is 

identified by purple cables and its components 

are marked with this symbol:


The hybrid powertrain uses a voltage of 

48 V. This system may be hot both when 

the ignition is on and after switching it off.

Comply with the warning messages shown on 

the labels.

High voltage system voltage is 

dangerous and can cause burns or other 

injuries or even fatal electric shock.

Since damage to high voltage components is 

not visible, PEUGEOT recommends that you:

–  Never touch the components, damaged 

or not, and never let your jewelry or other 

metallic objects come into contact with these 

components.

–  Never work on the purple high voltage 

cables or on any other high voltage 

component marked with the Electric risk label. 

Any intervention on the high voltage system 

must be carried out by qualified persons in 

workshops qualified and approved to carry 

out this type of work.

–  Never damage, modify or remove the 

purple high voltage cables or disconnect them 

from the high voltage network.

–  Never open, modify or remove the cover of 

the traction battery.

–  Never work with cutting and forming 

tools or heat sources near high voltage 

components and cables.

Any intervention on the high voltage system 

must be carried out by qualified persons in 

workshops qualified and approved to carry 

out this type of work.

Damage to the vehicle or the traction battery 

could result in the leakage of toxic gases or 

fluids either immediately or later. PEUGEOT 

recommends that you:

–  Always inform the fire and emergency 

services in the event of an incident, warning 

that the vehicle is equipped with a traction 

battery.

–  Never touch the liquids leaking from the 

traction battery.

–  Do not inhale the gases emitted by the 

traction battery which are toxic.

–  Move away from the vehicle in the event of 

incident or accident, the gases emitted being 

flammable and could cause a fire.

In the event of an accident with an 

airbag deployment

The traction battery is automatically 

disconnected from the electrical circuit to 

prevent the initiation of short circuits and/or 

fires.

In the event of an impact to the vehicle’s 

underbody

In these situations, the electrical circuit or the 

traction battery can be seriously damaged.

Stop as soon as it is safe to do so and switch 

off the ignition.

Move away from the vehicle.

Contact a PEUGEOT dealer or a qualified 

workshop.

High-pressure washing

To avoid damaging the electrical 

components, it is expressly prohibited to 

178

Practical information

use high-pressure washing in the engine 

compartment or under the body.

Do not use a pressure greater than 80 bar 

when washing the bodywork.

Traction battery

The 48 V Li-ion (Lithium-ion) traction battery 

stores the electrical energy needed to propel the 

vehicle.

The traction battery is automatically charged to 

ensure that the charge level is always around 

50% of the maximum level, in order to fully 

exploit the hybrid functionality and, at the same 

time, always have some capacity available for 

the energy recovery operation.

It is located under the front left seat.

The traction battery's range varies depending on 

the type of driving, the route and the ageing of its 

components.

The traction battery ageing depends on 

several factors, such as climatic 

conditions and the distance travelled.

To preserve the mileage of your vehicle 

and the durability of your traction battery, 

PEUGEOT recommends that you:

–  Do not expose the vehicle to temperatures 

below -30°C and above +60°C for more than 

24 hours.

–  Do not use a generator to recharge your 

vehicle's traction battery.

In the event of damage to the traction 

battery

It is strictly prohibited to work on the vehicle 

yourself.

Do not touch liquids coming from the battery, 

and in the event of skin contact with these 

products, wash abundantly with water and 

contact a doctor as soon as possible.

Contact a PEUGEOT dealer or a qualified 

workshop to have the system checked.

Traction battery overheating

If the following warning lamps 

appear, accompanied by the 

display of a message and an audible signal, it is 

required to:

►  Stop the vehicle as soon as possible in the 

best conditions of safety.

►  Switch off the ignition.

►  Evacuate the vehicle as quickly as possible 

and move to a safe distance.

►  Call the fire department and/or the 

emergency services and tell them that the 

vehicle is an electric one.

Danger of death / Risk of serious 

injury

A chain reaction can occur up to a traction 

battery fire.

Vehicle in storage for more than 

1 month

Always park the vehicle in a place with 

temperatures between -10°C and +30°C 

(parking in a place with extreme temperatures 

can damage the traction battery).

Carry out the charging procedure for the 

traction battery (48V) via the accessory 

battery (12V) and the DC/DC converter.

Refer to the 

12 V battery/Accessory 

batteries

 section for the charging the 

batteries using a battery charger procedure.

Disposal of the traction battery

The traction battery is designed for the life of the 

vehicle if the recommendations of PEUGEOT 

are followed.

If it becomes necessary to replace the battery, 

contact the PEUGEOT dealer for instructions on 

its disposal. Improper disposal carries the risk of 

severe burns, electric shock, and damage to the 

environment.

In accordance with regulations, PEUGEOT 

ensures a second life or recycling of this 

component in collaboration with qualified 

operators.

179

Practical information

7

Rechargeable hybrid 

system

Electrical system

The electrical circuit of the rechargeable hybrid 

system is identified by orange cables and its 

components are marked with this symbol:


The rechargeable hybrid powertrain uses 

a voltage of between 240 V and 400 V. 

This system may be hot both when the 

ignition is on and after switching it off.

Comply with the warning messages shown 

on the labels, particularly inside the charging 

flap.

High voltage system voltage is 

dangerous and can cause burns or other 

injuries or even fatal electric shock.

Since damage to high voltage components is 

not visible, PEUGEOT recommends that you:

–  Never touch the components, damaged 

or not, and never let your jewelry or other 

metallic objects come into contact with these 

components.

–  Never work on the orange high voltage 

cables or on any other high voltage 

component marked with the Electric risk label. 

Any intervention on the high voltage system 

must be carried out by qualified persons in 

workshops qualified and approved to carry 

out this type of work.

–  Never damage, modify or remove the 

orange high voltage cables or disconnect 

them from the high voltage network.

–  Never open, modify or remove the cover of 

the traction battery.

–  Never work with cutting and forming 

tools or heat sources near high voltage 

components and cables.

In case of low level of fluid in the cooling 

tank, the refilling shall only be performed in a 

qualified and trained workshop to verify that 

the leakage is not in the traction battery.

Any intervention on the high voltage system 

must be carried out by qualified persons in 

workshops qualified and approved to carry 

out this type of work.

Damage to the vehicle or the traction battery 

could result in the leakage of toxic gases or 

fluids either immediately or later. PEUGEOT 

recommends that you:

–  Always inform the fire and emergency 

services in the event of an incident, warning 

that the vehicle is equipped with a traction 

battery.

–  Never touch the liquids leaking from the 

traction battery.

–  Do not inhale the gases emitted by the 

traction battery which are toxic.

–  Move away from the vehicle in the event of 

incident or accident, the gases emitted being 

flammable and could cause a fire.


This label is intended solely for use by 

firefighters and maintenance services in 

the event of any work on the vehicle.

No other person must touch the device shown 

on this label.

In the event of an accident or impact 

to the vehicle’s underbody

In these situations, the electrical circuit or the 

traction battery can be seriously damaged.

Stop as soon as it is safe to do so and switch 

off the ignition.

Contact a PEUGEOT dealer or a qualified 

workshop.

When washing

Before washing the vehicle, always 

check that the charging flap is closed 

correctly.

Never wash the vehicle while the battery is 

on charge.

180

Practical information

High-pressure washing

To avoid damaging the electrical 

components, it is expressly prohibited to 

use high-pressure washing in the engine 

compartment or under the body.

Do not use a pressure greater than 80 bar 

when washing the bodywork.

Never allow water or dust to enter the 

connector or charging nozzle - risk of 

electrocution or fire!

Never connect / disconnect the charging 

nozzle or cable with wet hands - risk of 

electrocution!

Traction battery

The Li-ion (Lithium-ion) traction battery stores 

the electrical energy needed to propel the 

vehicle.

It is located under the rear seats.

The traction battery's range varies depending 

on the type of driving, the route, the use of 

thermal comfort equipment and the ageing of its 

components.

The traction battery ageing depends on 

several factors, such as climatic 

conditions and the distance travelled.

To preserve the mileage of your vehicle 

and the durability of your traction battery, 

PEUGEOT recommends that you:

–  Do not fully charge the battery of your 

electric vehicle daily (charge the traction 

battery below 80% as often as possible).

–  Do not completely discharge the battery.

–  Do not store the vehicle for a long period 

of non-use (more than 12 hours) when the 

traction battery has a low or high charge level. 

Prefer a charge level between 20 and 40%.

–  Limit the use of fast charging.

–  Do not expose the vehicle to temperatures 

below -30°C and above +60°C for more than 

24 hours.

–  Avoid charging the vehicle at negative 

temperatures (except if the vehicle ran more 

than 20 minutes) or above +30°C.

–  Do not use the vehicle's traction battery as 

a generator of energy.

–  Do not use a generator to recharge your 

vehicle's traction battery.

In the event of damage to the traction 

battery

It is strictly prohibited to work on the vehicle 

yourself.

Do not touch liquids coming from the battery, 

and in the event of skin contact with these 

products, wash abundantly with water and 

contact a doctor as soon as possible.

Contact a PEUGEOT dealer or a qualified 

workshop to have the system checked.

Traction battery overheating

If the following warning lamps 

appear, accompanied by the 

display of a message and an audible signal, it is 

required to:

►  Stop the vehicle as soon as possible in the 

best conditions of safety.

►  Switch off the ignition.

►  Evacuate the vehicle as quickly as possible 

and move to a safe distance.

►  Call the fire department and/or the 

emergency services and tell them that the 

vehicle is an electric one.

Danger of death / Risk of serious 

injury

A chain reaction can occur up to a traction 

battery fire.

Disposal of the traction battery

The traction battery is designed for the life of the 

vehicle if the recommendations of PEUGEOT 

are followed.

If it becomes necessary to replace the battery, 

contact the PEUGEOT dealer for instructions on 

its disposal. Improper disposal carries the risk of 

severe burns, electric shock, and damage to the 

environment.

In accordance with regulations, PEUGEOT 

ensures a second life or recycling of this 

component in collaboration with qualified 

operators.

181

Practical information

7

Charging flap

The charging flap is located on the rear left-hand 

side of the vehicle.


►  Press the top rear of the flap to open it.


1.

Deferred charging activation button

2.

Indicator lamp confirming that the nozzle is 

locked into the charging connector.

Fixed red: nozzle correctly positioned and 

locked.

Flashing red: nozzle incorrectly positioned or 

locking not possible.

3.

Charging connector

4.

Light guides


Status of light 

guides

Meaning

Fixed white

Welcome lighting when flap 

is opened

Fixed blue

Deferred charging

Flashing green

Charging

Fixed green

Charging complete

Fixed red

Malfunction

In case of impact, even light, against the 

charging flap, do not use it.

Do not dismantle or modify the charging 

connector - risk of electrocution and/or fire!

Contact a PEUGEOT dealer or a qualified 

workshop.

Charging cables, sockets 

and chargers

The traction battery can be charged using 

several different types of cables.

The charging cable supplied with the vehicle is 

compatible with the electrical installations of the 

country of sale. If you are travelling abroad, refer 

to the following tables to check the compatibility 

of local electrical installations with the charging 

cable.

Contact a PEUGEOT dealer or a qualified 

workshop to obtain the appropriate charging 

cable(s).

Identification labels on charging 

sockets/connectors

Identification labels are affixed to the vehicle, 

charging cable and charger to inform the user 

about which device needs to be used.


The meaning of each identification label is as 

follows:

182

Practical information

Identification label

Location

Configuration

Power type/Voltage range


C


Charging connector (vehicle side)

TYPE 2

AC

< 480 Vrms


C


Charging socket (charger side)

TYPE 2

AC

< 480 Vrms

Types of charging

Cable type

Compatibility

Specifications

Mode 2 charging cable with integrated control 

unit


Identification label 

C

 on the charging connector 

(vehicle side).

Conventional electrical socket (depending on 

country).


Charge limited to a maximum of 10 A.

"Green'Up" type socket.


Charge limited to a maximum of 16 A.

183

Practical information

7

Cable type

Compatibility

Specifications

Mode 3 charging cable


Identification labels 

C

 on the charging connector 

(vehicle side) and on the socket (charger side).

Accelerated charging unit socket.


Charge limited to a maximum of 32 A.

Wallbox accelerated charging unit.


The estimated charging time is indicated 

on the instrument panel when the vehicle 

is connected. It may vary depending on 

various factors such as the outside 

temperature or the quality of the electricity 

supply.

If the outside temperature is below -10°C, it 

is recommended to connect the vehicle as 

soon as possible as the charging time may 

increase significantly. The traction battery 

may not charge fully.

Domestic charging cable (mode 2)

It is essential to avoid damaging the 

cable and to keep it intact.

In the event of damage, do not use it and 

contact a PEUGEOT dealer or a qualified 

workshop to replace it.

Accelerated charging unit (mode 3)

Do not dismantle or modify the 

accelerated charging unit - risk of 

electrocution and/or fire!

To find out how it is used, please refer to the 

accelerated charging unit's user instructions.

Control unit (mode 2)


Type 1

184

Practical information


Type 2

POWER

Green: electrical connection established; 

charging can begin. 

CHARGE

Flashing green: charging in progress or 

temperature pre-conditioning activated.

Fixed green: charging complete.

FAULT

Red: fault; charging not permitted or must 

be stopped immediately. Check that everything 

is connected correctly and that the electrical 

system is not faulty.

If the indicator lamp does not go off, contact a 

PEUGEOT dealer or a qualified workshop.

Upon plugging the charging cable into a 

domestic socket, all of the indicator lamps come 

on briefly.

If no indicator lamps come on, check the 

domestic socket's circuit-breaker.

–  If the circuit-breaker has tripped, contact a 

professional to check that your electricity supply 

is compatible and carry out any necessary 

repairs.

–  If the circuit-breaker has not tripped, stop 

using the charging cable and contact a 

PEUGEOT dealer or a qualified workshop.

Type 1 control unit label 

- Recommendations

1.

Refer to the handbook before use.

2.

Incorrect use of this charging cable may 

result in fire, property damage and serious 

injury or death by electrocution!

3.

Always use a correctly earthed power 

socket, protected by a 30 mA residual 

current device.

4.

Always use an electrical socket protected 

by a circuit-breaker appropriate for the 

electrical circuit’s current rating.

5.

The weight of the control unit must not be 

borne by the electrical socket, plug and 

cables.

6.

Never use this charging cable if it is 

defective or in any way damaged.

7.

Never attempt to repair or open this 

charging cable. It contains no repairable 

parts - replace the charging cable if it is 

damaged.

8.

Never immerse this charging cable in water.

9.

Never use this charging cable with an 

extension cable, a multi-plug socket, a 

conversion adaptor or on a damaged 

electrical socket.

10.

Do not unplug the plug from the wall as a 

means of stopping charging.

11.

Do not force the connector if it is locked into 

the vehicle.

12.

Immediately stop charging, by locking and 

then unlocking the vehicle using the remote 

control key, if the charging cable or wall 

socket feel burning hot to the touch.

13.

This charging cable includes components 

liable to cause electrical arcing or sparks. 

Do not expose to flammable vapours.

14.

Only use this charging cable with PEUGEOT 

vehicles.

15.

Never plug the cable into the wall socket (or 

unplug it) with wet hands.

Type 2 control unit label 

- Recommendations

Refer to the handbook before use. 

185

Practical information

7

1.

Incorrect use of this charging cable may 

result in fire, property damage and serious 

injury or death by electrocution!

2.

Always use a correctly earthed power 

socket, protected by a 30 mA residual 

current device.

3.

Always use an electrical socket protected 

by a circuit-breaker appropriate for the 

electrical circuit’s current rating.

4.

The weight of the control unit must not be 

borne by the electrical socket, plug and 

cables.

5.

Never use this charging cable if it is 

defective or in any way damaged.

6.

Never attempt to repair or open this 

charging cable. It contains no repairable 

parts - replace the charging cable if it is 

damaged.

7.

Never immerse this charging cable in water.

8.

Never use this charging cable with an 

extension cable, a multi-plug socket, a 

conversion adaptor or on a damaged 

electrical socket.

9.

Do not unplug the plug from the wall as a 

means of stopping charging.

10.

Immediately stop charging, by locking and 

then unlocking the vehicle using the remote 

control key, if the charging cable or wall 

socket feel burning hot to the touch.

11.

This charging cable includes components 

liable to cause electrical arcing or sparks. 

Do not expose to flammable vapours.

12.

Only use this charging cable with PEUGEOT 

vehicles.

13.

Never plug the cable into the wall socket (or 

unplug it) with wet hands.

14.

Do not force the connector if it is locked into 

the vehicle.

Type 2 control unit label - State of 

indicator lamps

State of the 

indicator lamp

Off


On


Flashing


POWER

CHARGE

FAULT

Symbol

Description


Not connected to the power supply or power is not 

available from the infrastructure.


(green)


(green)


(red)


The control unit is currently performing a self-test.

186

Practical information

POWER

CHARGE

FAULT

Symbol

Description


(green)


Connected only to the infrastructure or to the 

infrastructure and to the Electric Vehicle (EV) but 

no charging in progress.


(green)


(green)


Connected to the power supply and to the Electric 

Vehicle (EV).

The EV is on charge or in a temperature pre-

conditioning sequence.


(green)


(green)


Connected to the power supply and to the Electric 

Vehicle (EV).

The EV is waiting for charging or the charging of 

the EV is completed.


(red)


Control unit malfunction. No charging allowed.

If an error indicator reappears after a manual reset, 

the control unit must be checked by a PEUGEOT 

dealer before the next charge.


(green)


(green)


(red)


The control unit is in diagnostic mode.

Manual reset procedure

The control unit can be reset by simultaneously disconnecting the charging connector and the wall socket.

Then, reconnect the wall socket first. For more information, refer to the handbook.

187

Practical information

7

Charging the traction 

battery (Rechargeable 

hybrid)

For a full charge, follow the charging procedure 

without interrupting it, until it stops automatically. 

Charging may be performed either immediately 

(by default) or deferred.

Deferred charging is set via the touch 

screen or the 

MYPEUGEOT APP


application.

When the vehicle is connected, the following 

information is displayed on the instrument panel:

–  Traction battery charge status (%).

–  Remaining range (miles or km).

–  Estimated charging time (calculation may take 

a few seconds).

–  Charging speed (miles or km gained per hour).

After the instrument panel has been put into 

standby mode, this information can be displayed 

again by unlocking the vehicle or opening a door.

It is also possible to monitor the charging 

progress using the 

MYPEUGEOT APP


application.

For more information on 

Remotely 

operable additional functions

, refer to the 

corresponding section.

Low charging / Driving

Driving when the charge level of the 

traction battery is too low can lead to the 

vehicle breaking down and can lead to 

accidents or serious injuries. ALWAYS make 

sure the traction battery has a sufficient 

charge level.

Low charging / Parking

If the outside temperature is negative, 

it is recommended not to park your vehicle 

outside for several hours at a low charging 

(less than 20%).

Vehicle in storage for more than 

1 month

In the event of a long period of non-use of 

the vehicle (beyond 4 weeks) without the 

possibility of charging when restarting, the 

self-discharge may make it impossible to 

restart if the traction battery charge level 

is a low or very low, especially at negative 

ambient temperatures. ALWAYS make sure 

that the traction battery has a charge between 

20% and 40% if you do not plan to use your 

vehicle for several weeks.

Do not connect the charging cable.

Always park the vehicle in a place with 

temperatures between -10°C and 30°C 

(parking in a place with extreme temperatures 

can damage the traction battery).

Refer to the 

12 V battery/Accessory 

batteries - With rechargeable hybrid 

engines

 section for the battery disconnection 

procedure.

Precautions

Rechargeable hybrid vehicles have 

been developed in accordance with the 

recommendations for maximum electromagnetic 

field limits established by the ICNIRP 

(International Commission on Non-Ionizing 

Radiation Protection - 1998 Guidelines).

Wearers of pacemakers or equivalent 

devices should consult a doctor to 

enquire about any applicable precautionary 

measures, or contact the manufacturer of their 

implanted electronic medical device to check that 

it is guaranteed to operate in an environment 

compliant with the ICNIRP guidelines.

If in doubt

, during charging, do not remain 

inside or near the vehicle, near the charging 

cable or the charging unit, even for a short time.

Before charging

Depending on the context:

►  Have a professional check that the 

electrical system to be used complies with 

applicable standards and is compatible with 

the vehicle.

►  Have a professional electrician install 

a dedicated domestic power socket or 

accelerated charging unit (Wallbox) 

compatible with the vehicle.

Use the charging cable supplied with the 

vehicle.

For more information, contact a PEUGEOT 

dealer or a qualified workshop.

188

Practical information

During charging

As a safety measure, the engine will 

not start if the charging cable is plugged into 

the connector on the vehicle. A warning is 

displayed on the instrument panel.

While charging is in progress, unlocking the 

vehicle will cause the charging to stop.

If no action is taken on one of the openings 

(door or boot) or on the charging nozzle, the 

vehicle will lock again after 30 seconds and 

charging will resume automatically.

Never work under the bonnet:

–  Some areas remain very hot, even an hour 

after charging ends - risk of burns!

–  The fan may start at any time - risk of cuts 

or strangulation!

After charging

Check that the charging flap is closed.

Do not leave the cable connected to the 

domestic power socket - risk of short-circuit 

or electrocution in the event of contact with or 

immersion in water!

Charging procedure

Connection

►  Before charging, check that 

the gear selector 

is in mode 

P

 and the ignition is off, otherwise 

charging is impossible.

►  Press on the rear of the charging flap to open 

it and check that there are no foreign bodies on 

the vehicle's charging connector.

The light guides in the flap come on white.

Domestic charging (mode 2)


►  First, connect the charging cable from the 

control unit to the domestic socket.

When the connection is made, all of the indicator 

lamps on the control unit light up, then only the 

POWER

 indicator lamp remains on in green.

►  Remove the protective cover from the 

charging nozzle.

►  Insert the nozzle into the vehicle's charging 

connector.

The start of charging is confirmed by the flashing 

of the green light guides in the flap and the 

flashing of the 

CHARGE

 indicator lamp in green 

on the control unit.

If this is not the case, charging has not started; 

restart the procedure, ensuring that all of the 

connections are properly established.

The red indicator lamp in the flap comes on to 

indicate that the nozzle is locked.

Accelerated charging (mode 3)


►  Follow the accelerated charging unit 

(Wallbox) user instructions.

►  Remove the protective cover from the 

charging nozzle.

►  Insert the nozzle into the vehicle's charging 

connector.

The start of charging is confirmed by the flashing 

of the green light guides in the flap.

If this is not the case, charging has not 

started; restart the procedure ensuring that all 

connections are properly established.

The red indicator lamp in the flap comes on to 

indicate that the nozzle is locked.

Deferred charging

By default, the deferred charging start time is set 

to midnight.

Depending on equipment, this time can be 

changed.

189

Practical information

7

Settings

With PEUGEOT Connect Nav

►  In the 

Energy

 touch screen menu, 

select the 

Charge

 page.

►  Set the charging start time.

►  Press 

OK

.

The setting is saved in the system.

With PEUGEOT Connect Radio or PEUGEOT 

Connect Nav

You can also programme the deferred 

charging function at any time from a 

smartphone via the 

MYPEUGEOT APP


application.

For more information on 

Remotely operable 

additional functions

, refer to the corresponding 

section.

Activation

►  After programming the deferred charging, 

connect the vehicle to the desired charging 

equipment.

►  Press this button in the flap within one 

minute to activate the deferred charging 

(confirmed by the light guides coming on in 

blue).

Disconnection


Before disconnecting the nozzle from the 

charging connector:

►  If the vehicle is locked, unlock it.

►  If the vehicle is unlocked, 

lock it and then 

unlock it

.

If selective unlocking of the doors is 

activated, press the unlocking button on 

the remote control twice to disconnect the 

nozzle.

The red indicator lamp in the flap goes out to 

confirm that the nozzle is unlocked.

►  Within 

30 seconds

, remove the charging 

nozzle.

Domestic charging (mode 2)

The end of charging is confirmed when the 

green 

CHARGE

 indicator lamp on the control 

unit comes on fixed and the green light guides in 

the flap come on fixed.

►  After disconnection, replace the protective 

cover over the nozzle and close the charging 

flap.

►  Disconnect the control unit's charging cable 

from the domestic socket.

Accelerated charging (mode 3)

The end of charging is confirmed by the 

accelerated charging unit (Wallbox) and when 

the green light guides in the flap come on fixed.

►  After disconnection, replace the nozzle on to 

the charging unit and close the charging flap.

Towing device

Load distribution

► 

Distribute the load in the trailer so that the 

heaviest items are as close as possible to the 

axle, and the nose weight approaches the 

maximum permitted without exceeding it.

Air density decreases with altitude, thus reducing 

engine performance. The maximum towable load 

must be reduced by 10% per 1,000 metres of 

altitude.

Use genuine towing devices and wiring 

harnesses approved by PEUGEOT. We 

recommend having them fitted by a 

PEUGEOT dealer or a qualified workshop.

If not fitted by a PEUGEOT dealer, they must 

still be fitted in accordance with the vehicle 

manufacturer's instructions.

Important

: if the vehicle has a motorised 

tailgate and Hands-Free Tailgate Access 

function, and a towing device has been fitted 

outside the PEUGEOT dealer network, it 

is essential to visit a PEUGEOT dealer or 

a qualified workshop to have the detection 

system recalibrated - risk of malfunction of the 

Hands-Free Tailgate Access function.

Certain driving or manoeuvring aid functions 

are automatically deactivated while an 

approved towing system is in use.

For more information about driving with a 

towing device fitted to a trailer and associated 

with the 

Trailer stability assist

, refer to the 

corresponding section.

190

Practical information

Comply with the maximum authorised 

towable weight, as indicated on your 

vehicle's registration certificate, on the 

manufacturer's label and in the 

Technical 

data

 section of this guide.

If using accessories attached to the 

towing device (e.g. bicycle carriers, tow 

boxes):

–  Comply with the maximum authorised nose 

weight.

–  Do not transport more than 4 conventional 

bicycles or 2 electric bicycles.

When loading bicycles onto a bicycle carrier 

on a towball, be sure to place the heaviest 

bicycles as close as possible to the vehicle.

Observe the legislation in force in the 

country where you are driving.

Vehicle equipped with motorised 

tailgate with hands-free function 

(Hands-Free Tailgate Access)

To avoid unintentionally opening the 

motorised tailgate when operating the towing 

device:

–  Deactivate this function in advance in the 

vehicle's configuration menu.

–  Or remove the electronic key from the 

recognition zone, with the tailgate closed.

Towing device with quickly 

detachable towball

Presentation

No tools are required to install or remove this 

genuine towing device.


1.

Carrier

2.

Protective plug

3.

Connection socket

4.

Safety eye

5.

Detachable towball

6.

Locking/unlocking wheel

7.

Security key lock

8.

Label to note the key references


A. Locked

 position (the 

green

 marks are 

opposite each other); the wheel is in contact 

with the towball (no gap).

B. Unlocked

 position (

red

 mark opposite 

the 

green

 mark); the wheel is no longer 

in contact with the towball (gap of around 

5 mm).

Affix the enclosed label in a clearly visible 

location, close to the carrier or in the 

boot.

Trailers with LED lamps are not 

compatible with the wiring harness of this 

device.

To ensure complete safety while driving 

with a 

Towing device

, refer to the 

corresponding section.

191

Practical information

7

Before each use

Verify that the towball is correctly fitted, 

checking the follow points:

–  The green mark on the wheel is in line with 

the green mark on the towball.

–  The wheel is in contact with the towball 

(position 

A

).

–  The security key lock is closed and the 

key removed; the wheel can no longer be 

operated.

–  The towball must not be able to move in 

its carrier; test by attempting to shake it with 

your hand.

If the towball is not locked, the trailer can 

become detached - risk of an accident!

During use

Never release the locking system with a 

trailer or load carrier on the towball.

Never exceed the maximum authorised 

weight for the vehicle - the Gross Train 

Weight or GTW.

Always comply with the maximum authorised 

load on the towing device: if it is exceeded, 

this device may become detached from the 

vehicle - risk of an accident!

Before driving, check the headlamp height 

adjustment and check that the lamps on the 

trailer operate correctly.

For more information on 

Headlamp height 

adjustment

, refer to the corresponding 

section.

After use

When travelling without a trailer or 

load carrier, remove the towball and fit the 

protective plug into the carrier, to provide 

clear visibility of the number plate and/or its 

lighting.

Fitting the towball


►  Below the rear bumper, remove the protective 

plug 

2

 from the carrier 

1

.

►  Insert the end of the towball 

5

 into the carrier 

1

 and push it upwards; it will lock into position 

automatically.


►  The wheel 

6

 rotates a quarter turn anti-

clockwise; take care to keep your hands clear!


►  Check that the mechanism has correctly 

locked into place (position 

A

).

►  Close the lock 

7

 using the key.

►  Remove the key. The key cannot be removed 

while the lock is open.

►  Clip the cap onto the lock.


192

Practical information


►  Remove the protective cover from the 

towball.

►  Attach the trailer to the towball.

►  Attach the cable on the trailer to the safety 

eye 

4

 on the carrier.

►  Insert the trailer plug and rotate it by a 

quarter turn to connect it to the connection 

socket 

3

 on the carrier.

Removing the towball

►  Grasp the trailer's plug, perform a quarter 

turn and pull to disconnect it from the connection 

socket 

3

 on the carrier.

►  Detach the trailer's safety cable from the 

safety eye 

4

 on the carrier.

►  Unhitch the trailer from the towball.

►  Replace the protective cover over the towball.

►  Remove the cap from the lock and press it 

onto the head of the key.


►  Insert the key into the lock 

7

.

►  Open the lock using the key.


►  Hold the towball 

5

 firmly in one hand; using 

the other hand, pull and turn the wheel 

6

 fully in 

a clockwise direction until it stops; do not release 

the wheel.

►  Extract the towball from the base of its 

carrier 

1

.

►  Release the wheel; it automatically locks in 

the unlocked position (position 

B

).


►  Replace the protective plug 

2

 into the 

carrier 

1

.

►  Stow the towball in its bag to protect it from 

knocks and dirt.

Maintenance

Correct operation is only possible if the towball 

and its carrier are kept clean.

Before cleaning the vehicle with a high-pressure 

jet wash, the towball must be removed and the 

protective plug fitted to the carrier.

Work on the towing device

Contact a PEUGEOT dealer or a 

qualified workshop.

Roof bars

As a safety measure and to avoid 

damaging the roof, it is essential to use 

193

Practical information

7

transverse roof bars approved for your 

vehicle.

Observe the instructions on fitting and use 

contained in the guide supplied with the roof 

bars.

Maximum load distributed over the 

transverse roof bars, for a loading height 

not exceeding 40 cm (except bicycle carrier): 

80 kg

.

As this value may change, please verify the 

maximum load quoted in the guide supplied 

with the roof bars.

If the height exceeds 40 cm, adapt the speed 

of the vehicle to the profile of the road to 

avoid damaging the roof bars and the fixings 

on the vehicle.

Be sure to refer to national legislation in order 

to comply with the regulations for transporting 

objects that are longer than the vehicle.

Fitting on longitudinal bars


The transverse bars must be fixed at the 

markings located on the longitudinal bars.

Direct fitting on roof


The transverse bars must only be fixed at the 

four anchorage points located on the roof frame. 

These points are concealed by the vehicle doors 

when the doors are closed.

The roof bar fixings have a stud which must be 

inserted into the opening of each anchorage 

point.

Recommendations

Distribute the load uniformly, taking care 

to avoid overloading one of the sides.

Arrange the heaviest part of the load as close 

as possible to the roof.

Secure the load firmly.

Drive gently: the vehicle will be more 

susceptible to the effects of side winds and its 

stability may be affected.

Regularly check the security and tight 

fastening of the roof bars, at least before each 

trip.

Remove the roof bars once they are no longer 

needed.

Sunroof

Check that the load does not protrude 

below the roof bars, so that it does not 

impede movement of the sunroof - risk of 

major damage!

Snow chains

In wintry conditions, snow chains improve 

traction as well as the behaviour of the vehicle 

when braking.

Snow chains must be fitted only to the 

front wheels. They must never be fitted to 

"space-saver" type spare wheels.

Observe the legislation in force in your 

country relating to the use of snow 

chains and maximum authorised speeds.

Use only chains designed to be fitted to the type 

of wheel fitted to the vehicle:

Original tyre size

Maximum link size

215/65 R17

9 mm

225/55 R18

9 mm

205/55 R19

9 mm


Content      ..     4      5      6      7     ..