Peugeot 3008 Dag (2010.5). Instruction - part 9
 

  Index      Peugeot     Peugeot 3008 Dag 2010.5 - instruction in english


Search            


Content   ..  7  8  9  10   ..


Peugeot 3008 Dag (2010.5). Instruction - part 9


C

H

IL

D

 SA

F

ET

Y

112

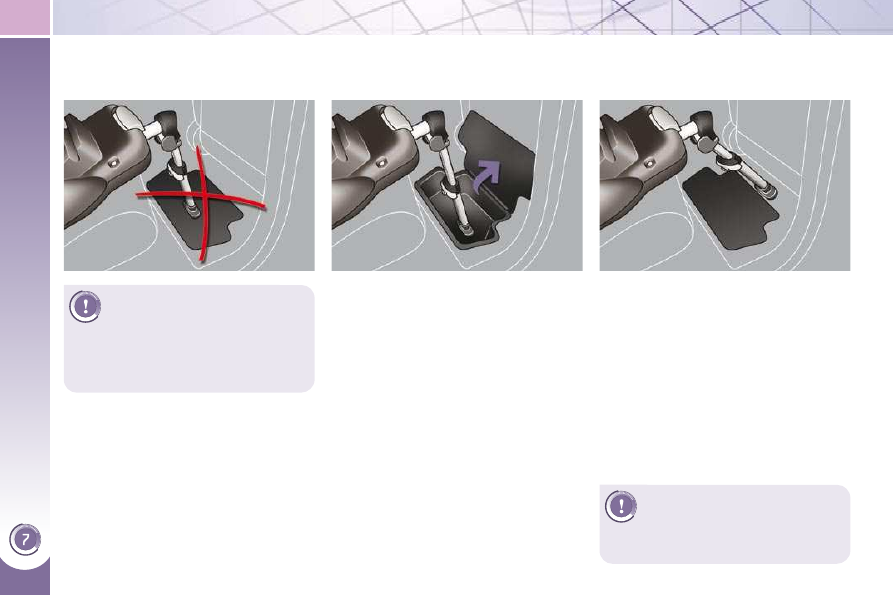
 INSTALLING CHILD SEATS WITH A STAY 

 Precautions must be taken when installing a child seat with a stay (or drop down leg). In particular, take care when there is a 
storage compartment present in the rear footwells. 

 Do  not  place  the  stay  on  the 

storage  compartment  cover, 
it could break in a serious im-

pact. Where the range of adjustment 
for  the  stay  allows,  we  suggest  two 
other possibilities for installation. 

  At the bottom of the storage 
compartment 

 If the stay is long enough, you can place 
it in contact with the bottom of the stor-

age  compartment.  Remove  all  objects 

before installing the stay.  

  Outside the storage 
compartment area 

 One other possibility, where the stay is 

long enough and can be inclined suffi -

ciently (while observing the recommen-

dations in the fi tting instructions for the 

child seat), is to position the stay so that 

it is in contact with the fl oor away from 

the  storage  compartment.  Remember 

to use the adjustment of the seat posi-
tion to obtain a satisfactory position for 
the stay which is away from the storage 
compartment. 

  If  you  cannot  fi t  the  stay  in 

the way described, we recom-

mend that you do not fi t a child 

seat with a stay in this position.  

C

H

IL

D

 SA

F

ET

Y

111

   Passenger airbag OFF   

CHILD SEATS RECOMMENDED BY PEUGEOT 

 PEUGEOT  offers  a  complete  range  of  recommended  child  seats  which  are 
secured using a  three point seat belt : 

   Group 0+: from birth to 13 kg   

   Group 1: from 9 to 18 kg   


   L1   

"RÖMER/BRITAX 

Baby-Safe Plus".   

Installed in the 

rearwards-facing 

position.  


   L2   

"RÖMER Duo Plus 

ISOFIX".  

   Groups 1, 2 and 3: from 9 to 36 kg   


   L3   

"KIDDY Life".  

The use of the restraining cushion is 

compulsory for the transportation of 

young children (from 9 to 18 kg).  

   Groups 2 and 3: from 15 to 36 kg   


   L4   

"RECARO Start''.  


   L5   

"KLIPPAN Optima".  

From the age 

of 6 years 

(approximately 22 kg), 
the booster is used on 

its own.  

  For  more  information  on  de-
activating  the  airbag,  refer 
to  the  "Safety"  section  then 
"Airbags".  

C

H

IL

D

 SA

F

ET

Y

112

 INSTALLING CHILD SEATS WITH A STAY 

 Precautions must be taken when installing a child seat with a stay (or drop down leg). In particular, take care when there is a 
storage compartment present in the rear footwells. 

 Do  not  place  the  stay  on  the 

storage  compartment  cover, 
it could break in a serious im-

pact. Where the range of adjustment 
for  the  stay  allows,  we  suggest  two 
other possibilities for installation. 

  At the bottom of the storage 
compartment 

 If the stay is long enough, you can place 
it in contact with the bottom of the stor-

age  compartment.  Remove  all  objects 

before installing the stay.  

  Outside the storage 
compartment area 

 One other possibility, where the stay is 

long enough and can be inclined suffi -

ciently (while observing the recommen-

dations in the fi tting instructions for the 

child seat), is to position the stay so that 

it is in contact with the fl oor away from 

the  storage  compartment.  Remember 

to use the adjustment of the seat posi-
tion to obtain a satisfactory position for 
the stay which is away from the storage 
compartment. 

  If  you  cannot  fi t  the  stay  in 

the way described, we recom-

mend that you do not fi t a child 

seat with a stay in this position.  

C

H

IL

D

 SA

F

ET

Y

113

INSTALLING CHILD SEATS ATTACHED USING THE SEAT BELT 

 In accordance with European regulations, this table indicates the options for installing child seats secured using a seat belt 
and universally approved  (a)  in accordance with the weight of the child and the seat in the vehicle. 

  a:  universal child seat, child seat that can be installed in all vehicles using a seat belt. 
  b:  group 0, from birth to 10 kg. Shell seats and baby carriers cannot be installed in the front passenger seat. 
  c:  consult the legislation in force in your country before installing your child on this seat. 
  U:   seat  suitable  for  the  installation  of  a  child  seat  secured  using  a  seat  belt  and  universally  approved,  "rearwards-facing" 

and/or "forwards-facing". 

  U (R):  as for  U , with the vehicle's seat adjusted to the highest position and as far back as possible. 
  L  -  :  only the child seats indicated can be installed on the seat concerned (according to country). 
  X:  seat position not suitable for installation of a child seat for the weight class indicated. 

   Weight of the child and indicative age   

   Seat   

   Under 13 kg   

(groups 0  (  b  )  and 

0+)  

Up to approx 1 year  

   From 9 to 18 kg   

(group 1)  

1 to 3 years approx  

   From 15 to 25 kg   

(group 2)  

3 to 6 years approx  

   From 22 to 36 kg   

(group 3)  

6 to 10 years 

approx  

 Front passenger 
seat  (  c  )  with 
height adjuster 


   U (R)   

   U (R)   

   U (R)   

   U (R)   

 Front passenger 
seat  (c)  without 
height adjuster 

   X   

   X   

   X   

   X   

 Outer rear seats 


   U  *   

   U  *   

   U  *   

   U  *   

 Centre rear seat 


   L1   

   L2, L3, L4   

   L3, L4, L5   

   L3, L4, L5   

  *    Child seats  with a     stay  (or drop down leg) should be fi tted to your vehicle with care. Refer to the page on fi tting a child seat 

with a stay.  

C

H

IL

D

 SA

F

ET

Y

114

 ADVICE ON CHILD 
SEATS 

 The  incorrect  installation  of  a  child 
seat  in  a  vehicle  compromises  the 
child's  protection  in  the  event  of  an 
accident. 
 Remember to fasten the seat belts or 

the child seat harnesses keeping the 
slack relative to the child's body to a 
minimum, even for short journeys. 
 When installing a child seat using the 
seat belt, ensure that the seat belt is 
tightened  correctly  on  the  child  seat 

and that it secures the child seat fi rm-

ly on the seat of your vehicle. Move 

the seat forwards if necessary. 
 For  optimum  installation  of  the  "for-
wards-facing" child seat, ensure that 
the back of the child seat is in contact 
with  the  back  of  the  vehicle's  seat 
and that the head restraint does not 
cause any discomfort. 
 If  the  head  restraint  has  to  be  re-
moved,  ensure  that  it  is  stored  or 
attached  securely  to  prevent  it  from 
being  thrown  around  the  vehicle  in 
the event of sharp braking. 

  Installing a booster seat 
 The  chest  part  of  the  seat  belt  must 
be positioned on the child's shoulder 
without touching the neck. 
 Ensure  that  the  lap  part  of  the  seat 
belt passes correctly over the child's 
thighs. 
 PEUGEOT  recommends  the  use  of 

a booster seat which has a back, fi t-

ted with a seat belt guide at shoulder 
level. 
 As a safety precaution, do not leave: 
   -  

a child or children alone and un-
supervised in a vehicle, 

  -  

a  child  or  an  animal  in  a  vehicle 
which is exposed to the sun, with 
the windows closed, 

  -  

the  keys  within  reach  of  children 
inside the vehicle.  

 To  prevent  accidental  opening  of 
the  doors  and  rear  windows,  use 

the "Child lock". 
 Take care not to open the rear win-
dows by more than one third. 
 To  protect  young  children  from  the 

rays of the sun, fi t side blinds on the 

rear windows.   

 Children  under  the  age  of  10  must 

not  travel  in  the  "forwards-facing" 
position on the front passenger seat, 
unless the rear seats are already oc-
cupied  by  other  children,  cannot  be 
used or are absent. 
 Deactivate  the  passenger  airbag 

when a "rearwards-facing" child seat 
is installed on the front seat. 
 Otherwise, the child would risk being 
seriously injured or killed if the airbag 

were to infl ate.  

C

H

IL

D

 SA

F

ET

Y

115

"ISOFIX" MOUNTINGS 

 Your vehicle has been approved in ac-

cordance with the  latest  ISOFIX  regu-
lation
  s . 
 The seats, represented below, are fi tted 

with regulation ISOFIX mountings: 

 There are three rings for each seat: 
   -  

two  rings   A ,  located  between  the 
vehicle seat back and cushion, indi-
cated by a label, 

  -  

a ring  B , behind the seat, referred to 
as  the   TOP  TETHER

   for  fi xing  the 

upper strap.  

 This ISOFIX mounting system provides 

fast, reliable and safe fi tting of the child 

seat in your vehicle. 

 The   ISOFIX child seats

  are fi tted with 

two latches which are easily secured on 
the two rings  A . 

 Some also have an  upper strap  which 
is attached to ring  B . 

 To  attach  this  strap,  raise  the  vehicle 
seat's head restraint then pass the hook 

between its rods. Then fi x the hook on 

ring  B  and tighten the upper strap. 
 The incorrect installation of a child seat 
in  a  vehicle  compromises  the  child's 
protection in the event of an accident. 
 For  information  regarding  the  ISOFIX 
child  seats  which  can  be  installed  in 
your vehicle, refer to the table showing 
the locations for installing ISOFIX child 
seats. 

C

H

IL

D

 SA

F

ET

Y

116

 This  child  seat  can  also  be 
used  on  seats  which  are  not 

fi tted  with  ISOFIX  mountings. 

In  this  case,  it  must  be  attached  to 
the vehicle seat using the three point 
seat belt. 
  

Follow  the  instructions  for  fi tting 

the  child  seat  given  in  the  seat 
manufacturer's installation guide.
  

ISOFIX CHILD SEAT RECOMMENDED BY PEUGEOT AND 
APPROVED FOR YOUR VEHICLE 

   RÖMER Duo Plus ISOFIX  (size category  B1 )  

   Group 1: from 9 to 18 kg   


  Installed in the forwards-facing position.  

Fitted with an upper strap to be secured on the upper ring  B ,

referred to as the TOP TETHER.  

Three seat body angles: sitting, reclining, lying.  

C

H

IL

D

 SA

F

ET

Y

117

LOCATIONS FOR INSTALLING ISOFIX CHILD SEATS 

 In accordance with European Regulations, this table indicates the options for installing ISOFIX child seats on seats in the 

vehicle fi tted with ISOFIX mountings. 
 In the case of universal and semi-universal ISOFIX child seats, the ISOFIX size category, determined by a letter from  A  to  G , 
is indicated on the child seat next to the ISOFIX logo. 

  IUF:  seat suitable for the installation of an  I

 sofi x  U niversal seat, " F orwards-facing" secured using the top belt. 

  IL-SU:  seat suitable for the installation of an  I

 sofi x  S emi- U niversal seat either: 

   -   "rearwards-facing" fi tted with a top belt or a stay, 

  -   "forwards-facing" fi tted with a stay, 

  -   a shell seat fi tted with an upper strap or a stay.  

 For advice on securing of the top belt, refer to the paragraph "Isofi x mountings". 
  X:  seat not suitable for the installation of a child seat or shell for the weight group indicated. 


   Weight of the child

 /indicative age  

   Less than 

10 kg  

(group 0)   

Up to approx. 

6 months  

   Less than 10 kg   

 (group 0)  

Less than 13 kg   

 (group 0+)   

Up to approx. 1 year  

   From 9 to 18 kg (group 1)   

From approx. 1 to 3 years  

   Type of ISOFIX child seat   

   Shell   

   "rearwards-facing"   

   "rearwards-facing"   

   "forwards-facing"   

   ISOFIX size category   

   F   

   G   

   C   

   D   

   E   

   C   

   D   

   A   

   B   

   B1   

  Front passenger seat  


   X   

   X   

   X   

   X   

  Outer rear seats  


   X   

   IL-SU  *   

   IL-SU  *   

   IUF  *   

 IL-SU *    

  Centre rear seat  


   X   

   X   

   X   

   X   

  *    Child seats  with a     stay  (or drop down leg) should be fi tted to your vehicle with care. Refer to the page on fi tting a child seat 

with a stay.  

C

H

IL

D

 SA

F

ET

Y

118

  This  system  is  independent 
and in no circumstances does 
it take the place of the central 
locking control. 

 Check  the  status  of  the  child  lock 

each time you switch on the ignition. 
 Always remove the key from the igni-
tion  when  leaving  the  vehicle,  even 
for a short time. 
 In the event of a serious impact, the 
electric child lock is deactivated auto-
matically to permit the exit of the rear 
passengers.   

MANUAL CHILD LOCK 

 Mechanical  system  to  prevent  opening 

of the rear door using its interior control. 
 The  control  is  located  on  the  edge  of 
each rear door.  

      Turn  the  red  control  one  eighth  of 

a  turn  to  the  left  using  the  ignition 
key.   

 ELECTRIC CHILD LOCK 

 Remote control system to prevent opening 

of the rear doors using their interior controls 
and use of the rear electric windows.  

      With the ignition on, press button  A .  
 The  indicator  lamp  on  button   A   comes 
on. 
 This indicator lamp remains on until the 
child lock is deactivated. 
 It is still possible to open the doors from 
the outside and operate the rear electric 
windows from the driver's control pad.  

  Locking 

  Unlocking 
      Turn  the  red  control  one  eighth  of 

a turn to the right using the ignition 
key.      

  Activation 

  Deactivation 
      With the ignition on, press button  A  

again.  

 The indicator lamp on button  A  switches 
off. 
 This indicator lamp remains off until the 
child lock is activated.  

   Any  other  status  of  the  indica-
tor lamp indicates a malfunction 
of  the  electric  child  lock.  Have 
it  checked  by  a  PEUGEOT 
dealer.  

119

DIRECTION INDICATORS 

 If  you  forget  to  cancel  the  di-
rection  indicators  for  more 
than  twenty  seconds,  the 

volume  of  the  audible  signal  will  in-
crease if the speed is above 40 mph 
(60 km/h). 

       Lower the lighting control stalk fully 

when moving to the left. 

     Raise  the  lighting  control  stalk  fully 

when moving to the right.  

       HAZARD WARNING LAMPS 

 A  visual  warning  by  means  of  the  di-
rection  indicators  to  alert  other  road 
users to a vehicle breakdown, towing or 
accident. 

      Tilt  or  press  button   A ,  the  direction 

indicators fl ash.  

 They can operate with the ignition off. 

Automatic operation of hazard 
warning lamps 

 When  braking  in  an  emergency,  de-
pending on the deceleration, the hazard 
warning lamps come on automatically. 
 They  switch  off  automatically  the  fi rst 

time you accelerate. 
      You  can  also  switch  them  off  by 

pressing the button.   

HORN 

      Press one of the spokes of the steer-

ing wheel.  

 Use  the  horn  moderately  and 
only in the following cases: 

   -  

immediate danger, 

  -  

overtaking a cyclist or pedestrian, 

  -  

when approaching an area where 
there is no visibility.   

  Audible warning to alert other road users 
to an imminent danger. 

  "Motorway" function 
 Move the stalk briefl y upwards or down-

wards,  without  going  beyond  the  point 
of  resistance;  the  corresponding  direc-

tion indicators will fl ash 3 times.   

120

TYRE UNDER-INFLATION 
DETECTION 

 System which automatically checks the 
pressure of the tyres while driving. 

   All  repairs  and  changing  of 

tyres on a wheel fi tted with this 

system must be carried out by 
a PEUGEOT dealer. 

 If,  when  changing  a  tyre,  you  install 
a  wheel  which  is  not  detected  by 

your vehicle (example: fi tting of snow 

tyres), you must have the system re-
initialised by a PEUGEOT dealer.  

  This  system  does  not  avoid 
the  need  to  have  the  tyre 
pressures  checked  regularly 

(refer to the "Identifi cation markings" 

section)  to  ensure  that  the  optimum 
 dynamic  performance  of  the  vehicle 
is maintained and prevent premature 
wear of the tyres, particularly in ardu-
ous  driving  conditions  (heavy  load, 
high speed). 
 The tyre pressures must be checked 
cold,  at  least  once  a  month.  Re-
member to check the pressure of the 
spare wheel. 
 The  tyre  under-infl ation  detection 

system  may  experience  temporary 
interference  due  to  electromagnetic 
emissions  on  a  frequency  close  to 
that used by the system.   

  Sensors  fi tted  in  each  valve  trigger  a 

warning  in  the  event  of  malfunction 
(speed above 12 mph (20 km/h)). 
 The spare wheel is not fi tted with a sensor. 

 This warning lamp is displayed in the 
instrument  panel  and/or  a  message 
appears  in  the  multifunction  screen, 
accompanied by an audible signal, to 
identify the wheel concerned. 

      Check  the  tyre  pressures  as  soon 

as possible.  

 This check must be carried out when the tyres are cold.  

  Under-infl ated tyre 

 The   STOP   warning  lamp 
comes 

on, 

accompanied 

by  an  audible  signal  and  a 
message  in  the  multifunc-
tion  screen  identifying  the 
wheel concerned. 

      Stop as soon as it is safe to do so, 

avoiding  any  sudden  movement  of 
the steering wheel and the brakes. 

     Change the damaged wheel (punc-

tured  or  very  defl ated  tyre),  and 

have  the  tyre  pressure  checked  as 
soon as possible.   

  Puncture 

  The tyre under-infl ation detec-

tion  system  is  an  aid  to  driv-
ing which does not replace the 

need for the driver to be vigilant or to 
drive responsibly.    

  Sensor(s) not detected or faulty 

 A  message  appears  in  the  multifunc-
tion screen, accompanied by an audible 
signal,  to  identify  the  wheel  or  wheels 
which are not  detected  or to indicate  a 
fault in the system. 
 Contact a PEUGEOT dealer to replace 
the faulty sensor(s).  

  This  message  is  also  dis-
played when one of the wheels 
is  away  from  the  vehicle  (be-

ing  repaired)  or  when  one  or  more 

wheels without a sensor are fi tted.  

121

 ELECTRONIC STABILITY 
PROGRAMME (ESP) 

 Electronic  stability  programme  (ESP) 
incorporating the following systems: 
   -  

the  anti-lock  braking  system  (ABS) 
and the electronic brake force distri-
bution system (EBFD), 

  -  

the emergency braking assistance, 

  -  

the traction control (ASR), 

  -  

the dynamic stability control (DSC).  

  Definitions 

  Anti-skid regulation (ASR) 
 The ASR system (also  known  as Trac-
tion Control) optimises traction in order 
to  avoid  wheel  slip  by  acting  on  the 
brakes of the driving wheels and on the 
engine. It also improves the directional 
stability of the vehicle on acceleration.  

  Dynamic stability control (DSC) 
 If there is a difference between the path 
followed  by  the  vehicle  and  that  re-
quired  by the  driver, the  DSC  monitors 
each  wheel  and  automatically  acts  on 
the  brake  of  one  or  more  wheels  and 
on  the  engine  to  return  the  vehicle  to 
the required path, within the limits of the 
laws of physics.   

  Emergency braking assistance 
 In  an  emergency,  this  system  enables 
you to reach the optimum braking pres-
sure more quickly and therefore reduce 
the stopping distance. 
 It is triggered in relation to the speed at 
which the brake pedal is pressed. This 
is felt by a reduction in the resistance of 
the pedal and an increase in the effec-
tiveness of the braking.  

  Anti-lock braking system (ABS) and 
electronic brake force distribution 
system (EBFD) 
 This  system  improves  the  stability  and 
manoeuvrability  of  your  vehicle  when 
braking  and  offers  improved  control,  in 
particular on poor or slippery road sur-
faces. 
 The  ABS  prevents  wheel  lock  in  the 
event of emergency braking. 
 The  electronic  brake  force  distribution 
system  manages  the  braking  pressure 
wheel by wheel.  

 When this warning lamp comes 
on, accompanied by an audible 
signal  and  a  message,  it  indi-
cates that there is a fault with the 

ABS, which could cause loss of control of 
the vehicle when braking. 

 When this warning lamp comes 
on,  coupled  with  the   STOP  
warning lamp, accompanied by 
an  audible  signal  and  a  mes-

sage, it indicates that there is a fault with 
the  electronic  brake  force  distribution 
(EBFD), which could cause loss of control 
of the vehicle when braking. 

  You  must  stop  as  soon  as  it  is  safe 
to do so.
  
 In  both  cases,  contact  a  PEUGEOT 

dealer or a qualifi ed workshop. 

 When changing wheels (tyres 
and  rims),  make  sure  that 
these  are  approved  for  your 
vehicle. 

 Normal  operation  of  the  ABS  may 
make itself felt by slight vibrations of 
the brake pedal. 

  In emergency braking, press 

very  fi rmly  without  releas-

ing the pressure.    

  Anti-lock braking system (ABS) and 
electronic brake force distribution 
(EBFD) 

121

 ELECTRONIC STABILITY 
PROGRAMME (ESP) 

 Electronic  stability  programme  (ESP) 
incorporating the following systems: 
   -  

the  anti-lock  braking  system  (ABS) 
and the electronic brake force distri-
bution system (EBFD), 

  -  

the emergency braking assistance, 

  -  

the traction control (ASR), 

  -  

the dynamic stability control (DSC).  

  Definitions 

  Anti-skid regulation (ASR) 
 The ASR system (also  known  as Trac-
tion Control) optimises traction in order 
to  avoid  wheel  slip  by  acting  on  the 
brakes of the driving wheels and on the 
engine. It also improves the directional 
stability of the vehicle on acceleration.  

  Dynamic stability control (DSC) 
 If there is a difference between the path 
followed  by  the  vehicle  and  that  re-
quired  by the  driver, the  DSC  monitors 
each  wheel  and  automatically  acts  on 
the  brake  of  one  or  more  wheels  and 
on  the  engine  to  return  the  vehicle  to 
the required path, within the limits of the 
laws of physics.   

  Emergency braking assistance 
 In  an  emergency,  this  system  enables 
you to reach the optimum braking pres-
sure more quickly and therefore reduce 
the stopping distance. 
 It is triggered in relation to the speed at 
which the brake pedal is pressed. This 
is felt by a reduction in the resistance of 
the pedal and an increase in the effec-
tiveness of the braking.  

  Anti-lock braking system (ABS) and 
electronic brake force distribution 
system (EBFD) 
 This  system  improves  the  stability  and 
manoeuvrability  of  your  vehicle  when 
braking  and  offers  improved  control,  in 
particular on poor or slippery road sur-
faces. 
 The  ABS  prevents  wheel  lock  in  the 
event of emergency braking. 
 The  electronic  brake  force  distribution 
system  manages  the  braking  pressure 
wheel by wheel.  

 When this warning lamp comes 
on, accompanied by an audible 
signal  and  a  message,  it  indi-
cates that there is a fault with the 

ABS, which could cause loss of control of 
the vehicle when braking. 

 When this warning lamp comes 
on,  coupled  with  the   STOP  
warning lamp, accompanied by 
an  audible  signal  and  a  mes-

sage, it indicates that there is a fault with 
the  electronic  brake  force  distribution 
(EBFD), which could cause loss of control 
of the vehicle when braking. 

  You  must  stop  as  soon  as  it  is  safe 
to do so.
  
 In  both  cases,  contact  a  PEUGEOT 

dealer or a qualifi ed workshop. 

 When changing wheels (tyres 
and  rims),  make  sure  that 
these  are  approved  for  your 
vehicle. 

 Normal  operation  of  the  ABS  may 
make itself felt by slight vibrations of 
the brake pedal. 

  In emergency braking, press 

very  fi rmly  without  releas-

ing the pressure.    

  Anti-lock braking system (ABS) and 
electronic brake force distribution 
(EBFD) 

122

                 Dynamic stability control 
(DSC)  

 The DSC system offers excep-
tional safety in normal driving, 
but this should not encourage 

the driver to take extra risks or drive 
at high speed. 
 The correct functioning of the system 
depends  on  observation  of  the  ma-
nufacturer's 

recommendations 

re-

garding  the  wheels  (tyres  and  rims), 
the braking components, the electron-
ic components and the assembly and 
repair procedures used by PEUGEOT 
dealers. 
 After  an  impact,  have  the  system 
checked by a PEUGEOT dealer.   

   Deactivation 
 In exceptional conditions (starting a ve-
hicle  which  is  bogged  down,  stuck  in 
snow,  on  soft  ground...),  it  may  be  ad-
visable  to  deactivate  the  DSC  system, 
so that the wheels can move freely and 
regain grip. 

      Press  the   "ESP  OFF"  

button  or,  according  to 
version,  turn  the  dial  to 
this position.  

 This warning lamp and the in-
dicator  lamp  on  the  button  or 
on the dial come on: the DSC 
system  no  longer  acts  on  the 
operation of the engine.  

  Reactivation 
 The system is reactivated automatically 
each time the ignition is switched back 

on or from 30 mph (50 km/h). 

  Operating fault 

 If this warning lamp comes on, 
accompanied by an audible sig-
nal and a message on the mul-
tifunction  screen,  this  indicates 
a malfunction of the system. 

 Contact a PEUGEOT dealer to have the 
system checked. 

 This is indicated by fl ashing of 

this warning lamp in the instru-
ment panel.   

  Activation 
 This  system  is  activated  automatically 
each time the vehicle is started. 
 It comes into operation in the event of a 
grip or trajectory problem. 

      Press  the   "ESP  OFF"   but-

ton  again  or,  according  to 
version, turn the dial to this 
position,  to  reactivate  it 
manually.   

123

GRIP CONTROL  

  ESP mode 

      Place the dial in this position.   

  Snow mode 

 Special  patented  traction  control  sys-
tem  which  improves  traction  on  snow, 
mud and sand. 
 This  system  is  combined  with  all-sea-

son M+S (Mud and Snow: 215/60 R16) 

tyres  which  offer  an  excellent  compro-
mise between safety, grip and traction. 
 This  system,  the  operation  of  which 
has  been  optimised  for  each  situation, 
allows you to manoeuvre in most condi-
tions  of  poor  grip  (encountered  during 
touring use). 
 The accelerator pedal should be pressed 

suffi ciently  to  allow  the  system  to  use 

the power of the engine. The electronics 
will ensure optimum management of the 
various  parameters.  Operation  at  high 
engine speeds is completely normal. 
 Each  time  the  ignition  is  switched  off, 
the  system  returns  to  standard  mode 
(ESP). 

 Standard  mode  which  is  calibrated  for 
a low level of wheel spin, based on the 
different levels of grip normally encoun-
tered on the road. 

 Mode  which  adapts  its  strategy  to  the 
conditions of grip encountered for each 
of the two front wheels on moving off. 
 When  moving,  the  system  optimises 
wheel spin to provide the best accelera-
tion possible for the grip available. 

      Place the dial in this position.   

124

  All-terrain mode (mud, wet grass, ...) 

 Mode  which,  when  moving  off  allows 
considerable spin on the wheel with the 
least grip to optimise clearing of the mud 
and  regain  grip. At  the  same  time,  the 
wheel with the most grip is controlled in 
such a way as to pass as much torque 
as possible. 
 When  moving,  the  system  optimises 
wheel spin to respond to the driver's re-
quirements as fully as possible. 

  Sand mode 

 Mode which allows little spin on the two 
driving wheels at the same time to allow 
the  vehicle  to  move  forward  and  limit 
the risks of getting stuck in the sand. 

  Driving advice 
 Your vehicle is designed princi-
pally to drive on tarmac roads 

but it allows you to drive on other less 
passable terrain occasionally. 
 However,  it  does  not  permit  all-
terrain activities such as: 
   -  

crossing  and  driving  on  terrain 
which  could  damage  the  under-
frame  or  strip  away  components 
(fuel  pipe,  fuel  cooler,  ...)  due  to 
obstacles or stones in particular, 

  -  

driving  on  terrain  with  steep  gra-
dients and poor grip, 

  -  

crossing a stream.    

      Place the dial in this position.   

      Place the dial in this position.  

  ESP OFF mode 

      Place the dial in this po-

sition.  

 Do not use the other modes on sand as 
the vehicle may become stuck.  

 This mode is active up to 30 mph (50 km/h).  


Content   ..  7  8  9  10   ..