Peugeot 3008 Dag (2010.5). Instruction - part 7
 

  Index      Peugeot     Peugeot 3008 Dag 2010.5 - instruction in english


Search            


Content   ..  5  6  7  8   ..


Peugeot 3008 Dag (2010.5). Instruction - part 7


91

WIPER CONTROLS 

 System for selection and control of the 
various front and rear wiping modes for 
the elimination of rain and cleaning. 
 The vehicle's front and rear wipers are 
designed to improve the driver's visibil-
ity  progressively  according  to  the  cli-
matic conditions. 

  Manual controls 

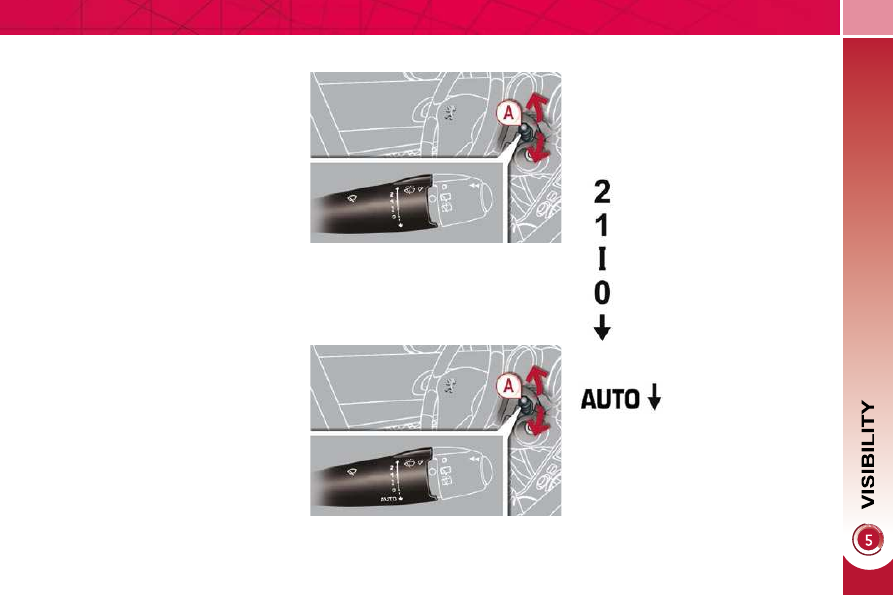
 The wiper commands are issued directly 
by the driver by means of the stalk  A  and 
the ring  B . 

   Model with intermittent wiping   

   Model with AUTO wiping   

 fast (heavy rain), 

 normal (moderate rain), 

 intermittent  (proportional  to 

the speed of the vehicle), 

 automatic, then single wipe 

(see following page). 

 park,   

 single  wipe  (press  down  and 

release), 

  Windscreen wipers 
  A.  Wiping speed selection stalk: 

      or 

  Programming 

 Various automatic wiper control modes 
are  also  available  according  to  the  fol-
lowing options: 
   -  

automatic rain sensitive windscreen 
wipers, 

  -  

rear  wiping  on  engaging  reverse 
gear.   

92

Windscreen and headlamp 
wash 

  B.  Rear wiper selection ring: 

 park, 

 intermittent wipe, 

 wash-wipe (set duration).  

  Reverse gear 
 When  reverse  gear  is  engaged,  the 
rear wiper will come into operation if the 
windscreen wipers are operating.  

  Programming 

      Pull  the  windscreen  wiper  stalk  to-

wards  you.  The  windscreen  wash 
then the windscreen wipers operate 

for a fi xed period.  

 The  headlamp  washers  only  operate 
when   the  dipped    beam    headlamps 
are on
 .  

             Rear wiper 

 If  a  signifi cant  accumulation 

of  snow  or  ice  is  present,  or 
when  using  a  bicycle  carrier 

on  the  boot,  deactivate  the  auto-
matic rear wiper via the multifunction 

screen confi guration menu. 

 The function is activated or 
deactivated  via  the  multi-

function  screen  confi gura-

tion menu. 
 This  function  is  activated 
by default.   

           Screenwash/headlamp wash low 
level 

 In the case of vehicles fi tted with 

headlamp  washers,  when  the 
minimum  level  of  the  reservoir 
is reached, this warning lamp is 

displayed  in  the  instrument  panel,  ac-
companied  by  an  audible  signal  and  a 
message in the multifunction screen. 
 The  warning  lamp  is  displayed  when 
the ignition is switched on, or every time 
the stalk is operated, until the reservoir 

is refi lled. 

 Next  time  you  stop,  refi ll  the  screen-

wash/headlamp wash reservoir.   

93

Special position of the 
windscreen wipers 

Automatic rain sensitive 
windscreen wipers 

 The  windscreen  wipers  operate  auto-
matically, without any action on the part 
of the driver, if rain is detected (sensor 

behind  the  rear  view  mirror),  adapting 

their  speed  to  the  intensity  of  the  rain-
fall. 

  Activation 
 This is controlled manually by the driver 
by pushing the  stalk downwards  to the 
 "AUTO"  position. 
 It is accompanied by a message on the 
multifunction screen.  

 This  position  permits  release  of  the 
windscreen wiper blades. 
 It  is  used  for  cleaning  or  replacement 
of  the  blades.  It  can  also  be  useful,  in 
winter,  to  detach  the  blades  from  the 
windscreen. 
 In  the  moment  following  switching  the 
ignition off, any action on the stalk posi-
tions  the  wipers  vertically  on  the  wind-
screen. 

  Do  not  cover  the  rain  sensor, 
linked  with  the  sunshine  sen-
sor  and  located  in  the  centre 

of  the  windscreen  behind  the  rear 
view mirror. 
 Switch  off  the  automatic  rain  sensi-
tive wipers when using an automatic 
car wash. 
 In winter, to avoid damaging the wip-
er blades, it is advisable to wait until 
the windscreen is completely clear of 
ice  before  activating  the  automatic 
rain sensitive wipers.   

 The  automatic  rain  sensitive 
wipers  must  be  reactivated  if 
the  ignition  has  been  off  for 

more  than  one  minute,  by  pushing 
the stalk downwards.  

  Switching off 
 This is controlled manually by the driver 
by  moving  the  stalk  upwards  then  re-
turning it to position  "0" . 
 It is accompanied by a message on the 
multifunction screen. 

  Operating fault 
 If  an  automatic  wiping  malfunction  oc-
curs, the wipers will operate in intermit-
tent mode. 
 Have it checked by a PEUGEOT dealer.

 To  park  the  wipers  after  this 
has been done, switch on the 
ignition and operate the stalk. 

 To  maintain  the  effectiveness  of  the 

"fl at-blade" wiper blades, it is advis-

able to: 
   -  

handle them with care, 

  -  

clean them regularly using soapy 
water, 

  -  

avoid  using  them  to  retain  card-
board on the windscreen, 

  -   replace them at the fi rst signs of 

wear.   

93

Special position of the 
windscreen wipers 

Automatic rain sensitive 
windscreen wipers 

 The  windscreen  wipers  operate  auto-
matically, without any action on the part 
of the driver, if rain is detected (sensor 

behind  the  rear  view  mirror),  adapting 

their  speed  to  the  intensity  of  the  rain-
fall. 

  Activation 
 This is controlled manually by the driver 
by pushing the  stalk downwards  to the 
 "AUTO"  position. 
 It is accompanied by a message on the 
multifunction screen.  

 This  position  permits  release  of  the 
windscreen wiper blades. 
 It  is  used  for  cleaning  or  replacement 
of  the  blades.  It  can  also  be  useful,  in 
winter,  to  detach  the  blades  from  the 
windscreen. 
 In  the  moment  following  switching  the 
ignition off, any action on the stalk posi-
tions  the  wipers  vertically  on  the  wind-
screen. 

  Do  not  cover  the  rain  sensor, 
linked  with  the  sunshine  sen-
sor  and  located  in  the  centre 

of  the  windscreen  behind  the  rear 
view mirror. 
 Switch  off  the  automatic  rain  sensi-
tive wipers when using an automatic 
car wash. 
 In winter, to avoid damaging the wip-
er blades, it is advisable to wait until 
the windscreen is completely clear of 
ice  before  activating  the  automatic 
rain sensitive wipers.   

 The  automatic  rain  sensitive 
wipers  must  be  reactivated  if 
the  ignition  has  been  off  for 

more  than  one  minute,  by  pushing 
the stalk downwards.  

  Switching off 
 This is controlled manually by the driver 
by  moving  the  stalk  upwards  then  re-
turning it to position  "0" . 
 It is accompanied by a message on the 
multifunction screen. 

  Operating fault 
 If  an  automatic  wiping  malfunction  oc-
curs, the wipers will operate in intermit-
tent mode. 
 Have it checked by a PEUGEOT dealer.

 To  park  the  wipers  after  this 
has been done, switch on the 
ignition and operate the stalk. 

 To  maintain  the  effectiveness  of  the 

"fl at-blade" wiper blades, it is advis-

able to: 
   -  

handle them with care, 

  -  

clean them regularly using soapy 
water, 

  -  

avoid  using  them  to  retain  card-
board on the windscreen, 

  -   replace them at the fi rst signs of 

wear.   

94

COURTESY LAMPS 

   1.    Front courtesy lamp  
  2.    Map reading lamps  

  3.    Rear side reading lamps  
  4.    Rear courtesy lamp   

  Front and rear courtesy lamps 

 In  this  position,  the  courtesy 
lamp comes on gradually: 

  Map reading lamps 

      With  the  ignition  on,  press  the  cor-

responding switch.   

 With  the  "permanent  lighting" 
mode,  the  duration  of  lighting 
varies depending on the context: 

   -  

with the ignition off, approximately 
ten minutes, 

  -  

in  energy  economy  mode,  ap-
proximately thirty seconds, 

  -  

with the engine running, unlimited.  

   -  

when the vehicle is unlocked, 

  -  

when  the  key  is  removed  from  the 
ignition, 

  -  

when a door is opened, 

  -  

when the remote control locking but-
ton  is  activated,  in  order  to  locate 
your vehicle.  

 Permanently off. 

 Permanent lighting. 

 When the front courtesy lamp 
is  in  the  "permanent  lighting" 
position,  the  rear  courtesy 

lamp will also come on, unless it is in 
the "permanently off" position. 
 To  switch  off  the  rear  courtesy  lamp, 
place it in the "permanently off" position.  

  Rear side reading lamps 

   

   With  the  ignition  on,  the  fi rst  press 

of the reading lamp switch switches 
on  the  reading  lamp  in  "permanent 
lighting" mode. 

     Following a second press, it comes 

on: 

   -   when the vehicle is unlocked, 
  -   when the key is removed from the 

ignition, 

  -   when a door is opened, 
  -   when  the  remote  control  locking 

button  is  pressed,  in  order  to 
locate your vehicle.   

 It switches off gradually: 
   -  

when the vehicle is locked, 

  -  

when the ignition is switched on, 

  -  

30  seconds  after  the  last  door  is 
closed.   

 It switches off gradually: 
   -  

when the vehicle is locked, 

  -  

when the ignition is switched on, 

  -  

30  seconds  after  the  last  door  is 
closed.  

 Take care not to place anything in con-
tact with the courtesy lamps. 

95

INTERIOR MOOD LIGHTING 

 The  dimmed  passenger  compartment 
lighting improves visibility in the vehicle 
when the light is poor. 

INTERIOR WELCOME LIGHTING 

 The remote switching on of the passen-
ger  compartment  lighting  makes  your 
approach  to  the  vehicle  easier  in  poor 
light.  It  operates  with  the  automatic  il-
lumination of headlamps. 

  Switching on 

      Press  the  open  padlock  on  the  re-

mote control.  

 The courtesy lamps come on; your ve-
hicle is also unlocked.  

  Switching off 

 The  interior  welcome  lighting  switch-
es  off  automatically  after  a  set  time  or 
when one of the doors is opened.  

  Programming 

  Switching on 

 At  night,  the  front  courtesy  lamp  mood 
lamp   A   comes  on  automatically  when 
the sidelamps are switched on.  

  Switching off 

 The  interior  mood  lighting  switches  off 
automatically  when  the  sidelamps  are 
switched off.  

 The  duration  of  the  welcome 
lighting  is  associated  with  and 
identical to that of the automatic 
guide-me-home lighting.  

 The function is activated or 
deactivated  via  the  multi-

function  screen  confi gura-

tion menu. 

DOOR MIRROR SPOTLAMPS 

 To  make  your  approach  to  the  vehicle 
easier, these illuminate: 
   -  

the  zones  facing  the  driver’s  and 
passenger’s doors, 

  -  

the zones forward of the door mirrors 
and rearward of the front doors.  

  Switching on 

 The spotlamps come on: 
   -  

when you unlock the vehicle, 

  -  

when  you  remove  the  key  from  the 
ignition, 

  -  

when you open a door, 

  -  

when you use the remote control.   

  Switching off 

 They are timed to go off automatically.  

96

 Different  lighting  times  are 
available: 

 This  comes  on  automatically  when  the 
boot  is  opened  and  switches  off  auto-
matically when the boot is closed. 

BOOT LAMP 

  TORCH 

 Portable  lamp,  fi tted  in  the  boot  wall, 

which  can  be  used  to  light  the  boot  or 
as a torch. 

  Operation 
 Once  engaged  fi rmly  in  its  location,  it 

comes  on  automatically  when  the  boot 
is  opened  and  switches  off  automati-
cally when the boot is closed. 
 It  operates  with  NiMH  type  recharge-
able batteries. 
 It  has  a  battery  life  of  approximately 
45 minutes  and  recharges  while  you 
are driving. 

 Observe the polarities when fi t-

ting the rechargeable batteries. 
 Never  replace  the  recharge-

able batteries with normal single-use 
batteries.   

 For the torch function, refer to 
the "Fittings - § Torch" section. 

 FOOTWELL LIGHTING 

 The  soft  lighting  provided  by  the  foot-
well lamps improves visibility in the ve-
hicle when the light is poor. 

  Activation 

 Its  operation  is  identical  to  that  of  the 
courtesy lamps. The lighting comes on 
when one of the doors is opened.  

   -  

when  the  ignition  is  off,  approxi-
mately ten minutes, 

  -  

in energy economy mode, approxi-
mately thirty seconds, 

  -  

when  the  engine  is  running,  no 
limit.  

96

 Different  lighting  times  are 
available: 

 This  comes  on  automatically  when  the 
boot  is  opened  and  switches  off  auto-
matically when the boot is closed. 

BOOT LAMP 

  TORCH 

 Portable  lamp,  fi tted  in  the  boot  wall, 

which  can  be  used  to  light  the  boot  or 
as a torch. 

  Operation 
 Once  engaged  fi rmly  in  its  location,  it 

comes  on  automatically  when  the  boot 
is  opened  and  switches  off  automati-
cally when the boot is closed. 
 It  operates  with  NiMH  type  recharge-
able batteries. 
 It  has  a  battery  life  of  approximately 
45 minutes  and  recharges  while  you 
are driving. 

 Observe the polarities when fi t-

ting the rechargeable batteries. 
 Never  replace  the  recharge-

able batteries with normal single-use 
batteries.   

 For the torch function, refer to 
the "Fittings - § Torch" section. 

 FOOTWELL LIGHTING 

 The  soft  lighting  provided  by  the  foot-
well lamps improves visibility in the ve-
hicle when the light is poor. 

  Activation 

 Its  operation  is  identical  to  that  of  the 
courtesy lamps. The lighting comes on 
when one of the doors is opened.  

   -  

when  the  ignition  is  off,  approxi-
mately ten minutes, 

  -  

in energy economy mode, approxi-
mately thirty seconds, 

  -  

when  the  engine  is  running,  no 
limit.  

F

IT

T

IN

G

S

109

          Torch 

 This  is  a  removable  lamp,  fi tted  in  the 

boot  wall,  which  can  be  used  to  illumi-
nate the boot or as a torch. 

  Operation 
 This torch operates with NiMH type re-
chargeable batteries. 
 It  has  a  battery  life  of  approximately 
45 minutes  and  charges  while  you  are 
driving. 

  Use 
      Extract  the  torch  from  its  location 

pulling the side of the torch  A . 

     Press  the  switch,  located  on  the 

back, to switch the torch on or off. 

     Unfold  the  support,  located  on  the 

back,  to  set  down  and  raise  the 

torch;  for  example,  when  changing 

a wheel.   

  Storing 
      Put the torch back in place in its loca-

tion starting with the narrow part  B .  


If  you  have  forgotten  to  switch  off 
the  torch,  this  switches  it  off  auto-
matically.  

  Rear side blinds 

 Fitted on the rear windows, these protect 
your young children from the sun. 

      Pull the blind by the central tab. 
     Position the blind attachment on the 

hook.   

 Observe  the  polarities  when 

fi tting the batteries. 

 Never replace the rechargeable batter-
ies with normal single-use batteries.  

 It the torch is not engaged cor-
rectly,  it  may  not  charge  and 
may  not  come  on  when  the 
boot is opened.   

 For  the  boot  lighting  function, 
refer to the "Visibility - § Boot 
lamp" section. 

F

IT

T

IN

G

S

97

INTERIOR FITTINGS 

   1.    Sun visor  

  2.    Grab handle with coat hook  

  3.    Storage compartment  

  4.    Storage compartment under the 

steering wheel  

  5.    Storage compartment  

  6.    Console handle  

  7.    Storage compartment with net  

  8.    Illuminated glove box  

  9.    Door trays  

  10.   Front 12 V accessory socket 

(120 W)  

  11.   Cup holder  

  12.   Front armrest with storage 

compartment  

  13.   Storage compartment  

  14.   Rear 12 V accessory socket 

(120 W)   

F

IT

T

IN

G

S

98

DRIVER'S STORAGE 
COMPARTMENTS 

  Storage box 

 This  has  storage  areas  for  the  hand-
book pack, ... 
      To open, pull the handle then tilt the 

box.   

ILLUMINATED GLOVE BOX 

 This  has  storage  areas,  audio  sockets 
for  a  portable  player  and  a  location  for 
the SIM card (only with Peugeot Connect 
Media), ... 
      To  open  the  glove  box,  raise  the 

handle.  

 The  lamp  comes  on  when  the  lid  is 
opened. 

SUN VISOR 

 Component  which  protects  against 
sunlight from the front or the side, also 
equipped  with  an  illuminated  courtesy 
mirror. 
      With  the  ignition  on,  raise  the  con-

cealing fl ap; the mirror is lit automati-

cally.  

 This  sun  visor  is  also  equipped  with  a 
ticket holder. 

  Card holder 

 This can be used for a toll payment ticket 
or parking card, for example.  

  Coin storage  

  Storage  

 To connect a portable player or 
a SIM card, refer to the "Audio 
and telematics" section. 

F

IT

T

IN

G

S

99

12 V ACCESSORY SOCKETS 

      To  connect  a  12 V  accessory  (max 

power: 120 Watts), remove the cover 
and connect a suitable adaptor.  

 Exceeding  the  maximum  power  could 
result in damage to your accessory. 

FRONT ARMREST 

 Comfort and storage device for the driver 
and front passenger. 
      Raise the cover on the left.  

  Storage 

 A ventilation outlet distributes cooled air.  

PEUGEOT CONNECT USB 

  This  connection  box,  consisting  of  an 
auxiliary  socket  and/or  USB  port,  is 
located  in  the  front  armrest  (under  the 
cover). 
 It  permits  the  connection  of  portable 
equipment, such as a digital audio player 
of the iPod 

®

  type or a USB memory stick. 

 It  reads  the  audio  fi le  formats  (MP3, 

OGG, WMA, WAV, ...) which are trans-
mitted  to  your  audio  equipment  and 
played via the vehicle's speakers. 
 You  can  manage  these  fi les  using  the 

steering mounted controls or the audio 
equipment  control  panel  and  display 
them on the multifunction screen.  

  When the USB port is used, the portable 
equipment charges automatically.  

  For  more  information  on  the 
use  of  this  equipment,  refer 
to the  "Audio and Telematics" 
section.  

F

IT

T

IN

G

S

100

  To  avoid  any  risk  of  jamming 
of the pedals: 

MATS 

 Removable carpet protection. 

  Refitting 

 To refi t the mat on the driver's side: 
      position the mat correctly, 
  

   refi t the fi xings by pressing, 

     check  that  the  mat  is  secured

correctly.  

  Fitting 

 When  fi tting  the  mat  for  the  fi rst  time, 

on the driver's side use only the fi xings 

provided in the wallet attached. 
 The  other  mats  are  simply  placed  on 
the carpet.  

  Removal 

 To remove the mat on the driver's side: 
      move  the  seat  as  far  back  as  pos-

sible, 

  

   unclip the fi xings, 

     remove the mat.   

   -  

only  use  mats  which  are  suited 

to  the  fi xings  already  present  in 

the vehicle; these fi xings must be 

used, 

  -   never fi t one mat on top of another.  
 The  use  of  mats  not  approved  by 
PEUGEOT may interfere with access 
to the pedals and hinder the operation 
of the cruise control/speed limiter.   

F

IT

T

IN

G

S

101

REAR MULTIMEDIA 

  Multimedia  system  permitting  the  con-
nection  of  any  external  portable  sys-
tem: Ipod Video, games consoles, DVD 
player, … 

 Two  separate   video   sources 
can be connected via the RCA 
connectors (yellow). 

 The video is displayed on two 
7’’  screens,  integrated  in  the 
head restraints. 

 Two  separate   audio   sources 
can be connected via the RCA 
connectors (red and white). 

 The  audio  is  heard  through 
two wireless headphones with 
Bluetooth  technology  which 
operate with rechargeable bat-
teries. 

 The   A/B   button  allows  you  to  pair 
the  headphones  with  the  screen:
 A  left-hand side,  B  right-hand side. 

  You  have  a  12 V  charger  with  two  out-
puts  permitting  simultaneous  charging 
of both headphones. 
 It is also possible to connect a 3 

rd

  set of 

Bluetooth headphones.  

  Set-up 
      With  the  engine  running,  connect 

your portable system to the RCA con-
nectors (e.g. with AV1 on the left). 

     Press the system's ON/OFF button, 

the indicator lamp comes on and the 
AV1 indicator lamps come on. 

     Press and hold the ON/OFF button on 

the  headphones,  the  indicator  lamp 

on the headphones fl ashes in blue. 

     Press and hold the system's ON/OFF 

button,  the  pairing  with  the  head-
phones  is  complete  when  the  blue 
indicator  lamps  on  the  headphones 
and  on  the  system  (in  the  shape  of 
headphones) are lit continuously. 

     Press  the  ON/OFF  buttons  on  the 

screens if you have a video source. 

     Start playing your portable system.   

  If your seat is in the table posi-
tion, position a cover to avoid 
damaging the screen. 

 These  covers  also  conceal  each 
screen.     

F

IT

T

IN

G

S

102

REAR ARMREST 

SKI FLAP 

  Opening 

      Lower the rear armrest. 
  

   Pull the fl ap handle downwards. 

  

   Lower the fl ap. 

     Load  the  objects  from  inside  the 

boot.   

      Lower  the  rear  armrest  for  a  more 

comfortable position.  

 The armrest incorporates two cup holders. 

 Comfort and storage device for the rear 
passengers. 

 Arrangement for storing and transporting 
long objects. 

     STORAGE COMPARTMENTS 
UNDER THE REAR FOOTWELLS 

  Depending  on  the  confi guration,  the 

vehicle  has  storage  compartments  un-
der the footwells, located forward of the 
outer  rear  seats. Access  is  via  clipped 

fl aps with a handle  A .  

F

IT

T

IN

G

S

98

DRIVER'S STORAGE 
COMPARTMENTS 

  Storage box 

 This  has  storage  areas  for  the  hand-
book pack, ... 
      To open, pull the handle then tilt the 

box.   

ILLUMINATED GLOVE BOX 

 This  has  storage  areas,  audio  sockets 
for  a  portable  player  and  a  location  for 
the SIM card (only with Peugeot Connect 
Media), ... 
      To  open  the  glove  box,  raise  the 

handle.  

 The  lamp  comes  on  when  the  lid  is 
opened. 

SUN VISOR 

 Component  which  protects  against 
sunlight from the front or the side, also 
equipped  with  an  illuminated  courtesy 
mirror. 
      With  the  ignition  on,  raise  the  con-

cealing fl ap; the mirror is lit automati-

cally.  

 This  sun  visor  is  also  equipped  with  a 
ticket holder. 

  Card holder 

 This can be used for a toll payment ticket 
or parking card, for example.  

  Coin storage  

  Storage  

 To connect a portable player or 
a SIM card, refer to the "Audio 
and telematics" section. 


Content   ..  5  6  7  8   ..