Mazda CX-5 (2024 year). Manual in english - page 15
 

  Index      Manuals     Mazda CX-5 (2024 year). Manual in english


Search            copyright infringement  


Content      ..     13      14      15      16     ..


Mazda CX-5 (2024 year). Manual in english - page 15


Interior Lights

NOTE

Do not leave the lights on for long periods
while the engine is turned off. Otherwise
the lead-acid battery power could be
depleted.

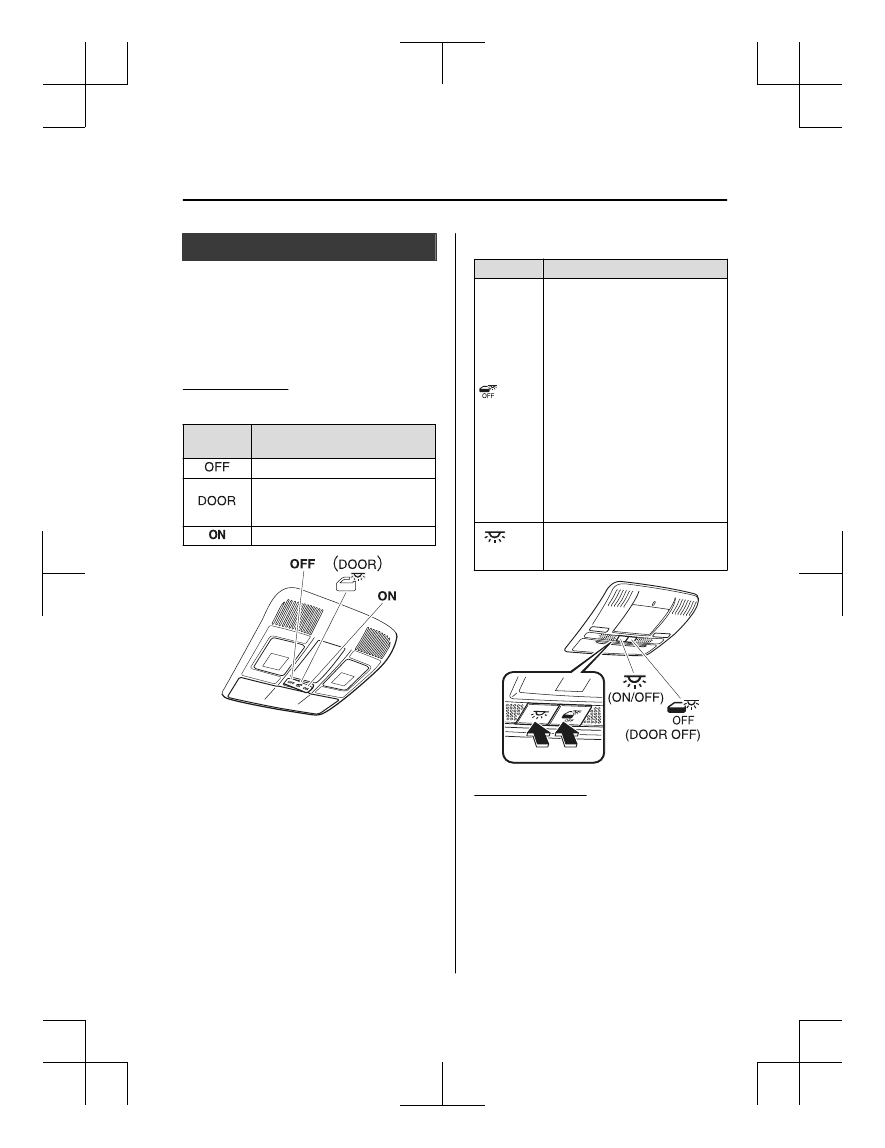
Overhead Lights

Type A

Switch Posi‐

tion

Overhead Lights

Light off

Light is on when any door is open

Light is on or off when the illumi‐
nated entry system is on

Light on

NOTE

The rear map lights also turn on and off
when the overhead light switch is
operated.

Type B

Switch

Overhead Lights

 (DOOR

OFF)

The DOOR OFF switch can be
switched between the DOOR posi‐
tion and DOOR OFF position.

DOOR position

The lights turn on when any of the
doors is opened.

The lights turn on/off in conjunc‐
tion with the illuminated entry
system.

DOOR OFF position

The lights do not turn on even if
any of the doors is opened.

The lights do not turn on/off in
conjunction with the illuminated
entry system.

 (ON/

OFF)

Press the switch to turn it on. Press
the switch again to turn off the
lights.

Front Map Lights

Type A

When the overhead light switch is in the
door or off position, press the lens to

Interior Features

Interior Equipment

5-37

CX-5_8MC3-EA-23G_Edition1_old

2023-5-8 11:05:50

illuminate the front map lights, and then
press the lens again to turn them off.

NOTE

The front map lights will not turn off even
if the lens is pressed in the following
cases:

The overhead light switch is in the ON
position.

The overhead light switch is in the door
position with the door open.

The illuminated entry system is on.

Type B

Press the switch to illuminate the front
map lights, and then press the switch again
to turn them off.

NOTE

The front map lights will not turn off even
if the switch is pressed in the following
cases:

The overhead lights turn on by
operating the overhead ON/OFF switch
(

).

The overhead lights turn on in
conjunction with a door opening/
closing.

The illuminated entry system is on.

Rear Map Lights

Type A

When the overhead light switch is in the
door or off position, press the lens to
illuminate a rear map light, and then press
the lens again to turn it off.

NOTE

Once the rear map lights have been
turned off, they will turn on and off
depending on the position to which the
overhead light is switched.

The rear map lights will not turn off
even if the lens is pressed in the
following cases:

The overhead light switch is ON.

The overhead light switch is in the
door position with the door open.

The illuminated entry system is on.

Type B

Press the switch to illuminate the rear map
lights, and then press the switch again to
turn them off.

Interior Features

Interior Equipment

5-38

CX-5_8MC3-EA-23G_Edition1_old

2023-5-8 11:05:50

NOTE

Once the rear map lights have been
turned off, they will turn on and off in
conjunction with the overhead light
operation.

The rear map lights will not turn off
even if the switch is pressed in the
following cases:

The overhead lights turn on by
operating the overhead ON/OFF
switch (

).

The overhead lights turn on in
conjunction with a door opening/
closing.

The illuminated entry system is on.

Luggage Compartment Lights

Switch Posi‐

tion

Luggage Compartment Light

Light off
Light on when the liftgate is open

Interior Features

Interior Equipment

5-39

CX-5_8MC3-EA-23G_Edition1_old

2023-5-8 11:05:50

Ambient Light

*

An ambient light continuously turn on when the ignition is switched ON.
An ambient light dim when the parking lights or headlights are turned on.

Ambient light

NOTE

An ambient light turn on or off in conjunction with the illuminated entry system when the
ignition is switched OFF.

The ambient light illumination level can be changed while the parking lights or headlights
are turned on.
Refer to the Settings section in the Mazda Connect Owner's Manual.

Illuminated Entry System

The overhead lights turn on when any of
the following operations is done with the
overhead light switch in the DOOR
position.
The ambient lights turn on regardless of
the overhead light switch position.

The driver's door is unlocked with the
ignition is switched OFF.

The ignition is switched OFF with all
doors closed.

NOTE

The illumination time differs depending
on the operation.

Lead-acid battery saver

If an interior light is left on with the
ignition switched OFF, the light turns off
automatically after a certain period of
time has passed to prevent lead-acid
battery depletion.

The operation of the illuminated entry
system can be changed.
Refer to the Settings section in the
Mazda Connect Owner's Manual.

Interior Features

Interior Equipment

5-40

*Some models.

CX-5_8MC3-EA-23G_Edition1_old

2023-5-8 11:05:50

(Type B)

The illumination entry system does not
operate in conjunction with the
overhead lights when the overhead
lights are turned on using the overhead
light ON/OFF switch.

Accessory Sockets

Only use genuine Mazda accessories or
the equivalent requiring no greater than
120 W (DC 12 V, 10 A).

Front

The ignition must be switched to ACC or
ON.
 

Interior Features

Interior Equipment

5-41

CX-5_8MC3-EA-23G_Edition1_old

2023-5-8 11:05:50

Center, Rear

The accessory sockets can be used
regardless of whether the ignition is on or
off.
 

Center

Rear


CAUTION

To prevent accessory socket damage or
electrical failure, pay attention to the
following:

Do not use accessories that require
more than 120 W (DC 12 V, 10 A).

Do not use accessories that are not
genuine Mazda accessories or the
equivalent.

Close the cover when the accessory
socket is not in use to prevent foreign
objects and liquids from getting into
the accessory socket.

Correctly insert the plug into the
accessory socket.

Do not insert the cigarette lighter into
the accessory socket.

Noise may occur on the audio playback
depending on the device connected to
the accessory socket.

Depending on the device connected to
the accessory socket, the vehicle's
electrical system may be affected, which
could cause the warning light to
illuminate. Disconnect the connected
device and make sure that the problem is
resolved. If the problem is resolved,
disconnect the device from the socket
and switch the ignition off. If the problem
is not resolved, consult an Authorized
Mazda Dealer.

NOTE

To prevent discharging of the battery, do
not use the socket for long periods with the
engine off or idling.

Connecting the accessory socket

1. Open the lid.
2. Pass the connection plug cord through

the cutout of the console and insert the
plug into the accessory socket.


Plug

Interior Features

Interior Equipment

5-42

CX-5_8MC3-EA-23G_Edition1_old

2023-5-8 11:05:50

USB Power Outlet

*

The USB power outlets can be used
regardless of whether the ignition is
switched to ACC or ON.
Only use USB devices that have a
maximum power consumption of 10.5W
(DC5V, 2.1A) or below.

USB power outlet

CAUTION

To prevent USB power outlets damage or
electrical failure, pay attention to the
following:

Do not use USB devices that require
more than 10.5 W (DC 5 V, 2.1 A).

Close the lid when the USB power
outlets are not in use to prevent
foreign objects and liquids from
getting into the USB power outlets.

Correctly connect the USB connector
into the USB power outlets.

NOTE

The USB power outlets are designed
only for charging and they cannot be
used for connecting to the vehicle's
audio system.

To prevent discharging of the lead-acid
battery, do not use the USB power
outlets for long periods with the engine
off or idling.

How to connect

The groove in the armrest box can be used
to pass the cord of the device into the box
to connect it to the USB power outlets.
1. Open the lid.
2. Route the cord through the groove in

the armrest box and insert the USB
connector into the USB power outlets.

USB Connector

Interior Features

Interior Equipment

*Some models.

5-43

CX-5_8MC3-EA-23G_Edition1_old

2023-5-8 11:05:50

Wireless Charger (Qi)

*

You can charge mobile devices such as
Smartphones which comply with the Qi
Wireless Charging standard.
Only use mobile devices that have a
maximum power consumption of 5 W, or
15 W or below. The maximum power
consumption differs depending on the
mobile device.

LED indicator

Power button

Charging area


WARNING

Radio waves from the Wireless Charger (Qi)
may affect the operation of medical
devices such as implanted-type cardiac
pacemakers or defibrillators.

Before using the Wireless Charger (Qi)
near people who use medical devices,
ask the medical device manufacturer or
your physician if radio waves from the
Wireless Charger (Qi) will affect the
device.

The Wireless Charger (Qi) can be disabled
to prevent it from affecting medical
devices. Consult an Authorized Mazda
Dealer for details.

Heed the following cautions. Otherwise,
the Wireless Charger (Qi) may malfunction
or be damaged, which could cause a fire,
burns due to heat generation, or an
accident such as electrical shock.

Do not install, remove, disassemble, or
change the wiring of the Wireless
Charger (Qi). If the Wireless Charger (Qi)
needs to be installed or removed, consult
an Authorized Mazda Dealer.

Do not use the Wireless Charger (Qi)
when it is malfunctioning. In addition, if
smoke, abnormal noise, or abnormal
smell is emitted from the Wireless
Charger (Qi), stop the vehicle in a safe
place, switch the ignition OFF, and
consult an Authorized Mazda Dealer.

When using the Wireless Charger (Qi) to
store items on, turn off the Wireless
Charger (Qi).

Do not place any metal object between
the charging area and the mobile device.
Also, do not apply items such as a
metallic sticker to the Wireless Charger
(Qi).

Interior Features

Interior Equipment

5-44

*Some models.

CX-5_8MC3-EA-23G_Edition1_old

2023-5-8 11:05:50

When charging, do not place any item
other than the mobile device to be
charged on the Wireless Charger (Qi). In
addition, do not place any metal object,
IC card, coin, or magnetic item near the
charging area.

Remove dust or dirt from the charging
area before use.

Do not apply strong force or impact to
the Wireless Charger (Qi) or get it wet.

Use only mobile devices which support
the Wireless Charger (Qi).


How to use

1. Start the engine.
2. The power for the Wireless Charger

(Qi) turns on and the LED indicator
turns on.

The power can be turned on/off by
pressing the power button on the
Wireless Charger (Qi) for about 3
seconds.

When the power is turned off, the
LED indicator turns off.

3. Place a device compliant with the Qi

Wireless Charging standard in the
center of the charging area on the tray.

The LED indicator turns on in amber
or green when charging starts.

For details on the LED indicator,
refer to the following LED indicator
table.

Charging starts when all the doors
and liftgate are closed.

The function to reduce noise on the
radio operates if the power button is
pressed for about 1 second during
charging. Use it when noise occurs
on the radio due to interference by

the Wireless Charger (Qi). Press the
power button again for about 1
second to cancel the function.


LED indicator

The status of the Wireless Charger (Qi)
can be checked using the LED indicator.

Status

Illumination/flash

pattern

OFF

Does not turn on

Stand-by (charging is pos‐
sible)

Turns on in white

Normal charging

Turns on in amber

Fast charging

*1

Turns on in green

Normal charging (charging
efficiency is low)

Flashes in amber

Fast charging

*1

 (charging

efficiency is low)

Flashes in green

Stand-by (charging is not
possible)

Flashes in white

Charging is stopped due to
high temperature or foreign
matter detected

Flashes in red

Charging is stopped due to
internal problem or mal‐
function

Turns on in red

*

1 Some mobile devices can switch

between normal charging and fast
charging.


CAUTION

While a mobile device is placed on the
charging area, keep the vehicle key away
from the Wireless Charger (Qi). The
vehicle key may not be detected due to
radio wave interference by the Wireless
Charger (Qi).

Interior Features

Interior Equipment

5-45

CX-5_8MC3-EA-23G_Edition1_old

2023-5-8 11:05:50

Charging may not operate normally
under the following conditions:

The mobile device is fully charged.

There is foreign matter between the
mobile device and the charging area.

The temperature of the mobile device
is high.

The mobile device is placed with the
charging side facing upward.

The mobile device is placed in a
position extremely deviating from the
center of the charging area.

Your vehicle is in an area where strong
radio waves or electrical noise occur
such as near a television tower, power
plant, or airport.

The Near Field Communication (NFC)
function setting of the mobile device is
on (depends on the model of the
mobile device).

Keep the following items away from the
charging area. Otherwise the data stored
on the mobile device could be erased or
the device could malfunction.

Magnetic items such as magnets,
magnetic cards, and magnetic
recording media.

High precision devices such as
wristwatches.

Before using the Wireless Charger (Qi),
make sure to back up the data stored on
the mobile device. The data on the
mobile device could be deleted.

Do not wipe the Wireless Charger (Qi)
using oil, alcohol, or thinner, or spray
hairspray or insecticide onto it.
Otherwise, it could cause damage or
cracking.

Do not leave mobile devices in the cabin.
The temperature inside the cabin may
become very hot, causing the devices to
malfunction.


NOTE

A mobile device larger than the
charging area cannot be charged. In
addition, even if the mobile device is in
the charging area, the charging
efficiency may decrease or charging
may not be possible depending on where
the mobile device is placed.

If the function to reduce noise on the
radio is used, fast charging may be
disabled depending on the mobile device
being charged.

If the LED indicator is flashing in amber
or green, the charging efficiency is low.
Check that there is no foreign matter
between the mobile device and the
charging area, and position the mobile
device near the center of the charging
area.

Depending on the mobile device case or
accessories used, the mobile device may
not charge, or the charging efficiency
may be reduced resulting in a longer
charging time. If charging does not start
even when a mobile device is placed on
the charging area, remove the mobile
device case or any accessories.

While the keyless entry is operating,
charging may stop temporarily, however,
this does not indicate a problem.

During charging, the Wireless Charger
(Qi) and the mobile device become
warm, however, this does not indicate a
problem.

Interior Features

Interior Equipment

5-46

CX-5_8MC3-EA-23G_Edition1_old

2023-5-8 11:05:50

If the mobile device temperature rises
during charging, charging may stop due
to the protection function of the device.
If that happens, wait until the mobile
device cools down sufficiently and then
recharge it.

When using the Wireless Charger (Qi),
applications using the Near Field
Communication (NFC) function may
activate, but this does not indicate a
problem with the Wireless Charger (Qi).


Trademarks

“Qi” and the Qi symbol are trademarks or
registered trademarks of the Wireless
Power Consortium (WPC).

Cup Holder

WARNING

Never use a cup holder to hold hot liquids
while the vehicle is moving:

Using a cup holder to hold hot liquids while
the vehicle is moving is dangerous. If the
contents spill, you could be scalded.

Do not put anything other than cups or
drink cans in cup holders:

Putting objects other than cups or drink
cans in a cup holder is dangerous.
During sudden braking or maneuvering,
occupants could be hit and injured, or
objects could be thrown around the
vehicle, causing interference with the driver
and the possibility of an accident. Only use
a cup holder for cups or drink cans.

Front

Interior Features

Interior Equipment

5-47

CX-5_8MC3-EA-23G_Edition1_old

2023-5-8 11:05:50

Rear

*

The rear cup holder is on the rear center
armrest.

Bottle Holder

Bottle holders are on the inside of the
doors.

Front

Bottle holder

Rear

Bottle holder

CAUTION

Do not use the bottle holders for containers
without caps. The contents may spill when
opening/closing the door or while driving
the vehicle.

Interior Features

Interior Equipment

5-48

*Some models.

CX-5_8MC3-EA-23G_Edition1_old

2023-5-8 11:05:50

Storage Compartments

WARNING

Keep storage boxes closed when driving:

Driving with the storage boxes open is
dangerous. To reduce the possibility of
injury in an accident or a sudden stop, keep
the storage boxes closed when driving.

When loading cargo, make sure that it is
completely secured:

If the cargo is not completely secured, it
may move or collapse while driving or
during sudden braking, resulting in injury
or an accident.

Do not put articles in storage spaces with
no lid:

Putting articles in storage spaces with no
lid is dangerous as they could be thrown
around the cabin if the vehicle is suddenly
accelerated and cause injury depending on
how the article is stored.

CAUTION

Do not leave lighters or eyeglasses in the
storage boxes while parked under the sun.
A lighter could explode or the plastic
material in eyeglasses could deform and
crack from high temperature.

Overhead Console

This console box is designed to store
eyeglasses or other accessories.

Push and release to open.

Type A

Type B

Glove Compartment

To open the glove compartment, pull the
latch toward you.

To close the glove compartment, firmly
press in the center of the glove
compartment lid.

Interior Features

Interior Equipment

5-49

CX-5_8MC3-EA-23G_Edition1_old

2023-5-8 11:05:50

Center Console

To open, pull the release latch.

Storage tray

The storage tray can be removed.

Storage tray

Armrest Box

*

To open, push the button and pull up the
lid.

Interior Features

Interior Equipment

5-50

*Some models.

CX-5_8MC3-EA-23G_Edition1_old

2023-5-8 11:05:50

Luggage Compartment

Cargo Securing Loops

Use the cargo securing loops in the luggage compartment to secure cargo with a rope or net.
The tensile strength of the loops is 196 N (20 kgf, 44 lbf). Do not apply excessive force to
the cargo securing loops as it will damage them.

Trim side

Luggage board side

CAUTION

When not using the cargo securing loops, return them to their original positions. If the cargo
securing loops are not returned to their original positions and cargo is placed on the top of
them, the cargo securing loops could be deformed or damaged.

When using the cargo securing loops, hook them to the pins.

Cargo securing 
loop

Pin

Cargo Sub-Compartment

The cargo sub-compartment is located under the luggage board, and it can be used to store
small items.

Interior Features

Interior Equipment

5-51

CX-5_8MC3-EA-23G_Edition1_old

2023-5-8 11:05:50

CAUTION

Do not apply excessive force to the luggage board when setting it up. Otherwise, it could
deform or damage the luggage board.

Return the luggage board to its original position before driving the vehicle. If the vehicle is
driven with the luggage board set up, it could cause an unexpected accident.

When not using the handle, return it to its original position. If the handle is not returned to
its original position and cargo is placed, it could contact the handle and the handle could
be deformed or damaged.

1. Lift up the luggage board.

Luggage board

2. Insert the luggage board into the left and right grooves.

Luggage board

Groove

Luggage Board

The height of the floor surface can be adjusted by changing the installation position of the
luggage board.

Interior Features

Interior Equipment

5-52

CX-5_8MC3-EA-23G_Edition1_old

2023-5-8 11:05:50

Reversible Luggage Board

*

The luggage board can be used with the underside facing up, depending on the intended use.
The underside is made of stain-resistant material which is easy to clean.

CAUTION

Do not spray large amounts of liquid such as water on the luggage board. If a large amount
of water or other liquid is poured or sprayed on the luggage board, the water or other liquid
may leak down and wet the luggage under the board.

When using the luggage board in the upper level

1. Place the front luggage board.

Luggage board

Groove

2. Insert the left and right hollows or holes of the rear luggage board into the pins.

Pin

Hollows

Pin

Hole

One-sided type

Reversible type

3. Remove in the reverse order of the installation procedure.

When using the luggage board in the lower level

1. When not using the cargo securing loops, return them to their original positions.

Refer to Cargo Securing Loops on page 5-51

Interior Features

Interior Equipment

*Some models.

5-53

CX-5_8MC3-EA-23G_Edition1_old

2023-5-8 11:05:50

2. Slide the front luggage board into the lower grooves and install.

Groove

Luggage board

3. Insert the left and right hollows or holes of the rear luggage board into the pins.

Pin

Hollows

Pin

Hole

One-sided type

Reversible type

4. Remove in the reverse order of the installation procedure.

NOTE

Loading golf bags

(Some golf bags may not fit using the following methods depending on their sizes.)
Up to four golf bags can be carried in the luggage compartment.
Bottom: Place the first and second golf bags in the luggage compartment with the bottoms
pointed to the right.

Interior Features

Interior Equipment

5-54

CX-5_8MC3-EA-23G_Edition1_old

2023-5-8 11:05:50

Top: Place the third golf bag with its bottom pointed to the left and the fourth golf bag with
its bottom pointed to the right in the luggage compartment.

The arrows indicate the bottoms of the golf bags.

Top

Bottom

The illustration shows the loading of four golf bags.

Rear Coat Hooks

WARNING

Never hang heavy or sharp objects on the
assist grips and coat hooks:

Hanging heavy or sharp-ended objects
such as a coat hanger from the assist grips
or coat hooks is dangerous as they can fly
off and hit an occupant in the cabin if a
curtain air bag was to deploy, which could
result in serious injury or death.

Always hang clothes on the coat hooks
and the assist grips without hangers.

Coat hook

Interior Features

Interior Equipment

5-55

CX-5_8MC3-EA-23G_Edition1_old

2023-5-8 11:05:50

MEMO

5-56

CX-5_8MC3-EA-23G_Edition1_old

2023-5-8 11:05:50

6

Maintenance and Care

How to keep your Mazda in top condition.

Essential Information........................6-2

Introduction.................................. 6-2

Scheduled Maintenance.................... 6-4

Scheduled Maintenance (U.S.A.,
Canada, and Puerto Rico)............. 6-4
Scheduled Maintenance
(Mexico)..................................... 6-10

Owner Maintenance........................6-15

Owner Maintenance
Precautions................................. 6-15
Hood........................................... 6-17
Engine Compartment
Overview.................................... 6-19

Engine Oil...................................6-20
Engine Coolant........................... 6-22
Brake Fluid................................. 6-24
Washer Fluid...............................6-24
Body Lubrication........................6-25
Wiper Blades.............................. 6-26
Battery........................................ 6-31
Key Battery Replacement...........6-33
Tires............................................ 6-35
Light Bulbs................................. 6-39
Fuses........................................... 6-43

Appearance Care.............................6-49

Exterior Care.............................. 6-49
Interior Care................................6-55

6-1

CX-5_8MC3-EA-23G_Edition1_old

2023-5-8 11:05:50

Introduction

Be careful not to hurt yourself when inspecting your vehicle, replacing a tire, or doing some
kind of maintenance such as car washing. In particular, wear thick work gloves such as
cotton gloves when touching areas that are difficult to see while inspecting or working on
your vehicle. Doing inspections or procedures with your bare hands could cause injury.
 
If you are unsure about any procedure this manual describes, we strongly urge you to have a
reliable and qualified service shop perform the work, preferably an Authorized Mazda
Dealer.
 
Factory-trained Mazda technicians and genuine Mazda parts are best for your vehicle.
Without this expertise and the parts that have been designed and made especially for your
Mazda, inadequate, incomplete, and insufficient servicing may result in problems. This
could lead to vehicle damage or an accident and injuries.
 
For expert advice and quality service, consult an Authorized Mazda Dealer.
 
To continue warranty eligibility and to protect your investment, it is your responsibility to
properly maintain your vehicle according to factory recommended schedules outlined in this
manual. As part of this you must keep your maintenance records, receipts, repair orders and
any other documents as evidence this maintenance was performed. You must present these
documents, should any warranty coverage disagreement occur. Failure to do so can result in
your warranty being voided either in whole or in part.
 
This evidence may consist of the following:

The Mazda Scheduled Maintenance Record, refer to the Warranty Booklet, must be
completely filled out showing mileage, repair order number, date for each service, and
signed by a qualified automotive service technician who service vehicles.

Original copies of repair orders or other receipts that include the mileage and date the
vehicle was serviced. Each receipt should be signed by a qualified automotive service
technician.

For self maintenance, a statement that you completed the maintenance yourself,
displaying mileage and the date the work was performed. Also, receipts for the
replacement parts (fluid, filters, etc.) indicating the date and mileage must accompany this
statement.


Maintenance and Care

Essential Information

6-2

CX-5_8MC3-EA-23G_Edition1_old

2023-5-8 11:05:50

NOTE

If you elect to perform maintenance yourself or have your vehicle serviced at a location
other than an Authorized Mazda Dealer, Mazda requires that all fluids, parts and materials
must meet Mazda standards for durability and performance as described in this manual.

 
Claims against the warranty resulting from lack of maintenance, as opposed to defective
materials or authorized Mazda workmanship, will not be honored.
 
Any auto repair shop using parts equivalent to your Mazda's original equipment may
perform maintenance. 

But we recommend that it always be done by an Authorized

Mazda Dealer using genuine Mazda parts.

Selecting “Maintenance Monitor” enables the system to notify you of your vehicle's
approaching inspection/servicing period, refer to the Information section in the Mazda
Connect Owner's Manual for the details.
 
The malfunction diagnosis connector is designed exclusively for connecting the specially
designed device to perform on-board diagnosis.
Do not connect any devices other than the specially designed malfunction diagnosis devices
for servicing. If any device other than the malfunction diagnosis device is connected, it may
affect the vehicle's electrical devices or lead to damage such as battery depletion.

Malfunction 
diagnosis 
connector

Maintenance and Care

Essential Information

6-3

CX-5_8MC3-EA-23G_Edition1_old

2023-5-8 11:05:50

Scheduled Maintenance (U.S.A., Canada, and Puerto

Rico)

Follow Schedule 1 if the vehicle is operated mainly where none of the following conditions
(severe driving conditions) apply.

Repeated short-distance driving

Driving in dusty conditions

Driving with extended use of brakes

Driving in areas where salt or other corrosive materials are used

Driving on rough or muddy roads

Extended periods of idling or low-speed operation

Driving for long periods in cold temperatures or extremely humid climates

Driving in extremely hot conditions

Driving in mountainous conditions continually

If any do apply, follow Schedule 2. (Canada residents follow Schedule 2.)

Vehicles using Engine Oil Flexible Maintenance

Engine Oil Flexible Maintenance is selected by default for U.S.A. and Puerto Rico
residents.
If any following conditions do apply, follow Schedule 2 with engine oil fixed maintenance.

Extended periods of idling or low-speed operation such as police car, taxi or driving
school car

Driving in dusty conditions

The vehicle calculates the remaining oil life based on engine operating conditions. The
vehicle lets you know when an oil change is due by illuminating the wrench indicator light
in the instrument cluster. Change the oil as soon as possible within the next 1,000 km (600
mile) or 15 days. Refer to the Information section in the Mazda Connect Owner's Manual
for the details.

NOTE

Please ensure that the Flexible Oil Maintenance Setting is reset after each Oil and Filter
replacement.

For maintenance guidelines beyond the miles/months listed, follow the maintenance
intervals provided in the Scheduled Maintenance Tables.

Maintenance and Care

Scheduled Maintenance

6-4

CX-5_8MC3-EA-23G_Edition1_old

2023-5-8 11:05:50

Schedule 1

U.S.A. and Puerto Rico residents - Engine oil flexible maintenance interval

Use when the maintenance monitor for "Oil Change" is set to "Flexible". For the de‐
tails, refer to the Information section in the Mazda Connect Owner's Manual.

Maintenance Interval

Number of months or kilometers (miles), whichever comes first.

Months

12

24

36

48

60

72

84

96

×1000 km

12

24

36

48

60

72

84

96

×1000 miles

7.5

15

22.5

30

37.5

45

52.5

60

Spark plugs

SKYACTIV-G
2.5T

Replace every 64,000 km (40,000 miles).

Except SKY‐
ACTIV-G
2.5T

Replace every 120,000 km (75,000 miles).

Air filter

R

R

Drive belts

I

I

Engine oil & filter

*1

Replace when wrench indicator light is ON. (Max interval: 12

months or 12,000 km (7,500 miles))

Engine coolant

*2

Replace at first 192,000 km (120,000 miles) or 10 years; after

that, every 96,000 km (60,000 miles) or 5 years.

Fuel lines and hoses

*3

I

I

I

I

Hoses and tubes for emission

*3

I

I

Brake lines, hoses and connections

I

I

I

I

Disc brakes

I

I

I

I

I

I

I

I

Tire (Rotation)

Rotate every 12,000 km (7,500 miles).

Steering operation and linkages

I

I

I

I

Front and rear suspension, ball joints and wheel
bearing axial play

I

I

I

I

Driveshaft dust boots

I

I

I

I

Bolts and nuts on chassis and body

T

T

T

T

Exhaust system and heat shields

I

Emergency flat tire repair kit (if equipped)

*4

Inspect annually.

Cabin air filter

R

R

R

R

Chart symbols:

I:

 Inspect: Inspect and clean, repair, adjust, fill up, or replace if necessary.

R:

 Replace

L:

 Lubricate

C:

 Clean

T:

 Tighten

D:

 Drain

Maintenance and Care

Scheduled Maintenance

6-5

CX-5_8MC3-EA-23G_Edition1_old

2023-5-8 11:05:50

Remarks:

*

1 The engine oil and filter must be changed at least once a year or within 12,000 km (7,500 miles) since last

engine oil and filter change. Reset the engine oil data whenever replacing the engine oil regardless of the
message/wrench indicator light display.

*

2 Use of FL-22 is recommended when replacing engine coolant. Using engine coolant other than FL-22 may

cause serious damage to the engine and cooling system.

*

3 According to state/provincial and federal regulations, failure to perform maintenance on these items will not

void your emissions warranties. However, Mazda recommends that all maintenance services be performed at
the recommended time or mileage/kilometer period to ensure long-term reliability.

*

4 Check the tire repair fluid expiration date every year when performing the periodic maintenance. Replace the

tire repair fluid bottle with new one before the expiration date.

Schedule 2

U.S.A. and Puerto Rico residents - Severe driving conditions maintenance interval

Maintenance Interval

Number of months or kilometers (miles), whichever comes first.

Months

6

12

18

24

30

36

42

48

54

60

66

72

×1000 km

8

16

24

32

40

48

56

64

72

80

88

96

×1000 miles

5

10

15

20

25

30

35

40

45

50

55

60

Spark plugs

SKYACTIV-G
2.5T

Replace every 64,000 km (40,000 miles).

Except SKY‐
ACTIV-G
2.5T

Replace every 120,000 km (75,000 miles).

Air filter

*1

R

R

Drive belts

I

I

I

Engine oil & filter

Flexible

*2

Replace when wrench indicator light is ON. (Max interval: 12

months or 12,000 km (7,500 miles))

Fixed

R

R

R

R

R

R

R

R

R

R

R

R

Engine coolant

*3

Replace at first 192,000 km (120,000 miles) or 10 years; after

that, every 96,000 km (60,000 miles) or 5 years.

Engine coolant level

I

I

I

I

I

I

I

I

I

I

I

I

Fuel lines and hoses

*4

I

I

I

I

Hoses and tubes for emission

*4

I

I

Function of all lights

I

I

I

I

I

I

I

I

I

I

I

I

Brake lines, hoses and connections

I

I

I

I

Brake and clutch fluid level

I

I

I

I

I

I

I

I

I

I

I

I

Disc brakes

I

I

I

I

I

I

I

I

I

I

I

I

Tire (Rotation)

Rotate every 8,000 km (5,000 miles).

Tire inflation pressure and tire wear

I

I

I

I

I

I

I

I

I

I

I

I

Steering operation and linkages

I

I

I

I

Maintenance and Care

Scheduled Maintenance

6-6

CX-5_8MC3-EA-23G_Edition1_old

2023-5-8 11:05:50

Maintenance Interval

Number of months or kilometers (miles), whichever comes first.

Months

6

12

18

24

30

36

42

48

54

60

66

72

×1000 km

8

16

24

32

40

48

56

64

72

80

88

96

×1000 miles

5

10

15

20

25

30

35

40

45

50

55

60

Front and rear suspension, ball joints and wheel
bearing axial play

I

I

I

I

Driveshaft dust boots

I

I

I

I

Bolts and nuts on chassis and body

T

T

T

T

Exhaust system and heat shields

I

All locks and hinges

L

L

L

L

L

L

L

L

L

L

L

L

Washer fluid level

I

I

I

I

I

I

I

I

I

I

I

I

Emergency flat tire repair kit (if equipped)

*5

Inspect annually.

Cabin air filter

Replace every 48,000 km (30,000 miles) or 2 years.

Chart symbols:

I:

 Inspect: Inspect and clean, repair, adjust, fill up, or replace if necessary.

R:

 Replace

L:

 Lubricate

C:

 Clean

T:

 Tighten

D:

 Drain

Remarks:

*

1 If the vehicle is operated in very dusty or sandy areas, clean and if necessary, replace the air filter more often

than the recommended intervals.

*

2 Engine oil flexible maintenance is available for U.S.A. and Puerto Rico residents whose vehicle is operated

mainly where none of the following conditions apply.

Extended periods of idling or low-speed operation such as police car, taxi or driving school car

Driving in dusty conditions

If any do apply, follow fixed maintenance.
The engine oil and filter must be changed at least once a year or within 12,000 km (7,500 miles) since last
engine oil and filter change. Reset the engine oil data whenever replacing the engine oil regardless of the
message/wrench indicator light display.

*

3 Use of FL-22 is recommended when replacing engine coolant. Using engine coolant other than FL-22 may

cause serious damage to the engine and cooling system.

*

4 According to state/provincial and federal regulations, failure to perform maintenance on these items will not

void your emissions warranties. However, Mazda recommends that all maintenance services be performed at
the recommended time or mileage/kilometer period to ensure long-term reliability.

*

5 Check the tire repair fluid expiration date every year when performing the periodic maintenance. Replace the

tire repair fluid bottle with new one before the expiration date.


Maintenance and Care

Scheduled Maintenance

6-7

CX-5_8MC3-EA-23G_Edition1_old

2023-5-8 11:05:50

Canada residents

Maintenance Interval

Number of months or kilometers (miles), whichever comes first.

Months

6

12

18

24

30

36

42

48

54

60

66

72

×1000 km

8

16

24

32

40

48

56

64

72

80

88

96

×1000 miles

5

10

15

20

25

30

35

40

45

50

55

60

Spark plugs

SKYACTIV-G
2.5T

Replace every 64,000 km (40,000 miles).

Except SKY‐
ACTIV-G
2.5T

Replace every 120,000 km (75,000 miles).

Air filter

I

I

I

I

I

I

I

I

I

I

I

I

Replace every 56,000 km (35,000 miles) or 3 years.

Drive belts

I

I

Engine oil & filter

*1

R

R

R

R

R

R

R

R

R

R

R

R

Engine coolant

*2

Replace at first 192,000 km (120,000 miles) or 10 years; after

that, every 96,000 km (60,000 miles) or 5 years.

Engine coolant level

I

I

I

I

I

I

I

I

I

I

I

I

Fuel lines and hoses

*3

I

I

I

Hoses and tubes for emission

*3

I

Function of all lights

I

I

I

I

I

I

I

I

I

I

I

I

Brake lines, hoses and connections

I

I

I

Brake and clutch fluid level

I

I

I

I

I

I

I

I

I

I

I

I

Disc brakes

Inspect every 24,000 km (15,000 miles) or 1 year.

Tire (Rotation)

Rotate every 8,000 km (5,000 miles).

Tire inflation pressure and tire wear

I

I

I

I

I

I

I

I

I

I

I

I

Steering operation and linkages

I

I

I

Front and rear suspension, ball joints and wheel
bearing axial play

I

I

I

Driveshaft dust boots

I

I

I

Bolts and nuts on chassis and body

T

T

T

Exhaust system and heat shields

Inspect every 72,000 km (45,000 miles) or 5 years.

All locks and hinges

L

L

L

L

L

L

L

L

L

L

L

L

Washer fluid level

I

I

I

I

I

I

I

I

I

I

I

I

Emergency flat tire repair kit (if equipped)

*4

Inspect annually.

Cabin air filter

R

R

R

Chart symbols:

I:

 Inspect: Inspect and clean, repair, adjust, fill up, or replace if necessary.

R:

 Replace

L:

 Lubricate

Maintenance and Care

Scheduled Maintenance

6-8

CX-5_8MC3-EA-23G_Edition1_old

2023-5-8 11:05:50

C:

 Clean

T:

 Tighten

D:

 Drain

Remarks:

*

1 Reset the engine oil data whenever replacing the engine oil regardless of the message/wrench indicator light

display.

*

2 Use of FL-22 is recommended when replacing engine coolant. Using engine coolant other than FL-22 may

cause serious damage to the engine and cooling system.

*

3 According to state/provincial and federal regulations, failure to perform maintenance on these items will not

void your emissions warranties. However, Mazda recommends that all maintenance services be performed at
the recommended time or mileage/kilometer period to ensure long-term reliability.

*

4 Check the tire repair fluid expiration date every year when performing the periodic maintenance. Replace the

tire repair fluid bottle with new one before the expiration date.

Maintenance and Care

Scheduled Maintenance

6-9

CX-5_8MC3-EA-23G_Edition1_old

2023-5-8 11:05:50

Scheduled Maintenance (Mexico)

Follow Schedule 1 if the vehicle is operated mainly where none of the following conditions
(severe driving conditions) apply.

Repeated short-distance driving

Driving in dusty conditions

Driving with extended use of brakes

Driving in areas where salt or other corrosive materials are used

Driving on rough or muddy roads

Extended periods of idling or low-speed operation

Driving for long periods in cold temperatures or extremely humid climates

Driving in extremely hot conditions

Driving in mountainous conditions continually

If any do apply, follow Schedule 2.

NOTE

For maintenance guidelines beyond the kilometers/months listed, follow the maintenance
intervals provided in the Scheduled Maintenance Tables.

Schedule 1

Maintenance Interval

Number of months or kilometers, whichever comes first

Months

6

12

18

24

30

36

42

48

54

60

66

72

×1000 km

10

20

30

40

50

60

70

80

90 100 110 120

Drive belts

I

I

I

Engine oil & filter

*1

R

R

R

R

R

R

R

R

R

R

R

R

Cooling system

I

I

I

Engine coolant

*2

Replace at first 200,000 km or 10 years; after that, every

100,000 km or 5 years

Air filter

R

R

R

R

R

R

Fuel lines and hoses

I

*3

I

*3

I

Hoses and tubes for emission

I

*3

I

*3

I

Fuel filter

Replace every 60,000 km

Spark plugs

SKYACTIV-G
2.5T

I

I

I

I

I

I

I

I

I

I

I

I

Replace every 64,000 km

Except SKY‐
ACTIV-G
2.5T

I

I

I

I

I

I

I

I

I

I

I

I

Replace every 120,000 km

Brake lines, hoses and connections

I

I

I

I

I

I

Brake and clutch fluid level

I

I

I

I

I

I

I

I

I

Brake fluid

R

R

R

Maintenance and Care

Scheduled Maintenance

6-10

CX-5_8MC3-EA-23G_Edition1_old

2023-5-8 11:05:50

Maintenance Interval

Number of months or kilometers, whichever comes first

Months

6

12

18

24

30

36

42

48

54

60

66

72

×1000 km

10

20

30

40

50

60

70

80

90 100 110 120

Disc brakes

I

I

I

I

I

I

I

I

I

I

I

I

Tire (Rotation)

Rotate every 10,000 km

Tire inflation pressure and tire wear

I

I

I

I

I

I

I

I

I

I

I

I

Steering operation and linkages

I

I

I

I

I

I

I

I

I

I

I

I

Front and rear suspension, ball joints and wheel
bearing axial play

I

I

I

I

I

I

Driveshaft dust boots

I

I

I

I

I

I

Bolts and nuts on chassis and body

T

T

T

T

T

T

Exhaust system and heat shields

I

I

I

I

I

I

All locks and hinges

L

L

L

L

L

L

L

L

L

L

L

L

Washer fluid level

I

I

I

I

I

I

I

I

I

I

I

I

Emergency flat tire repair kit (if equipped)

*4

Inspect annually.

Cabin air filter

R

R

R

Chart symbols:

I:

 Inspect: Inspect and clean, repair, adjust, fill up, or replace if necessary.

R:

 Replace

L:

 Lubricate

C:

 Clean

T:

 Tighten

D:

 Drain

Remarks:

*

1 Reset the engine oil data whenever replacing the engine oil regardless of the message/wrench indicator light

display.

*

2 Use of FL-22 is recommended when replacing engine coolant. Using engine coolant other than FL-22 may

cause serious damage to the engine and cooling system.

*

3 According to state/provincial and federal regulations, failure to perform maintenance on these items will not

void your emissions warranties. However, Mazda recommends that all maintenance services be performed at
the recommended time or kilometer period to ensure long-term reliability.

*

4 Check the tire repair fluid expiration date every year when performing the periodic maintenance. Replace the

tire repair fluid bottle with new one before the expiration date.

Schedule 2

Maintenance Interval

Number of months or kilometers, whichever comes first

Months

3

6

9

12

15

18

21

24

27

30

33

36

×1000 km

5

10

15

20

25

30

35

40

45

50

55

60

Drive belts

I

Engine oil & filter

*1

R

R

R

R

R

R

R

R

R

R

R

R

Cooling system

I

Maintenance and Care

Scheduled Maintenance

6-11

CX-5_8MC3-EA-23G_Edition1_old

2023-5-8 11:05:50

Maintenance Interval

Number of months or kilometers, whichever comes first

Months

3

6

9

12

15

18

21

24

27

30

33

36

×1000 km

5

10

15

20

25

30

35

40

45

50

55

60

Engine coolant

*2

Replace at first 200,000 km or 10 years; after that, every

100,000 km or 5 years

Engine coolant level

I

I

I

I

I

I

I

I

I

I

I

I

Air filter

C

R

C

R

C

R

Fuel lines and hoses

I

*3

Hoses and tubes for emission

I

*3

Fuel filter

Replace every 60,000 km

Spark plugs

SKYACTIV-G
2.5T

I

I

I

I

I

I

Replace every 64,000 km

Except SKY‐
ACTIV-G
2.5T

I

I

I

I

I

I

Replace every 120,000 km

Function of all lights

I

I

I

I

I

I

I

I

I

I

I

I

Brake lines, hoses and connections

I

I

I

Brake and clutch fluid level

I

I

I

I

I

Brake fluid

R

Disc brakes

I

I

I

I

I

I

Tire (Rotation)

Rotate every 10,000 km

Tire inflation pressure and tire wear

I

I

I

I

I

I

Steering operation and linkages

I

I

I

I

I

I

Front and rear suspension, ball joints and wheel
bearing axial play

I

I

I

Driveshaft dust boots

I

I

I

Bolts and nuts on chassis and body

T

T

T

Exhaust system and heat shields

I

I

I

All locks and hinges

L

L

L

L

L

L

Washer fluid level

I

I

I

I

I

I

Emergency flat tire repair kit (if equipped)

*4

Inspect annually.

Cabin air filter

R

R

R

Chart symbols:

I:

 Inspect: Inspect and clean, repair, adjust, fill up, or replace if necessary.

R:

 Replace

L:

 Lubricate

C:

 Clean

T:

 Tighten

D:

 Drain

Maintenance and Care

Scheduled Maintenance

6-12

CX-5_8MC3-EA-23G_Edition1_old

2023-5-8 11:05:50


Content      ..     13      14      15      16     ..