Mazda CX-5 (2024 year). Manual in english - page 13
 

  Index      Manuals     Mazda CX-5 (2024 year). Manual in english


Search            copyright infringement  


Content      ..     11      12      13      14     ..


Mazda CX-5 (2024 year). Manual in english - page 13


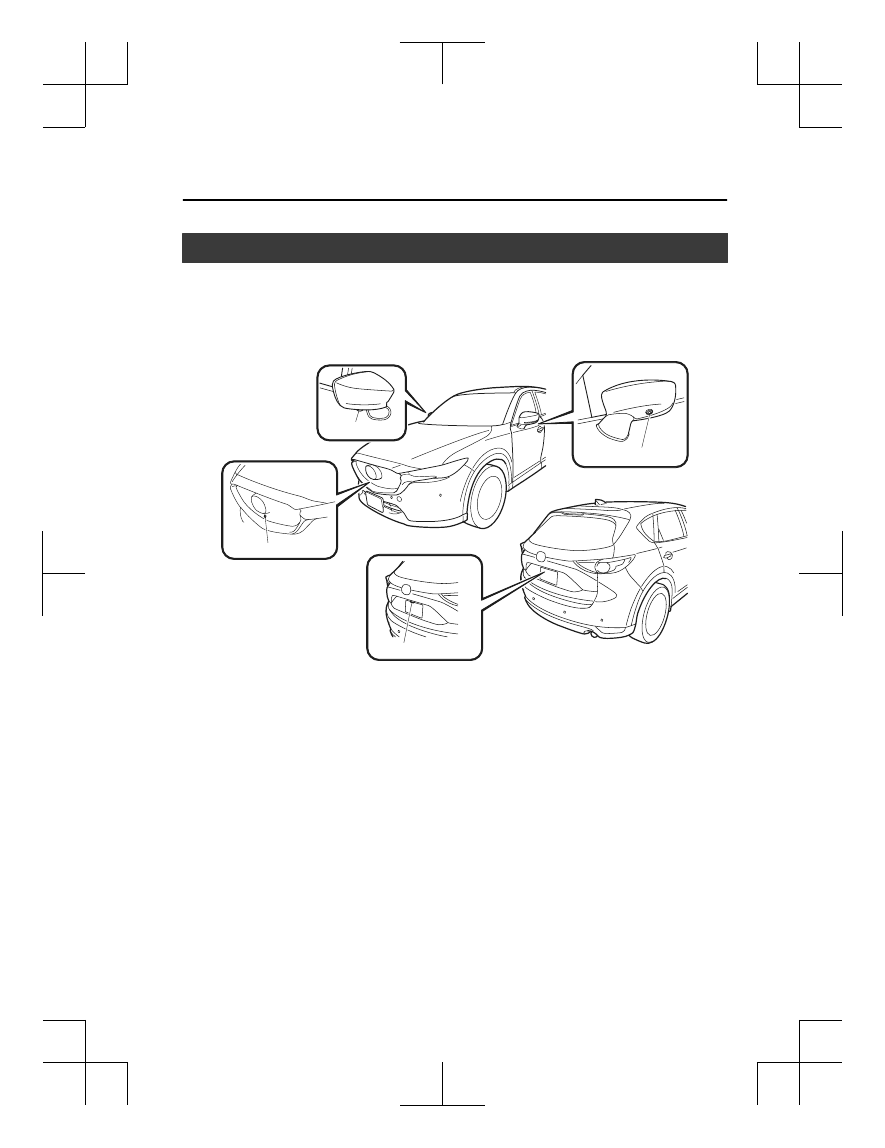
Front Camera/Side Cameras/Rear Camera

*

Your vehicle is equipped with a front camera, side cameras, and a rear camera. The 360°
View Monitor uses each camera.
The front camera, side cameras, and rear camera shoot images of the area surrounding the
vehicle.
Each camera is installed to the following positions.

Rear camera

Side camera

Side camera

Front camera

When Driving

i-ACTIVSENSE

*Some models.

4-245

CX-5_8MC3-EA-23G_Edition1_old

2023-5-8 11:05:50

Cruise Control

*

With cruise control, you can set and automatically maintain any speed of more than about
25 km/h (16 mph).

WARNING

Do not use the cruise control under the following conditions:

Using the cruise control under the following conditions is dangerous and could result in loss
of vehicle control.

Hilly terrain

Steep inclines

Heavy or unsteady traffic

Slippery or winding roads

Similar restrictions that require inconsistent speed

Cruise Control Switch

ON switch

RESUME/+ switch

SET/- switch

OFF/CANCEL switch

NOTE

If your Mazda has the following steering switch, your Mazda is equipped with the Mazda
Radar Cruise Control with Stop & Go function (MRCC with Stop & Go function) system.

When Driving

Cruise Control

4-246

*Some models.

CX-5_8MC3-EA-23G_Edition1_old

2023-5-8 11:05:50

Refer to Mazda Radar Cruise Control with Stop & Go function (MRCC with Stop & Go
function) on page 4-149
.

CANCEL switch

RES switch

OFF switch

switch

switch

MODE switch

SET- switch

SET+ switch

Cruise Main Indication (White)/
Cruise Set Indication (Green)

The indication has 2 colors.

Cruise Main Indication (White)

The indication turns on (white) when the
cruise control system is activated.

Cruise Set Indication (Green)

The indication turns on (green) when a
cruising speed has been set.

Activation/Deactivation

WARNING

Always turn off the cruise control system
when it is not in use:

Leaving the cruise control system in an
activation-ready state while the cruise
control is not in use is dangerous as the
cruise control could unexpectedly activate
if the activation button is accidentally
pressed, and result in loss of vehicle control
and an accident.

NOTE

When the ignition is switched OFF, the
system status before it was turned off is
maintained. For example, if the ignition is
switched OFF with the cruise control
system operable, the system will be
operable when the ignition is switched ON
the next time.

Activation

To activate the system, press the ON
switch. The cruise main indication (white)
turns on.

Deactivation

To deactivate the system, press the OFF/
CANCEL switch.
The cruise main indication (white) turns
off.

When Driving

Cruise Control

4-247

CX-5_8MC3-EA-23G_Edition1_old

2023-5-8 11:05:50

To Set Speed

1. Activate the cruise control system by

pressing the ON switch. The cruise
main indication (white) turns on.

2. Accelerate to the desired speed, which

must be more than 25 km/h (16 mph).

3. Set the cruise control by pressing the

SET/  switch at the desired speed. The
cruise control is set at the moment the
SET/  switch is pressed. Release the
accelerator pedal simultaneously. The
cruise set indication (green) turns on.

NOTE

The cruise control speed setting cannot
be performed under the following
conditions:

The selector lever is in the P or N
position.

The parking brake is applied.

Release the SET/  or RESUME/
switch at the desired speed, otherwise
the speed will continue increasing while
the RESUME/  switch is pressed and
held, and continue decreasing while the
SET/  switch is pressed and held
(except when the accelerator pedal is
depressed).

On a steep grade, the vehicle may
momentarily slow down while ascending
or speed up while descending.

The cruise control will cancel if the
vehicle speed decreases below 21 km/h
(13 mph) when the cruise control is
activated, such as when climbing a steep
grade.

The cruise control may cancel at about
15 km/h (9 mph) below the preset speed,
such as when climbing a long, steep
grade.

The vehicle speed preset using the cruise
control is displayed in the instrument
cluster and the active driving display
(vehicles with active driving display).

Type B

Type C

Type A

Instrument Cluster

Active Driving Display

*1

*1: Needle indicates set speed. 

To Increase Cruising Speed

Follow either of these procedures.

To increase speed using cruise control
switch

Press the RESUME/  switch and hold it.
Your vehicle will accelerate. Release the
switch at the desired speed.
 
Press the RESUME/  switch and release
it immediately to adjust the preset speed.
Multiple operations will increase the
preset speed according to the number of
times it is operated.

When Driving

Cruise Control

4-248

CX-5_8MC3-EA-23G_Edition1_old

2023-5-8 11:05:50

Increasing speed with a single
RESUME/  switch operation

Instrument cluster display for vehicle
speed indicated in km/h: 1 km/h (0.6 mph)
Instrument cluster display for vehicle
speed indicated in mph: 1 mph (1.6 km/h)

To increase speed using accelerator
pedal

Depress the accelerator pedal to accelerate
to the desired speed. Press the SET/
switch and release it immediately.

NOTE

Accelerate if you want to speed up
temporarily when the cruise control is on.
Greater speed will not interfere with or
change the set speed. Take your foot off
the accelerator to return to the set speed.

To Decrease Cruising Speed

Press the SET/  switch and hold it. The
vehicle will gradually slow.
Release the switch at the desired speed.
 
Press the SET/  switch and release it
immediately to adjust the preset speed.
Multiple operations will decrease the
preset speed according to the number of
times it is operated.

Decreasing speed with a single SET/
switch operation

Instrument cluster display for vehicle
speed indicated in km/h: 1 km/h (0.6 mph)
Instrument cluster display for vehicle
speed indicated in mph: 1 mph (1.6 km/h)

To Resume Cruising Speed at More
Than 25 km/h (16 mph)

If the cruise control system temporarily
canceled (such as by applying the brake

pedal) and the system is still activated, the
most recent set speed will automatically
resume when the RESUME/  switch is
pressed.
If vehicle speed is below 25 km/h (16
mph), increase the vehicle speed up to 25
km/h (16 mph) or more and press the
RESUME/  switch.

To Temporarily Cancel

To temporarily cancel the system, use one
of these methods:

Slightly depress the brake pedal.

Press the OFF/CANCEL switch.

If the RESUME/  switch is pressed when
the vehicle speed is 25 km/h (16 mph) or
higher, the system reverts to the previously
set speed.

NOTE

If any of the following conditions occur,
the cruise control system is temporarily
canceled.

The parking brake is applied.

The selector lever is in the P or N
position.

When the cruise control system is
temporarily canceled by even one of the
applicable cancel conditions, the speed
cannot be re-set.

The cruise control cannot be cancelled
while driving in manual mode (selector
lever shifted from D to M position).
Therefore, engine braking will not be
applied even if the transaxle is shifted
down to a lower gear. If deceleration is
required, lower the set speed or depress
the brake pedal.

When Driving

Cruise Control

4-249

CX-5_8MC3-EA-23G_Edition1_old

2023-5-8 11:05:50

To Deactivate

When a cruising speed has been set
(cruise set indication (green) turns on)

Long-press the OFF/CANCEL switch or
press the OFF/CANCEL switch 2 times.

When a cruising speed has not been set
(cruise main indication (white) turns
on)

Press the OFF/CANCEL switch.

When Driving

Cruise Control

4-250

CX-5_8MC3-EA-23G_Edition1_old

2023-5-8 11:05:50

Tire Pressure Monitoring System

The Tire Pressure Monitoring System (TPMS) monitors the pressure for each tire.
If tire pressure is too low in one or more tires, the system will inform the driver via the
warning light in the instrument cluster and by the warning beep sound.
Refer to Contact Authorized Mazda Dealer and Have Vehicle Inspected on page 7-25.
Refer to Taking Action on page 7-31.
Refer to Tire Inflation Pressure Warning Beep on page 7-42.
 
The tire pressure sensors installed on each wheel send tire pressure data by radio signal to
the receiver unit in the vehicle.

Tire pressure sensors

NOTE

When the ambient temperature is low due to seasonal changes, tire temperatures are also
lower. When the tire temperature decreases, the air pressure decreases as well. The TPMS
warning light may illuminate more frequently. Visually inspect the tires daily before driving,
and check tire pressures monthly with a tire pressure gauge. When checking tire pressures,
use of a digital tire pressure gauge is recommended.

 
TPMS does not alleviate your need to check the pressure and condition of all four tires
regularly.

CAUTION

Each tire, including the spare (if provided), should be checked monthly when cold and
inflated to the inflation pressure recommended by the vehicle manufacturer on the vehicle
placard or tire inflation pressure label. (If your vehicle has tires of a different size than the
size indicated on the vehicle placard or tire inflation pressure label, you should determine
the proper tire inflation pressure for those tires.)

When Driving

Tire Pressure Monitoring System

4-251

CX-5_8MC3-EA-23G_Edition1_old

2023-5-8 11:05:50

As an added safety feature, your vehicle has been equipped with a tire pressure monitoring
system (TPMS) that illuminates a low tire pressure telltale when one or more of your tires is
significantly under-inflated. Accordingly, when the low tire pressure telltale illuminates, you
should stop and check your tires as soon as possible, and inflate them to the proper
pressure. Driving on a significantly under-inflated tire causes the tire to overheat and can
lead to tire failure. Under-inflation also reduces fuel efficiency and tire tread life, and may
affect the vehicle's handling and stopping ability.
Please note that the TPMS is not a substitute for proper tire maintenance, and it is the
driver's responsibility to maintain correct tire pressure, even if under-inflation has not
reached the level to trigger illumination of the TPMS low tire pressure telltale.
Your vehicle has also been equipped with a TPMS malfunction indicator to indicate when
the system is not operating properly.
The TPMS malfunction indicator is combined with the low tire pressure telltale. When the
system detects a malfunction, the telltale will flash for approximately one minute and then
remain continuously illuminated. This sequence will continue upon subsequent vehicle
start-ups as long as the malfunction exists. When the malfunction indicator is illuminated,
the system may not be able to detect or signal low tire pressure as intended. TPMS
malfunctions may occur for a variety of reasons, including the installation of replacement
or alternate tires or wheels on the vehicle that prevent the TPMS from functioning properly.
Always check the TPMS malfunction telltale after replacing one or more tires or wheels on
your vehicle to ensure that the replacement or alternate tires and wheels allow the TPMS to
continue to function properly.

To avoid false readings, the system samples for a little while before indicating a problem. As
a result it will not instantaneously register a rapid tire deflation or blow out.

System Error Activation

When the warning light flashes, there may
be a system malfunction. Consult an
Authorized Mazda Dealer.
A system error activation may occur in the
following cases:

When there is equipment or a device
near the vehicle using the same radio
frequency as that of the tire pressure
sensors.

When a metallic device such as a
non-genuine navigation system is
equipped near the center of the
dashboard, which may block radio
signals from the tire pressure sensor to
the receiver unit.

When using the following devices in the
vehicle that may cause radio
interference with the receiver unit.

A digital device such as a personal
computer.

A current converter device such as a
DC-AC converter.

When excess snow or ice adheres to the
vehicle, especially around the wheels.

When the tire pressure sensor batteries
are exhausted.

When using a wheel with no tire
pressure sensor installed.

When using tires with steel wire
reinforcement in the sidewalls.

When using tire chains.

When Driving

Tire Pressure Monitoring System

4-252

CX-5_8MC3-EA-23G_Edition1_old

2023-5-8 11:05:50

Tires and Wheels

CAUTION

When inspecting or adjusting the tire air
pressures, do not apply excessive force to
the stem part of the wheel unit. The stem
part could be damaged.

Changing tires and wheels

The following procedure allows the TPMS
to recognize a tire pressure sensor's unique
ID signal code whenever tires or wheels
are changed, such as changing to and from
winter tires.

NOTE

Each tire pressure sensor has a unique ID
signal code. The signal code must be
registered with the TPMS before it can
work. The easiest way to do it is to have
an Authorized Mazda Dealer, change your
tire and complete ID signal code
registration.

When having tires changed at an
Authorized Mazda Dealer

When an Authorized Mazda Dealer,
changes your vehicle's tires, they will
complete the tire pressure sensor ID signal
code registration.
 

When changing tires yourself

If you or someone else changes tires, you
or someone else can also undertake the
steps for the TPMS to complete the ID
signal code registration.
1. After tires have been changed, switch

the ignition ON, then back to ACC or
OFF.

2. Wait for about 15 minutes.

3. After about 15 minutes, drive the

vehicle at a speed of at least 25 km/h
(16 mph) for 10 minutes and the tire
pressure sensor ID signal code will be
registered automatically.

NOTE

If the vehicle is driven within about 15
minutes of changing tires, the tire pressure
monitoring system warning light will flash
because the sensor ID signal code would
not have been registered. If this happens,
park the vehicle for about 15 minutes,
after which the sensor ID signal code will
register upon driving the vehicle for 10
minutes.

Replacing tires and wheels

CAUTION

When replacing/repairing the tires or
wheels or both, have the work done by
an Authorized Mazda Dealer, or the tire
pressure sensors may be damaged.

The wheels equipped on your Mazda are
specially designed for installation of the
tire pressure sensors. Do not use
non-genuine wheels, otherwise it may
not be possible to install the tire pressure
sensors.

Be sure to have the tire pressure sensors
installed whenever tires or wheels are
replaced.
When having a tire or wheel or both
replaced, the following types of tire
pressure sensor installations are possible.

The tire pressure sensor is removed
from the old wheel and installed to the
new one.

When Driving

Tire Pressure Monitoring System

4-253

CX-5_8MC3-EA-23G_Edition1_old

2023-5-8 11:05:50

The same tire pressure sensor is used
with the same wheel. Only the tire is
replaced.

A new tire pressure sensor is installed to
a new wheel.

NOTE

The tire pressure sensor ID signal code
must be registered when a new tire
pressure sensor is purchased. For
purchase of a tire pressure sensor and
registration of the tire pressure sensor
ID signal code, consult an Authorized
Mazda Dealer.

When reinstalling a previously removed
tire pressure sensor to a wheel, replace
the grommet (seal between valve body/
sensor and wheel) for the tire pressure
sensor.

When Driving

Tire Pressure Monitoring System

4-254

CX-5_8MC3-EA-23G_Edition1_old

2023-5-8 11:05:50

Rear View Monitor

*

The rear view monitor provides visual images of the rear of the vehicle when reversing.

WARNING

Always drive carefully confirming the safety of the rear and the surrounding conditions by
looking directly with your eyes:

Reversing the vehicle by only looking at the screen is dangerous as it may cause an accident
or a collision with an object. The rear view monitor is only a visual assist device when
reversing the vehicle. The images on the screen may be different from the actual conditions.

CAUTION

Do not use the rear view monitor under the following conditions: Using the rear view
monitor under the following conditions is dangerous and could result in injury or vehicle
damage or both.

Icy or snow-covered roads.

Tire chains or a temporary spare tire is installed.

The liftgate is not fully closed.

The vehicle is on a road incline.

When the display is cold, images may course across the monitor or the screen and may be
dimmer than usual, which could cause difficulty in confirming the surrounding conditions
of the vehicle. Always drive carefully confirming the safety of the rear and the surrounding
conditions by looking directly with your eyes.

Do not apply excessive force to the camera. The camera position and angle may deviate.

Do not disassemble, modify, or remove it as it may no longer be waterproof.

The camera cover is made of plastic. Do not apply degreasing agents, organic solvents,
wax, or glass coating agents to the camera cover. If any are spilled on the cover, wipe off
with a soft cloth immediately.

Do not rub the camera cover forcefully with an abrasive or hard brush. The camera cover or
lens may be scratched which might affect the images.

NOTE

If water, snow, or mud is stuck on the camera lens, wipe it off using a soft cloth. If it
cannot be wiped off, use a mild detergent.

If the camera temperature changes rapidly (Hot to cold, cold to hot), the rear view
monitor may not operate correctly.

When replacing the tires, consult an Authorized Mazda Dealer. Replacing the tires could
result in deviation of the guide lines which appear on the display.

When Driving

Rear View Monitor

*Some models.

4-255

CX-5_8MC3-EA-23G_Edition1_old

2023-5-8 11:05:50

If the vehicle's front, side, or rear has been involved in a collision, the alignment of the
rear view parking camera (location, installation angle) may have deviated. Always
consult an Authorized Mazda Dealer to have the vehicle inspected.

If “No camera signal.” is indicated in the display, there could be a problem with the
camera. Have your vehicle inspected at an Authorized Mazda Dealer.

Rear View Parking Camera Location

Rear view parking camera

Switching to the Rear View Monitor Display

Shift the selector lever to reverse (R) position with the ignition switched ON to switch the
display to the rear view monitor display.

NOTE

When the selector lever is shifted from reverse (R) position to another selector lever
position, the screen returns to the previous display.

When Driving

Rear View Monitor

4-256

CX-5_8MC3-EA-23G_Edition1_old

2023-5-8 11:05:50

Displayable Range on the Screen

The images on the screen may be different from the actual conditions.

(Screen display)

Object

Bumper

(Actual view)

NOTE

The displayable range varies depending on the vehicle and road conditions.

If the camera lens is touched or there is any dirt on it, it could affect the screen image.
Wipe the lens using a soft cloth.

The displayable range is limited. Objects under the bumper or around the bumper ends
cannot be displayed.

The distance appearing in the displayed image is different from the actual distance
because the rear view parking camera is equipped with a specific lens.

Images displayed on the monitor from the rear view parking camera are reversed images
(mirror images).

Some optionally installed vehicle accessories may be picked up by the camera. Do not
install any optional parts that can interfere with the camera view, such as illuminating
parts or parts made of reflective material.

It may be difficult to see the display under the following conditions, however, it does not
indicate a malfunction.

In darkened areas.

When the temperature around the lens is high/low.

When the camera is wet such as on a rainy day or during periods of high humidity.

When Driving

Rear View Monitor

4-257

CX-5_8MC3-EA-23G_Edition1_old

2023-5-8 11:05:50

When foreign material such as mud is stuck around the camera.

When the camera lens reflects sunlight or headlight beams.

The surroundings are illuminated by vehicle lights, fluorescent lights, or LED lights
(display may flicker).

Extremely small dark or white dots appear on the screen (dots may flicker).

Image display may be delayed if the temperature around the camera is low.

Viewing the Display

Guide lines which indicate the width of the vehicle are displayed on the screen as a
reference to the approximate width of the vehicle in comparison to the width of the parking
space you are about to back into.
Use this display view for parking your vehicle in a parking space or garage.

a) Vehicle width guide lines

Guide lines serve as a reference to the approximate width of the vehicle.

b) Distance guide lines

These guide lines indicate the approximate distance to a point measured from the
vehicle's rear (from the end of the bumper).
The red line indicates the point about 0.5 m (19 in) from the rear bumper.
The yellow lines indicate the points about 1.0 m (39 in) and 2.0 m (78 in) from the rear
bumper.

Rear View Monitor Operation

The operation of the rear view monitor when reversing the vehicle varies depending on the
traffic, road, and vehicle conditions. The amount of steering and the timing also varies
depending on conditions, so confirm the surrounding conditions directly with your eyes and
steer the vehicle in accordance with the conditions.
Be well aware of the above cautions prior to using the rear view monitor.

NOTE

Images displayed on the monitor from the rear view parking camera are reversed images
(mirror images).

When Driving

Rear View Monitor

4-258

CX-5_8MC3-EA-23G_Edition1_old

2023-5-8 11:05:50

1. Shift the selector lever to reverse (R) position to switch the display to the rear view

monitor display.

2. Confirming the surrounding conditions, reverse the vehicle.
3. After your vehicle begins entering the parking space, continue backing up slowly so that

the distance between the vehicle width lines and the sides of the parking space on the
left and right are roughly equal.
 

(Display condition)

(Vehicle condition)

4. Continue to adjust the steering wheel until the vehicle width guide lines are parallel to

the left and right sides of the parking space.

When Driving

Rear View Monitor

4-259

CX-5_8MC3-EA-23G_Edition1_old

2023-5-8 11:05:50

5. Once they are parallel, straighten the wheels and back your vehicle slowly into the

parking space. Continue checking the vehicle's surroundings and then stop the vehicle in
the best possible position. (If the parking space has division lines, check whether the
vehicle width guide lines are parallel to them.)
 

(Display condition)

(Vehicle condition)

6. When the selector lever is shifted from reverse (R) position to another selector lever

position, the screen returns to the previous display.

NOTE

Because there may be a difference between the displayed image, such as indicated below,
and the actual conditions when parking, always verify the safety at the rear of the vehicle
and the surrounding area directly with your eyes.

In the image of the parking space (or garage) displayed on the screen, the back end and
distance guide lines may appear aligned in the monitor, but they may not actually be
aligned on the ground.

When Driving

Rear View Monitor

4-260

CX-5_8MC3-EA-23G_Edition1_old

2023-5-8 11:05:50

When parking in a space with a division line on only one side of the parking space, the
division line and the vehicle width guide line appear aligned in the monitor, but they may
not actually be aligned on the ground.

Variance Between Actual Road Conditions and Displayed Image

Some variance occurs between the actual road and the displayed road. Such variance in
distance perspective could lead to an accident. Note the following conditions that may cause
a variance in distance perspective.

When the vehicle is tilted due to the weight of passengers and load

When the vehicle rear is lowered, the object displayed on the screen appears farther than the
actual distance.

Variance

Object

When Driving

Rear View Monitor

4-261

CX-5_8MC3-EA-23G_Edition1_old

2023-5-8 11:05:50

When there is a steep grade behind the vehicle

When there is a steep upgrade (downgrade) behind the vehicle, the object displayed on the
screen appears farther (downgrade: closer) than the actual distance.

A

A

B

B

Appears 
farther than 
actual 
distance

Object at actual 
position

Object at actual position

Object on screen

A: Distance between the vehicle and object displayed on the screen.
B: Actual distance between the vehicle and object.

Object on screen

Appears 
closer than 
actual 
distance

Three-dimensional object on vehicle rear

Because the distance guide lines are displayed based on a flat surface, the distance to the
three-dimensional object displayed on the screen is different from the actual distance.

(Screen display)

(Actual view)

(Actual distance) B>C=A

Sensed distance on screen A>B>C

A

C B

When Driving

Rear View Monitor

4-262

CX-5_8MC3-EA-23G_Edition1_old

2023-5-8 11:05:50

Parking Sensor System

*

The parking sensors use ultrasonic sensors which detect obstructions around the vehicle
when the vehicle is driven at low speeds, such as during garage or parallel parking, and a
buzzer sound and detection indicator notify the driver of the approximate distance from the
vehicle to the surrounding obstruction.
 

Rear corner ultrasonic sensor

Front corner ultrasonic sensor

Rear ultrasonic sensor

Front ultrasonic sensor

WARNING

Do not rely completely on the parking sensor system and be sure to confirm the safety around
your vehicle visually when driving:

This system can assist the driver in operating the vehicle in the forward and backward
directions while parking. The detection ranges of the sensors are limited, therefore, driving the
vehicle while relying only on the system may cause an accident. Always confirm the safety
around your vehicle visually when driving.

NOTE

Do not install any accessories within the detection ranges of the sensors. It may affect the
system operation.

Depending on the type of obstruction and the surrounding conditions, the detection range
of a sensor may narrow, or the sensors may not be able to detect obstructions.

The system may not operate normally under the following conditions:

Mud, ice, or snow is adhering to the sensor area (Returns to normal operation when
removed).

The sensor area is frozen (Returns to normal operation when the ice is thawed).

The sensor is covered by a hand.

The sensor is excessively shocked.

The vehicle is excessively tilted.

Under extremely hot or cold weather conditions.

When Driving

Parking Sensor System

*Some models.

4-263

CX-5_8MC3-EA-23G_Edition1_old

2023-5-8 11:05:50

The vehicle is driven on bumps, inclines, gravel, or grass covered roads.

Anything which generates ultrasound is near the vehicle, such as another vehicle's
horn, the engine sound of a motorcycle, the air brake sound of a large-sized vehicle, or
another vehicle's sensors.

The vehicle is driven in heavy rain or in road conditions causing water-splash.

A commercially-available fender pole or an antenna for a radio transmitter is installed
to the vehicle.

The vehicle is moving towards a tall or square curbstone.

An obstruction is too close to the sensor.

Obstructions under the bumper may not be detected. Obstructions that are lower than the
bumper or thin which may have been initially detected may no longer be detected as the
vehicle approaches more closely to the obstruction.

The following types of obstructions may not be detected:

Thin objects such as wire or rope

Things which absorb sonic waves easily such as cotton or snow

Angular shaped objects

Very tall objects, and those which are wide at the top

Small, short objects

Always have the system inspected at an Authorized Mazda Dealer if any shock is applied
to the bumpers, even in a minor accident. If the sensors are deviated, they cannot detect
obstructions.

The system may have a malfunction if the beep does not operate or the indicator light
does not illuminate when the parking sensor switch is turned on. Consult an Authorized
Mazda Dealer.

The system may have a malfunction if the beep sound which indicates a system
malfunction is heard and the indicator light flashes. Consult an Authorized Mazda Dealer.

The beeper which indicates a system malfunction may not be heard if the ambient
temperature is extremely cold, or mud, ice, or snow adheres to the sensor area. Remove
any foreign material from the sensor area.

When installing a trailer hitch, consult an Authorized Mazda Dealer.

When Driving

Parking Sensor System

4-264

CX-5_8MC3-EA-23G_Edition1_old

2023-5-8 11:05:50

Sensor Detection Range

The sensors detect obstructions within the following range.
 

Front ultrasonic sensor detection range

Front corner ultrasonic sensor detection range

Rear ultrasonic sensor detection range

Rear corner ultrasonic sensor detection range

B

A

D

C

A: About 55 cm (About 21.6 in)      
B: About 55 cm (About 21.6 in)       
C: About 100 cm (About 39.3 in) 
D: About 150 cm (About 59.0 in) 

 
Viewing distance display

Display

Distance between vehicle and obstruction

Front ultrasonic sensor/Front cor‐

ner ultrasonic sensor

Rear ultrasonic sensor/Rear cor‐

ner ultrasonic sensor

Green

Front ultrasonic sensor:

Approx. 100―60 cm (39.3―23.6

in)

Rear ultrasonic sensor:

Approx. 150―60 cm (59.0―23.6

in)

When Driving

Parking Sensor System

4-265

CX-5_8MC3-EA-23G_Edition1_old

2023-5-8 11:05:50

Display

Distance between vehicle and obstruction

Front ultrasonic sensor/Front cor‐

ner ultrasonic sensor

Rear ultrasonic sensor/Rear cor‐

ner ultrasonic sensor

Yellow

Front ultrasonic sensor:

Approx. 60―45 cm (23.6―17.7 in)

Front corner ultrasonic sensor:

Approx. 55―38 cm (21.6―14.9 in)

Rear ultrasonic sensor:

Approx. 60―45 cm (23.6―17.7 in)

Rear corner ultrasonic sensor:

Approx. 55―38 cm (21.6―14.9 in)

Amber

Front ultrasonic sensor:

Approx. 45―35 cm (17.7―13.7 in)

Front corner ultrasonic sensor:

Approx. 38―25 cm (14.9―9.8 in)

Rear ultrasonic sensor:

Approx. 45―35 cm (17.7―13.7 in)

Rear corner ultrasonic sensor:

Approx. 38―25 cm (14.9―9.8 in)

Red

Front ultrasonic sensor:

Within approx. 35 cm (13.7 in)

Front corner ultrasonic sensor:

Within approx. 25 cm (9.8 in)

Rear ultrasonic sensor:

Within approx. 35 cm (13.7 in)

Rear corner ultrasonic sensor:
Within approx. 25 cm (9.8 in)

When Driving

Parking Sensor System

4-266

CX-5_8MC3-EA-23G_Edition1_old

2023-5-8 11:05:50

Parking Sensor System Operation

When the parking sensor switch is pressed with the ignition switched ON, the buzzer sounds
and the indicator light turns on.
When the ignition is switched ON with the parking sensor activated, the indicator light turns
on.
Press the switch again to stop the operation.

Indicator light

Operation conditions

The parking sensor system can be used when all of the following conditions are met:

The ignition is switched ON.

The parking sensor switch is turned on.

NOTE

The detection indicator and buzzer of the front sensors/front corner sensors do not
operate when the selector lever is in the P position.

The detection indicator and buzzer sound do not activate when the parking brake is
applied.

Obstruction Detection Indication

The position of a sensor which has detected an obstruction is indicated. The gauge
illuminates in different areas depending on the distance to an obstruction detected by the
sensor.

When Driving

Parking Sensor System

4-267

CX-5_8MC3-EA-23G_Edition1_old

2023-5-8 11:05:50

As the vehicle approaches closer to an obstruction, the zone in the gauge closer to the
vehicle illuminates.

Rear sensor ultrasonic gauge

Left front corner 
ultrasonic sensor gauge

Left rear corner 
ultrasonic sensor gauge

Right front corner 
ultrasonic sensor gauge

Right rear corner 
ultrasonic sensor gauge

Front ultrasonic sensor gauge

NOTE

The detection indicator can be switched between display and non-display and the buzzer
volume can be changed.
Refer to the Settings section in the Mazda Connect Owner's Manual.
When the detection indicator is set to “Display”, even with the 360° view monitor not
displayed, if a front ultrasonic sensor or a front corner ultrasonic sensor detects an
obstruction, the 360° view monitor switches automatically to display. When an obstruction
is no longer detected, the display switches to the display before the obstruction was
detected. However, while the 360° view monitor is displayed, it continues to display no
matter if an obstruction is detected or not.

System problem notification

The indication displays if the system has a malfunction.

Check the reason for the indication displaying on the center display or multi-information
display.
Refer to If a Warning Light Turns On or Flashes on page 7-22.

When Driving

Parking Sensor System

4-268

CX-5_8MC3-EA-23G_Edition1_old

2023-5-8 11:05:50

Parking Sensor Warning Beep

The beeper sounds as follows while the system is operating.

Front ultrasonic sensor, Rear ultrasonic sensor

Distance Detec‐

tion area

Distance between vehicle and obstruction

Beeper sound

*1

Front ultrasonic sensor

Rear ultrasonic sensor

Farthest distance

Approx. 100―60 cm (39.3―23.6

in)

Approx. 150―60 cm (59.0―23.6

in)

Slow intermittent
sound

Far distance

Approx. 60―45 cm (23.6―17.7

in)

Approx. 60―45 cm (23.6―17.7

in)

Medium intermit‐
tent sound

Middle distance

Approx. 45―35 cm (17.7―13.7

in)

Approx. 45―35 cm (17.7―13.7

in)

Fast intermittent
sound

Close distance

Within approx. 35 cm (13.7 in)

Within approx. 35 cm (13.7 in)

Continuous sound

*

1 The rate at which the intermittent sound beeps increases as the vehicle approaches the obstruction.

When Driving

Parking Sensor System

4-269

CX-5_8MC3-EA-23G_Edition1_old

2023-5-8 11:05:50

Front corner ultrasonic sensor, Rear corner ultrasonic sensor

Distance Detection area

Distance between vehicle and obstruction

Beeper sound

*1

Front corner ultrasonic sensor/Rear corner ultra‐

sonic sensor

Far distance

Approx. 55―38 cm (21.6―14.9 in)

Medium intermittent sound

Middle distance

Approx. 38―25 cm (14.9―9.8 in)

Fast intermittent sound

Close distance

Within approx. 25 cm (9.8 in)

Continuous sound

*

1 The rate at which the intermittent sound beeps increases as the vehicle approaches the obstruction.

NOTE

If an obstruction is detected in a zone for 6 seconds or more, the beep sound is stopped
(except for the close-distance zone). If the same obstruction is detected in another zone,
the corresponding beep sound is heard.

When Warning Indicator/Beep is Activated

The system notifies the driver of an abnormality by activating the beep sound and the
indicator light.

Indicator/Beep

How to check

The indicator light flashes when
the parking sensor switch is
pressed at a vehicle speed of 10
km/h (6 mph) or less.

The system may have a malfunction. Have the vehicle inspected at an Author‐
ized Mazda Dealer as soon as possible.

The beep sound is not heard.

The system may have a malfunction. Have the vehicle inspected at an Author‐
ized Mazda Dealer as soon as possible.

When Driving

Parking Sensor System

4-270

CX-5_8MC3-EA-23G_Edition1_old

2023-5-8 11:05:50

Indicator/Beep

How to check

The intermittent sound of the
buzzer is heard 5 times.

Remove any foreign material from the sensor area. If the system does not re‐
cover, have the vehicle inspected at an Authorized Mazda Dealer.

A certain obstruction detection
indicator is continuously dis‐
played.

Refer to Obstruction Detection Indication on page 4-267.

When Driving

Parking Sensor System

4-271

CX-5_8MC3-EA-23G_Edition1_old

2023-5-8 11:05:50

MEMO

4-272

CX-5_8MC3-EA-23G_Edition1_old

2023-5-8 11:05:50

5

Interior Features

Use of various features for ride comfort, including air-conditioning
system and audio system.

Climate Control System....................5-2

Operating Tips.............................. 5-2
Vent Operation..............................5-3
Manual Type.................................5-5
Fully Automatic Type...................5-9

Mazda Connect................................5-14

What is Mazda Connect ?...........5-14
Mazda Connect Basic
Operations...................................5-18
Connected Service (If
applicable).................................. 5-34

Interior Equipment......................... 5-36

Sunvisors.................................... 5-36
Interior Lights.............................5-37
Accessory Sockets...................... 5-41
USB Power Outlet

*

.................... 5-43

Wireless Charger (Qi)

*

............... 5-44

Cup Holder................................. 5-47
Bottle Holder.............................. 5-48
Storage Compartments............... 5-49

*Some models.

5-1

CX-5_8MC3-EA-23G_Edition1_old

2023-5-8 11:05:50

Operating Tips

Operate the climate control system with
the engine running.

To prevent the battery from being
discharged, do not leave the fan control
dial/switch on for a long period of time
with the ignition switched ON when the
engine is not running.

(With i-stop)

The airflow amount may decrease
slightly while the i-stop function is
operating.

Clear all obstructions such as leaves,
snow and ice from the hood and the air
inlet in the cowl grille to improve the
system efficiency.

Use the climate control system to defog
the windows and dehumidify the air.

The recirculate mode should be used
when driving through tunnels or while
in a traffic jam, or when you would like
to shut off outside air for quick cooling
of the interior.

Use the outside air position for
ventilation or windshield defrosting.

If the vehicle has been parked in direct
sunlight during hot weather, open the
windows to let warm air escape, then
run the climate control system.

Run the air conditioner about 10
minutes at least once a month to keep
internal parts lubricated.

Have the air conditioner checked before
the weather gets hot. Lack of refrigerant
may make the air conditioner less
efficient.
The refrigerant specifications are
indicated on a label attached to the
inside of the engine compartment. If the
wrong type of refrigerant is used, it

could result in a serious malfunction of
the air conditioner. Consult a
professional, government certified
repairer for the inspection or repair
because a special device is required for
the air conditioner maintenance.
For details, consult an Authorized
Mazda Dealer.

Label

Interior Features

Climate Control System

5-2

CX-5_8MC3-EA-23G_Edition1_old

2023-5-8 11:05:50

Vent Operation

Adjusting the Vents

Directing airflow

To adjust the direction of airflow, move
the adjustment knob.

NOTE

When using the air conditioner under
humid ambient temperature conditions,
the system may blow fog from the vents.
This is not a sign of trouble but a result
of humid air being suddenly cooled.

The air vents can be fully opened and
closed by operating the dial.

Side Vents

Knob

Dial

Open

Close

Center Vents

Knob

Dial

Close

Open

Rear Vents

*

Knob

Dial

Close

Open

Interior Features

Climate Control System

*Some models.

5-3

CX-5_8MC3-EA-23G_Edition1_old

2023-5-8 11:05:50

Selecting the Airflow Mode

Dashboard Vents

Dashboard and Floor Vents

Floor Vents

Defroster and Floor Vents

Defroster Vents

* With rear vents

NOTE

The location airflow exits the air vents and the airflow amount may change depending on
the open or close status of the air vents.

Interior Features

Climate Control System

5-4

CX-5_8MC3-EA-23G_Edition1_old

2023-5-8 11:05:50


Content      ..     11      12      13      14     ..