Mazda CX-5 (2024 year). Manual in english - page 7
 

  Index      Manuals     Mazda CX-5 (2024 year). Manual in english


Search            copyright infringement  


Content      ..     5      6      7      8     ..


Mazda CX-5 (2024 year). Manual in english - page 7


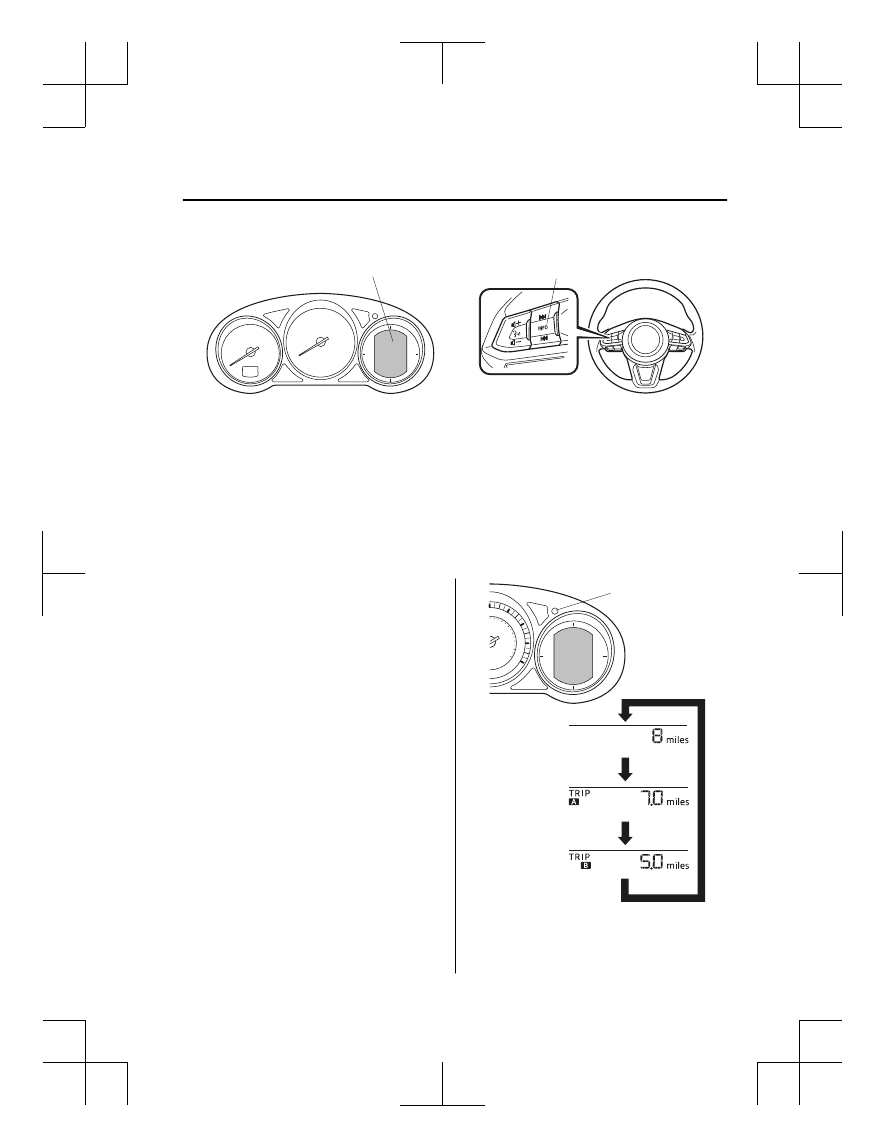
Multi-information Display (Type C)

INFO switch

Multi-information Display (Type C)

The multi-information display indicates the following information.

Odometer

Trip meter

Engine coolant temperature gauge

Fuel gauge

Outside temperature

Trip Computer

Cruise Control Display

Compass Display

Odometer, Trip Meter and Trip
Meter Selector

The display mode can be changed from
odometer to trip meter A to trip meter B
and then back to odometer by pressing the
selector while one of them is displayed.
The selected mode will be displayed.
 

Dashboard illumination knob

Press the dashboard 

illumination knob

Press the dashboard 

illumination knob

Press the dashboard 

illumination knob

Odometer

Trip meter A

Trip meter B


When Driving

Instrument Cluster and Display

4-53

CX-5_8MC3-EA-23G_Edition1_old

2023-5-8 11:05:50

Odometer

The odometer records the total distance
the vehicle has been driven.

Trip meter

The trip meter can record the total distance
of two trips. One is recorded in trip meter
A, and the other is recorded in trip meter
B.
 
For instance, trip meter A can record the
distance from the point of origin, and trip
meter B can record the distance from
where the fuel tank is filled.
 
When trip meter A is selected, pressing the
selector again within 1 second will change
to trip meter B mode.
 
When trip meter A is selected, TRIP A
will be displayed. When trip meter B is
selected, TRIP B will be displayed.
 
The trip meter records the total distance
the vehicle is driven until the meter is
again reset. Return it to “0.0” by
depressing and holding the selector for 1
second or more. Use this meter to measure
trip distances and to compute fuel
consumption.

NOTE

If TRIP A is reset using the trip meter
when the function which synchronizes
(resets) the fuel economy monitor and
the trip meter (TRIP A) is on, the fuel
economy data resets in conjunction with
TRIP A.
Refer to the Information section in the
Mazda Connect Owner's Manual.

Only the trip meters record tenths of
kilometers (miles).

The trip record will be erased when:

The power supply is interrupted
(blown fuse or the battery is
disconnected).

The vehicle is driven over 9999.9 km
(mile).

Engine Coolant Temperature Gauge

Displays the engine coolant temperature.
The white range of the gauge indicates
that the engine coolant temperature is low,
and the red range of the gauge indicates
that the engine coolant temperature is high
and overheating.
 

CAUTION

If the engine coolant temperature gauge
needle (white) flashes, there is a possibility
of overheating. Drive slowly to reduce
engine load until you can find a safe place
to stop the vehicle and wait for the engine
to cool down.
Refer to Overheating on page 7-17.

NOTE

(SKYACTIV-G 2.5T)

If the engine coolant temperature is high
or the engine is hot, the engine output
may be limited.

When Driving

Instrument Cluster and Display

4-54

CX-5_8MC3-EA-23G_Edition1_old

2023-5-8 11:05:50

The temperature unit (Centigrade/
Fahrenheit) of the engine coolant gauge
display changes in conjunction with the
temperature unit of the outside
temperature display.
Refer to the Settings section in the
Mazda Connect Owner's Manual.

Fuel Gauge

The fuel gauge shows approximately how
much fuel is remaining in the tank when
the ignition is switched ON. We
recommend keeping the tank over 1/4 full.
 

Full

1/4 Full

Empty

If the low fuel warning light illuminates or
the fuel level is very low, refuel as soon as
possible.
If inconsistency in engine performance or
stalling occurs due to low fuel level
conditions, refuel the vehicle as soon as
possible and add at least 10 L (2.7 US gal,
2.2 Imp gal) of fuel.
Refer to Taking Action on page 7-31.

NOTE

After refueling, it may require some time
for the indicator to stabilize. In addition,
the indicator may deviate while driving
on a slope or curve since the fuel moves
in the tank.

The display indicating a quarter or less
remaining fuel has more segments to
show the remaining fuel level in greater
detail.

The direction of the arrow ( ) indicates
that the fuel-filler lid is on the left side
of the vehicle.

Dashboard Illumination

(Without auto-light control)

When the lights are turned on with the
ignition switched ON, the brightness of
the dashboard illumination is dimmed.

(With auto-light control)

When the lights are turned on with the
ignition switched ON, the brightness of
the dashboard illumination is dimmed.
However, when the light sensor detects
that the surrounding area is bright such as
when the lights are turned on in the
daytime, the dashboard illumination does
not dim.

NOTE

(With auto-light control)

When the ignition is switched ON in the
early evening or at dusk, the dashboard
illumination is dimmed for several
seconds until the light sensor detects the
brightness of the surrounding area,
however, the dimming may cancel after
the brightness is detected.

When the lights are turned on, the
lights-on indicator light in the
instrument cluster turns on.

When Driving

Instrument Cluster and Display

4-55

CX-5_8MC3-EA-23G_Edition1_old

2023-5-8 11:05:50

Refer to Headlights on page 4-76.

The brightness of the instrument cluster
and dashboard illuminations can be
adjusted by rotating the knob.

The brightness decreases by rotating the
knob to the left. A beep sound will be
heard when the knob has been rotated to
the maximum dim position.

The brightness increases by rotating the
knob to the right.

Dim

Bright

Function for canceling illumination
dimmer

The illumination dimmer can be canceled
by rotating the dashboard illumination
knob to the right until a beep sound is
heard while the instrument cluster is
dimmed with the ignition switched ON. If
the instrument cluster's visibility is
reduced due to glare from surrounding
brightness, cancel the illumination
dimmer.

NOTE

When the illumination dimmer is
canceled, the instrument cluster cannot
be dimmed even if the lights are turned
on.

When the illumination dimmer is
canceled, the screen in the center
display switches to constant display of
the daytime screen.

Outside Temperature Display

When the ignition is switched ON, the
outside temperature is displayed.
 

NOTE

Under the following conditions, the
outside temperature display may differ
from the actual outside temperature
depending on the surroundings and
vehicle conditions:

Significantly cold or hot temperatures.

Sudden changes in outside
temperature.

The vehicle is parked.

The vehicle is driven at low speeds.

Changing the Temperature Unit of the
Outside Temperature Display

The outside temperature unit can be
switched between Celsius and Fahrenheit.
Settings can be changed by operating the
center display screen.
Refer to the Settings section in the Mazda
Connect Owner's Manual.

NOTE

When the temperature unit indicated in the
outside temperature display is changed,
the temperature unit indicated in the
engine coolant gauge display changes in
conjunction with it.

Trip Computer

The following information can be selected
by pressing the INFO switch with the
ignition switched ON.

Distance-to-empty mode

When Driving

Instrument Cluster and Display

4-56

CX-5_8MC3-EA-23G_Edition1_old

2023-5-8 11:05:50

Average fuel economy mode

Current fuel economy mode

Compass mode

If you have any problems with your trip
computer, consult an Authorized Mazda
Dealer.

Distance-to-empty mode

This mode displays the approximate
distance you can travel on the remaining
fuel based on the fuel economy.
 
The distance-to-empty will be calculated
and displayed every second.
 

NOTE

Even though the distance-to-empty
display may indicate a sufficient amount
of remaining driving distance before
refueling is required, refuel as soon as
possible if the fuel level is very low or
the low fuel warning light illuminates.

The display may not change unless you
add more than approximately 9 L (2.3
US gal, 1.9 Imp gal) of fuel.

The distance-to-empty is the
approximate remaining distance the
vehicle can be driven until all the
graduation marks in the fuel gauge
(indicating the remaining fuel supply)
disappear.

If there is no past fuel economy
information such as after first
purchasing your vehicle or the
information is deleted when the battery
cables are disconnected, the actual
distance-to empty/range may differ from
the amount indicated.

Average fuel economy mode

This mode displays the average fuel
economy by calculating the total traveled
distance and the total fuel consumption
since the vehicle was purchased or the past
data was reset. The average fuel economy
is calculated and displayed every minute.
 

To reset the displayed past data, press the
INFO switch for 1.5 seconds or longer.
After resetting the data, - - - L/100 km
(- - - mpg) is displayed for one minute
before the fuel economy is recalculated
and displayed.

NOTE

If TRIP A is reset using the trip meter
when the function which synchronizes
(resets) the fuel economy monitor and the
trip meter (TRIP A) is on, the displayed
past data is reset.

When Driving

Instrument Cluster and Display

4-57

CX-5_8MC3-EA-23G_Edition1_old

2023-5-8 11:05:50

Current fuel economy mode

This mode displays the current fuel
economy by calculating the amount of fuel
consumption and the distance traveled.
 
Current fuel economy will be calculated
and displayed every 2 seconds.
 

When you've slowed to about 5 km/h (3
mph), - - - L/100 km (- - - mpg) will be
displayed.

Compass mode

The direction the vehicle is moving is
displayed in one of eight directions while
the vehicle is being driven.
 

Display

Direction

N

North

S

South

E

East

W

West

NE

Northeast

NW

Northwest

SE

Southeast

SW

Southwest

Cruise Control Set Vehicle Speed
Display

The vehicle speed preset using the cruise
control is displayed.
 

Refer to Cruise Control on page 4-246.

When Driving

Instrument Cluster and Display

4-58

CX-5_8MC3-EA-23G_Edition1_old

2023-5-8 11:05:50

Warning/Indicator Lights

Instrument Cluster varies depending on model and specifications.

Instrument Cluster

Center of Dashboard

Warning lights will appear in any of the highlighted areas

Warning Indication/Warning Lights

These lights turn on or flash to notify the user of the system operation status or a system
malfunction.

Signal

Warning

Page

Brake System Warning Light

*1*2

7-22

ABS Warning Light

*1

Electronic Brake

Force Distribu‐

tion System

Warning

7-22

ABS warning

7-25

Charging System Warning Light

*1

7-22

Engine Oil Warning Light

*1

7-22

Power Steering Malfunction Indicator Light

*1

7-22

Master Warning Light

*1

7-25

Electric Parking Brake (EPB) Warning Light

*1

7-25

When Driving

Instrument Cluster and Display

4-59

CX-5_8MC3-EA-23G_Edition1_old

2023-5-8 11:05:50

Signal

Warning

Page

(Red)

Brake Pedal Operation Demand Warning Light

*1

Flashing

4-103

Buzzer & Flash‐

ing

7-25

Check Engine Light

*1

7-25

Automatic Transaxle Warning Light

*1

7-25

Air Bag/Seat Belt Pretensioner System Warning Light

*1

7-25

Tire Pressure Monitoring System Warning Light

*1

Flashing

7-25

Turns on

7-31

(Red)

KEY Warning Light

*1

Turns on

7-25

Flashing

7-31

LED Headlight Warning Light

*1

7-25

(Amber)

*

Smart City Brake Support (SCBS) Warning Light

*1

7-31

Low Fuel Warning Light

7-31

Check Fuel Cap Warning Light

*1

7-31

Engine Oil Level Warning Light

*1

7-31

Seat Belt Warning Light (Front seat)

7-31

(Red)

Seat Belt Warning Light (Rear seat)

7-31

*

Low Washer Fluid Level Warning Light

7-31

Door-Ajar Warning Light

7-31

*

1 The light turns on when the ignition is switched on for an operation check, and turns off a few seconds later or

when the engine is started. If the light does not turn on or remains turned on, have the vehicle inspected at an
Authorized Mazda Dealer.

When Driving

Instrument Cluster and Display

4-60

*Some models.

CX-5_8MC3-EA-23G_Edition1_old

2023-5-8 11:05:50

*

2 The light turns on continuously when the parking brake is applied.

Indication/Indicator Lights

These lights turn on or flash to notify the user of the system operation status or a system
malfunction.

Signal

Indicator

Page

(Green)

Seat Belt Indicator Light (Rear seat)

2-30

*

Front Passenger Air Bag Deactivation Indicator Light

*1

2-72

(Green)

KEY Indicator Light

4-5

Security Indicator Light

*1

3-43

Wrench Indication/Indicator Light

*1

4-62

Shift Position Indication

4-68

Lights-On Indication/Indicator Light

4-76

Headlight High-Beam Indicator Light

Headlight

High-Low Beam

4-80

Flashing the

Headlights

4-80

Turn Signal/Hazard Warning Indicator Lights

Turn and

Lane-Change

Signals

4-82

Hazard Warning

Flasher

4-90

(Green)

Brake Pedal Operation demand Indicator Light

4-100

AUTOHOLD Active Indicator Light

*1

4-105

When Driving

Instrument Cluster and Display

*Some models.

4-61

CX-5_8MC3-EA-23G_Edition1_old

2023-5-8 11:05:50

Signal

Indicator

Page

TCS/DSC Indicator Light

*1

Traction Control

System (TCS)

4-110

Dynamic Stabil‐

ity Control

(DSC)

4-112

Turns on

7-25

*

TCS OFF Indicator Light 

*1

4-110

Select Mode Indication

4-115

*

Blind Spot Monitoring (BSM) OFF Indicator Light

*1

Malfunction

7-25

Except malfunc‐

tion

4-132

(Red)

*

Smart City Brake Support (SCBS) Indicator Light

4-198

*

Smart City Brake Support (SCBS) OFF Indicator Light

*1

4-198

(White)

Cruise Main Indication

4-247

(Green)

Cruise Set Indication

4-247

*

1 The light turns on when the ignition is switched on for an operation check, and turns off

a few seconds later or when the engine is started. If the light does not turn on or remains
turned on, have the vehicle inspected at an Authorized Mazda Dealer.

Wrench Indicator Light

When the ignition is switched ON, the
wrench indicator light turns on and then
turns off after a few seconds.
 
The wrench indicator light turns on under
the following conditions:

When the preset maintenance period has
arrived.

When Driving

Instrument Cluster and Display

4-62

*Some models.

CX-5_8MC3-EA-23G_Edition1_old

2023-5-8 11:05:50

When it’s time to replace the engine oil.

Refer to the Information section in the
Mazda Connect Owner's Manual.

NOTE

The wrench indicator light turns on
earlier than the preset period depending
on vehicle usage conditions.

Whenever the engine oil is replaced, a
reset of the vehicle engine control unit is
necessary.
Refer to the Information section in the
Mazda Connect Owner's Manual.

When Driving

Instrument Cluster and Display

4-63

CX-5_8MC3-EA-23G_Edition1_old

2023-5-8 11:05:50

Active Driving Display

*

Dust-proof sheet

Display

Optical 
receiver

WARNING

Always adjust the display brightness and position with the vehicle stopped:

Adjusting the display brightness and position while driving the vehicle is dangerous as doing
so could distract your attention from the road ahead and lead to an accident.

CAUTION

Do not place beverages near the active driving display. If water or other liquids are splashed
on the active driving display, it could cause damage.

Do not place objects above the active driving display or apply stickers to the dust-proof
sheet/optical receiver as they will cause interference.

A sensor is integrated to control the display's luminosity. If the optical receiver is covered,
the display's luminosity will lower making the display difficult to view.

Do not allow intense light to hit the optical receiver. Otherwise, it could cause damage.

NOTE

Wearing polarized sunglasses will reduce the visibility of the active driving display due to
the characteristics of the display.

If the lead-acid battery has been removed and re-installed or the lead-acid battery voltage
is low, the adjusted position may deviate.

The display may be difficult to view or temporarily affected by weather conditions such as
rain, snow, light, and temperature.

If the audio system is removed, the active driving display cannot be operated.

The active driving display indicates the following information:

When Driving

Instrument Cluster and Display

4-64

*Some models.

CX-5_8MC3-EA-23G_Edition1_old

2023-5-8 11:05:50

Blind Spot Monitoring (BSM) Operation Conditions and Warnings
Refer to Blind Spot Monitoring (BSM) on page 4-128.

Traffic Sign Recognition System (TSR) traffic signs and Warnings
Refer to Traffic Sign Recognition System (TSR) on page 4-133.

Mazda Radar Cruise Control with Stop & Go function (MRCC with Stop & Go function)
Operation Conditions and Warnings
Refer to Mazda Radar Cruise Control with Stop & Go function (MRCC with Stop & Go
function) on page 4-149.

Cruising & Traffic Support (CTS) Operation Conditions and Warnings
Refer to Cruising & Traffic Support (CTS) on page 4-164.

Lane-keep Assist System (LAS) & Lane Departure Warning System (LDWS) Operation
Conditions and Warnings
Refer to Lane-keep Assist System (LAS) & Lane Departure Warning System (LDWS) on
page 4-180.

Advanced Smart City Brake Support (Advanced SCBS) Warnings
Refer to Advanced Smart City Brake Support (Advanced SCBS) on page 4-193.

Smart City Brake Support [Forward] (SCBS F) Warnings
Refer to Smart City Brake Support [Forward] (SCBS F) on page 4-196.

Smart Brake Support (SBS) Operation Conditions and Warnings
Refer to Smart Brake Support (SBS) on page 4-204.

Cruise Control Operation Conditions
Refer to Cruise Control on page 4-246.

Navigation Guidance (vehicles with navigation system)

Speed limit indicator (vehicles with navigation system)

Vehicle Speed

The active driving display settings can be changed or adjusted.
Refer to the Mazda Connect Owner's Manual or consult an Authorized Mazda Dealer.

NOTE

The desired driving position (display position, brightness level, display information) can
be called up after programming the position.
Refer to Driving Position Memory on page 2-11.

When Driving

Instrument Cluster and Display

4-65

CX-5_8MC3-EA-23G_Edition1_old

2023-5-8 11:05:50

Automatic Transaxle Controls

Lock-release button

Indicates the selector lever can be shifted freely into any position.

Indicates that you must hold in the lock-release button to shift.

Indicates that you must depress the brake pedal and hold in the lock-release 
button to shift (The ignition must be switched ON). 

Various Lockouts: 

NOTE

The Sport AT has an option that is not included in the traditional automatic transaxle that
gives the driver the option of selecting each gear instead of leaving it to the transaxle to
shift gears. Even if you intend to use the automatic transaxle functions as a traditional
automatic, you should also be aware that you can inadvertently shift into manual shift mode
and an inappropriate gear may be retained as the vehicle speed increases. If you notice the
engine speed going higher or hear the engine racing, confirm you have not accidentally
slipped into manual shift mode (page 4-69).

When Driving

Automatic Transaxle

4-66

CX-5_8MC3-EA-23G_Edition1_old

2023-5-8 11:05:50

Shift-Lock System

The shift-lock system prevents shifting out
of P unless the brake pedal is depressed.
 
To shift from P:
1. Depress and hold the brake pedal.
2. Start the engine.
3. Press and hold the lock-release button.
4. Move the selector lever.

NOTE

When the ignition is switched to ACC or
the ignition is switched off, the selector
lever cannot be shifted from P position.

The ignition cannot be switched to OFF
if the selector lever is not in P position.

Shift-Lock Override

If the selector lever will not move from P
using the proper shift procedure, continue
to hold down the brake pedal.
1. Remove the shift-lock override cover

using a cloth-wrapped flat head
screwdriver.

2. Insert a screwdriver and push it down.

Cover

3. Press and hold the lock-release button.
4. Move the selector lever.
Take the vehicle to an Authorized Mazda
Dealer to have the system checked.

Transaxle Ranges

The shift position indication in the
instrument cluster illuminates.
Refer to Indication/Indicator Lights on
page 4-32, 4-48, 4-61.

The selector lever must be in P or N
position to operate the starter.

P (Park)

P locks the transaxle and prevents the
front wheels from rotating.

WARNING

Always set the selector lever to P position
and set the parking brake:

Only setting the selector lever to the P
position without using the parking brake to
hold the vehicle is dangerous. If P fails to
hold, the vehicle could move and cause an
accident.

CAUTION

Shifting into P, N or R while the vehicle is
moving can damage your transaxle.

Shifting into a driving gear or reverse
when the engine is running faster than
idle can damage the transaxle.

R (Reverse)

In position R, the vehicle moves only
backward. You must be at a complete stop
before shifting to or from R, except under
rare circumstances as explained in
Rocking the Vehicle (page 3-48).

When Driving

Automatic Transaxle

4-67

CX-5_8MC3-EA-23G_Edition1_old

2023-5-8 11:05:50

NOTE

(With parking sensor system)

When the selector lever is shifted to the R
position with the ignition switched ON, the
parking sensor system is activated and a
beep sound is heard.
Refer to Parking Sensor System on page
4-263.

N (Neutral)

In N, the wheels and transaxle are not
locked. The vehicle will roll freely even
on the slightest incline unless the parking
brake or brakes are on.

WARNING

If the engine is running faster than idle, do
not shift from N or P into a driving gear:

It's dangerous to shift from N or P into a
driving gear when the engine is running
faster than idle. If this is done, the vehicle
could move suddenly, causing an accident
or serious injury.

Do not shift into N when driving the
vehicle:

Shifting into N while driving is dangerous.
Engine braking cannot be applied when
decelerating which could lead to an
accident or serious injury.

CAUTION

Do not shift into N when driving the
vehicle. Doing so can cause transaxle
damage.

NOTE

Apply the parking brake or depress the
brake pedal before moving the selector
lever from N position to prevent the
vehicle from moving unexpectedly.

D (Drive)

D is the normal driving position. From a
stop, the transaxle will automatically shift
through a 6-gear sequence.

M (Manual)

M is the manual shift mode position.
Gears can be shifted up or down by
operating the selector lever. Refer to
Manual Shift Mode on page 4-69.

Shift Position Indication

Instrument Cluster (Type A)

Instrument Cluster (Type B/C)

The selector position is indicated when the
ignition is switched ON.

Gear position indication

In manual shift mode, the “M” of the shift
position indication illuminates and the
numeral for the selected gear is displayed.

When Driving

Automatic Transaxle

4-68

CX-5_8MC3-EA-23G_Edition1_old

2023-5-8 11:05:50

Active Adaptive Shift (AAS)

Active Adaptive Shift (AAS)
automatically controls the transaxle shift
points to best suit the road conditions and
driver input. This improves driving feel.
The transaxle may switch to AAS mode
when driving up and down slopes,
cornering, driving at high elevations, or
depressing the accelerator pedal quickly
while the selector lever is in the D
position. Depending on the road and
driving conditions/vehicle operations, gear
shifting could be delayed or not occur,
however, this does not indicate a problem
because the AAS mode will maintain the
optimum gear position.

Manual Shift Mode

The manual shift mode gives you the feel
of driving a manual transaxle vehicle by
allowing you to operate the selector lever
manually. This allows you to control
engine rpm and torque to the drive wheels
much like a manual transaxle when more
control is desired.
To change to manual shift mode, shift the
lever from D to M.
 

NOTE

Changing to manual shift mode while
driving will not damage the transaxle.

To return to automatic shift mode, shift the
lever from M to D.

NOTE

If you change to manual shift mode
when the vehicle is stopped, the gear
will shift to M1.

If you change to manual shift mode
without depressing the accelerator pedal
when driving in D range, 5th gear/6th
gear, the gear will shift to M4/M5.

Indications

Manual shift mode indication

In manual shift mode, the “M” of the shift
position indication in the instrument panel
illuminates.

When Driving

Automatic Transaxle

4-69

CX-5_8MC3-EA-23G_Edition1_old

2023-5-8 11:05:50

Gear position indication

The numeral for the selected gear
illuminates.
 

Manual shift mode 
indication

Gear position 
indication

Manual shift mode 
indication

Gear position 
indication

Instrument Cluster (Type A)

Instrument Cluster (Type B/C)

NOTE

If the gears cannot be shifted down
when driving at higher speeds, the gear
position indication will flash twice to
signal that the gears cannot be shifted
down (to protect the transaxle).

If the automatic transaxle fluid (ATF)
temperature becomes too high, there is
the possibility that the transaxle will
switch to automatic shift mode,
canceling manual shift mode and
turning off the gear position indication
illumination. This is a normal function
to protect the AT. After the ATF
temperature has decreased, the gear
position indication illumination turns
back on and driving in manual shift
mode is restored.

Manually Shifting Up

You can shift gears up by operating the
selector lever or the steering shift
switches

*

.

M1 → M2 → M3 → M4 → M5 → M6

Using selector lever

To shift up to a higher gear, tap the
selector lever back   once.

Using steering shift switch

*

To shift up to a higher gear with the
steering shift switches, pull the UP switch
(

) toward you once with your

fingers.

UP switch (+/OFF)

When Driving

Automatic Transaxle

4-70

*Some models.

CX-5_8MC3-EA-23G_Edition1_old

2023-5-8 11:05:50

WARNING

Keep your hands on the steering wheel rim
when using fingers on the steering shift
switches:

Putting your hands inside the rim of the
steering wheel when using the steering
shift switches is dangerous. If the driver's
air bag were to deploy in a collision, your
hands could be impacted causing injury.

NOTE

When driving slowly, the gears may not
shift up.

Do not drive the vehicle with the
tachometer needle in the RED ZONE
while in manual shift mode. In addition,
manual shift mode switches to automatic
shift mode while the accelerator pedal is
completely depressed.
This function is canceled while the TCS
is turned off or the Off-Road Traction
Assist is turned on. However, if the
vehicle is continuously driven at a high
rpm, the gears may automatically shift
up to protect the engine.

The steering shift switch can be used
temporarily even if the selector lever is
in the D position while driving. In
addition, it returns to automatic shift
mode when the UP switch (

) is

pulled rearward for a sufficient amount
of time.

Manually Shifting Down

You can shift gears down by operating the
selector lever or the steering shift
switches

*

.

M6 → M5 → M4 → M3 → M2→ M1

Using selector lever

To shift down to a lower gear, tap the
selector lever forward   once.

Using steering shift switch

*

To shift down to a lower gear with the
steering shift switches, pull the DOWN
switch   toward you once with your
fingers.

DOWN switch (-)

WARNING

Do not use engine braking on slippery road
surfaces or at high speeds:

Shifting down while driving on wet, snowy,
or frozen roads, or while driving at high
speeds causes sudden engine braking,
which is dangerous. The sudden change in
tire speed could cause the tires to skid. This
could lead to loss of vehicle control and an
accident.

When Driving

Automatic Transaxle

*Some models.

4-71

CX-5_8MC3-EA-23G_Edition1_old

2023-5-8 11:05:50

Keep your hands on the steering wheel rim
when using fingers on the steering shift
switches:

Putting your hands inside the rim of the
steering wheel when using the steering
shift switches is dangerous. If the driver's
air bag were to deploy in a collision, your
hands could be impacted causing injury.

NOTE

When driving at high speeds, the gear
may not shift down.

During deceleration, the gear may
automatically shift down depending on
vehicle speed.

When depressing the accelerator fully,
the transaxle will shift to a lower gear,
depending on vehicle speed. However,
the gears do not kickdown while the TCS
is turned off or the Off-Road Traction
Assist is operating.

Second Gear Fixed Mode

When the selector lever is moved back 
while the vehicle speed is about 10 km/h
(6.2 mph) or less, the transaxle is set in the
second gear fixed mode. The gear is fixed
in second while in this mode for easier
acceleration from a stop and driving on
slippery roads such as snow-covered
roads.
If the selector lever is moved back   or
forward   while in the second gear fixed
mode, the mode will be canceled.

When Driving

Automatic Transaxle

4-72

CX-5_8MC3-EA-23G_Edition1_old

2023-5-8 11:05:50

Shift Gear (Shifting) Speed Limit

For each gear position while in the manual mode, the speed limit is set as follows: When the
selector lever is operated within the range of the speed limit, the gear is shifted.

Shift up

The gear does not shift up while the vehicle speed is lower than the speed limit.

Shift down

The gear does not shift down while the vehicle speed exceeds the speed limit.
If the vehicle speed exceeds the speed limit and the gear does not shift down, the gear
position indication flashes 2 times to notify the driver that the gear cannot be shifted.

Kickdown

When the accelerator pedal is depressed fully while driving, the gear shifts down.
However, the gears do not kickdown while the TCS is turned off or the Off-Road Traction
Assist is operating.

NOTE

The gear also shifts down using kickdown while in the second gear fixed mode.

Auto-shift down

The gear shifts down automatically depending on the vehicle speed during deceleration.

NOTE

If the vehicle comes to a stop while in the second gear fixed mode, the gear remains in
second.

When Driving

Automatic Transaxle

4-73

CX-5_8MC3-EA-23G_Edition1_old

2023-5-8 11:05:50

Direct Mode

*

Direct mode can be used for temporarily
switching gears by operating the steering
shift switch while the vehicle is being
driven with the selector lever in the D
position.
While in direct mode, the D and M
indication illuminate and the gear position
in use is illuminated.
Direct mode is canceled (released) under
the following conditions.

The UP switch (

) is pulled

rearward for a certain amount of time or
longer.

The vehicle is driven for a certain
amount of time or longer (time differs
depending on the driving conditions
while operating).

The vehicle is stopped or moving at a
slow speed.


Direct mode 
indication

Gear position 
indication

Direct mode 
indication

Gear position 
indication

Instrument Cluster (Type A)

Instrument Cluster (Type B/C)

NOTE

Shifting up and down while in direct mode
may not be possible depending on the
vehicle speed. In addition, because direct
mode is canceled (released) depending on
the rate of acceleration or if the
accelerator is fully depressed, use of the
manual shift mode is recommended if you
need to drive the vehicle in a particular
gear for long periods.

When Driving

Automatic Transaxle

4-74

*Some models.

CX-5_8MC3-EA-23G_Edition1_old

2023-5-8 11:05:50

Driving Tips

WARNING

Do not let the vehicle move in a direction
opposite to the direction selected by the
selector lever:

Do not let the vehicle move backward with
the selector lever in a forward position, or
do not let the vehicle move forward with
the selector lever in the reverse position.
Otherwise, the engine may stop, causing
the loss of the power brake and power
steering functions, and make it difficult to
control the vehicle which could result in an
accident.

Passing

For extra power when passing another
vehicle or climbing steep grades, depress
the accelerator fully. The transaxle will
shift to a lower gear, depending on vehicle
speed.

NOTE

The accelerator pedal may initially feel
heavy as it is being depressed, then feel
lighter as it is depressed further. This
change in pedal force aids the engine
control system in determining how much
the accelerator pedal has been depressed
for performing kickdown, and functions to
control whether or not kickdown should be
performed.

Climbing steep grades from a stop

To climb a steep grade from a stopped
position:
1. Depress the brake pedal.
2. Shift to D or M1, depending on the

load weight and grade steepness.

3. Release the brake pedal while

gradually accelerating.

Descending steep grades

When descending a steep grade, shift to
lower gears, depending on load weight and
grade steepness. Descend slowly, using the
brakes only occasionally to prevent them
from overheating.

When Driving

Automatic Transaxle

4-75

CX-5_8MC3-EA-23G_Edition1_old

2023-5-8 11:05:50

Lighting Control

Headlights

Turn the headlight switch to turn the headlights and other exterior lights on or off.
When the lights are turned on, the lights-on indicator light in the instrument cluster turns on.
 

NOTE

If the light switch is left on, the lights will automatically switch off approximately 30
seconds after switching the ignition off.
The time setting can be changed.
Refer to the Settings section in the Mazda Connect Owner's Manual or consult an
Authorized Mazda Dealer.

To prevent discharging the battery, do not leave the lights on while the engine is off unless
safety requires them.

Without auto-light control

Switch Position

OFF

Ignition Position

ON

ACC or

OFF

ON

ACC or

OFF

ON

ACC or

OFF

Headlights

Off

Off

Off

Off

On

On

*2

Daytime running lights

On

*1

Off

On

*1

Off

Off

Off

Taillights
Parking lights
License plate lights
Side-marker lights

Off

Off

On

On

*2

On

On

*2

*

1 The lights are turned on while the vehicle is driven.

When Driving

Switches and Controls

4-76

CX-5_8MC3-EA-23G_Edition1_old

2023-5-8 11:05:50

*

2 The lights are turned on for the specified period by the auto headlight off function.

With auto-light control
(Except Canada)

Switch Position

OFF

AUTO

Ignition Position

ON

ACC or

OFF

ON

ACC or

OFF

ON

ACC or

OFF

ON

ACC or

OFF

Headlights

Off

Off

Auto

*2

Auto

*4

Off

Off

On

On

*4

Daytime running lights

On

*1

Off

On

*3

Off

On

*1

Off

Off

Off

Taillights
Parking lights
License plate lights
Side-marker lights

Off

Off

Auto

*2

Auto

*4

On

On

*4

On

On

*4

*

1 The lights are turned on while the vehicle is driven.

*

2 The lights are turned on by the auto light function.

*

3 The lights are turned on while the vehicle is driven, and turned off when the headlights are turned on by the

auto light function.

*

4 The lights are turned on for the specified period by the auto headlight off function.

When Driving

Switches and Controls

4-77

CX-5_8MC3-EA-23G_Edition1_old

2023-5-8 11:05:50

(Canada)

Ignition Position

ACC or OFF

ON

Switch Position

OFF

*1

AUTO

OFF

*1

AUTO

Headlights

Off

Off

Off

Off

Auto

*2*4

Auto

*3*4

On

Daytime running
lights

Off

Off

Off

Off

Off

Taillights
Parking lights
License plate lights
Side-marker lights

Off

On

*5

On

On

*5

On

*

1 The light switch returns to the AUTO position automatically.

*

2 During the daytime, the daytime running lights turn on automatically. During the nighttime, the headlights,

parking lights, taillights, and the license plate lights turn on automatically.

*

3 During the daytime, the daytime running lights, parking lights, taillights, and the license plate lights turn on

automatically. During the nighttime, the headlights, parking lights, taillights, and the license plate lights turn
on automatically.

*

4 When the light switch is switched to the OFF position while the vehicle is stopped, all of the lights that are

turned on turn off. When the light switch is switched from a position other than 

 to the 

 position

while the vehicle is stopped, the daytime running lights or the headlights turn off. When starting to drive the
vehicle, the lights that are turned off turn on again.

*

5 The lights are turned on continuously if the ignition is switched from ON to any other position with the lights

turned on. The lights are turned off when the driver's door is opened or 30 seconds have elapsed since the
lights turned on.

Auto-light control

*

(Except Canada)

When the headlight switch is in the AUTO position and the ignition is switched ON, the
light sensor senses the surrounding lightness or darkness and automatically turns the
headlights and other exterior lights on or off.

When Driving

Switches and Controls

4-78

*Some models.

CX-5_8MC3-EA-23G_Edition1_old

2023-5-8 11:05:50

(Canada)

When the headlight switch is in a position other than   and the ignition is switched ON, the
light sensor senses the surrounding lightness or darkness and automatically turns the
headlights and other exterior lights on or off.

CAUTION

Do not shade the light sensor by adhering a sticker or a label on the windshield. Otherwise
the light sensor will not operate correctly.

The light sensor also works as a rain sensor for the auto-wiper control. Keep hands and
scrapers clear of the windshield when the wiper lever is in the AUTO position and the
ignition is switched ON as fingers could be pinched or the wipers and wiper blades could be
damaged when the wipers activate automatically. If you are going to clean the windshield,
be sure the wipers are turned off completely when it is particularly tempting to leave the
engine running. This is particularly important when clearing ice and snow.

NOTE

The headlights and other exterior lights may not turn off immediately even if the
surrounding area becomes well-lit because the light sensor determines that it is night time
if the surrounding area is continuously dark for several minutes such as inside long
tunnels, traffic jams inside tunnels, or in indoor parking lots.
In this case, the lights turn off if the light switch is turned to the OFF position.

If the headlight switch and the windshield wiper switch are in AUTO, and the wipers are
operated at low or high speed by the auto wiper control for several seconds, bad weather
conditions are determined and the headlights may be turned on.

The sensitivity of the auto-light control may be changed.
Refer to the Settings section in the Mazda Connect Owner's Manual or consult an
Authorized Mazda Dealer.

When Driving

Switches and Controls

4-79

CX-5_8MC3-EA-23G_Edition1_old

2023-5-8 11:05:50

Headlight High-Low Beam

The headlights switch between high and
low beams by moving the lever forward or
backward.
 

High beam

Low beam

When the headlight high-beams are on, the
headlight high-beam indicator light is
turned on.
 

Flashing the Headlights

Can be used when the ignition is switched
ON.
To flash the headlights, pull the lever fully
towards you (the headlight switch does not
need to be on).
 

OFF

Headlight 
flashing

The headlight high-beam indicator light in
the instrument cluster illuminates

simultaneously. The lever will return to
the normal position when released.
 

Coming Home Light

The coming home light turns on the
headlights (low beams) when the lever is
operated.

To turn on the lights

When the lever is pulled with the ignition
switched to ACC or OFF, the low beam
headlights turn on.
The headlights turn off after a certain
period of time has elapsed after all of the
doors are closed.

NOTE

The time until the headlights turn off
after all of the doors are closed can be
changed.
Refer to the Mazda Connect Owner's
Manual or consult an Authorized Mazda
Dealer.

If no operations are done for 3 minutes
after the lever is pulled, the headlights
turn off.

The headlights turn off if the lever is
pulled again while the headlights are
illuminated.

When Driving

Switches and Controls

4-80

CX-5_8MC3-EA-23G_Edition1_old

2023-5-8 11:05:50

Leaving Home Light

The leaving home light turns on the lights
when the transmitter unlock button is
pressed while away from the vehicle.
The following lights turn on when the
leaving home light is operated.
Low beams, Parking lights, Taillights,
License plate lights.

To turn on the lights

When the ignition switch and the headlight
switch are in the following conditions, the
headlights will illuminate when the
transmitter unlock button is pressed and
the vehicle receives the transmitter signal.
The headlights turn off after a certain
period of time has elapsed (30 seconds).

Ignition switch: off

Headlight switch: AUTO, 

, or 

Unlock 
button

Lock button

NOTE

Operation of the leaving home light can
be turned on or off.
Refer to the Mazda Connect Owner's
Manual or consult an Authorized Mazda
Dealer.

When the transmitter lock button is
pressed and the vehicle receives the
transmitter signal, the headlights turn
off.

When the headlight switch is turned to
the OFF position, the headlights turn
off.

Headlight Leveling

The number of passengers and weight of
cargo in the luggage compartment change
the angle of the headlights.
 

Auto type

The angle of the headlights will be
automatically adjusted when turning on
the headlights.
 
A system malfunction or operation
conditions are indicated by a warning.
Refer to Contact Mazda Dealer and Have
Vehicle Inspected on page 7-25.

Manual type

The headlight leveling switch is used to
adjust the angle of the headlights
manually.

When Driving

Switches and Controls

4-81

CX-5_8MC3-EA-23G_Edition1_old

2023-5-8 11:05:50

Select the proper headlight angle from the
following chart.

Front seat

Rear

seat

Load

Switch

Posi‐

tion

Driver

Passenger

×

0

×

×

0

×

×

×

1

×

×

×

×

1

×

×

1.5

×: Yes
―: No

Daytime Running Lights

Some countries require moving vehicles to
have their lights on (daytime running
lights) during the daytime.
 

Except Canada

The daytime running lights turn on when
the vehicle is driven and turn off when the
parking brake is operated or the selector
lever is shifted to the P position.

NOTE

The daytime running lights can be
deactivated.
Refer to the Settings section in the Mazda
Connect Owner's Manual or consult an
Authorized Mazda Dealer.

Canada

NOTE

When the light switch is switched to the 
position, the daytime running lights turn
off. If you want to drive the vehicle with
the daytime running lights turned on,
switch the light switch to a position other
than  .

Turn and Lane-Change

Signals

The ignition must be switched ON to use
the turn and lane-change signals.

Turn Signals

Move the signal lever down (for a left
turn) or up (for a right turn) to the stop
position. The signal will self-cancel after
the turn is completed.
 
If the indicator light continues to flash
after a turn, manually return the lever to its
original position.

Right turn

Left turn

Right lane change

Left lane change

OFF

The turn signal indicators in the
instrument cluster flash according to the
operation of the turn signal lever to show
which signal is working.
 

NOTE

There may be a problem with the turn
signal lights if they do not flash but
remain turned on, or they flash
abnormally. Have your vehicle inspected
by an Authorized Mazda Dealer.

A personalized function is available to
change the turn indicator sound volume.

When Driving

Switches and Controls

4-82

CX-5_8MC3-EA-23G_Edition1_old

2023-5-8 11:05:50

Refer to the Mazda Connect Owner's
Manual or consult an Authorized Mazda
Dealer.

Lane-Change Signals

Move the lever halfway toward the
direction of the lane change―until the
indicator flashes― and hold it there. It
will return to the off position when
released.

Three-Flash Turn Signal

After releasing the turn signal lever, the
turn signal indicator flashes 3 times. The
operation can be canceled by moving the
lever in the direction opposite to which it
was operated.

NOTE

The three-flash turn signal function can be
switched to operable/inoperable using the
personalization function.
Refer to the Mazda Connect Owner's
Manual or consult an Authorized Mazda
Dealer.

Windshield Wipers and

Washer

The ignition must be switched ON to use
the wipers.

WARNING

Use only windshield washer fluid or plain
water in the reservoir:

Using radiator antifreeze as washer fluid is
dangerous. If sprayed on the windshield, it
will dirty the windshield, affect your
visibility, and could result in an accident.

Only use windshield washer fluid mixed
with anti-freeze protection in freezing
weather conditions:

Using windshield washer fluid without
anti-freeze protection in freezing weather
conditions is dangerous as it could freeze
on the windshield and block your vision
which could cause an accident. In addition,
make sure the windshield is sufficiently
warmed using the defroster before
spraying the washer fluid.

CAUTION

When the wipers are not used during
freezing temperatures or for a long time,
the wiper rubber may adhere to the
glass. If the wipers are operated while
adhered to the glass, it could damage
the wiper rubber and motor.

If the wipers are operated while the glass
is dry, the glass could be scratched and
the wiper rubber damaged. When the
glass is dry, spray washer fluid before
operating the wipers.

When Driving

Switches and Controls

4-83

CX-5_8MC3-EA-23G_Edition1_old

2023-5-8 11:05:50

If the amount of washer fluid spray is
insufficient, do not use the washer
switch. If the washer switch continues to
be operated with no washer fluid being
sprayed, it could lead to pump damage.

NOTE

If the windshield wipers are operated
under cold weather conditions or during
snowfall, they could stop due to
accumulated snow on the windshield. If
the windshield wipers stop due to
accumulated snow on the windshield, park
the vehicle in a safe place, turn the wiper
switch off, and then remove the
accumulated snow. If the wiper switch is
turned to another position other than OFF,
the wipers will operate. If the wipers do
not operate even though the wiper switch
is turned to a position other than OFF,
consult an Authorized Mazda Dealer as
soon as possible.

Windshield Wipers

Turn the wipers on by pressing the lever
up or down.

With intermittent wiper

Switch Posi‐

tion

Wiper operation

MIST

Operation while pulling up lever

Switch Posi‐

tion

Wiper operation

OFF

Stop

INT

Intermittent

LO

Low speed

HI

High speed

Variable-speed intermittent wipers

Set the lever to the intermittent position
and choose the interval timing by rotating
the ring.

INT ring

With auto-wiper control

Switch Posi‐

tion

Wiper operation

MIST

Operation while pulling up lever

OFF

Stop

AUTO

Auto control

LO

Low speed

HI

High speed

When Driving

Switches and Controls

4-84

CX-5_8MC3-EA-23G_Edition1_old

2023-5-8 11:05:50


Content      ..     5      6      7      8     ..