Lexus RC-F (2022 year). Manual in english - page 12
 

  Index      Manuals     Lexus RC-F (2022 year). Manual in english


Search            copyright infringement  


Content      ..     10      11      12      13     ..


Lexus RC-F (2022 year). Manual in english - page 12


205

4

4-5. Using the driving support systems

Driving

VDIM control, making it suitable for pow-
erful sporty driving.
When in SPORT S mode, if the driving 
mode select switch is turned to the right, 
the “SPORT S+” indicator will come on.

Operation of the air conditioning sys-

tem in Eco drive mode

Eco drive mode controls the heating/cool-

ing operations and fan speed of the air con-

ditioning system to enhance fuel efficiency 

(

P.227). To improve air conditioning per-

formance, adjust the fan speed or turn off 

Eco drive mode.

Automatic deactivation of sport mode 

and custom mode

If the engine switch is turned off after driv-

ing in sport mode or custom mode, the 

drive mode will be changed to normal 

mode.

Driving mode pop-up display (vehicles 

with a 10.3-inch display)

When the driving mode is changed, the 

selected driving mode will be temporarily 

displayed on the side display. (

P.224)

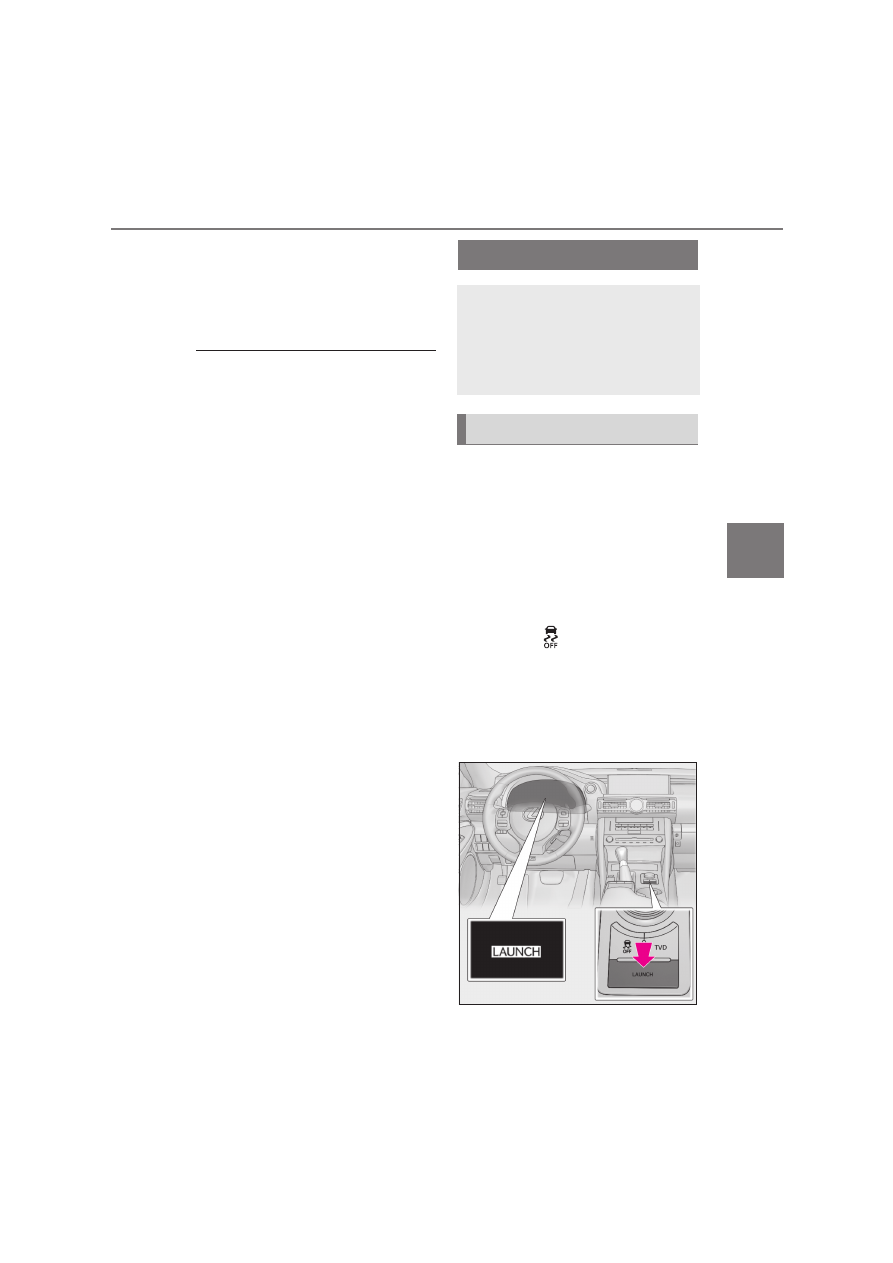
Operating launch control

1

Stop the vehicle.

2

Firmly and fully depress the brake 
pedal with your left foot.

Continue depressing the brake pedal.

3

Shift the shift lever to D.

4

Select SPORT S+ mode.

5

Press the 

 switch.

The “EXPERT” indicator will come on 

together with the “TRC OFF” and VSC 

OFF indicators.

6

Press the “LAUNCH” switch.

The “LAUNCH” indicator will illuminate.

Launch control

By controlling the engine torque, 
this function restrains tire slippage, 
providing optimal acceleration 
when starting off. (Do not use this 
function on public roads.)

Operating instruction

206

4-5. Using the driving support systems

7

Firmly and fully depress the accel-
erator pedal.

The control standby state will be entered 

and the engine speed will be automatically 

maintained between 1500-2000 r/min.
If the “LAUNCH” indicator turns off, 

release the accelerator pedal and perform 

this procedure again from 

6

.

8

Within 3 seconds of depressing the 
accelerator pedal, release the 
brake pedal to start off.

The “LAUNCH” indicator will turn off 3 

seconds after the accelerator pedal is 

depressed.
If the brake pedal is not released before the 

“LAUNCH” indicator turns off, release the 

accelerator pedal and perform this proce-

dure again from 

6

.

After starting off, when the accelerator 

pedal is released, launch control will stop 

operating.

Canceling launch control

Perform any of the following:

Shift the shift lever to any position 
other than D.

Operate the drive mode switch to 
select any mode other than SPORT 
S+ mode.

Press the 

 switch.

Press the “LAUNCH” switch.

Operation condition

When all of the following conditions are 

met, launch control can be enabled:

The engine and transmission are suffi-

ciently warmed up.

The engine, transmission, driving support 

systems, etc. are not malfunctioning.

Launch control will not operate prop-

erly when

In the following situations, launch control 

may not operate properly:

When the brake pedal is not firmly 

depressed and the rear wheels slip.

When starting off on a road surface that 

is wet with rain, standing water, etc.

When starting off on a slick road surface.

When the vehicle has not been properly 

maintained (tires are worn out, tire pres-

sure is low, etc.).

WARNING

Launch control precautions

Observe the following precautions. 

Failure to do so may result in death or 

serious injury.

Do not use on public roads.

Use only when road and ambient con-

ditions are safe.

Before use, ensure that no people or 

obstructions are nearby.

Proper use of launch control requires 

an expert level of driving skill. When 

using launch control, always check the 

track conditions and surrounding area.

Do not start off with the rear wheels 

spinning.

NOTICE

To avoid damage to the vehicle when 

using launch control

As launch control applies a large load 

on vehicle components, do not use it 

excessively.

Always follow the correct operation 

procedures as described in this man-

ual.

207

4

4-5. Using the driving support systems

Driving

*

: If equipped

Multi-information display (

P.78)

Displays the status of the active rear wing

Active rear wing switch

Operates the active rear wing manually

Indicator

Illuminates when the active rear wing is 
raised and turns off when it is retracted

Operating conditions

The engine switch is in IGNITION ON 

NOTICE

Only use launch control on dry, paved 

roads, as slippery or loose road sur-

faces may cause damage to the vehi-

cle.

When using launch control repeatedly, 

wait approximately 10 minutes 

between each use.

Active rear wing

*

The RC F is equipped with an active 
rear wing that operates automati-
cally while the vehicle is being 
driven. This active rear wing 
enhances aerodynamic perfor-
mance, especially at high speeds, 
contributing to a more stable ride.
The active rear wing can be con-
trolled using a switch.

System components

A

B

C

208

4-5. Using the driving support systems

mode.

The trunk is closed.

The active rear wing has been activated 

in a customized setting.

Conditions which stop the operation

In the following situations operation of the 

active rear wing will stop:

The engine switch is turned off while the 

active rear wing is operating.

The trunk is opened while the active rear 

wing is operating.

The raising operation of the active rear 

wing is interrupted by an object, etc.

The active rear wing is operated in an 

unusual manner causing it to stop at an 

irregular position.

In such cases, pressing the active rear wing 

switch will fully raise the active rear wing. 

Or, begin driving the vehicle and the active 

rear wing will raise automatically when the 

vehicle speed reaches 25 km/h (16 mph).

When there is a malfunction in the sys-

tem

A warning message will be displayed on the 

multi-information display. (

P.312)

Customization

Some functions can be customized. 

(

P.354)

The active rear wing will operate auto-
matically at the following speeds 
according to the selected driving 
mode (

P.204). (Always observe the 

legal speed limit when driving on pub-
lic roads.)

When other than Eco drive mode is 
selected

Up: Approximately 80 km/h (50 mph)
Down: Approximately 40 km/h (25 mph)

When Eco drive mode is selected

Up: Approximately 130 km/h (80 mph)
Down: Approximately 40 km/h (25 mph)

Operate the active rear wing switch to 
raise/retract the active rear wing man-
ually. (The active rear wing retracts 
when it is raised and raises when 
retracted.)

Operation by switch

NOTICE

To prevent system damage

Do not apply pressure to the active 

rear wing when pushing or pulling the 

vehicle.

Do not lean on the active rear wing.

Do not attach any accessories or other 

objects to the active rear wing.

Do not modify or disassemble the 

active rear wing.

Do not subject the active rear wing to 

severe impact.

Automatic operation

Manual operation

Vehicle speed

Up/Down

0 km/h (0 mph) 

(vehicle stopped)

Press/Press and 

hold

*

Approximately 0 – 

20 km/h (0 – 12 

mph)

Operation not pos-

sible

Approximately 20 – 

130 km/h (12 – 80 

mph)

Press/Press

Approximately 130 

km/h (80 mph) or 

more

Operation not pos-

sible

209

4

4-5. Using the driving support systems

Driving

*

: Press and hold the switch until the indi-

cator turns off. If the switch is released 
while the active rear wing is moving, it 
will return to the raised position auto-
matically.

Manual operation

Even if the active rear wing is changed to 

manual operation using the active rear wing 

switch, the setting will not be maintained. 

Automatic operation will resume if the 

engine switch is turned off or at certain 

vehicle speeds.

WARNING

When manually operating the active 

rear wing

Observe the following precautions 

before operating the active rear wing. 

Failure to do so may result in death or 

serious injury.

Ensure that the surrounding area is 

free of any objects that may come into 

contact with or get caught on the 

active rear wing.

If there are people near the active rear 

wing, make sure that there is no possi-

bility of their clothing, personal 

belongings or body parts getting 

caught. Children especially should be 

warned not to touch the active rear 

wing while it is being operated.

If there is a risk that an object may 

become caught on the active rear 

wing during operation, stop operation 

immediately.

NOTICE

To prevent battery discharge

Do not operate the active rear wing 

repeatedly while the engine is turned off.

210

4-5. Using the driving support systems

*

: If  equipped

Pressing the “TVD” switch changes the 
TVD control mode.

The current TVD control mode will be dis-
played on the meters.

1

STANDARD mode

This is the default mode and provides an 

optimum balance of driving agility and sta-
bility.

2

SLALOM mode

This mode emphasizes enhanced steering 
response.

3

TRACK mode

This mode emphasizes stability for high 
speed sporty driving.

Operating conditions

The engine switch is in IGNITION ON 

mode.

Automatic cancelation of the selected 

TVD control mode

SLALOM and TRACK mode are canceled 

when the engine switch is turned off. When 

the engine switch is turned to IGNITION 

ON mode, the TVD system will be in 

STANDARD mode.

Automatic disabling of the TVD system

If a malfunction is detected in the TVD sys-

tem, a warning message will be displayed 

on the multi-information display (

P.312) 

and the TVD system will be disabled auto-

matically. If the system is disabled, driving 

force will not be distributed by the TVD but 

through normal differential operation.

To protect the system

The TVD fluid temperature may become 

excessively high when driving for a long 

time under extremely high load conditions. 

In this case, a warning message will be dis-

played on the multi-information display. 

(

P.312)

TVD (Torque Vectoring Dif-
ferential)

*

The TVD system distributes driving 
force (torque) between the right 
and left rear wheels automatically. 
This system contributes to 
enhanced steering response while 
cornering and increased traction 
when exiting a corner, providing an 
agile driving experience.

Changing TVD control modes

WARNING

Cautions regarding the use of the sys-

tem

The driver is solely responsible for safe 

driving. Do not overly rely on the TVD 

system. Always drive safely, taking care 

to observe your surroundings.

211

4

4-5. Using the driving support systems

Driving

The multi-information display shows 
the distribution of driving force 
between the right and left rear wheels. 
(

P.78)

*

: If equipped

TVD control status on the 
multi-information display

Exhaust Gas Filter system

*

The Exhaust Gas Filter system is 
designed to collect particulate 
matter in the exhaust gases using 
an exhaust gas filter installed to the 
exhaust pipes.

NOTICE

To prevent the Exhaust Gas Filter sys-

tem from failing

Do not use fuel other than the speci-

fied type

Do not modify the exhaust pipes

212

4-5. Using the driving support systems

ABS (Anti-lock Brake System)

Helps to prevent wheel lock when the 
brakes are applied suddenly, or if the 
brakes are applied while driving on a 
slippery road surface

Brake assist

Generates an increased level of brak-
ing force after the brake pedal is 
depressed when the system detects a 
panic stop situation

VSC (Vehicle Stability Control)

Helps the driver to control skidding 
when swerving suddenly or turning on 
slippery road surfaces

VSC+ (Vehicle Stability Control+)

Provides cooperative control of the 
ABS, TRC, VSC and EPS. 
Helps to maintain directional stability 
when swerving on slippery road sur-
faces by controlling steering perfor-
mance.

TRC (Traction Control)

Helps to maintain drive power and pre-
vent the drive wheels from spinning 
when starting the vehicle or accelerat-
ing on slippery roads

Hill-start assist control

Helps to reduce the backward move-
ment of the vehicle when starting on an 
uphill

EPS (Electric Power Steering)

Employs an electric motor to reduce 
the amount of effort needed to turn the 
steering wheel

Adaptive Variable Suspension Sys-
tem

By independently controlling the 
damping force of the shock absorbers 
for each of the 4 wheels according to 
the road and driving conditions, this 
system helps riding comfort with supe-
rior vehicle stability, and helps good 
vehicle posture (

P.204)

VDIM (Vehicle Dynamics Inte-
grated Management)

Provides integrated control of the 
ABS, brake assist, TRC, VSC, hill-start 
assist control and EPS systems
Helps to maintain vehicle stability when 
swerving on slippery road surfaces by 
controlling the brakes, engine output 
and steering assist.

Emergency brake signal

When the brakes are applied suddenly, 
the stop lights automatically flash to 
alert the vehicle behind

Driving assist systems

To keep enhance driving safety and 
performance, the following systems 
operate automatically in response 
to various driving situations. Be 
aware, however, that these systems 
are supplementary and should not 
be relied upon too heavily when 
operating the vehicle.

Summary of the driving assist 
systems

213

4

4-5. Using the driving support systems

Driving

When the TRC/VSC systems are oper-

ating

The slip indicator light will flash while the 

TRC/VSC systems are operating.

Disabling the TRC system

If the vehicle gets stuck in mud, dirt or snow, 

the TRC system may reduce power from 
the engine to the wheels. Pressing the 


switch to turn the system off may make it 

easier for you to rock the vehicle in order to 

free it.
To turn the TRC system off, quickly press 
and release the 

 switch.

The “TRC OFF” indicator light will come 
on.

Press the 

 switch again to turn the sys-

tem back on.

Turning off both TRC and VSC system

To turn the TRC and VSC systems off, press 

and hold the 

 switch for more than 3 

seconds.
The “TRC OFF” indicator light and the 
VSC OFF indicator light will come on.

*

Press the 

 switch again to turn the sys-

tems back on.

*

: On vehicles with PCS (Pre-Collision 

System), pre-collision brake assist and 
pre-collision braking will also be disa-
bled. The Pre-collision safety system 
warning light will come on and a mes-
sage will be displayed on the multi-infor-
mation display. (

P.167)

Expert mode

When expert mode is selected, it is possible 

to drive in a more sporty manner than other 

drive modes. Expert mode disables the 

TRC and VSC systems but the engine and 

brakes may be controlled depending on the 

vehicle behavior.

To select expert mode, press the 


switch when in SPORT S+ mode.
The “EXPERT” indicator will come on 

together with the TRC OFF and VSC OFF 

indicators.

To cancel expert mode, press the 


switch or use the driving mode select switch 

to select a driving mode other than SPORT 

S+ mode.

214

4-5. Using the driving support systems

When the “TRC OFF” indicator light 
comes on even if the 

 switch has not 

been pressed

TRC is temporary deactivated. If the indica-

tor light continues to remain on, contact any 

authorized Lexus retailer or Lexus author-

ized repairer, or any reliable repairer.

Operating conditions of hill-start assist 

control

When the following four conditions are met, 

the hill-start assist control will operate:

The shift lever is in a position other than P 

or N (when starting off forward/back-

ward on an upward incline).

The vehicle is stopped.

The accelerator pedal is not depressed.

The parking brake is not engaged.

Automatic system cancelation of 

hill-start assist control

The hill-start assist control will turn off in any 

of the following situations:

The shift lever is moved to P or N.

The accelerator pedal is depressed.

The parking brake is engaged.

Approximately 2 seconds elapse after 

the brake pedal is released.

Sounds and vibrations caused by the 

ABS, brake assist, TRC, VSC and 

hill-start assist control systems

A sound may be heard from the engine 

compartment when the brake pedal is 

depressed repeatedly, when the engine is 

started or just after the vehicle begins to 

move. This sound does not indicate that a 

malfunction has occurred in any of these 

systems.

Any of the following conditions may 

occur when the above systems are oper-

ating. None of these indicates that a mal-

function has occurred.

• Vibrations may be felt through the vehicle 

body and steering.

• A motor sound may be heard after the 

vehicle comes to a stop.

• The brake pedal may pulsate slightly after 

the ABS is activated.

• The brake pedal may move down slightly 

after the ABS is activated.

EPS operation sound

When the steering wheel is operated, a 

motor sound (whirring sound) may be 

heard. This does not indicate a malfunction.

Reactivation of the TRC/VSC systems

Even after the TRC/VSC systems have 

been turned off, turning the engine off and 

then on again will automatically reactivate 

the TRC/VSC systems.

Reactivation of the TRC system linked 

to vehicle speed

When only the TRC system is turned off, the 

TRC system will turn on when vehicle speed 

increases. However, when both TRC and 

VSC systems are turned off, the systems will 

not turn on even when vehicle speed 

increases.

Reduced effectiveness of the EPS sys-

tem

The effectiveness of the EPS system is 

reduced to prevent the system from over-

heating when there is frequent steering 

input over an extended period of time. The 

steering wheel may feel heavy as a result. 

Should this occur, refrain from excessive 

steering input or stop the vehicle and turn 

215

4

4-5. Using the driving support systems

Driving

the engine off. The EPS system should 

return to normal within 10 minutes.

Operating conditions of emergency 

brake signal

When the following three conditions are 

met, the emergency brake signal will oper-

ate:

The emergency flashers are off.

Actual vehicle speed is over 55 km/h 

(35 mph).

The system judges from the vehicle 

deceleration that it is a sudden braking 

operation.

Automatic system cancelation of emer-

gency brake signal

The emergency brake signal will turn off in 

any of the following situations:

The emergency flashers are turned on.

The brake pedal is released.

The system judges from the vehicle 

deceleration that is not a sudden braking 

operation.

WARNING

The ABS does not operate effectively 

when

The limits of tire gripping performance 

have been exceeded (such as exces-

sively worn tires on a snow covered 

road).

The vehicle hydroplanes while driving 

at high speed on wet or slick roads.

Stopping distance when the ABS is 

operating may exceed that of normal 

conditions

The ABS is not designed to shorten the 

vehicle’s stopping distance. Always main-

tain a safe distance from the vehicle in 

front of you, especially in the following 

situations:

When driving on dirt, gravel or 

snow-covered roads

When driving with tire chains

When driving over bumps in the road

When driving over roads with potholes 

or uneven surfaces

TRC may not operate effectively 

when

Directional control and power may not 

be achievable while driving on slippery 

road surfaces, even if the TRC system is 

operating. Drive the vehicle carefully in 

conditions where stability and power 

may be lost.

Hill-start assist control does not oper-

ate effectively when

Do not overly rely on hill-start assist 

control. Hill-start assist control may 

not operate effectively on steep 

inclines and roads covered with ice.

Unlike the parking brake, hill-start 

assist control is not intended to hold 

the vehicle stationary for an extended 

period of time. Do not attempt to use 

hill-start assist control to hold the vehi-

cle on an incline, as doing so may lead 

to an accident.

When the TRC/VSC is activated

The slip indicator light flashes. Always 

drive carefully. Reckless driving may 

cause an accident. Exercise particular 

care when the indicator light flashes.

When the TRC/VSC systems are 

turned off

Be especially careful and drive at a speed 

appropriate to the road conditions. As 

these are the systems to help ensure 

vehicle stability and driving force, do not 

turn the TRC/VSC systems off unless 

necessary.

Expert mode precautions

Do not use on public roads.

Use only when the road conditions and 

safety of the surrounding area can be 

ensured.

216

4-5. Using the driving support systems

WARNING

Proper use of expert mode requires a 

professional level of driving skill. When 

using expert mode, always check the 

road conditions and surrounding area 

and drive more carefully than usual.

Replacing tires

Make sure that all tires are of the speci-

fied size, brand, tread pattern and total 

load capacity. In addition, make sure that 

the tires are inflated to the recom-

mended tire inflation pressure level.
The ABS, TRC and VSC systems will not 

function correctly if different tires are 

installed on the vehicle.

Contact any authorized Lexus retailer or 

Lexus authorized repairer, or any reliable 

repairer for further information when 

replacing tires or wheels.

Handling of tires and the suspension

Using tires with any kind of problem or 

modifying the suspension will affect the 

driving assist systems, and may cause a 

system to malfunction.

217

4

4-6. Driving tips

Driving

4-6.Driving tips

Use fluids that are appropriate to 
the prevailing outside temperatures.

• Engine  oil
• Engine coolant
• Washer  fluid

Have a service technician inspect 
the condition of the battery.

Have the vehicle fitted with four 
snow tires.

Ensure that all tires are the specified size 
and the same brand.

Tire chains can only be installed on 
the rear tires. However, tire chains 
cannot be installed on 
275/35ZR19 rear tires.

Before installing tire chains, change all four 
tires and wheels to those of the specified 
size for use with tire chains (front tires: 
235/40R19, rear tires: 235/40R19, 
wheels: 19 

 8 1/2 J 45 inset). Use the 

specified type of tire chains and install 
them on the rear tires only.
For details, contact any authorized Lexus 
retailer or Lexus authorized repairer, or 
any reliable repairer.

Winter driving tips

Carry out the necessary prepara-
tions and inspections before driving 
the vehicle in winter. Always drive 
the vehicle in a manner appropriate 
to the prevailing weather condi-
tions.

Preparation for winter

WARNING

Driving with snow tires

Observe the following precautions to 

reduce the risk of accidents.

Failure to do so may result in a loss of 

vehicle control and cause death or seri-

ous injury.

Use tires of the specified size.

Maintain the recommended level of air 

pressure.

Do not drive at speeds in excess of the 

speed limit or the speed limit specified 

for the snow tires being used.

Use snow tires on all, not just some 

wheels.

Driving with tire chains

Observe the following precautions to 

reduce the risk of accidents.

Failure to do so may result in the vehicle 

being unable to be driven safely, and may 

cause death or serious injury.

Do not drive in excess of the speed 

limit specified for the tire chains being 

used, or 50 km/h (30 mph), which-

ever is lower.

Avoid driving on bumpy road surfaces 

or over potholes.

Avoid sudden acceleration, abrupt 

steering, sudden braking and shifting 

operations that cause sudden engine 

braking.

Slow down sufficiently before entering 

a curve to ensure that vehicle control is 

maintained.

Do not use LDA (Lane Departure 

Alert with steering control) system. (if 

equipped)

218

4-6. Driving tips

Perform the following according to the 
driving conditions:

Do not try to forcibly open a window 
or move a wiper that is frozen. Pour 
warm water over the frozen area to 
melt the ice. Wipe away the water 
immediately to prevent it from 
freezing.

To ensure proper operation of the 
climate control system fan, remove 
any snow that has accumulated on 
the air inlet vents in front of the 
windshield.

Check for and remove any excess 
ice or snow that may have accumu-
lated on the exterior lights, vehicle’s 
roof, chassis, around the tires or on 
the brakes.

Remove any snow or mud from the 
bottom of your shoes before getting 
in the vehicle.

Accelerate the vehicle slowly, keep a 
safe distance between you and the 
vehicle ahead, and drive at a reduced 

speed suitable to road conditions.

Park the vehicle and move the shift 
lever to P without setting the park-
ing brake. The parking brake may 
freeze up, preventing it from being 
released. If the vehicle is parked 
without setting the parking brake, 
make sure to block the wheels.
Failure to do so may be dangerous 
because it may cause the vehicle to 
move unexpectedly, possibly lead-
ing to an accident.

If the vehicle is parked without set-
ting the parking brake, confirm that 
the shift lever cannot be moved out 
of P

*

.

*

: The shift lever will be locked if it is 

attempted to be shifted from P to any 
other position without depressing the 
brake pedal. If the shift lever can be 
shifted from P, there may be a problem 
with the shift lock system. Have the vehi-
cle inspected by your authorized Lexus 
retailer or Lexus authorized repairer, or 
any reliable repairer immediately.

Tire chains can be mounted on 
235/40R19 rear tires. They cannot be 
mounted on 275/35ZR19 rear tires. 
Use the correct tire chain size when 
mounting the tire chains.
Chain size is regulated for each tire 
size.

NOTICE

Repairing or replacing snow tires

Request repairs or replacement of snow 

tires from Lexus dealers or legitimate tire 

retailers.

This is because the removal and attach-

ment of snow tires affects the operation 

of the tire pressure warning valves and 

transmitters.

Before driving the vehicle

When driving the vehicle

When parking the vehicle

Selecting tire chains

219

4

4-6. Driving tips

Driving

Side chain (3 mm [0.12 in.] in diam-
eter)
Cross chain (4 mm [0.16 in.] in 
diameter)

Regulations regarding the use of tire 
chains vary depending on location and 
type of road. Always check local regu-
lations before installing chains.

Tire chain installation

Observe the following precautions when 

installing and removing chains:

Install and remove tire chains in a safe 

location.

Install tire chains on the rear tires. Do not 

install tire chains on the front tires.

Install tire chains on rear tires as tightly as 

possible. Retighten chains after driving 

0.5

1.0 km (1/4

1/2 mile).

Install tire chains following the instruc-

tions provided with the tire chains.

Regulations on the use of tire 
chains

NOTICE

Fitting tire chains

The tire pressure warning valves and 

transmitters may not function correctly 

when tire chains are fitted.

A

B

5

221

5

In

te

rior f
ea

ture
s

Interior features

.

5-1. Remote Touch/Display

Remote Touch............................

222

Center Display...........................

224

5-2. Using the air conditioning system

Automatic air conditioning system

........................................................

227

Heated steering wheel/seat heat-

ers/seat ventilators................

234

5-3. Using the interior lights

Interior lights list.........................

237

5-4. Using the storage features

List of storage features ...........

239

Trunk features..............................

241

5-5. Using the other interior features

Other interior features ...........

242


Content      ..     10      11      12      13     ..