Freelander Body Repair Manual - part 32


  Index      Land Rover     Freelander Body Repair Manual 1998 year


Search            


Content   ..  30  31  32  33   ..


Freelander Body Repair Manual - part 32


BODY

26

DOORS

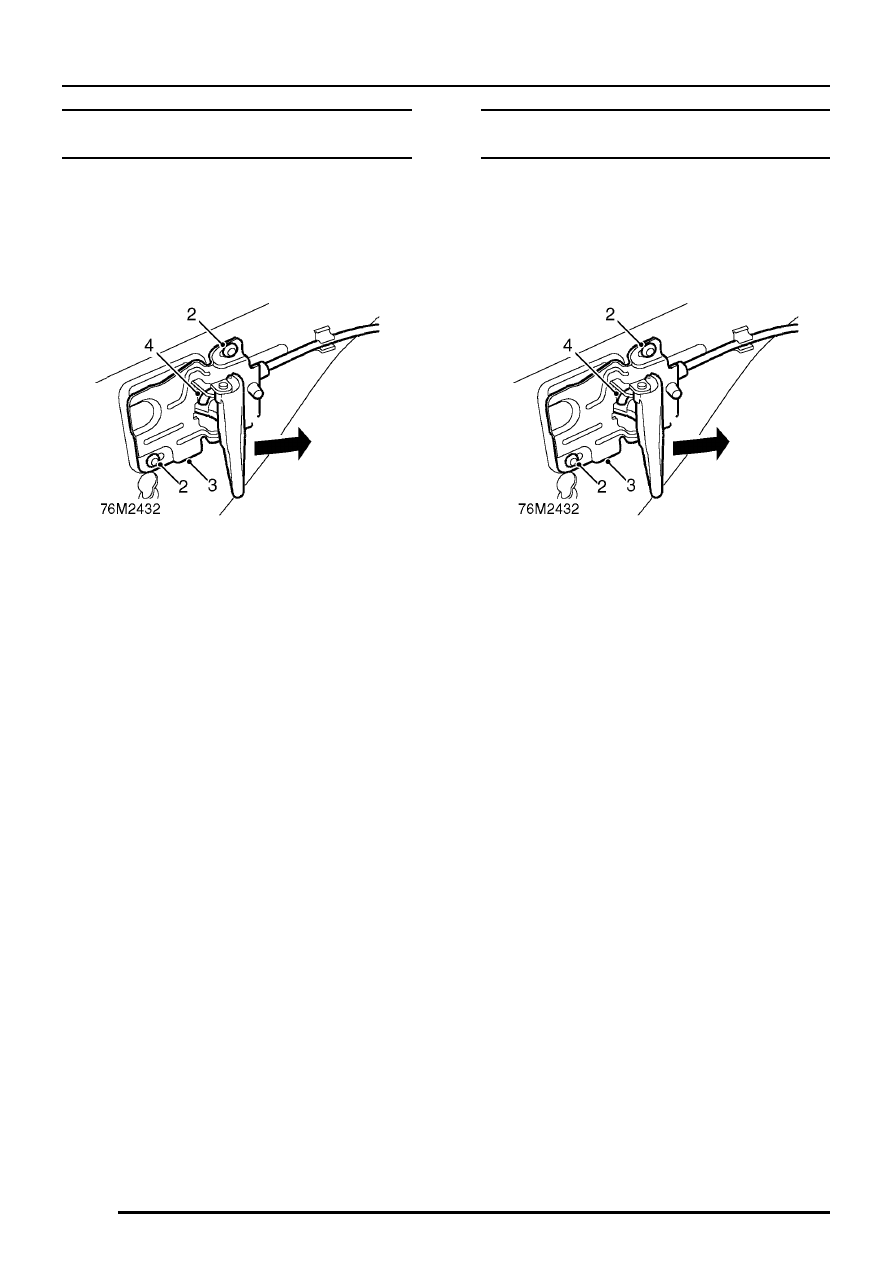
DOOR RELEASE - INTERIOR - FRONT DOOR - 3
DOOR

Service repair no - 76.37.31

Remove

1. Remove upper water shedder.

See this

section.

2. Drill out 2 rivets from door release.
3. Remove door release.
4. Release cable from door release.

Refit

1. Connect cable to door release.
2. Position door release and secure with rivets.
3. Fit water shedder.

See this section.

DOOR RELEASE - INTERIOR - FRONT DOOR - 5
DOOR

Service repair no - 76.37.31

Remove

1. Remove front door water shedder.

See this

section.

2. Drill out 2 rivets from door release.
3. Remove door release.
4. Release cable from door release.

Refit

1. Connect cable to door release.
2. Position door release and secure with rivets.
3. Fit water shedder.

See this section.

BODY

DOORS

27

DOOR RELEASE - INTERIOR - REAR DOOR

Service repair no - 76.37.32

Remove

1. Remove rear door water shedder.

See this

section.

2. Release cable from door release.
3. Drill out 2 rivets from door release.
4. Remove door release.

Refit

1. Connect cable to door release.
2. Position door release and secure with rivets.
3. Fit water shedder.

See this section.

CABLE - INTERIOR DOOR RELEASE - FRONT
DOOR

Service repair no - 76.37.60

Remove

1. Remove front door latch.

See this section.

2. Release cable from interior door release and

remove cable.

Refit

1. Connect cable to interior door release.
2. Fit door latch.

See this section.

BODY

28

DOORS

CABLE - INTERIOR DOOR RELEASE - REAR
DOOR

Service repair no - 76.37.61

Remove

1. Remove rear door latch.

See this section.

2. Release cable from door release and remove

cable.

Refit

1. Connect and secure cable to door release.
2. Fit door latch.

See this section.

FINISHER - UPPER - TAIL DOOR GLASS

Service repair no - 76.43.74

Remove

1. Remove tail door glass side finishers.

See this

section.

2. Release 5 clips securing finisher to bracket.
3. Remove tail door glass upper finisher.
4. Remove and discard clips from finisher and/or

bracket.

Refit

1. Fit NEW clips to finisher.
2. Fit finisher and secure clips to bracket.
3. Fit tail door glass side finishers.

See this

section.

BODY

DOORS

29

FINISHER - SIDE - TAIL DOOR GLASS

Service repair no - 76.43.81

Remove

1. Open tail door.

2. Release tail door glass seal from aperture for

access to side finisher fixings.

3. Using a suitable trim stud removal tool, release

3 side finisher fixings from studs on body.

4. Remove side finisher from upper fixing.
5. Remove and discard fixings from finisher.

Refit

1. Fit NEW fixings to finisher.
2. Fit door glass seal to flange.
3. Fit finisher and secure fixings.


Content   ..  30  31  32  33   ..