Freelander 1. Manual - part 278


  Index      Land Rover     Freelander 1 - service manual 2002 year


Search            


Content   ..  276  277  278  279   ..


Freelander 1. Manual - part 278


LIGHTING

REPAIRS

86-2-5

Lamp assembly - rear

$% 86.41.15

Remove

1. Remove 3 Torx screws securing lamp to body.
2. Release lamp, disconnect 2 bulb holders and 

remove lamp.

3. Remove lamp sealing rubber.

Refit

1. Fit sealing rubber and bulb holders to lamp.
2. Position lamp, fit and tighten Torx screws.

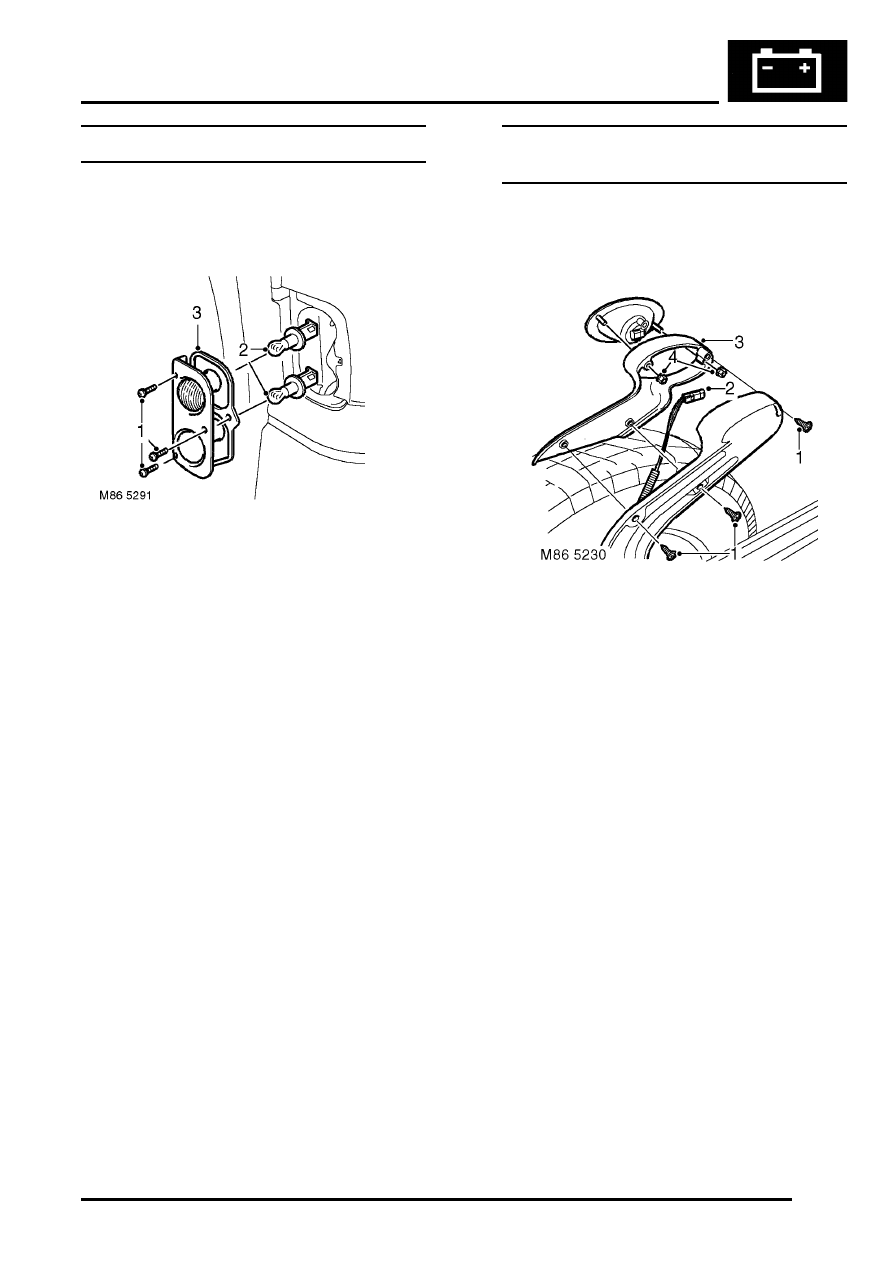
Lamp assembly - centre high mounted 
stop (CHMSL)

$% 86.41.32

Remove

1. Remove 3 screws securing CHMSL bracket to 

spare wheel carrier.

2. Release lamp bracket and disconnect 

multiplug.

3. Remove lamp and bracket.
4. Remove 2 nuts and remove lamp from bracket.

Refit

1. Position lamp to bracket and tighten nuts.
2. Position lamp bracket and connect multiplug to 

lamp.

3. Position lamp bracket to spare wheel carrier 

and secure with screws.

LIGHTING

86-2-6

REPAIRS

Lamp assembly - glove compartment

$% 86.45.08

Remove

1. Open glove box.

2. Release illumination lamp from glove box.
3. Disconnect 2 Lucars and remove glove box 

lamp.

Refit

1. Position lamp and connect Lucars.
2. Fit lamp and close glove box.

Lamp assembly - load space

$% 86.45.16

Remove

1. Release load space lamp from trim casing.
2. Disconnect 2 Lucars and remove load space 

lamp.

Refit

1. Position lamp and connect Lucars.
2. Fit load space lamp to trim casing.

LIGHTING

REPAIRS

86-2-7

Switch - headlamp levelling

$% 86.65.16

Remove

1. Release headlamp levelling switch from fascia 

and disconnect multiplug.

Refit

1. Position switch, connect multiplug and secure 

switch to fascia.

Switch - glove compartment

$% 86.65.24

Remove

1. Remove glove box.


 + 

 INTERIOR TRIM COMPONENTS, 

REPAIRS, Glove box.

2. Disconnect 2 Lucars from glove box lamp 

switch.

3. Release clips and remove switch from glove 

box latch.

Refit

1. Fit switch to glove box latch and connect 

Lucars.

2. Fit glove box.


 + 

 INTERIOR TRIM COMPONENTS, 

REPAIRS, Glove box.

LIGHTING

86-2-8

REPAIRS

Switch - hazard warning

$% 86.65.50

Remove

1. Remove radio.


 + 

 IN CAR ENTERTAINMENT, 

REPAIRS, Radio.

2. Remove selector knobs from heater controls.
3. Remove 2 screws securing heater control 

finisher to heater controls and remove finisher.

4. Release hazard warning switch from heater 

controls.

5. Disconnect multiplug and remove hazard 

warning switch.

Refit

1. Position hazard warning switch and connect 

multiplug.

2. Fit hazard warning switch to heater controls.
3. Fit heater contol finisher to heater controls and 

secure with screws.

4. Fit heater control knobs.
5. Fit radio.


 + 

 IN CAR ENTERTAINMENT, 

REPAIRS, Radio.

Switch - combined direction indicator/
headlight/horn

$% 86.65.55

Remove

1. Remove steering column nacelle.


 + 

 STEERING, REPAIRS, Nacelle - 

column.

2. Disconnect 2 multiplugs from indicator and light 

switch.

3. Rotate steering wheel to access switch screws.
4. Remove 2 screws securing switch.
5. Depress retaining tag and remove switch.

Refit

1. Fit indicator and light switch and secure with 

screws.

2. Connect multiplugs to switch.
3. Fit steering column nacelle.


 + 

 STEERING, REPAIRS, Nacelle - 

column.


Content   ..  276  277  278  279   ..