Freelander 1. Manual - part 190


  Index      Land Rover     Freelander 1 - service manual 2002 year


Search            


Content   ..  188  189  190  191   ..


Freelander 1. Manual - part 190


BRAKES

REPAIRS

70-9

7. Remove and discard 2 nuts securing master 

cylinder to servo, remove master cylinder.

8. Remove and discard sealing ring.

Refit

1. Clean master cylinder and servo mating 

surfaces.

2. Fit new sealing ring to master cylinder.
3. Align push rod and position master cylinder to 

servo.

4. Fit new nuts and tighten 25 Nm (18 lbf.ft).
5. Align reservoir, fit nut and bolts and tighten to 6 

Nm (4.5 lbf.ft).

6. Clean brake pipe unions.
7. Connect primary and secondary brake pipes 

and tighten unions 17 Nm (12 lbf.ft). 

8. Connect servo vacuum pipe to inlet manifold 

and secure to master cylinder reservoir.

9. Connect fluid level switch multiplug.

10. Bleed brakes.


 + 

 BRAKES, ADJUSTMENTS, Brake 

bleed.

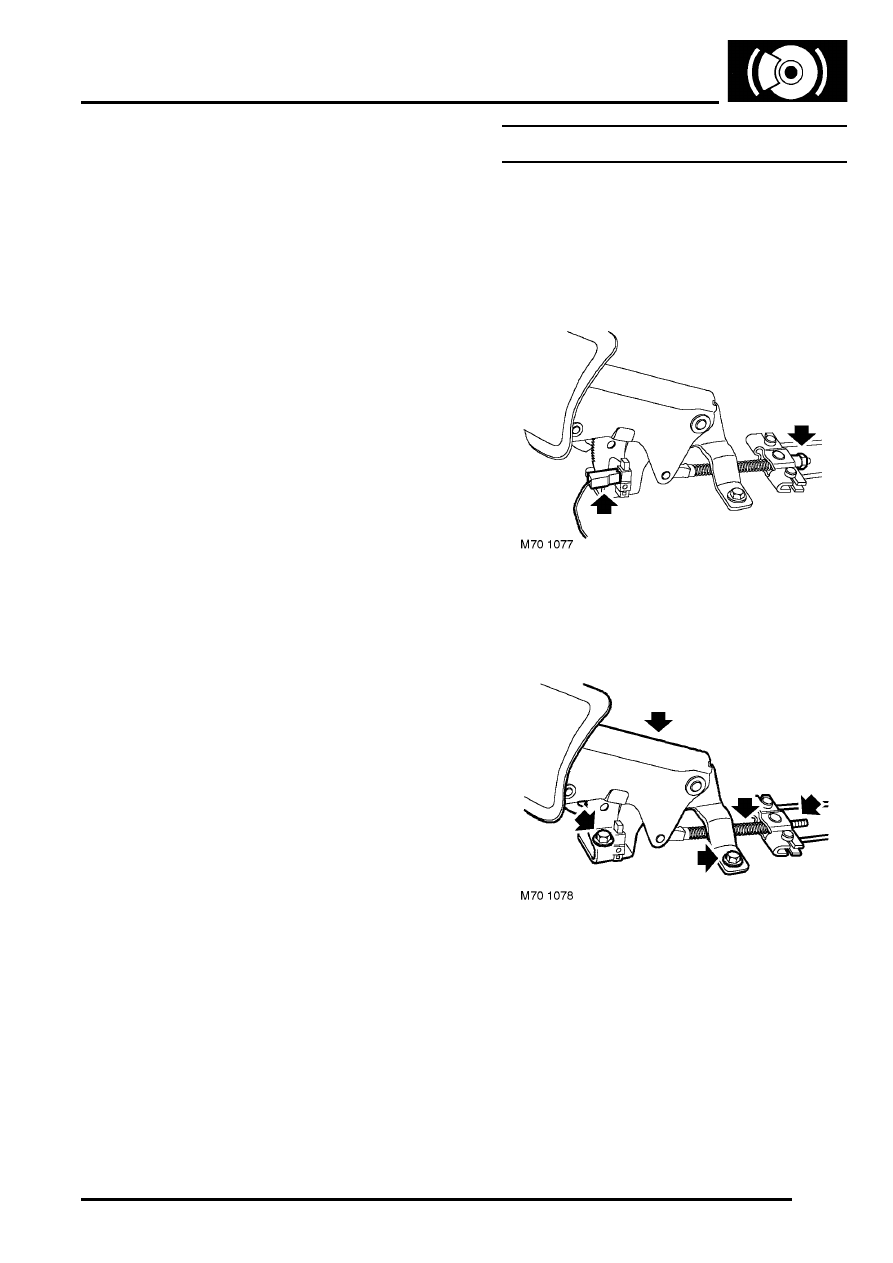
Lever assembly - handbrake

$% 70.35.08

Remove

1. Remove rear console.


 + 

 INTERIOR TRIM COMPONENTS, 

REPAIRS, Console - rear.

2. Disconnect Lucar from handbrake warning 

switch.

3. Remove cable adjusting  nut.

4. Remove 2 bolt securing  handbrake lever 

assembly.

5. Release adjusting rod from equalizer and 

remove handbrake lever assembly.

6. Remove spring from adjusting rod.

BRAKES

70-10

REPAIRS

Refit

1. Fit spring to adjusting rod.
2. Fit handbrake lever assembly, fit bolts and 

tighten to 22 Nm (16 lbf.ft).

3. Fit cable adjusting nut.
4. Connect Lucar to handbrake switch.
5. Adjust handbrake.


 + 

 BRAKES, ADJUSTMENTS, Cable - 

handbrake - check and adjust.

6. Fit rear console.


 + 

 INTERIOR TRIM COMPONENTS, 

REPAIRS, Console - rear.

Cable - handbrake 

$% 70.35.25

Remove

1. Raise rear of vehicle.

WARNING: Do not work on or under a 
vehicle supported only by a jack. Always 
support the vehicle on safety stands.

2. Remove road wheel(s).
3. Release rear ash tray, disconnect connector 

from cigar lighter and remove ash tray.

4. Remove cable adjusting  nut.
5. Remove 2 bolts securing cable retaining plate 

to body and remove plate.

6. Release equalizer from adjusting rod.
7. Release cable from equalizer plate.

8. Remove 2 bolts securing cable to body and 

subframe.

9. Release cable from chassis clip.

BRAKES

REPAIRS

70-11

10. Release cable grommet from floor and pull 

cable from interior.

11. Remove rear brake shoes.


 + 

 BRAKES, REPAIRS, Brake Shoes - 

rear set.

12. Using tool LRT-70-007 release cable retainer 

from backplate and withdraw cable from 
vehicle.

Refit

1. Manoeuvre cable into position and secure floor 

grommet.

2. Fit and secure handbrake cable to backplate.
3. Fit brake shoes.


 + 

 BRAKES, REPAIRS, Brake Shoes - 

rear set.

4. Align cable clips, fit bolts and tighten to 22 Nm 

(16 lbf.ft).

5. Secure cable in chassis clip.
6. Connect handbrake cable to equalizer.
7. Ensure spring is in place and fit equalizer to 

adjusting rod.

8. Fit cable adjusting nut.
9. Fit cable retaining plate, fit bolts and tighten to 

22 Nm (16 lbf.ft).

10. Adjust handbrake cable.


 + 

 BRAKES, ADJUSTMENTS, Cable - 

handbrake - check and adjust.

11. Fit ash tray and cigar lighter to rear console.
12. Fit road wheel(s).
13. Remove stands and lower vehicle.

BRAKES

70-12

REPAIRS

Switch - handbrake warning

$% 70.35.40

Remove

1. Remove rear console.


 + 

 INTERIOR TRIM COMPONENTS, 

REPAIRS, Console - rear.

2. Disconnect Lucar from handbrake warning 

switch.

3. Release switch from handbrake.

Refit

1. Fit switch to handbrake and connect Lucar.
2. Fit rear console.


 + 

 INTERIOR TRIM COMPONENTS, 

REPAIRS, Console - rear.

Switch - stop light

$% 70.35.42

Remove

1. Disconnect brake light switch  multiplug.
2. Release bayonet fitting on brake light switch 

and remove switch.

Refit

1. Position switch and secure bayonet fitting.
2. Connect brake light switch multiplug.
3. Depress and hold brake pedal.
4. Reset switch by pulling plunger fully out.
5. Release brake pedal slowly to set switch 

adjustment.


Content   ..  188  189  190  191   ..