Freelander 1. Manual - part 188
 

  Index      Land Rover     Freelander 1 - service manual 2002 year


Search            


Content   ..  186  187  188  189   ..


Freelander 1. Manual - part 188


BRAKES

ADJUSTMENTS

70-1

BRAKES

ADJUSTMENTS

Brake bleed

$% 70.25.02

Check

1. The following procedure covers bleeding the 

complete system but where only the primary or 
secondary circuit have been disturbed in 
isolation,  it should only be necessary to bleed 
that system. Partial bleeding of the hydraulic 
system is only permissible if a brake pipe or 
hose has been disconnected with only minor 
loss of fluid.

CAUTION: Ensure the fluid in the reservoir 
is maintained between the minimum and 
maximum levels throughout the bleed 
procedure using new brake fluid.

Adjust

1. Raise front and rear of vehicle.

WARNING: Do not work on or under a 
vehicle supported only by a jack. Always 
support the vehicle on safety stands.

2. Check all pipe and hose connections are tight 

and there are no signs of leakage.

3. Top-up fluid level in brake reservoir to 'MAX' 

mark. 
 

 + 

 MAINTENANCE, MAINTENANCE, 

Brake Fluid.

CAUTION: Never re-use fluid that has been 
bled from the system.

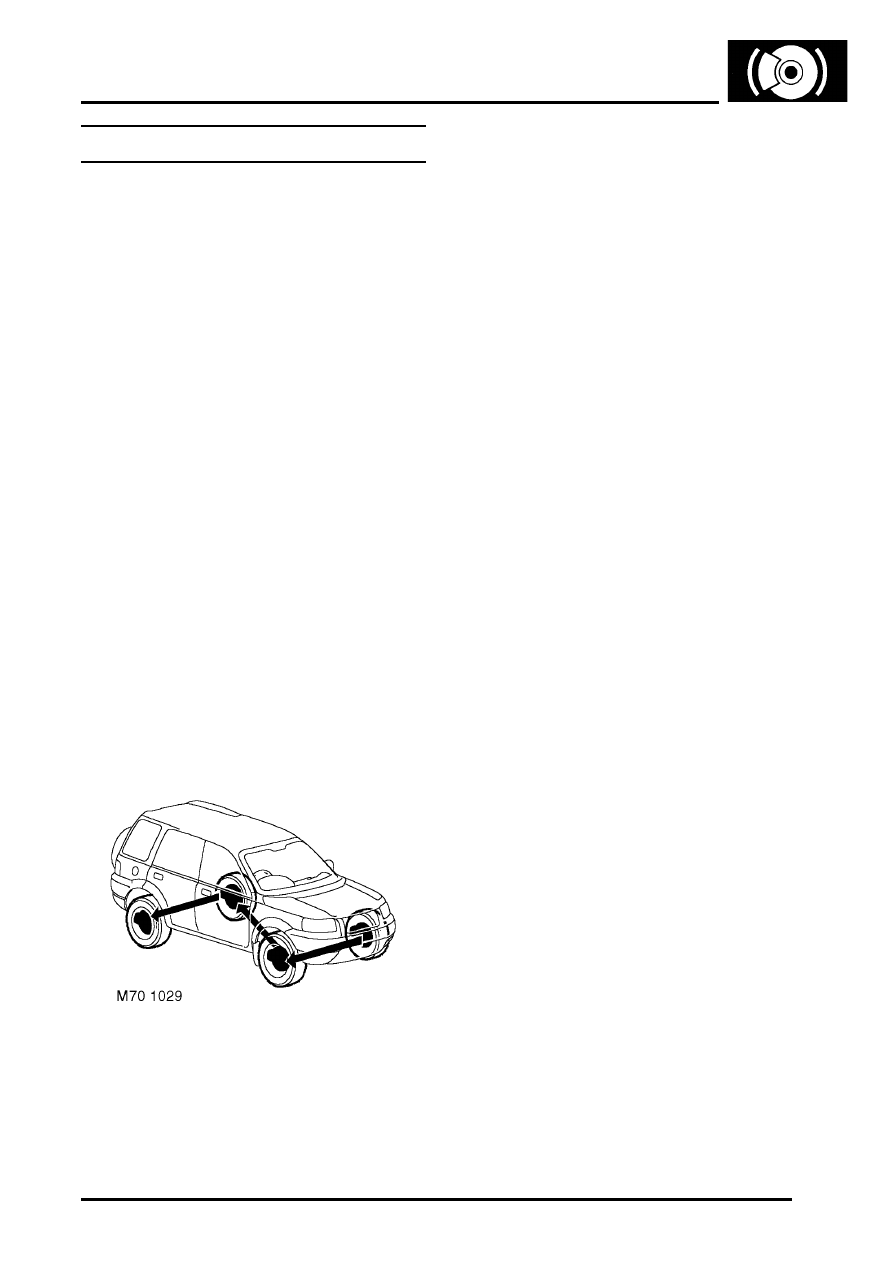
4. Bleed sequence: LH front to RH front, LH rear 

to RH rear.

CAUTION: Use only new brake fluid of the 
recommended grade.

5. Attach bleed tube to front brake caliper bleed 

screw on passenger side, submerge free end in 
a clear container containing brake fluid.

CAUTION: Brake fluid will damage paint 
finished surfaces. If spilled, immediately 
remove fluid and clean area with water.

6. Apply pressure to brake pedal several times, 

then apply steady pressure.

7. Loosen bleed screw to release brake fluid and 

air. Allow pedal to return unassisted.

8. Depress brake pedal steadily through its full 

stroke and allow to return unassisted. Repeat 
procedure until a flow of clean air-free fluid is 
purged into container then, whilst holding pedal 
at end of downward stroke tighten bleed screw 
to 10 Nm (7.5 lbf.ft) on calipers and 8 Nm (6 
lbf.ft) on wheel cylinders.

CAUTION: Ensure the fluid in the reservoir 
is maintained between the minimum and 
maximum levels throughout the bleed 
procedure using new brake fluid.

9. Top up brake system reservoir.

10. Repeat procedure at each wheel in the 

sequence shown.

WARNING: Braking efficiency may be 
seriously impaired if the incorrect bleed 
sequence is used.

11. Remove tube from bleed screw and fit bleed 

screw dust cap.

12. Apply brakes and check for leakage.
13. Remove stands and lower vehicle.
14. Road test vehicle. Check brake pedal for short 

firm travel when brakes are applied.

BRAKES

70-2

ADJUSTMENTS

Cable - handbrake - check and adjust

$% 70.35.10

Check

1. Release ash tray panel from rear console, 

disconnect multiplug from power socket and 
remove ash tray panel.

2. Fully release handbrake lever.
3. With engine running, apply footbrake a 

minimum of thirty times, to ensure full 
adjustment of rear brake shoes.

4. Switch off engine.
5. Apply handbrake lever one notch at a time and 

count the number of notches required to apply 
the brakes firmly, equivalent to a pull of 20 kgf. 
applied at mid point of handbrake lever grip. 
Handbrake lever travel = 4 to 5 notches.

6. Adjust handbrake cable tension if travel is 

outside limits.

CAUTION: Hand brake travel must be within 
the limits given or the automatic adjusters 
may not work.

Adjust

1. If carrying out handbrake adjustment after 

brake drum installation, apply brake pedal a 
min. of 30 times, to ensure full adjustment of 
rear brake shoes.

2. Raise rear of vehicle.

WARNING: Do not work on or under a 
vehicle supported only by a jack. Always 
support the vehicle on safety stands.

3. Check handbrake cable connections for free 

movement in handbrake equalizer.

4. Apply handbrake lever one notch.

5. Tighten equalizer adjusting nut until rear 

wheels drag slightly when turned.

6. Release handbrake lever and check that rear 

wheels do not drag when turned.  Adjust if 
necessary.

7. Apply handbrake one notch at a time and count 

the number of notches until both rear wheels 
lock. This should be a minimum of 4 and a 
maximum of 5 clicks. Adjust if necessary.

8. Release handbrake
9. Fit ash tray panel and cigar lighter to rear 

console.

10. Remove stands and lower vehicle.

BRAKES

REPAIRS

70-3

REPAIRS

Drum - rear

$% 70.12.03

Remove

1. Raise rear of vehicle.

WARNING: Do not work on or under a 
vehicle supported only by a jack. Always 
support the vehicle on safety stands.

2. Remove road wheel.
3. Release handbrake.

4. Remove 2 screws securing brake drum and 

remove brake drum.

NOTE: If brake drum cannot be removed, 
release brake shoe adjustment as follows:

5. Remove rubber grommet from rear of 

backplate.

6. Using 2 flat bladed screwdrivers, release 

ratchet and turn the adjuster to increase the 
shoe to drum clearance.

7. Remove brake drum.

WARNING: Do not use compressed air to 
clean brake components. Dust from friction 
materials can be harmful if inhaled.

Refit

1. Renew brake drum if scored, grooved or 

cracked.

2. Check wheel cylinder pistons for freedom of 

movement.

3. Clean backplate and brake disc with brake 

cleaning fluid.

WARNING: Do not use petroleum based 
fluid as damage will occur to rubber 
components

4. Measure inside diameter of drum at 2 points.  

Drum internal diameter: New = 254 mm. 
Service limit: = 255.49 mm.  Drum ovality limit: 
= 0.012 mm.  Renew  drum if outside limits.

5. Examine wheel cylinder dust seals for signs of 

brake fluid leakage, a certain amount of 
dampness is usual. However, if excessive fluid 
is apparent, lift dust seals and check for 
leakage. Renew wheel cylinders and brake 
shoes if linings are contaminated.

BRAKES

70-4

REPAIRS

6. Apply molykote 111 grease to brake shoe and 

spring contact points.

WARNING: Ensure grease does not contact 
brake shoe linings or wheel cylinder dust 
covers.

7. Fit brake drum and tighten screws.
8. If necessary, fit backplate grommet.
9. Apply brake pedal a min. of 30 times to  ensure 

full  adjustment of rear brake shoes after 
refitting.

10. Check handbrake operation, adjust if 

necessary.

11. Fit road wheel(s) and tighten nuts to 115  Nm 

(85 lbf.ft).

12. Remove stands and lower vehicle.

Disc - front

$% 70.12.10

Remove

1. Raise front of vehicle.

WARNING: Do not work on or under a 
vehicle supported only by a jack. Always 
support the vehicle on safety stands.

2. Remove road wheel(s).

3. Remove 2 bolts securing brake caliper to swivel 

hub.

4. Release caliper from disc and tie aside.

CAUTION: Do not allow caliper to hang on 
brake hose.


Content   ..  186  187  188  189   ..